AI ASCII Camera - Live Webcam to Text Art Converter - xelsed.ai

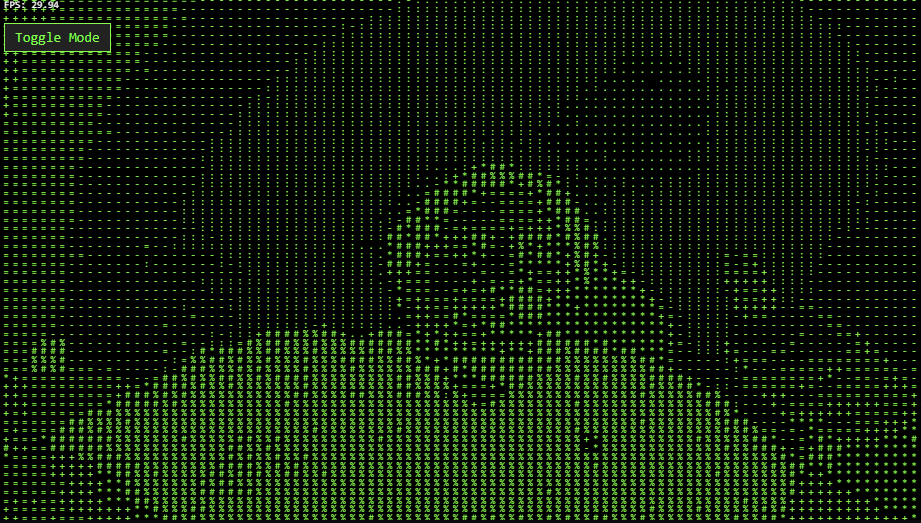
This sketch turns your live webcam feed into moving ASCII art, sampling the video's pixel brightness and mapping it to a ramp of text characters from spaces to '@' symbols. A toggle button lets you switch to a 'drawing' mode where you can finger-paint on a tiny buffer that also gets rendered as green terminal-style text.

🧪 Try This!

Experiment with the code by making these changes:

  1. Invert the ASCII shading — Swapping the map() output range flips which characters represent bright vs dark pixels, creating a photo-negative ASCII look.
  2. Use a blockier character ramp — Changing the asciiChars string to fewer, chunkier symbols gives the render a bolder, more graphic look.
  3. Switch to amber terminal color — Changing the hue value in fill() recolors all the ASCII characters, moving away from the classic green look.
Prefer the full editor? Open it there →

📖 About This Sketch

This sketch captures your webcam feed and re-renders it entirely out of monospace text characters, creating a retro green-on-black terminal aesthetic reminiscent of old computer displays. It works by shrinking the video down to a tiny low-resolution grid, then for every pixel in that grid it calculates a brightness value and picks a character from a ramp that runs from blank space to a solid '@' symbol. The result is a live, animated ASCII portrait of whatever the camera sees, and you can even switch to a drawing mode and paint your own low-res image to convert.

The code is built around p5.js's video capture (createCapture), pixel access (loadPixels/pixels), and text rendering functions. setup() prepares the canvas, webcam, and an off-screen graphics buffer for drawing mode; draw() runs the core loop that reads pixel colors and prints characters; and two small helper functions, toggleMode() and windowResized(), handle mode switching and responsive resizing. Studying this sketch teaches you how to sample pixel data efficiently, map numeric ranges with map(), and use nested loops to build a grid-based visual effect.

⚙️ How It Works

  1. When the sketch loads, setup() creates a full-window canvas, switches to HSB color mode for an easy bright-green look, starts the webcam via createCapture, and shrinks the video internally to a small 100x60 pixel grid so it can be sampled quickly.
  2. Also in setup(), an off-screen graphics buffer (pg) is created at the same small resolution to support a 'drawing' mode, and a Toggle Mode button is wired up to switch between webcam and drawing.
  3. Every frame, draw() picks its pixel source: either the live webcam pixels or the drawing buffer's pixels (which get a new line drawn into them if the mouse is pressed).
  4. A nested loop walks through every cell of the 100x60 grid, reads that pixel's red, green, and blue values, and combines them into a single brightness number using a perceptual weighting formula.
  5. That brightness value is mapped with map() onto an index into the asciiChars string (from light to dark), and the resulting character is printed at the matching position on the full-size canvas, scaled up by cellWidth and cellHeight.
  6. An FPS counter is drawn on top each frame so you can see the sketch's performance, and clicking the Toggle Mode button calls toggleMode() to flip between webcam and drawing sources.

🎓 Concepts You'll Learn

Webcam capture with createCapturePixel array manipulation with loadPixelsNested loops for grid renderingmap() for range conversionHSB color modeOff-screen graphics buffers with createGraphicsDOM elements in p5.js (createButton)

📝 Code Breakdown

setup()

setup() runs once when the sketch starts, and here it does the heavy lifting: requesting webcam access, sizing the video down for fast pixel sampling, and preparing both the canvas and an off-screen buffer. Getting these dimensions and modes right up front keeps the draw() loop simple and fast.

🔬 This sets up the classic green terminal look using HSB hue 120. What happens if you change 120 to 0 (red) or 240 (blue)? What about setting saturation to 0 for grayscale text?

  colorMode(HSB, 360, 100, 100);
  fill(120, 100, 100); // Bright green color in HSB (120 hue, 100 saturation, 100 brightness)
function setup() {
  // Create a canvas that fills the entire browser window
  createCanvas(windowWidth, windowHeight);
  // Set pixel density to 1 for consistent pixel access across screens
  pixelDensity(1);

  // Set text properties for ASCII output
  textFont('monospace'); // Use a monospace font for consistent character width
  textSize(10); // Set text size
  // Use HSB color mode for intuitive green text on black background
  colorMode(HSB, 360, 100, 100);
  fill(120, 100, 100); // Bright green color in HSB (120 hue, 100 saturation, 100 brightness)

  // Initialize webcam capture
  video = createCapture(VIDEO);
  // Resize the video feed to match our ASCII grid dimensions for efficient pixel sampling
  video.size(gridWidth, gridHeight);
  video.hide(); // Hide the actual video element from the DOM

  // Calculate the width and height of each character cell on the canvas
  cellWidth = width / gridWidth;
  cellHeight = height / gridHeight;

  // Create an off-screen graphics buffer for the drawing mode
  // This buffer will have the same dimensions as our ASCII grid
  pg = createGraphics(gridWidth, gridHeight);
  pg.pixelDensity(1); // Ensure consistent pixel density for the drawing buffer
  pg.background(0); // Initialize drawing buffer with black
  pg.stroke(255); // White stroke for drawing
  pg.strokeWeight(1); // 1-pixel stroke weight for drawing

  // Create a button to toggle between webcam and drawing modes
  toggleButton = createButton('Toggle Mode');
  toggleButton.position(10, 30); // Position the button below the FPS counter
  toggleButton.mousePressed(toggleMode); // Assign the toggleMode function to the button's click event
}
Line-by-line explanation (14 lines)
createCanvas(windowWidth, windowHeight);
Makes the canvas fill the entire browser window so the ASCII art has room to spread out.
pixelDensity(1);
Forces the canvas to use exactly 1 pixel per unit regardless of the screen's retina/HiDPI density, so pixel array math stays predictable.
textFont('monospace');
Monospace fonts give every character the same width, which is essential for lining characters up into a neat grid.
textSize(10);
Sets how big each printed character is - this also indirectly affects how spread out the ASCII grid looks.
colorMode(HSB, 360, 100, 100);
Switches p5's color system to Hue-Saturation-Brightness, making it easy to describe 'bright green' as a single hue number (120).
fill(120, 100, 100); // Bright green color in HSB (120 hue, 100 saturation, 100 brightness)
Sets the default text color to a vivid green, giving the sketch its classic terminal look.
video = createCapture(VIDEO);
Requests access to the user's webcam and starts streaming video frames into the `video` object.
video.size(gridWidth, gridHeight);
Shrinks the incoming video to a tiny 100x60 resolution so sampling its pixels for ASCII conversion is fast and simple.
video.hide();
Hides the raw <video> HTML element since we only want to see the ASCII version, not the actual video.
cellWidth = width / gridWidth;
Figures out how many canvas pixels each ASCII character cell should occupy horizontally so the grid fills the whole canvas width.
cellHeight = height / gridHeight;
Same idea as cellWidth, but for the vertical spacing between rows of characters.
pg = createGraphics(gridWidth, gridHeight);
Creates a separate, small off-screen canvas used only for the 'drawing' mode, matching the ASCII grid's resolution.
toggleButton = createButton('Toggle Mode');
Adds an actual HTML button to the page that the user can click.
toggleButton.mousePressed(toggleMode);
Tells p5.js to run the toggleMode() function whenever this button is clicked.
toggleMode()

This function is called by the button's mousePressed event handler. It demonstrates how a simple string variable can act as a 'state machine' controlling which branch of draw() runs each frame.

function toggleMode() {
  mode = (mode === 'webcam') ? 'drawing' : 'webcam';
  pg.background(0); // Clear the drawing buffer when switching to drawing mode
}
Line-by-line explanation (2 lines)

🔧 Subcomponents:

conditional Mode Ternary Switch mode = (mode === 'webcam') ? 'drawing' : 'webcam';

Flips the mode string between 'webcam' and 'drawing' each time the function runs.

mode = (mode === 'webcam') ? 'drawing' : 'webcam';
A ternary expression: if mode currently equals 'webcam', switch it to 'drawing', otherwise switch it back to 'webcam'. This is a compact way to write an if/else that assigns a value.
pg.background(0); // Clear the drawing buffer when switching to drawing mode
Wipes the drawing buffer black every time you toggle, so old scribbles don't linger unexpectedly when you switch back into drawing mode.

draw()

draw() is the animation engine of every p5.js sketch, running roughly 60 times per second. Here it demonstrates a very common creative-coding pattern: read pixel data into an array, loop over it, and transform each pixel's color into some other visual element - in this case, a text character instead of a colored square.

🔬 This draws a continuous line into the buffer while you drag the mouse. What happens if you replace pg.line(...) with pg.point(mouseX / cellWidth, mouseY / cellHeight) so you get dots instead of connected strokes?

    if (mouseIsPressed) {
      // Map mouse coordinates from canvas to the smaller drawing buffer grid
      pg.line(pmouseX / cellWidth, pmouseY / cellHeight, mouseX / cellWidth, mouseY / cellHeight);
    }

🔬 This is the heart of the effect - turning a color into a character index. What happens if you drop the green weight to near zero (like 0.05) and boost red to 0.9? How would that change how colored objects render?

      let brightnessValue = (r * 0.299 + g * 0.587 + b * 0.114);

      // Map the brightness value (0-255) to an index in our asciiChars string
      // The asciiChars string is ordered from lightest to darkest.
      // So, bright pixels (255) map to the darkest character (index 0),
      // and dark pixels (0) map to the lightest character (index asciiChars.length - 1).
      let charIndex = floor(map(brightnessValue, 0, 255, asciiChars.length - 1, 0));
function draw() {
  background(0, 0, 0); // Draw a black background (0 hue, 0 saturation, 0 brightness in HSB)

  let sourcePixels; // This variable will hold the pixel array (either from video or drawing buffer)

  if (mode === 'webcam') {
    video.loadPixels(); // Load pixels from the video feed
    sourcePixels = video.pixels;
  } else { // mode === 'drawing'
    // If the mouse is pressed, draw a line on the off-screen buffer
    if (mouseIsPressed) {
      // Map mouse coordinates from canvas to the smaller drawing buffer grid
      pg.line(pmouseX / cellWidth, pmouseY / cellHeight, mouseX / cellWidth, mouseY / cellHeight);
    }
    pg.loadPixels(); // Load pixels from the drawing buffer
    sourcePixels = pg.pixels;
  }

  // Loop through each character cell in our grid
  for (let y = 0; y < gridHeight; y++) {
    for (let x = 0; x < gridWidth; x++) {
      // Calculate the index for the top-left pixel of the current cell in the source pixel array
      // Each pixel in the array has 4 components: Red, Green, Blue, Alpha
      let index = (y * gridWidth + x) * 4;

      // Get the RGB color components for this pixel
      let r = sourcePixels[index];
      let g = sourcePixels[index + 1];
      let b = sourcePixels[index + 2];

      // Calculate brightness using a common formula for perceived brightness
      // This is a faster approximation than p5.js's brightness() function for individual pixels
      let brightnessValue = (r * 0.299 + g * 0.587 + b * 0.114);

      // Map the brightness value (0-255) to an index in our asciiChars string
      // The asciiChars string is ordered from lightest to darkest.
      // So, bright pixels (255) map to the darkest character (index 0),
      // and dark pixels (0) map to the lightest character (index asciiChars.length - 1).
      let charIndex = floor(map(brightnessValue, 0, 255, asciiChars.length - 1, 0));

      // Constrain the index to ensure it stays within the valid range of the asciiChars string
      charIndex = constrain(charIndex, 0, asciiChars.length - 1);

      // Get the ASCII character at the calculated index
      let charToDisplay = asciiChars.charAt(charIndex);

      // Display the character on the canvas at the correct position
      // Add textSize() to the y coordinate for proper baseline alignment of text
      text(charToDisplay, x * cellWidth, y * cellHeight + textSize());
    }
  }

  // Display the current frame rate (FPS) counter
  // Use fill(0, 0, 100) for white text to stand out against the green ASCII
  fill(0, 0, 100);
  text('FPS: ' + frameRate().toFixed(2), 10, 15);
  // Reset fill color back to green for the ASCII characters
  fill(120, 100, 100);
}
Line-by-line explanation (17 lines)

🔧 Subcomponents:

conditional Pixel Source Selector if (mode === 'webcam') { ... } else { ... }

Decides whether to read pixel data from the live webcam or from the off-screen drawing buffer.

conditional Mouse Drawing Check if (mouseIsPressed) { pg.line(...); }

Draws a line into the low-res buffer whenever the mouse is held down in drawing mode.

for-loop ASCII Grid Nested Loop for (let y = 0; y < gridHeight; y++) { for (let x = 0; x < gridWidth; x++) { ... } }

Visits every cell of the 100x60 grid, converts its pixel color to brightness, and prints the matching ASCII character.

calculation Perceived Brightness Formula let brightnessValue = (r * 0.299 + g * 0.587 + b * 0.114);

Combines red, green, and blue values into a single brightness number, weighted to match how human eyes perceive color.

calculation Brightness-to-Character Mapping let charIndex = floor(map(brightnessValue, 0, 255, asciiChars.length - 1, 0));

Converts brightness into an index into the asciiChars ramp so darker pixels get denser-looking characters.

background(0, 0, 0); // Draw a black background (0 hue, 0 saturation, 0 brightness in HSB)
Clears the whole canvas to black every frame so old characters don't smear into new ones.
if (mode === 'webcam') {
Checks the current mode so draw() knows whether to pull pixels from the webcam or the drawing buffer.
video.loadPixels(); // Load pixels from the video feed
Copies the webcam's current frame into an accessible pixel array (video.pixels) - you must call this before reading pixel colors.
if (mouseIsPressed) {
Checks whether the mouse button is currently held down, only relevant while in drawing mode.
pg.line(pmouseX / cellWidth, pmouseY / cellHeight, mouseX / cellWidth, mouseY / cellHeight);
Draws a line segment on the tiny off-screen buffer, converting full-size canvas mouse coordinates down into the buffer's small 100x60 coordinate space by dividing by the cell dimensions.
pg.loadPixels(); // Load pixels from the drawing buffer
Reads the current contents of the drawing buffer into pg.pixels so they can be sampled like the webcam pixels are.
for (let y = 0; y < gridHeight; y++) {
Outer loop steps through every row of the ASCII grid, top to bottom.
for (let x = 0; x < gridWidth; x++) {
Inner loop steps through every column within the current row, left to right.
let index = (y * gridWidth + x) * 4;
Pixel arrays store 4 numbers per pixel (red, green, blue, alpha) back to back, so this formula calculates where in the flat array this particular pixel's data begins.
let brightnessValue = (r * 0.299 + g * 0.587 + b * 0.114);
Combines the red, green and blue values using weights that match human eye sensitivity (we perceive green as brighter than red or blue) to get one brightness number from 0 to 255.
let charIndex = floor(map(brightnessValue, 0, 255, asciiChars.length - 1, 0));
map() rescales brightness (0-255) into an index range, but backwards - bright pixels (255) map toward index 0, dark pixels (0) map toward the last index - because the string is ordered light-to-dark and dark areas need 'heavier' looking characters.
charIndex = constrain(charIndex, 0, asciiChars.length - 1);
Safety check that clamps the index so it can never go outside the valid range of the asciiChars string, avoiding undefined characters.
let charToDisplay = asciiChars.charAt(charIndex);
Looks up the actual character (like '.', '+', or '@') at the computed index.
text(charToDisplay, x * cellWidth, y * cellHeight + textSize());
Draws that single character at the correct pixel position on the full-size canvas, scaling the small grid coordinates (x, y) up by the cell size.
fill(0, 0, 100);
Temporarily switches the fill color to white (in HSB, 100 brightness with 0 saturation) so the FPS counter is readable against the green ASCII art.
text('FPS: ' + frameRate().toFixed(2), 10, 15);
Prints the current frames-per-second, rounded to 2 decimal places, in the top-left corner.
fill(120, 100, 100);
Switches the fill color back to green so the next frame's ASCII characters are drawn in the correct color.

windowResized()

windowResized() is a special p5.js function that fires automatically on browser resize events. Recalculating derived values like cellWidth here (rather than only in setup()) keeps the sketch responsive to any window size.

function windowResized() {
  resizeCanvas(windowWidth, windowHeight); // Resize the canvas to match the new window dimensions
  // Recalculate cell dimensions based on the new canvas size
  cellWidth = width / gridWidth;
  cellHeight = height / gridHeight;
}
Line-by-line explanation (3 lines)
resizeCanvas(windowWidth, windowHeight); // Resize the canvas to match the new window dimensions
p5.js automatically calls this function whenever the browser window changes size; resizeCanvas() adjusts the canvas to match the new dimensions.
cellWidth = width / gridWidth;
Since the canvas size changed but the grid still has the same number of columns, this recalculates how many pixels wide each character cell should be.
cellHeight = height / gridHeight;
Same idea as cellWidth, keeping the grid stretched to fill the new canvas height.

📦 Key Variables

video object

Holds the p5.js webcam capture object used to read live video frames and their pixel data.

let video;
gridWidth number

The number of ASCII character columns in the output grid; also used to size the shrunken webcam feed for sampling.

let gridWidth = 100;
gridHeight number

The number of ASCII character rows in the output grid.

let gridHeight = 60;
cellWidth number

How many canvas pixels wide each character cell is, calculated from canvas width divided by gridWidth.

let cellWidth;
cellHeight number

How many canvas pixels tall each character cell is, calculated from canvas height divided by gridHeight.

let cellHeight;
asciiChars string

A ramp of characters ordered from lightest (space) to darkest ('@') used to represent brightness levels as text.

let asciiChars = ' .:-=+*#%@';
mode string

Tracks whether the sketch is currently in 'webcam' or 'drawing' mode, controlling which pixel source draw() samples from.

let mode = 'webcam';
pg object

An off-screen graphics buffer, the same low resolution as the ASCII grid, used to let the user draw with the mouse in 'drawing' mode.

let pg;
toggleButton object

The clickable HTML button element that switches between webcam and drawing modes.

let toggleButton;

🔧 Potential Improvements (4)

Here are some ways this code could be enhanced:

PERFORMANCE draw() nested for-loop

Calling text() up to 6,000 times per frame (100 x 60 grid) is expensive and can hurt frame rate, especially on slower devices.

💡 Consider building each row into a single string and calling text() once per row instead of once per character, or render to an off-screen buffer only when the underlying pixel data actually changes.

BUG setup() / draw() webcam handling

There is no error handling if the user denies webcam permission or no camera is available - video.pixels could be empty or undefined, causing draw() to throw errors when reading sourcePixels.

💡 Pass a callback to createCapture(VIDEO, callback) and/or check video.loadedmetadata before sampling pixels, showing a friendly message if the webcam isn't accessible.

STYLE setup() and draw()

The green color value fill(120, 100, 100) is hardcoded in two separate places, so changing the theme color requires editing it in multiple spots.

💡 Define a constant like `const ASCII_COLOR = [120, 100, 100];` at the top of the file and reuse it with fill(...ASCII_COLOR) wherever needed.

FEATURE draw() / toggleMode()

There's no on-canvas indicator of which mode is currently active besides the button label, which can be confusing for new users.

💡 Draw a small text label like 'Mode: WEBCAM' or 'Mode: DRAWING' near the FPS counter so the current state is always visible.

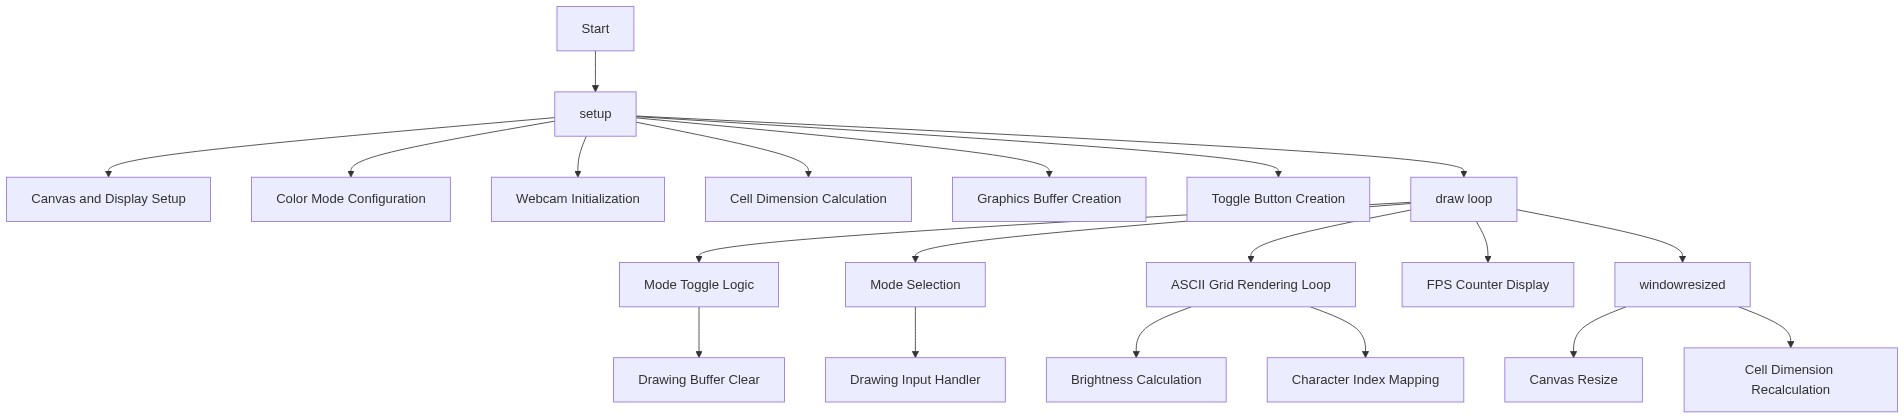
🔄 Code Flow

Code flow showing setup, togglemode, draw, windowresized

💡 Click on function names in the diagram to jump to their code

graph TD start[Start] --> setup[setup] setup --> draw[draw loop] draw --> togglemode[Toggle Mode] draw --> mode-source-branch[Pixel Source Selector] draw --> mouse-draw-check[Mouse Drawing Check] draw --> ascii-grid-loop[ASCII Grid Nested Loop] ascii-grid-loop --> brightness-calc[Perceived Brightness Formula] brightness-calc --> char-mapping[Brightness-to-Character Mapping] char-mapping --> ascii-grid-loop click setup href "#fn-setup" click togglemode href "#fn-togglemode" click draw href "#fn-draw" click mode-source-branch href "#sub-mode-source-branch" click mouse-draw-check href "#sub-mouse-draw-check" click ascii-grid-loop href "#sub-ascii-grid-loop" click brightness-calc href "#sub-brightness-calc" click char-mapping href "#sub-char-mapping" draw --> ternary-mode-switch[Ternary Mode Switch] ternary-mode-switch --> draw click ternary-mode-switch href "#sub-ternary-mode-switch" windowresized --> draw

❓ Frequently Asked Questions

What visual effect does the AI ASCII Camera sketch produce?

The sketch transforms your live webcam feed into real-time ASCII art, rendering your image using text characters in a retro green-on-black color scheme.

How can I interact with the AI ASCII Camera sketch?

Users can toggle between webcam mode and drawing mode using a button, allowing for dynamic engagement with the visual output.

What creative coding techniques are showcased in this ASCII art converter?

The sketch demonstrates real-time video processing, pixel manipulation, and the conversion of visual data into ASCII characters for artistic expression.

Preview

AI ASCII Camera - Live Webcam to Text Art Converter - xelsed.ai - p5.js creative coding sketch preview
Sketch Preview
Code flow diagram showing the structure of AI ASCII Camera - Live Webcam to Text Art Converter - xelsed.ai - Code flow showing setup, togglemode, draw, windowresized
Code Flow Diagram