
AI Bongo Drums - Tribal Percussion Instrument Tap the bongos to play! Left drum plays low tone, rig

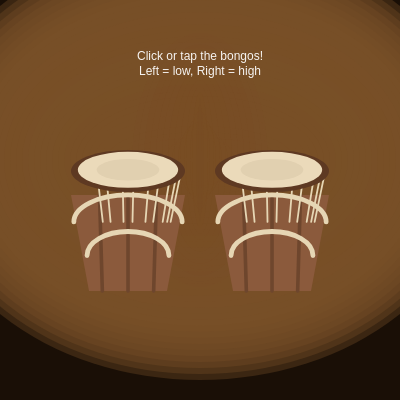
This sketch draws two 3D-styled bongo drums that you can click or tap to play realistic percussive tones. Each drum reacts to where you hit it with a squashing 'skin depression' animation and a pitch/volume change based on hit accuracy, all wrapped in a warm, spotlighted tribal-themed background.

🧪 Try This!

Experiment with the code by making these changes:

  1. Swap the drum pitches — Make the left drum high-pitched and the right drum low-pitched by swapping their base frequencies.
  2. Make hits linger longer — Slow down the visual decay so the drum skin stays depressed noticeably longer after each hit.
  3. Add a third drum — Push an extra Bongo into the array to see the layout and hit-detection loop automatically support a third drum (it will overlap the others without repositioning logic, but the sound will work).
Prefer the full editor? Open it there →

📖 About This Sketch

This sketch turns the browser into a playable percussion instrument: two wooden bongo drums sit side by side, and clicking or tapping either one triggers a short percussive tone plus a satisfying visual 'thump' where the drum skin appears to compress. It's built entirely with p5.js's sound library - p5.Oscillator, p5.Envelope, and p5.Reverb - combined with layered 2D shapes (trapezoids, arcs, and ellipses) to fake a 3D drum body, rim, and rope lacing.

The code is organized around a reusable Bongo class that bundles a drum's position, size, sound generator, and drawing logic together, so the same class produces both the low-pitched left drum and the high-pitched right drum. Global functions like setup(), draw(), mousePressed(), and touchStarted() handle the one-time setup, the per-frame rendering, and translating clicks/taps into hits on the correct drum. Studying this sketch teaches you how to combine object-oriented design, procedural drawing, and Web Audio-driven sound into one interactive instrument.

⚙️ How It Works

  1. When the page loads, setup() creates a full-window canvas, calculates drum size and spacing based on the window dimensions, and creates two Bongo objects - one tuned low (180Hz) on the left and one tuned high (270Hz) on the right - each with its own oscillator and envelope, plus a shared reverb effect for both.
  2. Every frame, draw() paints a dark background, layers dozens of semi-transparent ellipses behind the drums to fake a soft warm spotlight glow, then calls update() and draw() on each Bongo to animate and render it, finishing with on-screen instructions.
  3. When you click or tap inside a drum's circular hit zone, triggerDrum() finds which drum was hit and calls its hit() method, which calculates a 'velocity' based on how close to the center you tapped, bends the pitch slightly for off-center hits, scales the volume, and plays the amplitude envelope through the oscillator.
  4. Each hit also boosts that drum's hitAmount property, which controls how far the drawn skin 'depresses' inward; every frame update() shrinks hitAmount by multiplying it by 0.8, so the depression animation smoothly relaxes back to normal.
  5. If the browser window is resized, windowResized() recalculates the canvas size and repositions/rescales both drums so the layout stays centered and proportional.

🎓 Concepts You'll Learn

Object-oriented classes (ES6)p5.Oscillator and p5.Envelope (sound synthesis)Collision/hit detection with dist()Procedural 2D shape drawing (beginShape/vertex, arc, ellipse)Animation via exponential decaypush()/pop() and translate() for local coordinate systemsResponsive layout with windowResized()

📝 Code Breakdown

constructor(x, y, r, baseFreq)

The constructor runs once per Bongo object and is where you set up everything that object needs to remember and use later - its position, its sound engine, and its default state.

constructor(x, y, r, baseFreq) {
    this.x = x;          // center of drum head
    this.y = y;
    this.r = r;          // radius of drum head (for hit detection / drawing)
    this.baseFreq = baseFreq;
    this.hitAmount = 0;  // 0..1, used to animate skin depression

    // Sound: p5.Oscillator + p5.Envelope
    // Docs: https://p5js.org/reference/#/p5.Oscillator
    this.osc = new p5.Oscillator('sine');
    this.env = new p5.Envelope(); // https://p5js.org/reference/#/p5.Envelope

    // Percussive envelope: fast attack, short decay, no sustain, short release
    this.env.setADSR(0.001, 0.15, 0.0, 0.18);
    this.env.setRange(0.9, 0);

    this.osc.freq(this.baseFreq);
    this.osc.start();
    this.osc.amp(0); // silence until envelope plays
  }
Line-by-line explanation (8 lines)
this.x = x; this.y = y; this.r = r;
Stores the drum's center position and radius so hit-detection and drawing can use them later.
this.hitAmount = 0;
Starts the 'how depressed is the skin right now' value at 0, meaning no visual dent yet.
this.osc = new p5.Oscillator('sine');
Creates a sine-wave sound generator - the actual source of the drum's tone.
this.env = new p5.Envelope();
Creates an amplitude envelope, which will shape the volume of the oscillator over time to sound like a struck drum instead of a continuous tone.
this.env.setADSR(0.001, 0.15, 0.0, 0.18);
Sets Attack/Decay/Sustain/Release times in seconds - a near-instant attack and short decay with zero sustain is what makes this sound percussive rather than sustained like an organ.
this.env.setRange(0.9, 0);
Sets the envelope's peak and resting amplitude - it will jump to 0.9 volume then fall back to 0.
this.osc.start();
Starts the oscillator running continuously in the background (silently, since amp is 0) so it's ready to be triggered instantly on a hit.
this.osc.amp(0);
Mutes the oscillator directly - the envelope will control volume from now on instead of this base amplitude.
setGeometry(x, y, r)

This tiny helper method lets other code (like windowResized) update a drum's layout without rebuilding its sound objects, which would be wasteful and could cause audio glitches.

setGeometry(x, y, r) {
    this.x = x;
    this.y = y;
    this.r = r;
  }
Line-by-line explanation (1 lines)
this.x = x; this.y = y; this.r = r;
Overwrites the drum's position and size - used when the window is resized so the drum can move/scale without being recreated.

contains(px, py)

This is a classic 'point in circle' collision check using p5's dist() function - it's the same technique used for button hover states, particle collisions, or any circular click target.

contains(px, py) {
    return dist(px, py, this.x, this.y) <= this.r;
  }
Line-by-line explanation (1 lines)
return dist(px, py, this.x, this.y) <= this.r;
Measures the straight-line distance from a point (like the mouse) to the drum's center, and returns true if that distance is within the drum's radius - a simple circular hit test.

hit(px, py)

hit() is the heart of the interaction - it translates raw click coordinates into meaningful musical parameters (pitch, volume) and visual feedback (hitAmount), which is a common pattern in any tap-to-play instrument.

🔬 This line maps distance-from-center to a 0-1 velocity, then clamps its minimum to 0.25. What happens visually and sonically if you raise that minimum to 0.7 - do edge hits stop feeling 'weak'?

let velocity = 1 - d / this.r;
    velocity = constrain(velocity, 0.25, 1);
hit(px, py) {
    // Distance from center -> "velocity"
    let d = dist(px, py, this.x, this.y);
    let velocity = 1 - d / this.r;
    velocity = constrain(velocity, 0.25, 1);

    // Slight pitch variation: edge hits are a bit lower
    const pitchBend = (1 - velocity) * 40; // Hz
    this.osc.freq(this.baseFreq + pitchBend);

    // Scale envelope loudness with velocity
    this.env.setRange(0.9 * velocity, 0);

    // Visual depression amount
    this.hitAmount = constrain(this.hitAmount + 0.7 * velocity, 0, 1);

    // Trigger amplitude envelope
    this.env.play(this.osc);
  }
Line-by-line explanation (8 lines)

🔧 Subcomponents:

calculation Velocity From Distance let velocity = 1 - d / this.r;

Converts distance-from-center into a 0-1 'how hard/centered was the hit' value, so center hits feel stronger than edge hits.

calculation Pitch Bend For Off-Center Hits const pitchBend = (1 - velocity) * 40; // Hz

Lowers the pitch slightly the further from center you hit, mimicking how real drums sound duller near the rim.

let d = dist(px, py, this.x, this.y);
Finds how far the click/tap point is from the drum's center.
let velocity = 1 - d / this.r;
Turns that distance into a 0-1 scale where hitting dead-center gives a value near 1, and hitting near the edge gives a value near 0.
velocity = constrain(velocity, 0.25, 1);
Clamps velocity so even edge hits still produce a decent minimum volume/effect rather than fading to nothing.
const pitchBend = (1 - velocity) * 40; // Hz
this.osc.freq(this.baseFreq + pitchBend);
Applies the calculated pitch bend on top of the drum's base frequency before it plays.
this.env.setRange(0.9 * velocity, 0);
Scales the envelope's peak volume by velocity, so soft/edge hits are quieter than solid center hits.
this.hitAmount = constrain(this.hitAmount + 0.7 * velocity, 0, 1);
Adds to the visual 'dent' amount based on hit strength, capped at 1 so the skin can't sink further than its maximum.
this.env.play(this.osc);
Triggers the ADSR envelope, which ramps the oscillator's volume up and back down to actually produce the audible drum sound.

update()

Exponential decay (value *= someFactorLessThan1) is a very common, cheap way to animate something 'relaxing back to rest' without needing physics or easing libraries.

update() {
    // Exponential decay of visual hit
    this.hitAmount *= 0.8;
  }
Line-by-line explanation (1 lines)
this.hitAmount *= 0.8;
Multiplies hitAmount by 0.8 every frame, which is exponential decay - the value shrinks fast at first and slows down as it approaches zero, creating a natural-feeling 'settle' animation.

draw() (Bongo method)

This draw() method shows how combining push()/translate(), custom polygons via beginShape/vertex, and simple loops with trigonometry (cos/sin) can build a convincing pseudo-3D object out of flat 2D shapes.

🔬 This loop draws exactly 3 wood grain lines because i goes from -1 to 1. What happens if you change the loop to run from -3 to 3, giving you 7 bands instead?

for (let i = -1; i <= 1; i++) {
      const bandX = map(i, -1, 1, -topWidth * 0.25, topWidth * 0.25);
      line(bandX, bodyTopY, bandX * 0.9, bodyBottomY);
    }
draw() {
    push();
    translate(this.x, this.y);

    // hitAmount controls center depression
    const depression = this.hitAmount * (this.r * 0.18);

    // Drum body dimensions (2D perspective)
    const bodyHeight = this.r * 1.6;
    const bodyTopY = this.r * 0.25 + depression * 0.2;
    const bodyBottomY = bodyTopY + bodyHeight;
    const topWidth = this.r * 1.9;
    const bottomWidth = this.r * 1.3;

    // Wooden body (trapezoid)
    noStroke();
    fill(139, 90, 60); // main wood color
    beginShape();
    vertex(-topWidth / 2, bodyTopY);
    vertex(topWidth / 2, bodyTopY);
    vertex(bottomWidth / 2, bodyBottomY);
    vertex(-bottomWidth / 2, bodyBottomY);
    endShape(CLOSE);

    // Darker vertical wood grain bands
    stroke(110, 70, 45);
    strokeWeight(this.r * 0.06);
    for (let i = -1; i <= 1; i++) {
      const bandX = map(i, -1, 1, -topWidth * 0.25, topWidth * 0.25);
      line(bandX, bodyTopY, bandX * 0.9, bodyBottomY);
    }

    // Rope rings around the body
    stroke(230, 214, 180);
    strokeWeight(this.r * 0.08);
    noFill();
    const ropeY1 = bodyTopY + bodyHeight * 0.28;
    const ropeY2 = bodyTopY + bodyHeight * 0.63;
    arc(0, ropeY1, topWidth * 0.95, this.r * 0.9, PI, 0);
    arc(0, ropeY2, bottomWidth * 1.05, this.r * 0.8, PI, 0);

    // Rope lacing: from rim to first ring
    strokeWeight(this.r * 0.03);
    const rimRadiusX = topWidth * 0.47;
    const rimY = -this.r * 0.15 + depression * 0.4;
    for (let a = -PI * 0.7; a <= PI * 0.7; a += PI / 6) {
      const x1 = rimRadiusX * cos(a);
      const y1 = rimY + sin(a) * this.r * 0.07;
      const x2 = x1 * 0.8;
      line(x1, y1, x2, ropeY1);
    }

    // Wooden rim
    noStroke();
    fill(94, 57, 34);
    ellipse(0, rimY, topWidth, this.r * 0.7);

    // Drum skin (with depression)
    const skinY = rimY - this.r * 0.02 - depression;
    fill(235, 218, 186); // light skin
    ellipse(0, skinY, topWidth * 0.88, this.r * 0.6);

    // Inner area highlight / tension spot
    fill(225, 208, 176);
    ellipse(0, skinY + depression * 0.5, topWidth * 0.55, this.r * 0.36);

    pop();
  }
Line-by-line explanation (7 lines)

🔧 Subcomponents:

for-loop Wood Grain Bands for (let i = -1; i <= 1; i++) {

Draws three vertical dark lines across the drum body to simulate wood grain texture, spaced using map().

for-loop Rope Lacing for (let a = -PI * 0.7; a <= PI * 0.7; a += PI / 6) {

Draws several diagonal rope lines around the rim by stepping through an angle range and using cos/sin to place each line's start point.

push(); translate(this.x, this.y);
Saves the current drawing state and shifts the coordinate system so (0,0) is this drum's center - everything below is drawn relative to the drum, not the whole canvas.
const depression = this.hitAmount * (this.r * 0.18);
Converts the 0-1 hitAmount into an actual pixel offset used to visually push the skin and rim inward.
beginShape(); ... endShape(CLOSE);
Draws a custom four-cornered trapezoid shape (wider at top, narrower at bottom) to fake the 3D barrel shape of the drum's wooden body.
arc(0, ropeY1, topWidth * 0.95, this.r * 0.9, PI, 0);
Draws a half-circle arc (from angle PI to 0, i.e. the bottom half) to represent a rope ring wrapped around the drum body.
const skinY = rimY - this.r * 0.02 - depression;
Calculates the vertical position of the drum skin, subtracting the depression amount so a hit visually pushes the skin up/inward.
ellipse(0, skinY, topWidth * 0.88, this.r * 0.6);
Draws the light-colored drum skin as a flattened ellipse to look like it's viewed at a slight downward angle.
pop();
Restores the drawing state saved by push(), so translate() doesn't affect anything drawn after this drum.

setup()

setup() runs once and is the ideal place to size your canvas, compute a responsive layout, and instantiate the objects (like our two Bongo drums) that draw() will use every frame after.

🔬 These two lines set each drum's pitch (180Hz and 270Hz). What happens if you make them the same number - do the drums sound identical even though they're drawn separately?

  drums.push(new Bongo(leftX, centerY, baseR, 180)); // low bongo
  drums.push(new Bongo(rightX, centerY, baseR, 270)); // high bongo
function setup() {
  createCanvas(windowWidth, windowHeight);

  // Layout: two drums side-by-side
  const baseR = min(width, height) * 0.15;
  const centerY = height * 0.45;
  const spacing = baseR * 2.4;

  // Left = low tone, Right = high tone
  const leftX = width / 2 - spacing / 2;
  const rightX = width / 2 + spacing / 2;

  drums.push(new Bongo(leftX, centerY, baseR, 180)); // low bongo
  drums.push(new Bongo(rightX, centerY, baseR, 270)); // high bongo

  // Add a gentle room reverb to both drums
  // p5.Reverb docs: https://p5js.org/reference/#/p5.Reverb
  reverb = new p5.Reverb();
  for (let d of drums) {
    reverb.process(d.osc, 1.8, 2); // seconds, decayRate
  }
  reverb.amp(0.4);
}
Line-by-line explanation (7 lines)

🔧 Subcomponents:

for-loop Connect Reverb To Each Drum for (let d of drums) {

Routes each drum's oscillator through the shared reverb effect so both drums get the same room ambience.

createCanvas(windowWidth, windowHeight);
Makes the canvas fill the entire browser window.
const baseR = min(width, height) * 0.15;
Calculates a drum radius that's 15% of whichever canvas dimension is smaller, so drums scale sensibly on both wide and tall screens.
const spacing = baseR * 2.4;
Determines how far apart the two drum centers should be, proportional to their size.
drums.push(new Bongo(leftX, centerY, baseR, 180));
Creates the low-pitched left drum and adds it to the global drums array.
reverb = new p5.Reverb();
Creates a shared reverb audio effect object.
reverb.process(d.osc, 1.8, 2);
Routes each drum's oscillator output through the reverb, with a 1.8 second decay time and decay rate of 2.
reverb.amp(0.4);
Sets the overall wet volume of the reverb effect to 40%.

draw()

The global draw() function runs continuously (default 60 times per second) and is responsible for clearing and redrawing the entire scene every frame - a core p5.js concept for anything animated or interactive.

🔬 This loop fakes a radial gradient glow using 60 layered ellipses. What happens visually (and to performance) if you drop the loop count to 10? What if you push it to 200?

  for (let i = 0; i < 60; i++) {
    const alpha = map(i, 0, 59, 90, 0);
    fill(120, 80, 40, alpha);
    const w = width * 1.4 - i * 12;
    const h = height * 1.1 - i * 12;
    ellipse(width / 2, height * 0.4, w, h);
  }
function draw() {
  // Dark tribal background
  background(26, 15, 6);

  // Soft warm spotlight behind the bongos
  noStroke();
  for (let i = 0; i < 60; i++) {
    const alpha = map(i, 0, 59, 90, 0);
    fill(120, 80, 40, alpha);
    const w = width * 1.4 - i * 12;
    const h = height * 1.1 - i * 12;
    ellipse(width / 2, height * 0.4, w, h);
  }

  // Update + draw drums
  for (let d of drums) {
    d.update();
    d.draw();
  }

  // Instructions text
  fill(255, 240);
  noStroke();
  textAlign(CENTER, CENTER);
  textSize(min(width, height) * 0.03);
  text('Click or tap the bongos!\nLeft = low, Right = high', width / 2, height * 0.16);
}
Line-by-line explanation (5 lines)

🔧 Subcomponents:

for-loop Spotlight Gradient for (let i = 0; i < 60; i++) {

Draws 60 overlapping, increasingly transparent ellipses to fake a soft radial glow behind the drums, since p5 has no built-in radial gradient fill.

for-loop Update And Draw Each Drum for (let d of drums) {

Loops through both Bongo objects each frame to decay their hit animation and render them.

background(26, 15, 6);
Clears the canvas each frame with a near-black brown color, giving the dark tribal atmosphere and preventing old frames from smearing.
const alpha = map(i, 0, 59, 90, 0);
As the loop counter i goes from 0 to 59, alpha smoothly decreases from 90 to 0, making each successive ellipse more transparent.
const w = width * 1.4 - i * 12;
Shrinks each ellipse's width slightly more than the last, so layering many of them creates a soft glow that fades outward.
for (let d of drums) { d.update(); d.draw(); }
For each drum object, first updates its hit-decay animation state, then draws it in its current state.
textSize(min(width, height) * 0.03);
Scales the instruction text size relative to the screen so it looks proportional on both small and large windows.

mousePressed()

mousePressed() is a p5.js event function that automatically runs whenever the mouse button is clicked - it's the standard way to handle click-based interaction.

function mousePressed() {
  // Ensure audio context is started on first user gesture
  // userStartAudio: https://p5js.org/reference/#/p5/userStartAudio
  if (!audioStarted) {
    userStartAudio();
    audioStarted = true;
  }

  triggerDrum(mouseX, mouseY);
}
Line-by-line explanation (2 lines)

🔧 Subcomponents:

conditional First-Click Audio Unlock if (!audioStarted) {

Browsers block audio until a user gesture occurs; this ensures userStartAudio() only runs once, on the very first click.

if (!audioStarted) { userStartAudio(); audioStarted = true; }
Checks a flag so the audio context is only unlocked once - modern browsers require a user interaction (like a click) before they'll allow sound to play.
triggerDrum(mouseX, mouseY);
Passes the current mouse coordinates to triggerDrum(), which figures out which drum (if any) was clicked.

touchStarted()

touchStarted() is p5.js's event handler for touch devices; explicitly handling it (rather than relying only on mouse events) makes the sketch behave reliably across phones, tablets, and desktops.

function touchStarted() {
  if (!audioStarted) {
    userStartAudio();
    audioStarted = true;
  }
  if (touches.length > 0) {
    triggerDrum(touches[0].x, touches[0].y);
  }
  return false; // prevent default scrolling on touch
}
Line-by-line explanation (2 lines)

🔧 Subcomponents:

conditional Check For Active Touch if (touches.length > 0) {

Makes sure there's actually a touch point recorded before trying to read its coordinates, avoiding errors.

if (touches.length > 0) { triggerDrum(touches[0].x, touches[0].y); }
Reads the first active touch point's coordinates and passes them to triggerDrum() to check which drum was tapped.
return false; // prevent default scrolling on touch
Stops the browser's default touch behavior (like scrolling or zooming) so tapping the drums feels responsive on mobile.

triggerDrum(px, py)

This function centralizes hit-detection logic in one place so both mousePressed() and touchStarted() can reuse it - a good example of avoiding duplicate code by extracting a shared helper function.

function triggerDrum(px, py) {
  for (let d of drums) {
    if (d.contains(px, py)) {
      d.hit(px, py);
      break;
    }
  }
}
Line-by-line explanation (3 lines)

🔧 Subcomponents:

for-loop Find And Hit The Tapped Drum for (let d of drums) {

Checks each drum in turn to see if the given point falls inside it, stopping as soon as a match is found.

conditional Hit Test if (d.contains(px, py)) {

Uses the drum's own contains() method to test whether the click/tap point is within its circular hit area.

for (let d of drums) {
Loops through both Bongo objects in the drums array.
if (d.contains(px, py)) {
Tests whether the given coordinates fall inside this particular drum's circle.
d.hit(px, py); break;
If it's a hit, plays that drum's sound/animation and immediately stops checking the remaining drums (since a point can't be inside two non-overlapping circles anyway).

windowResized()

windowResized() is a p5.js event function that fires automatically whenever the browser window changes size - handling it makes a sketch feel polished and usable on any screen instead of breaking or clipping.

function windowResized() {
  resizeCanvas(windowWidth, windowHeight);

  // Reposition and rescale drums responsively
  const baseR = min(width, height) * 0.15;
  const centerY = height * 0.45;
  const spacing = baseR * 2.4;

  if (drums.length === 2) {
    drums[0].setGeometry(width / 2 - spacing / 2, centerY, baseR);
    drums[1].setGeometry(width / 2 + spacing / 2, centerY, baseR);
  }
}
Line-by-line explanation (3 lines)

🔧 Subcomponents:

conditional Safety Check Before Repositioning if (drums.length === 2) {

Ensures both drums exist before trying to reposition them, avoiding a crash if this ever ran before setup() finished.

resizeCanvas(windowWidth, windowHeight);
Resizes the canvas to match the new browser window dimensions.
const baseR = min(width, height) * 0.15;
Recalculates the drum radius using the same formula as setup(), so drums stay proportionally sized after resizing.
drums[0].setGeometry(width / 2 - spacing / 2, centerY, baseR);
Moves and rescales the left drum to its new position using the helper method defined on the Bongo class.

📦 Key Variables

drums array

Holds the two Bongo instances (left and right drums) so they can be looped over for updating, drawing, and hit-testing.

let drums = [];
audioStarted boolean

Tracks whether userStartAudio() has already been called, ensuring the audio context is only unlocked once on the first user interaction.

let audioStarted = false;
reverb object

Stores the shared p5.Reverb effect that both drums' oscillators are routed through, giving the sound a sense of room ambience.

let reverb;

🔧 Potential Improvements (4)

Here are some ways this code could be enhanced:

BUG mousePressed() and touchStarted()

On touch devices, p5.js often fires both a synthetic mousePressed event AND touchStarted for the same tap, which can call triggerDrum() twice and double-trigger a drum hit (double envelope play, doubled hitAmount).

💡 Guard against double-firing, e.g. by tracking the last trigger timestamp and ignoring a second trigger within ~50ms, or by only handling touchStarted on devices that support touch and relying on mousePressed elsewhere.

PERFORMANCE draw() spotlight loop

Drawing 60 overlapping semi-transparent ellipses every single frame (at 60fps) is a lot of redundant GPU/CPU work for a background that never changes.

💡 Render the spotlight gradient once onto an offscreen graphics buffer (createGraphics) in setup(), then just image() it each frame in draw() instead of redrawing 60 ellipses every frame.

STYLE Bongo.draw()

The drawing method is full of magic numbers (0.18, 1.6, 0.25, 1.9, 1.3, etc.) with no named constants, making it hard to understand or tweak the drum's proportions.

💡 Extract key ratios into named constants (e.g. const SKIN_RATIO = 0.6) at the top of the class so their purpose is clearer and they're easier to tune consistently.

FEATURE Bongo class / triggerDrum()

There's no visual feedback (like a ripple or color flash) beyond the skin depression, and no keyboard support for playing drums.

💡 Add a brief expanding ring/ripple on hit for extra visual punch, and map keys (e.g. 'A' and 'L') to trigger the left and right drums for players without a mouse or touchscreen.

🔄 Code Flow

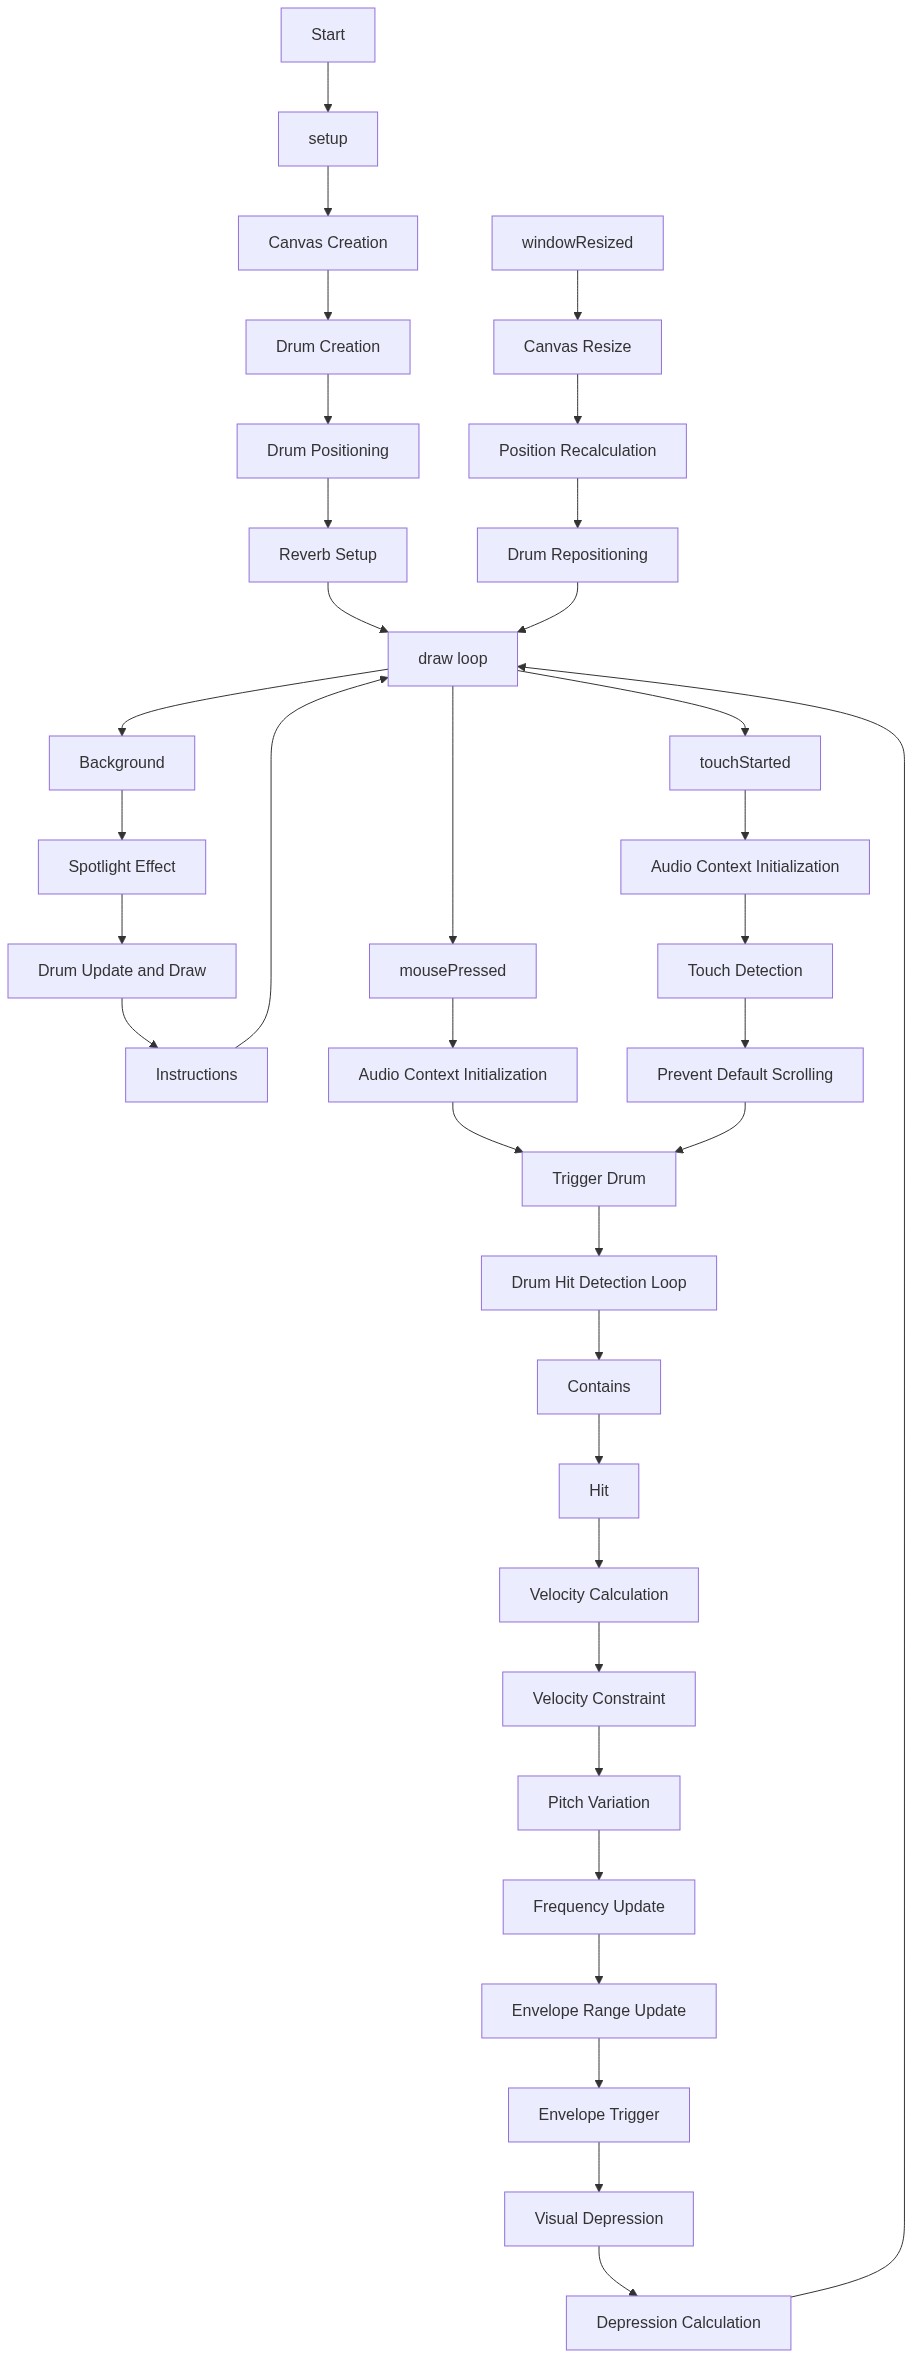
Code flow showing constructor, setgeometry, contains, hit, update, draw, setup, draw, mousepressed, touchstarted, triggerdrum, windowresized

💡 Click on function names in the diagram to jump to their code

graph TD start[Start] --> setup[setup] setup --> draw[draw loop] draw --> audiounlockcheck[audio-unlock-check] audiounlockcheck --> drawloop[drum-update-loop] drawloop --> hitloop[drum-hit-loop] hitloop --> containscheck[contains-check] containscheck --> hit[hit] hit --> hitvelocitycalc[hit-velocity-calc] hitvelocitycalc --> hitpitchbend[hit-pitch-bend] hitpitchbend --> draw draw --> woodgrainloop[wood-grain-loop] woodgrainloop --> ropelacingloop[rope-lacing-loop] ropelacingloop --> reverbloop[reverb-loop] reverbloop --> spotlightloop[spotlight-loop] spotlightloop --> drawloop drawloop --> draw click setup href "#fn-setup" click draw href "#fn-draw" click audiounlockcheck href "#sub-audio-unlock-check" click drawloop href "#sub-drum-update-loop" click hitloop href "#sub-drum-hit-loop" click containscheck href "#sub-contains-check" click hit href "#fn-hit" click hitvelocitycalc href "#sub-hit-velocity-calc" click hitpitchbend href "#sub-hit-pitch-bend" click woodgrainloop href "#sub-wood-grain-loop" click ropelacingloop href "#sub-rope-lacing-loop" click reverbloop href "#sub-reverb-loop" click spotlightloop href "#sub-spotlight-loop"

❓ Frequently Asked Questions

What visual elements are featured in the AI Bongo Drums sketch?

The sketch visually creates two round bongo drums side by side, each with a distinct design that reacts to user interaction.

How can users engage with the AI Bongo Drums instrument?

Users can tap on the left drum to produce a low tone and the right drum for a different sound, simulating a tribal percussion experience.

What creative coding concepts are showcased in this p5.js sketch?

The sketch demonstrates sound synthesis using oscillators and envelopes, as well as hit detection and visual animations to enhance user interaction.

Preview

AI Bongo Drums - Tribal Percussion Instrument Tap the bongos to play! Left drum plays low tone, rig - p5.js creative coding sketch preview
Sketch Preview
Code flow diagram showing the structure of AI Bongo Drums - Tribal Percussion Instrument Tap the bongos to play! Left drum plays low tone, rig - Code flow showing constructor, setgeometry, contains, hit, update, draw, setup, draw, mousepressed, touchstarted, triggerdrum, windowresized
Code Flow Diagram