
AI Breathing Guide - Calm Your Mind with Visual Breathing

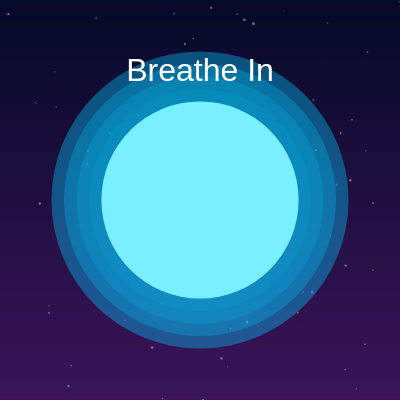
This sketch draws a full-screen meditation aid: a soft glowing circle that smoothly grows and shrinks on a 12-second cycle to guide the viewer's inhale, hold, exhale, and hold. A drifting particle field and a hand-rolled vertical gradient give the whole scene a calm, atmospheric feel.

🧪 Try This!

Experiment with the code by making these changes:

  1. Slow the breathing pace — Lengthening the inhale and exhale phase durations makes the guide breathe more slowly, like a deeper meditation rhythm.
  2. Switch to a warm color scheme — The two color variables control the whole gradient - swapping them for orange tones changes the entire mood of the scene.
  3. Make the particle field denser and bigger — Increasing the loop count and size range fills the background with many more, chunkier drifting dots.
Prefer the full editor? Open it there →

📖 About This Sketch

This sketch creates a full-window breathing coach: a luminous circle pulses outward on the inhale, holds, shrinks on the exhale, holds again, and repeats forever, while faint dust-like particles drift slowly upward through a hand-painted dark-blue-to-purple gradient. It is a great sketch to study because it shows how to drive an entire animation purely from time - using millis() instead of frame counters - and how a single sin() curve can turn linear motion into something that feels organic and breath-like.

The code is organized around one small state machine hidden inside draw(): a while loop figures out which of four timed phases (in, hold, out, hold) the current moment falls into, and an if/else chain turns that phase into a radius and an on-screen message. Separate helper functions each own one visual layer - setGradient() paints the background, drawParticles() animates the dust, and drawGlow() renders the pulsing circle - so by reading it you'll learn how to cleanly split a sketch into independent drawing layers that stack on top of each other every frame.

⚙️ How It Works

  1. When the page loads, setup() creates a canvas that fills the browser window, defines the two gradient colors, adds up the four phase durations into one total cycle length, sets the circle's minimum and maximum radius based on screen size, and scatters 80 particle objects with random positions and speeds.
  2. Every frame, draw() first repaints the gradient background, then computes millis() % totalDur to get a repeating 'clock' between 0 and the full cycle length, and walks a while loop through the phase durations to work out which of the four breathing phases is currently active and how far into it we are.
  3. Depending on the active phase, an if/else chain calculates the circle's radius: growing it with an eased sin() curve during 'Breathe In', holding it at maximum, shrinking it during 'Breathe Out', or holding it at minimum - along with a matching instruction message.
  4. drawParticles() moves every particle upward by its own speed and silently teleports it back below the bottom edge once it drifts off the top, creating an endless rising drift of soft dots.
  5. drawGlow() translates to the screen center and stacks several increasingly large, increasingly transparent circles behind a solid core circle, faking a soft glow around the main breathing shape at its current radius.
  6. Finally the phase's message ('Breathe In', 'Hold', 'Breathe Out', 'Hold') is drawn as large centered text above the circle, and windowResized() keeps the canvas and maxR in sync whenever the browser window changes size.

🎓 Concepts You'll Learn

Animation driven by millis() instead of frameCountManual state machine for timed phasesEasing motion with sin()Color interpolation with lerpColorParticle systemspush()/pop() for isolated transformsResponsive canvas via windowResized()

📝 Code Breakdown

setup()

setup() runs once when the sketch starts. Here it's used to size the canvas, precompute the total cycle length so draw() doesn't need to add it up every frame, and populate the particles array up front so no particles need to be created later during animation.

function setup(){
  createCanvas(windowWidth,windowHeight);textAlign(CENTER,CENTER);
  c1=color(5,10,40);c2=color(60,20,90);
  totalDur=phaseDur.reduce((a,b)=>a+b);
  minR=60;maxR=min(width,height)*0.25;
  for(let i=0;i<80;i++)particles.push({x:random(width),y:random(height),s:random(1,3),a:random(40,100),spd:random(0.05,0.3)});
}
Line-by-line explanation (5 lines)

🔧 Subcomponents:

for-loop Particle Initialization Loop for(let i=0;i<80;i++)particles.push({x:random(width),y:random(height),s:random(1,3),a:random(40,100),spd:random(0.05,0.3)});

Creates 80 particle objects, each with a random position, tiny size, random opacity, and its own upward drift speed

createCanvas(windowWidth,windowHeight);textAlign(CENTER,CENTER);
Makes the canvas fill the entire browser window and sets all future text() calls to be centered both horizontally and vertically on their coordinates
c1=color(5,10,40);c2=color(60,20,90);
Defines the two colors used for the background gradient - a very dark navy blue and a muted purple
totalDur=phaseDur.reduce((a,b)=>a+b);
Adds up all four phase durations (4000+2000+4000+2000) into one total, giving a 12000ms (12 second) full breathing cycle
minR=60;maxR=min(width,height)*0.25;
Sets the circle's smallest radius to 60 pixels, and its largest radius to a quarter of whichever screen dimension (width or height) is smaller, so it always fits on any screen
for(let i=0;i<80;i++)particles.push({x:random(width),y:random(height),s:random(1,3),a:random(40,100),spd:random(0.05,0.3)});
Runs 80 times, each time pushing a new particle object with random x/y position, size, alpha (opacity), and speed into the particles array
draw()

draw() runs continuously at roughly 60 frames per second. This sketch uses it as a real-time clock reader rather than a frame counter - by basing all timing on millis(), the breathing rhythm stays accurate in real seconds no matter how fast or slow the computer renders frames.

🔬 The sin(u*HALF_PI) curve is what makes the circle ease in and out instead of moving at a constant speed. What happens if you replace sin(u*HALF_PI) with plain u in both the Breathe In and Breathe Out lines, making the growth and shrink perfectly linear?

  if(phase===0){let u=t/phaseDur[0];r=lerp(minR,maxR,sin(u*HALF_PI));msg='Breathe In';}
  else if(phase===1){r=maxR;msg='Hold';}
  else if(phase===2){let u=t/phaseDur[2];r=lerp(maxR,minR,sin(u*HALF_PI));msg='Breathe Out';}
  else{r=minR;msg='Hold';}
function draw(){
  setGradient();
  let t=millis()%totalDur,phase=0;
  while(t>phaseDur[phase]){t-=phaseDur[phase];phase++;}
  let r=minR,msg='';
  if(phase===0){let u=t/phaseDur[0];r=lerp(minR,maxR,sin(u*HALF_PI));msg='Breathe In';}
  else if(phase===1){r=maxR;msg='Hold';}
  else if(phase===2){let u=t/phaseDur[2];r=lerp(maxR,minR,sin(u*HALF_PI));msg='Breathe Out';}
  else{r=minR;msg='Hold';}
  drawParticles();drawGlow(r);
  fill(255);noStroke();textSize(32);
  text(msg,width/2,height*0.18);
}
Line-by-line explanation (11 lines)

🔧 Subcomponents:

while-loop Phase Calculation Loop while(t>phaseDur[phase]){t-=phaseDur[phase];phase++;}

Subtracts phase durations one at a time to figure out which of the 4 breathing phases the current moment falls into, leaving t as the elapsed time within that phase

conditional Breathing Phase Behavior if(phase===0){let u=t/phaseDur[0];r=lerp(minR,maxR,sin(u*HALF_PI));msg='Breathe In';} else if(phase===1){r=maxR;msg='Hold';} else if(phase===2){let u=t/phaseDur[2];r=lerp(maxR,minR,sin(u*HALF_PI));msg='Breathe Out';} else{r=minR;msg='Hold';}

Turns the current phase number into a circle radius and an on-screen instruction, using a sin()-based ease so growth and shrink feel smooth rather than linear

setGradient();
Repaints the full-screen background gradient before anything else is drawn, so nothing from the previous frame lingers
let t=millis()%totalDur,phase=0;
millis() gives milliseconds since the sketch started; using % totalDur wraps that ever-growing number into a repeating 0-to-12000 'clock' for one breathing cycle
while(t>phaseDur[phase]){t-=phaseDur[phase];phase++;}
Repeatedly subtracts each phase's duration from t and advances phase until t is small enough to belong to the current phase - this is how the code figures out 'are we inhaling, holding, exhaling, or holding again?'
let r=minR,msg='';
Sets default fallback values for radius and message before the phase-specific logic overwrites them
if(phase===0){let u=t/phaseDur[0];r=lerp(minR,maxR,sin(u*HALF_PI));msg='Breathe In';}
During the inhale phase, u goes from 0 to 1 across the phase duration; wrapping it in sin(u*HALF_PI) turns that straight line into an ease-out curve, and lerp() uses it to grow the radius smoothly from minR to maxR
else if(phase===1){r=maxR;msg='Hold';}
During the first hold, the radius simply stays pinned at its maximum while the message tells the viewer to hold their breath
else if(phase===2){let u=t/phaseDur[2];r=lerp(maxR,minR,sin(u*HALF_PI));msg='Breathe Out';}
The exhale phase mirrors the inhale, easing the radius back down from maxR to minR using the same sin() curve
else{r=minR;msg='Hold';}
The final hold phase (phase 3, caught by this else) keeps the circle at its smallest size
drawParticles();drawGlow(r);
Draws the drifting background particles first, then draws the glowing circle at the radius just calculated, layering it on top
fill(255);noStroke();textSize(32);
Sets up white fill, no outline, and a 32-pixel font size for the instruction text that's about to be drawn
text(msg,width/2,height*0.18);
Draws the current phase's message (like 'Breathe In') horizontally centered, positioned near the top of the screen at 18% of the height

setGradient()

p5.js has no built-in gradient function, so this is a common trick: draw hundreds of thin lines, each a slightly different blended color, to fake a smooth gradient using lerpColor().

🔬 inter goes straight from 0 to 1 down the screen. What happens if you change it to sin(map(y,0,height,0,PI)), so the gradient brightens toward the middle and darkens at both the top and bottom edges?

  for(let y=0;y<height;y++){
    let inter=y/height;
    stroke(lerpColor(c1,c2,inter));line(0,y,width,y);
  }
function setGradient(){ // soft dark blue → purple
  noFill();
  for(let y=0;y<height;y++){
    let inter=y/height;
    stroke(lerpColor(c1,c2,inter));line(0,y,width,y);
  }
}
Line-by-line explanation (4 lines)

🔧 Subcomponents:

for-loop Row-by-Row Gradient Loop for(let y=0;y<height;y++){ let inter=y/height; stroke(lerpColor(c1,c2,inter));line(0,y,width,y); }

Draws one horizontal line for every pixel row, blending from color c1 at the top to color c2 at the bottom to fake a smooth vertical gradient

noFill();
Turns off shape fill since this function only draws lines (which use stroke, not fill)
for(let y=0;y<height;y++){
Loops once for every single vertical pixel row on the canvas
let inter=y/height;
Converts the current row number into a 0-to-1 fraction representing how far down the screen we are
stroke(lerpColor(c1,c2,inter));line(0,y,width,y);
lerpColor blends between c1 and c2 by the inter fraction, then a full-width horizontal line is drawn in that blended color at row y

drawGlow()

push() and pop() let you temporarily change the coordinate system (like moving the origin to the screen center) without affecting any drawing that happens afterward - a crucial pattern once a sketch has more than one shape or layer to position.

🔬 This loop stacks 4 translucent rings to build the glow. What happens if you start the loop at i=10 instead of i=4, drawing many more, softer overlapping rings?

  for(let i=4;i>0;i--){fill(0,200,255,20*i);circle(0,0,r*2+i*25);}
function drawGlow(r){
  push();translate(width/2,height/2);noStroke();
  for(let i=4;i>0;i--){fill(0,200,255,20*i);circle(0,0,r*2+i*25);}
  fill(120,240,255);circle(0,0,r*2);
  pop();
}
Line-by-line explanation (4 lines)

🔧 Subcomponents:

for-loop Glow Ring Loop for(let i=4;i>0;i--){fill(0,200,255,20*i);circle(0,0,r*2+i*25);}

Draws four progressively larger, progressively more transparent circles behind the main circle to fake a soft glowing halo

push();translate(width/2,height/2);noStroke();
Saves the current drawing settings, then shifts the coordinate system so that (0,0) is now the center of the screen, and turns off outlines for the circles about to be drawn
for(let i=4;i>0;i--){fill(0,200,255,20*i);circle(0,0,r*2+i*25);}
Loops from i=4 down to i=1, each time drawing a bigger circle (r*2 + i*25) with a low alpha (20*i) - because it counts down, the biggest circle is drawn first and gets covered by smaller, more opaque ones, building up a glow
fill(120,240,255);circle(0,0,r*2);
Draws the solid, fully opaque core circle at the current breathing radius on top of the glow layers
pop();
Restores the coordinate system and drawing settings that were saved by push(), so later drawing (like the text) isn't affected by the translate() done here

drawParticles()

This is a minimal particle system: instead of deleting and recreating particles, each one is simply repositioned when it leaves the visible area, which is far cheaper than managing array insertion and removal every frame.

🔬 Particles currently drift upward and wrap at the top. What happens if you flip the direction - changing p.y-=p.spd to p.y+=p.spd and updating the wrap check to catch particles falling off the bottom instead?

    p.y-=p.spd;
    if(p.y<-10){p.y=height+10;p.x=random(width);}
function drawParticles(){
  noStroke();
  for(let p of particles){
    fill(255,255,255,p.a);circle(p.x,p.y,p.s);
    p.y-=p.spd;
    if(p.y<-10){p.y=height+10;p.x=random(width);}
  }
}
Line-by-line explanation (5 lines)

🔧 Subcomponents:

for-loop Particle Draw & Update Loop for(let p of particles){ fill(255,255,255,p.a);circle(p.x,p.y,p.s); p.y-=p.spd; if(p.y<-10){p.y=height+10;p.x=random(width);} }

Draws every particle as a tiny dot, moves it upward by its own speed, and wraps it back to the bottom with a fresh random x once it drifts off the top of the screen

noStroke();
Turns off outlines so the particle dots are drawn as clean filled circles
for(let p of particles){
Loops through every particle object stored in the particles array, using the for...of syntax which gives direct access to each object
fill(255,255,255,p.a);circle(p.x,p.y,p.s);
Sets the fill to white with the particle's own alpha (opacity) value, then draws it as a tiny circle at its current position and size
p.y-=p.spd;
Moves the particle upward each frame by its own random speed, since subtracting from y moves things toward the top of the screen
if(p.y<-10){p.y=height+10;p.x=random(width);}
Once a particle drifts just above the top edge, it's teleported to just below the bottom edge with a brand new random x position, creating an endless rising loop

windowResized()

windowResized() is a p5.js event function that automatically runs whenever the browser window changes size - it's the standard place to call resizeCanvas() and recompute any values (like maxR here) that depend on width or height.

function windowResized(){resizeCanvas(windowWidth,windowHeight);maxR=min(width,height)*0.25;}
Line-by-line explanation (2 lines)
resizeCanvas(windowWidth,windowHeight);
Resizes the p5.js canvas to match the browser window whenever it changes size, keeping the sketch full-screen
maxR=min(width,height)*0.25;
Recalculates the maximum circle radius using the new width and height, so the breathing circle keeps a sensible size relative to the resized window

📦 Key Variables

phaseDur array

Holds the duration in milliseconds of each of the 4 breathing phases: inhale, hold, exhale, hold

let phaseDur=[4000,2000,4000,2000];
totalDur number

The sum of all phase durations - the full length of one complete breathing cycle in milliseconds

totalDur=phaseDur.reduce((a,b)=>a+b);
minR number

The smallest radius the breathing circle shrinks to during exhale/hold

minR=60;
maxR number

The largest radius the breathing circle grows to during inhale/hold, scaled to screen size

maxR=min(width,height)*0.25;
particles array

Stores all the floating background particle objects, each with position, size, opacity, and speed

let particles=[];
c1 object

The top color of the background gradient (dark navy blue)

c1=color(5,10,40);
c2 object

The bottom color of the background gradient (muted purple)

c2=color(60,20,90);

🔧 Potential Improvements (4)

Here are some ways this code could be enhanced:

PERFORMANCE setGradient()

The gradient is redrawn from scratch every single frame by drawing one line() per pixel row (potentially 1000+ draw calls per frame), even though c1, c2, and height never change while the sketch runs.

💡 Render the gradient once into an offscreen buffer with createGraphics(), draw that image every frame with image(), and only regenerate it inside windowResized() when the canvas size actually changes.

BUG drawParticles() and windowResized()

Particles are positioned using the width/height available at setup() time, but if the window is resized smaller or larger, existing particles keep their old x/y values - only their y wraps automatically once they drift off the top, so a particle's x coordinate can remain outside the new canvas bounds indefinitely.

💡 In windowResized(), reposition or re-randomize particle x/y values (or clamp them with constrain()) so they always stay within the current canvas.

STYLE throughout the file

Many lines chain multiple statements with semicolons and skip spacing (e.g. c1=color(5,10,40);c2=color(60,20,90);), and several variables are declared without let/const in a single long line, which makes the code hard to scan and modify safely.

💡 Spread related statements onto separate lines, group constants with clear comments (e.g. // colors, // circle sizing), and consistently declare each variable with let/const for readability.

FEATURE draw() / overall sketch

There's no way for the user to pause the animation, adjust the breathing pace, or choose a different rhythm (e.g. box breathing vs. 4-7-8 breathing) without editing the source code.

💡 Add simple on-screen controls (buttons or keyboard shortcuts) that let the user pick from a few preset phaseDur arrays, or drag a slider to scale all phase durations at once.

🔄 Code Flow

Code flow showing setup, draw, setgradient, drawglow, drawparticles, windowresized

💡 Click on function names in the diagram to jump to their code

graph TD start[Start] --> setup[setup] setup --> draw[draw loop] draw --> phasewhile[Phase Calculation Loop] phasewhile --> phaseconditional[Breathing Phase Behavior] phaseconditional --> drawglow[drawglow] drawglow --> glowloop[Glow Ring Loop] glowloop --> setgradient[setgradient] setgradient --> gradientloop[Row-by-Row Gradient Loop] gradientloop --> drawparticles[drawparticles] drawparticles --> particleupdateloop[Particle Draw & Update Loop] particleupdateloop --> draw click setup href "#fn-setup" click draw href "#fn-draw" click phasewhile href "#sub-phase-while-loop" click phaseconditional href "#sub-phase-conditional" click drawglow href "#fn-drawglow" click glowloop href "#sub-glow-loop" click setgradient href "#fn-setgradient" click gradientloop href "#sub-gradient-loop" click drawparticles href "#fn-drawparticles" click particleupdateloop href "#sub-particle-update-loop" phasewhile -->|Subtract phase durations| t[Elapsed time in phase] phaseconditional -->|Determine radius and instruction| radius[Circle radius] phaseconditional -->|Set instruction| instruction[On-screen instruction] setup -->|Initialize particles| particleinitloop[Particle Initialization Loop] particleinitloop -->|Create 80 particles| particles[Particles Array] particleupdateloop -->|Draw particles| drawparticles[Draw each particle] particleupdateloop -->|Update position| update[Move particle upward] update -->|Wrap to bottom| wrap[Wrap particle to bottom]

❓ Frequently Asked Questions

What visual elements can users expect from the AI Breathing Guide sketch?

The sketch features a glowing circle that expands and contracts to guide breathing, surrounded by floating particles and a soothing gradient background of dark blue to purple.

How do users interact with the AI Breathing Guide for meditation?

Users can follow the glowing circle's rhythm to synchronize their breathing: inhale as it grows, hold, exhale as it shrinks, and hold again, creating a calming meditation experience.

What creative coding techniques are showcased in this p5.js sketch?

This sketch demonstrates techniques such as animation timing, particle systems, and dynamic color gradients to create an immersive and tranquil environment.

Preview

AI Breathing Guide - Calm Your Mind with Visual Breathing - p5.js creative coding sketch preview
Sketch Preview
Code flow diagram showing the structure of AI Breathing Guide - Calm Your Mind with Visual Breathing - Code flow showing setup, draw, setgradient, drawglow, drawparticles, windowresized
Code Flow Diagram