AI Breathing Mandala - Meditative Geometric Animation - xelsed.ai

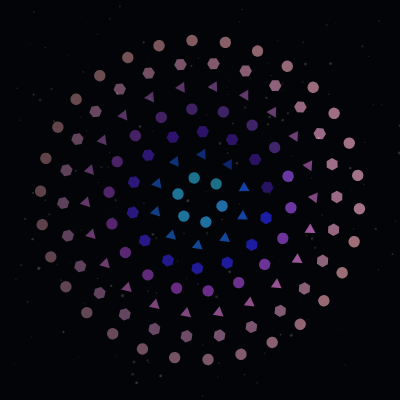
This sketch renders a glowing, symmetrical mandala made of concentric rings of circles, triangles, and hexagons that smoothly expand and contract like a breathing rhythm. Moving the mouse toward the center speeds up the breathing cycle, while soft glowing dust particles drift in the background for a calm, meditative atmosphere.

🧪 Try This!

Experiment with the code by making these changes:

  1. Add more mandala rings — Increasing NUM_RINGS packs more concentric layers of shapes into the mandala, making it denser and more intricate.
  2. Shift the color palette — Changing the starting hue offset moves the whole mandala's colors toward warm reds and oranges instead of cool blues.
  3. Change the background tint — The background color is set once per frame in HSB - shifting its hue changes the whole scene's ambient mood.
  4. Make the dust particles bigger and more visible — Increasing the particle size range turns the subtle background dust into noticeable glowing orbs.
Prefer the full editor? Open it there →

📖 About This Sketch

This sketch creates a hypnotic breathing mandala: rings of geometric shapes pulse in and out of a common center in a slow, rhythmic scale animation, while colors shift gently and shapes rotate at different speeds per ring. The glow comes from additive blending (blendMode(ADD)), where overlapping translucent shapes brighten instead of just layering, and the palette is built entirely in HSB color mode so hue can be smoothly animated with sine waves. Moving the mouse closer to the canvas center speeds up the breathing cycle, giving the piece a subtle, responsive interactivity on top of its automatic animation.

The code is organized around a single draw() loop that first computes a breathing speed and scale factor from the mouse's distance to center, then uses nested for-loops to place shapes around each ring using cos()/sin() and TWO_PI to distribute them evenly in a circle. A separate DustParticle class manages 200 small background particles with their own update/display cycle, and small helper functions (drawMandalaShape, polygon) keep the shape-drawing logic reusable. Studying this sketch teaches you how to combine trigonometry, HSB color, blend modes, and simple object-oriented particle systems into one cohesive generative artwork.

⚙️ How It Works

  1. When the sketch loads, setup() creates a full-window canvas, switches to HSB color mode (which makes animating hue easy), and calls initDust() to spawn 200 floating dust particles.
  2. Every frame, draw() paints a near-black tinted background, then measures the distance between the mouse and the canvas center to compute a 'breathing speed factor' - closer to center means faster breathing.
  3. That speed factor drives a variable t based on frameCount, which is fed into a sine wave to produce breathingScale, a value that smoothly oscillates between 0.65 and 1.12 to shrink and grow the whole mandala like a lung.
  4. Inside a translated and scaled coordinate space, nested loops draw NUM_RINGS concentric rings; each ring places an increasing number of circles, triangles, or hexagons evenly around its circumference using cos()/sin() and TWO_PI, with hue, saturation, brightness, and rotation all animated by sine functions of time.
  5. blendMode(ADD) is enabled while the mandala is drawn so overlapping translucent shapes glow brighter where they intersect, then blendMode(BLEND) restores normal drawing afterward.
  6. Meanwhile, each DustParticle updates its own position every frame, drifting slightly and being gently pulled back toward the center; particles that wander far off-screen are reset to a new random position, keeping the ambient dust layer alive indefinitely.

🎓 Concepts You'll Learn

HSB color mode for smooth hue animationTrigonometry (sin/cos) for circular shape placementNested loops for layered pattern generationAdditive blend modes for glow effectsmap() for scaling one value range to anotherpush()/pop() and transform stack (translate/scale/rotate)Classes for particle systems

📝 Code Breakdown

setup()

setup() runs exactly once when the sketch starts. It's the right place to configure canvas size, color mode, and drawing defaults (like noStroke()) before any animation begins.

function setup() {
  createCanvas(windowWidth, windowHeight);
  colorMode(HSB, 360, 100, 100, 100); // HSB with alpha
  noStroke();
  initDust();
}
Line-by-line explanation (4 lines)
createCanvas(windowWidth, windowHeight);
Creates a canvas that fills the entire browser window, using the browser's current width and height.
colorMode(HSB, 360, 100, 100, 100);
Switches p5's color system from default RGB to HSB (Hue, Saturation, Brightness), with an alpha channel that goes from 0 to 100. HSB makes it easy to animate color by simply shifting the hue number.
noStroke();
Turns off outlines on every shape drawn from now on, so shapes are filled color only with no border.
initDust();
Calls the helper function that fills the dustParticles array with new DustParticle objects, setting up the background particle layer before the first frame draws.

initDust()

This function is called both from setup() and from windowResized(), showing a common pattern: extracting repeated setup logic into its own function so it can be reused whenever the canvas needs to reset its particle system.

🔬 This loop is what actually creates every dust particle. What happens visually if NUM_PARTICLES were 20 instead of 200? What about 1000?

  for (let i = 0; i < NUM_PARTICLES; i++) {
    dustParticles.push(new DustParticle());
  }
function initDust() {
  dustParticles = [];
  for (let i = 0; i < NUM_PARTICLES; i++) {
    dustParticles.push(new DustParticle());
  }
}
Line-by-line explanation (3 lines)

🔧 Subcomponents:

for-loop Particle Creation Loop for (let i = 0; i < NUM_PARTICLES; i++) {

Creates NUM_PARTICLES new DustParticle objects and adds each one to the dustParticles array.

dustParticles = [];
Empties (or initializes) the array that holds all dust particle objects - useful when the window is resized and particles need to restart.
for (let i = 0; i < NUM_PARTICLES; i++) {
Loops NUM_PARTICLES times (200 by default) to build the full set of particles.
dustParticles.push(new DustParticle());
Creates a brand new DustParticle instance (which randomizes its own position and speed in its constructor) and adds it to the array.

draw()

draw() is the animation heartbeat of any p5.js sketch, running about 60 times per second. Here it demonstrates layering (dust drawn before the mandala), a shared transform stack (push/pop/translate/scale/rotate), and driving many visual parameters from a single time variable t so everything stays synchronized.

🔬 These lines turn mouse distance into a breathing rhythm. What happens if you swap the map() output range from (2.5, 0.6) to (0.6, 2.5)? Would moving toward the center now slow the breathing instead of speeding it up?

  const breathingSpeedFactor = map(d, 0, maxD, 2.5, 0.6, true);

  // Use sin(frameCount * 0.02 * factor) for breathing phase
  const t = frameCount * 0.02 * breathingSpeedFactor;
  const breathingScale = map(sin(t), -1, 1, 0.65, 1.12); // scale oscillates smoothly

🔬 This controls how many shapes appear per ring and what hue each ring starts at. What happens if numShapes stays constant across all rings instead of growing with i?

    const numShapes = 6 + i * 4;

    // Base hue shifts as rings go outward
    const baseHue = (200 + i * 25) % 360;
function draw() {
  // Dark, slightly tinted background (HSB)
  background(230, 60, 3, 100);

  const cx = width / 2;
  const cy = height / 2;

  // ----- Breathing speed from mouse distance -----
  const d = dist(mouseX, mouseY, cx, cy);
  const maxD = max(width, height) / 2;
  // Closer to center = higher factor (faster breathing)
  const breathingSpeedFactor = map(d, 0, maxD, 2.5, 0.6, true);

  // Use sin(frameCount * 0.02 * factor) for breathing phase
  const t = frameCount * 0.02 * breathingSpeedFactor;
  const breathingScale = map(sin(t), -1, 1, 0.65, 1.12); // scale oscillates smoothly

  // ----- Dust layer (normal blending) -----
  for (let p of dustParticles) {
    p.update();
    p.display();
  }

  // ----- Mandala -----
  push();
  translate(cx, cy);
  scale(breathingScale);

  // Additive blending for glowing overlaps
  blendMode(ADD);

  const maxRadius = min(width, height) * 0.4;
  const radiusStep = maxRadius / NUM_RINGS;

  for (let i = 0; i < NUM_RINGS; i++) {
    const ringRadius = radiusStep * (i + 1);

    // More shapes as we go outward
    const numShapes = 6 + i * 4;

    // Base hue shifts as rings go outward
    const baseHue = (200 + i * 25) % 360;

    // Each ring slowly rotates; alternate direction for variety
    const ringRotation = t * 0.1 * (i % 2 === 0 ? 1 : -1);

    for (let j = 0; j < numShapes; j++) {
      const angle = TWO_PI * (j / numShapes) + ringRotation;
      const x = cos(angle) * ringRadius;
      const y = sin(angle) * ringRadius;

      push();
      translate(x, y);

      // Choose shape type per ring: 0 circle, 1 triangle, 2 hexagon
      const shapeType = i % 3;

      // Shape size relative to ring spacing
      const diameter = radiusStep * 0.5;

      // Subtle hue and brightness variation per shape
      const hueJitter = 10 * sin(t + i + j * 0.3);
      const sat = 60 + 30 * sin(t * 0.3 + i * 0.7);
      const bright = 70 + 20 * sin(t * 0.4 - j * 0.2);

      fill((baseHue + hueJitter + 360) % 360, sat, bright, 70);

      // Shapes also rotate slowly for added motion
      rotate(t * 0.2 + angle * 0.1);

      drawMandalaShape(shapeType, diameter);
      pop();
    }
  }

  pop();

  // Reset blending for anything drawn later
  blendMode(BLEND);
}
Line-by-line explanation (21 lines)

🔧 Subcomponents:

for-loop Dust Particle Loop for (let p of dustParticles) {

Updates and draws every dust particle before the mandala is drawn, so it sits visually behind the glowing shapes.

for-loop Ring Loop for (let i = 0; i < NUM_RINGS; i++) {

Iterates over each concentric ring, computing its radius, shape count, color, and rotation before drawing its shapes.

for-loop Shape Placement Loop for (let j = 0; j < numShapes; j++) {

Places numShapes copies of a shape evenly around the current ring's circumference using trigonometry.

calculation Shape Type Selection const shapeType = i % 3;

Cycles through circle, triangle, and hexagon shapes ring by ring using the modulo operator.

background(230, 60, 3, 100);
Repaints the whole canvas each frame with a very dark, slightly blue-tinted color (HSB hue 230, low saturation, very low brightness), which both clears the previous frame and sets the mood.
const d = dist(mouseX, mouseY, cx, cy);
Calculates the pixel distance between the mouse cursor and the canvas center - this drives the interactive breathing speed.
const breathingSpeedFactor = map(d, 0, maxD, 2.5, 0.6, true);
Maps the mouse distance to a speed factor: when the mouse is at the center (d=0) the factor is 2.5 (fast), and at the farthest edge it's 0.6 (slow). The final 'true' clamps the result so it never goes outside that range.
const t = frameCount * 0.02 * breathingSpeedFactor;
Builds an ever-increasing 'time' value from the frame counter, scaled by the speed factor - this t variable drives every animated sine wave in the sketch.
const breathingScale = map(sin(t), -1, 1, 0.65, 1.12);
Takes the sine wave of t (which oscillates between -1 and 1) and remaps it to a scale factor between 0.65 and 1.12 - this is the actual 'breathing' zoom in/out amount.
for (let p of dustParticles) {
Loops through every dust particle object and calls its update() and display() methods, moving and drawing each one.
translate(cx, cy);
Moves the coordinate origin (0,0) to the center of the canvas, so all mandala shapes can be positioned relative to the center instead of the top-left corner.
scale(breathingScale);
Scales everything drawn afterward by the breathing factor, making the entire mandala grow and shrink as one unit - this is the 'breathing' effect.
blendMode(ADD);
Switches to additive color blending so overlapping translucent shapes add their brightness together, creating a glowing effect where colors intersect.
const radiusStep = maxRadius / NUM_RINGS;
Divides the total available radius evenly among all rings, so each ring is spaced consistently from the center outward.
const numShapes = 6 + i * 4;
Increases the number of shapes per ring the further out you go (ring 0 has 6 shapes, ring 1 has 10, etc.), making outer rings denser.
const ringRotation = t * 0.1 * (i % 2 === 0 ? 1 : -1);
Gives each ring its own slow rotation over time; even-indexed rings rotate one way and odd-indexed rings rotate the opposite way, creating a swirling counter-rotation effect.
const angle = TWO_PI * (j / numShapes) + ringRotation;
Calculates the angle for shape j by dividing the full circle (TWO_PI radians) evenly among numShapes, then adds the ring's current rotation offset.
const x = cos(angle) * ringRadius;
Converts the angle and ring radius into an x coordinate using cosine - this is standard 'polar to cartesian' conversion for placing points on a circle.
const y = sin(angle) * ringRadius;
Converts the angle and ring radius into a y coordinate using sine, completing the circular placement.
const shapeType = i % 3;
Uses modulo 3 on the ring index to cycle through three shape types (circle, triangle, hexagon) as rings go outward.
const hueJitter = 10 * sin(t + i + j * 0.3);
Adds a small wobble to the hue based on time, ring index, and shape index, so colors shimmer slightly instead of staying static.
fill((baseHue + hueJitter + 360) % 360, sat, bright, 70);
Sets the fill color for this shape using the jittered hue (wrapped into the 0-360 range with +360 % 360 to avoid negative values), computed saturation, brightness, and a fixed alpha of 70.
rotate(t * 0.2 + angle * 0.1);
Rotates this individual shape slightly based on time and its own angle, adding extra layered motion on top of the ring's overall rotation.
drawMandalaShape(shapeType, diameter);
Calls the helper function to actually draw the circle, triangle, or hexagon at the current transformed position.
blendMode(BLEND);
Restores normal (non-additive) blending at the end of the frame so nothing drawn afterward is accidentally affected by the glow blend mode.

drawMandalaShape()

This function is a simple dispatcher pattern: it takes a numeric 'type' and decides which drawing routine to call. This keeps the main draw() loop clean and makes it easy to add new shape types later by adding another else-if branch.

function drawMandalaShape(type, diameter) {
  if (type === 0) {
    // circle(d) uses diameter: https://p5js.org/reference/#/p5/circle
    circle(0, 0, diameter);
  } else if (type === 1) {
    polygon(0, 0, diameter * 0.55, 3); // triangle
  } else {
    polygon(0, 0, diameter * 0.55, 6); // hexagon
  }
}
Line-by-line explanation (6 lines)

🔧 Subcomponents:

conditional Shape Type Branching if (type === 0) {

Chooses which shape to draw (circle, triangle, or hexagon) based on the numeric type passed in.

if (type === 0) {
Checks if the shape type is 0, which is used for circles.
circle(0, 0, diameter);
Draws a circle centered at the local origin (0,0) - since this function is always called after translate(), (0,0) is wherever the shape is supposed to appear.
} else if (type === 1) {
Checks if the shape type is 1, used for triangles.
polygon(0, 0, diameter * 0.55, 3); // triangle
Calls the polygon() helper with 3 points to draw a triangle, using a slightly smaller radius (diameter * 0.55) so triangles look visually similar in size to the circles.
} else {
Any other type value (here, only 2) falls into this final branch, used for hexagons.
polygon(0, 0, diameter * 0.55, 6); // hexagon
Calls polygon() with 6 points to draw a hexagon at the same relative size as the triangle.

polygon()

This is a classic reusable geometry helper: by parameterizing the number of points, one function can draw a triangle, square, hexagon, or any regular polygon, avoiding duplicated drawing code.

🔬 This loop is a general-purpose 'draw any regular polygon' routine. Since drawMandalaShape() calls it with npoints=3 or 6, what shape would you get if you called polygon(0, 0, radius, 4) instead - and where else in the sketch could you use that?

  for (let a = 0; a < TWO_PI; a += TWO_PI / npoints) {
    const sx = x + cos(a) * radius;
    const sy = y + sin(a) * radius;
    vertex(sx, sy);
  }
function polygon(x, y, radius, npoints) {
  beginShape();
  for (let a = 0; a < TWO_PI; a += TWO_PI / npoints) {
    const sx = x + cos(a) * radius;
    const sy = y + sin(a) * radius;
    vertex(sx, sy);
  }
  endShape(CLOSE);
}
Line-by-line explanation (6 lines)

🔧 Subcomponents:

for-loop Vertex Placement Loop for (let a = 0; a < TWO_PI; a += TWO_PI / npoints) {

Walks around a full circle in equal angular steps, placing one vertex per step to build a regular polygon shape.

beginShape();
Starts recording a custom shape made of vertices - nothing is drawn until endShape() is called.
for (let a = 0; a < TWO_PI; a += TWO_PI / npoints) {
Loops through angles from 0 to a full circle (TWO_PI radians), stepping by an equal fraction each time so npoints vertices are evenly spaced around the circle.
const sx = x + cos(a) * radius;
Computes the x position of this vertex using cosine of the current angle, offset by the polygon's center x.
const sy = y + sin(a) * radius;
Computes the y position of this vertex using sine of the current angle, offset by the polygon's center y.
vertex(sx, sy);
Adds this point as the next corner of the shape being built.
endShape(CLOSE);
Finishes the shape and connects the last vertex back to the first one (CLOSE), producing a closed polygon outline that gets filled with the current fill color.

windowResized()

windowResized() is a special p5.js callback that automatically runs whenever the browser window is resized, letting you keep responsive sketches that adapt to any screen size.

function windowResized() {
  resizeCanvas(windowWidth, windowHeight);
  initDust();
}
Line-by-line explanation (2 lines)
resizeCanvas(windowWidth, windowHeight);
A built-in p5.js function that resizes the canvas element whenever the browser window changes size, keeping the sketch full-screen.
initDust();
Rebuilds the dust particle array from scratch after resizing, since old particle positions were based on the previous (now stale) width and height.

DustParticle (class)

This class demonstrates the constructor + reset() pattern, useful whenever an object needs to be both freshly created AND periodically 'reborn' with new random values, avoiding duplicated initialization code. It also shows a simple particle system: independent objects that each track their own position, velocity, and appearance, updated and drawn every frame in a loop.

🔬 This is the 'gentle pull toward center' force. What happens if you increase 0.02 to something like 0.2? Would the dust cluster tightly around the middle instead of spreading across the whole screen?

    this.x += 0.02 * cos(angleToCenter) * this.z;
    this.y += 0.02 * sin(angleToCenter) * this.z;
class DustParticle {
  constructor() {
    this.reset();
  }

  reset() {
    this.x = random(width);
    this.y = random(height);
    this.z = random(0.5, 1.2);       // depth factor for speed/size
    this.size = random(1, 3);
    this.alpha = random(5, 20);      // very subtle
    this.vx = random(-0.15, 0.15);
    this.vy = random(-0.15, 0.15);
  }

  update() {
    this.x += this.vx * this.z;
    this.y += this.vy * this.z;

    // Gentle drift back toward center for cohesion
    const cx = width / 2;
    const cy = height / 2;
    const angleToCenter = atan2(cy - this.y, cx - this.x);
    this.x += 0.02 * cos(angleToCenter) * this.z;
    this.y += 0.02 * sin(angleToCenter) * this.z;

    // Wrap or reset if far out of bounds
    if (this.x < -50 || this.x > width + 50 || this.y < -50 || this.y > height + 50) {
      this.reset();
    }
  }

  display() {
    // Soft white dust in HSB (S=0 gives grayscale)
    fill(0, 0, 100, this.alpha);
    circle(this.x, this.y, this.size * this.z);
  }
}
Line-by-line explanation (13 lines)

🔧 Subcomponents:

conditional Out-of-Bounds Reset if (this.x < -50 || this.x > width + 50 || this.y < -50 || this.y > height + 50) {

Checks whether a particle has drifted far past the canvas edges and, if so, resets it to a new random position.

constructor() {
Runs automatically whenever 'new DustParticle()' is called - it immediately calls reset() to give the particle its starting randomized properties.
this.x = random(width);
Picks a random starting horizontal position anywhere across the canvas width.
this.z = random(0.5, 1.2); // depth factor for speed/size
Gives the particle a fake 'depth' value between 0.5 and 1.2, used later to scale both its speed and its size - larger z means it moves faster and appears bigger, simulating closer particles.
this.size = random(1, 3);
Sets a small random base size for the particle, between 1 and 3 pixels.
this.alpha = random(5, 20); // very subtle
Gives the particle a very low opacity (5 to 20 out of 100) so the dust stays subtle and doesn't distract from the mandala.
this.vx = random(-0.15, 0.15);
Assigns a tiny random horizontal velocity, which can be positive or negative, so particles drift in different directions.
this.x += this.vx * this.z;
Moves the particle horizontally each frame, with the depth factor z scaling how fast it moves (deeper/closer particles drift faster).
const angleToCenter = atan2(cy - this.y, cx - this.x);
Calculates the angle pointing from the particle's current position toward the canvas center, using atan2 (a math function that returns the angle of a direction vector).
this.x += 0.02 * cos(angleToCenter) * this.z;
Nudges the particle a tiny bit toward the center each frame, creating a gentle gravitational pull that keeps particles loosely clustered rather than drifting away forever.
if (this.x < -50 || this.x > width + 50 || this.y < -50 || this.y > height + 50) {
Checks if the particle has drifted more than 50 pixels past any edge of the canvas.
this.reset();
Calls reset() again to give the particle a brand new random position and properties, effectively recycling it instead of letting it disappear forever.
fill(0, 0, 100, this.alpha);
Sets the fill color to white (hue and saturation both 0, brightness 100) with this particle's individual low alpha, giving a soft grayscale dust look.
circle(this.x, this.y, this.size * this.z);
Draws the particle as a small circle, with its final diameter scaled by the depth factor z so 'closer' particles appear larger.

📦 Key Variables

NUM_RINGS number

A constant defining how many concentric rings of shapes make up the mandala.

const NUM_RINGS = 7;
NUM_PARTICLES number

A constant defining how many DustParticle objects populate the background particle layer.

const NUM_PARTICLES = 200;
dustParticles array

Holds all the active DustParticle instances that are updated and displayed every frame.

let dustParticles = [];

🔧 Potential Improvements (3)

Here are some ways this code could be enhanced:

PERFORMANCE DustParticle.update()

Every particle recalculates 'const cx = width / 2;' and 'const cy = height / 2;' independently each frame, even though these values are identical for all 200 particles and are already computed once in draw().

💡 Pass cx and cy into update(p.update(cx, cy)) from draw(), or store them as sketch-level variables updated once per frame, to avoid redundant division for every particle every frame.

STYLE draw()

Many 'magic numbers' (0.02, 0.1, 0.2, 0.4, 0.5, 0.55) control breathing speed, rotation speed, and sizing but have no named constants explaining their purpose.

💡 Extract these into well-named constants near the top of the file (e.g. const BREATHING_TIME_SCALE = 0.02; const SHAPE_SIZE_RATIO = 0.5;) so the animation's tuning knobs are easy to find and adjust.

FEATURE draw() breathing speed calculation

Breathing speed only responds to mouse position, so touch-only devices (phones/tablets) never get the interactive speed-up effect since there's no mousePressed/touch equivalent wired in.

💡 Add touch support by tracking touches[0].x/touches[0].y (or using p5's touchX/touchY) as a fallback for mouseX/mouseY so the interaction also works on mobile.

🔄 Code Flow

Code flow showing setup, initdust, draw, drawmandalashape, polygon, windowresized, dustparticle

💡 Click on function names in the diagram to jump to their code

graph TD start[Start] --> setup[setup] setup --> initdust[initdust] setup --> draw[draw loop] click setup href "#fn-setup" click initdust href "#fn-initdust" click draw href "#fn-draw" draw --> dust-update-loop[dust-update-loop] dust-update-loop --> dust-bounds-check[dust-bounds-check] dust-bounds-check --> drawmandalashape[drawmandalashape] click dust-update-loop href "#sub-dust-update-loop" click dust-bounds-check href "#sub-dust-bounds-check" click drawmandalashape href "#fn-drawmandalashape" drawmandalashape --> ring-loop[ring-loop] ring-loop --> shape-loop[shape-loop] ring-loop --> shape-type-calc[shape-type-calc] click ring-loop href "#sub-ring-loop" click shape-loop href "#sub-shape-loop" click shape-type-calc href "#sub-shape-type-calc" shape-loop --> shape-type-switch[shape-type-switch] shape-type-switch --> polygon[polygon] click shape-type-switch href "#sub-shape-type-switch" click polygon href "#fn-polygon" polygon --> polygon-vertex-loop[polygon-vertex-loop] click polygon-vertex-loop href "#sub-polygon-vertex-loop" dust-update-loop --> dust-fill-loop[dust-fill-loop] click dust-fill-loop href "#sub-dust-fill-loop" windowresized[windowResized] --> initdust click windowresized href "#fn-windowresized"

❓ Frequently Asked Questions

What kind of visual experience does the AI Breathing Mandala sketch provide?

The sketch creates a visually calming experience with concentric rings of geometric shapes that expand and contract in a rhythmic pattern, enhanced by floating dust particles.

How can users interact with the AI Breathing Mandala animation?

Users can interact by moving their mouse closer to the center of the canvas, which speeds up the breathing rhythm of the mandala.

What creative coding concepts are showcased in the AI Breathing Mandala sketch?

The sketch demonstrates concepts such as sinusoidal animations for breathing effects, particle systems for ambiance, and additive blending for glowing visual effects.

Preview

AI Breathing Mandala - Meditative Geometric Animation - xelsed.ai - p5.js creative coding sketch preview
Sketch Preview
Code flow diagram showing the structure of AI Breathing Mandala - Meditative Geometric Animation - xelsed.ai - Code flow showing setup, initdust, draw, drawmandalashape, polygon, windowresized, dustparticle
Code Flow Diagram