
AI Color Mixer Lab - RGB Additive Blending Tool Learn color theory with interactive RGB mixing! Dra

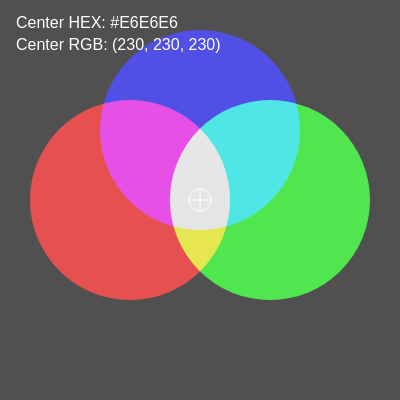
This sketch creates an interactive RGB color mixer where three translucent red, green, and blue circles can be dragged around a full-window canvas. Using p5.js's additive blend mode, overlapping circles combine like beams of light rather than paint, and a crosshair fixed at the canvas center samples the resulting color, displaying it live as both RGB numbers and a hex code.

🧪 Try This!

Experiment with the code by making these changes:

  1. Make overlaps more dramatic — Increasing the alpha value makes each circle less transparent, so mixed colors in overlaps look bolder and closer to pure white/cyan/magenta.
  2. Shrink or grow all circles — The radius factor controls how big the three circles are relative to the window - a smaller factor makes them tiny with little overlap.
  3. Darken the background — Changing the background brightness makes the glowing additive colors pop even more against a near-black canvas.
Prefer the full editor? Open it there →

📖 About This Sketch

This sketch turns color theory into a hands-on toy: three draggable, translucent circles - one red, one green, one blue - overlap on a gray canvas using p5.js's additive blendMode(ADD), so wherever they intersect, the colors combine the way light does rather than the way paint does. A fixed crosshair at the center of the screen samples whatever color is currently underneath it with get(), and prints that pixel's RGB values and hex code onscreen in real time, turning the sketch into a live color-mixing lab.

The code keeps all circle data in a single array of plain objects (circles), with mousePressed/mouseDragged/mouseReleased handling the drag interaction and a helper function converting sampled RGB values into a hex string. By studying it you'll learn how additive blend modes work, how to detect and drag objects with the mouse using distance checks, how to read pixel colors directly off the canvas, and how to keep a fullscreen sketch responsive to window resizing.

⚙️ How It Works

  1. When the sketch loads, setup() creates a canvas that fills the browser window and calls initCircles() to position the red, green, and blue circles in a triangular arrangement around the center.
  2. Every frame, draw() clears the background to gray, switches to additive blend mode, and draws the three translucent circles at their current positions - wherever two or three overlap, the colors visually add together.
  3. After drawing the circles, draw() switches back to normal blend mode and uses get() to read the actual color of the single pixel at the canvas center, converting it to both RGB and hex text for display.
  4. When you press the mouse, mousePressed() checks each circle (front-to-back) to see if your click landed inside its radius; if so, it starts a drag and moves that circle to the end of the array so it renders on top.
  5. While the mouse is held down, mouseDragged() continuously updates the dragged circle's x/y position to follow the cursor, and mouseReleased() ends the drag.
  6. If the browser window is resized, windowResized() resizes the canvas and calls initCircles() again to re-center the three circles for the new dimensions.

🎓 Concepts You'll Learn

Additive color blending with blendMode(ADD)RGB color model and hex conversionMouse dragging with distance-based hit testingPixel sampling with get()Array of objects for managing multiple shapesResponsive fullscreen canvas with windowResized

📝 Code Breakdown

setup()

setup() runs once when the sketch starts. It's the place to configure the canvas and call any initialization helpers before the animation loop begins.

function setup() {
  createCanvas(windowWidth, windowHeight);
  pixelDensity(1); // keeps get(x, y) sampling simple on high-DPI screens

  initCircles();
}
Line-by-line explanation (3 lines)
createCanvas(windowWidth, windowHeight);
Creates a canvas that fills the entire browser window, using p5's built-in windowWidth and windowHeight variables.
pixelDensity(1); // keeps get(x, y) sampling simple on high-DPI screens
Forces the canvas to use a 1:1 pixel density instead of the device's native (often 2x or 3x) density, so get(x, y) reads exactly the pixel you expect on Retina/high-DPI screens.
initCircles();
Calls the helper function that sets up the starting positions and sizes of the three RGB circles.
draw()

draw() runs continuously about 60 times per second. Here it handles both the additive rendering of the RGB circles and the UI overlay that reads back and displays the resulting mixed color.

🔬 This draws the red circle at the shared alpha level. What happens if you hardcode this circle's alpha to 255 (fully opaque) while green and blue stay translucent?

  fill(255, 0, 0, alpha);
  circle(circles[0].x, circles[0].y, circles[0].r * 2);

🔬 This draws a small outlined circle marking the exact pixel being sampled. What happens if you make this marker much bigger, like 150 pixels wide?

  noFill();
  circle(cx, cy, 22);
function draw() {
  // Gray background
  background(80);

  // Draw additive RGB circles
  blendMode(ADD); // https://p5js.org/reference/#/p5/blendMode
  noStroke();

  const alpha = 150; // translucency so overlaps show mixing

  // Red
  fill(255, 0, 0, alpha);
  circle(circles[0].x, circles[0].y, circles[0].r * 2);

  // Green
  fill(0, 255, 0, alpha);
  circle(circles[1].x, circles[1].y, circles[1].r * 2);

  // Blue
  fill(0, 0, 255, alpha);
  circle(circles[2].x, circles[2].y, circles[2].r * 2);

  // Back to normal blend for overlay UI
  blendMode(BLEND);

  // Sample center pixel
  const cx = floor(width / 2);
  const cy = floor(height / 2);
  const col = get(cx, cy); // https://p5js.org/reference/#/p5/get
  const r = col[0];
  const g = col[1];
  const b = col[2];
  const hex = rgbToHex(r, g, b);

  // Draw crosshair at center
  stroke(255);
  strokeWeight(1);
  line(cx - 10, cy, cx + 10, cy);
  line(cx, cy - 10, cx, cy + 10);
  noFill();
  circle(cx, cy, 22);

  // Text with hex + RGB
  noStroke();
  fill(255);
  textSize(16);
  textAlign(LEFT, TOP);
  text(`Center HEX: ${hex}`, 16, 16);
  text(`Center RGB: (${r}, ${g}, ${b})`, 16, 38);
}
Line-by-line explanation (10 lines)

🔧 Subcomponents:

calculation Draw Red Circle circle(circles[0].x, circles[0].y, circles[0].r * 2);

Renders the first draggable circle as translucent red using the current additive blend mode.

calculation Sample Center Pixel const col = get(cx, cy); // https://p5js.org/reference/#/p5/get

Reads the actual blended color at the canvas center directly off the rendered pixels, after all circles have been drawn.

calculation Draw Crosshair Overlay line(cx - 10, cy, cx + 10, cy);

Draws a small crosshair and circle marker showing exactly where the sampled pixel is located.

background(80);
Clears the canvas to a mid-gray each frame so previous frames don't leave trails.
blendMode(ADD);
Switches p5's drawing mode to additive blending, so overlapping shape colors are summed together like light instead of averaged like paint.
const alpha = 150; // translucency so overlaps show mixing
Sets how transparent each circle is; a mid-level alpha lets overlapping colors visibly combine instead of one circle fully covering another.
fill(255, 0, 0, alpha);
Sets the fill color to translucent pure red for the next shape drawn.
circle(circles[0].x, circles[0].y, circles[0].r * 2);
Draws the red circle using its stored x/y position and doubling its radius to get the diameter that circle() expects.
blendMode(BLEND);
Restores normal (non-additive) blending so the UI text and crosshair drawn afterward look correct instead of glowing.
const cx = floor(width / 2);
Calculates the integer x-coordinate of the canvas center, used both for sampling and for drawing the crosshair.
const col = get(cx, cy); // https://p5js.org/reference/#/p5/get
Reads the actual rendered color at pixel (cx, cy) as a [r, g, b, a] array, capturing whatever blended color exists there right now.
const hex = rgbToHex(r, g, b);
Converts the sampled RGB values into a hex color string like #FF00CC using the helper function defined below.
text(`Center HEX: ${hex}`, 16, 16);
Draws the hex code text near the top-left corner of the screen using a JavaScript template literal to insert the value.

initCircles()

This helper centralizes the circle setup logic so it can be reused both in setup() and whenever the window is resized, keeping the layout consistent and responsive.

🔬 These lines set circle size and spacing. What happens if you set offset to 0, so all three circles start stacked exactly on top of each other?

  const radius = min(width, height) * 0.25;
  const cx = width / 2;
  const cy = height / 2;
  const offset = radius * 0.7;
function initCircles() {
  circles = [];

  const radius = min(width, height) * 0.25;
  const cx = width / 2;
  const cy = height / 2;
  const offset = radius * 0.7;

  // Red left
  circles.push({
    x: cx - offset,
    y: cy,
    r: radius,
  });

  // Green right
  circles.push({
    x: cx + offset,
    y: cy,
    r: radius,
  });

  // Blue top
  circles.push({
    x: cx,
    y: cy - offset,
    r: radius,
  });
}
Line-by-line explanation (4 lines)

🔧 Subcomponents:

calculation Position Red Circle circles.push({ x: cx - offset, y: cy, r: radius, });

Adds the red circle's starting position and radius to the circles array, placed to the left of center.

circles = [];
Resets the array to empty so this function can be safely called again (e.g. on window resize) without duplicating circles.
const radius = min(width, height) * 0.25;
Calculates a circle radius that scales with the smaller of the canvas's width or height, so circles look proportional on any screen shape.
const offset = radius * 0.7;
Determines how far each circle is pushed away from dead-center, based on the radius, so the amount of spread scales with circle size.
circles.push({ x: cx - offset, y: cy, r: radius, });
Adds a new object describing the red circle's x, y, and radius to the circles array.

mousePressed()

mousePressed() runs once whenever the mouse button is clicked. Here it performs hit-testing against each circle and sets up state for the drag that mouseDragged() will continue.

🔬 This checks whether your click is within the circle's full radius. What happens if you require the click to be within half the radius instead, making circles much harder to grab?

    const d = dist(mouseX, mouseY, c.x, c.y);
    if (d <= c.r) {
function mousePressed() {
  // Check circles topmost-first
  for (let i = circles.length - 1; i >= 0; i--) {
    const c = circles[i];
    const d = dist(mouseX, mouseY, c.x, c.y);
    if (d <= c.r) {
      draggingIndex = i;
      dragOffsetX = mouseX - c.x;
      dragOffsetY = mouseY - c.y;

      // Bring this circle to the front visually
      const [picked] = circles.splice(i, 1);
      circles.push(picked);
      draggingIndex = circles.length - 1;

      break;
    }
  }
}
Line-by-line explanation (7 lines)

🔧 Subcomponents:

for-loop Topmost-First Hit Test for (let i = circles.length - 1; i >= 0; i--) {

Loops through circles from the last (drawn on top) to the first, so clicking an overlapping area grabs the circle you actually see on top.

conditional Circle Hit Check if (d <= c.r) {

Determines whether the mouse click landed inside this circle by comparing distance to its radius.

for (let i = circles.length - 1; i >= 0; i--) {
Iterates through the circles array backwards, checking the most recently drawn (topmost) circle first.
const d = dist(mouseX, mouseY, c.x, c.y);
Calculates the straight-line distance between the mouse click and this circle's center using p5's dist() function.
if (d <= c.r) {
If the click is within the circle's radius, it counts as a hit and dragging begins.
dragOffsetX = mouseX - c.x;
Records how far the click was from the circle's center horizontally, so dragging feels natural instead of snapping the circle to the cursor.
const [picked] = circles.splice(i, 1);
Removes the clicked circle from its current position in the array using destructuring to grab it directly.
circles.push(picked);
Adds the picked circle back at the end of the array, which makes it render last (and therefore appear on top) in the next draw() call.
break;
Stops checking further circles once a hit has been found, so only one circle is grabbed per click.

mouseDragged()

mouseDragged() runs automatically on every frame where the mouse moves while a button is held down, making it perfect for implementing drag-and-drop interactions.

function mouseDragged() {
  if (draggingIndex < 0) return;

  const c = circles[draggingIndex];
  c.x = mouseX - dragOffsetX;
  c.y = mouseY - dragOffsetY;
}
Line-by-line explanation (3 lines)
if (draggingIndex < 0) return;
Exits early if no circle is currently being dragged, since draggingIndex is -1 whenever nothing is grabbed.
const c = circles[draggingIndex];
Gets a reference to the circle object currently being dragged.
c.x = mouseX - dragOffsetX;
Updates the circle's x position to follow the mouse, preserving the original offset so the circle doesn't jump to be centered exactly on the cursor.

mouseReleased()

mouseReleased() runs once whenever a mouse button is let go, making it the natural place to clean up any dragging state started in mousePressed().

function mouseReleased() {
  draggingIndex = -1;
}
Line-by-line explanation (1 lines)
draggingIndex = -1;
Resets the dragging state to 'nothing selected' once the mouse button is released, stopping mouseDragged() from moving any circle.

windowResized()

windowResized() is a built-in p5.js callback that fires automatically whenever the browser window changes size, letting you keep responsive sketches correctly laid out.

function windowResized() {
  resizeCanvas(windowWidth, windowHeight);
  initCircles();
}
Line-by-line explanation (2 lines)
resizeCanvas(windowWidth, windowHeight);
Resizes the p5 canvas to match the browser window's new width and height whenever it changes.
initCircles();
Recalculates and repositions the three circles so they stay correctly centered and proportioned after the resize.

rgbToHex()

This helper isolates the RGB-to-hex conversion logic so draw() can stay focused on rendering, and demonstrates how JavaScript's toString(16) and padStart() work together to build hex color codes.

function rgbToHex(r, g, b) {
  const toHex = (v) => {
    const clamped = constrain(round(v), 0, 255);
    return clamped.toString(16).padStart(2, '0').toUpperCase();
  };
  return `#${toHex(r)}${toHex(g)}${toHex(b)}`;
}
Line-by-line explanation (4 lines)

🔧 Subcomponents:

calculation Single Channel Converter const clamped = constrain(round(v), 0, 255);

Rounds and clamps a color channel value to a safe 0-255 integer before converting it to hexadecimal.

const toHex = (v) => {
Defines a small local arrow function that converts a single color channel (0-255) into a two-digit hex string.
const clamped = constrain(round(v), 0, 255);
Rounds the value to a whole number and clamps it between 0 and 255, protecting against any out-of-range or fractional pixel values.
return clamped.toString(16).padStart(2, '0').toUpperCase();
Converts the number to base-16 (hex), pads it with a leading zero if it's only one digit, and uppercases the letters for a standard hex look.
return `#${toHex(r)}${toHex(g)}${toHex(b)}`;
Combines the three converted channels into a single hex color string like #FF00CC, using a template literal.

📦 Key Variables

circles array

Stores the three circle objects (each with x, y, and r properties) representing the red, green, and blue draggable shapes.

let circles = [];
draggingIndex number

Tracks which circle (by array index) is currently being dragged; -1 means nothing is being dragged.

let draggingIndex = -1;
dragOffsetX number

Stores the horizontal distance between the mouse and a circle's center at the moment dragging starts, so the circle doesn't jump when grabbed.

let dragOffsetX = 0;
dragOffsetY number

Stores the vertical distance between the mouse and a circle's center at the moment dragging starts, keeping drags feeling natural.

let dragOffsetY = 0;

🔧 Potential Improvements (4)

Here are some ways this code could be enhanced:

BUG mousePressed()

draggingIndex is assigned twice - once to i and then again to circles.length - 1 after the splice/push - the first assignment is dead code that could confuse future readers.

💡 Remove the initial `draggingIndex = i;` line since it's immediately overwritten after the circle is moved to the end of the array.

PERFORMANCE draw()

get(cx, cy) reads pixel data back from the GPU framebuffer every single frame, which is a relatively expensive operation compared to normal drawing calls, especially on large canvases.

💡 Consider only re-sampling the pixel when circles have actually moved (e.g. during dragging or shortly after), rather than every frame regardless of whether anything changed.

STYLE draw() and initCircles()

Magic numbers like 150 (alpha), 0.25 (radius factor), and 0.7 (offset factor) are scattered inline without names explaining their purpose.

💡 Hoist these into named constants near the top of the file (e.g. const CIRCLE_ALPHA = 150;) so their intent is clear at a glance and they're easy to tune.

FEATURE mousePressed/mouseDragged

The sketch only handles mouse events, so it won't respond to touch input on phones or tablets.

💡 Add touchStarted(), touchMoved(), and touchEnded() functions (or reuse the same logic) so the color mixer works on touchscreens too.

🔄 Code Flow

Code flow showing setup, draw, initcircles, mousepressed, mousedragged, mousereleased, windowresized, rgbtohex

💡 Click on function names in the diagram to jump to their code

graph TD start[Start] --> setup[setup] setup --> initcircles[initcircles] initcircles --> draw[draw loop] draw --> red-circle[red-circle] draw --> color-sampling[color-sampling] draw --> crosshair-overlay[crosshair-overlay] red-circle --> push-red[push-red] draw --> hit-test-loop[hit-test-loop] hit-test-loop --> distance-check[distance-check] distance-check --> hit-test-loop draw --> mousedragged[mousedragged] draw --> mousereleased[mousereleased] draw --> windowresized[windowresized] draw --> rgbtohex[rgbtohex] rgbtohex --> tohex-arrow[tohex-arrow] click setup href "#fn-setup" click initcircles href "#fn-initcircles" click draw href "#fn-draw" click red-circle href "#sub-red-circle" click color-sampling href "#sub-color-sampling" click crosshair-overlay href "#sub-crosshair-overlay" click push-red href "#sub-push-red" click hit-test-loop href "#sub-hit-test-loop" click distance-check href "#sub-distance-check" click mousedragged href "#fn-mousedragged" click mousereleased href "#fn-mousereleased" click windowresized href "#fn-windowresized" click rgbtohex href "#fn-rgbtohex" click tohex-arrow href "#sub-tohex-arrow"

❓ Frequently Asked Questions

What visual experience does the AI Color Mixer Lab sketch provide?

The sketch creates a vibrant visualization of RGB color blending with three overlapping translucent circles, allowing users to see how colors mix in real-time.

How can users interact with the RGB Color Mixer Lab sketch?

Users can drag the colored circles around the canvas to change their positions, which alters the resulting color mixture displayed at the center.

What creative coding techniques are showcased in the AI Color Mixer Lab?

The sketch demonstrates additive color mixing using blend modes, along with real-time color sampling to display RGB and HEX values.

Preview

AI Color Mixer Lab - RGB Additive Blending Tool Learn color theory with interactive RGB mixing! Dra - p5.js creative coding sketch preview
Sketch Preview
Code flow diagram showing the structure of AI Color Mixer Lab - RGB Additive Blending Tool Learn color theory with interactive RGB mixing! Dra - Code flow showing setup, draw, initcircles, mousepressed, mousedragged, mousereleased, windowresized, rgbtohex
Code Flow Diagram