
AI Constellation Drawer - Create Your Own Star Patterns - xelsed.ai

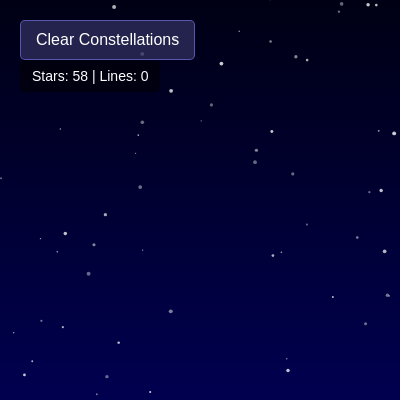
This sketch fills the screen with dozens of gently twinkling stars set against a deep blue gradient sky, and lets you click any two stars to draw a glowing white line between them - building your own constellation. Stars glow brighter under the mouse and while selected, and a subtle parallax effect makes the whole starfield drift as you move your cursor.

🧪 Try This!

Experiment with the code by making these changes:

  1. Fill the sky with far more stars — Raising the random range in generateStars() creates a much denser, busier starfield.
  2. Crank up the parallax depth — A larger parallaxStrength makes the whole sky shift much more dramatically as you move the mouse.
  3. Give constellation lines a golden glow — Changing the stroke color and alpha instantly recolors every connecting line drawn between stars.
  4. Speed up the twinkle — Increasing the frequency multiplier makes stars pulse noticeably faster and with a wider brightness range.
Prefer the full editor? Open it there →

📖 About This Sketch

This sketch turns the browser window into an interactive night sky filled with 50-80 twinkling stars, each pulsing at its own rhythm using a sine wave. Clicking any two stars draws a glowing constellation line between them, and hovering over a star makes it glow using p5's shadowBlur effect on the raw canvas context. A soft parallax effect shifts the whole starfield based on mouse position, and a linear gradient - built directly with the HTML5 Canvas API - gives the background smooth depth instead of a flat color.

The code is organized around a Star class that handles each star's position, twinkle animation, and hover/click detection, plus a handful of helper functions - generateStars(), clearConnections(), drawBackgroundGradient() - that setup() and draw() call every frame or on demand. Studying it teaches you how to combine classes, arrays of objects, mouse interaction, canvas gradients, and simple animation math (sin, map, dist) into one cohesive interactive drawing.

⚙️ How It Works

  1. When the page loads, setup() creates a full-window canvas, defines four gradient colors for the sky, and calls generateStars() to scatter 50-80 Star objects at random positions with random sizes
  2. Every frame, draw() first paints the gradient background, then loops through every star to update its hover state and re-draw it with a small parallax offset based on how far the mouse is from the canvas center
  3. Each Star's display() method uses sin(frameCount * 0.05 + alphaOffset) to smoothly oscillate its transparency, creating an independent twinkling rhythm for every star, and adds a glowing shadowBlur when hovered or selected
  4. draw() also loops through the connections array and draws a translucent white line between every pair of connected stars, applying the same parallax offset so lines move together with the stars
  5. When you click, mouseClicked() checks whether you hit the Clear button first, then checks every star's checkClick() distance test; the first star you click becomes 'selected' and glows, and clicking a second star creates a connection and pushes that pair into the connections array
  6. Clicking 'Clear Constellations' or resizing the window resets everything - clearConnections() empties the lines array, while windowResized() resizes the canvas and calls generateStars() to re-scatter a fresh set of stars

🎓 Concepts You'll Learn

Classes and objectsArrays of objectsMouse interaction and click detectionCanvas gradients via drawingContextSine wave animationpush()/pop() transformsDistance-based hit testing

📝 Code Breakdown

setup()

setup() runs once and is the perfect place to configure the canvas, precompute values like gradientColors that never change, and create any HTML UI elements you need before the animation loop starts.

function setup() {
  createCanvas(windowWidth, windowHeight);
  noStroke(); // Disable outlines for shapes
  colorMode(RGB); // Use RGB color mode

  // Define gradient colors (dark blue/black) for the background
  gradientColors = [
    color(0, 0, 20),   // Darkest blue/black
    color(0, 0, 40),   // Slightly lighter
    color(0, 0, 60),   // Even lighter
    color(0, 0, 80)    // Lightest blue/black
  ];

  generateStars(); // Populate the stars array

  // Create UI elements
  clearButton = createButton('Clear Constellations');
  clearButton.position(20, 20); // Position button in top-left
  clearButton.mousePressed(clearConnections); // Attach clear function
  clearButton.addClass('p5-button'); // Add CSS class for styling

  infoDiv = createDiv(`Stars: ${starCount} | Lines: ${lineCount}`);
  infoDiv.position(20, 60); // Position info below button
  infoDiv.addClass('p5-info'); // Add CSS class for styling
}
Line-by-line explanation (8 lines)
createCanvas(windowWidth, windowHeight);
Makes the canvas fill the entire browser window.
noStroke();
Turns off shape outlines globally so circles and rects draw with fill only by default.
colorMode(RGB);
Explicitly sets the color mode to RGB (the default), used for clarity.
gradientColors = [ ... ];
Builds an array of four color() objects that go from very dark blue to lighter blue, used later to paint the sky gradient.
generateStars();
Calls the helper function that fills the stars array with new Star objects at random positions.
clearButton = createButton('Clear Constellations');
Creates an HTML button element using p5's DOM API.
clearButton.mousePressed(clearConnections);
Wires the button up so clicking it calls clearConnections(), wiping all constellation lines.
infoDiv = createDiv(`Stars: ${starCount} | Lines: ${lineCount}`);
Creates a text div showing the current star and line counts, using a template literal to insert the numbers.
draw()

draw() is the animation heartbeat, running ~60 times per second. Here it demonstrates how push()/translate()/pop() lets you offset individual objects without disturbing the rest of the scene - a core technique for parallax and camera-like effects.

🔬 This block moves each star slightly based on the mouse position. What happens visually if you multiply parallaxX and parallaxY by -1 before using them - does the sky push away from the mouse instead of following it?

    let parallaxX = (mouseX - width / 2) * parallaxStrength;
    let parallaxY = (mouseY - height / 2) * parallaxStrength;

    // Apply parallax to the star's displayed position using translate
    // push() and pop() ensure the translation only affects the current star
    push();
    translate(parallaxX, parallaxY);
    star.display();
    pop();
function draw() {
  drawBackgroundGradient(); // Draw the gradient background

  // Update and display stars
  for (let star of stars) {
    // Check for hover state
    star.isHovered = star.checkHover(mouseX, mouseY);

    // Calculate parallax effect based on mouse position
    // The offset is proportional to how far the mouse is from the canvas center
    let parallaxX = (mouseX - width / 2) * parallaxStrength;
    let parallaxY = (mouseY - height / 2) * parallaxStrength;

    // Apply parallax to the star's displayed position using translate
    // push() and pop() ensure the translation only affects the current star
    push();
    translate(parallaxX, parallaxY);
    star.display();
    pop();
  }

  // Draw connections (constellation lines)
  stroke(255, 150); // White color with slight transparency (150 out of 255)
  strokeWeight(1); // Thin lines
  for (let pair of connections) {
    // Apply parallax to lines as well for consistency
    let parallaxX = (mouseX - width / 2) * parallaxStrength;
    let parallaxY = (mouseY - height / 2) * parallaxStrength;
    line(
      pair[0].x + parallaxX, pair[0].y + parallaxY,
      pair[1].x + parallaxX, pair[1].y + parallaxY
    );
  }
  noStroke(); // Disable stroke after drawing lines

  // Update info display
  infoDiv.html(`Stars: ${starCount} | Lines: ${lineCount}`);
}
Line-by-line explanation (8 lines)

🔧 Subcomponents:

for-loop Star Update & Parallax Draw for (let star of stars) { ... push(); translate(parallaxX, parallaxY); star.display(); pop(); }

Updates each star's hover state and redraws it shifted slightly based on mouse position for the parallax effect.

for-loop Constellation Line Drawing for (let pair of connections) { ... line(pair[0].x + parallaxX, pair[0].y + parallaxY, pair[1].x + parallaxX, pair[1].y + parallaxY); }

Draws a line between every connected pair of stars, applying the same parallax offset used for the stars themselves.

drawBackgroundGradient();
Repaints the gradient sky every frame, clearing the previous frame's drawing.
star.isHovered = star.checkHover(mouseX, mouseY);
Checks if the mouse is near this star and stores the result so display() knows whether to glow.
let parallaxX = (mouseX - width / 2) * parallaxStrength;
Calculates a horizontal offset proportional to how far the mouse is from the center, scaled down by parallaxStrength.
push(); translate(parallaxX, parallaxY); star.display(); pop();
Temporarily shifts the drawing origin so this one star is drawn slightly offset, then restores the original origin with pop() so it doesn't affect anything else.
stroke(255, 150); // White color with slight transparency (150 out of 255)
Sets the line color to semi-transparent white for all constellation lines drawn after this point.
line(pair[0].x + parallaxX, pair[0].y + parallaxY, pair[1].x + parallaxX, pair[1].y + parallaxY);
Draws a straight line between the two connected stars' positions, each nudged by the same parallax offset.
noStroke();
Turns stroke back off so it doesn't accidentally outline stars drawn next frame.
infoDiv.html(`Stars: ${starCount} | Lines: ${lineCount}`);
Updates the on-screen text every frame to reflect the current counts.

generateStars()

generateStars() shows the common 'reset and repopulate' pattern: clear all relevant arrays and counters first, then use a for-loop to build a fresh set of objects - useful whenever you need to regenerate a scene from scratch.

🔬 This creates each star at a fully random position and size. What happens if you change random(1, 4) to random(1, 15) - do a few 'giant stars' start standing out among the tiny ones?

    let x = random(width);
    let y = random(height);
    // Random size between 1 and 4 pixels
    let size = random(1, 4);
    stars.push(new Star(x, y, size));
    starCount++;
function generateStars() {
  stars = []; // Clear existing stars
  connections = []; // Clear existing connections
  starCount = 0;
  lineCount = 0;
  selectedStar = null; // Clear selected star
  // Also clear selection highlighting on all stars, just in case
  for (let star of stars) {
    star.isSelected = false;
  }

  // Random number of stars between 50 and 80
  let numStars = floor(random(50, 81));

  for (let i = 0; i < numStars; i++) {
    // Random position within the canvas boundaries
    let x = random(width);
    let y = random(height);
    // Random size between 1 and 4 pixels
    let size = random(1, 4);
    stars.push(new Star(x, y, size));
    starCount++;
  }
}
Line-by-line explanation (5 lines)

🔧 Subcomponents:

for-loop Star Creation Loop for (let i = 0; i < numStars; i++) { ... stars.push(new Star(x, y, size)); starCount++; }

Creates numStars new Star objects at random positions and sizes, adding each to the stars array.

stars = []; // Clear existing stars
Empties the stars array, discarding any previously generated stars.
let numStars = floor(random(50, 81));
Picks a random whole number of stars between 50 and 80 (floor() rounds down a decimal random value).
let x = random(width);
Chooses a random horizontal position anywhere across the canvas width.
let size = random(1, 4);
Gives each star a random diameter between 1 and 4 pixels, so stars vary slightly in size.
stars.push(new Star(x, y, size));
Creates a new Star object with this position/size and adds it to the stars array.

clearConnections()

This function is attached to the Clear button via clearButton.mousePressed(clearConnections) in setup() - a common p5.js pattern for wiring DOM elements to sketch logic.

function clearConnections() {
  connections = []; // Empty the connections array
  selectedStar = null; // De-select any active star
  lineCount = 0;
  // Also clear selection highlighting on all stars
  for (let star of stars) {
    star.isSelected = false;
  }
}
Line-by-line explanation (3 lines)

🔧 Subcomponents:

for-loop Deselect All Stars for (let star of stars) { star.isSelected = false; }

Removes the glow highlight from every star since all connections and selections are being reset.

connections = []; // Empty the connections array
Discards every stored line pair, instantly removing all drawn constellation lines next frame.
selectedStar = null; // De-select any active star
Clears any in-progress connection so the next click starts a fresh selection.
for (let star of stars) { star.isSelected = false; }
Loops through every star and turns off its highlighted/selected glow, since the visual selection state is stored on each Star object.

mouseClicked()

mouseClicked() is a built-in p5.js callback that fires once per click, separate from mousePressed() which fires on the mouse-down event. Using a selectedStar variable to remember state between clicks is a simple but powerful pattern for multi-step interactions.

🔬 This loop stops at the FIRST star close enough to your click, even if a closer one exists later in the array. What would happen if you removed the break so it kept checking - could clickedStar end up being a different, later star in the array instead?

  let clickedStar = null;
  for (let star of stars) {
    if (star.checkClick(mouseX, mouseY)) {
      clickedStar = star;
      break; // Found a star, exit loop
    }
  }
function mouseClicked() {
  // Check if click was on the clear button using its position and size
  if (mouseX > clearButton.x && mouseX < clearButton.x + clearButton.width &&
      mouseY > clearButton.y && mouseY < clearButton.y + clearButton.height) {
    return; // Do nothing if the button was clicked, its own handler will fire
  }

  // Find if a star was clicked
  let clickedStar = null;
  for (let star of stars) {
    if (star.checkClick(mouseX, mouseY)) {
      clickedStar = star;
      break; // Found a star, exit loop
    }
  }

  if (clickedStar) {
    // If a star was clicked
    if (selectedStar === null) {
      // This is the first star selected for a connection
      selectedStar = clickedStar;
      selectedStar.isSelected = true; // Highlight it
    } else if (selectedStar === clickedStar) {
      // Same star clicked again, de-select it
      selectedStar.isSelected = false; // De-highlight
      selectedStar = null;
    } else {
      // This is the second star selected, create a connection
      connections.push([selectedStar, clickedStar]); // Store the pair of star objects
      lineCount++;
      selectedStar.isSelected = false; // De-highlight the first star
      clickedStar.isSelected = false; // De-highlight the second star immediately after connection
      selectedStar = null; // Reset selection for the next connection
    }
  }
}
Line-by-line explanation (5 lines)

🔧 Subcomponents:

conditional Ignore Clicks On The Button if (mouseX > clearButton.x && mouseX < clearButton.x + clearButton.width && ...) { return; }

Prevents a click on the Clear button from also being interpreted as a click on a nearby star.

for-loop Find Clicked Star for (let star of stars) { if (star.checkClick(mouseX, mouseY)) { clickedStar = star; break; } }

Loops through all stars to find the first one close enough to the click point.

conditional Selection / Connection Logic if (selectedStar === null) { ... } else if (selectedStar === clickedStar) { ... } else { ... }

Implements a simple state machine: first click selects a star, clicking it again deselects it, and clicking a different star creates a connecting line.

if (mouseX > clearButton.x && ... ) { return; }
Checks if the click coordinates fall within the Clear button's rectangle, and if so exits early so no star gets selected.
for (let star of stars) { if (star.checkClick(mouseX, mouseY)) { clickedStar = star; break; } }
Tests every star's checkClick() distance test until it finds one under the click, then stops searching with break.
if (selectedStar === null) { selectedStar = clickedStar; selectedStar.isSelected = true; }
If no star was previously selected, this click becomes the starting point of a new line and gets highlighted.
} else if (selectedStar === clickedStar) { selectedStar.isSelected = false; selectedStar = null; }
Clicking the same star twice cancels the selection instead of connecting a star to itself.
connections.push([selectedStar, clickedStar]); lineCount++;
Stores the pair of stars as a new connection (an array of two Star objects) and increments the line counter for the info display.

touchStarted()

touchStarted() is p5.js's touch equivalent of mouseClicked(), meant to mirror the same interaction for mobile devices. This is a great example of how an early return statement can silently disable an entire function - always double check where 'return' sits relative to the logic you want to run.

function touchStarted() {
  // Prevent default browser behavior like scrolling or zooming
  // This is crucial for touch interactions on mobile
  return false;

  // Check if touch was on the clear button
  if (touchX > clearButton.x && touchX < clearButton.x + clearButton.width &&
      touchY > clearButton.y && touchY < clearButton.y + clearButton.height) {
    return; // Do nothing if the button was touched, its own handler will fire
  }

  // Find if a star was touched
  let touchedStar = null;
  for (let star of stars) {
    if (star.checkClick(touchX, touchY)) {
      touchedStar = star;
      break; // Found a star, exit loop
    }
  }

  if (touchedStar) {
    // If a star was touched
    if (selectedStar === null) {
      // First star selected
      selectedStar = touchedStar;
      selectedStar.isSelected = true; // Highlight
    } else if (selectedStar === touchedStar) {
      // Same star touched again, de-select
      selectedStar.isSelected = false; // De-highlight
      selectedStar = null;
    } else {
      // Second star selected, create connection
      connections.push([selectedStar, touchedStar]);
      lineCount++;
      selectedStar.isSelected = false; // De-highlight first star
      touchedStar.isSelected = false; // De-highlight second star immediately after connection
      selectedStar = null; // Reset selection
    }
  }
}
Line-by-line explanation (3 lines)

🔧 Subcomponents:

conditional Unreachable Code After Return return false;

Intended to stop default mobile browser gestures, but placed before any touch-handling logic, so everything below it never runs.

return false;
This immediately exits the function on every touch. Because it's the very first statement, none of the code below it - including the star-selection logic - ever executes.
if (touchX > clearButton.x && ...) { return; }
Meant to skip star-selection when the Clear button is touched, but this line is unreachable due to the early return above.
for (let star of stars) { if (star.checkClick(touchX, touchY)) { touchedStar = star; break; } }
Would find the touched star using the same distance test as mouseClicked(), but never runs in the current code.

drawBackgroundGradient()

This function shows how to drop down to the raw Canvas 2D API (via p5's drawingContext) to access features p5.js doesn't wrap directly, like linear gradients - a useful escape hatch when p5's built-in drawing functions aren't enough.

🔬 This array (defined in setup) controls every color drawBackgroundGradient() blends between. What happens if you swap one color for something like color(40, 0, 60) - does the sky take on a purple tint at that band?

  gradientColors = [
    color(0, 0, 20),   // Darkest blue/black
    color(0, 0, 40),   // Slightly lighter
    color(0, 0, 60),   // Even lighter
    color(0, 0, 80)    // Lightest blue/black
  ];
function drawBackgroundGradient() {
  // Loop through gradient colors to create smooth transitions
  for (let i = 0; i < gradientColors.length - 1; i++) {
    // Calculate the y-coordinate for the top and bottom of each gradient segment
    // map() converts the index 'i' (from 0 to gradientColors.length-2) to a y-coordinate (from 0 to height)
    let y1 = map(i, 0, gradientColors.length - 1, 0, height);
    let y2 = map(i + 1, 0, gradientColors.length - 1, 0, height);

    // Create a linear gradient object using the raw drawing context
    // It goes from (0, y1) to (0, y2), creating a vertical gradient
    let gradient = drawingContext.createLinearGradient(0, y1, 0, y2);

    // Add the starting color to the gradient at position 0 (top)
    gradient.addColorStop(0, gradientColors[i]);
    // Add the ending color to the gradient at position 1 (bottom)
    gradient.addColorStop(1, gradientColors[i + 1]);

    // Set the fill style to our newly created gradient
    drawingContext.fillStyle = gradient;

    // Draw a rectangle covering the current gradient segment
    rect(0, y1, width, y2 - y1);
  }
}
Line-by-line explanation (5 lines)

🔧 Subcomponents:

for-loop Gradient Segment Loop for (let i = 0; i < gradientColors.length - 1; i++) { ... rect(0, y1, width, y2 - y1); }

Draws one smooth vertical gradient rectangle between each consecutive pair of colors in gradientColors, stacking them to form the full sky.

let y1 = map(i, 0, gradientColors.length - 1, 0, height);
Converts the color index into a y-coordinate, so the first color starts at the top (y=0) and the last color ends at the bottom (y=height).
let gradient = drawingContext.createLinearGradient(0, y1, 0, y2);
Uses the raw HTML5 Canvas 2D context (accessible in p5 via drawingContext) to create a gradient object that transitions vertically between y1 and y2.
gradient.addColorStop(0, gradientColors[i]);
Sets the gradient's starting color, at position 0 (the top of this segment).
drawingContext.fillStyle = gradient;
Tells the canvas to use this gradient (instead of a flat color) for the next shape it fills.
rect(0, y1, width, y2 - y1);
Draws a rectangle spanning the full width and this segment's height, filled with the gradient just created.

windowResized()

windowResized() is a built-in p5.js callback fired automatically whenever the browser window changes size, letting you keep full-window sketches responsive.

function windowResized() {
  resizeCanvas(windowWidth, windowHeight);
  // Re-generate stars to fit the new window size
  generateStars();
}
Line-by-line explanation (2 lines)
resizeCanvas(windowWidth, windowHeight);
Resizes the canvas to match the browser window's new dimensions whenever it's resized.
generateStars();
Regenerates a fresh set of stars sized for the new canvas dimensions, since the old star positions may no longer fit or look well-distributed.

Star.display()

display() is called once per star per frame from draw()'s star loop. It demonstrates combining trigonometric animation (sin) with canvas-level effects (shadowBlur) that p5.js doesn't provide shortcuts for.

🔬 This glow only triggers on hover or selection. What happens if you change the condition to just 'true' so every star glows all the time?

    if (this.isHovered || this.isSelected) {
      // drawingContext is the raw WebGL/Canvas2D context
      // shadowBlur creates a blur effect around the shape
      drawingContext.shadowBlur = this.size * 2; // Adjust glow intensity based on star size
      drawingContext.shadowColor = 'rgba(255, 255, 255, 0.8)'; // White glow
    } else {
      drawingContext.shadowBlur = 0; // No glow
    }
  display() {
    // Calculate alpha for twinkling effect
    // sin() creates a smooth oscillation between -1 and 1
    // map() converts this to an alpha value between 100 and 200 (semi-transparent white)
    let alpha = map(sin(frameCount * 0.05 + this.alphaOffset), -1, 1, 100, 200);
    fill(255, alpha); // White color with dynamic transparency

    // Apply glow effect if hovered or selected
    if (this.isHovered || this.isSelected) {
      // drawingContext is the raw WebGL/Canvas2D context
      // shadowBlur creates a blur effect around the shape
      drawingContext.shadowBlur = this.size * 2; // Adjust glow intensity based on star size
      drawingContext.shadowColor = 'rgba(255, 255, 255, 0.8)'; // White glow
    } else {
      drawingContext.shadowBlur = 0; // No glow
    }

    // Draw the star as a circle
    circle(this.x, this.y, this.size);

    // Reset shadow blur to 0 to prevent it from affecting other drawings
    // It's good practice to reset drawing styles after applying them locally
    drawingContext.shadowBlur = 0;
  }
Line-by-line explanation (5 lines)

🔧 Subcomponents:

conditional Hover/Selected Glow if (this.isHovered || this.isSelected) { drawingContext.shadowBlur = this.size * 2; ... } else { drawingContext.shadowBlur = 0; }

Adds a soft white glow around a star when the mouse hovers it or it's selected for a connection, and removes the glow otherwise.

let alpha = map(sin(frameCount * 0.05 + this.alphaOffset), -1, 1, 100, 200);
Uses sin() with frameCount (which always increases) to produce a smooth wave between -1 and 1, then map() rescales that wave into an alpha (transparency) value between 100 and 200. Because each star has its own alphaOffset, they all twinkle out of sync.
fill(255, alpha); // White color with dynamic transparency
Sets the fill color to white with the twinkling alpha value calculated above.
drawingContext.shadowBlur = this.size * 2; // Adjust glow intensity based on star size
Directly sets the canvas shadow blur radius, scaled to the star's size, so bigger stars get a bigger glow.
circle(this.x, this.y, this.size);
Draws the star itself as a simple circle at its stored position and size.
drawingContext.shadowBlur = 0;
Resets the shadow blur back to zero after drawing so it doesn't leak into whatever gets drawn next (a common cleanup step when touching raw context properties).

Star.checkHover()

This method encapsulates hit-testing logic inside the Star class itself, so draw() can simply ask 'star.checkHover(mouseX, mouseY)' without needing to know how the distance math works.

  checkHover(px, py) {
    // dist() calculates the distance between two points
    // The tolerance is this.size + 10, meaning it glows when mouse is within 10px of its edge
    return dist(px, py, this.x, this.y) < this.size + 10;
  }
Line-by-line explanation (1 lines)
return dist(px, py, this.x, this.y) < this.size + 10;
dist() computes the straight-line distance between the given point (usually the mouse) and the star's center; if it's less than the star's radius plus 10 pixels, the mouse counts as 'hovering' this star.

Star.checkClick()

Using a fixed generous click radius (rather than just this.size) is a common usability trick - it makes tiny 1-4 pixel stars practical to click on without needing to be pixel-perfect.

  checkClick(px, py) {
    // The tolerance for clicking is 20px from the star's center
    return dist(px, py, this.x, this.y) < 20;
  }
Line-by-line explanation (1 lines)
return dist(px, py, this.x, this.y) < 20;
Returns true if the clicked point is within a fixed 20-pixel radius of the star's center, giving even tiny stars a comfortably large click target.

📦 Key Variables

stars array

Holds every Star object currently on screen; rebuilt by generateStars() and looped over every frame in draw().

let stars = [];
connections array

Stores each constellation line as a two-element array of [starA, starB], used by draw() to render lines between stars.

let connections = [];
selectedStar object

Remembers which star was clicked first while the user is in the middle of creating a connection; null when nothing is selected.

let selectedStar = null;
clearButton object

Reference to the p5.js DOM button element used to clear all constellation lines.

let clearButton;
infoDiv object

Reference to the p5.js DOM div that displays the current star and line counts.

let infoDiv;
starCount number

Tracks how many stars currently exist, shown in the info display.

let starCount = 0;
lineCount number

Tracks how many constellation lines have been drawn, shown in the info display.

let lineCount = 0;
gradientColors array

Holds the four colors used to build the vertical sky gradient in drawBackgroundGradient().

let gradientColors = [];
parallaxStrength number

Multiplier controlling how strongly the starfield shifts in response to mouse movement, creating the parallax depth effect.

let parallaxStrength = 0.01;

🔧 Potential Improvements (4)

Here are some ways this code could be enhanced:

BUG touchStarted()

The very first line, 'return false;', exits the function immediately, so every line of touch-selection logic below it - including finding the touched star and creating connections - is completely unreachable dead code.

💡 Move the 'return false;' to the end of the function (or restructure to run the logic first and return false at the very end) so touch devices can actually select stars and draw constellations, matching mouseClicked()'s behavior.

BUG generateStars()

Right after 'stars = [];' empties the array, the code loops 'for (let star of stars) { star.isSelected = false; }' - but stars is already empty at that point, so this loop always does nothing.

💡 Remove this leftover loop entirely, since it has no effect; the intended cleanup already happens naturally because the array itself was cleared.

PERFORMANCE drawBackgroundGradient()

This function creates a brand-new canvas gradient object and calls addColorStop() multiple times, every single frame (60 times per second), even though gradientColors never change unless the window is resized.

💡 Render the gradient once into an offscreen createGraphics() buffer in setup() (and again in windowResized()), then simply image() that buffer each frame in draw() instead of rebuilding the gradient from scratch every frame.

FEATURE mouseClicked() / clearConnections()

Users can only clear ALL constellation lines at once; there's no way to remove a single mistaken connection without starting over completely.

💡 Add logic (e.g. on right-click) that finds the nearest line to the click point and removes just that pair from the connections array, giving users finer control while sketching.

🔄 Code Flow

Code flow showing setup, draw, generatestars, clearconnections, mouseclicked, touchstarted, drawbackgroundgradient, windowresized, display, checkhover, checkclick

💡 Click on function names in the diagram to jump to their code

graph TD start[Start] --> setup[setup] setup --> draw[draw loop] draw --> star-update-loop[Star Update & Parallax Draw] draw --> connections-loop[Constellation Line Drawing] draw --> gradient-segment-loop[Gradient Segment Loop] star-update-loop --> glow-conditional[Hover/Selected Glow] star-update-loop --> deselect-loop[Deselect All Stars] deselect-loop --> selection-state-machine[Selection / Connection Logic] selection-state-machine --> button-check[Ignore Clicks On The Button] button-check --> find-star-loop[Find Clicked Star] find-star-loop --> checkclick[checkclick] find-star-loop --> checkhover[checkhover] connections-loop --> glow-conditional gradient-segment-loop --> drawbackgroundgradient[drawbackgroundgradient] drawbackgroundgradient --> draw click setup href "#fn-setup" click draw href "#fn-draw" click star-update-loop href "#sub-star-update-loop" click connections-loop href "#sub-connections-loop" click gradient-segment-loop href "#sub-gradient-segment-loop" click glow-conditional href "#sub-glow-conditional" click deselect-loop href "#sub-deselect-loop" click selection-state-machine href "#sub-selection-state-machine" click button-check href "#sub-button-check" click find-star-loop href "#sub-find-star-loop" click checkclick href "#fn-checkclick" click checkhover href "#fn-checkhover"

❓ Frequently Asked Questions

What visual experience does the AI Constellation Drawer provide?

The sketch creates a dynamic night sky where users can draw their own constellations by connecting twinkling stars with lines.

How can users interact with the AI Constellation Drawer sketch?

Users can click on stars to connect them, watch them twinkle, and clear the canvas to start over anytime.

What creative coding concept is demonstrated in the AI Constellation Drawer?

It showcases the use of object-oriented programming by implementing a Star class that encapsulates properties and behaviors for creating interactive visual elements.

Preview

AI Constellation Drawer - Create Your Own Star Patterns - xelsed.ai - p5.js creative coding sketch preview
Sketch Preview
Code flow diagram showing the structure of AI Constellation Drawer - Create Your Own Star Patterns - xelsed.ai - Code flow showing setup, draw, generatestars, clearconnections, mouseclicked, touchstarted, drawbackgroundgradient, windowresized, display, checkhover, checkclick
Code Flow Diagram