AI Flow Field - Perlin Noise Particle Trails Mesmerizing generative art using Perlin noise flow fie

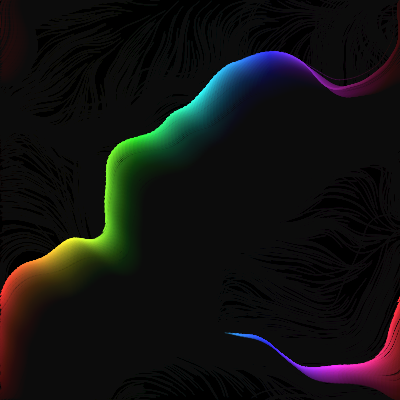
This sketch fills the screen with 2000 tiny particles that drift along an invisible, ever-shifting Perlin noise flow field. Each particle leaves a thin colored trail behind it, and because the field slowly evolves over time, the whole canvas fills with swirling, silk-like ribbons of hue that never quite repeat.

🧪 Try This!

Experiment with the code by making these changes:

  1. Shorten the trails — Raising the background alpha clears more of the previous frame each time, making trails shorter and crisper.
  2. Make the flow field evolve faster — A bigger noiseStep shifts the noise field further every frame, making the swirling pattern morph and churn much more quickly.
  3. Crank up the flow strength — Increasing flowStrength makes particles react much more forcefully to the noise field, creating sharper, faster curves.
  4. Thin out the particle swarm — Fewer particles means you can see each individual trail more clearly instead of a dense colorful mass.
Prefer the full editor? Open it there →

📖 About This Sketch

This sketch creates a mesmerizing generative art piece where thousands of particles are pushed around by an invisible 'flow field' built from Perlin noise. Instead of random jittery motion, noise() produces smooth, organic angles at every point in space, so nearby particles drift together in swirling currents rather than scattering chaotically. The trails you see are created by drawing a nearly-transparent black rectangle over the canvas every frame instead of fully clearing it, and the rainbow coloring comes from mapping each particle's horizontal position to a hue in HSB color mode.

The code is organized around a global array of Particle objects, a setup() that creates the canvas and populates that array, and a draw() loop that ticks the noise field forward and updates/draws every particle each frame. The real logic lives inside the Particle class: its update() method samples noise() at the particle's position to get a flow direction, turns that into a force vector, and integrates it into velocity and position - the classic 'acceleration → velocity → position' physics pattern used throughout creative coding. Studying this sketch teaches you how to build particle systems, how to use p5.Vector for physics-style motion, and how a single noise field can drive the behavior of thousands of independent objects at once.

⚙️ How It Works

  1. On load, setup() creates a full-window canvas, switches to HSB color mode for easy hue control, paints an initial black background, and creates 2000 Particle objects at random positions.
  2. Every frame, draw() paints a nearly-transparent black rectangle over everything (instead of a solid background), which is what causes old particle positions to fade into trails rather than vanish instantly.
  3. draw() also nudges a global noiseOffset value forward slightly, which will shift the entire noise field over time so the flow pattern gradually morphs instead of staying frozen.
  4. For every particle, update() looks up a Perlin noise value at that particle's (x, y) position (offset by noiseOffset), converts that 0-1 noise value into an angle between 0 and 2π, and builds a force vector pointing in that direction.
  5. That force is added to the particle's acceleration, which is added to its velocity (capped at maxSpeed), which is added to its position - classic vector-based motion - and then show() draws a short colored line from the particle's old position to its new one.
  6. Clicking the mouse (mousePressed) or resizing the window (windowResized) picks a brand new noise seed, clears the canvas, and rebuilds all the particles from scratch, giving you an entirely new flow pattern on demand.

🎓 Concepts You'll Learn

Perlin noise flow fieldsParticle systems with classesp5.Vector physics (acceleration/velocity/position)HSB color modeTrail effects via alpha blendingScreen wrapping / boundary handlingResponsive canvas resizing

📝 Code Breakdown

setup()

setup() runs exactly once when the sketch starts. It's the right place to configure the canvas, set color modes, and build any starting arrays of objects like the particle swarm here.

function setup() {
  createCanvas(windowWidth, windowHeight); // Create a canvas that fills the browser window
  colorMode(HSB, 255);                     // Use HSB color mode for easier hue manipulation
  background(0);                           // Initial dark background

  // Optional: Adjust noise detail for different patterns
  // noiseDetail(4); // Default is 8, lower values are smoother, higher values are more detailed

  // Initialize particles
  for (let i = 0; i < numParticles; i++) {
    particles.push(new Particle());
  }

  // Set an initial random noise seed for a unique pattern
  noiseSeed(random(10000));
}
Line-by-line explanation (6 lines)

🔧 Subcomponents:

for-loop Particle Initialization Loop for (let i = 0; i < numParticles; i++) {

Creates numParticles new Particle objects and stores them in the global particles array

createCanvas(windowWidth, windowHeight); // Create a canvas that fills the browser window
Creates a canvas that exactly matches the browser window size, so the sketch fills the whole screen.
colorMode(HSB, 255); // Use HSB color mode for easier hue manipulation
Switches p5's color system from default RGB to Hue-Saturation-Brightness, with all three channels ranging 0-255, which makes rainbow color cycling much easier to write.
background(0); // Initial dark background
Paints the canvas solid black once at the start, so the very first frame doesn't show old/garbage pixels.
for (let i = 0; i < numParticles; i++) {
Loops numParticles (2000) times to build the initial swarm of particles.
particles.push(new Particle());
Creates a new Particle object using the class defined below and adds it to the global particles array.
noiseSeed(random(10000));
Picks a random seed for Perlin noise so every time you reload the page, the flow field pattern looks different.

draw()

draw() runs continuously (about 60 times per second) after setup(). Because it never clears the canvas completely, it's a great example of using transparency to create motion trails instead of frame-by-frame erasing.

🔬 This loop updates then draws every particle, in that order. What do you think happens visually if you call particle.show() before particle.update() - will the trail look ahead of or behind the particle's real motion?

  for (let particle of particles) {
    particle.update();
    particle.show();
  }
function draw() {
  // Draw a semi-transparent dark background to create fading trails
  // The alpha value (10) controls the length of the trails
  background(0, 10);

  // Update noiseOffset to make the flow field gradually change over time
  noiseOffset += noiseStep;

  // Update and display each particle
  for (let particle of particles) {
    particle.update();
    particle.show();
  }
}
Line-by-line explanation (5 lines)

🔧 Subcomponents:

for-loop Update & Draw Loop for (let particle of particles) {

Runs the physics update and drawing step for every single particle, once per frame

background(0, 10);
Draws a black rectangle over the whole canvas but with only 10 out of 255 alpha (very transparent), so old drawings fade slowly instead of disappearing instantly - this is what creates the glowing trail effect.
noiseOffset += noiseStep;
Increases the global noise offset a tiny bit every frame, which shifts the entire noise field over time so the flow pattern slowly morphs instead of staying frozen forever.
for (let particle of particles) {
Loops through every particle in the array using a for-of loop, which is a clean way to iterate without needing an index variable.
particle.update();
Calls the particle's own update() method, which samples the noise field and moves the particle accordingly.
particle.show();
Calls the particle's own show() method, which draws a short colored line representing the particle's current motion.

Particle (class)

This class encapsulates everything one particle needs to know about itself: its own position, velocity, acceleration, and speed limit. Bundling state and behavior together like this is core object-oriented design, and it's what lets draw() manage 2000 independent 'agents' with just a two-line loop.

🔬 This code teleports particles to the opposite edge when they leave the canvas. What happens if you replace the teleport with a random respawn, like this.pos = createVector(random(width), random(height))?

    if (this.pos.x > width) this.pos.x = 0;
    if (this.pos.x < 0) this.pos.x = width;
    if (this.pos.y > height) this.pos.y = 0;
    if (this.pos.y < 0) this.pos.y = height;

🔬 Right now noise output maps to a FULL circle of directions (0 to TWO_PI). What do you think happens to the flow pattern if you map it to only half a circle, 0 to PI, so particles can never point 'backwards'?

    let angle = noise(
      this.pos.x * noiseScale + noiseOffset,
      this.pos.y * noiseScale + noiseOffset
    );

    // Map the noise value (0 to 1) to a full circle (0 to 2π radians)
    angle = map(angle, 0, 1, 0, TWO_PI);
class Particle {
  constructor() {
    // Random initial position within the canvas
    this.pos = createVector(random(width), random(height));
    this.vel = createVector(0, 0); // Initial velocity
    this.acc = createVector(0, 0); // Initial acceleration
    this.maxSpeed = 4;             // Maximum speed of the particle
  }

  update() {
    // Calculate the noise value at the particle's current position
    // We add noiseOffset to the x and y coordinates to make the noise field evolve
    let angle = noise(
      this.pos.x * noiseScale + noiseOffset,
      this.pos.y * noiseScale + noiseOffset
    );

    // Map the noise value (0 to 1) to a full circle (0 to 2π radians)
    angle = map(angle, 0, 1, 0, TWO_PI);

    // Create a force vector based on the angle
    let force = p5.Vector.fromAngle(angle);

    // Scale the force by the flowStrength
    force.mult(flowStrength);

    // Apply the force to the particle's acceleration
    this.acc.add(force);

    // Update velocity and position
    this.vel.add(this.acc);
    this.vel.limit(this.maxSpeed); // Limit the velocity to prevent particles from moving too fast
    this.pos.add(this.vel);

    // Reset acceleration for the next frame
    this.acc.mult(0);

    // Wrap particles around the canvas edges
    if (this.pos.x > width) this.pos.x = 0;
    if (this.pos.x < 0) this.pos.x = width;
    if (this.pos.y > height) this.pos.y = 0;
    if (this.pos.y < 0) this.pos.y = height;
  }

  show() {
    // Set stroke weight and color
    strokeWeight(1);
    noFill();

    // Map the particle's x position to a hue value (0-255)
    // This creates the colorful trails
    let hue = map(this.pos.x, 0, width, 0, 255);
    // Set stroke color with hue, high saturation, high brightness, and semi-transparent alpha
    stroke(hue, 200, 255, 100);

    // Draw a short line segment in the direction of the particle's velocity
    // This creates a more visible trail than just a point
    line(this.pos.x, this.pos.y, this.pos.x - this.vel.x, this.pos.y - this.vel.y);
  }
}
Line-by-line explanation (16 lines)

🔧 Subcomponents:

calculation Constructor / Initial State this.pos = createVector(random(width), random(height));

Gives each new particle a random starting position and zeroed velocity/acceleration vectors

calculation Noise-to-Angle Conversion angle = map(angle, 0, 1, 0, TWO_PI);

Converts the raw 0-1 noise value sampled at the particle's position into a full-circle direction angle

conditional Edge Wrapping if (this.pos.x > width) this.pos.x = 0;

Teleports particles that leave one edge of the canvas back to the opposite edge, keeping them on screen forever

this.pos = createVector(random(width), random(height));
Creates a p5.Vector for position and gives the particle a random spot anywhere on the canvas.
this.vel = createVector(0, 0); // Initial velocity
Starts the particle with zero velocity - it will speed up gradually as forces are applied.
this.maxSpeed = 4; // Maximum speed of the particle
Stores a speed cap unique to this particle, used later to prevent runaway acceleration.
let angle = noise( this.pos.x * noiseScale + noiseOffset, this.pos.y * noiseScale + noiseOffset );
Samples Perlin noise using the particle's scaled position (plus the global time offset) as coordinates, returning a smooth value between 0 and 1 that's similar for nearby points.
angle = map(angle, 0, 1, 0, TWO_PI);
Rescales that 0-1 noise value into a full rotation (0 to 2π radians) so it can be used as a direction.
let force = p5.Vector.fromAngle(angle);
Builds a unit-length vector pointing in that direction using p5's built-in vector helper.
force.mult(flowStrength);
Scales the force vector's magnitude by flowStrength, making the push stronger or weaker.
this.acc.add(force);
Adds the flow force to the particle's acceleration for this frame.
this.vel.add(this.acc);
Integrates acceleration into velocity - the standard 'accelerate then move' physics pattern.
this.vel.limit(this.maxSpeed); // Limit the velocity to prevent particles from moving too fast
Clamps the velocity vector's length so particles never exceed maxSpeed, keeping motion controlled.
this.pos.add(this.vel);
Integrates velocity into position, actually moving the particle.
this.acc.mult(0);
Resets acceleration to zero so forces don't accumulate forever across frames.
if (this.pos.x > width) this.pos.x = 0;
If the particle drifts off the right edge, it reappears on the left edge, creating an infinite wrap-around canvas.
let hue = map(this.pos.x, 0, width, 0, 255);
Maps the particle's horizontal position to a hue value, so color shifts smoothly from left to right across the screen.
stroke(hue, 200, 255, 100);
Sets the line color using HSB with high saturation and brightness, and partial transparency (100 out of 255 alpha) so trails glow rather than look solid.
line(this.pos.x, this.pos.y, this.pos.x - this.vel.x, this.pos.y - this.vel.y);
Draws a short line from the particle's current position back to where it was roughly one frame ago, visualizing both its position and direction of travel.

mousePressed()

mousePressed() is a p5.js event function that automatically runs whenever the user clicks anywhere on the canvas, making it easy to add simple interactivity like 'reset the pattern' without any extra setup.

function mousePressed() {
  // Generate a new random seed for the Perlin noise function
  noiseSeed(random(10000));
  noiseOffset = 0; // Reset noise offset so the new pattern starts fresh
  background(0);   // Clear the canvas to start new trails

  // Reinitialize particles with random positions for a completely new start
  particles = [];
  for (let i = 0; i < numParticles; i++) {
    particles.push(new Particle());
  }
}
Line-by-line explanation (5 lines)

🔧 Subcomponents:

for-loop Particle Reinitialization for (let i = 0; i < numParticles; i++) {

Rebuilds the entire particles array from scratch with fresh random starting positions

noiseSeed(random(10000));
Chooses a brand new random seed for Perlin noise, which completely changes the shape of the flow field.
noiseOffset = 0; // Reset noise offset so the new pattern starts fresh
Resets the time-based offset back to zero so the new field starts from its 'beginning' state rather than continuing to evolve from the old one.
background(0); // Clear the canvas to start new trails
Paints the canvas fully black, instantly erasing all old trails so the new pattern starts on a clean slate.
particles = [];
Empties the global particles array, discarding all the old particle objects.
particles.push(new Particle());
Creates a fresh batch of particles at new random positions to populate the new flow field.

windowResized()

windowResized() is a p5.js event function that automatically fires whenever the browser window changes size, which is essential for making a full-window sketch like this one stay responsive.

function windowResized() {
  resizeCanvas(windowWidth, windowHeight);
  background(0); // Clear canvas on resize
  noiseOffset = 0; // Reset noise offset
  // Optionally reinitialize particles or let them adapt
  particles = [];
  for (let i = 0; i < numParticles; i++) {
    particles.push(new Particle());
  }
}
Line-by-line explanation (5 lines)

🔧 Subcomponents:

for-loop Particle Reinitialization on Resize for (let i = 0; i < numParticles; i++) {

Rebuilds all particles so their positions make sense within the new canvas dimensions

resizeCanvas(windowWidth, windowHeight);
Resizes the existing canvas to match the browser window's new width and height whenever it changes.
background(0); // Clear canvas on resize
Repaints the canvas solid black so leftover trails from the old size don't look stretched or misplaced.
noiseOffset = 0; // Reset noise offset
Resets the flow field's time evolution back to its starting point for a clean restart.
particles = [];
Clears out the old particles, since their positions were based on the old canvas size and might now be off-screen or clustered oddly.
particles.push(new Particle());
Creates new particles positioned randomly within the freshly resized canvas.

📦 Key Variables

particles array

Holds every Particle object currently being simulated and drawn each frame

let particles = [];
numParticles number

Sets how many particles are created, controlling the density of the flow field visualization

let numParticles = 2000;
noiseScale number

Scales particle coordinates before sampling noise(), controlling how 'zoomed in' or 'zoomed out' the flow pattern looks

let noiseScale = 0.01;
flowStrength number

Multiplies the force vector applied to each particle, controlling how strongly the field pushes particles around

let flowStrength = 4;
noiseOffset number

A shifting value added to noise coordinates so the entire flow field slowly changes shape over time

let noiseOffset = 0;
noiseStep number

How much noiseOffset increases every frame, controlling how fast the flow field evolves

let noiseStep = 0.005;

🔧 Potential Improvements (4)

Here are some ways this code could be enhanced:

BUG Particle.update() edge wrapping

When a particle wraps from one edge to the opposite edge, show() still draws a line from the OLD position (now teleported) to pos - vel, which can create a long streak flashing across the entire canvas.

💡 Track whether the particle wrapped this frame (a boolean flag) and skip drawing the line on that frame, or simply call point(this.pos.x, this.pos.y) instead of line() right after a wrap.

PERFORMANCE Particle.update()

Every particle creates a brand-new p5.Vector via p5.Vector.fromAngle(angle) every single frame for 2000 particles, which generates a lot of garbage-collected objects and can hurt frame rate on slower machines.

💡 Reuse a single scratch vector per particle (e.g. this.force.set(cos(angle), sin(angle))) instead of allocating a new one each frame.

STYLE setup(), mousePressed(), windowResized()

The exact same 'clear particles array and refill it with numParticles new Particle() objects' loop is duplicated in three separate functions.

💡 Extract a helper function like function initParticles() { particles = []; for (...) particles.push(new Particle()); } and call it from all three places to avoid repeating code.

FEATURE draw() / mousePressed()

The flow field currently only reacts to noise and time - the mouse has no ongoing influence beyond resetting the whole pattern on click.

💡 Add a continuous attraction or repulsion force from mouseX/mouseY inside Particle.update() so dragging the mouse actively bends the flow field in real time.

🔄 Code Flow

Code flow showing setup, draw, particle, mousepressed, windowresized

💡 Click on function names in the diagram to jump to their code

graph TD start[Start] --> setup[setup] setup --> particle-init-loop[Particle Initialization Loop] particle-init-loop --> draw[draw loop] draw --> particle-update-loop[Update & Draw Loop] particle-update-loop --> particle-constructor[Constructor / Initial State] particle-update-loop --> noise-angle-calc[Noise-to-Angle Conversion] particle-update-loop --> wrap-edges[Edge Wrapping] draw --> draw click setup href "#fn-setup" click draw href "#fn-draw" click particle-init-loop href "#sub-particle-init-loop" click particle-update-loop href "#sub-particle-update-loop" click particle-constructor href "#sub-particle-constructor" click noise-angle-calc href "#sub-noise-angle-calc" click wrap-edges href "#sub-wrap-edges" mousepressed --> mousepressed-reinit-loop[Particle Reinitialization] mousepressed-reinit-loop --> particle-init-loop click mousepressed href "#fn-mousepressed" click mousepressed-reinit-loop href "#sub-mousepressed-reinit-loop" windowresized --> windowresized-reinit-loop[Particle Reinitialization on Resize] windowresized-reinit-loop --> particle-init-loop click windowresized href "#fn-windowresized" click windowresized-reinit-loop href "#sub-windowresized-reinit-loop"

❓ Frequently Asked Questions

What visual effect does the AI Flow Field sketch create?

The AI Flow Field sketch generates mesmerizing particle trails that flow and evolve over time, using Perlin noise to create a dynamic and organic visual experience.

Is there any way for users to interact with the AI Flow Field sketch?

The sketch is primarily passive, but users can resize their browser window to adjust the canvas size, allowing for different visual perspectives.

What creative coding technique is showcased in this sketch?

This sketch demonstrates the use of Perlin noise to create a flow field that influences particle movement, showcasing the concept of generative art through algorithmic design.

Preview

AI Flow Field - Perlin Noise Particle Trails Mesmerizing generative art using Perlin noise flow fie - p5.js creative coding sketch preview
Sketch Preview
Code flow diagram showing the structure of AI Flow Field - Perlin Noise Particle Trails Mesmerizing generative art using Perlin noise flow fie - Code flow showing setup, draw, particle, mousepressed, windowresized
Code Flow Diagram
