AI Gravity Painter - Click to Create Orbital Particle Wells - xelsed.ai

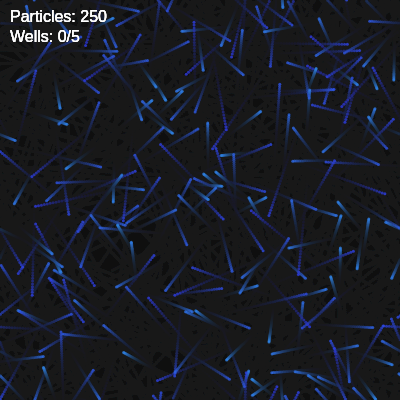
This sketch simulates glowing gravity wells that pull a swarm of 250 particles into swirling orbital trails using real inverse-square physics. Clicking anywhere spawns a pulsing well that attracts nearby particles until it fades away after ten seconds, leaving behind streaking, color-shifting trails.

🧪 Try This!

Experiment with the code by making these changes:

  1. Supercharge the particle count — Raising numParticles fills the canvas with a much denser, busier swarm of particles.
  2. Crank up gravity — Increasing G makes wells pull particles into tighter, faster orbits almost immediately after clicking.
  3. Kill the trails — Making the background fully opaque removes the smeared motion trails, showing only crisp, instantaneous particle positions each frame.
Prefer the full editor? Open it there →

📖 About This Sketch

This sketch turns mouse clicks into miniature gravity fields. Every click drops a glowing GravityWell that tugs on 250 free-floating particles using Newton's inverse-square law, so particles swing into orbit-like arcs before drifting away as the well fades. The colorful streaking trails come from drawing a translucent background each frame instead of clearing it, and each particle's hue shifts with its speed using HSB color mode - fast particles glow a different color than slow ones.

The code is organized around two ES6 classes, Particle and GravityWell, each with update() and show() methods, plus the standard p5.js setup(), draw(), and mousePressed() functions. By studying it you'll learn how to model forces with p5.Vector, how to manage a growing/shrinking array of objects (creating wells on click and removing dead ones with splice), and how millis() and frameCount can drive smooth fading and pulsing animations.

⚙️ How It Works

  1. When the sketch loads, setup() creates a full-window canvas, switches to HSB color mode, and fills the particles array with 250 Particle objects scattered at random positions with random initial velocities.
  2. Every frame, draw() paints a translucent dark rectangle over the whole canvas instead of fully clearing it, which is what creates the smeared, comet-like trails behind each particle.
  3. For every particle, the code loops through every active gravity well, computes the vector from the particle to the well, clamps the distance, and applies an inverse-square force - closer wells pull much harder than distant ones.
  4. After forces are applied, each particle moves by its velocity, wraps around any edge of the canvas it crosses, and is drawn as a tiny ellipse whose hue is mapped from its current speed.
  5. Clicking the mouse triggers mousePressed(), which spawns a new GravityWell at the cursor and discards the oldest well if more than 5 exist; each well pulses using a sine wave and fades its opacity toward zero over 10 seconds via millis(), removing itself from the array once fully transparent.
  6. If the browser window is resized, windowResized() keeps the canvas matched to the new window dimensions so the simulation always fills the screen.

🎓 Concepts You'll Learn

Vector math with p5.VectorInverse-square force simulationClasses and OOP in JavaScriptHSB color modeParticle systemsArray management with push/splice/shiftScreen-edge wrappingAlpha fading driven by millis()

📝 Code Breakdown

Particle constructor

The constructor runs once when 'new Particle(x, y)' is called in setup(). It's where each particle gets its starting position, random velocity, and mass before the draw loop takes over.

constructor(x, y) {
    this.pos = createVector(x, y); // Position vector
    this.vel = p5.Vector.random2D(); // Random initial velocity vector (magnitude 1)
    this.vel.mult(random(1, 3));   // Scale initial velocity for faster movement
    this.mass = 1;                 // Mass of the particle (used for gravity calculation)
  }
Line-by-line explanation (4 lines)
this.pos = createVector(x, y);
Creates a p5.Vector to store the particle's x/y position on the canvas.
this.vel = p5.Vector.random2D();
Generates a random unit-length vector pointing in a random direction, giving each particle a different starting heading.
this.vel.mult(random(1, 3));
Scales that direction vector by a random amount between 1 and 3, so particles start at different speeds.
this.mass = 1;
Stores the particle's mass, used later in the gravitational force formula (F = G*m1*m2/d^2).
Particle.applyForce()

This is a tiny but important physics helper - it's called once per particle per gravity well in draw(), accumulating every well's pull into the particle's velocity before it moves.

applyForce(force) {
    // F = ma, so a = F/m. Acceleration is added to velocity.
    // Here, mass is 1, so acceleration equals force.
    this.vel.add(force);
  }
Line-by-line explanation (1 lines)
this.vel.add(force);
Adds the incoming force vector directly onto the particle's velocity. Since mass is 1, force equals acceleration, so this single line implements Newton's second law.

Particle.update()

update() is deliberately separate from applyForce() so all gravity wells can influence velocity first, then position is updated once per frame using the combined result.

update() {
    this.pos.add(this.vel);
  }
Line-by-line explanation (1 lines)
this.pos.add(this.vel);
Moves the particle by adding its current velocity vector to its position - the core of frame-by-frame motion.

Particle.wrapEdges()

This is a classic 'toroidal' screen wrap - it keeps particles inside the visible canvas forever instead of letting them fly off and get lost.

wrapEdges() {
    if (this.pos.x < 0) this.pos.x = width;
    if (this.pos.x > width) this.pos.x = 0;
    if (this.pos.y < 0) this.pos.y = height;
    if (this.pos.y > height) this.pos.y = 0;
  }
Line-by-line explanation (4 lines)

🔧 Subcomponents:

conditional Horizontal Screen Wrap if (this.pos.x < 0) this.pos.x = width;

Teleports the particle to the opposite horizontal edge when it exits the canvas

conditional Vertical Screen Wrap if (this.pos.y < 0) this.pos.y = height;

Teleports the particle to the opposite vertical edge when it exits the canvas

if (this.pos.x < 0) this.pos.x = width;
If the particle drifts off the left edge, snap it to the right edge.
if (this.pos.x > width) this.pos.x = 0;
If the particle drifts off the right edge, snap it to the left edge.
if (this.pos.y < 0) this.pos.y = height;
If the particle drifts off the top edge, snap it to the bottom edge.
if (this.pos.y > height) this.pos.y = 0;
If the particle drifts off the bottom edge, snap it to the top edge.

Particle.show()

show() is called once per particle per frame. Mapping speed to hue is a common creative-coding trick - it visually communicates velocity without any extra text or graphs.

🔬 hueShiftRate (120) controls how much color changes with speed. What happens if you set hueShiftRate to 360 in the global constants? What about 0?

    let hue = map(this.vel.mag(), 0, maxVel, hueBase, hueBase + hueShiftRate);
    hue = hue % 360; // Ensure hue stays within 0-360 range
show() {
    // Map particle speed (velocity magnitude) to hue for a colorful trail effect
    let hue = map(this.vel.mag(), 0, maxVel, hueBase, hueBase + hueShiftRate);
    hue = hue % 360; // Ensure hue stays within 0-360 range

    fill(hue, saturationBase, brightnessBase, 80); // Low alpha for trails
    ellipse(this.pos.x, this.pos.y, particleSize, particleSize);
  }
Line-by-line explanation (4 lines)
let hue = map(this.vel.mag(), 0, maxVel, hueBase, hueBase + hueShiftRate);
Converts the particle's current speed into a hue value - slow particles get hues near hueBase, fast ones shift up to hueBase + hueShiftRate.
hue = hue % 360;
Wraps the hue back into the valid 0-360 range in case the mapped value overshoots (using modulo).
fill(hue, saturationBase, brightnessBase, 80);
Sets the fill color in HSB with a low alpha (80 out of 100), so overlapping particles blend softly and create the trailing look.
ellipse(this.pos.x, this.pos.y, particleSize, particleSize);
Draws the particle as a small circle at its current position with diameter particleSize.

GravityWell constructor

This constructor runs every time mousePressed() creates 'new GravityWell(mouseX, mouseY)'. Its high mass value is what makes wells so much more influential than particles in the gravity calculation.

constructor(x, y) {
    this.pos = createVector(x, y); // Position vector
    this.mass = 500;               // Mass of the well (influences gravitational strength)
    this.creationTime = millis();  // Timestamp when the well was created for fading
    this.alpha = 100;              // Initial alpha (opacity) of the well
    this.pulseSize = wellSize;     // Current size of the glowing pulse
    this.pulseAlpha = 0;           // Current alpha of the glowing pulse
  }
Line-by-line explanation (6 lines)
this.pos = createVector(x, y);
Stores where the well was clicked into existence as a p5.Vector.
this.mass = 500;
Gives the well a large mass compared to particles (mass 1), making it dominate the gravity formula and pull hard.
this.creationTime = millis();
Records the exact millisecond the well was born, used later to calculate how much time has passed for fading.
this.alpha = 100;
Starts the well fully opaque (100 out of 100 in HSB alpha).
this.pulseSize = wellSize;
Initializes the glowing pulse's size to match the well's base diameter before animation begins.
this.pulseAlpha = 0;
Starts the glow's opacity at zero so it fades in smoothly rather than popping into view.

GravityWell.update()

update() runs every frame for every active well, driving both the slow 10-second fade-out and the fast sine-wave pulse animation independently of each other.

🔬 The multiplier (wellSize * 0.5) controls how much the glow grows and shrinks. What happens if you change 0.5 to 2 so the pulse becomes much larger than the well itself?

    this.pulseSize = wellSize + sin(frameCount * 0.05) * (wellSize * 0.5);
    this.pulseAlpha = map(sin(frameCount * 0.05), -1, 1, 0, this.alpha * 0.4); // Pulse alpha also fades
update() {
    let elapsedTime = millis() - this.creationTime; // Time since creation

    // Calculate alpha based on elapsed time, fading out over wellFadeTime
    this.alpha = map(elapsedTime, 0, wellFadeTime, 100, 0);
    this.alpha = constrain(this.alpha, 0, 100); // Ensure alpha stays within 0-100

    // Animate the pulsing glow behind the well
    // sin(frameCount * 0.05) oscillates between -1 and 1
    // This creates a smooth growing/shrinking effect
    this.pulseSize = wellSize + sin(frameCount * 0.05) * (wellSize * 0.5);
    this.pulseAlpha = map(sin(frameCount * 0.05), -1, 1, 0, this.alpha * 0.4); // Pulse alpha also fades
  }
Line-by-line explanation (5 lines)

🔧 Subcomponents:

calculation Alpha Fade Calculation this.alpha = map(elapsedTime, 0, wellFadeTime, 100, 0);

Converts elapsed time since creation into a smoothly decreasing opacity value

calculation Pulse Size Calculation this.pulseSize = wellSize + sin(frameCount * 0.05) * (wellSize * 0.5);

Uses a sine wave driven by frameCount to make the glow grow and shrink rhythmically

let elapsedTime = millis() - this.creationTime;
Calculates how many milliseconds have passed since this well was created.
this.alpha = map(elapsedTime, 0, wellFadeTime, 100, 0);
Maps elapsed time onto an opacity range, going from fully opaque (100) at creation down to invisible (0) once wellFadeTime has passed.
this.alpha = constrain(this.alpha, 0, 100);
Clamps alpha so it never goes negative or above 100, even after the well should already be gone.
this.pulseSize = wellSize + sin(frameCount * 0.05) * (wellSize * 0.5);
Oscillates the glow's size up and down over time using a sine wave based on the frame counter, creating a breathing pulse effect.
this.pulseAlpha = map(sin(frameCount * 0.05), -1, 1, 0, this.alpha * 0.4);
Fades the glow's own opacity in sync with the pulse, scaled by the well's overall fading alpha so the glow fades along with the well.

GravityWell.show()

Drawing the glow first and the solid circle second is a simple layering trick: later shapes draw on top, so the glow appears to emanate from behind the well.

show() {
    // Draw the glowing pulse
    fill(0, 0, 100, this.pulseAlpha); // White glow
    ellipse(this.pos.x, this.pos.y, this.pulseSize, this.pulseSize);

    // Draw the main well circle
    fill(hueBase, saturationBase, brightnessBase, this.alpha); // Same color as particles, but solid
    ellipse(this.pos.x, this.pos.y, wellSize, wellSize);
  }
Line-by-line explanation (4 lines)
fill(0, 0, 100, this.pulseAlpha);
Sets the fill to pure white (brightness 100, saturation 0) with the pulse's current fading alpha.
ellipse(this.pos.x, this.pos.y, this.pulseSize, this.pulseSize);
Draws the glowing pulse circle behind the well using its animated pulseSize.
fill(hueBase, saturationBase, brightnessBase, this.alpha);
Switches fill color to the same hue used by particles, but drawn solid on top of the glow.
ellipse(this.pos.x, this.pos.y, wellSize, wellSize);
Draws the well's main circle at a fixed size, using the well's current fading alpha.

GravityWell.isDead()

This tiny helper keeps the removal logic readable in draw() - instead of checking 'wells[i].alpha <= 0' directly, the code reads 'wells[i].isDead()', which is easier to understand at a glance.

isDead() {
    return this.alpha <= 0;
  }
Line-by-line explanation (1 lines)
return this.alpha <= 0;
Returns true once the well's opacity has fully faded to zero (or below), signaling that draw() should remove it from the wells array.

setup()

setup() runs once when the page loads. It's the right place to configure the canvas, choose a color mode, and populate arrays like particles before the animation loop begins.

function setup() {
  createCanvas(windowWidth, windowHeight);
  colorMode(HSB, 360, 100, 100, 100); // Set color mode to HSB with alpha
  noStroke(); // No outlines for shapes

  // Initialize particles with random positions and velocities
  for (let i = 0; i < numParticles; i++) {
    particles.push(new Particle(random(width), random(height)));
  }
}
Line-by-line explanation (5 lines)

🔧 Subcomponents:

for-loop Particle Initialization Loop for (let i = 0; i < numParticles; i++) {

Creates 250 Particle objects at random starting positions and adds them to the particles array

createCanvas(windowWidth, windowHeight);
Creates a canvas that fills the entire browser window.
colorMode(HSB, 360, 100, 100, 100);
Switches p5's color system to Hue-Saturation-Brightness (with alpha up to 100) instead of the default RGB, which makes it easy to shift hue based on speed.
noStroke();
Disables outlines on all shapes so particles and wells are drawn as clean, solid ellipses.
for (let i = 0; i < numParticles; i++) {
Loops numParticles (250) times to build the initial swarm.
particles.push(new Particle(random(width), random(height)));
Creates a new Particle at a random x/y position and adds it to the particles array.

draw()

draw() runs 60 times per second and is the heart of the simulation - it recalculates every particle's forces, moves everything, cleans up expired wells, and redraws the whole scene every single frame.

🔬 This divides by distance squared to create the inverse-square law real gravity follows. What happens if you change distance * distance to just distance (an inverse-linear law instead)?

      let strength = (G * particle.mass * well.mass) / (distance * distance);

      // Set the magnitude of the force vector to the calculated strength
      force.setMag(strength);

🔬 This loop counts backwards (i--) specifically so splice() doesn't skip elements. What happens if you change it to count forward instead (let i = 0; i < wells.length; i++)? Try it and watch what happens when two wells fade at once.

  for (let i = wells.length - 1; i >= 0; i--) {
    wells[i].update(); // Update well fading and pulsing
    wells[i].show();   // Draw the well

    // Remove the well if it has faded completely
    if (wells[i].isDead()) {
      wells.splice(i, 1);
    }
  }
function draw() {
  // Semi-transparent background creates particle trails
  background(0, 0, 10, 10); // Dark background, low alpha

  // Update and draw particles
  for (let particle of particles) {
    // Calculate gravitational force from each well
    for (let well of wells) {
      let force = p5.Vector.sub(well.pos, particle.pos); // Vector from particle to well
      let distance = force.mag(); // Distance between particle and well

      // Clamp distance to prevent extreme forces when very close and division by zero
      distance = constrain(distance, wellSize / 2, 200);

      // Calculate gravitational strength (inverse-square law: F = G * m1 * m2 / d^2)
      let strength = (G * particle.mass * well.mass) / (distance * distance);

      // Set the magnitude of the force vector to the calculated strength
      force.setMag(strength);

      // Apply the force to the particle
      particle.applyForce(force);
    }

    particle.update();    // Update particle position
    particle.wrapEdges(); // Handle screen edge wrapping
    particle.show();      // Draw the particle
  }

  // Update and draw wells, and remove faded ones
  for (let i = wells.length - 1; i >= 0; i--) {
    wells[i].update(); // Update well fading and pulsing
    wells[i].show();   // Draw the well

    // Remove the well if it has faded completely
    if (wells[i].isDead()) {
      wells.splice(i, 1);
    }
  }

  // Display particle count
  fill(0, 0, 100); // White text
  textSize(16);
  textAlign(LEFT, TOP);
  text(`Particles: ${particles.length}`, 10, 10);
  text(`Wells: ${wells.length}/${maxWells}`, 10, 30);
}
Line-by-line explanation (19 lines)

🔧 Subcomponents:

for-loop Particle Update Loop for (let particle of particles) {

Iterates over every particle to apply gravity forces, move it, wrap it, and draw it

for-loop Gravity Well Force Loop for (let well of wells) {

Sums the pull from every currently active gravity well onto the current particle

calculation Inverse-Square Gravity Calculation let strength = (G * particle.mass * well.mass) / (distance * distance);

Computes attraction strength using Newton's inverse-square gravity formula

for-loop Wells Update & Cleanup Loop for (let i = wells.length - 1; i >= 0; i--) {

Updates each well's fade/pulse animation and safely removes fully-faded wells while iterating backwards

conditional Remove Faded Well if (wells[i].isDead()) {

Deletes a well from the array once its opacity has reached zero

background(0, 0, 10, 10); // Dark background, low alpha
Draws a nearly-transparent dark rectangle over the whole canvas instead of fully clearing it, which is what causes previous frames to linger as fading trails.
for (let particle of particles) {
Loops through all 250 particles to update and draw each one this frame.
for (let well of wells) {
For the current particle, loops through every active gravity well to sum up their combined pull.
let force = p5.Vector.sub(well.pos, particle.pos);
Creates a vector pointing from the particle toward the well - this direction is what the force will be aimed along.
let distance = force.mag();
Measures the straight-line distance between the particle and the well.
distance = constrain(distance, wellSize / 2, 200);
Clamps the distance between a minimum (half the well's size) and a maximum (200 pixels), preventing forces from becoming infinite up close or negligible far away.
let strength = (G * particle.mass * well.mass) / (distance * distance);
Applies Newton's inverse-square law: force weakens with the square of distance, so nearby wells pull dramatically harder than distant ones.
force.setMag(strength);
Keeps the force vector's direction but resizes its length to the calculated strength value.
particle.applyForce(force);
Adds this well's pull onto the particle's velocity.
particle.update();
Moves the particle according to its (now updated) velocity.
particle.wrapEdges();
Wraps the particle around the canvas edges if it has drifted off-screen.
particle.show();
Draws the particle as a small colored ellipse.
for (let i = wells.length - 1; i >= 0; i--) {
Loops through the wells array backwards so that removing items with splice() doesn't skip the next one.
wells[i].update();
Advances that well's fade and pulse animation for this frame.
wells[i].show();
Draws the well's glow and solid circle.
if (wells[i].isDead()) {
Checks whether this well has fully faded away.
wells.splice(i, 1);
Removes exactly one element at index i from the wells array, deleting the faded well.
text(`Particles: ${particles.length}`, 10, 10);
Displays the current particle count as an overlay in the top-left corner.
text(`Wells: ${wells.length}/${maxWells}`, 10, 30);
Displays how many gravity wells currently exist out of the maximum allowed.

mousePressed()

mousePressed() is a p5.js event function that p5 automatically calls whenever the mouse button is clicked, making it the natural place to handle user interaction like spawning new objects.

function mousePressed() {
  // Create a new gravity well at the mouse position
  wells.push(new GravityWell(mouseX, mouseY));

  // If there are more wells than allowed, remove the oldest one
  if (wells.length > maxWells) {
    wells.shift(); // .shift() removes the first element from an array
  }
}
Line-by-line explanation (3 lines)

🔧 Subcomponents:

conditional Well Limit Check if (wells.length > maxWells) {

Removes the oldest well when the array exceeds the maximum allowed, keeping performance stable

wells.push(new GravityWell(mouseX, mouseY));
Creates a brand-new GravityWell at the current mouse position and adds it to the end of the wells array.
if (wells.length > maxWells) {
Checks whether there are now more wells than the allowed maximum (5).
wells.shift();
Removes the first (oldest) element from the wells array, keeping the total count capped at maxWells.

windowResized()

windowResized() is another automatic p5.js event function, called whenever the browser window changes size, keeping full-window sketches responsive.

function windowResized() {
  resizeCanvas(windowWidth, windowHeight);
  // Re-center any existing wells if desired, or let them stay relative to their creation point
  // For this sketch, we'll let them stay in their original relative positions.
}
Line-by-line explanation (1 lines)
resizeCanvas(windowWidth, windowHeight);
Resizes the canvas to match the browser window's new width and height whenever the window is resized.

📦 Key Variables

particles array

Holds all 250 Particle objects that make up the swarm being drawn and updated every frame.

let particles = [];
wells array

Holds all currently active GravityWell objects created by mouse clicks; grows on click and shrinks as wells fade out.

let wells = [];
numParticles number

Total number of particles created once in setup() - controls the density of the swarm.

const numParticles = 250;
maxWells number

Maximum number of gravity wells allowed at once; oldest wells are removed once this limit is exceeded.

const maxWells = 5;
particleSize number

Diameter in pixels used to draw each particle's ellipse.

const particleSize = 3;
wellSize number

Diameter of each gravity well's main circle and the minimum distance used when clamping gravitational force.

const wellSize = 25;
wellFadeTime number

Number of milliseconds it takes a gravity well to fully fade out and be removed.

const wellFadeTime = 10000;
G number

Gravitational constant that scales how strongly wells attract particles in the inverse-square force formula.

const G = 0.8;
maxVel number

Reference maximum velocity magnitude used to map a particle's speed onto its hue.

const maxVel = 10;
hueBase number

Base hue value (out of 360) used as the starting color for slow-moving particles and wells.

const hueBase = 200;
hueShiftRate number

Range added on top of hueBase as particle speed increases, controlling how much color shifts with velocity.

const hueShiftRate = 120;
saturationBase number

Fixed saturation value used for particle and well colors in HSB mode.

const saturationBase = 80;
brightnessBase number

Fixed brightness value used for particle and well colors in HSB mode.

const brightnessBase = 90;

🔧 Potential Improvements (4)

Here are some ways this code could be enhanced:

PERFORMANCE draw() gravity force loop

p5.Vector.sub() creates a brand-new vector object for every particle-well pair, every single frame (up to 250 x 5 = 1250 allocations per frame), which pressures the garbage collector and can cause frame stutters as more wells and particles are added.

💡 Reuse a single scratch p5.Vector per particle (e.g. particle.force.set(well.pos).sub(particle.pos)) instead of creating a new vector each time, avoiding repeated memory allocation.

BUG draw() distance clamp

Distance is clamped to a maximum of 200 pixels before computing gravity, meaning a well 200px away and one 2000px away pull with exactly the same strength - this can look inconsistent as wells fade at the edge of their range.

💡 Consider letting the force naturally fall off with real distance (removing or greatly increasing the upper clamp) so influence smoothly diminishes with range instead of hitting a hard cutoff.

FEATURE mousePressed() / missing touchStarted()

Only mousePressed() is implemented, so on touch devices (phones/tablets) tapping the screen may not reliably create gravity wells since p5.js treats touch and mouse events somewhat differently.

💡 Add a touchStarted() function that calls the same logic as mousePressed() (or simply calls mousePressed() and returns false) to guarantee touch support.

STYLE Particle.show() and GravityWell.show()

Magic numbers like 80 (particle alpha), 100 (white brightness), and 0.4 (pulse alpha scale) are scattered directly in the drawing code without explanation, making them harder to find and tune.

💡 Pull these into named constants near the top of the file (e.g. const particleAlpha = 80; const pulseAlphaScale = 0.4;) so all the visual tuning knobs live in one place, matching the style already used for hueBase and saturationBase.

🔄 Code Flow

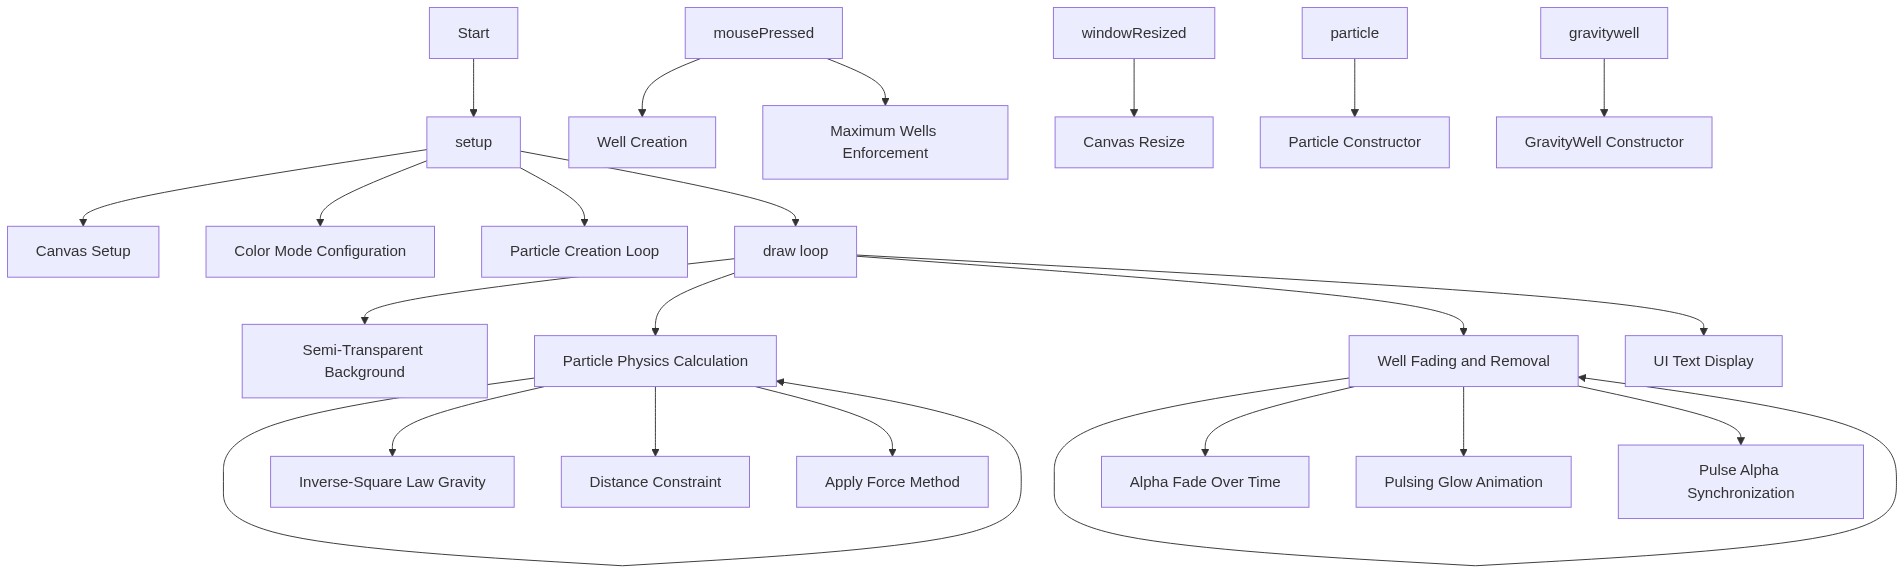
Code flow showing particle, applyforce, update, wrapedges, show, gravitywell, gravitywellupdate, gravitywellshow, isdead, setup, draw, mousepressed, windowresized

💡 Click on function names in the diagram to jump to their code

graph TD start[Start] --> setup[setup] setup --> init-particles-loop[Particle Initialization Loop] init-particles-loop --> draw[draw loop] draw --> particle-loop[Particle Update Loop] particle-loop --> well-force-loop[Gravity Well Force Loop] well-force-loop --> gravity-calc[Inverse-Square Gravity Calculation] gravity-calc --> applyforce[applyforce] applyforce --> update[update] update --> wrapedges[wrapedges] wrapedges --> show[show] show --> particle-loop draw --> wells-cleanup-loop[Wells Update & Cleanup Loop] wells-cleanup-loop --> gravitywellupdate[gravitywellupdate] gravitywellupdate --> well-dead-check[Remove Faded Well] well-dead-check --> well-limit-check[Well Limit Check] well-limit-check --> wells-cleanup-loop wells-cleanup-loop --> draw click setup href "#fn-setup" click draw href "#fn-draw" click init-particles-loop href "#sub-init-particles-loop" click particle-loop href "#sub-particle-loop" click well-force-loop href "#sub-well-force-loop" click gravity-calc href "#sub-gravity-calc" click applyforce href "#fn-applyforce" click update href "#fn-update" click wrapedges href "#fn-wrapedges" click show href "#fn-show" click wells-cleanup-loop href "#sub-wells-cleanup-loop" click gravitywellupdate href "#fn-gravitywellupdate" click well-dead-check href "#sub-well-dead-check" click well-limit-check href "#sub-well-limit-check"

❓ Frequently Asked Questions

What visual effects does the AI Gravity Painter sketch produce?

The sketch creates mesmerizing orbital patterns as colorful particles swirl and dance around gravity wells, which users can spawn by clicking on the canvas.

How can users interact with the AI Gravity Painter sketch?

Users can click anywhere on the canvas to create gravity wells, which will attract and animate particles for a limited time before fading away.

What creative coding concepts are showcased in the AI Gravity Painter sketch?

This sketch demonstrates the principles of inverse-square attraction and particle physics, allowing for an interactive exploration of gravitational effects.

Preview

AI Gravity Painter - Click to Create Orbital Particle Wells - xelsed.ai - p5.js creative coding sketch preview
Sketch Preview
Code flow diagram showing the structure of AI Gravity Painter - Click to Create Orbital Particle Wells - xelsed.ai - Code flow showing particle, applyforce, update, wrapedges, show, gravitywell, gravitywellupdate, gravitywellshow, isdead, setup, draw, mousepressed, windowresized
Code Flow Diagram