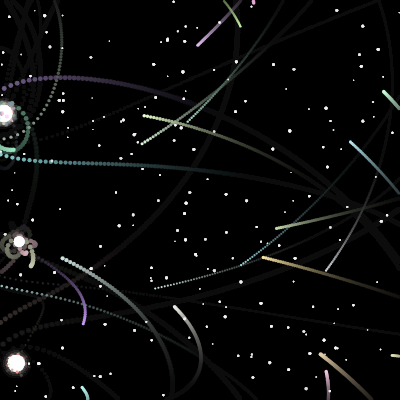
function setup() {
  createCanvas(windowWidth, windowHeight);
  pixelDensity(1); // Improve performance, especially on high-DPI screens

  // Generate background stars once
  generateStars();

  // Create 3-4 initial gravity wells at random positions
  let numWells = floor(random(3, 5));
  for (let i = 0; i < numWells; i++) {
    gravityWells.push(new GravityWell(random(width), random(height), random(500, 2000)));
  }
}
Line-by-line explanation (6 lines)
🔧 Subcomponents:
for-loop
Initial Gravity Well Creation
for (let i = 0; i < numWells; i++) {
Creates 3-4 gravity wells at random positions and masses when the sketch first loads
createCanvas(windowWidth, windowHeight);- Makes the canvas fill the entire browser window.
pixelDensity(1);- Forces the canvas to render at 1 pixel per pixel instead of matching a high-DPI (Retina) screen's density, which keeps the simulation fast since it draws hundreds of circles every frame.
generateStars();- Calls the helper function that fills the global stars array with random star data - done once so stars don't move around.
let numWells = floor(random(3, 5));- Picks a random whole number of 3 or 4 to decide how many gravity wells to start with.
for (let i = 0; i < numWells; i++) {- Loops that many times to create each starting well.
gravityWells.push(new GravityWell(random(width), random(height), random(500, 2000)));- Creates a new GravityWell object at a random position with a random mass between 500 and 2000, and adds it to the gravityWells array.
🔬 This spawns exactly one particle every particleSpawnRate frames. What happens if you push two particles instead of one inside this block?
  if (frameCount % particleSpawnRate === 0) {
    particles.push(spawnParticle());
  }
🔬 Every particle sums the pull from every single well here. What do you predict will happen to the motion if there are 10 wells instead of 3-4? Try clicking many times to add wells and watch the particle paths.
    for (let well of gravityWells) {
      particle.applyForce(well.getGravityForce(particle));
    }
function draw() {
  // Draw fading trails by drawing a semi-transparent black rectangle
  // This causes previous frames to fade out, creating the trail effect.
  background(0, 10);

  // Draw background stars
  drawStars();

  // Spawn new particles from the edges of the screen periodically
  if (frameCount % particleSpawnRate === 0) {
    particles.push(spawnParticle());
  }

  // Update and display gravity wells
  for (let well of gravityWells) {
    well.update();
    well.display();
  }

  // Update and display particles, applying gravity from all wells
  for (let i = particles.length - 1; i >= 0; i--) {
    let particle = particles[i];

    // Apply gravity from each well to the current particle
    for (let well of gravityWells) {
      particle.applyForce(well.getGravityForce(particle));
    }

    particle.update();
    particle.display();

    // Remove particles that go too far off-screen to maintain performance
    if (particle.isOffScreen()) {
      particles.splice(i, 1);
    }
  }

  // Clean up any wells that might have been marked for removal (e.g., mass <= 0)
  for (let i = gravityWells.length - 1; i >= 0; i--) {
    if (gravityWells[i].mass <= 0) { // Check if mass has been set to 0 or less
      gravityWells.splice(i, 1);
    }
  }
}
Line-by-line explanation (14 lines)
🔧 Subcomponents:
conditional
Periodic Particle Spawn
if (frameCount % particleSpawnRate === 0) {
Only spawns a new particle every particleSpawnRate frames instead of every single frame
for-loop
Update & Display Wells
for (let well of gravityWells) {
Updates each gravity well's glow and draws it before particles are handled
for-loop
Update, Apply Gravity, Remove Particles
for (let i = particles.length - 1; i >= 0; i--) {
Loops backwards through particles so items can be safely removed mid-loop; applies gravity from every well, moves the particle, draws it, and deletes it if off-screen
for-loop
Sum Forces From All Wells
for (let well of gravityWells) {
For a single particle, adds up the pull from every gravity well in the scene
conditional
Remove Off-Screen Particles
if (particle.isOffScreen()) {
Deletes particles that have drifted far past the canvas edges to keep the array (and performance) from growing forever
for-loop
Remove Dead Wells
for (let i = gravityWells.length - 1; i >= 0; i--) {
Removes any gravity well whose mass has dropped to zero or below (currently unused since nothing reduces mass)
background(0, 10);- Draws a black rectangle over the whole canvas with only 10 out of 255 alpha (very transparent). Instead of fully erasing the frame, this slightly darkens everything, so old particle positions fade out gradually instead of vanishing instantly - that's what creates the glowing trail effect.
drawStars();- Redraws all the background stars every frame since the background rectangle would otherwise cover them up.
if (frameCount % particleSpawnRate === 0) {- frameCount increases by 1 every frame; using modulo checks if it's evenly divisible by particleSpawnRate, so this only runs true once every 5 frames by default.
particles.push(spawnParticle());- Calls the helper function to create a new particle at a screen edge and adds it to the particles array.
for (let well of gravityWells) {- A for-of loop that visits every gravity well currently in the scene.
well.update();- Recalculates that well's glow brightness based on nearby particles and a pulsing sine wave.
well.display();- Draws the well's glow and solid core to the canvas.
for (let i = particles.length - 1; i >= 0; i--) {- Loops through the particles array backwards. This matters because the loop may remove (splice) items - looping backwards avoids skipping elements that shift after a removal.
for (let well of gravityWells) {- For the current particle, checks every gravity well in the scene.
particle.applyForce(well.getGravityForce(particle));- Asks the well to calculate its pull on this particle, then tells the particle to add that force to its acceleration - forces from multiple wells stack together.
particle.update();- Moves the particle according to its current velocity and acceleration, then resets acceleration to zero for the next frame.
particle.display();- Draws the particle as a small colored circle at its new position.
if (particle.isOffScreen()) {- Checks whether the particle has drifted well past the canvas edges.
particles.splice(i, 1);- Removes that one particle from the array so it stops being updated and drawn, keeping the array size manageable.
🔬 This makes top-edge particles always move downward (vy is always positive). What happens visually if you let vy go negative too, like random(-initialSpeed, initialSpeed)?
    case 0: // Top edge
      x = random(width);
      y = 0;
      vx = random(-initialSpeed, initialSpeed);
      vy = random(0.5, initialSpeed);
      break;
function spawnParticle() {
  let x, y, vx, vy;
  let edge = floor(random(4)); // 0: top, 1: right, 2: bottom, 3: left

  // Vary initial speed slightly for more dynamic behavior
  let initialSpeed = random(1, 2);

  switch (edge) {
    case 0: // Top edge
      x = random(width);
      y = 0;
      vx = random(-initialSpeed, initialSpeed);
      vy = random(0.5, initialSpeed);
      break;
    case 1: // Right edge
      x = width;
      y = random(height);
      vx = random(-initialSpeed, -0.5);
      vy = random(-initialSpeed, initialSpeed);
      break;
    case 2: // Bottom edge
      x = random(width);
      y = height;
      vx = random(-initialSpeed, initialSpeed);
      vy = random(-initialSpeed, -0.5);
      break;
    case 3: // Left edge
      x = 0;
      y = random(height);
      vx = random(0.5, initialSpeed);
      vy = random(-initialSpeed, initialSpeed);
      break;
  }

  // Slight color variation for particles
  let pColor = color(random(150, 255), random(150, 255), random(150, 255));

  return new Particle(x, y, vx, vy, pColor);
}
Line-by-line explanation (10 lines)
🔧 Subcomponents:
switch-case
Pick Spawn Edge
switch (edge) {
Chooses one of the four screen edges (top, right, bottom, left) and sets the particle's starting position and velocity so it's aimed generally inward
let edge = floor(random(4));- Picks a random whole number 0, 1, 2, or 3, each representing a different screen edge.
let initialSpeed = random(1, 2);- Picks a random base speed between 1 and 2 used to scale the velocity for this particle.
switch (edge) {- Branches into different code depending on which edge value was picked.
case 0: // Top edge- If edge is 0, spawn the particle somewhere along the top of the canvas.
x = random(width);- Random horizontal position across the full width.
y = 0;- Places the particle exactly at the top row of the canvas.
vx = random(-initialSpeed, initialSpeed);- Random horizontal velocity in either direction.
vy = random(0.5, initialSpeed);- Always-positive vertical velocity so the particle moves downward, into the screen.
let pColor = color(random(150, 255), random(150, 255), random(150, 255));- Creates a p5 color object with random-but-bright red, green, and blue values, giving each particle a slightly different pastel hue.
return new Particle(x, y, vx, vy, pColor);- Builds and returns a new Particle instance using all the values computed above.
function mouseReleased() {
  if (mouseButton === RIGHT) {
    // If there are wells, find and remove the nearest one
    if (gravityWells.length > 0) {
      let minDist = Infinity;
      let nearestIndex = -1;

      for (let i = 0; i < gravityWells.length; i++) {
        let well = gravityWells[i];
        let d = dist(mouseX, mouseY, well.x, well.y);
        if (d < minDist) {
          minDist = d;
          nearestIndex = i;
        }
      }

      if (nearestIndex !== -1) {
        gravityWells.splice(nearestIndex, 1);
      }
    }
  }
  // Prevent default right-click context menu
  return false;
}
Line-by-line explanation (7 lines)
🔧 Subcomponents:
for-loop
Find Nearest Well
for (let i = 0; i < gravityWells.length; i++) {
Scans every gravity well to find the one closest to the mouse position, keeping track of the smallest distance seen so far
if (mouseButton === RIGHT) {- Only runs this removal logic when the right mouse button was released.
let minDist = Infinity;- Starts with an impossibly large 'closest distance so far' so any real distance will be smaller.
let nearestIndex = -1;- Tracks the array index of the closest well found; -1 means none found yet.
for (let i = 0; i < gravityWells.length; i++) {- Checks every gravity well one by one.
let d = dist(mouseX, mouseY, well.x, well.y);- Uses p5's dist() to measure the straight-line distance between the mouse and this well.
if (d < minDist) {- If this well is closer than any well checked so far, remember it as the new closest.
gravityWells.splice(nearestIndex, 1);- Removes exactly one item at the closest well's index, deleting it from the simulation.
constructor(x, y, mass) {
    this.x = x;
    this.y = y;
    this.mass = mass;
    // Visual size of the well core, mapped from its mass
    this.radius = map(mass, 500, 4000, 5, 20);
    // Radius for checking nearby particles to influence glow
    this.glowRadius = this.radius * 2;
    this.glowBrightness = 0; // Current brightness of the well's glow
    // Random speed for the subtle brightness pulse
    this.pulseSpeed = random(0.02, 0.05);
  }
Line-by-line explanation (6 lines)
this.x = x;- Stores the well's horizontal position.
this.y = y;- Stores the well's vertical position.
this.mass = mass;- Stores the mass value, which directly controls how strong its gravitational pull is.
this.radius = map(mass, 500, 4000, 5, 20);- Uses map() to convert mass (expected to be roughly 500-4000) into a visual core radius between 5 and 20 pixels, so heavier wells look bigger.
this.glowRadius = this.radius * 2;- Sets the glow's reach to twice the core radius, used both for drawing the glow and for detecting nearby particles.
this.pulseSpeed = random(0.02, 0.05);- Gives each well its own random pulsing speed so multiple wells don't glow in perfect sync.
🔬 This decides what counts as 'nearby' for glow purposes. What happens if you shrink the detection range from glowRadius * 2 to glowRadius * 0.5 - will wells glow less often?
      let d = dist(this.x, this.y, particle.position.x, particle.position.y);
      if (d < this.glowRadius * 2) {
        nearbyParticles++;
      }
update() {
    let nearbyParticles = 0;
    // Count particles within a certain range to determine glow intensity
    for (let particle of particles) {
      let d = dist(this.x, this.y, particle.position.x, particle.position.y);
      if (d < this.glowRadius * 2) {
        nearbyParticles++;
      }
    }
    // Map nearby particle count to glow brightness, capping at 100 particles
    this.glowBrightness = map(nearbyParticles, 0, 100, 0, 255, true);

    // Add a subtle brightness pulse using sine wave
    this.glowBrightness += sin(frameCount * this.pulseSpeed) * 50;
    this.glowBrightness = constrain(this.glowBrightness, 0, 255); // Keep brightness within valid range
  }
Line-by-line explanation (7 lines)
🔧 Subcomponents:
for-loop
Count Nearby Particles
for (let particle of particles) {
Counts how many particles are currently within this well's glow-detection radius, used to intensify the glow when a crowd of particles is nearby
let nearbyParticles = 0;- Starts a counter at zero for this frame.
for (let particle of particles) {- Checks every particle currently in the simulation.
let d = dist(this.x, this.y, particle.position.x, particle.position.y);- Measures the distance between this well and the particle.
if (d < this.glowRadius * 2) {- If the particle is within twice the glow radius, count it as 'nearby'.
this.glowBrightness = map(nearbyParticles, 0, 100, 0, 255, true);- Converts the nearby-particle count into a brightness value from 0 to 255; the true flag clamps the result so counts above 100 don't overshoot 255.
this.glowBrightness += sin(frameCount * this.pulseSpeed) * 50;- Adds a smooth oscillating pulse (ranging roughly -50 to +50) on top of the base brightness, using a sine wave driven by frameCount so it animates continuously.
this.glowBrightness = constrain(this.glowBrightness, 0, 255);- Clamps the final brightness back into the valid 0-255 range after the pulse was added, since the pulse could push it slightly out of bounds.
🔬 This loop draws rings every 2 pixels for a smooth glow. What happens visually if you change 'r -= 2' to 'r -= 10' - do you get a smooth gradient or visible banding rings?
    for(let r = this.glowRadius; r > 0; r -= 2) {
      // Alpha fades out towards the edge of the glow
      let alpha = map(r, this.glowRadius, 0, 0, this.glowBrightness * 0.1);
      fill(200, 200, 255, alpha); // Soft blue-white glow
      circle(this.x, this.y, r * 2);
    }
display() {
    noStroke();

    // Draw the glow effect using additive blending
    blendMode(SCREEN);
    for(let r = this.glowRadius; r > 0; r -= 2) {
      // Alpha fades out towards the edge of the glow
      let alpha = map(r, this.glowRadius, 0, 0, this.glowBrightness * 0.1);
      fill(200, 200, 255, alpha); // Soft blue-white glow
      circle(this.x, this.y, r * 2);
    }
    blendMode(NORMAL); // Reset blend mode for other elements

    // Draw the solid core of the gravity well
    fill(255); // White core
    circle(this.x, this.y, this.radius * 2);
  }
Line-by-line explanation (7 lines)
🔧 Subcomponents:
for-loop
Draw Concentric Glow Rings
for(let r = this.glowRadius; r > 0; r -= 2) {
Draws many overlapping semi-transparent circles shrinking from glowRadius down to 0, which blend together (thanks to SCREEN mode) into a smooth soft glow
blendMode(SCREEN);- Switches to additive blending so overlapping glow circles brighten each other instead of just stacking flatly.
for(let r = this.glowRadius; r > 0; r -= 2) {- Starts at the outer glow radius and steps inward by 2 pixels each time, drawing a series of shrinking circles.
let alpha = map(r, this.glowRadius, 0, 0, this.glowBrightness * 0.1);- Maps the current ring radius r to a transparency value - the outermost ring (r = glowRadius) is fully transparent (alpha 0) while the innermost ring is more visible, scaled by the well's current glowBrightness.
fill(200, 200, 255, alpha);- Sets a soft blue-white color at the calculated transparency.
circle(this.x, this.y, r * 2);- Draws a circle of diameter r*2 centered on the well; drawing many of these from large to small builds up a soft radial glow.
fill(255); // White core- After finishing the glow, switches to solid opaque white for the well's core.
circle(this.x, this.y, this.radius * 2);- Draws the small solid circle representing the actual gravity well at its full size.
🔬 This is the heart of the inverse-square law. What happens to the orbits if you change the formula to (G * this.mass) / sqrt(distanceSq) instead - a weaker, non-squared falloff?
    let strength = (G * this.mass) / distanceSq;

    // Limit max force to prevent particles from accelerating too wildly when very close
    strength = constrain(strength, 0, 10);
getGravityForce(particle) {
    // Vector pointing from particle to well
    let force = createVector(this.x - particle.position.x, this.y - particle.position.y);
    // Calculate distance squared, constrained to prevent division by zero and limit max distance
    // Particles inside the well's core experience force as if at the edge.
    let distanceSq = constrain(force.magSq(), this.radius * this.radius, 1000 * 1000);
    // Calculate gravitational strength
    let strength = (G * this.mass) / distanceSq;

    // Limit max force to prevent particles from accelerating too wildly when very close
    strength = constrain(strength, 0, 10);

    // Set the magnitude of the force vector
    force.setMag(strength);
    return force;
  }
Line-by-line explanation (6 lines)
let force = createVector(this.x - particle.position.x, this.y - particle.position.y);- Builds a vector pointing from the particle toward the well by subtracting the particle's position from the well's position - this becomes the direction of the pull.
let distanceSq = constrain(force.magSq(), this.radius * this.radius, 1000 * 1000);- magSq() gives the squared distance (faster than sqrt-based magnitude). constrain() clamps it so it never goes below the well's own radius squared (preventing an infinite force at distance 0) and never above 1,000,000 (a distance of 1000 pixels), which limits how far gravity can meaningfully reach.
let strength = (G * this.mass) / distanceSq;- This is Newton's inverse-square law in miniature: force strength is proportional to mass and inversely proportional to distance squared. G is the shared gravitational constant.
strength = constrain(strength, 0, 10);- Caps the maximum force strength at 10 so particles that get very close to a massive well don't get an absurdly huge, physics-breaking kick.
force.setMag(strength);- Keeps the force vector's direction (toward the well) but rescales its length to equal the calculated strength.
return force;- Sends the finished force vector back to be applied to the particle.
constructor(x, y, vx, vy, pColor) {
    this.position = createVector(x, y);
    this.velocity = createVector(vx, vy);
    this.acceleration = createVector(0, 0);
    this.size = random(2, 5); // Random size for particles
    this.color = pColor; // Assigned color
    this.mass = 1; // For simplicity, particles have a mass of 1
  }
Line-by-line explanation (5 lines)
this.position = createVector(x, y);- Stores the particle's location as a p5.Vector, which bundles x and y together and supports vector math like add() and mult().
this.velocity = createVector(vx, vy);- Stores the particle's starting speed and direction as a vector.
this.acceleration = createVector(0, 0);- Starts with zero acceleration; this gets filled in each frame by the sum of gravitational forces.
this.size = random(2, 5);- Gives each particle a random diameter between 2 and 5 pixels for visual variety.
this.mass = 1;- All particles share a mass of 1 to keep the physics simple - this means force and acceleration are numerically equal for every particle.
applyForce(force) {
    let f = force.copy();
    f.div(this.mass);
    this.acceleration.add(f);
  }
Line-by-line explanation (3 lines)
let f = force.copy();- Makes a copy of the incoming force vector so modifying it doesn't accidentally change the original vector elsewhere in the code.
f.div(this.mass);- Implements Newton's second law rearranged as acceleration = force / mass. Since mass is 1 here, this technically does nothing, but it keeps the code physically correct and ready for particles with different masses in the future.
this.acceleration.add(f);- Adds this force's contribution onto the particle's running acceleration total for the current frame - since applyForce() is called once per gravity well, multiple forces stack up here before update() uses them.
🔬 This four-line pattern (velocity += acceleration, limit speed, position += velocity, reset acceleration) is the entire physics engine. What happens to the orbits if you remove the acceleration.mult(0) reset line - would forces just keep piling up forever?
    this.velocity.add(this.acceleration);
    this.velocity.limit(10); // Limit maximum speed of particles
    this.position.add(this.velocity);
    this.acceleration.mult(0); // Reset acceleration for the next frame
update() {
    this.velocity.add(this.acceleration);
    this.velocity.limit(10); // Limit maximum speed of particles
    this.position.add(this.velocity);
    this.acceleration.mult(0); // Reset acceleration for the next frame
  }
Line-by-line explanation (4 lines)
this.velocity.add(this.acceleration);- Adds this frame's total acceleration onto the velocity - this is how gravitational pull actually speeds the particle up or changes its direction over time.
this.velocity.limit(10);- Caps the velocity vector's length at 10, preventing particles from reaching unrealistic, screen-tearing speeds when very close to a strong well.
this.position.add(this.velocity);- Moves the particle by adding its velocity to its position - this is the basic 'position changes over time' rule of motion.
this.acceleration.mult(0);- Resets acceleration back to zero so next frame's forces start fresh instead of accumulating forever.
display() {
    noStroke();
    fill(this.color);
    circle(this.position.x, this.position.y, this.size);
  }
Line-by-line explanation (3 lines)
noStroke();- Removes the outline so the particle is a clean filled dot.
fill(this.color);- Uses the p5.Color object stored on this particle (assigned randomly when it was spawned).
circle(this.position.x, this.position.y, this.size);- Draws the particle as a circle at its current position with its stored size as the diameter.
isOffScreen() {
    let padding = 100; // Extra space before considering off-screen
    return (
      this.position.x < -padding ||
      this.position.x > width + padding ||
      this.position.y < -padding ||
      this.position.y > height + padding
    );
  }
Line-by-line explanation (5 lines)
🔧 Subcomponents:
conditional
Off-Screen Bounds Check
return (
Returns true if the particle's position has moved past the canvas edges by more than the padding amount in any direction
let padding = 100;- Allows particles to travel 100 pixels beyond the visible canvas before being considered 'gone' - this avoids abruptly deleting particles the instant they touch the edge.
this.position.x < -padding ||- True if the particle has drifted too far left of the canvas.
this.position.x > width + padding ||- True if the particle has drifted too far right of the canvas.
this.position.y < -padding ||- True if the particle has drifted too far above the canvas.
this.position.y > height + padding- True if the particle has drifted too far below the canvas; if any of these four conditions is true, the whole expression returns true.