
AI Laser Harp - Rainbow Light Instrument Play music with light! Move your mouse across the rainbow

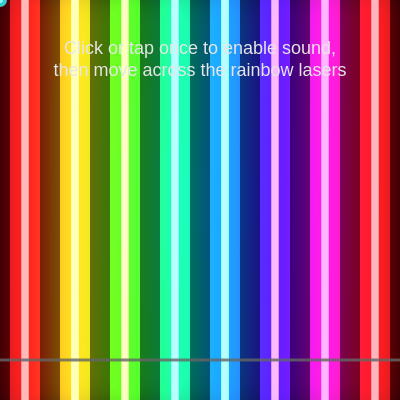
This sketch turns your mouse cursor into a light-triggered instrument by drawing eight vertical, rainbow-colored laser beams across the screen. Moving the cursor through a beam plays a musical note from a C major scale while the beam glows brighter, creating a synesthetic light-and-sound experience.

🧪 Try This!

Experiment with the code by making these changes:

  1. Add more strings to the harp — Increasing NUM_BEAMS adds more, thinner beams and cycles back through the scale, giving you more notes to play.
  2. Switch the oscillator's tone — p5.Oscillator supports 'sine', 'square', 'sawtooth', and 'triangle' waveforms, each with a distinctly different timbre.
  3. Recolor the background scene — The background and vignette both use hue 240 (blue-purple) - changing it shifts the whole scene's mood.
  4. Make triggered beams flash longer — Stretching the flash duration makes each note leave a lingering glow trail behind after you move away.
Prefer the full editor? Open it there →

📖 About This Sketch

This sketch creates a virtual laser harp: eight neon, rainbow-hued vertical beams stretch across the canvas, and sweeping your mouse through one plays a note from a C major scale while the beam flashes brighter. It combines p5.sound's Oscillator for real audio synthesis, HSB colorMode for smooth rainbow hues, additive blendMode plus canvas shadowBlur for a glowing neon look, and simple collision detection to know when the mouse enters or leaves a beam.

The code is organized around a Beam class that bundles each beam's position, color, oscillator, and glow state together, while setup() builds an array of Beam objects and draw() updates and renders them every frame. Studying it teaches you how to structure interactive audio-visual objects with classes, how to fade sound in and out smoothly with amp ramps to avoid clicks, and how simple entering/leaving checks drive both animation and sound triggers.

⚙️ How It Works

  1. When the sketch loads, setup() creates a full-window canvas, switches to HSB color mode for easy rainbow hues, hides the system cursor, and builds 8 Beam objects, each assigned a musical frequency from the C major scale and a hue spread evenly around the color wheel.
  2. Every frame, draw() paints a dark background, layers a soft radial vignette behind everything, then loops through each beam calling update() and display() while additive blending is active so overlapping glows brighten instead of just covering each other.
  3. Each beam's update() method checks whether the mouse's x position falls inside that beam's vertical strip; the moment the mouse enters, it calls trigger() to start the note and flash the beam, and the moment it leaves, release() fades the note back to silence.
  4. trigger() and release() use the oscillator's amp() ramp feature to fade volume up and down smoothly over a fraction of a second, which avoids the harsh clicking sound that instant volume changes would cause.
  5. display() calculates a glow intensity based on how recently the beam was triggered and whether the mouse is still inside it, then uses that intensity to control the canvas shadowBlur amount and fill brightness, making the beam pulse with light.
  6. Because browsers block audio until a user interacts with the page, mousePressed() and touchStarted() call userStartAudio() on the very first click or tap, flip the audioStarted flag, and start every oscillator so subsequent triggers can actually make sound.

🎓 Concepts You'll Learn

ES6 classes for organizing objectsp5.sound Oscillator for audio synthesisHSB color mode for rainbow huesAdditive blendMode for glow effectsCanvas shadowBlur for neon renderingCollision/region detection with mouse coordinatesSmooth amplitude ramps to avoid audio clicksResponsive layout using width/height instead of fixed pixels

📝 Code Breakdown

Beam constructor()

The constructor runs once for each Beam object when setup() creates it, setting up all the state (position index, color, sound) that the beam will need for its entire lifetime.

  constructor(index, total, freq) {
    this.index = index;
    this.total = total;
    this.freq = freq;

    // Hue from 0..360 across beams for rainbow
    this.hue = map(index, 0, total - 1, 0, 360);

    this.isActive = false;          // mouse currently inside this beam
    this.lastTriggerTime = -1000;   // for glow flash
    this.started = false;           // has osc.start() been called yet?

    // Create oscillator (from p5.sound)
    // https://p5js.org/reference/#/p5.Oscillator
    this.osc = new p5.Oscillator('triangle'); // nice, slightly harp-like
    this.osc.freq(this.freq);
    this.osc.amp(0); // start silent
    // We will actually start() after user enables audio
  }
Line-by-line explanation (8 lines)
this.index = index; this.total = total; this.freq = freq;
Stores which beam number this is, how many beams exist total, and which musical frequency it should play.
this.hue = map(index, 0, total - 1, 0, 360);
Spreads each beam's color evenly around the 360-degree hue wheel based on its position in the lineup, creating the rainbow effect.
this.isActive = false;
Tracks whether the mouse is currently inside this beam, used to decide when to trigger or release the note.
this.lastTriggerTime = -1000;
Remembers when the beam was last triggered so display() can calculate a fading flash effect; starts far in the past so no flash shows initially.
this.started = false;
Tracks whether the oscillator's start() has been called yet, since browsers require a user gesture before audio can play.
this.osc = new p5.Oscillator('triangle');
Creates a triangle-wave oscillator, which produces a mellow, harp-like tone.
this.osc.freq(this.freq);
Tunes the oscillator to this beam's assigned musical note frequency.
this.osc.amp(0);
Sets the oscillator's volume to zero so it starts silent even after it begins running.
startOsc()

This helper exists because browsers require user interaction before audio can play, so startOsc() is called both when audio is first enabled and defensively inside trigger() to be safe.

  startOsc() {
    if (!this.started) {
      this.osc.start();
      this.started = true;
    }
  }
Line-by-line explanation (3 lines)

🔧 Subcomponents:

conditional Start-Once Guard if (!this.started) {

Ensures osc.start() is only ever called once per oscillator, since calling it repeatedly would throw errors or restart the sound unexpectedly.

if (!this.started) {
Only runs the code inside if the oscillator hasn't already been started, preventing duplicate start() calls.
this.osc.start();
Actually begins the oscillator running in the browser's audio engine (silently, since amp is still 0).
this.started = true;
Marks the oscillator as started so this method won't try to start it again.

getX()

Computing position from width every call (instead of storing a fixed x) means beams automatically re-space themselves correctly whenever the window is resized.

  getX() {
    return (this.index + 0.5) * (width / this.total);
  }
Line-by-line explanation (1 lines)
return (this.index + 0.5) * (width / this.total);
Divides the canvas width into equal slots (one per beam) and returns the center x-coordinate of this beam's slot, using +0.5 to land in the middle rather than the left edge.

getW()

Like getX(), this recalculates from the live canvas width each time it's called, so beam thickness scales responsively with the browser window.

  getW() {
    return (width / this.total) * 0.6; // beam width as fraction of slot
  }
Line-by-line explanation (1 lines)
return (width / this.total) * 0.6;
Takes each beam's equal slot width and shrinks it to 60% so there's visible gap between neighboring beams instead of them touching.

update()

This is a classic 'edge detection' pattern: instead of checking 'is the mouse inside right now', it checks 'did the state just change', which is essential for triggering one-shot events like sounds instead of continuously re-triggering every frame.

🔬 This check only tests my >= 0 && my <= height, meaning the whole vertical strip counts as 'inside'. What happens if you require my to be within a smaller band, like height*0.3 to height*0.7, so you'd need to cross through the middle of the screen to trigger a note?

    const inside =
      mx >= x - w / 2 &&
      mx <= x + w / 2 &&
      my >= 0 &&
      my <= height;
  update(mx, my) {
    const x = this.getX();
    const w = this.getW();

    const inside =
      mx >= x - w / 2 &&
      mx <= x + w / 2 &&
      my >= 0 &&
      my <= height;

    // Mouse just entered the beam
    if (inside && !this.isActive) {
      this.isActive = true;
      this.trigger();
    }
    // Mouse just left the beam
    else if (!inside && this.isActive) {
      this.isActive = false;
      this.release();
    }
  }
Line-by-line explanation (6 lines)

🔧 Subcomponents:

calculation Inside-Beam Test const inside = mx >= x - w / 2 && mx <= x + w / 2 && my >= 0 && my <= height;

Determines whether the mouse's current x,y position falls within this beam's vertical rectangle.

conditional Enter Detection if (inside && !this.isActive) {

Fires trigger() only on the exact frame the mouse crosses into the beam, not on every frame it stays inside.

conditional Leave Detection else if (!inside && this.isActive) {

Fires release() only on the exact frame the mouse leaves the beam.

const x = this.getX(); const w = this.getW();
Gets this beam's current center position and width so the collision check uses up-to-date, resize-aware values.
const inside = mx >= x - w / 2 && mx <= x + w / 2 && my >= 0 && my <= height;
Checks if the mouse x is within the beam's horizontal bounds and the mouse y is anywhere within the canvas height (beams are vertical strips, so only x matters for the sides).
if (inside && !this.isActive) {
Detects the transition from 'outside' to 'inside' - this is what makes the note play exactly once per crossing rather than repeatedly.
this.isActive = true; this.trigger();
Marks the beam as active and starts the note/flash.
else if (!inside && this.isActive) {
Detects the opposite transition, from inside to outside.
this.isActive = false; this.release();
Marks the beam inactive and fades the note out.

trigger()

trigger() is called from update() the instant the mouse enters a beam, connecting the visual/positional event to both the sound (amp ramp) and the animation (lastTriggerTime for flashing).

  trigger() {
    this.lastTriggerTime = millis();

    if (!audioStarted) return;

    this.startOsc();
    // Smooth attack to avoid clicks
    // osc.amp(amp, rampTime) — see https://p5js.org/reference/#/p5.Oscillator/amp
    this.osc.amp(0.7, 0.05);
  }
Line-by-line explanation (4 lines)

🔧 Subcomponents:

conditional Audio-Not-Ready Guard if (!audioStarted) return;

Skips actually playing sound if the user hasn't interacted with the page yet, since browsers block audio until then, but still records the flash time.

this.lastTriggerTime = millis();
Records the current time in milliseconds so display() can calculate the glow flash decay, regardless of whether audio is ready.
if (!audioStarted) return;
Exits early if the browser hasn't unlocked audio yet - the beam will still flash visually but stay silent.
this.startOsc();
Makes sure this oscillator's start() has been called before trying to change its volume.
this.osc.amp(0.7, 0.05);
Ramps the oscillator's volume up to 0.7 over 0.05 seconds instead of jumping instantly, which prevents a harsh audio 'click' at the start of the note.

release()

release() mirrors trigger()'s smooth fade but in reverse, and is called the instant the mouse leaves a beam's boundary in update().

  release() {
    if (!audioStarted || !this.started) return;
    // Smooth release
    this.osc.amp(0, 0.2);
  }
Line-by-line explanation (2 lines)

🔧 Subcomponents:

conditional Not-Playing Guard if (!audioStarted || !this.started) return;

Avoids calling amp() on an oscillator that was never started, which would be pointless or throw an error.

if (!audioStarted || !this.started) return;
Exits early if audio was never enabled or this specific oscillator was never started, since there's nothing to fade out.
this.osc.amp(0, 0.2);
Ramps the volume down to silence over 0.2 seconds, giving the note a natural decay instead of cutting off abruptly.

display()

display() shows how to fake a neon/laser look with plain 2D rectangles by layering a wide blurred glow rectangle with a thin bright core rectangle, driven by a single computed intensity value.

🔬 The flash currently fades over 250 milliseconds. What happens visually if you stretch that to 2000 (2 seconds) so beams glow long after you've moved away?

    const flash = constrain(1 - timeSinceTrigger / 250.0, 0, 1); // 0..1
    const activeBoost = this.isActive ? 1 : 0;

    // Overall intensity: max of being active and flash decay
    const intensity = max(flash, activeBoost); // 0..1
  display() {
    const x = this.getX();
    const w = this.getW();

    // How "bright" should the beam be?
    const now = millis();
    const timeSinceTrigger = now - this.lastTriggerTime;

    // Short flash after triggering
    const flash = constrain(1 - timeSinceTrigger / 250.0, 0, 1); // 0..1
    const activeBoost = this.isActive ? 1 : 0;

    // Overall intensity: max of being active and flash decay
    const intensity = max(flash, activeBoost); // 0..1

    // Outer glowing beam
    push();
    rectMode(CENTER);
    noStroke();

    // Neon glow using canvas shadow
    // https://p5js.org/reference/#/p5/drawingContext
    drawingContext.shadowColor = color(this.hue, 100, 100, 90);
    drawingContext.shadowBlur = 40 + intensity * 40;

    fill(this.hue, 80, 60 + intensity * 40, 90);
    rect(x, height / 2, w, height * 1.1);
    pop();

    // Inner bright core
    push();
    rectMode(CENTER);
    noStroke();
    fill(0, 0, 100, 60 + intensity * 40); // white core
    rect(x, height / 2, w * 0.25, height * 1.1);
    pop();
  }
Line-by-line explanation (10 lines)

🔧 Subcomponents:

calculation Glow Intensity Calculation const intensity = max(flash, activeBoost); // 0..1

Combines a fading 'just triggered' flash with a steady 'currently active' glow so the beam looks bright both while held and briefly after release.

calculation Outer Glow Rectangle rect(x, height / 2, w, height * 1.1);

Draws the wide, blurred, colored rectangle that creates the glowing laser beam look.

calculation Inner White Core rect(x, height / 2, w * 0.25, height * 1.1);

Draws a thin bright white rectangle down the center of the beam to simulate a hot laser core inside the colored glow.

const timeSinceTrigger = now - this.lastTriggerTime;
Calculates how many milliseconds have passed since this beam was last triggered.
const flash = constrain(1 - timeSinceTrigger / 250.0, 0, 1);
Converts elapsed time into a fading brightness value: 1 right when triggered, fading down to 0 over 250 milliseconds, clamped so it never goes negative or above 1.
const activeBoost = this.isActive ? 1 : 0;
Adds full brightness whenever the mouse is currently inside the beam, independent of the flash timer.
const intensity = max(flash, activeBoost);
Picks whichever is brighter - the fading flash or the steady active glow - so held beams stay bright and released beams still flash briefly.
drawingContext.shadowColor = color(this.hue, 100, 100, 90);
Sets the color of the soft glow halo using this beam's hue, accessing the underlying HTML canvas API directly through p5's drawingContext.
drawingContext.shadowBlur = 40 + intensity * 40;
Sets how far the glow spreads outward; it gets blurrier and larger as intensity increases, making triggered beams visibly glow more.
fill(this.hue, 80, 60 + intensity * 40, 90);
Colors the outer beam rectangle using HSB, increasing brightness (the third value) as intensity rises.
rect(x, height / 2, w, height * 1.1);
Draws the beam as a tall rectangle centered on the canvas, slightly taller than the canvas itself so it fills the full height edge-to-edge.
fill(0, 0, 100, 60 + intensity * 40);
Sets the inner core color to white (hue and saturation 0, brightness 100), with alpha increasing with intensity.
rect(x, height / 2, w * 0.25, height * 1.1);
Draws a much thinner rectangle for the bright core, at 25% of the outer beam's width.

setup()

setup() runs once when the sketch starts, and here it's responsible for preparing the color system and building every Beam object that draw() will later update and render each frame.

function setup() {
  createCanvas(windowWidth, windowHeight);
  colorMode(HSB, 360, 100, 100, 100);
  noCursor(); // Let the glowing dot act as our cursor

  // Create beams, each with its own oscillator frequency
  for (let i = 0; i < NUM_BEAMS; i++) {
    const freq = SCALE_FREQS[i % SCALE_FREQS.length];
    beams.push(new Beam(i, NUM_BEAMS, freq));
  }
}
Line-by-line explanation (5 lines)

🔧 Subcomponents:

for-loop Beam Creation Loop for (let i = 0; i < NUM_BEAMS; i++) {

Creates one Beam object per beam slot, cycling through the 8-note scale array with the modulo operator so it wraps around if there were more beams than notes.

createCanvas(windowWidth, windowHeight);
Makes the canvas fill the entire browser window.
colorMode(HSB, 360, 100, 100, 100);
Switches p5's color system to Hue-Saturation-Brightness with ranges 0-360 for hue and 0-100 for the rest, making it easy to create rainbow colors by just varying the hue number.
noCursor();
Hides the normal system mouse cursor since the sketch draws its own glowing dot to represent the cursor instead.
const freq = SCALE_FREQS[i % SCALE_FREQS.length];
Picks a note frequency from the scale array using modulo, so the index safely wraps around even if NUM_BEAMS were larger than the scale array's length.
beams.push(new Beam(i, NUM_BEAMS, freq));
Creates a new Beam object with its index, total count, and assigned frequency, and adds it to the global beams array.

draw()

draw() is the heartbeat of the sketch, running about 60 times per second. Every frame it redraws the background, vignette, beams, instrument bar, and cursor from scratch, which is the standard p5.js pattern for smooth animation.

🔬 blendMode(ADD) is what makes overlapping beam glows look super bright. What happens if you delete both blendMode lines entirely, or swap ADD for MULTIPLY?

  blendMode(ADD);
  for (let beam of beams) {
    beam.update(mouseX, mouseY);
    beam.display();
  }
  blendMode(BLEND);
function draw() {
  // Dark background, slightly tinted
  background(240, 80, 2); // HSB: dark purplish

  // Add a subtle vignette / spotlight
  push();
  noStroke();
  for (let r = max(width, height); r > 0; r -= 40) {
    const b = map(r, 0, max(width, height), 20, 0);
    fill(240, 80, b, 10);
    ellipse(width / 2, height / 2, r * 1.5, r * 1.5);
  }
  pop();

  // Draw beams with additive blend for extra glow
  blendMode(ADD);
  for (let beam of beams) {
    beam.update(mouseX, mouseY);
    beam.display();
  }
  blendMode(BLEND);

  // Base bar at the bottom for “instrument” feel
  push();
  stroke(0, 0, 40, 80);
  strokeWeight(3);
  line(0, height * 0.9, width, height * 0.9);
  pop();

  // Glowing cursor dot
  push();
  noStroke();
  fill(180, 80, 100, 80); // bright cyan
  ellipse(mouseX, mouseY, 14, 14);
  fill(180, 40, 100, 90);
  ellipse(mouseX, mouseY, 6, 6);
  pop();

  // Instructions before audio is enabled
  if (!audioStarted) {
    push();
    textAlign(CENTER, CENTER);
    textSize(18);
    fill(0, 0, 90);
    text(
      'Click or tap once to enable sound,\nthen move across the rainbow lasers',
      width / 2,
      height * 0.15
    );
    pop();
  }
}
Line-by-line explanation (11 lines)

🔧 Subcomponents:

for-loop Vignette Ellipse Loop for (let r = max(width, height); r > 0; r -= 40) {

Draws a series of shrinking, increasingly opaque translucent circles from the outside in, creating a soft dark spotlight vignette effect around the center of the screen.

for-loop Beam Update & Draw Loop for (let beam of beams) {

Updates each beam's active/inactive state based on the mouse position and then renders its glow, every single frame.

conditional Pre-Audio Instructions if (!audioStarted) {

Displays on-screen text telling the user to click/tap to enable sound, but only until they do so for the first time.

background(240, 80, 2);
Repaints the entire canvas each frame with a very dark, slightly purple color, which is what erases the previous frame's drawing (necessary for animation).
for (let r = max(width, height); r > 0; r -= 40) {
Loops from a large radius down to zero in steps of 40 pixels, drawing one translucent circle per step.
const b = map(r, 0, max(width, height), 20, 0);
Maps the current radius to a brightness value, so smaller circles (near the center) are darker and larger circles (near the edges) are barely visible - the opposite creates the vignette's darkened edges since circles overlap most at the edges.
ellipse(width / 2, height / 2, r * 1.5, r * 1.5);
Draws a circle centered on the canvas whose size shrinks each loop iteration, building up the layered vignette effect.
blendMode(ADD);
Switches to additive blending so overlapping colors add their brightness together instead of simply covering each other, which makes overlapping beam glows look intensely bright like real light.
for (let beam of beams) { beam.update(mouseX, mouseY); beam.display(); }
Goes through every beam, first checking if the mouse just entered/left it (which may trigger sound), then drawing its current glow state.
blendMode(BLEND);
Restores normal blending so everything drawn afterward (the bottom bar, cursor dot, text) looks normal rather than additively brightened.
line(0, height * 0.9, width, height * 0.9);
Draws a horizontal bar near the bottom of the screen to visually suggest the base of a physical harp instrument.
ellipse(mouseX, mouseY, 14, 14);
Draws a larger, softer cyan circle at the mouse position as the outer part of the custom glowing cursor.
ellipse(mouseX, mouseY, 6, 6);
Draws a smaller, brighter circle on top to give the cursor dot a hot, glowing center.
if (!audioStarted) {
Only shows the 'click to enable sound' instructions while the user hasn't interacted yet; once mousePressed() or touchStarted() flips audioStarted to true, this text disappears permanently.

mousePressed()

mousePressed() is a built-in p5.js event function that automatically runs whenever the mouse button is clicked; here it's used specifically to satisfy the browser's requirement that audio only starts after user interaction.

function mousePressed() {
  if (!audioStarted) {
    userStartAudio();
    audioStarted = true;
    beams.forEach(b => b.startOsc());
  }
}
Line-by-line explanation (4 lines)

🔧 Subcomponents:

conditional One-Time Audio Unlock if (!audioStarted) {

Ensures the audio-enabling code only runs on the very first click, not on every subsequent click.

if (!audioStarted) {
Checks whether audio has already been enabled, so this block only runs once per session.
userStartAudio();
A p5.sound function that unlocks the browser's Web Audio context, which is required before any sound can play due to browser autoplay restrictions.
audioStarted = true;
Flips the global flag so the sketch knows audio is ready and stops showing the instruction text.
beams.forEach(b => b.startOsc());
Starts every beam's oscillator now that audio is unlocked, so they're all ready to have their volume ramped up later when triggered.

touchStarted()

touchStarted() is p5.js's touch-equivalent of mousePressed(), needed so the sketch also works correctly on phones and tablets where there's no mouse click event.

function touchStarted() {
  if (!audioStarted) {
    userStartAudio();
    audioStarted = true;
    beams.forEach(b => b.startOsc());
  }
  // Prevent default scrolling on touch
  return false;
}
Line-by-line explanation (2 lines)
if (!audioStarted) { ... }
Performs the exact same one-time audio-unlocking steps as mousePressed(), but triggered by a touch event on mobile devices instead of a mouse click.
return false;
Tells the browser not to perform its default touch behavior (like scrolling or zooming), which keeps the interaction focused entirely on playing the laser harp.

windowResized()

windowResized() is a built-in p5.js callback that fires automatically when the browser window changes size; because getX()/getW() calculate positions from the live width/height each frame, beams reflow correctly without any extra code.

function windowResized() {
  resizeCanvas(windowWidth, windowHeight);
}
Line-by-line explanation (1 lines)
resizeCanvas(windowWidth, windowHeight);
Resizes the canvas to match the browser window whenever it changes size, so the sketch always fills the screen.

📦 Key Variables

NUM_BEAMS number

The total number of laser beams (and therefore musical notes) created in the sketch.

const NUM_BEAMS = 8;
SCALE_FREQS array

Holds the frequencies (in Hz) of a one-octave C major scale that beams cycle through for their pitches.

const SCALE_FREQS = [261.63, 293.66, 329.63, 349.23, 392.00, 440.00, 493.88, 523.25];
beams array

Stores all the Beam objects created in setup(), which draw() loops through every frame to update and render.

let beams = [];
audioStarted boolean

Tracks whether the browser's audio context has been unlocked by a user gesture; controls whether notes actually play and whether instructions are shown.

let audioStarted = false;
this.hue number

Each Beam's assigned color hue (0-360), spread evenly across all beams to create the rainbow.

this.hue = map(index, 0, total - 1, 0, 360);
this.isActive boolean

Whether the mouse is currently inside this specific beam, used to detect enter/leave transitions.

this.isActive = false;
this.lastTriggerTime number

The millis() timestamp of the beam's last trigger, used to compute the fading flash glow in display().

this.lastTriggerTime = -1000;
this.started boolean

Whether this beam's oscillator has had start() called on it yet, to avoid calling it more than once.

this.started = false;
this.osc object

The p5.Oscillator instance that actually produces this beam's musical tone.

this.osc = new p5.Oscillator('triangle');

🔧 Potential Improvements (5)

Here are some ways this code could be enhanced:

PERFORMANCE draw() vignette loop

Every single frame, the vignette is redrawn by looping and drawing dozens of overlapping translucent ellipses (stepping the radius down by 40 pixels from the full canvas size), which is a lot of repeated GPU/CPU work for a shape that never actually changes.

💡 Draw the vignette once into an offscreen buffer with createGraphics() in setup() (or use a radial gradient via drawingContext), then just image() that buffer onto the canvas each frame instead of recomputing dozens of ellipses every draw() call.

PERFORMANCE Beam.display()

Setting drawingContext.shadowBlur and shadowColor for every beam every frame is relatively expensive on the canvas 2D context, especially with many beams or on lower-end devices/mobile.

💡 Consider capping shadowBlur's maximum value, disabling shadows on mobile (detect via window size), or pre-rendering the glow as a semi-transparent image that's scaled/tinted instead of relying on live canvas shadows.

BUG Beam.update()

The horizontal bounds check (mx >= x - w/2 && mx <= x + w/2) doesn't account for noCursor() hiding the real cursor - on touch devices there's no continuous mouseX/mouseY dragging without a 'mousemove'-equivalent, so touch users can only trigger a beam at the exact touchStarted() point rather than sweeping across strings like on desktop.

💡 Add a touchMoved() function that updates mouseX/mouseY equivalents (touches[0].x / touches[0].y) and calls the same update logic, so touch users get the same sweeping-gesture experience as mouse users.

STYLE Beam.trigger() and Beam.release()

Magic numbers like 0.7, 0.05, 0.2, and 250.0 are scattered directly in the code with only brief comments, making them harder to find and tune consistently.

💡 Pull these into named constants near the top of the file (e.g. const NOTE_VOLUME = 0.7, const ATTACK_TIME = 0.05, const RELEASE_TIME = 0.2, const FLASH_MS = 250) so they're easier to locate and adjust together.

FEATURE Beam class / trigger()

Each beam only plays a single fixed note, so the instrument can only ever produce the same 8 tones in the same order regardless of vertical mouse position.

💡 Use the mouse's y-position within a beam (via map()) to modulate the oscillator's frequency slightly (like a pitch bend) or to control amplitude/vibrato, adding an extra expressive dimension to each string.

🔄 Code Flow

Code flow showing constructor, startosc, getx, getw, update, trigger, release, display, setup, draw, mousepressed, touchstarted, windowresized

💡 Click on function names in the diagram to jump to their code

graph TD start[Start] --> setup[setup] setup --> draw[draw loop] draw --> beamsloop[beams-loop] draw --> vignetteloop[vignette-loop] draw --> instructionsconditional[instructions-conditional] beamsloop --> update[update] beamsloop --> display[display] update --> insidecheck[inside-check] update --> enterconditional[enter-conditional] update --> leaveconditional[leave-conditional] enterconditional --> trigger[trigger] leaveconditional --> release[release] trigger --> startosc[startosc] startosc --> startoscguard[startosc-guard] startoscguard --> audioguard[audio-guard] audioguard --> intensitycalc[intensity-calc] intensitycalc --> outerglow[outer-glow] outerglow --> innercore[inner-core] vignetteloop --> vignette[vignette-loop] beamcreationloop[beam-creation-loop] --> constructor[constructor] click setup href "#fn-setup" click draw href "#fn-draw" click beamsloop href "#sub-beams-loop" click vignetteloop href "#sub-vignette-loop" click instructionsconditional href "#sub-instructions-conditional" click update href "#fn-update" click insidecheck href "#sub-inside-check" click enterconditional href "#sub-enter-conditional" click leaveconditional href "#sub-leave-conditional" click trigger href "#fn-trigger" click release href "#fn-release" click startosc href "#fn-startosc" click startoscguard href "#sub-startosc-guard" click audioguard href "#sub-audio-guard" click intensitycalc href "#sub-intensity-calc" click outerglow href "#sub-outer-glow" click innercore href "#sub-inner-core" click beamcreationloop href "#sub-beam-creation-loop"

❓ Frequently Asked Questions

What visual experience does the AI Laser Harp sketch provide?

The AI Laser Harp sketch creates a vibrant visual display of vertical laser beams in rainbow colors that react as users move their mouse across the screen.

How can users interact with the AI Laser Harp instrument?

Users interact by moving their mouse across the screen, triggering musical notes as they cross the colored laser beams.

What creative coding concepts does the AI Laser Harp showcase?

This sketch demonstrates concepts such as real-time user interaction, sound synthesis with p5.js, and visual mapping of audio frequency to color.

Preview

AI Laser Harp - Rainbow Light Instrument Play music with light! Move your mouse across the rainbow - p5.js creative coding sketch preview
Sketch Preview
Code flow diagram showing the structure of AI Laser Harp - Rainbow Light Instrument Play music with light! Move your mouse across the rainbow - Code flow showing constructor, startosc, getx, getw, update, trigger, release, display, setup, draw, mousepressed, touchstarted, windowresized
Code Flow Diagram