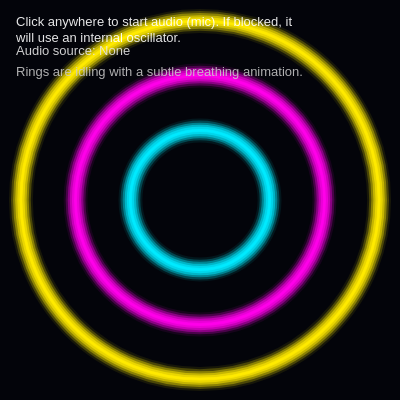
AI Music Visualizer Rings - Audio Frequency Art Watch neon concentric rings pulse to your music! Us

This sketch turns live microphone audio (or a fallback oscillator) into three glowing neon rings that pulse outward with bass, mid, and treble energy. Each ring smoothly eases toward a target radius driven by p5.FFT frequency analysis, creating a hypnotic, club-visualizer feel entirely in the browser.

🧪 Try This!

Experiment with the code by making these changes:

  1. Speed up the breathing animation — Increasing the sine wave's speed multiplier makes the idle 'breathing' wobble noticeably faster and jitterier.
  2. Make rings pulse more dramatically — Raising the max offset multiplier lets loud sounds push the rings much further outward.
  3. Thicken the neon glow — Doubling the number of glow layers creates a heavier, smoother halo around each ring (at a small performance cost).
  4. Change the fallback oscillator's tone — Switching the waveform from a buzzy sawtooth to a smooth sine changes the timbre of the fallback sound and its frequency content.
Prefer the full editor? Open it there →

📖 About This Sketch

This sketch listens to your microphone (or a built-in oscillator if mic access is blocked) and turns the sound into three pulsing neon rings, one each for bass, mid, and treble frequencies. What makes it visually interesting is the multi-layer glow effect - each ring is actually drawn six times with decreasing opacity and increasing thickness to fake a soft neon halo, on top of a single bright core stroke. The core p5.js techniques on display are p5.sound's FFT frequency analysis (fft.analyze() and getEnergy()), HSB color mode for vivid neon hues, and lerp() easing so the rings glide instead of snapping to new sizes.

The code is organized around a small state object per ring (stored in the rings array) that tracks a base radius, a target radius influenced by audio energy, and a current radius that eases toward that target every frame. setup() and initRings() build this state, draw() updates it each frame using live frequency energies, and two helper functions - drawNeonRing() and drawHUD() - handle all the actual rendering. By studying it you'll learn how to wire up p5.sound's microphone and FFT objects, how to fake a glow effect with layered strokes, and how easing with lerp() turns jumpy data into fluid motion.

⚙️ How It Works

  1. On load, setup() creates a full-window canvas, switches to HSB color mode for punchy neon hues, and creates a p5.FFT analyzer with smoothing so the frequency readings don't jitter wildly.
  2. initRings() builds three ring objects (bass, mid, treble), each starting at a different base radius spaced outward from the center of the canvas.
  3. The sketch waits for the user to click, which triggers startAudio() - it tries to start the microphone via userStartAudio() and p5.AudioIn, falling back to an internal sawtooth oscillator if mic access fails or is denied.
  4. Every frame, draw() calls fft.analyze() and fft.getEnergy() to read the current bass, mid, and treble loudness (0-255), then maps that energy into an extra radius offset for each ring, plus a small sine-wave 'breathing' wobble so the rings never sit perfectly still.
  5. Each ring's current radius eases toward its new target using lerp(..., 0.12), which smooths out sudden loudness spikes into fluid growth and shrinkage instead of jarring jumps.
  6. drawNeonRing() renders each ring as six overlapping translucent circles (glow) plus one bright core circle, while drawHUD() overlays instructions, the active audio source, and live energy numbers; pressing M lets you toggle between the microphone and the oscillator at any time.

🎓 Concepts You'll Learn

p5.FFT frequency analysisp5.AudioIn microphone inputHSB color mode for neon hueslerp() easing for smooth animationLayered translucent strokes for glow effectsPromise-based audio initialization (userStartAudio)

📝 Code Breakdown

setup()

setup() runs once when the sketch starts. Here it's used to configure the canvas, color system, and audio analyzer before any drawing happens.

function setup() {
  createCanvas(windowWidth, windowHeight);
  colorMode(HSB, 360, 100, 100, 255);
  angleMode(RADIANS);

  // p5.FFT(smoothing, bins) – smoothing ~0.8 keeps motion smooth
  fft = new p5.FFT(0.85, 1024);

  initRings();

  textFont('sans-serif');
  textSize(13);
}
Line-by-line explanation (7 lines)
createCanvas(windowWidth, windowHeight);
Makes the canvas fill the entire browser window so the rings can be centered on any screen size.
colorMode(HSB, 360, 100, 100, 255);
Switches p5's color system from RGB to Hue-Saturation-Brightness, which makes it much easier to pick vivid neon colors by just changing a hue number (0-360).
angleMode(RADIANS);
Ensures any angle-based math (like sin/cos used in the breathing animation) uses radians, p5's default and JavaScript's native math unit.
fft = new p5.FFT(0.85, 1024);
Creates the FFT (Fast Fourier Transform) analyzer that will turn raw audio into frequency data. 0.85 is smoothing (higher = less jittery), 1024 is the resolution of the analysis.
initRings();
Calls the helper function that builds the three ring objects (bass, mid, treble) with their starting radii.
textFont('sans-serif');
Sets the font used for the HUD overlay text.
textSize(13);
Sets the default text size in pixels for all text drawn afterward.
initRings()

This function builds the initial state for every ring as plain JavaScript objects stored in an array - a common pattern for managing multiple similar entities in p5.js sketches.

🔬 This loop spaces the three rings apart using the 0.13 multiplier. What happens if you increase it to 0.3 so the rings spread much further apart? What if you set it to 0 so they all start at the same radius?

  for (let i = 0; i < bands.length; i++) {
    const baseRadius = minDim * 0.18 + i * (minDim * 0.13);
function initRings() {
  rings.length = 0;
  const minDim = min(width, height);

  for (let i = 0; i < bands.length; i++) {
    const baseRadius = minDim * 0.18 + i * (minDim * 0.13);
    rings.push({
      index: i,
      band: bands[i].name,
      label: bands[i].label,
      hue: bands[i].hue,
      baseRadius,
      currentRadius: baseRadius,
      targetRadius: baseRadius
    });
  }
}
Line-by-line explanation (5 lines)

🔧 Subcomponents:

for-loop Build Ring Objects for (let i = 0; i < bands.length; i++) {

Creates one ring state object per frequency band, spacing their base radii outward from the center.

rings.length = 0;
Empties the rings array by setting its length to zero - a quick way to clear an array without creating a new one, useful when the window is resized and rings need to be rebuilt.
const minDim = min(width, height);
Finds the smaller of the canvas's width and height, used to scale ring sizes proportionally on any screen shape.
for (let i = 0; i < bands.length; i++) {
Loops once for each entry in the bands array (bass, mid, treble).
const baseRadius = minDim * 0.18 + i * (minDim * 0.13);
Calculates each ring's starting radius: the first ring starts at 18% of minDim, and each subsequent ring is pushed out another 13% of minDim.
rings.push({ ... });
Adds a new ring object to the array, storing its index, band name, label, hue, and radius values (base, current, target all start equal).

draw()

draw() is the animation heartbeat of any p5.js sketch, running ~60 times per second. Here it reads live audio data, updates state (radii), and then renders - a pattern (update, then draw) worth using in almost every animated sketch you build.

🔬 This only runs when the fallback oscillator is active, sweeping its pitch between 80 and 420 Hz. What happens if you widen the range to 40-1000, or speed up the sweep by changing 0.01 to 0.1?

    if (!useMic && osc) {
      const freq = map(sin(frameCount * 0.01), -1, 1, 80, 420);
      osc.freq(freq);
    }

🔬 The 0.12 controls how quickly each ring eases toward its target size. What happens if you change it to 0.5 (snappier) or 0.02 (much lazier, more delayed)?

    r.targetRadius = r.baseRadius + energyOffset + breath;

    // Smooth easing towards target radius
    // lerp() ref: https://p5js.org/reference/#/p5/lerp
    r.currentRadius = lerp(r.currentRadius, r.targetRadius, 0.12);
function draw() {
  // Very dark blue-ish background for neon contrast
  background(230, 70, 4);

  // Center of canvas
  const cx = width / 2;
  const cy = height / 2;

  // Get band energies if audio is running
  const energies = {
    bass: 0,
    mid: 0,
    treble: 0
  };

  if (audioStarted) {
    fft.analyze(); // Fill internal spectrum data
    // getEnergy(bandName) returns 0–255
    energies.bass   = fft.getEnergy('bass');
    energies.mid    = fft.getEnergy('mid');
    energies.treble = fft.getEnergy('treble');

    // Optional: animate oscillator a bit if that's the source
    if (!useMic && osc) {
      const freq = map(sin(frameCount * 0.01), -1, 1, 80, 420);
      osc.freq(freq);
    }
  }

  // Update ring radii with smooth easing
  const minDim = min(width, height);
  const maxOffset = minDim * 0.16; // max extra radius due to energy

  for (let r of rings) {
    const energy = energies[r.band] || 0;
    const energyNorm = energy / 255; // 0..1

    // Map energy to a radius offset
    const energyOffset = energyNorm * maxOffset;

    // Subtle breathing so rings move even when quiet
    const breath = sin(frameCount * 0.03 + r.index * 0.8) * (minDim * 0.01);

    r.targetRadius = r.baseRadius + energyOffset + breath;

    // Smooth easing towards target radius
    // lerp() ref: https://p5js.org/reference/#/p5/lerp
    r.currentRadius = lerp(r.currentRadius, r.targetRadius, 0.12);
  }

  // Draw rings with neon glow
  for (let r of rings) {
    drawNeonRing(cx, cy, r.currentRadius, r.hue);
  }

  drawHUD(energies);
}
Line-by-line explanation (17 lines)

🔧 Subcomponents:

conditional Read Audio Energy if (audioStarted) {

Only analyzes frequency data and reads energies once audio has actually been started.

conditional Animate Oscillator Pitch if (!useMic && osc) {

When using the fallback oscillator instead of the mic, slowly sweeps its pitch so the visualizer has something to react to.

for-loop Update Ring Radii for (let r of rings) {

Calculates each ring's target radius from its band energy plus a breathing wobble, then eases the current radius toward it.

for-loop Render Rings for (let r of rings) {

Draws each ring using its eased current radius and assigned neon hue.

background(230, 70, 4);
Repaints the whole canvas each frame with a very dark, deep-blue color (in HSB), which also erases the previous frame so the rings don't smear.
const cx = width / 2;
Finds the horizontal center of the canvas so all rings can be drawn concentric to it.
if (audioStarted) {
Skips all frequency analysis until the user has clicked to start audio, avoiding errors from an uninitialized FFT input.
fft.analyze();
Tells the FFT object to process the latest chunk of audio into frequency spectrum data - must be called before getEnergy() each frame.
energies.bass = fft.getEnergy('bass');
Reads how loud the bass frequency range currently is, returned as a number from 0 (silent) to 255 (max loudness).
if (!useMic && osc) {
Only runs this pitch-sweeping animation when the oscillator (not the mic) is the active audio source.
const freq = map(sin(frameCount * 0.01), -1, 1, 80, 420);
Uses a sine wave based on frameCount to smoothly sweep a frequency value back and forth between 80Hz and 420Hz.
osc.freq(freq);
Applies the newly calculated frequency to the oscillator, changing its pitch in real time.
const maxOffset = minDim * 0.16;
Defines the maximum extra radius (as a fraction of the smaller canvas dimension) a ring can gain from loudness.
for (let r of rings) {
Loops through each of the three ring objects to update its size.
const energyNorm = energy / 255;
Converts the 0-255 energy reading into a normalized 0-1 range, which is easier to multiply against other values.
const energyOffset = energyNorm * maxOffset;
Scales the normalized energy into an actual pixel offset to add to the ring's radius.
const breath = sin(frameCount * 0.03 + r.index * 0.8) * (minDim * 0.01);
Adds a slow, gentle sine-wave wobble to each ring so they visibly 'breathe' even when there's no sound - each ring is offset in phase by its index so they don't all move in sync.
r.targetRadius = r.baseRadius + energyOffset + breath;
Combines the ring's fixed base size, the audio-driven offset, and the breathing wobble into one target radius to animate toward.
r.currentRadius = lerp(r.currentRadius, r.targetRadius, 0.12);
Moves the ring's displayed radius 12% of the way toward its target every frame, which creates smooth, springy easing instead of an instant jump.
drawNeonRing(cx, cy, r.currentRadius, r.hue);
Draws the actual glowing ring on screen using its current eased radius and hue.
drawHUD(energies);
Draws the text overlay showing instructions, audio source, and live energy readouts on top of the rings.

mousePressed()

mousePressed() is a p5.js event function that runs automatically whenever the mouse is clicked, commonly used here to satisfy the browser's requirement that audio must start from a user gesture.

function mousePressed() {
  if (!audioStarted) {
    startAudio();
  }
}
Line-by-line explanation (2 lines)

🔧 Subcomponents:

conditional Start Audio Once if (!audioStarted) {

Prevents restarting audio if it's already running when the user clicks again.

if (!audioStarted) {
Only attempts to start audio if it hasn't already been started, since browsers require a user gesture (like a click) to begin audio playback.
startAudio();
Calls the helper function that requests microphone access (or falls back to the oscillator).

keyPressed()

keyPressed() is a p5.js event function triggered whenever any key is pressed, and 'key' holds the character typed - useful for adding simple keyboard shortcuts to a sketch.

🔬 This checks for the 'm' key to trigger the audio-source toggle. What happens if you change it to check for the spacebar (key === ' ') instead?

  if (key === 'm' || key === 'M') {
    if (useMic) {
function keyPressed() {
  // Toggle between microphone and oscillator after audio has started
  if (!audioStarted) return;

  if (key === 'm' || key === 'M') {
    if (useMic) {
      // Switch to oscillator
      if (mic) {
        mic.stop();
      }
      startOscillatorOnly();
    } else {
      // Switch back to microphone
      if (osc) {
        osc.stop();
        if (osc.dispose) osc.dispose();
      }
      startMicOnly();
    }
  }
}
Line-by-line explanation (7 lines)

🔧 Subcomponents:

conditional Require Audio Started if (!audioStarted) return;

Prevents toggling audio sources before any audio has been initialized.

conditional Check For M Key if (key === 'm' || key === 'M') {

Only responds when the M key (either case) is pressed.

conditional Toggle Mic/Oscillator if (useMic) {

Switches to the opposite audio source from whichever is currently active.

if (!audioStarted) return;
Exits immediately if audio hasn't started yet, since there's nothing to toggle between.
if (key === 'm' || key === 'M') {
Checks whether the pressed key is 'm' or 'M' - p5.js's key variable holds the character of the last key pressed.
if (useMic) {
If the microphone is currently active, this branch switches to the oscillator instead.
if (mic) { mic.stop(); }
Stops the microphone stream if it exists, freeing up the audio input.
startOscillatorOnly();
Starts the fallback oscillator and routes it into the FFT analyzer.
if (osc) { osc.stop(); if (osc.dispose) osc.dispose(); }
Stops and cleans up the oscillator before switching back to the microphone.
startMicOnly();
Restarts the microphone and routes it into the FFT analyzer.

windowResized()

windowResized() is a p5.js event function that fires automatically whenever the browser window is resized - essential for making responsive, full-window sketches.

function windowResized() {
  resizeCanvas(windowWidth, windowHeight);
  initRings();
}
Line-by-line explanation (2 lines)
resizeCanvas(windowWidth, windowHeight);
Resizes the canvas to match the browser window whenever it changes size (e.g. resizing the browser or rotating a phone).
initRings();
Rebuilds the ring objects from scratch since their base radii depend on the canvas dimensions, which just changed.

startAudio()

This function demonstrates handling browser audio permission requirements using a Promise (userStartAudio().then/.catch) - a pattern you'll need for any p5.sound project that plays or records audio.

function startAudio() {
  if (audioStarted) return;

  // Required on browsers for starting audio in a user gesture
  // https://p5js.org/reference/#/p5/userStartAudio
  userStartAudio().then(() => {
    startMicOnly();
  }).catch(err => {
    console.warn('Audio context start error, using oscillator instead:', err);
    startOscillatorOnly();
  });
}
Line-by-line explanation (5 lines)

🔧 Subcomponents:

conditional Prevent Double Start if (audioStarted) return;

Stops this function from running again if audio is already active.

if (audioStarted) return;
Exits early if audio has already been started, avoiding duplicate audio contexts.
userStartAudio().then(() => {
Asks the browser to unlock/start the Web Audio context (required because browsers block audio until a user gesture happens); .then() runs once that succeeds.
startMicOnly();
Once audio is allowed, attempts to start the microphone as the primary audio source.
}).catch(err => {
Catches any error from starting the audio context, for example if the browser blocks it entirely.
startOscillatorOnly();
Falls back to the internal oscillator so the visualizer still has something to react to, even without microphone access.

startMicOnly()

This function shows the standard p5.AudioIn pattern: create it, then call start() with success/error callbacks since microphone access is asynchronous and requires user permission.

function startMicOnly() {
  mic = new p5.AudioIn();

  // mic.start(successCallback, errorCallback)
  mic.start(() => {
    console.log('Microphone started');
    fft.setInput(mic);
    useMic = true;
    audioStarted = true;
  }, err => {
    console.warn('Mic error, falling back to oscillator:', err);
    startOscillatorOnly();
  });
}
Line-by-line explanation (6 lines)
mic = new p5.AudioIn();
Creates a new microphone input object using p5.sound's AudioIn class.
mic.start(() => { ... }, err => { ... });
Requests microphone access from the browser; the first callback runs on success, the second runs if the user denies permission or an error occurs.
fft.setInput(mic);
Tells the FFT analyzer to analyze the microphone's audio stream instead of the default master output.
useMic = true;
Records that the microphone is now the active audio source, used elsewhere (like the HUD and keyPressed toggle).
audioStarted = true;
Marks that audio analysis can now begin in draw().
startOscillatorOnly();
If the microphone fails to start (e.g. permission denied), falls back to the internal oscillator so the sketch still works.

startOscillatorOnly()

This function shows how to create and configure a p5.Oscillator as a synthetic fallback audio source, giving the visualizer something to analyze even without microphone access.

function startOscillatorOnly() {
  if (osc) {
    osc.stop();
    if (osc.dispose) osc.dispose();
  }
  osc = new p5.Oscillator('sawtooth');
  osc.freq(120);
  osc.amp(0.3);
  osc.start();

  fft.setInput(osc);
  useMic = false;
  audioStarted = true;
}
Line-by-line explanation (8 lines)

🔧 Subcomponents:

conditional Clean Up Old Oscillator if (osc) {

Stops and disposes of any previous oscillator instance before creating a fresh one, avoiding overlapping sounds.

if (osc) { osc.stop(); if (osc.dispose) osc.dispose(); }
If an oscillator already exists from a previous call, stops it and frees its resources first.
osc = new p5.Oscillator('sawtooth');
Creates a new oscillator using a buzzy sawtooth waveform as the fallback sound source.
osc.freq(120);
Sets the oscillator's starting pitch to 120 Hz (a low bass-ish tone).
osc.amp(0.3);
Sets the oscillator's volume to 30% to avoid it being too loud.
osc.start();
Begins playing the oscillator's sound.
fft.setInput(osc);
Routes the oscillator's audio into the FFT analyzer so its frequency content can drive the rings.
useMic = false;
Records that the oscillator (not the mic) is now the active source.
audioStarted = true;
Marks audio as running so draw() begins analyzing frequency data.

drawNeonRing()

This function demonstrates a classic 'fake glow' trick used in creative coding: instead of a real blur/bloom shader, you just stack several semi-transparent shapes of increasing size to simulate soft light spreading outward.

🔬 This loop fades opacity from 200 (inner) to 20 (outer). What happens if you widen that range to 255 and 5 for a more intense glow, or narrow it to 100 and 80 for a flatter, more uniform look?

  for (let i = glowLayers; i >= 1; i--) {
    const alpha = map(i, 1, glowLayers, 200, 20); // stronger alpha inside
    const weight = map(i, 1, glowLayers, 3, 24);  // thicker outer halo

    stroke(hue, 100, 100, alpha);
    strokeWeight(weight);
function drawNeonRing(cx, cy, radius, hue) {
  push();
  noFill();

  const glowLayers = 6;

  // Soft glow layers (outer to inner)
  for (let i = glowLayers; i >= 1; i--) {
    const alpha = map(i, 1, glowLayers, 200, 20); // stronger alpha inside
    const weight = map(i, 1, glowLayers, 3, 24);  // thicker outer halo

    stroke(hue, 100, 100, alpha);
    strokeWeight(weight);
    circle(cx, cy, radius * 2);
  }

  // Bright core ring
  stroke(hue, 100, 100, 255);
  strokeWeight(2);
  circle(cx, cy, radius * 2);

  pop();
}
Line-by-line explanation (11 lines)

🔧 Subcomponents:

for-loop Draw Glow Layers for (let i = glowLayers; i >= 1; i--) {

Draws multiple overlapping translucent circles of decreasing weight and increasing opacity to simulate a soft neon glow.

push();
Saves the current drawing style settings so changes made inside this function don't leak out and affect other drawing calls.
noFill();
Ensures the circles are drawn as outlines only, not filled shapes, since we only want a ring.
const glowLayers = 6;
Sets how many stacked translucent circles will be drawn to build up the glow effect.
for (let i = glowLayers; i >= 1; i--) {
Loops from the outermost glow layer down to the innermost, drawing each in turn.
const alpha = map(i, 1, glowLayers, 200, 20);
Maps the loop counter to an opacity value - layers closer to the center (i=1) are more opaque (200), and outer layers (i=6) fade out (20).
const weight = map(i, 1, glowLayers, 3, 24);
Maps the loop counter to a stroke thickness - outer layers are drawn thicker (24px) to spread the glow, inner layers thinner (3px).
stroke(hue, 100, 100, alpha);
Sets the outline color to the ring's assigned hue at full saturation/brightness, with the calculated transparency.
circle(cx, cy, radius * 2);
Draws a circle centered at (cx, cy). The diameter is radius * 2 since circle() takes a diameter, not a radius.
stroke(hue, 100, 100, 255);
After the glow loop, sets a fully opaque stroke color for the bright, crisp core ring.
strokeWeight(2);
Uses a thin stroke for the sharp core ring so it reads as a crisp edge on top of the soft glow.
pop();
Restores the drawing style settings that were saved with push(), so this function's changes don't affect anything drawn afterward.

drawHUD()

drawHUD() shows how to layer a text overlay on top of graphics using push()/pop()/resetMatrix() to isolate its styling, plus template literals and ternaries for dynamic status text.

🔬 This loop pads each energy number to 3 digits using nf(e, 3, 0). What happens if you change it to 5 digits, or show it as a percentage of 255 instead of the raw number?

    for (let r of rings) {
      const e = energies[r.band] || 0;
      fill(r.hue, 80, 100, 220);
      text(`${r.label}: ${nf(e, 3, 0)}`, x, y);
      y += lineH;
    }
function drawHUD(energies) {
  push();
  resetMatrix();
  textAlign(LEFT, TOP);
  noStroke();

  let x = 16;
  let y = 16;
  const lineH = 18;

  // Instructions
  fill(0, 0, 100, 230);
  const instr = audioStarted
    ? 'Press M to toggle between microphone and internal oscillator.'
    : 'Click anywhere to start audio (mic). If blocked, it will use an internal oscillator.';
  text(instr, x, y, width * 0.7);
  y += lineH * 1.6;

  // Source info
  fill(0, 0, 90, 230);
  const src = audioStarted ? (useMic ? 'Microphone' : 'Oscillator') : 'None';
  text(`Audio source: ${src}`, x, y);
  y += lineH * 1.2;

  // Ring / band energy readout
  if (audioStarted) {
    for (let r of rings) {
      const e = energies[r.band] || 0;
      fill(r.hue, 80, 100, 220);
      text(`${r.label}: ${nf(e, 3, 0)}`, x, y);
      y += lineH;
    }
  } else {
    fill(0, 0, 80, 220);
    text('Rings are idling with a subtle breathing animation.', x, y);
  }

  pop();
}
Line-by-line explanation (11 lines)

🔧 Subcomponents:

conditional Choose Instruction Text const instr = audioStarted

Shows different instructions depending on whether audio has already started.

for-loop List Band Energies for (let r of rings) {

Prints each ring's label and current energy value as text lines.

push();
Saves the current drawing style so HUD-specific settings don't affect the rings drawn earlier.
resetMatrix();
Resets any translation/rotation transforms to make sure the HUD text is always positioned relative to the true canvas origin (not affected by transforms elsewhere).
textAlign(LEFT, TOP);
Sets text to be aligned from its left edge and top, so (x, y) marks the top-left corner of each line of text.
let x = 16;
Starting horizontal position for all HUD text, 16 pixels from the left edge.
const instr = audioStarted ? '...' : '...';
Uses a ternary operator to pick one of two instruction strings depending on whether audio has started yet.
text(instr, x, y, width * 0.7);
Draws the instruction text, constrained to 70% of the canvas width so it wraps instead of running off-screen.
const src = audioStarted ? (useMic ? 'Microphone' : 'Oscillator') : 'None';
A nested ternary that reports which audio source is active, or 'None' if audio hasn't started.
if (audioStarted) {
Only shows live energy numbers once there's actual audio data to display.
for (let r of rings) {
Loops through each ring to print its band label and current energy value.
text(`${r.label}: ${nf(e, 3, 0)}`, x, y);
Draws text like 'Bass: 042', using nf() (number format) to pad the number to 3 digits for a tidy, aligned readout.
pop();
Restores the saved drawing style so anything drawn next frame starts fresh.

📦 Key Variables

fft object

Holds the p5.FFT instance used to analyze audio and extract bass/mid/treble energy each frame.

let fft;
mic object

Holds the p5.AudioIn instance representing the user's microphone input.

let mic;
osc object

Holds the p5.Oscillator instance used as a fallback audio source when the microphone isn't available.

let osc;
audioStarted boolean

Tracks whether any audio source (mic or oscillator) has been successfully started, gating frequency analysis in draw().

let audioStarted = false;
useMic boolean

Tracks whether the microphone (true) or the oscillator (false) is currently feeding the FFT analyzer.

let useMic = true;
rings array

Stores one state object per frequency band (bass, mid, treble), each tracking its base/current/target radius and hue.

const rings = [];
bands array

A fixed configuration list defining each frequency band's name (used with getEnergy), display label, and neon hue.

const bands = [{ name: 'bass', label: 'Bass', hue: 185 }];

🔧 Potential Improvements (4)

Here are some ways this code could be enhanced:

BUG keyPressed()

When switching from microphone to oscillator, mic.stop() is called but the p5.AudioIn object itself is never disposed, which can leave unused audio nodes lingering in memory.

💡 Call mic.dispose() (if available) after mic.stop(), similar to how the oscillator is cleaned up with osc.dispose(), to fully release the microphone's audio resources.

PERFORMANCE drawNeonRing()

Every ring is redrawn as 7 separate circle() calls (6 glow layers + 1 core) every single frame, and with 3 rings that's 21 stroked circles per frame just for the visualizer.

💡 For very large canvases or lower-end devices, consider caching the glow as a pre-rendered p5.Graphics buffer that's scaled/tinted per frame instead of redrawing every stroke layer from scratch.

STYLE draw() and initRings()

Several 'magic numbers' (0.18, 0.13, 0.16, 0.01, 0.03, 0.12) control layout and animation feel but aren't named or documented in one place.

💡 Pull these into named constants (e.g. RING_SPACING, MAX_PULSE_RATIO, EASING_SPEED, BREATH_SPEED) declared near the top of the file so their purpose is clear and they're easy to tune together.

FEATURE drawHUD() / bands

The visualizer only shows three fixed bands (bass, mid, treble) with no way to see the full spectrum shape.

💡 Add an optional full-spectrum waveform or bar display using fft.waveform() or fft.analyze() array data, toggled with another key, to complement the three summary rings.

🔄 Code Flow

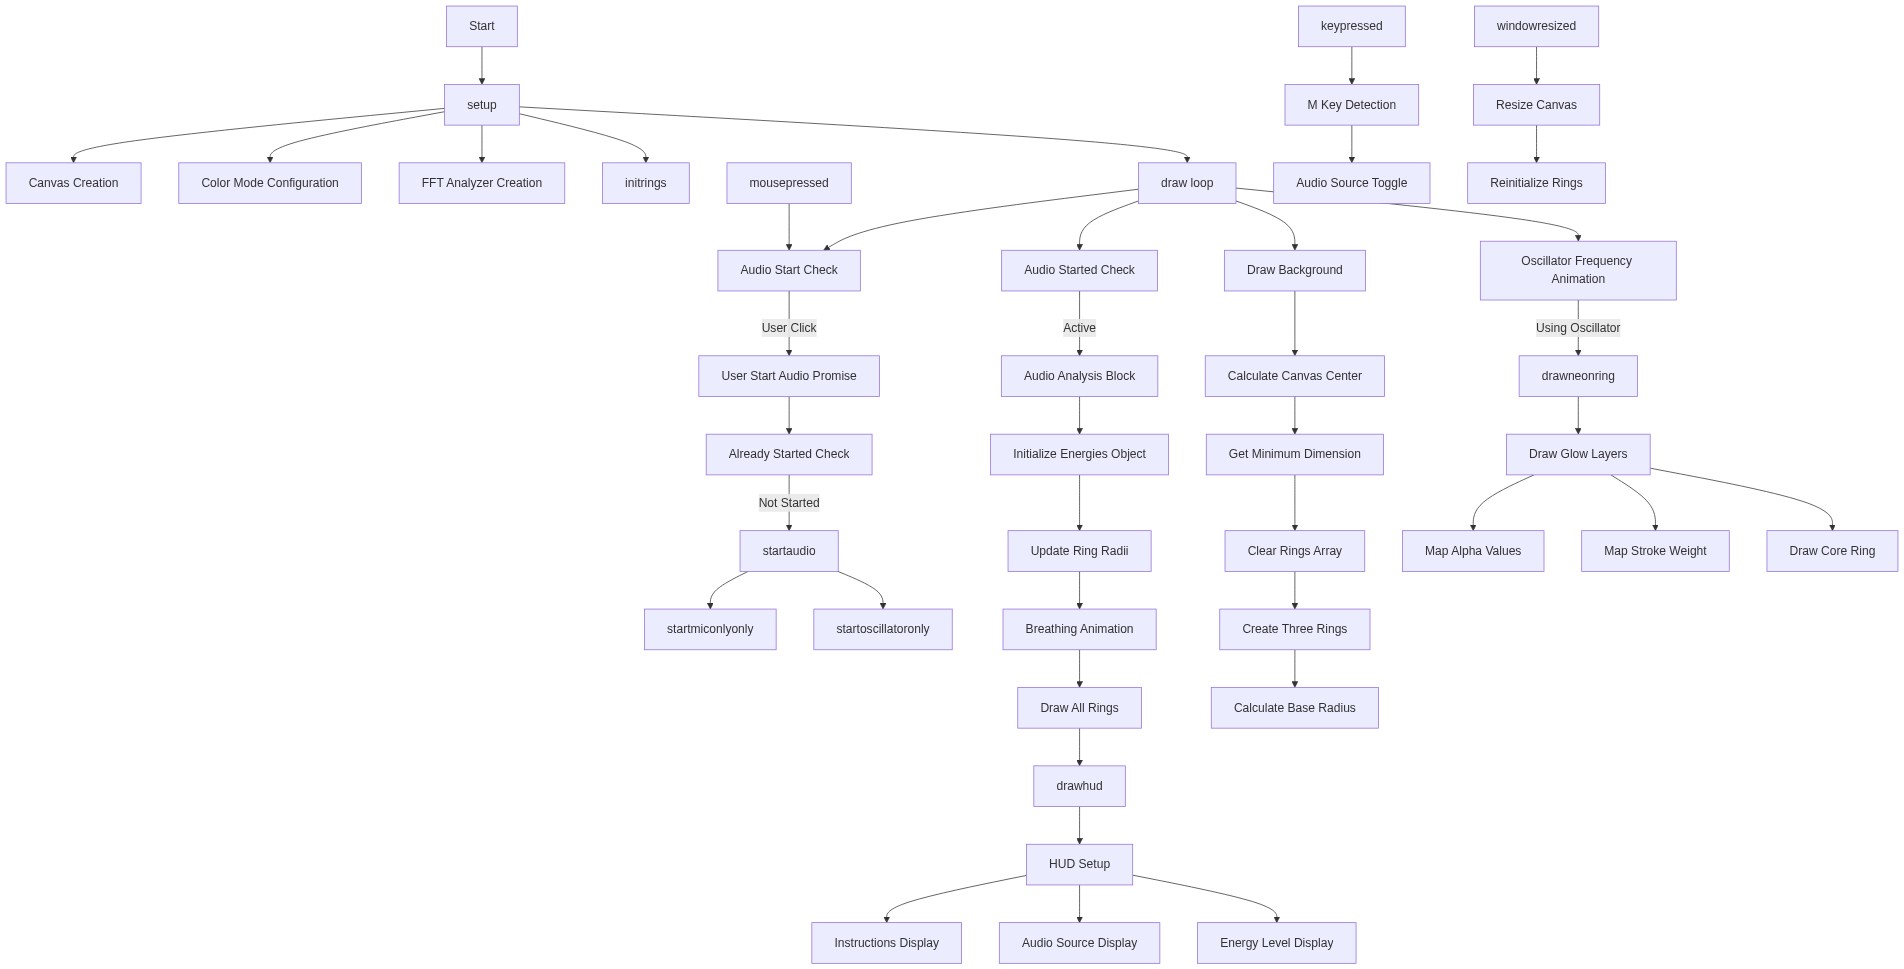
Code flow showing setup, initrings, draw, mousepressed, keypressed, windowresized, startaudio, startmiconly, startoscillatoronly, drawneonring, drawhud

💡 Click on function names in the diagram to jump to their code

graph TD start[Start] --> setup[setup] setup --> initrings[initrings] setup --> draw[draw loop] click setup href "#fn-setup" click initrings href "#fn-initrings" click draw href "#fn-draw" draw --> draw-audiocheck[Audio Check] draw-audiocheck -->|Audio Started| draw-oscanim[Oscillator Animation] draw-audiocheck -->|Audio Not Started| draw-updateloop[Update Loop] draw-audiocheck -->|Audio Not Started| draw-renderloop[Render Loop] draw-oscanim --> draw-updateloop draw-updateloop --> draw-renderloop draw-updateloop --> initrings-forloop[Build Ring Objects] draw-renderloop --> drawneonring-glowloop[Draw Glow Layers] click draw-audiocheck href "#sub-draw-audiocheck" click draw-oscanim href "#sub-draw-oscanim" click draw-updateloop href "#sub-draw-updateloop" click draw-renderloop href "#sub-draw-renderloop" click initrings-forloop href "#sub-initrings-forloop" click drawneonring-glowloop href "#sub-drawneonring-glowloop" initrings-forloop -->|Create Rings| draw-updateloop draw-updateloop -->|Update Radii| draw-renderloop draw-renderloop --> drawhud[drawhud] drawhud --> drawhud-instrternary[Instruction Text] drawhud --> drawhud-energyloop[Band Energies] click drawhud href "#fn-drawhud" click drawhud-instrternary href "#sub-drawhud-instrternary" click drawhud-energyloop href "#sub-drawhud-energyloop" mousepressed[mousepressed] --> mousepressed-check[Start Audio Once] click mousepressed href "#fn-mousepressed" click mousepressed-check href "#sub-mousepressed-check" keypressed[keypressed] --> keypressed-guard[Require Audio Started] keypressed --> keypressed-keycheck[Check For M Key] keypressed-keycheck --> keypressed-toggle[Toggle Mic/Oscillator] click keypressed href "#fn-keypressed" click keypressed-guard href "#sub-keypressed-guard" click keypressed-keycheck href "#sub-keypressed-keycheck" click keypressed-toggle href "#sub-keypressed-toggle" startaudio[startaudio] --> startaudio-guard[Prevent Double Start] startaudio --> startmiconly[startmiconly] startaudio --> startoscillatoronly[startoscillatoronly] click startaudio href "#fn-startaudio" click startaudio-guard href "#sub-startaudio-guard" click startmiconly href "#fn-startmiconly" click startoscillatoronly href "#fn-startoscillatoronly" startoscillatoronly --> startosc-cleanup[Clean Up Old Oscillator] click startosc-cleanup href "#sub-startosc-cleanup"

❓ Frequently Asked Questions

What visual effects does the AI Music Visualizer Rings sketch produce?

The sketch creates vibrant, neon concentric rings that pulse and morph in response to different audio frequency bands, such as bass, mid, and treble.

How can users interact with the AI Music Visualizer Rings sketch?

Users can interact by using their microphone to input audio, allowing the visualizer to respond dynamically to the sounds in the environment.

What creative coding concepts are showcased in the AI Music Visualizer Rings sketch?

This sketch demonstrates the use of audio frequency analysis with p5.js, specifically utilizing the Fast Fourier Transform (FFT) to visualize audio data creatively.

Preview

AI Music Visualizer Rings - Audio Frequency Art Watch neon concentric rings pulse to your music! Us - p5.js creative coding sketch preview
Sketch Preview
Code flow diagram showing the structure of AI Music Visualizer Rings - Audio Frequency Art Watch neon concentric rings pulse to your music! Us - Code flow showing setup, initrings, draw, mousepressed, keypressed, windowresized, startaudio, startmiconly, startoscillatoronly, drawneonring, drawhud
Code Flow Diagram