
AI Pendulum Wave - Mesmerizing Harmonic Motion Physics - xelsed.ai

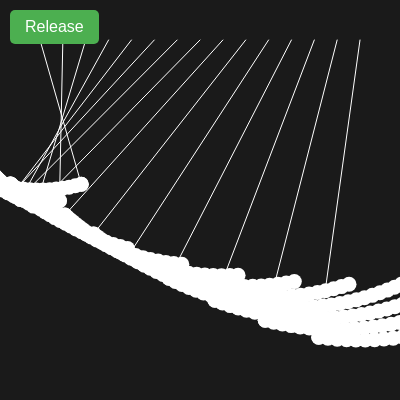
This sketch simulates 15 pendulums of gradually increasing arm length, all released from the same starting angle so they swing at slightly different frequencies. As they oscillate, the pendulums drift in and out of phase with each other, producing traveling wave patterns, moments of perfect synchronization, and eventual chaotic motion - a classic physics demonstration rendered with glowing HSB-colored trails.

🧪 Try This!

Experiment with the code by making these changes:

  1. Add more pendulums — Doubling the pendulum count makes the wave pattern denser and smoother, since more points fill in the traveling wave shape.
  2. Speed up gravity — Increasing gravity makes every pendulum swing faster, so the wave, sync, and chaos cycle repeats much more quickly.
  3. Fix the trail fade bug — Since colorMode's alpha range tops out at 1 (not 150), correcting the map() range makes the trails actually fade smoothly instead of appearing almost fully opaque.
  4. Leave ghostly motion smears — Lowering the background's alpha stops it from fully erasing the previous frame, leaving longer ghost trails behind every bob.
Prefer the full editor? Open it there →

📖 About This Sketch

This sketch creates a row of 15 pendulums with arm lengths that increase step by step from left to right, each swinging from the same starting angle at the same instant. Because longer pendulums swing more slowly than shorter ones, tiny differences in period cause the bobs to drift apart into rippling wave shapes, briefly re-align into a mirrored formation, then dissolve into apparent chaos - only to resynchronize again later. The effect is powered by a simple angular-acceleration physics formula, an array of custom Pendulum objects, HSB color cycling, and fading motion trails built from an array of past positions.

The code is organized around a Pendulum class that stores each pendulum's anchor point, arm length, angle, and velocity, with update() handling the physics and display() handling the drawing. setup() builds the array of 15 Pendulum instances with lengths and hues spread evenly across the canvas, draw() loops through them every frame, and a resetPendulums() function tied to an on-screen button restarts the whole wave. Studying this sketch teaches you how to model real physics with just a few lines of math, how classes keep per-object state organized, and how storing a short history of positions creates a smooth glowing trail effect.

⚙️ How It Works

  1. When the sketch loads, setup() creates a full-window canvas, switches to HSB color mode, and builds 15 Pendulum objects whose arm lengths increase linearly from 150 to 300 pixels and whose colors sweep across the full hue spectrum
  2. A 'Release' button is created and wired to resetPendulums(), which snaps every pendulum back to its 45-degree starting angle with zero velocity
  3. Every frame, draw() clears the background and calls update() then display() on each pendulum in turn
  4. Inside update(), each pendulum's angular acceleration is calculated from a simplified pendulum-physics formula (proportional to gravity, inversely proportional to arm length, and dependent on the sine of the current angle), which is added to velocity and then to the angle
  5. Each pendulum keeps a short list of its last 30 bob positions in this.path, and display() draws that list as a trail of fading circles behind the solid bob, using the arm's line from anchor to bob and circles at each stored point
  6. Because longer pendulums swing more slowly, all 15 pendulums gradually fall out of step with one another, creating the wave, sync, and chaos cycle, and windowResized() keeps the anchor points evenly spread if the browser window changes size

🎓 Concepts You'll Learn

Simple harmonic motion physicsES6 classes and object-oriented designHSB color mode with alphaArrays of custom objectsMotion trails via position history arraysDOM elements with createButtonwindowResized responsive layout

📝 Code Breakdown

Pendulum constructor()

The constructor runs once when 'new Pendulum(...)' is called in setup(). It's where you set up all the starting values an object needs before the simulation begins - a foundational pattern in object-oriented JavaScript.

constructor(x, y, length, initialAngle, bobSize, color) {
    this.x = x;           // Anchor x-coordinate
    this.y = y;           // Anchor y-coordinate
    this.len = length;    // Length of the pendulum arm
    this.angle = initialAngle; // Current angle from vertical
    this.velocity = 0;    // Angular velocity
    this.bobSize = bobSize; // Diameter of the bob
    this.color = color;   // Color of the bob

    // For trails (glowing circles)
    this.bobX = this.x + this.len * sin(this.angle);
    this.bobY = this.y + this.len * cos(this.angle);
    this.path = [];         // Stores past positions of the bob for trails
    this.pathLength = 30;   // Number of points to keep in the trail
  }
Line-by-line explanation (7 lines)
this.x = x;
Stores the fixed anchor point's horizontal position - the pendulum swings around this point.
this.len = length;
Stores how long this particular pendulum's arm is, which directly controls its swing speed.
this.angle = initialAngle;
Sets the starting angle (in radians) that the pendulum begins swinging from - all pendulums start at the same 45-degree angle.
this.velocity = 0;
Angular velocity starts at zero since the pendulum is released from rest.
this.bobX = this.x + this.len * sin(this.angle);
Calculates the bob's initial x position using basic trigonometry: horizontal offset from the anchor equals arm length times the sine of the angle.
this.path = [];
Creates an empty array that will store the bob's recent positions to draw a fading trail.
this.pathLength = 30;
Sets how many past positions are remembered - this controls how long the glowing trail appears.
update()

update() is called once per pendulum every frame from draw(). It's a textbook example of numerical integration - repeatedly nudging velocity by acceleration and position by velocity to simulate continuous motion.

🔬 This is the core physics engine: acceleration builds up velocity, and velocity moves the angle. What happens if you add friction by multiplying velocity by 0.999 right after adding acceleration, like this.velocity += acceleration; this.velocity *= 0.999;?

    this.velocity += acceleration;
    this.angle += this.velocity;
update() {
    // Apply pendulum physics
    // acceleration = -gravity / length * sin(angle)
    let acceleration = -gravity / this.len * sin(this.angle);

    // Update velocity and angle
    this.velocity += acceleration;
    this.angle += this.velocity;

    // Calculate the bob's current position
    this.bobX = this.x + this.len * sin(this.angle);
    this.bobY = this.y + this.len * cos(this.angle);

    // Add current bob position to the path for trails
    this.path.push(createVector(this.bobX, this.bobY));
    if (this.path.length > this.pathLength) {
      this.path.shift(); // Remove the oldest point if path is too long
    }
  }
Line-by-line explanation (6 lines)

🔧 Subcomponents:

conditional Trail Length Limiter if (this.path.length > this.pathLength) {

Removes the oldest stored position once the trail array grows past its allowed length, keeping the trail a fixed size.

let acceleration = -gravity / this.len * sin(this.angle);
This is the simplified pendulum physics formula: acceleration is stronger for shorter arms and larger swing angles, and always pulls the bob back toward the center (hence the minus sign).
this.velocity += acceleration;
Adds this frame's acceleration to the running angular velocity - this is basic Euler integration, the same technique used in most simple physics simulations.
this.angle += this.velocity;
Moves the pendulum by adding velocity to its current angle, actually changing its swing position.
this.bobX = this.x + this.len * sin(this.angle);
Converts the new angle back into an x,y pixel position using trigonometry so it can be drawn.
this.path.push(createVector(this.bobX, this.bobY));
Saves the current bob position into the trail history array as a p5.Vector.
if (this.path.length > this.pathLength) { this.path.shift(); }
Once the trail has more points than allowed, the oldest one is removed so the trail doesn't grow forever.

display()

display() is called once per pendulum every frame from draw(), right after update(). It's responsible for everything you actually see - the arm, the fading trail, and the bob - all drawn using the position values update() just calculated.

🔬 setup() uses colorMode(HSB, 360, 100, 100, 1) - meaning alpha only ranges from 0 to 1, not 0 to 150! What happens if you change the map()'s output range from 0, 150 to 0, 1 so the fade actually works as intended?

    for (let i = 0; i < this.path.length; i++) {
      let alpha = map(i, 0, this.path.length, 0, 150); // Trail fades out
      fill(this.color.h, this.color.s, this.color.b, alpha);
      circle(this.path[i].x, this.path[i].y, this.bobSize);
    }
display() {
    // Draw the pendulum arm
    stroke(200); // Light grey arm
    strokeWeight(1);
    line(this.x, this.y, this.bobX, this.bobY);

    // Draw the trail (glowing circles)
    noStroke();
    for (let i = 0; i < this.path.length; i++) {
      let alpha = map(i, 0, this.path.length, 0, 150); // Trail fades out
      fill(this.color.h, this.color.s, this.color.b, alpha);
      circle(this.path[i].x, this.path[i].y, this.bobSize);
    }

    // Draw the main bob
    fill(this.color.h, this.color.s, this.color.b); // Solid color
    circle(this.bobX, this.bobY, this.bobSize);
  }
Line-by-line explanation (6 lines)

🔧 Subcomponents:

for-loop Trail Circle Loop for (let i = 0; i < this.path.length; i++) {

Draws every stored past position as a circle with increasing transparency, creating the glowing trail effect.

line(this.x, this.y, this.bobX, this.bobY);
Draws the straight arm connecting the fixed anchor point to the current bob position.
for (let i = 0; i < this.path.length; i++) {
Loops through every saved position in the trail history, oldest to newest.
let alpha = map(i, 0, this.path.length, 0, 150); // Trail fades out
Calculates an alpha (transparency) value for each trail point - later points (closer to the bob) should be more opaque, earlier ones more transparent.
fill(this.color.h, this.color.s, this.color.b, alpha);
Sets the fill color for this trail circle using the pendulum's hue, saturation, and brightness plus the calculated transparency.
circle(this.path[i].x, this.path[i].y, this.bobSize);
Draws a small circle at this historical position, building up the fading trail effect.
fill(this.color.h, this.color.s, this.color.b); // Solid color
Switches to the fully solid version of the pendulum's color for drawing the current bob on top of the trail.

reset()

reset() is called on every pendulum from resetPendulums() when the Release button is clicked. Keeping reset logic inside the class means each pendulum knows how to restore itself, which keeps the code organized.

reset() {
    this.angle = initialAngle;
    this.velocity = 0;
    this.path = []; // Clear trails
    this.bobX = this.x + this.len * sin(this.angle);
    this.bobY = this.y + this.len * cos(this.angle);
  }
Line-by-line explanation (4 lines)
this.angle = initialAngle;
Snaps the pendulum back to the same 45-degree starting angle used when the sketch first loaded.
this.velocity = 0;
Stops all motion so the pendulum begins swinging from rest again.
this.path = []; // Clear trails
Empties the trail history so no leftover trail points from the previous run are drawn.
this.bobX = this.x + this.len * sin(this.angle);
Immediately recalculates the bob's position for the reset angle, so it visually snaps back instead of waiting a frame.

setup()

setup() runs once when the sketch starts. It's where the entire array of Pendulum objects is constructed with calculated lengths, positions, and colors, and where the DOM button that controls the simulation is created.

🔬 This loop makes lengths increase from left to right. What happens if you swap minLength and maxLength in the map() call so the longest (slowest) pendulum is on the left instead of the right?

  for (let i = 0; i < numPendulums; i++) {
    // Calculate length, varying linearly
    let length_n_pixels = map(i, 0, numPendulums - 1, minLength, maxLength);

    // Calculate anchor position
    let anchorX = map(i, 0, numPendulums - 1, leftAnchorX, rightAnchorX);
function setup() {
  createCanvas(windowWidth, windowHeight);
  colorMode(HSB, 360, 100, 100, 1); // Use HSB color mode with alpha

  // Calculate pendulum lengths and anchor positions
  // Anchor points are distributed across 80% of the canvas width
  let anchorY = height * 0.1; // Anchor point 10% from the top
  let leftAnchorX = width * 0.1;
  let rightAnchorX = width * 0.9;

  for (let i = 0; i < numPendulums; i++) {
    // Calculate length, varying linearly
    let length_n_pixels = map(i, 0, numPendulums - 1, minLength, maxLength);

    // Calculate anchor position
    let anchorX = map(i, 0, numPendulums - 1, leftAnchorX, rightAnchorX);

    // Calculate color based on position in the wave
    let hue = map(i, 0, numPendulums - 1, 0, 360); // Full color spectrum
    let pendulumColor = color(hue, 80, 90); // Moderate saturation and brightness

    // Create a new Pendulum object and add it to the array
    pendulums.push(new Pendulum(anchorX, anchorY, length_n_pixels, initialAngle, bobSize, pendulumColor));
  }

  // Create the "Release" button
  releaseButton = createButton('Release');
  releaseButton.position(10, 10); // Position at top-left
  releaseButton.mousePressed(resetPendulums);
  releaseButton.style('font-size', '16px');
  releaseButton.style('padding', '8px 15px');
  releaseButton.style('background-color', '#4CAF50');
  releaseButton.style('color', 'white');
  releaseButton.style('border', 'none');
  releaseButton.style('border-radius', '5px');
  releaseButton.style('cursor', 'pointer');
}
Line-by-line explanation (8 lines)

🔧 Subcomponents:

for-loop Pendulum Creation Loop for (let i = 0; i < numPendulums; i++) {

Builds all 15 Pendulum objects, giving each one a different arm length, anchor position, and hue based on its index.

createCanvas(windowWidth, windowHeight);
Makes the canvas fill the entire browser window.
colorMode(HSB, 360, 100, 100, 1);
Switches p5's color system from RGB to HSB (Hue, Saturation, Brightness) with an alpha range from 0 to 1, making it easy to spread hues evenly across the pendulums.
let anchorY = height * 0.1; // Anchor point 10% from the top
Places every pendulum's fixed anchor point near the top of the screen, 10% down from the top edge.
let length_n_pixels = map(i, 0, numPendulums - 1, minLength, maxLength);
Uses map() to spread arm lengths evenly between minLength and maxLength based on each pendulum's index, so pendulum 0 is shortest and the last is longest.
let hue = map(i, 0, numPendulums - 1, 0, 360); // Full color spectrum
Assigns each pendulum a different hue across the full 360-degree color wheel based on its position in the row.
pendulums.push(new Pendulum(anchorX, anchorY, length_n_pixels, initialAngle, bobSize, pendulumColor));
Creates a new Pendulum object with all the calculated values and adds it to the pendulums array so draw() can update and display it.
releaseButton = createButton('Release');
Creates an HTML button element using p5's DOM functions, letting users interact with the sketch outside the canvas.
releaseButton.mousePressed(resetPendulums);
Wires up the button so clicking it calls resetPendulums(), restarting the whole wave.

draw()

draw() runs continuously about 60 times per second and is the heartbeat of the whole animation. Each frame it clears the screen and asks every pendulum to update its physics and redraw itself, which is the standard update-then-render pattern used in almost all p5.js animations.

🔬 Each pendulum updates once and draws once per frame. What happens if you call p.update() twice before p.display(), simulating two physics steps per frame?

  for (let p of pendulums) {
    p.update();
    p.display();
  }
function draw() {
  background(0, 0, 10); // Dark background, clears the canvas each frame

  // Update and display each pendulum
  for (let p of pendulums) {
    p.update();
    p.display();
  }
}
Line-by-line explanation (4 lines)

🔧 Subcomponents:

for-loop Update and Display Loop for (let p of pendulums) {

Runs physics update and drawing for every pendulum in the array, once per frame.

background(0, 0, 10); // Dark background, clears the canvas each frame
Repaints the entire canvas with a near-black HSB color every frame, erasing the previous frame's drawing before the new one is drawn.
for (let p of pendulums) {
Loops through every Pendulum object stored in the array using a for-of loop, which is a clean way to iterate without needing an index variable.
p.update();
Advances this pendulum's physics by one step - recalculating its velocity, angle, and bob position.
p.display();
Draws this pendulum's arm, trail, and bob at its newly updated position.

resetPendulums()

This function is connected to the Release button via releaseButton.mousePressed(resetPendulums) in setup(). It demonstrates how a simple UI event can trigger a coordinated reset across an entire array of objects.

function resetPendulums() {
  for (let p of pendulums) {
    p.reset(); // Reset each pendulum
  }
}
Line-by-line explanation (2 lines)

🔧 Subcomponents:

for-loop Reset All Pendulums Loop for (let p of pendulums) {

Calls reset() on every pendulum in the array so the entire wave restarts together.

for (let p of pendulums) {
Iterates over every Pendulum object currently in the array.
p.reset(); // Reset each pendulum
Calls that pendulum's own reset() method, which snaps it back to its starting angle, zero velocity, and an empty trail.

windowResized()

windowResized() is a special p5.js function that runs automatically whenever the browser window changes size. It's essential for responsive sketches - without it, the canvas would resize but everything drawn on it would stay in its old, now-misaligned positions.

function windowResized() {
  resizeCanvas(windowWidth, windowHeight);
  // Recalculate anchor positions to keep pendulums centered
  let anchorY = height * 0.1;
  let leftAnchorX = width * 0.1;
  let rightAnchorX = width * 0.9;

  for (let i = 0; i < pendulums.length; i++) {
    let anchorX = map(i, 0, numPendulums - 1, leftAnchorX, rightAnchorX);
    pendulums[i].x = anchorX;
    pendulums[i].y = anchorY;
    // Update bob position based on new anchor and current angle
    pendulums[i].bobX = pendulums[i].x + pendulums[i].len * sin(pendulums[i].angle);
    pendulums[i].bobY = pendulums[i].y + pendulums[i].len * cos(pendulums[i].angle);
    pendulums[i].path = []; // Clear trails on resize
  }
}
Line-by-line explanation (4 lines)

🔧 Subcomponents:

for-loop Reposition Anchors Loop for (let i = 0; i < pendulums.length; i++) {

Recalculates each pendulum's anchor position and bob position so the wave stays evenly spread and centered after the window resizes.

resizeCanvas(windowWidth, windowHeight);
Resizes the canvas element to match the browser window's new dimensions.
let anchorX = map(i, 0, numPendulums - 1, leftAnchorX, rightAnchorX);
Recomputes this pendulum's horizontal anchor position using the new window width, keeping the row of pendulums evenly spaced.
pendulums[i].bobX = pendulums[i].x + pendulums[i].len * sin(pendulums[i].angle);
Immediately recalculates the bob's screen position using the pendulum's current swing angle so it doesn't jump incorrectly before the next update() call.
pendulums[i].path = []; // Clear trails on resize
Clears the trail history since old trail points were calculated relative to the previous anchor position and would look wrong after resizing.

📦 Key Variables

pendulums array

Holds every Pendulum object in the simulation so draw() can loop through and update/display each one.

let pendulums = [];
numPendulums number

Sets how many pendulums are created in setup(), controlling the density of the wave pattern.

let numPendulums = 15;
initialAngle number

The starting angle (in radians) that every pendulum is released from, and the angle they snap back to on reset.

const initialAngle = Math.PI / 4;
gravity number

A physics constant used in the acceleration formula that determines how fast all pendulums swing.

const gravity = 0.5;
bobSize number

The diameter used when drawing each pendulum's bob and its trail circles.

const bobSize = 15;
minLength number

The shortest pendulum arm length, assigned to the first pendulum in the row.

const minLength = 150;
maxLength number

The longest pendulum arm length, assigned to the last pendulum in the row.

const maxLength = 300;
releaseButton object

Stores the p5.Element reference to the on-screen Release button, used to reposition/style it and attach its click handler.

let releaseButton;

🔧 Potential Improvements (4)

Here are some ways this code could be enhanced:

BUG display()

The trail's alpha value is calculated with map(i, 0, this.path.length, 0, 150), but colorMode(HSB, 360, 100, 100, 1) sets the alpha channel's range to only 0-1. Values above 1 get clamped, so most trail circles render at full opacity instead of gradually fading, defeating the intended trail effect.

💡 Change the map() call's output range to 0, 1 (e.g. map(i, 0, this.path.length, 0, 1)) so the alpha values match colorMode's expected 0-1 range.

BUG constructor() / display()

Pendulum colors are stored as p5.Color objects created via color(hue, 80, 90) in setup(), but display() then tries to read this.color.h, this.color.s, and this.color.b - properties that p5.Color objects don't expose directly, so these will likely be undefined and produce incorrect fill colors.

💡 Store the hue, saturation, and brightness as separate numeric properties (e.g. this.hue, this.sat, this.bri) instead of a p5.Color object, and pass those numbers directly into fill().

STYLE setup() and windowResized()

The logic for computing anchorY, leftAnchorX, and rightAnchorX is duplicated almost identically in both functions, making it easy for the two to drift out of sync if one is edited later.

💡 Extract a small helper function like calculateAnchorLayout() that returns { anchorY, leftAnchorX, rightAnchorX } and call it from both setup() and windowResized().

PERFORMANCE update()

Array.prototype.shift() used to trim old trail points is an O(n) operation because it re-indexes every remaining element; with many pendulums and long trails this adds unnecessary overhead every frame.

💡 Use a circular buffer (a fixed-size array with a rotating write index) instead of push/shift for the trail history to keep trail updates O(1).

🔄 Code Flow

Code flow showing constructor, update, display, reset, setup, draw, resetpendulums, windowresized

💡 Click on function names in the diagram to jump to their code

graph TD start[Start] --> setup[setup] setup --> pendulum-build-loop[pendulum-build-loop] pendulum-build-loop --> draw[draw loop] draw --> pendulum-loop[pendulum-loop] pendulum-loop --> update[update] update --> display[display] display --> trail-trim[trail-trim] trail-trim --> trail-draw-loop[trail-draw-loop] trail-draw-loop --> draw click setup href "#fn-setup" click draw href "#fn-draw" click pendulum-build-loop href "#sub-pendulum-build-loop" click pendulum-loop href "#sub-pendulum-loop" click update href "#fn-update" click display href "#fn-display" click trail-trim href "#sub-trail-trim" click trail-draw-loop href "#sub-trail-draw-loop" resetpendulums --> reset-loop[reset-loop] reset-loop --> reset[reset] reset --> resetpendulums click resetpendulums href "#fn-resetpendulums" click reset-loop href "#sub-reset-loop" windowresized --> reflow-loop[reflow-loop] reflow-loop --> windowresized click windowresized href "#fn-windowresized" click reflow-loop href "#sub-reflow-loop"

❓ Frequently Asked Questions

What visual effects can I expect from the AI Pendulum Wave sketch?

The sketch creates mesmerizing wave patterns formed by 15 pendulums of varying lengths, oscillating at different frequencies to produce hypnotic visual effects.

How can I interact with the AI Pendulum Wave sketch?

Users can click the 'Release' button to restart the synchronized swing of the pendulums, allowing them to observe the changing patterns and chaos.

What creative coding concepts are demonstrated in this pendulum wave sketch?

This sketch showcases harmonic motion physics and the concept of synchronization and chaos in oscillating systems, enhanced through p5.js coding.

Preview

AI Pendulum Wave - Mesmerizing Harmonic Motion Physics - xelsed.ai - p5.js creative coding sketch preview
Sketch Preview
Code flow diagram showing the structure of AI Pendulum Wave - Mesmerizing Harmonic Motion Physics - xelsed.ai - Code flow showing constructor, update, display, reset, setup, draw, resetpendulums, windowresized
Code Flow Diagram