
AI Pixel Canvas - Draw Retro Pixel Art

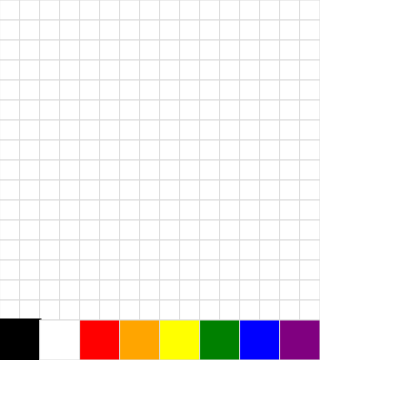
This sketch turns the canvas into a 16x16 pixel-art editor: you click or drag across a grid of squares to paint them with a color chosen from an 8-swatch palette at the bottom, and pressing C wipes everything back to white.

🧪 Try This!

Experiment with the code by making these changes:

  1. Make the pixels bigger — Increasing cell size makes each grid square larger and automatically resizes the canvas to match, giving you a chunkier, more zoomed-in pixel art canvas.
  2. Recolor the palette — Swap out any of the eight named colors for different ones to change the entire set of colors available for your artwork.
  3. Bolden the grid lines — The stroke() call sets the outline color of every grid cell - lowering the number makes the lines much darker and more visible.
Prefer the full editor? Open it there →

📖 About This Sketch

This sketch creates a tiny retro pixel-art studio: a 16x16 grid of squares that you paint by clicking or dragging, plus a row of eight color swatches you tap to switch your 'brush' color. It's a great sketch to study because it shows how to turn raw mouseX/mouseY pixel coordinates into grid row/column indices, how a 2D array can act as the 'memory' of everything drawn so far, and how a single redraw loop repaints that memory every frame.

The code is organized around one shared data structure, the grid array, which every other function reads or writes. setup() builds that array and sizes the canvas to match it, draw() renders it (plus the palette bar) every frame, paint() does the actual coordinate math to figure out which cell or swatch was clicked, and mousePressed()/mouseDragged()/keyPressed() are thin event handlers that call into paint() or clear the grid. Studying it will teach you grid-based coordinate mapping, persistent state via arrays, and how p5's built-in mouse and keyboard event functions connect user input to that state.

⚙️ How It Works

  1. When the sketch loads, setup() creates a canvas exactly sized to fit 16 columns and 16 rows of 20-pixel cells, plus 40 extra pixels of space for the palette bar, and fills a 2D grid array with white as the starting color for every cell.
  2. Every frame, draw() clears the background, then loops through the grid array drawing each cell as a small rectangle in its stored color, and loops through the palette array drawing eight swatches below the grid, giving the currently selected swatch a thicker black outline.
  3. When you press or drag the mouse, mousePressed() and mouseDragged() both call the shared paint() function, which checks whether the click landed inside the grid or inside the palette bar.
  4. If the click was inside the grid, paint() converts the mouse's pixel position into a row/column index by dividing by the cell size, then stores the currently selected color into that cell of the grid array.
  5. If the click was inside the palette bar instead, paint() figures out which swatch was tapped and updates the 'cur' variable so future paints use that new color.
  6. Pressing the C key runs keyPressed(), which loops over the entire grid array and resets every cell back to white, visually clearing the canvas on the next redraw.

🎓 Concepts You'll Learn

2D arrays as persistent stateNested for loopsMouse-to-grid coordinate mappingMouse event functions (mousePressed/mouseDragged)Keyboard events (keyPressed)Conditional logic and bounds checkingBuilding a simple UI (palette bar) inside the canvas

📝 Code Breakdown

setup()

setup() runs once when the sketch starts. Here it's responsible for sizing the canvas to match the grid dimensions and initializing the 2D array that stores every pixel's color - the sketch's entire 'memory'.

🔬 This nested loop fills every cell with white using color(255). What happens if you replace that with color(random(255)) so every cell starts as a random gray shade?

for(let i=0;i<rows;i++){ grid[i]=[]; for(let j=0;j<cols;j++) grid[i][j]=color(255); }
function setup(){
  createCanvas(cols*cell, rows*cell+40);
  for(let i=0;i<rows;i++){ grid[i]=[]; for(let j=0;j<cols;j++) grid[i][j]=color(255); }
  noSmooth();
}
Line-by-line explanation (3 lines)

🔧 Subcomponents:

for-loop Grid Initialization for(let i=0;i<rows;i++){ grid[i]=[]; for(let j=0;j<cols;j++) grid[i][j]=color(255); }

Builds the 2D grid array row by row and fills every cell with white as the starting color

createCanvas(cols*cell, rows*cell+40);
Creates a canvas exactly wide enough for 16 columns of 20px cells and tall enough for 16 rows plus 40 extra pixels reserved for the palette bar at the bottom.
for(let i=0;i<rows;i++){ grid[i]=[]; for(let j=0;j<cols;j++) grid[i][j]=color(255); }
Builds the grid array one row at a time: creates an empty array for each row, then fills every column in that row with white (255) so the canvas starts blank.
noSmooth();
Turns off anti-aliasing so the edges of every pixel square stay crisp and blocky instead of blurred - essential for the retro pixel-art look.
draw()

draw() runs continuously, about 60 times per second, and here it acts purely as a renderer: it doesn't change any data itself, it just paints whatever is currently stored in the grid and palette arrays, which is a common and useful pattern - separate 'update state' logic from 'render state' logic.

🔬 This loop draws all 8 palette swatches and gives the selected one a thicker border (strokeWeight 3 vs 1). What happens if you change the 3 to 10 for a much bolder selection outline?

for(let i=0;i<palette.length;i++){
    fill(palette[i]);
    stroke(i==cur?0:220);
    strokeWeight(i==cur?3:1);
    rect(i*width/palette.length,rows*cell,width/palette.length,40);
  }
function draw(){
  background(255);
  stroke(220);
  for(let i=0;i<rows;i++) for(let j=0;j<cols;j++){
    fill(grid[i][j]);
    rect(j*cell,i*cell,cell,cell);
  }
  for(let i=0;i<palette.length;i++){
    fill(palette[i]);
    stroke(i==cur?0:220);
    strokeWeight(i==cur?3:1);
    rect(i*width/palette.length,rows*cell,width/palette.length,40);
  }
  strokeWeight(1);
}
Line-by-line explanation (8 lines)

🔧 Subcomponents:

for-loop Grid Rendering for(let i=0;i<rows;i++) for(let j=0;j<cols;j++){ fill(grid[i][j]); rect(j*cell,i*cell,cell,cell); }

Reads every cell's stored color from the grid array and draws it as a rectangle at the correct pixel position

for-loop Palette Swatch Rendering for(let i=0;i<palette.length;i++){ fill(palette[i]); stroke(i==cur?0:220); strokeWeight(i==cur?3:1); rect(i*width/palette.length,rows*cell,width/palette.length,40); }

Draws each of the 8 color swatches and gives the currently selected one a bold black outline

background(255);
Clears the whole canvas to white at the start of every frame, since p5 doesn't automatically erase old drawings.
stroke(220);
Sets a light gray outline color that will be used for the borders of each grid cell.
for(let i=0;i<rows;i++) for(let j=0;j<cols;j++){ fill(grid[i][j]); rect(j*cell,i*cell,cell,cell); }
Loops over every row and column of the grid array, sets the fill to that cell's stored color, and draws a square at the matching pixel position - this is what actually renders your artwork every frame.
for(let i=0;i<palette.length;i++){
Loops through all 8 colors in the palette array to draw the selectable swatches below the grid.
stroke(i==cur?0:220);
A ternary expression: if this swatch's index matches the currently selected color (cur), give it a black border; otherwise use the same light gray as the grid lines.
strokeWeight(i==cur?3:1);
Makes the selected swatch's border thicker (3px) so it visually stands out from the others (1px).
rect(i*width/palette.length,rows*cell,width/palette.length,40);
Draws each swatch as an evenly spaced rectangle across the full canvas width, positioned just below the grid, 40 pixels tall.
strokeWeight(1);
Resets the stroke weight back to the default so it doesn't affect the grid lines drawn in the next frame.

paint()

paint() is the sketch's core logic: it translates messy pixel coordinates from the mouse into clean grid or palette indices, then decides whether to update the drawing (grid) or the tool (cur). This 'coordinate mapping' pattern - dividing by a cell size and using floor() - is used constantly in grid-based games and tools.

🔬 This block paints exactly one cell per click or drag frame. What happens if you also paint the cell to the right (grid[r][c+1]) whenever it exists, turning your brush into a 1x2 stamp?

if(mouseY<rows*cell){
    let c=floor(mouseX/cell), r=floor(mouseY/cell);
    if(c>=0&&c<cols&&r>=0&&r<rows) grid[r][c]=palette[cur];
  }
function paint(){
  if(mouseY<rows*cell){
    let c=floor(mouseX/cell), r=floor(mouseY/cell);
    if(c>=0&&c<cols&&r>=0&&r<rows) grid[r][c]=palette[cur];
  }else if(mouseY<height){
    let i=floor(mouseX/(width/palette.length));
    if(i>=0&&i<palette.length) cur=i;
  }
}
Line-by-line explanation (6 lines)

🔧 Subcomponents:

conditional Paint a Grid Cell if(mouseY<rows*cell){ let c=floor(mouseX/cell), r=floor(mouseY/cell); if(c>=0&&c<cols&&r>=0&&r<rows) grid[r][c]=palette[cur]; }

Converts the mouse position into a grid row/column and paints that cell with the selected color

conditional Select a Palette Swatch else if(mouseY<height){ let i=floor(mouseX/(width/palette.length)); if(i>=0&&i<palette.length) cur=i; }

Detects a click in the palette bar and updates the currently selected color index

if(mouseY<rows*cell){
Checks whether the mouse is above the palette bar, meaning it's inside the actual 16x16 painting grid.
let c=floor(mouseX/cell), r=floor(mouseY/cell);
Converts the raw mouse pixel coordinates into grid column (c) and row (r) indices by dividing by the cell size and rounding down with floor().
if(c>=0&&c<cols&&r>=0&&r<rows) grid[r][c]=palette[cur];
Safety check to make sure the calculated indices are inside the grid's bounds, then stores the currently selected palette color into that cell.
}else if(mouseY<height){
Otherwise, if the mouse is below the grid but still within the canvas, it must be inside the palette bar area.
let i=floor(mouseX/(width/palette.length));
Divides the canvas width evenly by the number of palette colors to figure out which swatch index was clicked based on horizontal mouse position.
if(i>=0&&i<palette.length) cur=i;
Bounds-checks the swatch index, then updates 'cur' so future paints use this newly chosen color.

mousePressed()

mousePressed() is a built-in p5.js event function that p5 automatically calls exactly once whenever a mouse button is clicked, making it perfect for single-tap actions.

function mousePressed(){ paint(); }
Line-by-line explanation (1 lines)
paint();
Calls the paint() helper function once, immediately coloring the cell (or selecting a swatch) under the cursor the instant the mouse button is pressed down.

mouseDragged()

mouseDragged() is a built-in p5.js event function that fires repeatedly while the mouse moves with a button held down, which is what makes this sketch feel like a real paintbrush instead of a single-click stamp.

function mouseDragged(){ paint(); }
Line-by-line explanation (1 lines)
paint();
Calls paint() again every time the mouse moves while a button is held down, letting you drag across the grid to paint continuous streaks of color instead of clicking one cell at a time.

keyPressed()

keyPressed() is a built-in p5.js event function that fires once per key press. Here it's used to implement a simple 'clear canvas' shortcut by looping through the same grid array that draw() and paint() also use.

🔬 This clears the canvas to white when you press C. What happens if you change color(255) to color(random(255)) so pressing C fills the canvas with a random shade of gray instead?

if(key=='c'||key=='C')
    for(let i=0;i<rows;i++) for(let j=0;j<cols;j++) grid[i][j]=color(255);
function keyPressed(){
  if(key=='c'||key=='C')
    for(let i=0;i<rows;i++) for(let j=0;j<cols;j++) grid[i][j]=color(255);
}
Line-by-line explanation (2 lines)

🔧 Subcomponents:

conditional Check for C Key if(key=='c'||key=='C')

Detects whether the key just pressed was C, in either lowercase or uppercase form

for-loop Reset Every Cell for(let i=0;i<rows;i++) for(let j=0;j<cols;j++) grid[i][j]=color(255);

Loops through the entire grid array and resets every stored color back to white

if(key=='c'||key=='C')
Checks whether the key that was just pressed is a 'c', matching both lowercase and uppercase so it works whether or not Caps Lock or Shift is on.
for(let i=0;i<rows;i++) for(let j=0;j<cols;j++) grid[i][j]=color(255);
Loops through every row and column of the grid array and resets each stored color to white, which visually clears the canvas the next time draw() renders it.

📦 Key Variables

cols number

Number of columns in the pixel art grid (16), used to size the canvas and bound painting/loop logic.

let cols = 16;
rows number

Number of rows in the pixel art grid (16), used to size the canvas and bound painting/loop logic.

let rows = 16;
cell number

The pixel size of each grid square; controls how large the whole canvas and every drawn square appear.

let cell = 20;
grid array

A 2D array storing the current color of every cell in the drawing - this is the sketch's persistent 'canvas memory' that draw() renders every frame.

let grid = [];
palette array

A list of 8 color name strings shown as selectable swatches at the bottom of the canvas.

let palette = ["black","white","red","orange","yellow","green","blue","purple"];
cur number

The index into the palette array of the currently selected 'brush' color, updated when the user clicks a swatch.

let cur = 0;

🔧 Potential Improvements (3)

Here are some ways this code could be enhanced:

STYLE global variable declaration line

All six global variables (cols, rows, cell, grid, palette, cur) are packed onto a single dense line, which makes the code harder to read and riskier to edit safely.

💡 Split each variable onto its own line with a short comment, e.g. 'let cols = 16; // number of grid columns', to make the sketch's configuration easier to scan and tweak.

PERFORMANCE draw()

The entire 16x16 grid and palette bar are cleared and redrawn from scratch every single frame (about 60 times per second), even though nothing changes between paint actions.

💡 Add a simple 'dirty' boolean flag that's set to true only when paint() or keyPressed() changes the grid, and skip the redraw in draw() when nothing has changed - or draw persistently onto a graphics buffer instead of clearing with background(255) every frame.

FEATURE sketch overall

There is no way to save or export the finished pixel art, and no undo if you accidentally clear the canvas or paint the wrong cell.

💡 Add a keyboard shortcut (e.g. pressing S) that calls saveCanvas('pixelart', 'png') to export the drawing, and consider storing a short history of past grid states to support an undo action.

🔄 Code Flow

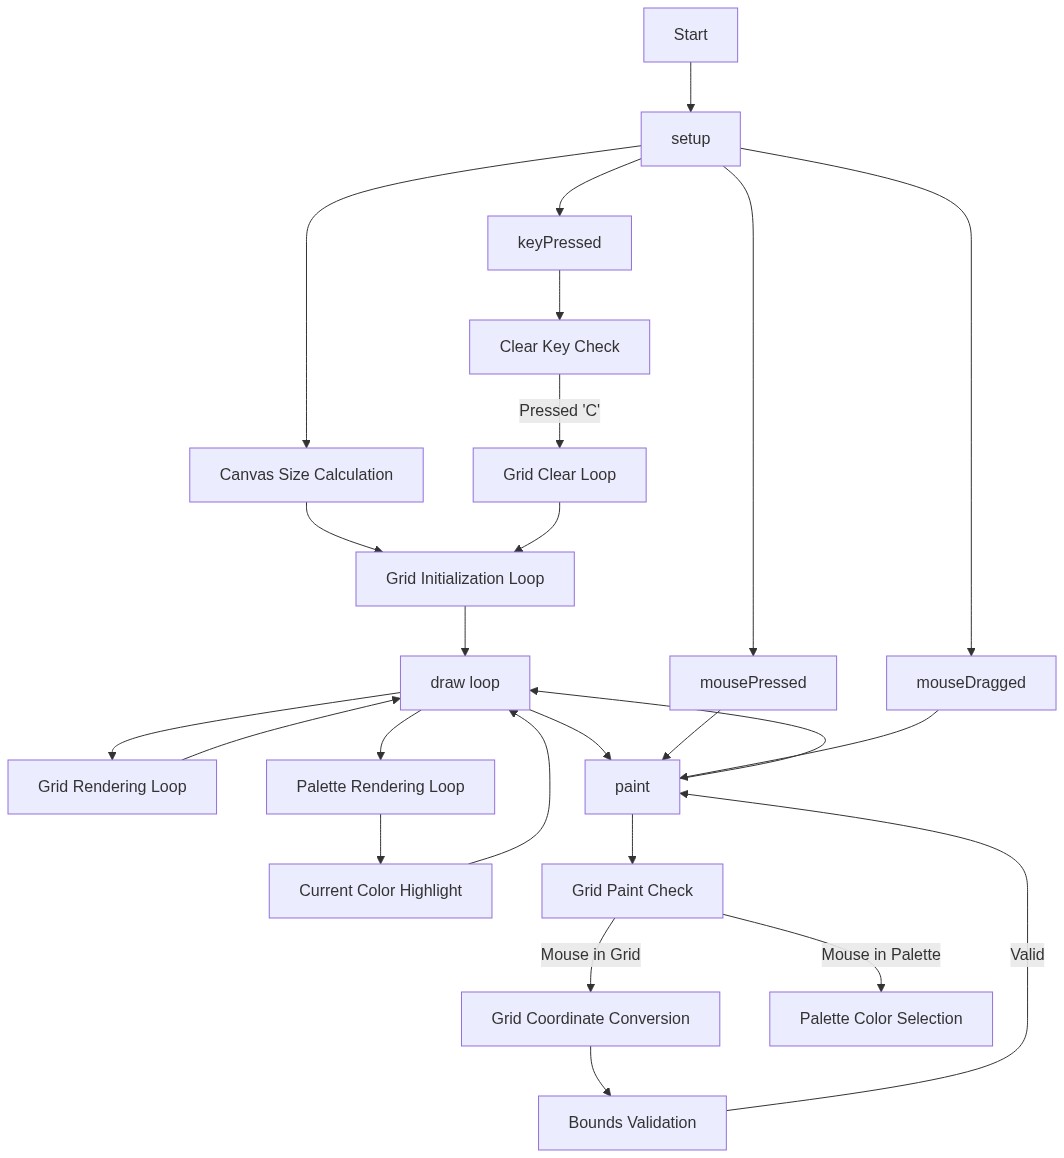
Code flow showing setup, draw, paint, mousepressed, mousedragged, keypressed

💡 Click on function names in the diagram to jump to their code

graph TD start[Start] --> setup[setup] setup --> gridinit[grid-init-loop] gridinit --> draw[draw loop] draw --> gridrender[grid-render-loop] gridrender --> palette[palette-render-loop] draw --> paint[paint] draw --> mousepressed[mousepressed] draw --> mousedragged[mousedragged] draw --> keypressed[keypressed] gridinit -->|Initialize grid| gridinitloop[Grid Initialization Loop] gridrender -->|Render grid| gridrenderloop[Grid Rendering Loop] palette -->|Render palette| paletterenderloop[Palette Swatch Rendering Loop] paint --> paintgrid[paint-grid-branch] paintgrid -->|Convert mouse position| mouseconvert[Mouse Position Conversion] paintgrid -->|Update grid cell| updatecell[Update Grid Cell] mousepressed --> selectpalette[select-palette-branch] selectpalette -->|Detect click in palette| palettecheck[Palette Click Check] keypressed --> clearcheck[clear-check] clearcheck -->|Check for C key| ckeycheck[C Key Check] ckeycheck --> clearloop[clear-loop] clearloop -->|Reset every cell| resetcells[Reset Cells Loop] click setup href "#fn-setup" click draw href "#fn-draw" click gridinitloop href "#sub-grid-init-loop" click gridrenderloop href "#sub-grid-render-loop" click paletterenderloop href "#sub-palette-render-loop" click paintgrid href "#sub-paint-grid-branch" click mouseconvert href "#sub-mouse-position-conversion" click updatecell href "#sub-update-grid-cell" click selectpalette href "#sub-select-palette-branch" click palettecheck href "#sub-palette-click-check" click clearcheck href "#sub-clear-check" click ckeycheck href "#sub-c-key-check" click clearloop href "#sub-clear-loop" click resetcells href "#sub-reset-cells-loop"

❓ Frequently Asked Questions

What kind of visual art can users create with the AI Pixel Canvas sketch?

Users can create retro pixel art masterpieces on a 16x16 grid using a selection of 8 classic colors.

How can users interact with the AI Pixel Canvas to create art?

Users can click or drag to paint on the grid with their selected color and press 'C' to clear the canvas and start anew.

What creative coding concepts does the AI Pixel Canvas sketch showcase?

This sketch demonstrates grid-based drawing techniques, color selection, and mouse interaction in p5.js for a nostalgic pixel art experience.

Preview

AI Pixel Canvas - Draw Retro Pixel Art - p5.js creative coding sketch preview
Sketch Preview
Code flow diagram showing the structure of AI Pixel Canvas - Draw Retro Pixel Art - Code flow showing setup, draw, paint, mousepressed, mousedragged, keypressed
Code Flow Diagram