function setup() {
  createCanvas(windowWidth, windowHeight);
  colorMode(HSL, 360, 100, 100, 1);

  // Pre-render gradient background to a graphics buffer
  bgLayer = createGraphics(width, height);
  bgLayer.colorMode(HSL, 360, 100, 100, 1);
  drawBackgroundGradient();
}
Line-by-line explanation (5 lines)
createCanvas(windowWidth, windowHeight);- Makes the canvas fill the entire browser window.
colorMode(HSL, 360, 100, 100, 1);- Switches from the default RGB color system to Hue-Saturation-Lightness, with hue 0-360, saturation/lightness 0-100, and alpha 0-1. This makes it easy to pick related blue tones by just changing the hue number.
bgLayer = createGraphics(width, height);- Creates a separate, off-screen canvas the same size as the main one. Drawing here doesn't show up until you image() it onto the main canvas.
bgLayer.colorMode(HSL, 360, 100, 100, 1);- The off-screen buffer has its own independent color settings, so HSL mode must be set on it separately.
drawBackgroundGradient();- Fills bgLayer with a vertical gradient once - since gradients are slow to draw pixel-by-pixel, doing it only once in setup() instead of every frame in draw() saves a lot of performance.
🔬 This loop blends linearly from top to bottom using t. What happens visually if you replace `t` with `t * t` (making the gradient curve instead of blend evenly)?
  for (let y = 0; y < height; y++) {
    const t = y / height;
    const c = lerpColor(topColor, bottomColor, t);
    bgLayer.stroke(c);
    bgLayer.line(0, y, width, y);
  }
function drawBackgroundGradient() {
  const topColor = color(215, 80, 20);   // desaturated blue, lighter
  const bottomColor = color(215, 80, 7); // deep navy blue

  bgLayer.noFill();
  for (let y = 0; y < height; y++) {
    const t = y / height;
    const c = lerpColor(topColor, bottomColor, t);
    bgLayer.stroke(c);
    bgLayer.line(0, y, width, y);
  }
}
Line-by-line explanation (6 lines)
🔧 Subcomponents:
for-loop
Row-by-row Gradient Loop
for (let y = 0; y < height; y++) {
Draws one horizontal line per pixel row, each blended slightly darker than the last, to fake a smooth vertical gradient.
const topColor = color(215, 80, 20); // desaturated blue, lighter- Defines the color at the very top of the canvas using HSL values (hue 215 = blue, 80% saturation, 20% lightness).
const bottomColor = color(215, 80, 7); // deep navy blue- Defines the color at the very bottom - same hue but much darker (7% lightness) for a deep navy look.
const t = y / height;- Converts the current row number into a 0-to-1 fraction representing how far down the canvas we are.
const c = lerpColor(topColor, bottomColor, t);- lerpColor() blends smoothly between the two colors based on t - near the top it's mostly topColor, near the bottom mostly bottomColor.
bgLayer.stroke(c);- Sets the line color for this row on the off-screen buffer.
bgLayer.line(0, y, width, y);- Draws a full-width horizontal line at this row, one pixel tall, building the gradient one row at a time.
🔬 This accumulator pattern turns a fractional rate into whole raindrops. What happens if you change 0.08 to 0.5? What about 0.01?
  spawnAccumulator += rainIntensity * 0.08;
  while (spawnAccumulator >= 1) {
    createRaindrop();
    spawnAccumulator -= 1;
  }
function draw() {
  // Draw background
  image(bgLayer, 0, 0, width, height);

  drawWaterline();

  // Spawn new raindrops based on intensity
  // ~ rainIntensity * 0.08 drops per frame on average
  spawnAccumulator += rainIntensity * 0.08;
  while (spawnAccumulator >= 1) {
    createRaindrop();
    spawnAccumulator -= 1;
  }

  // Update and draw raindrops
  for (let i = raindrops.length - 1; i >= 0; i--) {
    const d = raindrops[i];
    d.update();
    d.draw();

    if (d.y + d.length >= height) {
      // Hit the bottom: ripple + splashes + note
      spawnSplashEffects(d.x);
      playRaindropNote();
      raindrops.splice(i, 1);
    } else if (d.y - d.length > height + 50) {
      // Safety clean-up (should rarely happen)
      raindrops.splice(i, 1);
    }
  }

  // Update and draw ripples
  for (let i = ripples.length - 1; i >= 0; i--) {
    const r = ripples[i];
    r.update();
    r.draw();
    if (r.isDone()) {
      ripples.splice(i, 1);
    }
  }

  // Update and draw splash particles
  for (let i = splashes.length - 1; i >= 0; i--) {
    const s = splashes[i];
    s.update();
    s.draw();
    if (s.isDone()) {
      splashes.splice(i, 1);
    }
  }

  drawHUD();
}
Line-by-line explanation (9 lines)
🔧 Subcomponents:
while-loop
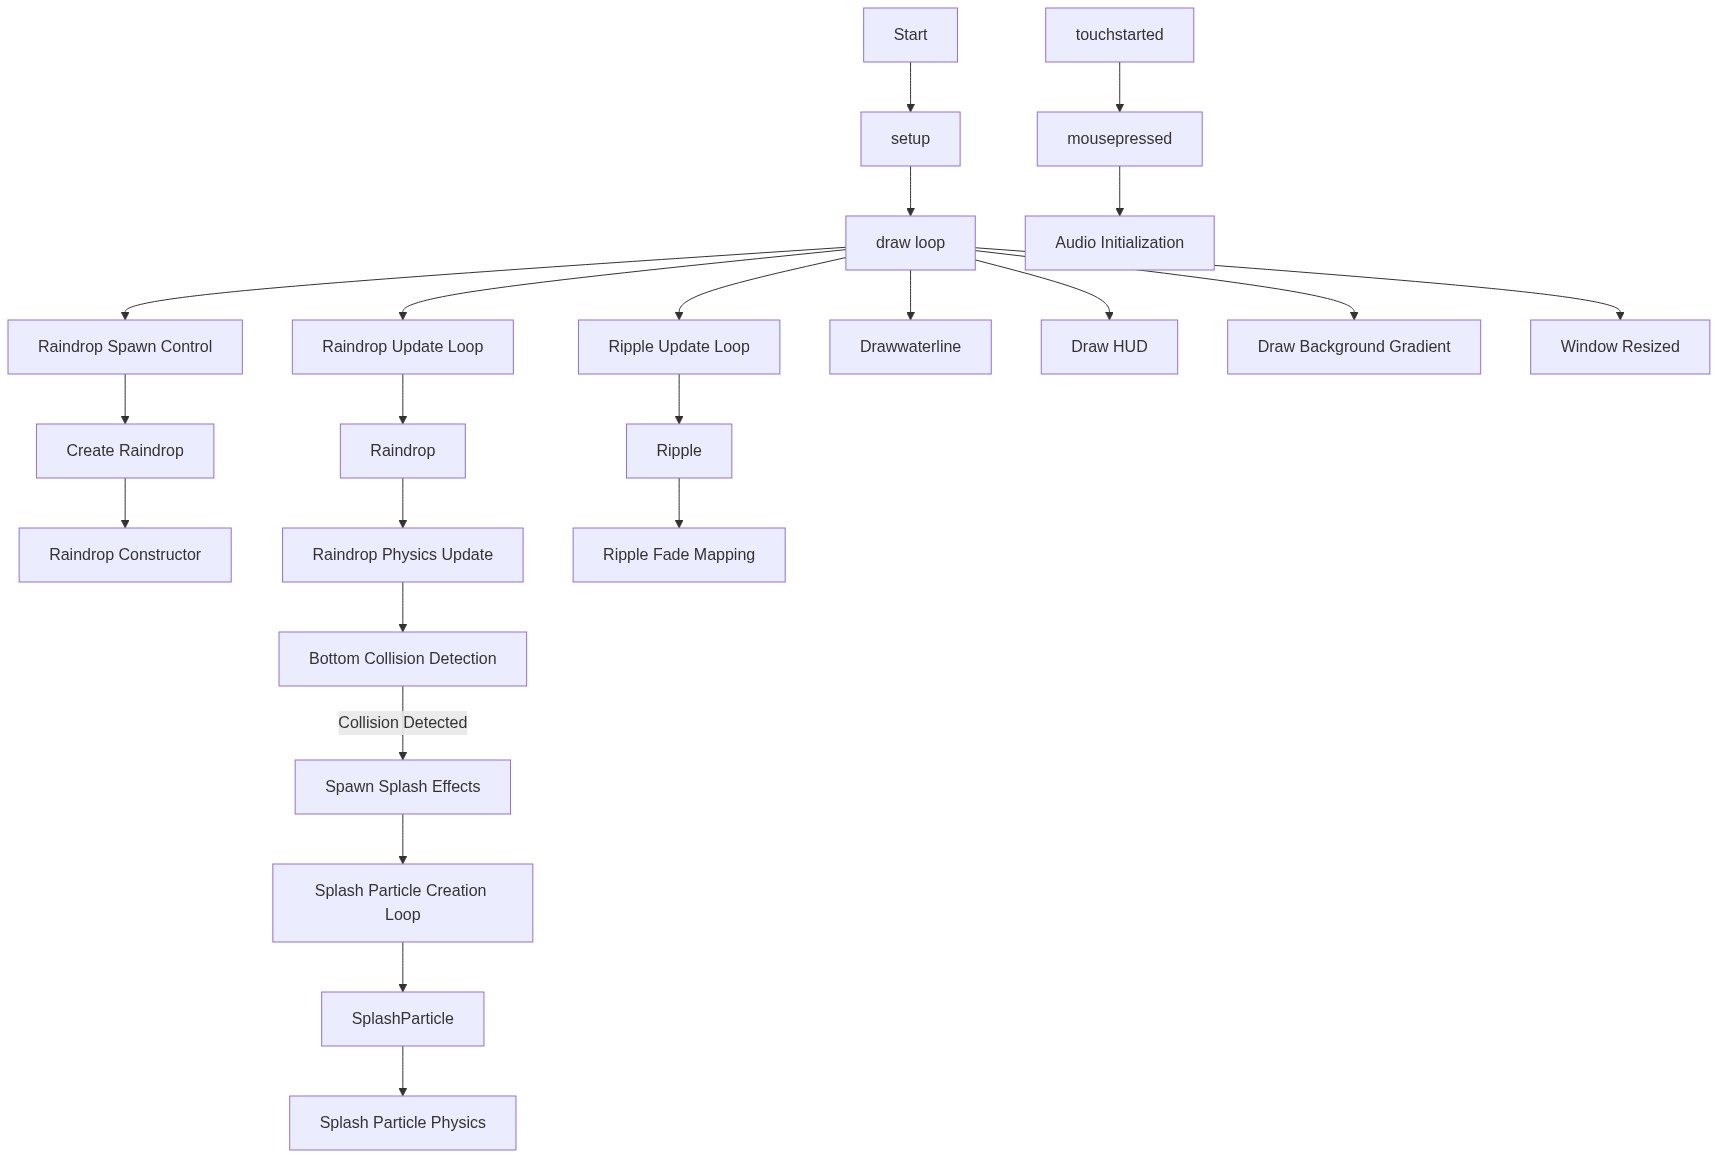
Raindrop Spawner
while (spawnAccumulator >= 1) {
Converts a fractional spawn rate into whole raindrops by accumulating a counter and creating a drop each time it crosses 1.
for-loop
Raindrop Update/Draw Loop
for (let i = raindrops.length - 1; i >= 0; i--) {
Updates and draws every raindrop, checking if it has hit the ground or gone off-screen so it can be removed.
for-loop
Ripple Update/Draw Loop
for (let i = ripples.length - 1; i >= 0; i--) {
Updates and draws every ripple, removing it once it has grown past its max radius.
for-loop
Splash Particle Update/Draw Loop
for (let i = splashes.length - 1; i >= 0; i--) {
Updates and draws every splash particle, removing it once it has faded out or fallen off-screen.
conditional
Raindrop Landing Check
if (d.y + d.length >= height) {
Detects when a raindrop's tail reaches the bottom of the canvas and triggers the splash/ripple/sound response.
image(bgLayer, 0, 0, width, height);- Draws the pre-rendered gradient buffer onto the visible canvas every frame - this both shows the background and clears away last frame's drawings.
drawWaterline();- Draws a subtle horizontal line near the bottom to represent the water surface.
spawnAccumulator += rainIntensity * 0.08;- Adds a small fractional amount to the accumulator each frame - higher rainIntensity adds more, making drops spawn more often.
while (spawnAccumulator >= 1) { createRaindrop(); spawnAccumulator -= 1; }- Whenever the accumulator has built up to at least 1, it creates a raindrop and subtracts 1 - this lets you spawn drops at fractional, smooth average rates like 1.5 per frame.
d.update(); d.draw();- Each raindrop moves itself (falls, accelerates) then draws its current position as a short line.
if (d.y + d.length >= height) {- Checks whether the bottom tip of the raindrop's line has reached the canvas floor.
spawnSplashEffects(d.x); playRaindropNote(); raindrops.splice(i, 1);- On landing: creates the ripple/splash particles at that x position, plays a musical note, and removes the raindrop from the array since it's done.
raindrops.splice(i, 1);- splice() removes exactly one element at index i from the array - looping backwards (i--) makes this safe, since removing an element doesn't shift the indices of items still left to process.
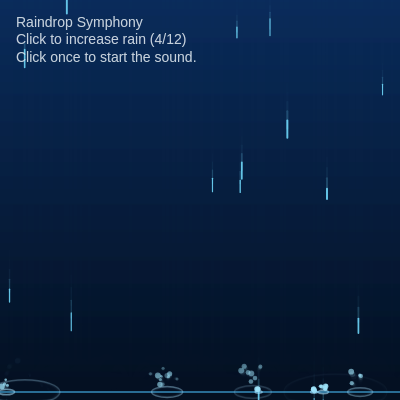
drawHUD();- Draws the title text and instructions on top of everything else, last, so it's never hidden behind drops or splashes.
function drawHUD() {
  noStroke();
  fill(210, 30, 90, 0.85); // soft white/blue
  textSize(14);
  textAlign(LEFT, TOP);

  const title = "Raindrop Symphony";
  const hintIntensity = "Click to increase rain (" + rainIntensity + "/" + maxRainIntensity + ")";
  const hintAudio = audioStarted ? "" : "Click once to start the sound.";

  let textToShow = title + "\n" + hintIntensity;
  if (hintAudio) {
    textToShow += "\n" + hintAudio;
  }

  text(textToShow, 16, 16);
}
Line-by-line explanation (6 lines)
🔧 Subcomponents:
conditional
Audio Hint Check
if (hintAudio) {
Only appends the 'click to start sound' line if audio hasn't been started yet.
fill(210, 30, 90, 0.85); // soft white/blue- Sets the text color to a nearly-white pale blue with slight transparency.
textAlign(LEFT, TOP);- Makes the text() call position text so its top-left corner sits at the given coordinates, rather than centering it.
const hintIntensity = "Click to increase rain (" + rainIntensity + "/" + maxRainIntensity + ")";- Builds a string showing the current rain intensity out of the maximum, updating live as rainIntensity changes.
const hintAudio = audioStarted ? "" : "Click once to start the sound.";- A ternary expression: if audio has already started, this is an empty string; otherwise it's an instruction to click.
if (hintAudio) { textToShow += "\n" + hintAudio; }- Empty strings are 'falsy' in JavaScript, so this line only runs (and adds the hint) when hintAudio actually contains text.
text(textToShow, 16, 16);- Draws all the combined text lines starting 16 pixels from the top-left corner.
function createRaindrop() {
  const x = random(width);
  const y = random(-40, -10);
  const speed = random(4, 9);
  const length = random(10, 20);
  const thickness = random(1, 2);

  raindrops.push(new Raindrop(x, y, speed, length, thickness));
}
Line-by-line explanation (5 lines)
const x = random(width);- Picks a random horizontal position anywhere across the canvas width.
const y = random(-40, -10);- Starts the drop above the visible canvas (negative y), so it falls into view rather than popping in abruptly.
const speed = random(4, 9);- Gives each drop a random initial falling speed, so they don't all move in lockstep.
const length = random(10, 20);- Randomizes how long each drop's streak looks.
raindrops.push(new Raindrop(x, y, speed, length, thickness));- Creates a new Raindrop object with these random properties and adds it to the raindrops array so draw() will update and render it.
🔬 The four ADSR numbers are attack, decay, sustain, and release in seconds. What happens if you make the release much longer, like 1.5 seconds, so notes linger?
  env.setADSR(0.01, 0.18, 0.0, 0.25);
  env.setRange(0.15, 0); // quiet, gentle
function playRaindropNote() {
  if (!audioStarted) return;

  const baseFreq = 220;        // A3
  const scale = [0, 2, 4, 7, 9]; // Major pentatonic steps in semitones
  const degree = random(scale);
  const octave = random([0, 12]); // 0 or +1 octave in semitones

  const semitoneOffset = degree + octave;
  const freq = baseFreq * pow(2, semitoneOffset / 12);

  const oscType = random(['sine', 'triangle']); // soft waveforms
  const osc = new p5.Oscillator(oscType);
  osc.freq(freq);
  osc.start();
  osc.amp(0); // start silent

  const env = new p5.Envelope();
  // attack, decay, sustainRatio, release (seconds)
  env.setADSR(0.01, 0.18, 0.0, 0.25);
  env.setRange(0.15, 0); // quiet, gentle

  // Connect envelope to oscillator amplitude and play it
  osc.amp(env);
  env.play();

  // Stop oscillator after envelope finishes (~0.46s)
  const totalDuration = 0.01 + 0.18 + 0.25 + 0.02;
  setTimeout(() => {
    osc.stop();
  }, totalDuration * 1000);
}
Line-by-line explanation (12 lines)
🔧 Subcomponents:
conditional
Audio Not-Started Guard
if (!audioStarted) return;
Prevents trying to play sound before the browser's audio context has been unlocked by a user click.
if (!audioStarted) return;- Browsers block audio until a user interacts with the page, so this exits early if that hasn't happened yet, avoiding errors.
const scale = [0, 2, 4, 7, 9]; // Major pentatonic steps in semitones- A pentatonic scale (5 notes) always sounds pleasant together no matter which notes are combined, which is why random notes from this array never clash.
const degree = random(scale);- Picks one random semitone offset from the pentatonic scale array.
const octave = random([0, 12]);- Randomly picks either the same octave (0 semitones) or one octave higher (12 semitones), adding pitch variety.
const freq = baseFreq * pow(2, semitoneOffset / 12);- Converts a semitone offset into an actual frequency using the standard musical formula: each 12 semitones doubles the frequency (one octave).
const osc = new p5.Oscillator(oscType);- Creates a new sound-generating oscillator using either a sine or triangle waveform for a soft tone.
osc.amp(0); // start silent- The oscillator starts at zero volume so it doesn't click or pop before the envelope takes over.
env.setADSR(0.01, 0.18, 0.0, 0.25);- Configures the volume envelope's Attack, Decay, Sustain level, and Release times in seconds - here it fades in almost instantly, decays, and has no sustain before releasing.
env.setRange(0.15, 0);- Sets the loudest point of the envelope to 0.15 (quiet) and its resting point to 0 (silent).
osc.amp(env);- Connects the envelope to control the oscillator's volume over time, instead of a fixed volume.
env.play();- Triggers the envelope, which ramps the oscillator's volume up and back down automatically.
setTimeout(() => { osc.stop(); }, totalDuration * 1000);- Schedules the oscillator to fully stop (freeing up audio resources) shortly after the envelope finishes, since setTimeout() works in milliseconds.
🔬 What happens to the way drops fall if you remove gravity entirely by changing 0.12 to 0?
  update() {
    this.y += this.speed;
    this.speed += 0.12; // gravity
  }
class Raindrop {
  constructor(x, y, speed, length, thickness) {
    this.x = x;
    this.y = y;
    this.speed = speed;
    this.length = length;
    this.thickness = thickness;
  }

  update() {
    this.y += this.speed;
    this.speed += 0.12; // gravity
  }

  draw() {
    stroke(195, 90, 70, 0.9); // bright aqua
    strokeWeight(this.thickness);
    line(this.x, this.y, this.x, this.y + this.length);
  }
}
Line-by-line explanation (5 lines)
constructor(x, y, speed, length, thickness) {- Runs once when `new Raindrop(...)` is called, storing all the passed-in values as properties on this specific drop.
this.y += this.speed;- Moves the drop downward each frame by its current speed.
this.speed += 0.12; // gravity- Increases the drop's speed slightly every frame, simulating acceleration due to gravity so drops fall faster the longer they fall.
stroke(195, 90, 70, 0.9); // bright aqua- Sets a bright aqua-blue color for the raindrop's line, with a hue distinct from the background.
line(this.x, this.y, this.x, this.y + this.length);- Draws a short vertical line from the drop's current position down to its tail, giving it a streaking rain-like appearance.
🔬 map() here fades alpha from 0.7 down to 0 as the ripple grows. What happens if you flip the last two arguments to fade from 0 up to 0.7 instead, so ripples get MORE visible as they expand?
  draw() {
    const alpha = map(this.radius, 0, this.maxRadius, 0.7, 0);
    noFill();
    stroke(200, 80, 80, alpha);
    strokeWeight(1.5);
class Ripple {
  constructor(x, y) {
    this.x = x;
    this.y = y;
    this.radius = 2;
    this.maxRadius = random(20, 60);
  }

  update() {
    this.radius += 1.5;
  }

  draw() {
    const alpha = map(this.radius, 0, this.maxRadius, 0.7, 0);
    noFill();
    stroke(200, 80, 80, alpha);
    strokeWeight(1.5);

    // Slightly flattened ellipse to hint at perspective
    ellipse(this.x, this.y, this.radius * 2, this.radius * 0.7);
  }

  isDone() {
    return this.radius > this.maxRadius;
  }
}
Line-by-line explanation (5 lines)
this.maxRadius = random(20, 60);- Each ripple gets its own random maximum size, so they don't all look identical.
this.radius += 1.5;- Grows the ripple's radius by a fixed amount every frame, making it expand steadily outward.
const alpha = map(this.radius, 0, this.maxRadius, 0.7, 0);- map() converts the current radius (somewhere between 0 and maxRadius) into a transparency value between 0.7 and 0 - so the ripple starts visible and fades out as it grows, just like a real water ripple.
ellipse(this.x, this.y, this.radius * 2, this.radius * 0.7);- Draws the ripple as an ellipse that's wider than it is tall (radius * 0.7 for height), giving a subtle illusion of looking at the water surface from an angle.
return this.radius > this.maxRadius;- isDone() reports true once the ripple has grown past its maximum size, signaling draw() that it's safe to remove from the ripples array.
🔬 This uses || so the particle is removed if EITHER condition is true. What would happen if you changed || to && here - would particles disappear sooner or later?
  isDone() {
    return this.alpha <= 0 || this.y > height + 10;
  }
class SplashParticle {
  constructor(x, y) {
    this.x = x;
    this.y = y;
    this.vx = random(-1.5, 1.5);
    this.vy = random(-3.5, -1.5);
    this.alpha = 0.9;
    this.radius = random(1.2, 3);
  }

  update() {
    this.x += this.vx;
    this.y += this.vy;
    this.vy += 0.18;  // gravity
    this.alpha -= 0.04;
  }

  draw() {
    noStroke();
    fill(195, 90, 80, this.alpha);
    circle(this.x, this.y, this.radius * 2);
  }

  isDone() {
    return this.alpha <= 0 || this.y > height + 10;
  }
}
Line-by-line explanation (7 lines)
this.vx = random(-1.5, 1.5);- Gives each particle a random small horizontal velocity, so splashes scatter left and right instead of moving identically.
this.vy = random(-3.5, -1.5);- Gives each particle an initial upward velocity (negative y is up in p5.js), simulating a splash bouncing off the water surface.
this.x += this.vx; this.y += this.vy;- Moves the particle each frame according to its current velocity.
this.vy += 0.18; // gravity- Continuously pulls the particle's vertical velocity downward, so it arcs upward then falls back down like a real splash droplet.
this.alpha -= 0.04;- Gradually fades the particle out over time by reducing its transparency value each frame.
fill(195, 90, 80, this.alpha);- Colors the particle using its own current alpha, so it visibly fades as it flies through the air.
return this.alpha <= 0 || this.y > height + 10;- isDone() returns true if the particle has fully faded out OR fallen below the bottom of the canvas, whichever happens first - this double-check prevents particles lingering invisibly forever.