
AI Reaction Time Test - How Fast Are Your Reflexes - xelsed.ai

This sketch is a classic reaction-time tester: the screen stays red for a random delay, flashes green, and measures how many milliseconds pass before you click. A simple state machine drives four screens (waiting, ready, result, and too-early) and keeps track of your personal best score.

🧪 Try This!

Experiment with the code by making these changes:

  1. Show a personalized result message — Add a quick judgment of your reaction speed right next to the number on the result screen.
  2. Make the wait longer and more suspenseful — Widening the random delay range means you'll wait longer on average before the green screen appears.
  3. Rewrite the too-early message — Swap the plain 'Too early!' text for something more playful to change the tone of the penalty screen.
Prefer the full editor? Open it there →

📖 About This Sketch

This sketch creates a full-screen reaction test: the canvas starts red and waits a random amount of time before flashing green, and the moment you click after green appears is measured down to the millisecond. Click too soon and you get a 'Too early!' penalty screen instead of a score. It's a great example of building a game entirely out of a state machine, using p5.js's millis() function for precise timing and random() to keep the delay unpredictable.

The code is organized around a single gameState variable that controls which of four screens is shown, updated inside a switch statement in draw() and another switch statement in mousePressed(). By studying it you'll learn how to structure interactive programs as explicit states, how to load and use a custom web font with preload(), and how to make a canvas responsive to browser resizing.

⚙️ How It Works

  1. When the sketch loads, preload() fetches a custom Roboto font, then setup() creates a full-window canvas, applies that font, centers all text, and calls resetGame() to pick a random delay and reset the game to the WAIT state.
  2. On every frame, draw() first prints the best score in the corner, then uses a switch statement on gameState to decide what to paint: red with 'Wait for green...' during WAIT, green with 'CLICK NOW!' during READY, or a white results screen during RESULT or EARLY.
  3. While in the WAIT state, draw() constantly checks if millis() has passed the randomly chosen targetTime; once it has, the state flips to READY and the exact switch-over time is stored in startTime.
  4. mousePressed() reacts differently depending on the current state: clicking during WAIT is treated as jumping the gun and moves to EARLY, clicking during READY calculates reactionTime as millis() - startTime and updates bestScore, and clicking during RESULT or EARLY simply starts a new round via resetGame().
  5. resetGame() re-randomizes the next delay with random(2000, 5000) added to the current millis(), then clears reactionTime and startTime so the cycle can repeat.
  6. windowResized() keeps the canvas matching the browser size any time the window is resized, so the full-screen experience stays intact.

🎓 Concepts You'll Learn

State machine implemented with a switch statementTiming with millis()Custom web font loading via preload() and loadFont()Randomized delays with random()Responsive canvas sizing with windowResized()Mouse input handling with mousePressed()

📝 Code Breakdown

preload()

preload() runs before setup() and pauses the sketch until everything inside it (fonts, images, sounds) finishes loading. This guarantees myFont is ready by the time textFont(myFont) is called in setup().

function preload() {
  // Load a custom font from Fontsource CDN.
  // We're using Roboto regular (400 weight).
  // The URL pattern is @fontsource/{slug}@latest/files/{slug}-latin-400-normal.woff
  myFont = loadFont('https://unpkg.com/@fontsource/roboto@latest/files/roboto-latin-400-normal.woff');
}
Line-by-line explanation (1 lines)
myFont = loadFont('https://unpkg.com/@fontsource/roboto@latest/files/roboto-latin-400-normal.woff');
Downloads the Roboto font file from a CDN and stores the loaded font object in the global myFont variable, so it's ready to use before setup() runs.

setup()

setup() runs exactly once and is the right place to configure the canvas, fonts, and alignment before any animation begins. Calling resetGame() here avoids duplicating initialization logic.

function setup() {
  // Create a canvas that fills the entire browser window.
  createCanvas(windowWidth, windowHeight);

  // Set the custom font for all text in the sketch.
  textFont(myFont);

  // Set text alignment to center horizontally and vertically.
  textAlign(CENTER, CENTER);

  // No outline around shapes (like the background rectangles).
  noStroke();

  // Initialize the game for the first round.
  resetGame();
}
Line-by-line explanation (5 lines)
createCanvas(windowWidth, windowHeight);
Creates a canvas that exactly matches the current browser window size, so the game fills the screen.
textFont(myFont);
Applies the custom Roboto font loaded in preload() to all text drawn from now on.
textAlign(CENTER, CENTER);
Sets text so that when you call text(str, x, y), the string is centered around the (x, y) point both horizontally and vertically - useful for centering big messages.
noStroke();
Disables outlines on shapes. In this sketch it has almost no visible effect since only background() and text() are used, neither of which draws a stroke.
resetGame();
Calls the helper function that sets the initial game state and picks the first random delay, kicking off the first round.

draw()

draw() runs continuously and is where nearly all state-based games live: instead of separate screens or scenes, everything is drawn conditionally based on a single state variable, which is a simple but powerful pattern for small games.

🔬 This is the exact moment the screen turns green. What happens if you change the condition to `if (true)`, so it always passes immediately - does the red 'wait' screen ever show up?

      if (millis() >= targetTime) {
        gameState = "READY"; // Switch to the green "CLICK NOW!" state
        startTime = millis(); // Record the exact time green appears
      }

🔬 The reaction time is shown with a raw template literal. What happens if you change it to show seconds with two decimals instead, like `${(reactionTime/1000).toFixed(2)} s`?

    case "RESULT":
      // White screen, showing the reaction time.
      background(255);       // White
      fill(0);               // Black text
      textSize(128);
      text(`${reactionTime} ms`, width / 2, height / 2 - 50);
function draw() {
  // Display the best score in the top-left corner.
  // If bestScore is Infinity (no successful tries yet), display "N/A".
  fill(0); // Black text for the score
  textSize(24);
  textAlign(LEFT, TOP);
  text(`Best: ${bestScore === Infinity ? 'N/A' : bestScore + ' ms'}`, 20, 20);

  // Reset text alignment for main messages.
  textAlign(CENTER, CENTER);

  // Use a switch statement to handle different game states.
  switch (gameState) {
    case "WAIT":
      // Red screen, waiting for the random delay to pass.
      background(255, 0, 0); // Red
      fill(255);             // White text
      textSize(64);
      text("Wait for green...", width / 2, height / 2);

      // Check if the target time has been reached.
      if (millis() >= targetTime) {
        gameState = "READY"; // Switch to the green "CLICK NOW!" state
        startTime = millis(); // Record the exact time green appears
      }
      break;

    case "READY":
      // Green screen, user should click now.
      background(0, 255, 0); // Green
      fill(0);               // Black text
      textSize(96);
      text("CLICK NOW!", width / 2, height / 2);
      break;

    case "RESULT":
      // White screen, showing the reaction time.
      background(255);       // White
      fill(0);               // Black text
      textSize(128);
      text(`${reactionTime} ms`, width / 2, height / 2 - 50);
      textSize(32);
      text("Click to try again", width / 2, height / 2 + 50);
      break;

    case "EARLY":
      // White screen, user clicked too early.
      background(255);       // White
      fill(0);               // Black text
      textSize(64);
      text("Too early!", width / 2, height / 2 - 50);
      textSize(32);
      text("Click to try again", width / 2, height / 2 + 50);
      break;
  }
}
Line-by-line explanation (8 lines)

🔧 Subcomponents:

switch-case WAIT state screen case "WAIT":

Paints the red waiting screen and checks whether the random delay has elapsed so the game can move to READY.

conditional Delay elapsed check if (millis() >= targetTime) {

Compares the current time to the random target time; once it passes, switches state to READY and records the exact switch moment.

switch-case READY state screen case "READY":

Paints the green 'CLICK NOW!' screen that the player must click as fast as possible.

switch-case RESULT state screen case "RESULT":

Shows the calculated reaction time in milliseconds and prompts the player to click again.

switch-case EARLY state screen case "EARLY":

Shows a 'Too early!' message when the player clicked before the screen turned green.

text(`Best: ${bestScore === Infinity ? 'N/A' : bestScore + ' ms'}`, 20, 20);
Displays the best score using a ternary operator: if bestScore is still Infinity (no successful round yet), show 'N/A', otherwise show the number followed by ' ms'.
switch (gameState) {
Branches the drawing logic based on the current game state string, so only one screen is drawn per frame.
background(255, 0, 0); // Red
Fills the whole canvas red for the WAIT screen, giving a clear visual cue not to click yet.
if (millis() >= targetTime) {
Checks whether enough real time has passed since resetGame() picked the random targetTime; millis() returns milliseconds since the sketch started.
gameState = "READY"; // Switch to the green "CLICK NOW!" state
Changes the state variable so that on the very next frame, draw() will render the green screen instead of red.
startTime = millis(); // Record the exact time green appears
Stores the precise millisecond the screen turned green, which is later used to calculate how long the player took to react.
background(0, 255, 0); // Green
Fills the canvas green - this is the exact moment the player is supposed to click.
text(`${reactionTime} ms`, width / 2, height / 2 - 50);
Displays the stored reactionTime value (calculated in mousePressed()) as the main result on screen.

mousePressed()

mousePressed() is called automatically by p5.js whenever the mouse is clicked (or the screen tapped). Combining it with the same gameState variable used in draw() lets a single click mean different things depending on context, which is the essence of a state machine.

🔬 bestScore keeps the fastest reaction using min(). What happens if you swap min() for max() here - what would 'Best' actually mean then?

    case "READY":
      // User clicked while the screen was green.
      reactionTime = millis() - startTime; // Calculate reaction time
      bestScore = min(bestScore, reactionTime); // Update best score
      gameState = "RESULT"; // Transition to the "Result" state
      break;
function mousePressed() {
  switch (gameState) {
    case "WAIT":
      // User clicked while the screen was red.
      gameState = "EARLY"; // Transition to the "Too early!" state
      // We don't reset targetTime here, as the user might click again
      // after seeing "Too early!" to restart, which resetGame handles.
      break;

    case "READY":
      // User clicked while the screen was green.
      reactionTime = millis() - startTime; // Calculate reaction time
      bestScore = min(bestScore, reactionTime); // Update best score
      gameState = "RESULT"; // Transition to the "Result" state
      break;

    case "RESULT":
    case "EARLY":
      // User clicked after seeing the result or early message.
      resetGame(); // Start a new round
      break;
  }
}
Line-by-line explanation (6 lines)

🔧 Subcomponents:

switch-case Clicked too early case "WAIT":

Moves the game to the EARLY state when the player clicks before the screen turns green.

switch-case Valid reaction click case "READY":

Calculates the elapsed reaction time, updates the best score if this attempt is faster, and moves to the RESULT state.

switch-case Restart click case "RESULT": case "EARLY":

Falls through both cases to start a brand-new round whenever the player clicks after seeing either the result or the too-early message.

switch (gameState) {
Looks at the current state to decide what a click should mean - the same click does something different depending on when it happens.
gameState = "EARLY"; // Transition to the "Too early!" state
Immediately flags the click as premature by switching to the EARLY state, which draw() will render next frame.
reactionTime = millis() - startTime; // Calculate reaction time
Subtracts the moment the screen turned green (startTime) from right now, giving the number of milliseconds the player took to react.
bestScore = min(bestScore, reactionTime); // Update best score
Uses p5's min() function to keep whichever value is smaller - the previous best or this new attempt - as the new best score.
case "RESULT": case "EARLY":
These two case labels share no code between them and both fall through to the same resetGame() call below, meaning a click on either screen restarts the game.
resetGame(); // Start a new round
Calls the helper function to pick a new random delay and reset the state back to WAIT.

resetGame()

Keeping all reset logic in one function avoids duplicating the same lines in setup() and mousePressed() - both places that need to start a fresh round simply call resetGame() instead of repeating themselves.

🔬 The delay before green appears is randomized between 2000 and 5000 milliseconds. What happens if you narrow it to random(100, 300) - does the game become nearly impossible to react to fairly, or does it just feel more intense?

  gameState = "WAIT"; // Set initial state to "WAIT" (red screen)
  // Calculate a new random target time between 2 and 5 seconds from now.
  targetTime = millis() + random(2000, 5000);
function resetGame() {
  gameState = "WAIT"; // Set initial state to "WAIT" (red screen)
  // Calculate a new random target time between 2 and 5 seconds from now.
  targetTime = millis() + random(2000, 5000);
  reactionTime = 0;   // Clear previous reaction time
  startTime = 0;      // Clear previous start time
}
Line-by-line explanation (4 lines)
gameState = "WAIT"; // Set initial state to "WAIT" (red screen)
Puts the game back into the red waiting screen so a new round can begin.
targetTime = millis() + random(2000, 5000);
Picks a random number of milliseconds between 2000 and 5000 (2-5 seconds) and adds it to the current time, giving an unpredictable future moment when the screen should turn green.
reactionTime = 0; // Clear previous reaction time
Resets the stored reaction time so the old result doesn't linger for the next round.
startTime = 0; // Clear previous start time
Resets the recorded 'green appeared' timestamp so it's ready to be set again in draw().

windowResized()

windowResized() is a special p5.js function that's automatically called whenever the browser window changes size. Pairing it with resizeCanvas() is the standard way to build responsive full-window sketches.

function windowResized() {
  // Resize the canvas to match the new window dimensions.
  resizeCanvas(windowWidth, windowHeight);
}
Line-by-line explanation (1 lines)
resizeCanvas(windowWidth, windowHeight);
Whenever the browser window changes size, this resizes the p5.js canvas to match the new windowWidth and windowHeight, keeping the game full-screen.

📦 Key Variables

gameState string

Tracks which screen the game is currently showing: "WAIT", "READY", "RESULT", or "EARLY". Everything in draw() and mousePressed() branches off this value.

let gameState = "WAIT";
targetTime number

Stores the future millis() timestamp at which the screen should turn green, calculated with a random delay in resetGame().

let targetTime = 0;
startTime number

Stores the exact millis() timestamp when the screen turned green, used to measure how long the player takes to click.

let startTime = 0;
reactionTime number

Holds the calculated number of milliseconds between the screen turning green and the player's click.

let reactionTime = 0;
bestScore number

Tracks the lowest (fastest) reactionTime achieved so far in the session; starts at Infinity so any real score beats it.

let bestScore = Infinity;
myFont object

Holds the loaded p5.Font object for the custom Roboto typeface, applied to all text via textFont().

let myFont;

🔧 Potential Improvements (4)

Here are some ways this code could be enhanced:

STYLE setup()

noStroke() is called but the sketch never draws a shape that respects stroke settings - only background() and text() are used, and neither is affected by stroke().

💡 Remove the unused noStroke() call, or add a stroked shape (like a border rectangle indicating game state) so the setting has a visible purpose.

BUG mousePressed() READY case / draw() RESULT case

reactionTime is stored as a raw float from millis() - startTime, which can occasionally produce long decimal values (e.g. '234.60000002 ms') since millis() isn't guaranteed to return whole numbers.

💡 Round the value when it's calculated, e.g. reactionTime = Math.round(millis() - startTime);, so the displayed number is always a clean integer.

FEATURE global variable bestScore

bestScore only lives in memory, so it resets to 'N/A' every time the page is refreshed, making it impossible to track improvement across sessions.

💡 Persist the value with localStorage.setItem('bestScore', bestScore) whenever it improves, and read it back with localStorage.getItem('bestScore') at the start of setup().

FEATURE mousePressed()

The game only responds to mouse clicks, so keyboard-only users can't play, and there's no way to distinguish how early an early click was.

💡 Add a keyPressed() function that mirrors mousePressed() for keyboard input, and consider showing how many milliseconds before green the early click happened.

🔄 Code Flow

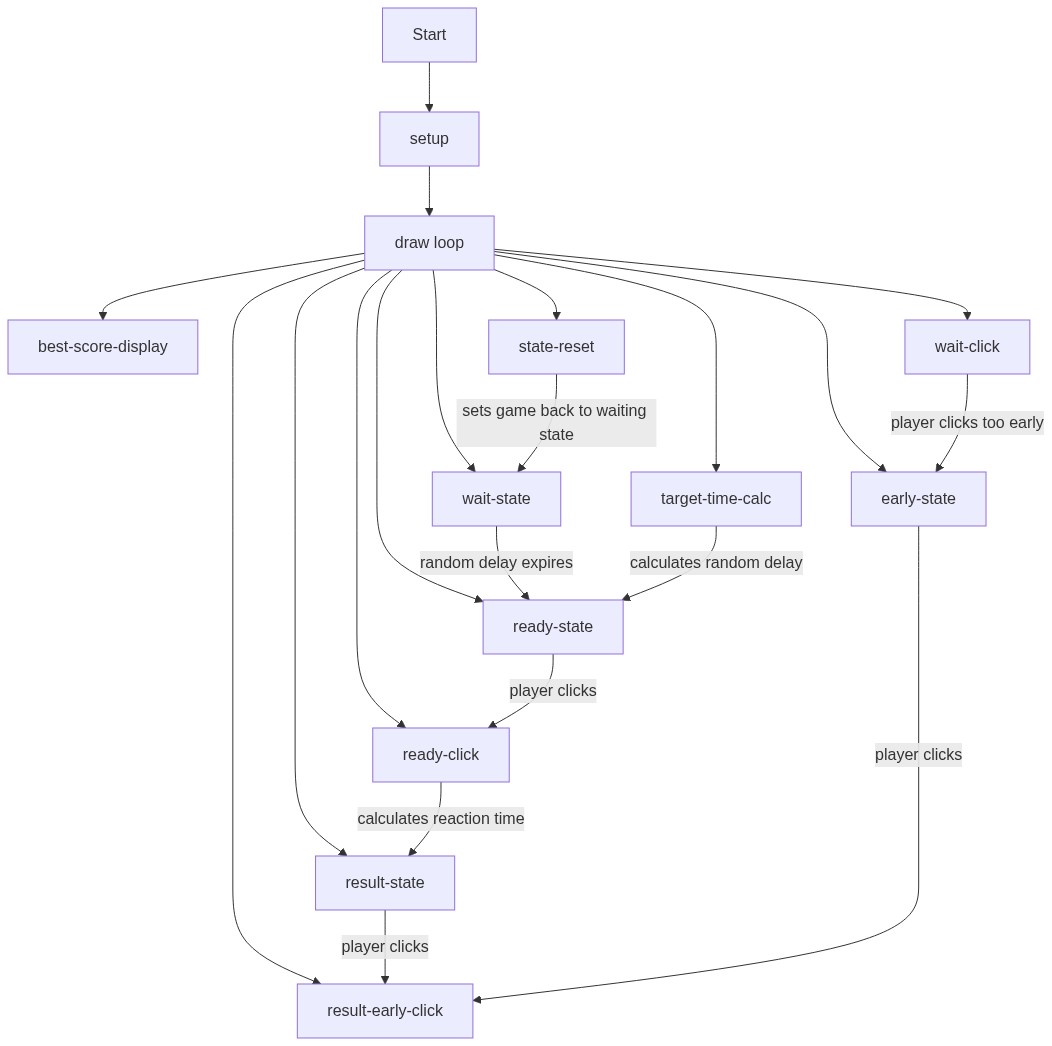
Code flow showing preload, setup, draw, mousepressed, resetgame, windowresized

💡 Click on function names in the diagram to jump to their code

graph TD start[Start] --> setup[setup] setup --> draw[draw loop] draw --> wait-case[WAIT state screen] draw --> ready-case[READY state screen] draw --> result-case[RESULT state screen] draw --> early-case[EARLY state screen] wait-case --> wait-timer-check[Delay elapsed check] wait-timer-check -->|Time elapsed| ready-case wait-timer-check -->|Time not elapsed| wait-case ready-case --> wait-click[Clicked too early] ready-case --> ready-click[Valid reaction click] wait-click --> early-case ready-click --> result-case result-case --> result-early-click[Restart click] early-case --> result-early-click result-early-click --> resetgame[resetGame] resetgame --> draw click setup href "#fn-setup" click draw href "#fn-draw" click wait-case href "#sub-wait-case" click wait-timer-check href "#sub-wait-timer-check" click ready-case href "#sub-ready-case" click result-case href "#sub-result-case" click early-case href "#sub-early-case" click wait-click href "#sub-wait-click" click ready-click href "#sub-ready-click" click result-early-click href "#sub-result-early-click"

❓ Frequently Asked Questions

What visual elements are present in the AI Reaction Time Test sketch?

The sketch features a fullscreen canvas that changes color to green when it's time to click, with text displaying the best reaction time in the top-left corner.

How do users participate in the reaction time test?

Users interact by waiting for the screen to turn green and then clicking as quickly as possible; if they click too early, they must restart the test.

What coding techniques does this sketch demonstrate in p5.js?

This sketch showcases event handling, state management, and real-time feedback through a simple game design, effectively illustrating creative coding principles.

Preview

AI Reaction Time Test - How Fast Are Your Reflexes - xelsed.ai - p5.js creative coding sketch preview
Sketch Preview
Code flow diagram showing the structure of AI Reaction Time Test - How Fast Are Your Reflexes - xelsed.ai - Code flow showing preload, setup, draw, mousepressed, resetgame, windowresized
Code Flow Diagram