
AI Squishy Blob - Poke the Jelly Creature

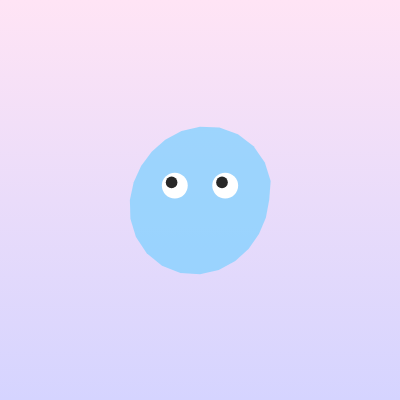
This sketch renders a soft, wobbly blob made of 24 connected points that stretches and squishes in response to the mouse. The blob chases your cursor when you click-drag near it, has googly eyes that always look at the mouse, and sits on a smooth pastel gradient background.

🧪 Try This!

Experiment with the code by making these changes:

  1. Make the blob bigger — Increasing the size multiplier makes the resting radius (and therefore the whole creature) noticeably larger.
  2. Recolor the blob — Changing the fill color instantly repaints the blob's body a different hue.
  3. Widen the poke zone — Increasing the proximity threshold lets you squish the blob from much further away from its edge.
  4. Make it extra jiggly — Reducing damping lets each vertex overshoot and wobble longer before settling, giving the blob a looser, jellier feel.
Prefer the full editor? Open it there →

📖 About This Sketch

This sketch draws a single soft-body blob out of 24 points arranged in a circle, then nudges each point away from the mouse cursor so the whole shape squishes like jelly when you poke it. Dragging the mouse also drags the blob's center around the screen with springy, bouncy motion, and two googly eyes rotate to stare at your cursor at all times. The visual effect relies on beginShape()/vertex()/endShape() to draw a custom polygon, per-point spring physics (velocity and offset arrays) for the squish, dist() for poke detection, and a raw canvas gradient via drawingContext for the pastel background.

The code is deliberately compact: one setup() that seeds arrays of angles and offsets, one draw() that repaints the gradient, moves the blob's center with spring physics, and loops over every vertex to compute its wobble and squish, plus a small drawEyes() helper and a windowResized() for responsiveness. Studying it teaches you how to fake soft-body physics with simple spring math (attract-back-to-rest-position plus damping) applied independently to many points, and how per-vertex forces combined with beginShape() can produce an organic, non-rigid shape from a rigid circle of angles.

⚙️ How It Works

  1. When the sketch loads, setup() creates a full-window canvas, centers the blob at the middle of the screen, and fills the ang[] array with 24 evenly spaced angles around a circle while zeroing out every point's offset and velocity.
  2. Every frame, draw() first paints a pink-to-lavender gradient using the raw HTML5 canvas API, then recalculates the blob's base radius so it stays proportional to the window size.
  3. The blob's center (cx, cy) is pulled toward the mouse position ONLY while the mouse button is held down (otherwise it drifts back to the screen center), using a spring formula: acceleration toward the target, then velocity damping, which creates smooth, bouncy chasing motion.
  4. For each of the 24 vertices, draw() computes a resting position on a circle (with a gentle sine-wave wobble for a breathing effect), then checks the distance from that point to the mouse - if the mouse is within 120 pixels, it pushes the point away, creating the squish.
  5. Each vertex also has its own tiny spring pulling it back toward zero offset and a damping factor that bleeds off velocity, so once you stop poking, every point springs back to its resting shape.
  6. After the vertex loop draws the wobbly polygon with beginShape()/vertex()/endShape(CLOSE), drawEyes() draws two white circles with black pupils that shift toward the mouse direction, completing the googly-eyed look.

🎓 Concepts You'll Learn

beginShape/vertex/endShape custom polygonsSpring physics (attraction + damping)Per-vertex force accumulationdist() for proximity/collision-like checksRaw canvas gradients via drawingContextVector-like normalization with sqrt/magnitudeResponsive canvas with windowResized()

📝 Code Breakdown

setup()

setup() runs once when the sketch starts. Here it's used to precompute the resting angle of every vertex so draw() doesn't have to recalculate it every frame - a common performance pattern in creative coding.

function setup(){
  createCanvas(windowWidth,windowHeight);
  noStroke();
  cx=width/2;cy=height/2;
  for(let i=0;i<n;i++){ang[i]=TWO_PI*i/n;offX[i]=offY[i]=vX[i]=vY[i]=0;}
}
Line-by-line explanation (4 lines)

🔧 Subcomponents:

for-loop Vertex Data Initializer for(let i=0;i<n;i++){ang[i]=TWO_PI*i/n;offX[i]=offY[i]=vX[i]=vY[i]=0;}

Fills the ang[] array with evenly spaced angles around a circle and zeroes out every vertex's offset/velocity so the blob starts as a perfect resting circle

createCanvas(windowWidth,windowHeight);
Makes the canvas fill the entire browser window.
noStroke();
Turns off outlines so all shapes drawn later (blob, eyes) are filled with no border.
cx=width/2;cy=height/2;
Places the blob's center at the middle of the screen to start.
for(let i=0;i<n;i++){ang[i]=TWO_PI*i/n;offX[i]=offY[i]=vX[i]=vY[i]=0;}
Loops through all 24 vertices, giving each one an angle evenly spaced around a full circle (TWO_PI radians), and setting its squish offset and velocity to zero so it starts perfectly round.
draw()

draw() runs 60 times per second and is where all the physics and rendering happens. This function shows how you can layer several independent spring systems (one for the whole blob's center, one per vertex) to build convincing soft-body motion without a physics engine.

🔬 This block pushes vertices AWAY from the mouse, which is what makes the blob squish when poked. What happens if you flip the plus signs to minus (vX[i]-=dx*f; vY[i]-=dy*f;) so the blob gets pulled TOWARD the mouse instead?

    if(d<120){
      let f=(120-d)*0.03,dx=(px-mouseX)/d,dy=(py-mouseY)/d;
      vX[i]+=dx*f;vY[i]+=dy*f;
    }

🔬 This makes the blob's edge gently pulse. What happens if you change the 4 to 30 for a much bigger wobble, or change 0.08 to 0.02 for a slower, calmer breathing rhythm?

    let r=baseR+sin(frameCount*0.08+i*0.5)*4;
    let bx=cx+cos(ang[i])*r,by=cy+sin(ang[i])*r;
function draw(){
  let ctx=drawingContext,g=ctx.createLinearGradient(0,0,0,height);
  g.addColorStop(0,"#ffe4f5");g.addColorStop(1,"#d5d4ff");
  ctx.save();ctx.fillStyle=g;ctx.fillRect(0,0,width,height);ctx.restore();
  baseR=min(width,height)*0.18;
  let tx=mouseIsPressed?mouseX:width/2,ty=mouseIsPressed?mouseY:height/2;
  vx+=(tx-cx)*0.05;vy+=(ty-cy)*0.05;vx*=0.85;vy*=0.85;cx+=vx;cy+=vy;
  fill(130,210,255,190);
  beginShape();
  for(let i=0;i<n;i++){
    let r=baseR+sin(frameCount*0.08+i*0.5)*4;
    let bx=cx+cos(ang[i])*r,by=cy+sin(ang[i])*r;
    let px=bx+offX[i],py=by+offY[i];
    let d=max(1,dist(mouseX,mouseY,px,py));
    if(d<120){
      let f=(120-d)*0.03,dx=(px-mouseX)/d,dy=(py-mouseY)/d;
      vX[i]+=dx*f;vY[i]+=dy*f;
    }
    vX[i]+= -offX[i]*0.15;vY[i]+= -offY[i]*0.15;
    vX[i]*=0.8;vY[i]*=0.8;offX[i]+=vX[i];offY[i]+=vY[i];
    vertex(bx+offX[i],by+offY[i]);
  }
  endShape(CLOSE);
  drawEyes();
}
Line-by-line explanation (20 lines)

🔧 Subcomponents:

calculation Gradient Background Paint let ctx=drawingContext,g=ctx.createLinearGradient(0,0,0,height);

Reaches into the underlying HTML5 canvas API to paint a smooth pink-to-lavender vertical gradient behind the blob

calculation Blob Center Spring Physics vx+=(tx-cx)*0.05;vy+=(ty-cy)*0.05;vx*=0.85;vy*=0.85;cx+=vx;cy+=vy;

Accelerates the blob's center toward a target point (mouse if pressed, else screen center) and damps velocity for a bouncy chase

for-loop Per-Vertex Squish Loop for(let i=0;i<n;i++){

Loops over all 24 outline points, computing each one's wobble, squish force from the mouse, spring-back force, and final drawn position

conditional Mouse Proximity Squish if(d<120){

Only pushes a vertex away from the mouse if the mouse is within 120 pixels of it, creating a localized poke effect

let ctx=drawingContext,g=ctx.createLinearGradient(0,0,0,height);
Grabs the raw canvas 2D context p5 is drawing on, and creates a vertical gradient definition from top (y=0) to bottom (y=height).
g.addColorStop(0,"#ffe4f5");g.addColorStop(1,"#d5d4ff");
Sets the gradient's top color to a light pink and its bottom color to a soft lavender.
ctx.save();ctx.fillStyle=g;ctx.fillRect(0,0,width,height);ctx.restore();
Temporarily switches the canvas's fill style to the gradient, paints a rectangle covering the whole screen with it, then restores the previous fill style so it doesn't affect later p5 drawing calls.
baseR=min(width,height)*0.18;
Recomputes the blob's resting radius every frame based on the smaller of width/height, so it stays proportional if the window is resized.
let tx=mouseIsPressed?mouseX:width/2,ty=mouseIsPressed?mouseY:height/2;
Chooses the blob's target position: the mouse location while you're holding the mouse button down, otherwise the center of the screen.
vx+=(tx-cx)*0.05;vy+=(ty-cy)*0.05;vx*=0.85;vy*=0.85;cx+=vx;cy+=vy;
A simple spring formula: the further the center is from its target, the stronger the pull (velocity increases), then velocity is damped by 0.85 to prevent endless acceleration, and finally the center's position is updated - this produces smooth, elastic following motion.
fill(130,210,255,190);
Sets the blob's fill color to a semi-transparent light blue (alpha 190 out of 255).
beginShape();
Starts defining a custom shape - every vertex() call between this and endShape() becomes a corner of the polygon.
let r=baseR+sin(frameCount*0.08+i*0.5)*4;
Adds a small sine-wave wobble to this vertex's radius, offset by its index i so different points wobble slightly out of phase, giving a 'breathing' jelly look.
let bx=cx+cos(ang[i])*r,by=cy+sin(ang[i])*r;
Converts the vertex's angle and wobbly radius into an actual x/y position on screen using basic trigonometry (cos/sin around the blob's center).
let px=bx+offX[i],py=by+offY[i];
Adds this vertex's current squish offset (from being poked) to its resting position, giving its true current location.
let d=max(1,dist(mouseX,mouseY,px,py));
Measures the distance from the mouse to this vertex, using max(1, ...) to avoid ever dividing by zero later.
if(d<120){
Only applies a squish force if the mouse is close enough (within 120 pixels) to this particular vertex.
let f=(120-d)*0.03,dx=(px-mouseX)/d,dy=(py-mouseY)/d;
Calculates a force strength that gets bigger the closer the mouse is (120-d), and a normalized direction (dx, dy) pointing away from the mouse toward the vertex.
vX[i]+=dx*f;vY[i]+=dy*f;
Pushes this vertex's velocity in the direction away from the mouse, scaled by the force strength - this is what makes the blob squish away from your cursor.
vX[i]+= -offX[i]*0.15;vY[i]+= -offY[i]*0.15;
Applies a spring force pulling the vertex back toward its resting offset of zero - the further it's been pushed, the harder it's pulled back.
vX[i]*=0.8;vY[i]*=0.8;offX[i]+=vX[i];offY[i]+=vY[i];
Damps the vertex's velocity (so it doesn't oscillate forever) and then updates its offset position by that velocity, completing one physics step for this vertex.
vertex(bx+offX[i],by+offY[i]);
Adds this vertex's final squished position as a corner of the shape being built.
endShape(CLOSE);
Finishes the shape and connects the last vertex back to the first, closing the polygon into a filled blob outline.
drawEyes();
Calls the helper function that draws the two googly eyes on top of the finished blob body.

drawEyes()

This function demonstrates manual vector math (finding direction and normalizing it without p5.Vector) and shows how looping over a small array like [-1,1] is a clean way to draw mirrored/symmetric elements instead of copy-pasting code twice.

🔬 This loop uses [-1,1] to place two mirrored eyes. What happens if you change it to [-1,0,1] to add a third eye in the middle?

  fill(255);for(let s of[-1,1]){
    let ex=cx+eyeOffsetX*s,ey=cy+eyeOffsetY;
    ellipse(ex,ey,eyeR*2,eyeR*2);
    fill(40);circle(ex+lookX*shift,ey+lookY*shift,pupilR*2);fill(255);
  }
function drawEyes(){
  let lookX=mouseX-cx,lookY=mouseY-cy,mag=sqrt(lookX*lookX+lookY*lookY)||1;
  lookX/=mag;lookY/=mag;
  let eyeOffsetX=baseR*0.35,eyeOffsetY=-baseR*0.2,eyeR=baseR*0.18,pupilR=eyeR*0.45,shift=eyeR*0.35;
  fill(255);for(let s of[-1,1]){
    let ex=cx+eyeOffsetX*s,ey=cy+eyeOffsetY;
    ellipse(ex,ey,eyeR*2,eyeR*2);
    fill(40);circle(ex+lookX*shift,ey+lookY*shift,pupilR*2);fill(255);
  }
}
Line-by-line explanation (7 lines)

🔧 Subcomponents:

for-loop Left/Right Eye Drawer fill(255);for(let s of[-1,1]){

Draws both eyes by looping over -1 and 1 to mirror the same eye drawing code on the left and right side of the blob's face

let lookX=mouseX-cx,lookY=mouseY-cy,mag=sqrt(lookX*lookX+lookY*lookY)||1;
Calculates a vector from the blob's center to the mouse, and its length (magnitude) using the Pythagorean theorem - the '||1' prevents dividing by zero if the mouse is exactly at the center.
lookX/=mag;lookY/=mag;
Normalizes the look vector so it has a length of exactly 1, keeping only the direction toward the mouse (this is manual vector normalization, similar to what p5.Vector.normalize() does).
let eyeOffsetX=baseR*0.35,eyeOffsetY=-baseR*0.2,eyeR=baseR*0.18,pupilR=eyeR*0.45,shift=eyeR*0.35;
Defines the eyes' position relative to the blob's center and their sizes, all scaled from baseR so they resize automatically as the blob grows or shrinks.
fill(255);for(let s of[-1,1]){
Sets the fill to white for the eye whites, then loops twice using s = -1 and s = 1 to mirror the eye position left and right.
let ex=cx+eyeOffsetX*s,ey=cy+eyeOffsetY;
Computes this eye's center position - multiplying by s flips it to the left or right side of the face.
ellipse(ex,ey,eyeR*2,eyeR*2);
Draws the white of the eye as a circle (ellipse with equal width/height).
fill(40);circle(ex+lookX*shift,ey+lookY*shift,pupilR*2);fill(255);
Switches to dark gray, draws the pupil shifted toward the mouse direction (so the eye appears to track the cursor), then switches fill back to white so the next eye's white circle draws correctly.

windowResized()

windowResized() is a built-in p5.js callback that fires automatically on browser resize. Pairing it with createCanvas(windowWidth, windowHeight) in setup() is the standard way to make a sketch fully responsive.

function windowResized(){resizeCanvas(windowWidth,windowHeight);}
Line-by-line explanation (1 lines)
resizeCanvas(windowWidth,windowHeight);
Automatically called by p5 whenever the browser window changes size; this resizes the canvas to match the new window dimensions so the sketch always fills the screen.

📦 Key Variables

n number

The number of vertices (points) used to draw the blob's outline; more points make a smoother edge.

let n=24;
cx, cy number

The current x/y position of the blob's center, updated every frame by the spring-follow physics.

let cx, cy;
vx, vy number

The current velocity of the blob's center, used to create smooth spring-like chasing motion toward the target position.

let vx=0, vy=0;
baseR number

The blob's resting radius, recalculated each frame as a fraction of the screen size so the blob scales with the window.

let baseR;
ang array

Stores the fixed angle (in radians) of each of the 24 vertices around the blob's circle, computed once in setup().

let ang=[];
offX, offY array

Store each vertex's current squish displacement from its resting position - these create the visible poke/squish deformation.

let offX=[], offY=[];
vX, vY array

Store each vertex's own velocity, used to smoothly accelerate and decelerate its offset (its personal spring physics).

let vX=[], vY=[];

🔧 Potential Improvements (4)

Here are some ways this code could be enhanced:

PERFORMANCE draw()

A new linear gradient object is created with ctx.createLinearGradient() every single frame, even though the colors and dimensions never change.

💡 Create the gradient once in setup() (or the first time height is known) and store it in a global variable, then just reuse it inside draw().

STYLE global variables and functions

Variable names like n, cx, vx, ang, offX are extremely terse, and many statements are crammed onto single lines separated by semicolons, which makes the code hard to scan and modify safely.

💡 Use more descriptive names (e.g. numVertices, centerX, velocityX, restAngles) and spread multi-statement lines across multiple lines for readability, especially in a sketch meant to be studied by beginners.

BUG draw() center-follow logic

When mouseIsPressed becomes true, the target snaps straight to the exact mouse position regardless of where on the blob you first clicked, so clicking near the edge causes a sudden jump toward the cursor instead of a natural grab-and-drag feel.

💡 On mousePressed, store the offset between the mouse and the blob's center at the moment of the click, then keep that offset constant while dragging so the blob follows smoothly without teleporting.

FEATURE draw()

The blob only reacts to proximity but never registers an actual 'poke' or 'pop' event distinctly from ordinary hovering.

💡 Add a mousePressed() check for a strong, sudden squish (like a bigger one-time force burst) plus a little squeak sound or color flash to make poking feel more rewarding.

🔄 Code Flow

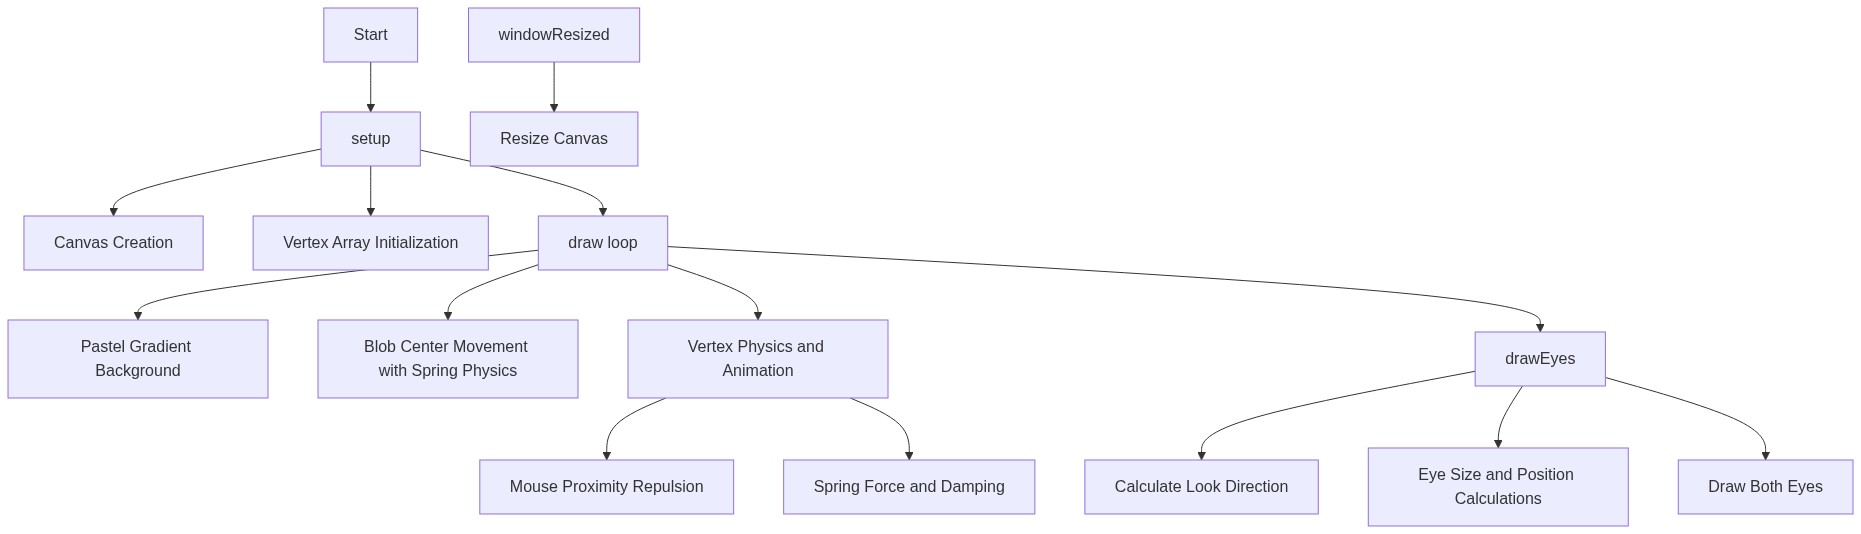
Code flow showing setup, draw, draweyes, windowresized

💡 Click on function names in the diagram to jump to their code

graph TD start[Start] --> setup[setup] setup --> draw[draw loop] draw --> draw-gradient-bg[Gradient Background Paint] draw --> draw-center-spring[Blob Center Spring Physics] draw --> draw-vertex-loop[Per-Vertex Squish Loop] draw --> draweyes[draweyes] draw-vertex-loop --> draw-poke-conditional[Mouse Proximity Squish] draw-vertex-loop --> vertexloop[setup-vertex-init-loop] draweyes --> draweyes-loop[Left/Right Eye Drawer] click setup href "#fn-setup" click draw href "#fn-draw" click draw-gradient-bg href "#sub-draw-gradient-bg" click draw-center-spring href "#sub-draw-center-spring" click draw-vertex-loop href "#sub-draw-vertex-loop" click draw-poke-conditional href "#sub-draw-poke-conditional" click draweyes href "#fn-draweyes" click draweyes-loop href "#sub-draweyes-loop"

❓ Frequently Asked Questions

What visual effects can I expect from the AI Squishy Blob sketch?

This sketch features a cute, bouncy blob with soft body vertex animation set against a pastel gradient background, creating a playful and visually satisfying experience.

How can I interact with the jelly creature in this sketch?

Users can poke the blob by clicking near it, making it squish and react, or drag their mouse to have the blob follow with springy physics.

What creative coding techniques are showcased in this p5.js sketch?

The sketch demonstrates soft body physics and vertex animation, along with mouse tracking for interactive elements like the googly eyes.

Preview

AI Squishy Blob - Poke the Jelly Creature - p5.js creative coding sketch preview
Sketch Preview
Code flow diagram showing the structure of AI Squishy Blob - Poke the Jelly Creature - Code flow showing setup, draw, draweyes, windowresized
Code Flow Diagram