
AI Synth Pad - Interactive Musical Grid Click the colorful pads to play musical tones! A 4x4 grid o

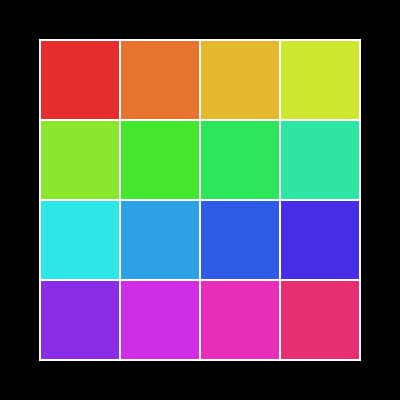
This sketch creates a glowing 4x4 grid of colorful synth pads that each play a note from a C major scale when clicked. Clicking a pad triggers a sine-wave tone through p5.Oscillator and flashes a bright HSB-colored glow that smoothly fades away, turning the canvas into a playable, visually reactive instrument.

🧪 Try This!

Experiment with the code by making these changes:

  1. Slow down the glow fade — Lowering glowDecay makes each pad's flash fade out much faster, while raising it toward 1 makes the glow linger noticeably longer.
  2. Shrink the whole grid — Reducing the fraction of the canvas the grid occupies makes all the pads smaller with more empty space around them.
  3. Give it a buzzier sound — Changing the oscillator's waveform from a smooth sine to a buzzy sawtooth completely changes how every pad sounds when clicked.
Prefer the full editor? Open it there →

📖 About This Sketch

This sketch turns the canvas into a tiny playable instrument: a 4x4 grid of colored squares, each mapped to a note in a C major scale, that lights up and sings when you click it. It combines p5.js's sound library (p5.Oscillator) for real audio synthesis with HSB color mode, object-oriented Pad classes, and an exponential glow-decay animation to give every click satisfying visual feedback. The grid also resizes itself responsively so it always fits neatly in the browser window.

The code is organized around a Pad class that bundles together a pad's position, color, note, oscillator, and glow state, plus methods to draw itself, play its note, and fade its glow. setup() and initializePads() build the grid once, draw() runs the animation loop every frame, and mousePressed() handles the actual interaction. Studying this sketch teaches you how to structure interactive audio-visual objects with classes, how to fake an ADSR sound envelope with p5.Oscillator's amp(), and how to build a decaying glow effect with simple multiplication.

⚙️ How It Works

  1. When the sketch loads, setup() creates a full-window canvas, switches to HSB color mode, unlocks the browser's audio context, and calls initializePads() to build the grid.
  2. initializePads() calculates a square pad size that fits 80% of the window, centers the grid with margins, and creates 16 Pad objects arranged in 4 rows and 4 columns, each given a unique hue and a note from the midiNotes scale.
  3. Every Pad's constructor creates its own silent p5.Oscillator tuned to its note's frequency, ready to be triggered later.
  4. On every frame, draw() clears the background, then loops through all pads calling pulse() (which shrinks each pad's glow brightness by 5% per frame) and display() (which draws the pad square plus its glow on top if it's still visible).
  5. When you click the mouse, mousePressed() checks every pad's contains() method to find which one you clicked, then calls that pad's play() method - this ramps the oscillator's amplitude up and back down to fake a short plucked note and resets glowAlpha to a bright value.
  6. If you resize the browser window, windowResized() resizes the canvas and rebuilds the entire pad grid so it stays centered and properly sized.

🎓 Concepts You'll Learn

Classes and objects (OOP)p5.Oscillator and sound envelopesHSB color modeExponential decay animationMouse hit-testing with contains()Responsive layout with windowResized()

📝 Code Breakdown

Pad constructor

The constructor runs once per Pad object when it's created. Setting up an oscillator per pad here (instead of one shared oscillator) lets every pad play its own note independently, even at the same time.

  constructor(x, y, size, color, noteMIDI) {
    this.x = x;
    this.y = y;
    this.size = size;
    this.color = color;
    this.note = noteMIDI;
    this.freq = midiToFreq(noteMIDI); // Convert MIDI note number to frequency in Hz

    // Create a p5.Oscillator (sine wave by default)
    this.oscillator = new p5.Oscillator('sine');
    this.oscillator.amp(0); // Start with 0 amplitude (silent)
    this.oscillator.freq(this.freq); // Set the oscillator's frequency to the pad's note
    this.oscillator.start(); // Start the oscillator, but it won't make sound until amp() is > 0

    this.glowAlpha = 0; // Initial glow brightness (0 = fully transparent)
  }
Line-by-line explanation (7 lines)
this.x = x; this.y = y; this.size = size;
Stores the pad's position and size so display() and contains() know where to draw and test clicks.
this.freq = midiToFreq(noteMIDI);
Converts a MIDI note number (like 60 for middle C) into a frequency in Hertz that the oscillator can play.
this.oscillator = new p5.Oscillator('sine');
Creates a new sine-wave sound generator from the p5.sound library, one per pad.
this.oscillator.amp(0);
Sets the oscillator's volume to zero so it's completely silent until play() is called.
this.oscillator.freq(this.freq);
Tunes the oscillator to the pad's specific note frequency.
this.oscillator.start();
Starts the oscillator running in the background - it's always 'on' but inaudible at zero amplitude, ready to be triggered instantly.
this.glowAlpha = 0;
Initializes the glow brightness to fully transparent so pads start with no visible flash.
display()

display() is called every frame for every pad, so it's responsible for both the static square and the animated glow layer. Drawing two overlapping rectangles with different transparencies is a simple but effective way to fake a glowing highlight.

🔬 This block only draws the glow while it's above 0.1 alpha. What happens if you lower that threshold to 0.01 - does the glow linger visibly longer, or does it just look the same because it's already so faint?

    if (this.glowAlpha > 0.1) {
      noStroke(); // No border for the glow
      fill(this.color, this.glowAlpha); // Use the pad's color with the glow's transparency
      rect(this.x, this.y, this.size, this.size);
    }
  display() {
    // Draw the pad base square
    fill(this.color);
    stroke(255); // White border
    strokeWeight(2); // Border thickness
    rect(this.x, this.y, this.size, this.size);

    // Draw the glow effect if it's visible
    if (this.glowAlpha > 0.1) {
      noStroke(); // No border for the glow
      fill(this.color, this.glowAlpha); // Use the pad's color with the glow's transparency
      rect(this.x, this.y, this.size, this.size);
    }
  }
Line-by-line explanation (6 lines)

🔧 Subcomponents:

conditional Glow Visibility Check if (this.glowAlpha > 0.1) {

Only redraws the extra glow square when it's still bright enough to matter, avoiding wasted drawing calls once it's nearly invisible.

fill(this.color);
Sets the fill color to this pad's stored HSB color before drawing its base square.
stroke(255); strokeWeight(2);
Draws a solid white 2-pixel border around each pad so the grid lines are clearly visible.
rect(this.x, this.y, this.size, this.size);
Draws the pad itself as a square using its stored position and size.
if (this.glowAlpha > 0.1) {
Checks if the glow is bright enough to be worth drawing - once it fades below this threshold, it's skipped entirely.
fill(this.color, this.glowAlpha);
Reuses the pad's color but with the glow's current alpha (transparency) value, creating a fading highlight.
rect(this.x, this.y, this.size, this.size);
Draws a second square directly on top of the pad using the glow's transparency, making it look like it's flashing brighter.

play()

play() is where sound and visuals meet - the same click that triggers the oscillator's amplitude envelope also resets the glow, so the ear and eye react together.

🔬 This pair of amp() calls fakes an attack-decay envelope. What happens if you make decayTime much longer, like 2 seconds - does the note now ring out like a bell instead of a quick pluck?

    // Fade in to 0.5 amplitude
    this.oscillator.amp(0.5, attackTime);
    // Fade out to 0 amplitude after the attack and decay times
    this.oscillator.amp(0, attackTime + decayTime);
  play() {
    const attackTime = 0.05; // Time in seconds for the sound to fade in
    const decayTime = 0.2;  // Time in seconds for the sound to fade out after the attack

    // Fade in to 0.5 amplitude
    this.oscillator.amp(0.5, attackTime);
    // Fade out to 0 amplitude after the attack and decay times
    this.oscillator.amp(0, attackTime + decayTime);

    this.glowAlpha = 200; // Set glow to a bright value
  }
Line-by-line explanation (5 lines)
const attackTime = 0.05;
Defines how long (in seconds) it takes the note to ramp up to full volume, giving it a soft attack instead of an abrupt click.
const decayTime = 0.2;
Defines how long after the attack the note takes to fade back to silence.
this.oscillator.amp(0.5, attackTime);
Tells the oscillator to smoothly ramp its amplitude up to 0.5 over the attackTime duration - this is the 'fade in'.
this.oscillator.amp(0, attackTime + decayTime);
Schedules the amplitude to ramp back down to 0 starting after the attack, finishing at attackTime + decayTime seconds - this creates the fade out.
this.glowAlpha = 200;
Resets the glow brightness to a high value so the visual flash restarts every time the pad is clicked, even mid-fade.

pulse()

pulse() runs on every pad every frame regardless of whether it was just clicked. Multiplying by a decay factor smaller than 1 repeatedly is a classic technique for smooth fades, springs, and easing in animation.

  pulse() {
    this.glowAlpha *= glowDecay; // Multiply glowAlpha by decay factor each frame
  }
Line-by-line explanation (1 lines)
this.glowAlpha *= glowDecay;
Multiplies the current glow brightness by glowDecay (0.95) every frame, so it loses 5% of its value each frame - this is exponential decay, which produces a natural-looking fade rather than a linear one.

contains()

contains() is a simple bounding-box collision test, one of the most common patterns in interactive graphics for detecting clicks, hovers, and drags on rectangular shapes.

🔬 This hit-test uses this.size for both width and height, assuming pads are perfect squares. What would you need to change if pads were rectangles with separate widths and heights?

  contains(mx, my) {
    return mx > this.x && mx < this.x + this.size &&
           my > this.y && my < this.y + this.size;
  }
  contains(mx, my) {
    return mx > this.x && mx < this.x + this.size &&
           my > this.y && my < this.y + this.size;
  }
Line-by-line explanation (2 lines)
return mx > this.x && mx < this.x + this.size &&
Checks that the mouse's x coordinate falls between the pad's left edge (this.x) and right edge (this.x + this.size).
my > this.y && my < this.y + this.size;
Checks that the mouse's y coordinate falls between the pad's top edge (this.y) and bottom edge (this.y + this.size); both conditions must be true for a hit.

setup()

setup() runs exactly once when the sketch starts, making it the right place to configure the canvas, color mode, and audio unlocking before anything is drawn or played.

function setup() {
  createCanvas(windowWidth, windowHeight);
  // Set color mode to HSB for easier color variations (Hue, Saturation, Brightness)
  colorMode(HSB, 360, 100, 100);
  noStroke(); // By default, don't draw strokes for background
  userStartAudio(); // Important for unlocking audio context in modern browsers on user interaction
  initializePads(); // Set up the pad grid
}
Line-by-line explanation (5 lines)
createCanvas(windowWidth, windowHeight);
Creates a canvas that fills the entire browser window.
colorMode(HSB, 360, 100, 100);
Switches color values to Hue/Saturation/Brightness instead of RGB, making it easy to spread rainbow colors evenly using hue alone.
noStroke();
Turns off outlines by default so the background doesn't get an unwanted border (pads turn stroke back on themselves).
userStartAudio();
Unlocks the browser's audio context, which modern browsers require to happen after a user gesture before any sound can play.
initializePads();
Calls the function that builds the entire 4x4 grid of Pad objects.

initializePads()

initializePads() is the layout engine of the sketch - it's called both at startup and whenever the window resizes, so all the grid math has to work for any canvas size, not just one fixed dimension.

🔬 This nested loop builds a 4x4 grid using the rows and cols constants. What happens visually if you change rows and cols (near the top of the file) to make a 3x5 grid instead?

  for (let r = 0; r < rows; r++) {
    for (let c = 0; c < cols; c++) {
function initializePads() {
  pads = []; // Clear any existing pads

  // Calculate total grid dimensions (e.g., 80% of canvas width/height)
  const totalGridWidth = width * 0.8;
  const totalGridHeight = height * 0.8;

  // Determine pad size. We want square pads, so use the minimum of the two dimensions,
  // divided by the number of columns/rows.
  padSize = min(totalGridWidth / cols, totalGridHeight / rows);

  // Recalculate actual grid dimensions based on the determined padSize
  const actualGridWidth = padSize * cols;
  const actualGridHeight = padSize * rows;

  // Calculate margins to center the grid on the canvas
  marginX = (width - actualGridWidth) / 2;
  marginY = (height - actualGridHeight) / 2;

  let noteIndex = 0; // Index to cycle through our midiNotes array

  // Loop through rows and columns to create each pad
  for (let r = 0; r < rows; r++) {
    for (let c = 0; c < cols; c++) {
      // Calculate pad position
      const x = marginX + c * padSize;
      const y = marginY + r * padSize;

      // Generate a unique color using HSB color mode
      // Hue ranges from 0 to 360, so we map our note index to this range
      const hue = map(noteIndex, 0, midiNotes.length, 0, 360);
      const saturation = 80;
      const brightness = 90;
      const padColor = color(hue, saturation, brightness);

      // Get the MIDI note for this pad, cycling through midiNotes if needed
      const note = midiNotes[noteIndex % midiNotes.length];

      // Create a new Pad object and add it to our pads array
      pads.push(new Pad(x, y, padSize, padColor, note));
      noteIndex++;
    }
  }
}
Line-by-line explanation (6 lines)

🔧 Subcomponents:

for-loop Row/Column Grid Loop for (let r = 0; r < rows; r++) { for (let c = 0; c < cols; c++) {

Iterates over every row and column combination to compute each pad's position, color, and note, then creates a Pad object for it.

pads = [];
Empties the pads array so old pads (and their oscillators) are discarded before rebuilding the grid.
padSize = min(totalGridWidth / cols, totalGridHeight / rows);
Picks the smaller of the two possible pad sizes so pads stay perfectly square and fit within 80% of both width and height.
marginX = (width - actualGridWidth) / 2;
Calculates how much empty space to leave on the left/right so the whole grid is centered horizontally.
const hue = map(noteIndex, 0, midiNotes.length, 0, 360);
Converts each pad's index (0-15) into a hue value (0-360), spreading all 16 pads evenly across the color wheel.
const note = midiNotes[noteIndex % midiNotes.length];
Looks up which MIDI note this pad should play from the midiNotes array, using modulo so the index never goes out of bounds.
pads.push(new Pad(x, y, padSize, padColor, note));
Creates a new Pad object with all its calculated properties and adds it to the pads array so it will be drawn and playable.

draw()

draw() is p5.js's animation loop, running about 60 times per second. Because it clears the background every frame and redraws each pad, tiny per-frame changes (like the glow decay) accumulate into smooth animation.

🔬 This loop always calls pulse() before display() for every pad. What would happen visually if you swapped the order and called display() first, then pulse()?

  for (let pad of pads) {
    pad.pulse();   // Update the glow effect
    pad.display(); // Draw the pad on the canvas
  }
function draw() {
  background(0); // Dark background

  // Loop through all pads and update their glow and display them
  for (let pad of pads) {
    pad.pulse();   // Update the glow effect
    pad.display(); // Draw the pad on the canvas
  }
}
Line-by-line explanation (4 lines)

🔧 Subcomponents:

for-loop Pad Update & Draw Loop for (let pad of pads) { pad.pulse(); pad.display(); }

Updates every pad's glow fade and redraws every pad, every single frame, which is what makes the glow animation smooth.

background(0);
Paints the entire canvas black at the start of every frame, erasing the previous frame's drawing before redrawing everything fresh.
for (let pad of pads) {
Loops through every Pad object stored in the pads array using a for-of loop, which is a clean way to iterate without needing an index variable.
pad.pulse();
Calls this pad's pulse() method to shrink its glowAlpha slightly, continuing any fade-out animation in progress.
pad.display();
Calls this pad's display() method to draw its square (and glow, if visible) at its current state.

mousePressed()

mousePressed() is a built-in p5.js event function that runs automatically whenever the mouse is clicked. Pairing it with each pad's own contains() method keeps the hit-testing logic neatly encapsulated inside the Pad class.

🔬 This function checks every single pad on every click, even though only one can ever match in this grid. Can you think of a faster way to find the right pad using math (row/column from mouseX/mouseY) instead of looping?

  for (let pad of pads) {
    if (pad.contains(mouseX, mouseY)) {
      pad.play(); // Play the note and trigger glow for the clicked pad
function mousePressed() {
  for (let pad of pads) {
    if (pad.contains(mouseX, mouseY)) {
      pad.play(); // Play the note and trigger glow for the clicked pad
      // No 'break' here, as in some complex layouts, multiple pads might overlap
      // For this simple grid, only one will be clicked at a time.
    }
  }
}
Line-by-line explanation (3 lines)

🔧 Subcomponents:

for-loop Pad Hit-Test Loop for (let pad of pads) { if (pad.contains(mouseX, mouseY)) { pad.play(); } }

Checks every pad to see which one (if any) was under the mouse click, and triggers its play() method if so.

for (let pad of pads) {
Loops through every pad in the grid to test each one against the current mouse position.
if (pad.contains(mouseX, mouseY)) {
Uses the pad's own contains() method to check whether the click landed inside this specific pad's square.
pad.play();
If the click was inside this pad, triggers its note and glow flash by calling play().

windowResized()

windowResized() is a built-in p5.js event that fires automatically whenever the browser window changes size, making it easy to build responsive sketches that always look correct.

function windowResized() {
  resizeCanvas(windowWidth, windowHeight);
  initializePads(); // Re-initialize pads to adapt to the new window size
}
Line-by-line explanation (2 lines)
resizeCanvas(windowWidth, windowHeight);
Resizes the canvas to match the browser window's new dimensions whenever it changes.
initializePads();
Rebuilds the entire pad grid from scratch so pad sizes and positions stay centered and correctly sized for the new window.

📦 Key Variables

pads array

Holds all 16 Pad objects that make up the grid, used every frame to update and draw them.

let pads = [];
cols number

The number of columns in the pad grid (fixed at 4).

const cols = 4;
rows number

The number of rows in the pad grid (fixed at 4).

const rows = 4;
padSize number

The calculated pixel size of each square pad, recomputed whenever the grid is initialized or the window resizes.

let padSize;
marginX number

Horizontal offset used to center the grid on the canvas.

let marginX;
marginY number

Vertical offset used to center the grid on the canvas.

let marginY;
glowDecay number

The multiplier applied to a pad's glowAlpha every frame, controlling how quickly the glow fades out.

const glowDecay = 0.95;
midiNotes array

A list of 16 MIDI note numbers forming a C major scale, one assigned to each pad in the grid.

const midiNotes = [60, 62, 64, 65, 67, 69, 71, 72, 74, 76, 77, 79, 81, 83, 84, 86];

🔧 Potential Improvements (4)

Here are some ways this code could be enhanced:

BUG initializePads() / windowResized()

When the window is resized, initializePads() clears the pads array with `pads = []` but never calls `.stop()` on the old pads' oscillators first. Those old p5.Oscillator instances keep running in the background silently, accumulating audio nodes every time the window is resized.

💡 Before clearing the array, loop through the existing pads and call `pad.oscillator.stop()` (or `.dispose()`) to properly clean up the old oscillators, e.g. `for (let p of pads) p.oscillator.stop();` before `pads = [];`.

PERFORMANCE mousePressed()

Every click loops through all 16 pads calling contains() on each one, even though only one pad can ever be clicked in a non-overlapping grid.

💡 Since pad positions are on a regular grid, the clicked pad's row and column can be computed directly with `floor((mouseX - marginX) / padSize)` and `floor((mouseY - marginY) / padSize)`, avoiding the loop entirely.

FEATURE mousePressed()

The sketch only responds to mouse clicks, which won't work well on touchscreens without an emulated click, and offers no keyboard alternative.

💡 Add a `touchStarted()` function that mirrors the mousePressed() logic using touches[0].x and touches[0].y, and consider mapping number keys 1-9/0 to trigger specific pads for accessibility.

STYLE Pad.play()

The attack amplitude (0.5) and envelope times (0.05, 0.2) are hardcoded magic numbers inside play(), making them hard to find and tune consistently across pads.

💡 Pull these values out as named constants near the top of the file (e.g. `const PLAY_AMP = 0.5;`) so they're easy to locate and adjust in one place.

🔄 Code Flow

Code flow showing constructor, display, play, pulse, contains, setup, initializepads, draw, mousepressed, windowresized

💡 Click on function names in the diagram to jump to their code

graph TD start[Start] --> setup[setup] setup --> draw[draw loop] draw --> gridloop[Grid Loop] gridloop --> padupdate[Pad Update & Draw Loop] padupdate --> glowcheck[Glow Visibility Check] padupdate --> draw draw --> hitloop[Hit-Test Loop] hitloop --> mousepressed[mousePressed] mousepressed --> play[play] play --> pulse[pulse] pulse --> draw click setup href "#fn-setup" click draw href "#fn-draw" click gridloop href "#sub-grid-loop" click padupdate href "#sub-pad-update-loop" click glowcheck href "#sub-glow-check" click hitloop href "#sub-hit-test-loop" click mousepressed href "#fn-mousepressed" click play href "#fn-play" click pulse href "#fn-pulse"

❓ Frequently Asked Questions

What visual elements does the AI Synth Pad sketch feature?

The sketch displays a 4x4 grid of colorful square pads against a dark background, each pad illuminating with a glow effect when interacted with.

How can users interact with the AI Synth Pad to create music?

Users can click on the colorful pads to play different musical tones, corresponding to MIDI notes in a C major scale.

What creative coding concepts are showcased in the AI Synth Pad sketch?

The sketch demonstrates concepts like object-oriented programming through the Pad class and real-time audio generation using p5.js's oscillator features.

Preview

AI Synth Pad - Interactive Musical Grid Click the colorful pads to play musical tones! A 4x4 grid o - p5.js creative coding sketch preview
Sketch Preview
Code flow diagram showing the structure of AI Synth Pad - Interactive Musical Grid Click the colorful pads to play musical tones! A 4x4 grid o - Code flow showing constructor, display, play, pulse, contains, setup, initializepads, draw, mousepressed, windowresized
Code Flow Diagram