AI Theremin Simulator - Spooky Sci-Fi Instrument Move your mouse to play the classic electronic ins

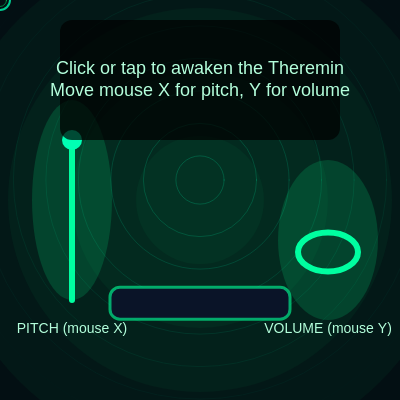
This sketch turns your mouse into a virtual theremin - moving it left/right changes pitch and up/down changes volume, while a glowing sci-fi visualizer pulses in sync with the sound using p5.sound's Oscillator and Amplitude analyzer.

🧪 Try This!

Experiment with the code by making these changes:

  1. Switch the waveform — Changing the oscillator type from 'sine' to a harsher waveform gives the theremin a completely different, buzzier voice.
  2. Extend the pitch range — Raising MAX_FREQ lets the mouse reach much higher, more piercing notes near the right edge of the screen.
  3. Recolor the glow — The background glow's fill color can be swapped from ghostly green to hot pink for a totally different mood.
Prefer the full editor? Open it there →

📖 About This Sketch

This sketch recreates the eerie electronic theremin as a browser instrument: moving your mouse horizontally slides the pitch from a low hum to a high whine, and moving it vertically fades the volume in and out, exactly like waving your hands near the antennas of a real theremin. Underneath the hood it uses p5.sound's p5.Oscillator to generate a sine wave and p5.Amplitude to measure how loud that wave currently is, then feeds that measurement back into glowing concentric circles and expanding sound-wave rings so the whole screen visually pulses with the audio. It is a great sketch for learning how to map continuous mouse input to sound parameters and how to make visuals that react to audio in real time rather than just to the mouse directly.

The code is organized around a handful of small drawing helpers - drawBackgroundGlow(), drawSoundWaves(), drawThereminBody(), and drawHandIndicator() - each called once per frame from draw(), plus updateThereminSound() which handles the actual pitch/volume mapping. You will learn how map() converts pixel coordinates into frequency and amplitude values, why browsers require a user click before audio can play (and how mousePressed()/touchStarted() handle that), and how an amplitude analyzer lets you drive visuals from sound instead of hardcoding animation values.

⚙️ How It Works

  1. When the sketch loads, setup() creates a full-window canvas and builds a silent sine-wave Oscillator plus an Amplitude analyzer listening to that oscillator, so no sound plays until the user interacts.
  2. The instruction overlay tells the visitor to click or tap; mousePressed() (and its touch equivalent) calls userStartAudio() and starts the oscillator exactly once, flipping the audioStarted flag to true.
  3. On every frame, draw() clears the background and, if audio has started, calls updateThereminSound() which maps mouseX to a frequency between 130Hz and 1200Hz and maps mouseY to a volume between 0 and 0.6, smoothly ramping the oscillator toward those values.
  4. drawBackgroundGlow() and drawSoundWaves() read the current amplitude level from the analyzer and use it to brighten layered circles and expand rippling rings, so louder notes make the whole screen glow more intensely.
  5. drawThereminBody() draws the static-looking hardware - antennas, base, and labels - while drawHandIndicator() draws a glowing ring that follows the mouse and grows with volume, visually connecting your cursor position to the sound.
  6. windowResized() keeps the canvas matching the browser window size any time the visitor resizes it, so the theremin layout stays proportional.

🎓 Concepts You'll Learn

p5.sound Oscillatorp5.Amplitude analysismap() for input scalingAudio-reactive visualsUser-gesture audio unlockingCanvas resizingAlpha transparency layering

📝 Code Breakdown

setup()

setup() runs once at the start. Here it prepares the audio engine in a silent state and hooks up the amplitude analyzer so later drawing functions can react to sound without needing to know anything about the oscillator itself.

function setup() {
  createCanvas(windowWidth, windowHeight);

  // Create sine-wave oscillator (but don't start yet)
  osc = new p5.Oscillator('sine');
  osc.amp(0); // ensure silent until we control it

  // Amplitude analyzer for visual pulsing
  // p5.Amplitude docs: https://p5js.org/reference/#/p5.Amplitude
  amplitudeAnalyzer = new p5.Amplitude(0.9); // smoothing
  amplitudeAnalyzer.setInput(osc);

  textFont('sans-serif');
}
Line-by-line explanation (6 lines)
createCanvas(windowWidth, windowHeight);
Makes the canvas fill the entire browser window.
osc = new p5.Oscillator('sine');
Creates a sine-wave sound generator but does not start it playing yet.
osc.amp(0);
Forces the oscillator's volume to zero so nothing is audible until the user clicks and moves the mouse.
amplitudeAnalyzer = new p5.Amplitude(0.9);
Creates a tool that measures how loud a sound is; 0.9 is a smoothing factor so the reading doesn't jump around too fast.
amplitudeAnalyzer.setInput(osc);
Tells the analyzer to specifically listen to the oscillator, rather than the whole computer's audio.
textFont('sans-serif');
Sets the default font used by any text() calls later in the sketch.

draw()

draw() is the main animation loop, running ~60 times per second. It is intentionally kept short by delegating work to helper functions, which is a good pattern for keeping sketches readable as they grow.

function draw() {
  background(3, 5, 15); // very dark blue/black

  // Update sound based on mouse if audio is running
  if (audioStarted) {
    updateThereminSound();
  }

  // Draw eerie glow and sound waves that react to audio
  drawBackgroundGlow();
  drawSoundWaves();

  // Draw the theremin hardware (antennas, base, labels)
  drawThereminBody();

  // Small visual crosshair where the "hand" is
  drawHandIndicator();

  // Instruction overlay before first click
  if (!audioStarted) {
    drawStartInstructions();
  }
}
Line-by-line explanation (7 lines)

🔧 Subcomponents:

conditional Sound Update Gate if (audioStarted) { updateThereminSound(); }

Only updates pitch/volume once the user has interacted and audio is unlocked

conditional Instructions Overlay Gate if (!audioStarted) { drawStartInstructions(); }

Shows the click-to-start message only before the user has activated audio

background(3, 5, 15);
Repaints the whole canvas with a near-black dark blue every frame, erasing the previous frame's drawing.
if (audioStarted) { updateThereminSound(); }
Only touches the oscillator's pitch/volume once the user has clicked to start audio - otherwise mouse movement would try to control silent audio.
drawBackgroundGlow();
Draws the soft layered green glow behind everything, sized by the current volume.
drawSoundWaves();
Draws expanding rings that simulate sound waves rippling outward.
drawThereminBody();
Draws the static-looking hardware: antennas, base box, and labels.
drawHandIndicator();
Draws a glowing circle that follows the mouse cursor to show where the 'hand' is playing.
if (!audioStarted) { drawStartInstructions(); }
Displays a semi-transparent instruction box until the visitor clicks or taps to start the sound.

updateThereminSound()

This function is the heart of the theremin - it's where raw pixel coordinates from the mouse get translated into meaningful audio parameters using map(), one of the most useful functions in all of p5.js.

🔬 This flips mouseY so the top of the screen is loud. What happens if you swap the arguments to map(mouseY, 0, height, 0, MAX_AMP, true) instead?

  const amp = map(mouseY, height, 0, 0, MAX_AMP, true);
function updateThereminSound() {
  // Map mouseX -> pitch (frequency)
  const freq = map(mouseX, 0, width, MIN_FREQ, MAX_FREQ, true);

  // Map mouseY -> volume (top loud, bottom quiet)
  const amp = map(mouseY, height, 0, 0, MAX_AMP, true);

  // Smooth ramping for less clicky sound
  // https://p5js.org/reference/#/p5.Oscillator/freq
  // https://p5js.org/reference/#/p5.Oscillator/amp
  osc.freq(freq, 0.05); // 50 ms ramp
  osc.amp(amp, 0.05);
}
Line-by-line explanation (4 lines)
const freq = map(mouseX, 0, width, MIN_FREQ, MAX_FREQ, true);
Converts the mouse's horizontal position (0 to width) into a frequency between MIN_FREQ and MAX_FREQ; the trailing true clamps the value so it never goes outside that range.
const amp = map(mouseY, height, 0, 0, MAX_AMP, true);
Converts mouseY into a volume, but the input range is flipped (height to 0) so being near the top of the screen produces louder sound and the bottom produces near-silence.
osc.freq(freq, 0.05);
Tells the oscillator to glide to the new frequency over 50 milliseconds instead of jumping instantly, which avoids harsh clicking sounds.
osc.amp(amp, 0.05);
Same idea but for volume - ramps smoothly to the new amplitude over 50 milliseconds.

drawBackgroundGlow()

This function demonstrates how to translate an audio measurement (amplitude) into a visual property (opacity), a core technique in audio-reactive art.

🔬 This loop draws 5 layered circles. What happens if you change the starting value from i = 5 to i = 12 (and keep dividing by 5)?

  for (let i = 5; i >= 1; i--) {
    const r = (maxR * i) / 5;
    const alpha = 10 + (50 * boost * i) / 5;
    fill(0, 255, 120, alpha);
    ellipse(cx, cy, r * 2, r * 2);
  }
function drawBackgroundGlow() {
  const level = amplitudeAnalyzer.getLevel(); // 0..~0.3
  const boost = constrain(level * 8, 0, 1);  // exaggerate a bit

  const cx = width / 2;
  const cy = height * 0.5;
  const maxR = min(width, height) * 0.8;

  noStroke();
  // A few layered circles for a soft, eerie green glow
  for (let i = 5; i >= 1; i--) {
    const r = (maxR * i) / 5;
    const alpha = 10 + (50 * boost * i) / 5;
    fill(0, 255, 120, alpha);
    ellipse(cx, cy, r * 2, r * 2);
  }
}
Line-by-line explanation (7 lines)

🔧 Subcomponents:

for-loop Layered Glow Circles for (let i = 5; i >= 1; i--) { ... }

Draws five overlapping semi-transparent circles from largest to smallest to create a soft glow effect

const level = amplitudeAnalyzer.getLevel();
Reads the current loudness of the oscillator, typically a small number like 0 to 0.3.
const boost = constrain(level * 8, 0, 1);
Multiplies the quiet level by 8 to make small volume changes visually obvious, then clamps the result between 0 and 1.
const maxR = min(width, height) * 0.8;
Picks a maximum glow radius based on whichever of width or height is smaller, so the glow fits on any screen shape.
for (let i = 5; i >= 1; i--) {
Loops from 5 down to 1, drawing the biggest circle first so smaller, brighter circles layer on top of it.
const alpha = 10 + (50 * boost * i) / 5;
Calculates transparency for this ring - louder sound (higher boost) and outer rings (higher i) get more opacity.
fill(0, 255, 120, alpha);
Sets a green glow color with the calculated transparency.
ellipse(cx, cy, r * 2, r * 2);
Draws the circle centered on screen with a diameter of r*2.

drawSoundWaves()

This function shows the classic 'expanding ring' animation trick using the modulo operator, combined with mapping the ring's position to its own transparency for a natural fade-out.

🔬 numWaves controls how many rings are drawn. What happens visually if you change numWaves from 8 to 20 for much denser ripples?

  for (let i = 0; i < numWaves; i++) {
    const radius = (frameCount * speed + i * spacing) % maxR;
    let alpha = map(radius, 0, maxR, 220, 0);
    alpha *= 0.25 + levelBoost * 0.9; // brighter when louder
function drawSoundWaves() {
  const level = amplitudeAnalyzer.getLevel();
  const levelBoost = pow(constrain(level * 5, 0, 1), 1.3);

  const cx = width / 2;
  const cy = height * 0.45;
  const maxR = min(width, height) * 0.65;

  const numWaves = 8;
  const speed = 2.2;
  const spacing = maxR / numWaves;

  noFill();
  for (let i = 0; i < numWaves; i++) {
    const radius = (frameCount * speed + i * spacing) % maxR;
    let alpha = map(radius, 0, maxR, 220, 0);
    alpha *= 0.25 + levelBoost * 0.9; // brighter when louder

    const weight = 1 + levelBoost * 4;

    stroke(0, 255, 180, alpha);
    strokeWeight(weight);
    ellipse(cx, cy, radius * 2, radius * 2);
  }
}
Line-by-line explanation (6 lines)

🔧 Subcomponents:

for-loop Expanding Ring Loop for (let i = 0; i < numWaves; i++) { ... }

Draws 8 evenly-spaced rings that continuously expand outward and fade, using the modulo operator to loop them seamlessly

const levelBoost = pow(constrain(level * 5, 0, 1), 1.3);
Amplifies the loudness reading and applies a power curve so quiet sounds barely register but loud sounds react strongly.
const spacing = maxR / numWaves;
Evenly spaces out the starting radius of each ring so they don't all overlap at once.
const radius = (frameCount * speed + i * spacing) % maxR;
Uses frameCount (which always increases) plus each ring's offset, then wraps the result with % maxR so each ring continuously grows and resets, like a real ripple.
let alpha = map(radius, 0, maxR, 220, 0);
Makes rings fade out as they expand outward - close to the center they're opaque, far away they're nearly invisible.
alpha *= 0.25 + levelBoost * 0.9;
Further scales the opacity by how loud the sound currently is, so the whole ripple effect gets brighter with volume.
ellipse(cx, cy, radius * 2, radius * 2);
Draws the ring as an ellipse outline (since noFill() was called) with the calculated radius.

drawThereminBody()

This function is purely proportional layout - every position and size is a percentage of width/height, which is why the theremin still looks correct after windowResized() changes the canvas dimensions.

function drawThereminBody() {
  const baseY = height * 0.75;
  const pitchX = width * 0.18;   // left vertical antenna
  const volX = width * 0.82;     // right horizontal loop

  // Glows behind antennas
  noStroke();
  fill(0, 255, 140, 40);
  ellipse(pitchX, baseY - height * 0.25, width * 0.2, height * 0.5);
  ellipse(volX, baseY - height * 0.15, width * 0.25, height * 0.4);

  // Base box
  stroke(0, 255, 150, 160);
  strokeWeight(3);
  fill(10, 20, 40);
  const baseW = width * 0.45;
  const baseH = height * 0.08;
  rectMode(CENTER);
  rect(width / 2, baseY + baseH * 0.1, baseW, baseH, 10);

  // Vertical pitch antenna (left)
  stroke(0, 255, 160);
  strokeWeight(6);
  const pitchTopY = baseY - height * 0.4;
  line(pitchX, baseY, pitchX, pitchTopY);

  // Tip sphere
  noStroke();
  fill(0, 255, 180);
  circle(pitchX, pitchTopY, 20);

  // Horizontal volume loop (right)
  noFill();
  stroke(0, 255, 160);
  strokeWeight(6);
  const loopR = width * 0.075;
  ellipse(volX, baseY - height * 0.12, loopR * 2, loopR * 1.3);

  // Labels
  fill(180, 255, 220);
  noStroke();
  textAlign(CENTER, CENTER);
  textSize(14);

  text('PITCH (mouse X)', pitchX, baseY + baseH * 0.9);
  text('VOLUME (mouse Y)', volX, baseY + baseH * 0.9);
}
Line-by-line explanation (6 lines)
const baseY = height * 0.75;
Positions the theremin's base box three-quarters of the way down the screen, using a percentage so it scales with any window size.
rect(width / 2, baseY + baseH * 0.1, baseW, baseH, 10);
Draws the rounded rectangle base box centered horizontally, with a 10px corner radius.
line(pitchX, baseY, pitchX, pitchTopY);
Draws the tall vertical pitch antenna as a straight line from the base up to its tip.
circle(pitchX, pitchTopY, 20);
Draws a small glowing sphere at the very top of the pitch antenna.
ellipse(volX, baseY - height * 0.12, loopR * 2, loopR * 1.3);
Draws the oval volume loop antenna as an outline (no fill) on the right side.
text('PITCH (mouse X)', pitchX, baseY + baseH * 0.9);
Labels the pitch antenna so visitors know what controlling mouseX does.

drawHandIndicator()

This function ties visual feedback directly to the mouse position and the current volume, helping the player 'see' how loud they're playing right where their hand/cursor is.

function drawHandIndicator() {
  // Simple glowing circle that follows the mouse
  const level = amplitudeAnalyzer.getLevel();
  const boost = constrain(level * 8, 0, 1);

  const r = 10 + boost * 20;

  noFill();
  stroke(0, 255, 180, 200);
  strokeWeight(2 + boost * 4);
  ellipse(mouseX, mouseY, r * 2, r * 2);

  stroke(0, 255, 120, 120);
  strokeWeight(1);
  ellipse(mouseX, mouseY, r * 1.3, r * 1.3);
}
Line-by-line explanation (3 lines)
const r = 10 + boost * 20;
Calculates the indicator circle's radius - it grows from 10px to up to 30px as the volume increases.
ellipse(mouseX, mouseY, r * 2, r * 2);
Draws the main glowing ring centered exactly on the current mouse position.
ellipse(mouseX, mouseY, r * 1.3, r * 1.3);
Draws a second, thinner, dimmer ring slightly smaller than the first to give a layered glow effect.

drawStartInstructions()

This function demonstrates push()/pop() for isolating style changes, and shows a common UI pattern: an overlay that only displays before the user has interacted.

function drawStartInstructions() {
  push();
  fill(0, 0, 0, 180);
  noStroke();
  rectMode(CENTER);
  const w = min(width * 0.7, 500);
  const h = 120;
  rect(width / 2, height * 0.2, w, h, 12);

  fill(180, 255, 220);
  textAlign(CENTER, CENTER);
  textSize(18);
  text('Click or tap to awaken the Theremin\nMove mouse X for pitch, Y for volume', width / 2, height * 0.2);
  pop();
}
Line-by-line explanation (5 lines)
push();
Saves the current drawing style settings so changes made in this function don't leak into other functions.
const w = min(width * 0.7, 500);
Makes the instruction box 70% of the screen width, but never wider than 500px, so it looks good on both phones and large monitors.
rect(width / 2, height * 0.2, w, h, 12);
Draws a semi-transparent black rounded rectangle as a backdrop for the instruction text.
text('Click or tap to awaken the Theremin\nMove mouse X for pitch, Y for volume', width / 2, height * 0.2);
Displays two lines of instruction text (the \n creates a line break) centered inside the box.
pop();
Restores the drawing style settings that were active before this function ran.

mousePressed()

Browsers require a direct user gesture (like a click or tap) before they'll allow audio playback - this function demonstrates the standard p5.sound pattern of calling userStartAudio() inside an interaction handler.

🔬 This guard makes sure osc.start() only runs once. What do you think would happen to the sound if you removed the if (!audioStarted) check and let osc.start() run on every single click?

function mousePressed() {
  if (!audioStarted) {
    userStartAudio();
    osc.start();
    audioStarted = true;
  }
}
function mousePressed() {
  if (!audioStarted) {
    userStartAudio();
    osc.start();
    audioStarted = true;
  }
}
Line-by-line explanation (4 lines)

🔧 Subcomponents:

conditional Start-Once Guard if (!audioStarted) { ... }

Ensures the oscillator only starts a single time no matter how many times the user clicks

if (!audioStarted) {
Checks that audio hasn't already been started, so clicking repeatedly doesn't create duplicate oscillators.
userStartAudio();
Unlocks the browser's Web Audio API - most browsers block audio until a real user gesture like a click happens.
osc.start();
Begins playing the oscillator (it was created silently in setup(), and now actually starts producing sound).
audioStarted = true;
Flips the flag so draw() will start calling updateThereminSound() and stop showing the instruction overlay.

touchStarted()

This shows a common p5.js pattern for supporting both desktop and mobile: touchStarted() mirrors mousePressed() rather than duplicating its logic.

function touchStarted() {
  // Mirror mousePressed behavior for touch screens
  mousePressed();
  return false; // prevent default scrolling on mobile
}
Line-by-line explanation (2 lines)
mousePressed();
Reuses the exact same start-audio logic used for mouse clicks, so touch and mouse users get identical behavior.
return false;
Stops the browser's default touch behavior (like scrolling or zooming) so tapping the canvas doesn't scroll the page on mobile.

windowResized()

p5.js automatically calls windowResized() whenever the browser window changes size - handling it here keeps the sketch fully responsive on any device.

function windowResized() {
  resizeCanvas(windowWidth, windowHeight);
}
Line-by-line explanation (1 lines)
resizeCanvas(windowWidth, windowHeight);
Resizes the canvas to match the browser window whenever it changes size, keeping the theremin layout responsive.

📦 Key Variables

osc object

Holds the p5.Oscillator instance that generates the sine-wave tone controlled by mouse position.

let osc;
amplitudeAnalyzer object

Holds the p5.Amplitude instance that measures how loud the oscillator currently is, driving all the audio-reactive visuals.

let amplitudeAnalyzer;
audioStarted boolean

Tracks whether the user has clicked/tapped yet, gating both sound updates and the instruction overlay.

let audioStarted = false;
MIN_FREQ number

The lowest pitch (in Hz) the oscillator can play, mapped from the left edge of the screen.

const MIN_FREQ = 130;
MAX_FREQ number

The highest pitch (in Hz) the oscillator can play, mapped from the right edge of the screen.

const MAX_FREQ = 1200;
MAX_AMP number

The maximum volume (0 to 1) the oscillator can reach, mapped from the top of the screen.

const MAX_AMP = 0.6;

🔧 Potential Improvements (4)

Here are some ways this code could be enhanced:

BUG mousePressed()

If the audio context fails to resume immediately (some browsers delay it), audioStarted is still set to true right away, so the sketch may think audio is running when it isn't yet.

💡 Use userStartAudio().then(() => { audioStarted = true; }) so the flag only flips after the audio context actually resumes.

STYLE Throughout drawThereminBody(), drawSoundWaves(), drawHandIndicator()

The same green-cyan RGB values like (0, 255, 160) and (0, 255, 180) are repeated as magic numbers across many functions.

💡 Define a few reusable color constants (e.g. const GLOW_COLOR = [0, 255, 160];) near the top of the file so the palette can be changed in one place.

FEATURE updateThereminSound()

The sketch only ever plays a single sine oscillator, so it can't produce vibrato, portamento glissando effects, or richer timbres beyond swapping waveform type.

💡 Add a second detuned oscillator or a p5.Reverb/p5.Delay effect chained after osc to make the sound feel more like a real theremin's rich harmonic voice.

PERFORMANCE drawBackgroundGlow() and drawSoundWaves()

Both functions call amplitudeAnalyzer.getLevel() separately every frame, duplicating work that could be shared.

💡 Calculate the level and boost once in draw() and pass them as parameters to both functions to avoid redundant analyzer calls.

🔄 Code Flow

Code flow showing setup, draw, updatetheereminsound, drawbackgroundglow, drawsoundwaves, drawthereminbody, drawhandindicator, drawstartinstructions, mousepressed, touchstarted, windowresized

💡 Click on function names in the diagram to jump to their code

graph TD start[Start] --> setup[setup] setup --> draw[draw loop] draw --> sound-update-check[Sound Update Gate] sound-update-check -->|User interacted| updatetheereminsound[updatetheereminsound] sound-update-check -->|No interaction| drawbackgroundglow[drawbackgroundglow] draw --> drawthereminbody[drawthereminbody] draw --> drawhandindicator[drawhandindicator] draw --> instructions-gate[Instructions Overlay Gate] instructions-gate -->|Audio not activated| drawstartinstructions[drawstartinstructions] instructions-gate -->|Audio activated| drawhandindicator draw --> drawsoundwaves[drawsoundwaves] updatetheereminsound -->|Map mouse position| drawhandindicator drawbackgroundglow --> glow-layers-loop[Glow Layers Loop] glow-layers-loop -->|Draw 5 circles| drawbackgroundglow drawsoundwaves --> rings-loop[Rings Loop] rings-loop -->|Draw 8 rings| drawsoundwaves mousepressed[mousepressed] -->|User gesture| start-once-check[Start-Once Guard] start-once-check -->|Start audio| updatetheereminsound start-once-check -->|Already started| mousepressed touchstarted[touchstarted] --> mousepressed windowresized[windowresized] --> drawthereminbody click setup href "#fn-setup" click draw href "#fn-draw" click updatetheereminsound href "#fn-updatetheereminsound" click drawbackgroundglow href "#fn-drawbackgroundglow" click drawthereminbody href "#fn-drawthereminbody" click drawhandindicator href "#fn-drawhandindicator" click drawstartinstructions href "#fn-drawstartinstructions" click drawsoundwaves href "#fn-drawsoundwaves" click mousepressed href "#fn-mousepressed" click touchstarted href "#fn-touchstarted" click windowresized href "#fn-windowresized" click sound-update-check href "#sub-sound-update-check" click instructions-gate href "#sub-instructions-gate" click glow-layers-loop href "#sub-glow-layers-loop" click rings-loop href "#sub-rings-loop" click start-once-check href "#sub-start-once-check"

❓ Frequently Asked Questions

What visual effects can I expect from the AI Theremin Simulator sketch?

The sketch creates an eerie glow and sound waves that react dynamically to the audio output, enhancing the spooky atmosphere of the Theremin simulation.

How do users interact with the AI Theremin Simulator?

Users control the pitch and volume of the sound by moving their mouse; the horizontal position adjusts the pitch, while the vertical position controls the volume.

What creative coding concepts are demonstrated in this p5.js sketch?

This sketch showcases the use of sound synthesis with p5.Oscillator, real-time audio manipulation based on mouse input, and visual feedback through amplitude analysis.

Preview

AI Theremin Simulator - Spooky Sci-Fi Instrument Move your mouse to play the classic electronic ins - p5.js creative coding sketch preview
Sketch Preview
Code flow diagram showing the structure of AI Theremin Simulator - Spooky Sci-Fi Instrument Move your mouse to play the classic electronic ins - Code flow showing setup, draw, updatetheereminsound, drawbackgroundglow, drawsoundwaves, drawthereminbody, drawhandindicator, drawstartinstructions, mousepressed, touchstarted, windowresized
Code Flow Diagram