AI Voronoi Crystals - Stained Glass Tessellation Beautiful crystal formations using Voronoi diagram

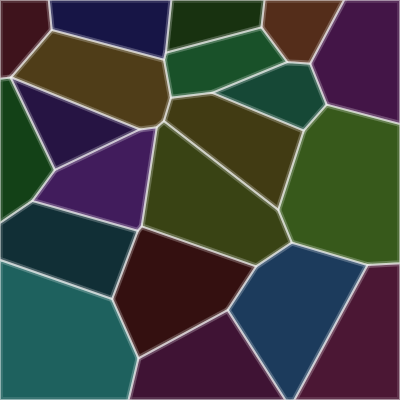
This sketch generates a living stained-glass window by scattering colorful seed points across the canvas and computing the Voronoi diagram between them every frame. Each cell is filled with a slowly pulsing HSB color and outlined with a soft glowing edge, while the seeds themselves drift and bounce off the canvas walls, so the whole mosaic subtly reshapes itself forever. Clicking anywhere on the canvas drops a brand new seed, instantly splitting nearby cells and growing the crystal pattern.

🧪 Try This!

Experiment with the code by making these changes:

  1. Grow a denser crystal — Increasing the initial seed count creates many more, smaller cells right from the start.
  2. Make the glass glow brighter — Raising the base brightness lifts every cell's average color, giving a lighter, more luminous look.
  3. Speed up the drifting seeds — Scaling up the random speed range makes the whole crystal pattern churn and reshape much faster.
  4. Turn up the neon glow — Boosting the outer glow's opacity makes the leaded edges look far more luminous and neon-like.
Prefer the full editor? Open it there →

📖 About This Sketch

This sketch creates an animated stained-glass effect by placing 20 drifting seed points on the canvas and computing the Voronoi diagram between them every single frame - the region of space closest to each seed. Every cell is painted with a hue spaced around the color wheel using the golden angle, then gently pulsed brighter and darker with a sine wave so the whole piece breathes. Glowing white edges are layered on top of each polygon to fake the look of leaded glass, and clicking the canvas drops a new seed that instantly carves the nearby cells into smaller shards.

The code is organized around one core geometry algorithm: for every seed, it starts with a polygon covering the whole canvas and repeatedly slices it in half with every other seed's perpendicular bisector, a technique called half-plane clipping (closely related to the Sutherland-Hodgman polygon clipping algorithm). By studying how computeVoronoiCells, clipPolygonWithHalfPlane, isInsideHalfPlane, and segmentBisectorIntersection work together, you will learn how to build a real computational-geometry algorithm from vector math, on top of p5.js fundamentals like HSB color, custom objects, and the animation loop.

⚙️ How It Works

  1. On load, setup() creates a full-window canvas, switches to HSB color mode for easy hue control, and generates 20 seed objects at random positions, each with a random slow velocity and a hue spaced evenly around the color wheel using the golden angle.
  2. Every frame, draw() clears the background to a near-black color, then calls updateSeeds() to move every seed slightly and bounce it off any canvas edge it reaches.
  3. computeVoronoiCells() then rebuilds the entire diagram from scratch: for each seed it starts with a polygon covering the whole canvas and clips it down using the perpendicular bisector between that seed and every other seed, keeping only the half that is closer to it.
  4. drawCellFill() paints each resulting polygon with its seed's hue, using a sine wave driven by millis() to make the brightness gently pulse over time, giving the glass a subtle inner glow.
  5. drawCellEdges() draws every cell's outline twice - once thick and very transparent for a soft glow, and once thin and brighter for a crisp inner line - creating the leaded-glass look.
  6. Clicking the canvas triggers mousePressed(), which drops a brand new seed at the cursor position, and resizing the window triggers windowResized(), which keeps the canvas and all existing seeds inside the new bounds.

🎓 Concepts You'll Learn

Voronoi diagramsPolygon half-plane clippingHSB color modep5.Vector mathObject-oriented data with plain objectsSine wave animationGolden angle color distributionMouse interaction

📝 Code Breakdown

setup()

setup() runs exactly once when the sketch starts. It's the right place to configure the canvas, color mode, and any starting data - here that means building the initial array of seed objects that everything else in the sketch depends on.

🔬 This loop decides how many crystal shards you start with. What happens visually if INITIAL_SEEDS is dropped to 3? What about pushed up to 100?

  for (let i = 0; i < INITIAL_SEEDS; i++) {
    seeds.push(createSeed(random(width), random(height)));
  }
function setup() {
  createCanvas(windowWidth, windowHeight); // https://p5js.org/reference/#/p5/createCanvas
  colorMode(HSB, 360, 100, 100, 1);        // HSB for nice color control
  noStroke();

  // Create initial drifting seeds
  for (let i = 0; i < INITIAL_SEEDS; i++) {
    seeds.push(createSeed(random(width), random(height)));
  }
}
Line-by-line explanation (5 lines)

🔧 Subcomponents:

for-loop Initial Seed Creation Loop for (let i = 0; i < INITIAL_SEEDS; i++) {

Creates INITIAL_SEEDS seed objects at random positions and stores them in the seeds array

createCanvas(windowWidth, windowHeight);
Makes the drawing area fill the entire browser window
colorMode(HSB, 360, 100, 100, 1);
Switches from default RGB to HSB (Hue, Saturation, Brightness, Alpha) with ranges 0-360, 0-100, 0-100, 0-1, which makes it easy to pick evenly spaced hues
noStroke();
Turns off outlines for shapes drawn from now on, since edges are drawn separately later
for (let i = 0; i < INITIAL_SEEDS; i++) {
Repeats the seed-creation code INITIAL_SEEDS (20) times
seeds.push(createSeed(random(width), random(height)));
Builds one new seed object at a random x,y position and adds it to the global seeds array
draw()

draw() is the animation heartbeat of a p5.js sketch, running about 60 times per second. Here it ties together three big steps every frame: move the seeds, recompute the geometry, then render fills and edges - a pattern you'll see in almost any generative animation.

🔬 This loop paints every cell before the edges are drawn on top. What happens if you comment out the drawCellEdges(cells); call below it - can you still tell the cells apart?

  for (const cell of cells) {
    drawCellFill(cell, time);
  }
function draw() {
  // Dark background for stained-glass feel
  background(0, 0, 5); // HSB: very dark gray

  // Update seed positions
  updateSeeds();

  // Compute Voronoi cells for current seed positions
  const cells = computeVoronoiCells(seeds);

  const time = millis() / 1000; // seconds

  // Fill cells with pulsing colors
  for (const cell of cells) {
    drawCellFill(cell, time);
  }

  // Draw glowing white-ish edges over the top
  drawCellEdges(cells);
}
Line-by-line explanation (6 lines)

🔧 Subcomponents:

for-loop Cell Fill Loop for (const cell of cells) {

Paints every computed Voronoi cell with its pulsing color before edges are drawn on top

background(0, 0, 5);
Repaints the whole canvas with a near-black HSB color every frame, erasing the previous frame (no motion trails)
updateSeeds();
Moves every seed point slightly and bounces it off canvas edges before this frame's geometry is calculated
const cells = computeVoronoiCells(seeds);
Recalculates the entire Voronoi diagram from the current seed positions - this is the most expensive step and runs fresh every frame
const time = millis() / 1000; // seconds
Converts the milliseconds since the sketch started into seconds, used to drive the pulsing brightness animation smoothly
for (const cell of cells) { drawCellFill(cell, time); }
Loops over every cell and fills it with its glowing, pulsing color
drawCellEdges(cells);
Draws the glowing outlines over all the filled cells, on top so the leaded-glass lines are always visible

createSeed()

createSeed() is a small factory function that builds one seed object at a time, used both in setup() for the initial batch and in mousePressed() when the user clicks. Using a factory function like this keeps the seed's data structure consistent everywhere it's created.

🔬 The 137.508 value is the golden angle, chosen to spread colors evenly. What happens to the color pattern if you change it to a plain 90 or 45 instead?

  const hue = (seedCounter * 137.508) % 360;
  seedCounter++;
function createSeed(x, y) {
  // Use golden angle to distribute hues around the color wheel
  const hue = (seedCounter * 137.508) % 360;
  seedCounter++;

  const angleVec = p5.Vector.random2D();
  const speed = random(0.15, 0.35); // slow drift
  angleVec.mult(speed);

  return {
    pos: createVector(x, y),
    vel: angleVec,
    hue: hue,
    pulseOffset: random(TWO_PI) // phase offset for pulsing
  };
}
Line-by-line explanation (6 lines)
const hue = (seedCounter * 137.508) % 360;
Multiplies an ever-increasing counter by the golden angle (137.508°) and wraps it with modulo 360 - this spreads hues evenly and avoids ever repeating a similar color for a long time
seedCounter++;
Increments the global counter so the next seed gets a different, well-spaced hue
const angleVec = p5.Vector.random2D();
Creates a unit-length vector pointing in a completely random direction
const speed = random(0.15, 0.35); // slow drift
Picks a random slow speed so seeds drift gently instead of shooting across the screen
angleVec.mult(speed);
Scales the random direction vector by the speed to produce the seed's velocity
return { pos: createVector(x, y), vel: angleVec, hue: hue, pulseOffset: random(TWO_PI) // phase offset for pulsing };
Returns a plain object bundling the seed's position, velocity, color hue, and a random phase offset so each cell's pulse animation is out of sync with the others

updateSeeds()

updateSeeds() shows a classic edge-bounce pattern using p5.Vector components (.x and .y), combined with deltaTime-based movement so the animation speed doesn't depend on the viewer's frame rate.

🔬 This flips velocity by multiplying by -1 for a perfect bounce. What happens if you multiply by -0.5 instead, so seeds lose energy every time they hit a wall?

    if (s.pos.x < 0) {
      s.pos.x = 0;
      s.vel.x *= -1;
    } else if (s.pos.x > width) {
      s.pos.x = width;
      s.vel.x *= -1;
    }
function updateSeeds() {
  const dt = deltaTime / 16.67; // normalize to ~1 at 60fps

  for (const s of seeds) {
    s.pos.x += s.vel.x * dt;
    s.pos.y += s.vel.y * dt;

    // Bounce off edges
    if (s.pos.x < 0) {
      s.pos.x = 0;
      s.vel.x *= -1;
    } else if (s.pos.x > width) {
      s.pos.x = width;
      s.vel.x *= -1;
    }

    if (s.pos.y < 0) {
      s.pos.y = 0;
      s.vel.y *= -1;
    } else if (s.pos.y > height) {
      s.pos.y = height;
      s.vel.y *= -1;
    }
  }
}
Line-by-line explanation (5 lines)

🔧 Subcomponents:

for-loop Seed Update Loop for (const s of seeds) {

Moves each seed by its velocity and checks for wall collisions

conditional Horizontal Bounce if (s.pos.x < 0) {

Reverses horizontal velocity and clamps position when a seed crosses the left or right edge

conditional Vertical Bounce if (s.pos.y < 0) {

Reverses vertical velocity and clamps position when a seed crosses the top or bottom edge

const dt = deltaTime / 16.67; // normalize to ~1 at 60fps
deltaTime is the milliseconds since the last frame; dividing by 16.67 (roughly 1000/60) means movement stays consistent even if the frame rate isn't exactly 60fps
s.pos.x += s.vel.x * dt;
Moves the seed horizontally by its velocity, scaled by the frame-rate-independent time step
s.pos.y += s.vel.y * dt;
Moves the seed vertically the same way
if (s.pos.x < 0) { s.pos.x = 0; s.vel.x *= -1; } else if (s.pos.x > width) { s.pos.x = width; s.vel.x *= -1; }
If the seed has gone past the left or right edge, snap it back to the boundary and flip its horizontal velocity so it bounces inward
if (s.pos.y < 0) { s.pos.y = 0; s.vel.y *= -1; } else if (s.pos.y > height) { s.pos.y = height; s.vel.y *= -1; }
Does the same bounce check for the top and bottom edges

computeVoronoiCells()

This function is the mathematical heart of the sketch. It implements Voronoi diagrams via repeated half-plane intersection: each cell is simply the canvas rectangle progressively cut down by the perpendicular bisector between its seed and every other seed - a beautiful example of turning a geometric definition directly into code.

🔬 This inner loop compares every seed against every other seed, making the algorithm O(n²). What do you think happens to the frame rate if you add 200 seeds by clicking rapidly?

    for (let j = 0; j < seedsArray.length; j++) {
      if (i === j) continue;

      const other = seedsArray[j];
function computeVoronoiCells(seedsArray) {
  const cells = [];

  // Canvas bounding box as initial polygon for each cell
  const bbox = [
    createVector(0, 0),
    createVector(width, 0),
    createVector(width, height),
    createVector(0, height)
  ];

  for (let i = 0; i < seedsArray.length; i++) {
    const seed = seedsArray[i];
    let poly = bbox.map(v => v.copy());

    for (let j = 0; j < seedsArray.length; j++) {
      if (i === j) continue;

      const other = seedsArray[j];

      // Half-plane of points closer to seed than to other
      const mid = p5.Vector.add(seed.pos, other.pos).mult(0.5);
      const dir = p5.Vector.sub(other.pos, seed.pos); // q - p

      poly = clipPolygonWithHalfPlane(poly, mid, dir);
      if (poly.length === 0) break;
    }

    cells.push({ seed: seed, vertices: poly });
  }

  return cells;
}
Line-by-line explanation (8 lines)

🔧 Subcomponents:

for-loop Outer Loop (per seed) for (let i = 0; i < seedsArray.length; i++) {

Builds one polygon for each seed, starting from the full canvas rectangle

for-loop Inner Loop (clip against every other seed) for (let j = 0; j < seedsArray.length; j++) {

Repeatedly slices the current polygon using the bisector with every other seed, narrowing it down to the true Voronoi cell

const bbox = [ createVector(0, 0), createVector(width, 0), createVector(width, height), createVector(0, height) ];
Defines the four corners of the canvas as a starting polygon - every cell begins as this full rectangle before being clipped smaller
let poly = bbox.map(v => v.copy());
Makes a fresh copy of the bounding box corners for this seed, so clipping one seed's cell doesn't affect the shared bbox array
if (i === j) continue;
Skips comparing a seed against itself, since that comparison is meaningless
const mid = p5.Vector.add(seed.pos, other.pos).mult(0.5);
Finds the midpoint between the current seed and the other seed - the perpendicular bisector line passes through this point
const dir = p5.Vector.sub(other.pos, seed.pos); // q - p
Computes the direction vector pointing from the current seed toward the other seed, which is also the normal vector of the bisector line
poly = clipPolygonWithHalfPlane(poly, mid, dir);
Cuts the polygon down to only the half-plane that is closer to the current seed than to the other seed
if (poly.length === 0) break;
If clipping has already reduced the polygon to nothing, stop early since further clipping is pointless
cells.push({ seed: seed, vertices: poly });
Stores the finished cell as an object pairing the original seed with its final clipped polygon vertices

clipPolygonWithHalfPlane()

This function implements the Sutherland-Hodgman polygon clipping algorithm applied to a single straight cutting line (the perpendicular bisector). Studying its four cases is a great way to understand how professional graphics libraries clip shapes against clipping planes or viewports.

🔬 This is the classic Sutherland-Hodgman polygon clipping pattern. What do you predict happens to the cell shapes if you swap the insideA/insideB checks so the OPPOSITE half-plane is kept?

    if (insideA && insideB) {
      // Both inside: keep end point
      output.push(B.copy());
    } else if (insideA && !insideB) {
function clipPolygonWithHalfPlane(poly, mid, dir) {
  const output = [];
  if (poly.length === 0) return output;

  for (let i = 0; i < poly.length; i++) {
    const A = poly[i];
    const B = poly[(i + 1) % poly.length];

    const insideA = isInsideHalfPlane(A, mid, dir);
    const insideB = isInsideHalfPlane(B, mid, dir);

    if (insideA && insideB) {
      // Both inside: keep end point
      output.push(B.copy());
    } else if (insideA && !insideB) {
      // Leaving the half-plane: keep intersection
      const I = segmentBisectorIntersection(A, B, mid, dir);
      if (I) output.push(I);
    } else if (!insideA && insideB) {
      // Entering the half-plane: add intersection and end point
      const I = segmentBisectorIntersection(A, B, mid, dir);
      if (I) output.push(I);
      output.push(B.copy());
    }
    // If both outside: keep nothing
  }

  return output;
}
Line-by-line explanation (7 lines)

🔧 Subcomponents:

for-loop Polygon Edge Loop for (let i = 0; i < poly.length; i++) {

Walks every edge of the polygon (from vertex A to the next vertex B) and decides what to keep

conditional Sutherland-Hodgman Cases if (insideA && insideB) {

Handles the four possible cases of an edge relative to the clipping half-plane: both inside, leaving, entering, or both outside

const A = poly[i];
Gets the current vertex of the polygon edge being examined
const B = poly[(i + 1) % poly.length];
Gets the next vertex, wrapping back to index 0 at the end so the last edge connects back to the first vertex, closing the polygon
const insideA = isInsideHalfPlane(A, mid, dir);
Checks whether vertex A is on the 'keep' side of the bisector line
const insideB = isInsideHalfPlane(B, mid, dir);
Checks whether vertex B is on the 'keep' side of the bisector line
if (insideA && insideB) { // Both inside: keep end point output.push(B.copy()); }
If both ends of the edge are inside the kept region, the edge doesn't cross the line at all, so just keep vertex B
else if (insideA && !insideB) { const I = segmentBisectorIntersection(A, B, mid, dir); if (I) output.push(I); }
If the edge starts inside but ends outside, it's exiting the region - keep only the crossing point where it exits
else if (!insideA && insideB) { const I = segmentBisectorIntersection(A, B, mid, dir); if (I) output.push(I); output.push(B.copy()); }
If the edge starts outside but ends inside, it's entering the region - keep the crossing point AND the endpoint B

isInsideHalfPlane()

This tiny function is a textbook use of the dot product for a point-side test: given a line defined by a point (mid) and a normal direction (dir), the sign of the dot product between the direction and the vector to the point tells you which side of the line that point falls on.

function isInsideHalfPlane(pt, mid, dir) {
  const v = p5.Vector.sub(pt, mid);
  const d = p5.Vector.dot(dir, v);
  // Keep the side that contains the seed: dot <= 0
  return d <= 0;
}
Line-by-line explanation (3 lines)
const v = p5.Vector.sub(pt, mid);
Creates a vector from the bisector's midpoint to the point being tested
const d = p5.Vector.dot(dir, v);
The dot product tells us how much v points in the same direction as dir - its sign tells us which side of the line the point is on
return d <= 0;
Points with a non-positive dot product are on the side closer to the current seed, so they are kept

segmentBisectorIntersection()

This function solves for where a line segment crosses an infinite line, using algebra derived from the dot-product line equation. It's the piece of vector math that makes precise polygon clipping possible - without it, cell edges would look jagged or wrong wherever they get cut.

🔬 This tiny threshold (1e-6) protects against dividing by zero. What do you think happens visually - flickering polygons or crashes - if you loosen it to 0.5?

  // Segment is (almost) parallel to the bisector
  if (abs(denominator) < 1e-6) return null;
function segmentBisectorIntersection(A, B, mid, dir) {
  const ABx = B.x - A.x;
  const ABy = B.y - A.y;
  const AMx = A.x - mid.x;
  const AMy = A.y - mid.y;

  const numerator = - (dir.x * AMx + dir.y * AMy);
  const denominator = dir.x * ABx + dir.y * ABy;

  // Segment is (almost) parallel to the bisector
  if (abs(denominator) < 1e-6) return null;

  const t = numerator / denominator;
  const x = A.x + ABx * t;
  const y = A.y + ABy * t;

  return createVector(x, y);
}
Line-by-line explanation (8 lines)

🔧 Subcomponents:

conditional Parallel Segment Guard if (abs(denominator) < 1e-6) return null;

Avoids dividing by (near) zero when the polygon edge is parallel to the bisector line

const ABx = B.x - A.x;
The horizontal component of the vector from A to B, describing the polygon edge's direction
const AMx = A.x - mid.x;
The horizontal offset from the bisector's midpoint to vertex A, used to set up the line equation
const numerator = - (dir.x * AMx + dir.y * AMy);
Part of solving the line-intersection equation dot(dir, A + t*AB - mid) = 0 for t
const denominator = dir.x * ABx + dir.y * ABy;
The other part of that equation - how much the edge direction aligns with the bisector's normal
if (abs(denominator) < 1e-6) return null;
If the edge is essentially parallel to the bisector line, there's no meaningful single intersection point, so bail out safely instead of dividing by zero
const t = numerator / denominator;
Solves for t, the fraction along segment AB where it crosses the bisector line
const x = A.x + ABx * t;
Plugs t back into the segment's parametric equation to find the actual intersection x coordinate
return createVector(x, y);
Packages the intersection point as a p5.Vector so it can be used just like any other polygon vertex

drawCellFill()

This function turns raw polygon vertices into an actual colored shape using beginShape()/vertex()/endShape(), one of p5.js's most flexible drawing tools for shapes that aren't simple rectangles or circles. The sine-based pulse is a common trick for adding lifelike, organic motion to static-looking data.

🔬 The 1.5 controls pulse speed and pulseAmplitude controls pulse strength. What happens if you speed up time to 5 and widen the amplitude to 30?

  const pulse = sin(time * 1.5 + s.pulseOffset); // subtle speed
  const brightness = constrain(baseBrightness + pulseAmplitude * pulse, 10, 60);
function drawCellFill(cell, time) {
  const s = cell.seed;

  // Pulsing brightness using sin wave
  const baseBrightness = 30;
  const pulseAmplitude = 10;
  const pulse = sin(time * 1.5 + s.pulseOffset); // subtle speed
  const brightness = constrain(baseBrightness + pulseAmplitude * pulse, 10, 60);

  const saturation = 70;

  fill(s.hue, saturation, brightness, 0.95);
  beginShape(); // https://p5js.org/reference/#/p5/beginShape
  for (const v of cell.vertices) {
    vertex(v.x, v.y); // https://p5js.org/reference/#/p5/vertex
  }
  endShape(CLOSE);
}
Line-by-line explanation (6 lines)

🔧 Subcomponents:

for-loop Vertex Drawing Loop for (const v of cell.vertices) {

Traces every point of the clipped polygon so p5.js can fill in the shape

const pulse = sin(time * 1.5 + s.pulseOffset); // subtle speed
Produces a smooth wave between -1 and 1 over time; multiplying time by 1.5 controls the pulse speed, and each seed's own pulseOffset keeps cells out of sync with each other
const brightness = constrain(baseBrightness + pulseAmplitude * pulse, 10, 60);
Adds the wave (scaled by pulseAmplitude) to the base brightness, then clamps the result between 10 and 60 so cells never go fully black or blindingly bright
fill(s.hue, saturation, brightness, 0.95);
Sets the fill color using this cell's own hue plus the shared saturation and computed pulsing brightness, at 95% opacity
beginShape();
Starts defining a custom shape from a series of vertices
for (const v of cell.vertices) { vertex(v.x, v.y); }
Adds each polygon corner, in order, as a vertex of the shape being built
endShape(CLOSE);
Finishes the shape and connects the last vertex back to the first, closing the polygon so it can be filled

drawCellEdges()

Drawing the same shape twice with different stroke weights and opacities is a lightweight way to fake a glow/bloom effect without needing shaders or post-processing - a useful trick anywhere you want light to look like it's softly spilling outward.

🔬 This first pass draws a thick, faint glow. What happens if you change the hue from 0 (white) to something colorful, like 200 (blue)?

  stroke(0, 0, 100, 0.12); // white, low alpha
  strokeWeight(6);
function drawCellEdges(cells) {
  push();
  noFill();

  // Soft outer glow
  stroke(0, 0, 100, 0.12); // white, low alpha
  strokeWeight(6);
  for (const cell of cells) {
    beginShape();
    for (const v of cell.vertices) {
      vertex(v.x, v.y);
    }
    endShape(CLOSE);
  }

  // Brighter sharp inner outline
  stroke(0, 0, 100, 0.45);
  strokeWeight(2);
  for (const cell of cells) {
    beginShape();
    for (const v of cell.vertices) {
      vertex(v.x, v.y);
    }
    endShape(CLOSE);
  }

  pop();
}
Line-by-line explanation (8 lines)

🔧 Subcomponents:

for-loop Soft Glow Pass stroke(0, 0, 100, 0.12); // white, low alpha

Draws a thick, very transparent white outline around every cell to simulate a soft glow

for-loop Sharp Outline Pass stroke(0, 0, 100, 0.45);

Draws a thin, brighter white outline on top to give crisp, glass-like seams

push();
Saves the current drawing style settings so changes made in this function don't leak into other parts of the sketch
noFill();
Turns off fill so only the outline of each shape is drawn in this function
stroke(0, 0, 100, 0.12); // white, low alpha
Sets a nearly invisible white stroke color - hue and saturation at 0 with brightness 100 is pure white in HSB
strokeWeight(6);
Makes the line very thick, which combined with the low alpha creates a soft blurred-looking glow
for (const cell of cells) { beginShape(); for (const v of cell.vertices) { vertex(v.x, v.y); } endShape(CLOSE); }
Redraws every cell's outline (without fill) using the current glow stroke settings
stroke(0, 0, 100, 0.45);
Switches to a brighter, more opaque white for the second, sharper pass
strokeWeight(2);
Uses a thin line width for a crisp, glass-seam look
pop();
Restores the drawing style settings that were active before this function ran

mousePressed()

mousePressed() is a p5.js event function that automatically runs once whenever the mouse button goes down. It's the standard way to add click-based interactivity, here used to let the viewer directly sculpt the crystal pattern.

function mousePressed() {
  // Only react to clicks inside the canvas
  if (mouseX >= 0 && mouseX <= width && mouseY >= 0 && mouseY <= height) {
    seeds.push(createSeed(mouseX, mouseY));
  }
}
Line-by-line explanation (2 lines)

🔧 Subcomponents:

conditional Canvas Bounds Check if (mouseX >= 0 && mouseX <= width && mouseY >= 0 && mouseY <= height) {

Makes sure a new seed is only added if the click happened inside the visible canvas

if (mouseX >= 0 && mouseX <= width && mouseY >= 0 && mouseY <= height) {
Checks that the click position is within the canvas rectangle before doing anything, guarding against clicks on the page outside the sketch
seeds.push(createSeed(mouseX, mouseY));
Creates a brand new seed at the exact click location and adds it to the seeds array, which immediately affects next frame's Voronoi calculation

windowResized()

windowResized() is a p5.js callback that fires automatically whenever the browser window changes size. Combined with constrain(), it keeps existing seeds sensible after a resize instead of leaving them stranded off-screen.

function windowResized() {
  resizeCanvas(windowWidth, windowHeight); // https://p5js.org/reference/#/p5/resizeCanvas

  // Constrain seeds to new bounds
  for (const s of seeds) {
    s.pos.x = constrain(s.pos.x, 0, width);
    s.pos.y = constrain(s.pos.y, 0, height);
  }
}
Line-by-line explanation (3 lines)

🔧 Subcomponents:

for-loop Seed Bounds Constraint Loop for (const s of seeds) {

Pulls any seed that would now be outside the resized canvas back onto the visible area

resizeCanvas(windowWidth, windowHeight);
Resizes the canvas element to match the browser window's new width and height
s.pos.x = constrain(s.pos.x, 0, width);
Clamps each seed's x position so it can't stay outside the new, possibly smaller canvas
s.pos.y = constrain(s.pos.y, 0, height);
Does the same clamp for the y position

📦 Key Variables

INITIAL_SEEDS number

A constant controlling how many seed points are created when the sketch starts

const INITIAL_SEEDS = 20;
seeds array

Holds every seed object currently in the sketch, each with a position, velocity, hue, and pulse offset - this array drives the entire Voronoi computation

let seeds = [];
seedCounter number

Tracks how many seeds have ever been created, used with the golden angle to give each new seed a well-spaced, non-repeating hue

let seedCounter = 0;

🔧 Potential Improvements (4)

Here are some ways this code could be enhanced:

PERFORMANCE computeVoronoiCells()

The algorithm is O(n²) per frame since every seed is clipped against every other seed, and clicking repeatedly to add seeds can quickly make this slow because there's no cap on how many seeds can exist.

💡 Add a maximum seed limit (e.g. stop pushing new seeds past 150) or use a spatial structure like a grid to only clip against nearby seeds, which is the standard optimization for real-time Voronoi diagrams.

PERFORMANCE computeVoronoiCells() and clipPolygonWithHalfPlane()

Every frame allocates many new p5.Vector and array objects (bbox copies, intersection points, cell objects), creating garbage-collection pressure that can cause frame stutters, especially with many seeds.

💡 Consider reusing pre-allocated vector objects/arrays across frames instead of creating new ones each time, or only recomputing the diagram when seeds have moved a meaningful amount.

STYLE createSeed() and drawCellFill()

Magic numbers like 137.508, 0.15/0.35, 1.5, and 10/30/70 are scattered through the code without names explaining their purpose beyond a brief comment.

💡 Pull these into named constants at the top of the file (e.g. const GOLDEN_ANGLE = 137.508; const PULSE_SPEED = 1.5;) so their role is clearer and they're easier to tune in one place.

FEATURE mousePressed()

There's currently no way to remove seeds or reset the sketch once many have accumulated from clicking, which can make the mosaic increasingly slow and cluttered over time.

💡 Add a keyPressed() handler (e.g. pressing 'r') that resets seeds back to the initial random batch, or let a right-click / double-click remove the nearest seed.

🔄 Code Flow

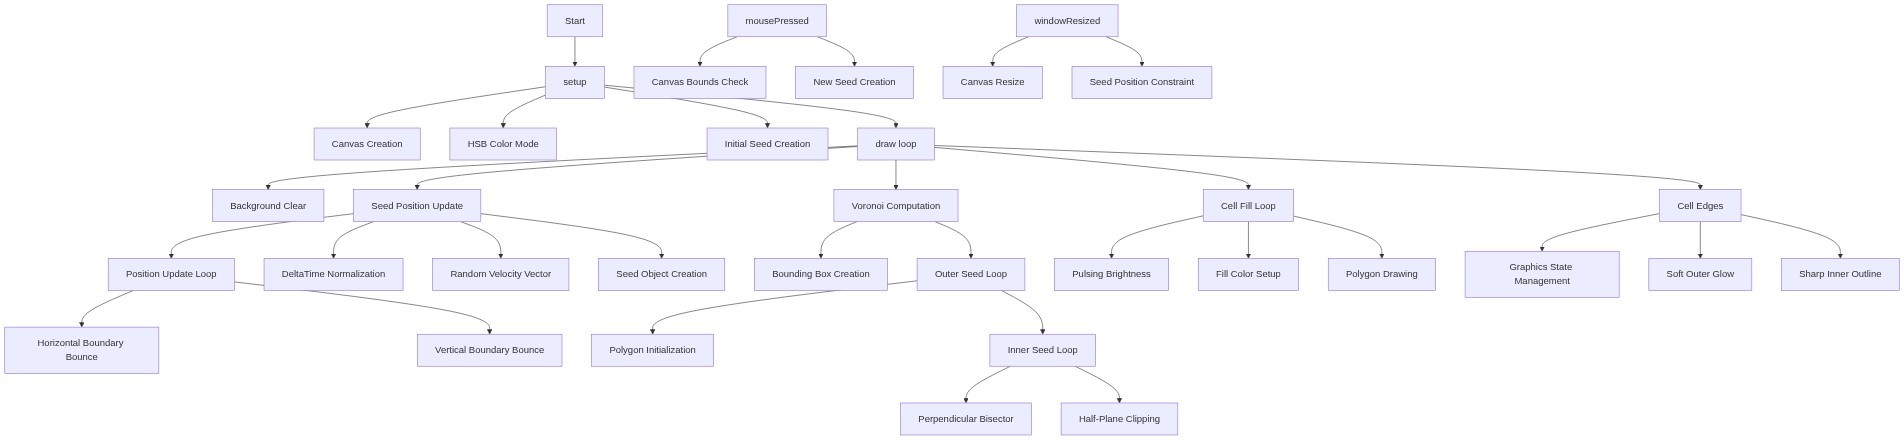
Code flow showing setup, draw, createseed, updateseeds, computevoronoicells, clippolygonwithhalfplane, isinsidehalfplane, segmentbisectorintersection, drawcellfill, drawcelledges, mousepressed, windowresized

💡 Click on function names in the diagram to jump to their code

graph TD start[Start] --> setup[setup] setup -->|Initializes| setup-seed-loop[Initial Seed Creation Loop] setup-seed-loop --> setup setup --> draw[draw loop] draw -->|Animation heartbeat| update-seeds-loop[Seed Update Loop] update-seeds-loop --> x-bounce[Horizontal Bounce] x-bounce -->|Reverses velocity| update-seeds-loop update-seeds-loop --> y-bounce[Vertical Bounce] y-bounce -->|Reverses velocity| update-seeds-loop update-seeds-loop --> computevoronoicells[computevoronoicells] computevoronoicells --> outer-seed-loop[Outer Loop] outer-seed-loop --> inner-clip-loop[Inner Loop] inner-clip-loop --> clip-edge-loop[Polygon Edge Loop] clip-edge-loop --> clip-cases[Sutherland-Hodgman Cases] clip-cases -->|Handles edge cases| clip-edge-loop clip-edge-loop --> fill-vertex-loop[Vertex Drawing Loop] fill-vertex-loop --> computevoronoicells draw --> draw-fill-loop[Cell Fill Loop] draw-fill-loop --> drawcellfill[drawcellfill] drawcellfill --> draw-fill-loop draw-fill-loop --> drawcelledges[drawcelledges] drawcelledges --> draw draw -->|Soft glow effect| glow-pass-loop[Soft Glow Pass] glow-pass-loop --> draw draw -->|Sharp outline effect| sharp-pass-loop[Sharp Outline Pass] sharp-pass-loop --> draw draw -->|Handles interactivity| mousepressed[mousePressed] mousepressed --> click-bounds-check[Canvas Bounds Check] click-bounds-check -->|Checks click position| mousepressed draw -->|Handles resizing| windowresized[windowResized] windowresized --> resize-constrain-loop[Seed Bounds Constraint Loop] resize-constrain-loop -->|Constrain seeds| windowresized click setup href "#fn-setup" click draw href "#fn-draw" click update-seeds-loop href "#sub-update-seeds-loop" click x-bounce href "#sub-x-bounce" click y-bounce href "#sub-y-bounce" click computevoronoicells href "#fn-computevoronoicells" click outer-seed-loop href "#sub-outer-seed-loop" click inner-clip-loop href "#sub-inner-clip-loop" click clip-edge-loop href "#sub-clip-edge-loop" click clip-cases href "#sub-clip-cases" click fill-vertex-loop href "#sub-fill-vertex-loop" click draw-fill-loop href "#sub-draw-fill-loop" click drawcellfill href "#fn-drawcellfill" click drawcelledges href "#fn-drawcelledges" click glow-pass-loop href "#sub-glow-pass-loop" click sharp-pass-loop href "#sub-sharp-pass-loop" click mousepressed href "#fn-mousepressed" click click-bounds-check href "#sub-click-bounds-check" click windowresized href "#fn-windowresized" click resize-constrain-loop href "#sub-resize-constrain-loop"

❓ Frequently Asked Questions

What visual effects are produced by the AI Voronoi Crystals sketch?

The sketch creates beautiful crystal formations resembling stained glass tessellations, with pulsing colors and glowing edges that dynamically change as the seed points drift.

Is there any way for users to interact with the AI Voronoi Crystals sketch?

The sketch is primarily a visual experience without direct user interaction, but users can resize their browser window to see the sketch adapt to different dimensions.

What creative coding technique is showcased in the AI Voronoi Crystals sketch?

This sketch demonstrates the use of Voronoi diagrams to create intricate spatial patterns, combined with color dynamics and motion to enhance the visual appeal.

Preview

AI Voronoi Crystals - Stained Glass Tessellation Beautiful crystal formations using Voronoi diagram - p5.js creative coding sketch preview
Sketch Preview
Code flow diagram showing the structure of AI Voronoi Crystals - Stained Glass Tessellation Beautiful crystal formations using Voronoi diagram - Code flow showing setup, draw, createseed, updateseeds, computevoronoicells, clippolygonwithhalfplane, isinsidehalfplane, segmentbisectorintersection, drawcellfill, drawcelledges, mousepressed, windowresized
Code Flow Diagram