
AI Wave Function Simulator - Physics Interference Visualization Explore wave interference physics!

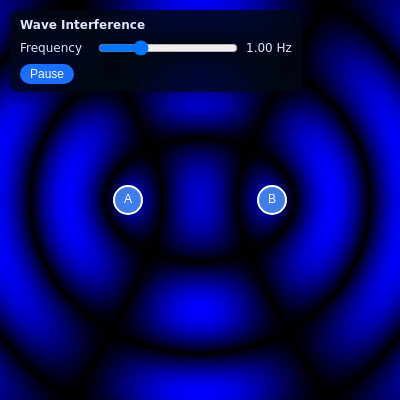
This sketch simulates two circular wave sources whose ripples overlap to create a classic interference pattern, rendered as glowing blue bands on a dark canvas. You can drag the two sources (A and B) around the screen, adjust their oscillation frequency with a slider, and pause/resume the animation to study the moving pattern.

🧪 Try This!

Experiment with the code by making these changes:

  1. Shrink the wavelength for tighter ripples — A smaller wavelength packs the bright and dark interference bands much closer together, making the pattern look denser.
  2. Boost the simulation resolution — Lowering fieldScale computes the wave pattern at a higher resolution, giving sharper, less blocky edges (at the cost of some performance).
  3. Flip constructive and destructive spots — Changing addition to subtraction in the interference formula swaps which regions appear bright and which appear dark.
Prefer the full editor? Open it there →

📖 About This Sketch

This sketch renders the physics of wave interference: two point sources emit circular waves, and wherever those waves overlap they either reinforce each other (bright bands) or cancel out (dark gaps). It computes this per-pixel using sine waves based on distance and time, then paints the result into an off-screen graphics buffer with loadPixels()/updatePixels() for speed. You can drag the two glowing source markers labeled A and B anywhere on the canvas, tweak the oscillation frequency with a slider, and pause the simulation with a button - all built with p5.js DOM functions like createSlider() and createButton().

The code is organized around a small off-screen render buffer (fieldG) that is computed at a lower resolution than the canvas for performance, then stretched up with image(). Reading through it teaches you how to manually manipulate pixel data for a physics simulation, how to build simple HTML UI controls with p5.js, how to implement draggable objects with mousePressed/mouseDragged/mouseReleased, and how sine waves combine to create interference patterns.

⚙️ How It Works

  1. When the sketch loads, setup() creates a full-window canvas, allocates a smaller off-screen graphics buffer (fieldG) for the wave math, places the two sources at fixed positions, and builds the frequency slider and Pause button in the #controls panel.
  2. Every frame, draw() advances the simulation clock (unless paused), reads the current slider value into the frequency variable, then calls renderField() to recompute the entire interference pattern into fieldG.
  3. Inside renderField(), a nested loop visits every pixel of the low-resolution buffer, computes each pixel's distance to source A and source B, converts those distances (plus elapsed time) into two sine wave values, adds them together, and turns the combined amplitude into a shade of blue - bright where waves reinforce, dark where they cancel.
  4. Back in draw(), that buffer image is scaled up to fill the canvas with image(), and drawSources() draws the two circular source markers labeled A and B on top.
  5. Mouse events let you grab and drag either source: mousePressed() checks if the click landed inside a source's radius, mouseDragged() moves whichever source is being dragged (constrained to the canvas), and mouseReleased() lets go - since the sources move, the interference pattern updates live.
  6. windowResized() rebuilds the canvas and the off-screen buffer at the new size whenever the browser window changes, keeping the simulation resolution proportional to the window.

🎓 Concepts You'll Learn

Off-screen graphics buffers (createGraphics)Pixel manipulation with loadPixels/updatePixelsSine waves and phase for interference physicsMouse dragging (mousePressed/mouseDragged/mouseReleased)p5.js DOM UI elements (createSlider, createButton)Time-based animation with millis()Responsive canvas resizing (windowResized)

📝 Code Breakdown

setup()

setup() runs once when the sketch starts, and is the right place to build your canvas, off-screen buffers, initial object positions, and any HTML UI elements you need.

function setup() {
  createCanvas(windowWidth, windowHeight);
  pixelDensity(1); // make per-pixel math predictable

  createFieldGraphics();
  initSources();
  setupUI();

  timeSec = 0;
  lastMillis = millis();
}
Line-by-line explanation (7 lines)
createCanvas(windowWidth, windowHeight);
Makes the canvas fill the entire browser window.
pixelDensity(1); // make per-pixel math predictable
Forces exactly 1 pixel of canvas data per screen pixel, so the pixel-array math in renderField() lines up correctly even on high-DPI (Retina) screens.
createFieldGraphics();
Builds the smaller off-screen buffer used to compute the wave pattern efficiently.
initSources();
Places the two wave source objects (A and B) at their starting positions.
setupUI();
Builds the HTML slider and button controls inside the #controls panel.
timeSec = 0;
Resets the simulation clock to zero at the start.
lastMillis = millis();
Records the current real-world time so updateTime() can measure elapsed time correctly on the first frame.
draw()

draw() runs continuously (about 60 times per second), so it's where you update state and redraw everything based on the current time and user input.

function draw() {
  updateTime();

  // Update frequency from slider
  if (frequencySlider) {
    frequency = parseFloat(frequencySlider.value());
    if (frequencyLabelSpan) {
      frequencyLabelSpan.html(nf(frequency, 1, 2) + ' Hz');
    }
  }

  background(0);

  renderField();          // compute interference pattern
  image(fieldG, 0, 0, width, height); // scale buffer onto canvas

  drawSources();
}
Line-by-line explanation (8 lines)

🔧 Subcomponents:

conditional Read Slider Value if (frequencySlider) { frequency = parseFloat(frequencySlider.value()); ... }

Pulls the current frequency value from the HTML slider each frame and updates the on-screen label.

updateTime();
Advances the simulation clock (timeSec) if the animation isn't paused.
if (frequencySlider) {
Checks the slider exists before reading it, avoiding errors if UI setup failed.
frequency = parseFloat(frequencySlider.value());
Reads the slider's current numeric value and stores it as the wave frequency.
frequencyLabelSpan.html(nf(frequency, 1, 2) + ' Hz');
Updates the text label next to the slider to show the frequency formatted to 2 decimal places.
background(0);
Clears the canvas to black before drawing the new frame.
renderField(); // compute interference pattern
Recomputes the entire wave interference pattern into the off-screen buffer.
image(fieldG, 0, 0, width, height); // scale buffer onto canvas
Draws the low-resolution buffer stretched to fill the full canvas size.
drawSources();
Draws the two circular source markers (A and B) on top of the wave pattern.

createFieldGraphics()

createGraphics() makes a separate drawing surface you can render to independently and then place onto the main canvas with image() - useful for performance when a computation is expensive.

function createFieldGraphics() {
  const gWidth = max(1, floor(width / fieldScale));
  const gHeight = max(1, floor(height / fieldScale));
  fieldG = createGraphics(gWidth, gHeight);
  fieldG.pixelDensity(1);
}
Line-by-line explanation (4 lines)
const gWidth = max(1, floor(width / fieldScale));
Calculates the buffer's width by dividing the canvas width by fieldScale, guaranteeing at least 1 pixel.
const gHeight = max(1, floor(height / fieldScale));
Same idea for height - a bigger fieldScale means a smaller, cheaper-to-compute buffer.
fieldG = createGraphics(gWidth, gHeight);
Creates a new off-screen p5.Graphics object to hold the wave pattern pixels.
fieldG.pixelDensity(1);
Ensures the off-screen buffer also uses 1:1 pixel density so its pixel array matches expectations.

initSources()

Using plain JavaScript objects like {x, y, isDragging} is a simple way to group related data for each interactive item in a sketch, similar to a lightweight class.

function initSources() {
  const midY = height * 0.5;
  const spacing = width * 0.18;
  const centerX = width * 0.5;

  source1 = {
    x: centerX - spacing,
    y: midY,
    isDragging: false,
    offsetX: 0,
    offsetY: 0
  };

  source2 = {
    x: centerX + spacing,
    y: midY,
    isDragging: false,
    offsetX: 0,
    offsetY: 0
  };
}
Line-by-line explanation (4 lines)
const midY = height * 0.5;
Both sources start vertically centered on the canvas.
const spacing = width * 0.18;
Determines how far apart (horizontally) the two sources start, as a fraction of canvas width.
source1 = { x: centerX - spacing, y: midY, ... };
Creates source A's object with position and drag-state properties, placed left of center.
source2 = { x: centerX + spacing, y: midY, ... };
Creates source B's object, placed right of center, mirroring source A.

setupUI()

p5.js DOM functions like createSlider(), createButton(), createDiv(), and createSpan() let you build real HTML controls that live alongside your canvas, and .parent() lets you nest them into existing page elements.

function setupUI() {
  const panel = select('#controls');
  if (!panel) return;

  // Frequency row
  const freqRow = createDiv();
  freqRow.parent(panel);
  freqRow.addClass('control-row');

  const freqLabel = createSpan('Frequency');
  freqLabel.parent(freqRow);
  freqLabel.addClass('label');

  // createSlider: https://p5js.org/reference/#/p5/createSlider
  frequencySlider = createSlider(minFrequency, maxFrequency, defaultFrequency, 0.01);
  frequencySlider.parent(freqRow);

  frequencyLabelSpan = createSpan(nf(defaultFrequency, 1, 2) + ' Hz');
  frequencyLabelSpan.parent(freqRow);

  // Play / Pause button
  const buttonRow = createDiv();
  buttonRow.parent(panel);
  buttonRow.addClass('control-row');

  // createButton: https://p5js.org/reference/#/p5/createButton
  playPauseButton = createButton('Pause');
  playPauseButton.parent(buttonRow);
  playPauseButton.mousePressed(togglePlayPause);
}
Line-by-line explanation (7 lines)
const panel = select('#controls');
Grabs the existing #controls <div> from the HTML page so the new elements can be nested inside it.
if (!panel) return;
Safety check - if the HTML panel doesn't exist, skip building UI instead of crashing.
const freqRow = createDiv();
Creates a new empty HTML div to hold the frequency label and slider together.
frequencySlider = createSlider(minFrequency, maxFrequency, defaultFrequency, 0.01);
Creates an HTML range slider limited between minFrequency and maxFrequency, starting at defaultFrequency, moving in steps of 0.01.
frequencyLabelSpan = createSpan(nf(defaultFrequency, 1, 2) + ' Hz');
Creates a text span next to the slider showing the starting frequency value formatted with 2 decimal places.
playPauseButton = createButton('Pause');
Creates a clickable HTML button labeled 'Pause'.
playPauseButton.mousePressed(togglePlayPause);
Wires the button up so clicking it calls togglePlayPause().

updateTime()

Using millis() and delta-time (dt) instead of a fixed increment keeps animation speed consistent even if the frame rate varies, and makes pausing as simple as skipping the time-accumulation step.

function updateTime() {
  const now = millis();
  if (isPlaying) {
    const dt = (now - lastMillis) / 1000.0;
    timeSec += dt;
  }
  lastMillis = now;
}
Line-by-line explanation (5 lines)

🔧 Subcomponents:

conditional Only Advance Time When Playing if (isPlaying) { const dt = (now - lastMillis) / 1000.0; timeSec += dt; }

Prevents the simulation clock from advancing while paused, effectively freezing the wave pattern.

const now = millis();
Gets the number of milliseconds since the sketch started.
if (isPlaying) {
Only updates the simulation time if the animation isn't paused.
const dt = (now - lastMillis) / 1000.0;
Calculates how much real time (in seconds) has passed since the last frame.
timeSec += dt;
Adds that elapsed time to the running simulation clock used inside the wave phase math.
lastMillis = now;
Stores the current time so the next frame can measure elapsed time correctly, whether playing or paused.

togglePlayPause()

Toggling a boolean flag is a common and simple pattern for building play/pause, show/hide, or on/off controls in interactive sketches.

function togglePlayPause() {
  isPlaying = !isPlaying;
  if (playPauseButton) {
    playPauseButton.html(isPlaying ? 'Pause' : 'Play');
  }
}
Line-by-line explanation (2 lines)
isPlaying = !isPlaying;
Flips the boolean play state - true becomes false and vice versa.
playPauseButton.html(isPlaying ? 'Pause' : 'Play');
Updates the button's visible text to match the new state, so it always shows the action that will happen next.

renderField()

renderField() is the physics heart of the sketch - it directly reads and writes pixel color data using loadPixels()/updatePixels(), a technique used whenever you need custom per-pixel effects that built-in shapes and filters can't achieve.

🔬 This adds the two wave amplitudes together to simulate interference. What happens if you multiply a1 and a2 instead of adding them?

      const a1 = Math.sin(phase1);
      const a2 = Math.sin(phase2);

      // Combined amplitude (interference)
      const A = a1 + a2;

🔬 Both phases use the same omega (angular frequency), so both sources pulse in sync. What happens if source B's phase uses omega * 1.5, so it oscillates faster than source A?

      // Phase = k * distance - omega * t
      const phase1 = k * d1 - omega * timeSec;
      const phase2 = k * d2 - omega * timeSec;
function renderField() {
  if (!fieldG) return;

  const g = fieldG;
  g.loadPixels(); // https://p5js.org/reference/#/p5.Image/loadPixels

  const gw = g.width;
  const gh = g.height;

  const simW = width;
  const simH = height;

  const omega = TWO_PI * frequency;      // angular frequency
  const k = TWO_PI / wavelength;         // wave number
  const maxAmp = 2.0;                    // max |A| for two unit waves

  for (let y = 0; y < gh; y++) {
    const vy = ((y + 0.5) / gh) * simH;

    for (let x = 0; x < gw; x++) {
      const vx = ((x + 0.5) / gw) * simW;

      // Distance to source 1
      const dx1 = vx - source1.x;
      const dy1 = vy - source1.y;
      const d1 = Math.sqrt(dx1 * dx1 + dy1 * dy1);

      // Distance to source 2
      const dx2 = vx - source2.x;
      const dy2 = vy - source2.y;
      const d2 = Math.sqrt(dx2 * dx2 + dy2 * dy2);

      // Phase = k * distance - omega * t
      const phase1 = k * d1 - omega * timeSec;
      const phase2 = k * d2 - omega * timeSec;

      // Wave amplitudes from each source
      const a1 = Math.sin(phase1);
      const a2 = Math.sin(phase2);

      // Combined amplitude (interference)
      const A = a1 + a2;
      const ampAbs = Math.abs(A);

      // Map |A| from 0..maxAmp to brightness 0..1
      const b = constrain(ampAbs / maxAmp, 0, 1);
      const blue = b * 255;

      const idx = 4 * (y * gw + x);
      g.pixels[idx + 0] = 0;        // R
      g.pixels[idx + 1] = 0;        // G
      g.pixels[idx + 2] = blue;     // B
      g.pixels[idx + 3] = 255;      // A
    }
  }

  g.updatePixels(); // https://p5js.org/reference/#/p5.Image/updatePixels
}
Line-by-line explanation (15 lines)

🔧 Subcomponents:

for-loop Outer Row Loop for (let y = 0; y < gh; y++) {

Iterates over every row of pixels in the low-resolution buffer.

for-loop Inner Column Loop for (let x = 0; x < gw; x++) {

Iterates over every column within the current row, so together the nested loops visit each pixel exactly once.

calculation Phase and Amplitude Calculation const phase1 = k * d1 - omega * timeSec;

Turns each pixel's distance from a source plus the current time into a wave phase, then a sine amplitude.

calculation Amplitude to Brightness Mapping const b = constrain(ampAbs / maxAmp, 0, 1);

Converts the combined wave amplitude into a 0-1 brightness value used to color the pixel blue.

if (!fieldG) return;
Safety check - skip rendering if the off-screen buffer hasn't been created yet.
g.loadPixels();
Loads the buffer's raw pixel data into the g.pixels array so it can be edited directly.
const omega = TWO_PI * frequency;
Converts the frequency (in Hz) into angular frequency, used inside the sine wave formula.
const k = TWO_PI / wavelength;
Computes the wave number - how quickly the wave's phase changes per pixel of distance.
for (let y = 0; y < gh; y++) {
Loops through every row of the buffer, from top to bottom.
const vy = ((y + 0.5) / gh) * simH;
Converts the buffer's row index into a real y-coordinate on the full-size canvas, so distances match the sources' actual positions.
for (let x = 0; x < gw; x++) {
Loops through every column within the current row.
const d1 = Math.sqrt(dx1 * dx1 + dy1 * dy1);
Calculates the straight-line distance from this pixel to source A using the Pythagorean theorem.
const phase1 = k * d1 - omega * timeSec;
Combines distance and time into a wave phase for source A - this is what makes the ripples appear to travel outward.
const a1 = Math.sin(phase1);
Turns the phase into a wave value between -1 and 1, just like a real ripple's height.
const A = a1 + a2;
Adds the two waves together - this single line is the entire interference effect: matching peaks add up (bright), opposite peaks cancel out (dark).
const b = constrain(ampAbs / maxAmp, 0, 1);
Scales the combined amplitude into a 0-1 range suitable for a color brightness value, clamping any out-of-range values.
const idx = 4 * (y * gw + x);
Calculates where this pixel's RGBA values live in the flat pixels array (4 numbers per pixel: R, G, B, A).
g.pixels[idx + 2] = blue; // B
Sets the pixel's blue channel based on the wave brightness, creating the glowing blue interference pattern.
g.updatePixels();
Pushes the edited pixels array back into the graphics buffer so it actually appears when drawn.

drawSources()

Drawing UI markers on top of a computed background is a common pattern: compute/draw the data layer first, then overlay interactive handles so users know what they can grab.

function drawSources() {
  stroke(255);
  strokeWeight(2);
  fill(80, 160, 255, 200);

  const d = sourceRadius * 2;
  ellipse(source1.x, source1.y, d, d);
  ellipse(source2.x, source2.y, d, d);

  noStroke();
  fill(255);
  textAlign(CENTER, CENTER);
  textSize(12);
  text('A', source1.x, source1.y);
  text('B', source2.x, source2.y);
}
Line-by-line explanation (7 lines)
stroke(255);
Sets the outline color of the next shapes to white.
fill(80, 160, 255, 200);
Sets the fill color to a semi-transparent light blue for the source circles.
const d = sourceRadius * 2;
Converts the radius constant into a diameter for use with ellipse().
ellipse(source1.x, source1.y, d, d);
Draws source A's circular marker at its current position.
ellipse(source2.x, source2.y, d, d);
Draws source B's circular marker at its current position.
text('A', source1.x, source1.y);
Draws the letter 'A' centered inside source A's circle to label it.
text('B', source2.x, source2.y);
Draws the letter 'B' centered inside source B's circle to label it.

mousePressed()

mousePressed() runs once whenever the mouse button goes down, and is where you typically test for hits against interactive objects to begin a drag or click action.

function mousePressed() {
  if (!insideCanvas(mouseX, mouseY)) return;

  const d1 = dist(mouseX, mouseY, source1.x, source1.y);
  const d2 = dist(mouseX, mouseY, source2.x, source2.y);

  if (d1 <= sourceRadius + 6) {
    source1.isDragging = true;
    source1.offsetX = mouseX - source1.x;
    source1.offsetY = mouseY - source1.y;
  } else if (d2 <= sourceRadius + 6) {
    source2.isDragging = true;
    source2.offsetX = mouseX - source2.x;
    source2.offsetY = mouseY - source2.y;
  }
}
Line-by-line explanation (4 lines)

🔧 Subcomponents:

conditional Source Hit Test if (d1 <= sourceRadius + 6) { ... } else if (d2 <= sourceRadius + 6) { ... }

Checks whether the click landed close enough to source A or source B to start dragging it, with a 6-pixel tolerance beyond the visible radius.

if (!insideCanvas(mouseX, mouseY)) return;
Ignores clicks that happen outside the canvas area, such as on the UI panel.
const d1 = dist(mouseX, mouseY, source1.x, source1.y);
Measures how far the mouse click is from source A's center.
if (d1 <= sourceRadius + 6) {
If the click is close enough to source A (within its radius plus a little extra tolerance), start dragging it.
source1.offsetX = mouseX - source1.x;
Remembers exactly where inside the source the mouse grabbed it, so dragging feels natural instead of snapping the center to the cursor.

mouseDragged()

mouseDragged() fires continuously while the mouse moves with the button held down, making it the natural place to update a dragged object's position every frame.

function mouseDragged() {
  if (!insideCanvas(mouseX, mouseY)) return;

  if (source1.isDragging) {
    source1.x = constrain(mouseX - source1.offsetX, 0, width);
    source1.y = constrain(mouseY - source1.offsetY, 0, height);
  } else if (source2.isDragging) {
    source2.x = constrain(mouseX - source2.offsetX, 0, width);
    source2.y = constrain(mouseY - source2.offsetY, 0, height);
  }
}
Line-by-line explanation (3 lines)
if (!insideCanvas(mouseX, mouseY)) return;
Stops the drag update if the mouse has moved outside the canvas bounds.
if (source1.isDragging) {
Only updates source A's position if it's the one currently being dragged.
source1.x = constrain(mouseX - source1.offsetX, 0, width);
Moves source A to follow the mouse (accounting for the original grab offset), while constrain() keeps it from leaving the canvas.

mouseReleased()

Resetting drag flags on mouseReleased() ensures objects stop following the mouse the instant you let go, even if the cursor later moves back over them.

function mouseReleased() {
  source1.isDragging = false;
  source2.isDragging = false;
}
Line-by-line explanation (2 lines)
source1.isDragging = false;
Stops source A from being dragged once the mouse button is released.
source2.isDragging = false;
Stops source B from being dragged as well, regardless of which one (if any) was active.

insideCanvas()

Small helper functions like this keep repeated boundary-checking logic in one place, making the mouse-handling functions easier to read.

function insideCanvas(x, y) {
  return x >= 0 && x <= width && y >= 0 && y <= height;
}
Line-by-line explanation (1 lines)
return x >= 0 && x <= width && y >= 0 && y <= height;
Returns true only if the given coordinates fall within the canvas's boundaries, used to ignore clicks/drags over the HTML UI panel.

windowResized()

windowResized() is a built-in p5.js callback that fires automatically whenever the browser window changes size, letting you keep your sketch responsive.

function windowResized() {
  resizeCanvas(windowWidth, windowHeight);
  pixelDensity(1);
  createFieldGraphics();
}
Line-by-line explanation (3 lines)
resizeCanvas(windowWidth, windowHeight);
Resizes the main canvas to match the browser window's new dimensions whenever it changes.
pixelDensity(1);
Re-applies the fixed pixel density after resizing, since some browsers can reset it.
createFieldGraphics();
Rebuilds the off-screen buffer at a size matching the new canvas dimensions.

📦 Key Variables

fieldG object

The off-screen p5.Graphics buffer that stores the computed wave interference pattern before it's scaled onto the main canvas.

let fieldG;
fieldScale number

Divides the canvas size to determine the buffer's resolution - higher values trade visual sharpness for performance.

const fieldScale = 2;
source1 object

Stores position and drag-state for wave source A (x, y, isDragging, offsetX, offsetY).

let source1;
source2 object

Stores position and drag-state for wave source B, mirroring source1's structure.

let source2;
sourceRadius number

Controls the visual size and click/drag hitbox radius of both source markers.

const sourceRadius = 14;
frequencySlider object

Reference to the HTML range slider element used to control wave frequency.

let frequencySlider;
frequencyLabelSpan object

Reference to the HTML span showing the current frequency value in Hz.

let frequencyLabelSpan;
playPauseButton object

Reference to the HTML button used to toggle the simulation between playing and paused.

let playPauseButton;
defaultFrequency number

The starting frequency value in Hz used to initialize both the frequency variable and the slider.

const defaultFrequency = 1.0;
minFrequency number

The minimum value allowed on the frequency slider.

const minFrequency = 0.2;
maxFrequency number

The maximum value allowed on the frequency slider.

const maxFrequency = 3.0;
wavelength number

The fixed distance (in pixels) between wave crests, used to compute the wave number k in the interference formula.

const wavelength = 150;
frequency number

The current oscillation frequency in Hz, read from the slider every frame and used to compute angular frequency omega.

let frequency = defaultFrequency;
timeSec number

The running simulation clock (in seconds) used inside the wave phase formula to animate the pattern over time.

let timeSec = 0;
lastMillis number

Stores the millis() timestamp from the previous frame so updateTime() can calculate elapsed time (dt).

let lastMillis = 0;
isPlaying boolean

Tracks whether the simulation clock is currently advancing (true) or paused (false).

let isPlaying = true;

🔧 Potential Improvements (4)

Here are some ways this code could be enhanced:

BUG mousePressed() / windowResized()

The HTML #controls panel sits absolutely positioned on top of the canvas, but mousePressed only checks insideCanvas() (canvas bounds), not whether the click actually hit the UI panel. Clicking the slider or button could still register as a canvas click underneath if coordinates overlap.

💡 Check event.target or compare mouseX/mouseY against the panel's bounding box (panel.elt.getBoundingClientRect()) and skip source hit-testing when the click is over the UI panel.

BUG windowResized()

windowResized() rebuilds the off-screen buffer but never repositions source1/source2, so after a resize the sources can end up far from the new center or even off-screen if the window shrinks.

💡 Either re-run initSources() on resize, or scale/clamp the existing source positions proportionally to the new width/height.

PERFORMANCE renderField()

Every frame, the nested loop calls Math.sqrt and Math.sin twice per pixel across the entire buffer, which can get expensive at low fieldScale values or on large windows.

💡 Consider caching per-pixel distances (which only change when a source moves) and only recomputing the sine/phase step each frame, or use a typed Float32Array precomputed distance grid to avoid recalculating sqrt every frame.

STYLE renderField()

Magic numbers like the '+ 6' drag tolerance in mousePressed() and maxAmp = 2.0 in renderField() aren't named constants, making their purpose less obvious at a glance.

💡 Extract them into named constants (e.g. const dragTolerance = 6; const maxAmp = 2.0;) declared near the top of the file alongside the other configuration constants.

🔄 Code Flow

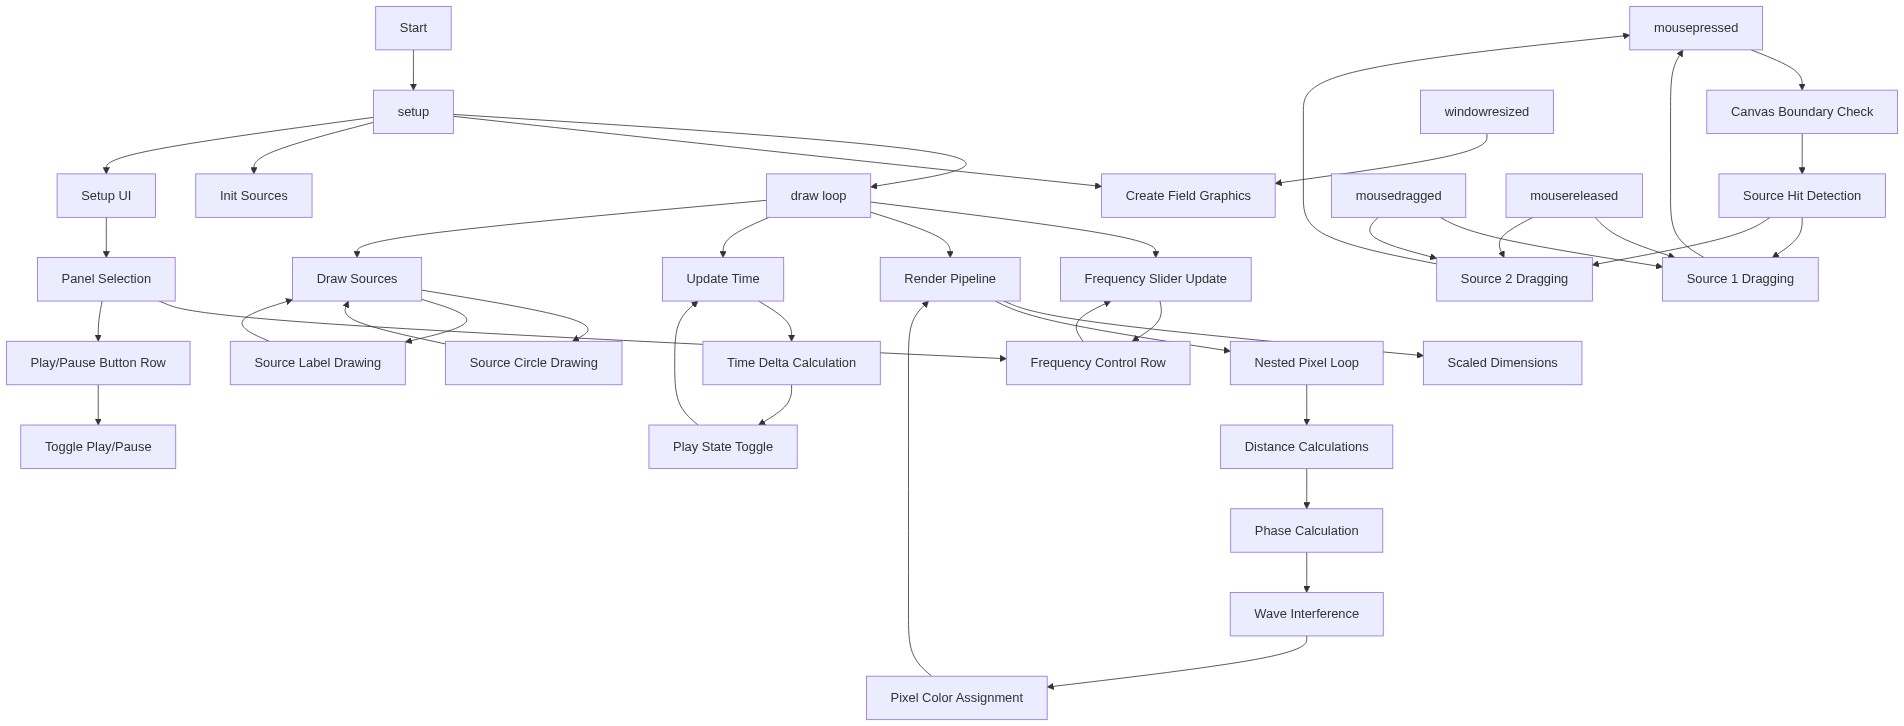
Code flow showing setup, draw, createfieldgraphics, initsources, setupui, updatetime, toggleplaypause, renderfield, drawsources, mousepressed, mousedragged, mousereleased, insidecanvas, windowresized

💡 Click on function names in the diagram to jump to their code

graph TD start[Start] --> setup[setup] setup --> draw[draw loop] draw --> sliderread[slider-read] draw --> playingcheck[playing-check] playingcheck -->|If Playing| updatetime[updatetime] updatetime --> renderfield[renderfield] renderfield --> rowloop[row-loop] rowloop --> colloop[col-loop] colloop --> phasecalc[phase-calc] phasecalc --> brightnessmap[brightness-map] brightnessmap --> colloop colloop -->|Next Column| rowloop rowloop -->|Next Row| draw draw --> drawsources[drawsources] draw --> mousepressed[mousepressed] mousepressed --> hitcheck[hit-test] hitcheck -->|If Hit| mousedragged[mousedragged] mousedragged --> mousereleased[mousereleased] mousereleased --> draw draw --> windowresized[windowresized] click setup href "#fn-setup" click draw href "#fn-draw" click sliderread href "#sub-slider-read" click playingcheck href "#sub-playing-check" click updatetime href "#fn-updatetime" click renderfield href "#fn-renderfield" click rowloop href "#sub-row-loop" click colloop href "#sub-col-loop" click phasecalc href "#sub-phase-calc" click brightnessmap href "#sub-brightness-map" click drawsources href "#fn-drawsources" click mousepressed href "#fn-mousepressed" click hitcheck href "#sub-hit-test" click mousedragged href "#fn-mousedragged" click mousereleased href "#fn-mousereleased" click windowresized href "#fn-windowresized"

❓ Frequently Asked Questions

What visual effects does the AI Wave Function Simulator create?

The simulator visually represents wave interference patterns resulting from two point sources, illustrating how waves interact with each other.

How can users interact with the AI Wave Function Simulator?

Users can drag the point sources to different positions and adjust the frequency of the waves using a slider, allowing them to explore various interference patterns.

What creative coding concepts does this sketch demonstrate?

This sketch demonstrates the principles of wave interference and real-time graphics rendering, showcasing how physics can be visualized through interactive coding.

Preview

AI Wave Function Simulator - Physics Interference Visualization Explore wave interference physics! - p5.js creative coding sketch preview
Sketch Preview
Code flow diagram showing the structure of AI Wave Function Simulator - Physics Interference Visualization Explore wave interference physics! - Code flow showing setup, draw, createfieldgraphics, initsources, setupui, updatetime, toggleplaypause, renderfield, drawsources, mousepressed, mousedragged, mousereleased, insidecanvas, windowresized
Code Flow Diagram