
Animated Color Pattern - xelsed.ai

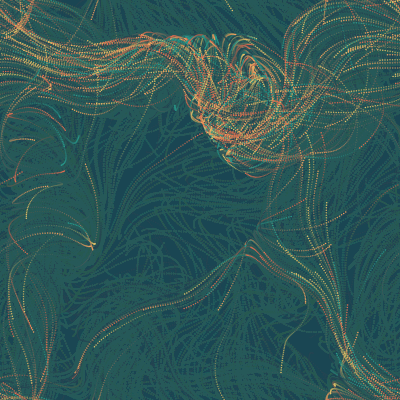
This sketch creates a mesmerizing flow field of 1000 colorful particles that swirl across the canvas following invisible currents generated by Perlin noise. Fading trails and an earthy color palette give the motion an organic, painterly quality, and clicking the mouse resets the whole pattern.

🧪 Try This!

Experiment with the code by making these changes:

  1. Slow down the fade for longer trails — Lowering the fill alpha makes old particle trails linger much longer before fading out, creating longer streaky lines
  2. Make particles chunkier — Increasing strokeWeight turns the thin points into bold brush-stroke-like dots
  3. Add a new color to the palette — Adding another hex color to the colors array gives particles one more possible color to be randomly assigned
  4. Crank up turbulence — A larger noiseScale samples the noise field much faster across space, producing tighter, more chaotic swirls
Prefer the full editor? Open it there →

📖 About This Sketch

This sketch generates a flow field animation: a thousand tiny particles drift across the canvas as if caught in an invisible current, leaving soft fading trails of warm sandy oranges, teal, and mustard yellow. The swirling motion isn't random - it's driven by Perlin noise, a p5.js function that produces smoothly changing values, which the sketch turns into a directional force at every point on the canvas. Key techniques on display include p5.Vector math for position and velocity, an ES6 class to encapsulate each particle's behavior, and a semi-transparent overlay rectangle that creates the ghostly trail effect instead of instantly erasing old frames.

The code is organized around a Particle class with a constructor, an update() method that applies noise-based forces, and a show() method that draws the particle as a colored point. The global setup() function builds a canvas and an array of particles, while draw() loops over that array every frame to update and render each one. Studying this sketch teaches you how to build a self-contained particle system, how noise() can be reshaped into an angle to create organic movement, and how alpha blending produces trail effects without needing to store any history of past positions.

⚙️ How It Works

  1. When the sketch loads, setup() creates a canvas that fills the browser window, paints a dark teal-blue background, and creates 1000 Particle objects, each starting at a random position with a small random velocity and a random color from the palette.
  2. Every frame, draw() first paints a nearly-invisible rectangle over the whole canvas (alpha of only 10) instead of a solid background - this slightly dims old particle trails rather than erasing them completely, which is what produces the smooth fading streaks.
  3. draw() then loops through every particle, calling update() and show() on each one to move it and draw it as a single colored point.
  4. Inside update(), each particle reads the Perlin noise value at its own x,y position (scaled down by noiseScale) and converts that value into an angle; this angle becomes a small force vector that gets added to the particle's acceleration, then its velocity, then its position, so the particle steers smoothly rather than moving in straight lines.
  5. Because nearby particles sample nearby noise values, they end up flowing together in coherent streams, which is why the pattern looks like organized swirls instead of random scattering. Particles that drift off one edge of the canvas are wrapped around to the opposite edge so none of them disappear.
  6. If the user resizes the browser window, windowResized() rebuilds the canvas and particle array to fit the new size; clicking the mouse triggers mousePressed(), which clears the background and regenerates a fresh set of particles for a new pattern.

🎓 Concepts You'll Learn

Perlin noise fieldsp5.Vector mathES6 classes for particle systemsAcceleration/velocity/position physicsAlpha transparency for trail effectsEdge wrappingEvent handlers (mousePressed, windowResized)

📝 Code Breakdown

Particle (class)

This class is the heart of the sketch - it packages a particle's data (position, velocity, acceleration, color) together with the behavior that moves it (update) and draws it (show). This pattern, common in creative coding, lets you manage thousands of independent objects with clean, reusable code instead of separate arrays for each property.

🔬 This wraps particles around the edges like Pac-Man. What happens if you delete these four lines entirely - where do all the particles eventually end up?

    if (this.pos.x > width) this.pos.x = 0;
    if (this.pos.x < 0) this.pos.x = width;
    if (this.pos.y > height) this.pos.y = 0;
    if (this.pos.y < 0) this.pos.y = height;
class Particle {
  constructor() {
    // Initialize particle position randomly across the canvas
    this.pos = createVector(random(width), random(height));
    // Initialize particle velocity with a random direction and small magnitude
    this.vel = p5.Vector.random2D();
    this.vel.mult(random(0.5, 1.5)); // Randomize initial speed slightly
    // Initialize acceleration to zero
    this.acc = createVector(0, 0);
    // Assign a random color from our defined palette
    this.color = colors[floor(random(colors.length))];
  }

  update() {
    let angle = noise(this.pos.x * noiseScale, this.pos.y * noiseScale) * TWO_PI * 4;
    let force = p5.Vector.fromAngle(angle);
    force.mult(0.1);

    this.acc.add(force);
    this.vel.add(this.acc);
    this.vel.limit(maxSpeed);
    this.pos.add(this.vel);
    this.acc.mult(0);

    if (this.pos.x > width) this.pos.x = 0;
    if (this.pos.x < 0) this.pos.x = width;
    if (this.pos.y > height) this.pos.y = 0;
    if (this.pos.y < 0) this.pos.y = height;
  }

  show() {
    stroke(this.color);
    strokeWeight(1.5);
    point(this.pos.x, this.pos.y);
  }
}
Line-by-line explanation (15 lines)

🔧 Subcomponents:

conditional Horizontal Wrap if (this.pos.x > width) this.pos.x = 0; if (this.pos.x < 0) this.pos.x = width;

Teleports the particle to the opposite horizontal edge when it drifts off screen

conditional Vertical Wrap if (this.pos.y > height) this.pos.y = 0; if (this.pos.y < 0) this.pos.y = height;

Teleports the particle to the opposite vertical edge when it drifts off screen

calculation Noise-to-Angle Conversion let angle = noise(this.pos.x * noiseScale, this.pos.y * noiseScale) * TWO_PI * 4;

Turns a smooth noise value (0-1) into an angle that can span multiple full rotations, creating swirling directions

this.pos = createVector(random(width), random(height));
Creates a p5.Vector to store the particle's x,y position, starting at a random spot on the canvas
this.vel = p5.Vector.random2D();
Creates a vector pointing in a completely random direction with length 1, used as the initial velocity direction
this.vel.mult(random(0.5, 1.5));
Scales that random direction vector by a random amount between 0.5 and 1.5 so particles don't all start at the same speed
this.acc = createVector(0, 0);
Acceleration starts at zero - it will be recalculated fresh every frame from the noise field
this.color = colors[floor(random(colors.length))];
Picks a random index into the colors array; floor() rounds the random decimal down to a valid whole-number index
let angle = noise(this.pos.x * noiseScale, this.pos.y * noiseScale) * TWO_PI * 4;
Samples Perlin noise using the particle's own position (scaled small) as coordinates, then stretches the 0-1 result into an angle covering up to 4 full rotations for more swirl variety
let force = p5.Vector.fromAngle(angle);
Converts that angle into an actual 2D vector pointing in that direction with length 1
force.mult(0.1);
Shrinks the force so it nudges the particle gently instead of throwing it violently in a new direction
this.acc.add(force);
Adds the noise-based force to acceleration (in case other forces were added elsewhere, though here it's the only one)
this.vel.add(this.acc);
Classic physics integration step: acceleration changes velocity
this.vel.limit(maxSpeed);
Caps the velocity's length so particles never move faster than maxSpeed pixels per frame
this.pos.add(this.vel);
Velocity changes position - this is what actually moves the particle each frame
this.acc.mult(0);
Resets acceleration to zero so forces don't accumulate forever across frames
stroke(this.color);
Sets the outline/point color to this particle's assigned hex color string
point(this.pos.x, this.pos.y);
Draws a single point at the particle's current position using the current stroke color and weight
setup()

setup() runs exactly once when the sketch starts. It's the right place to size the canvas and build any starting data structures - here, the entire particles array.

function setup() {
  // Create a full-window canvas
  createCanvas(windowWidth, windowHeight);
  // Set a dark, slightly muted background color to provide strong contrast for the particles
  background(26, 70, 83);

  // Initialize all particles
  for (let i = 0; i < numParticles; i++) {
    particles.push(new Particle());
  }
}
Line-by-line explanation (4 lines)

🔧 Subcomponents:

for-loop Particle Creation Loop for (let i = 0; i < numParticles; i++) { particles.push(new Particle()); }

Creates numParticles new Particle objects and adds each one to the particles array

createCanvas(windowWidth, windowHeight);
Makes the drawing canvas exactly as big as the browser window
background(26, 70, 83);
Fills the canvas with a dark muted blue-teal color as a one-time base background
for (let i = 0; i < numParticles; i++) {
Repeats the code inside the braces numParticles times to build the full particle list
particles.push(new Particle());
Creates a brand-new Particle object (running its constructor) and adds it to the end of the particles array

draw()

draw() runs continuously, roughly 60 times per second. This sketch's key trick is drawing a nearly-invisible rectangle every frame instead of calling background() outright - that low alpha value is what turns discrete point positions into flowing, connected-looking trails.

🔬 This is what creates the fading trails instead of a hard clear. What happens if you change the alpha value 10 to 255, making it fully opaque?

  noStroke();
  fill(26, 70, 83, 10); // Use the same background color with a low alpha value for subtle fading
  rect(0, 0, width, height);
function draw() {
  // Draw a semi-transparent rectangle over the entire canvas each frame.
  // This creates a fading effect for the particle trails, making the animation smoother and more organic.
  noStroke();
  fill(26, 70, 83, 10); // Use the same background color with a low alpha value for subtle fading
  rect(0, 0, width, height);

  // Update and display each particle
  for (let particle of particles) {
    particle.update();
    particle.show();
  }
}
Line-by-line explanation (6 lines)

🔧 Subcomponents:

for-loop Particle Update & Draw Loop for (let particle of particles) { particle.update(); particle.show(); }

Moves and draws every particle in the array once per frame

noStroke();
Turns off outlines so the fading rectangle doesn't get an unwanted border
fill(26, 70, 83, 10);
Sets the fill color to the same dark blue as the background but with alpha 10 out of 255 - almost fully transparent
rect(0, 0, width, height);
Draws that near-transparent rectangle over the whole canvas, slightly darkening everything drawn in previous frames instead of erasing it completely
for (let particle of particles) {
A for-of loop that visits every Particle object stored in the particles array, one at a time
particle.update();
Calls the particle's own update method to recalculate its noise-based force and move it
particle.show();
Calls the particle's own show method to draw it as a colored point at its new position

windowResized()

windowResized() is a p5.js callback that fires automatically whenever the browser window changes size. Rebuilding both the canvas and the particle array keeps the animation looking correct instead of leaving particles stuck outside the visible area.

function windowResized() {
  // Resize the canvas to match the new window dimensions
  resizeCanvas(windowWidth, windowHeight);
  // Clear the background and reinitialize particles to adapt to the new canvas size
  background(26, 70, 83);
  particles = [];
  for (let i = 0; i < numParticles; i++) {
    particles.push(new Particle());
  }
}
Line-by-line explanation (4 lines)

🔧 Subcomponents:

for-loop Particle Rebuild Loop for (let i = 0; i < numParticles; i++) { particles.push(new Particle()); }

Rebuilds the entire particle array to fit the newly resized canvas

resizeCanvas(windowWidth, windowHeight);
Changes the canvas dimensions to match the browser window's current size after a resize
background(26, 70, 83);
Repaints a fresh solid background, clearing any leftover trails from before the resize
particles = [];
Empties the particles array completely so old particles (which may be positioned outside the new canvas) are discarded
particles.push(new Particle());
Creates a fresh particle positioned randomly within the new canvas dimensions

mousePressed()

mousePressed() is a built-in p5.js event handler that automatically runs whenever the user clicks anywhere on the canvas. Here it's used as a simple 'reset' button to generate a brand-new random pattern on demand.

function mousePressed() {
  // Clear the background and reinitialize particles to create a fresh pattern
  background(26, 70, 83);
  particles = [];
  for (let i = 0; i < numParticles; i++) {
    particles.push(new Particle());
  }
}
Line-by-line explanation (3 lines)

🔧 Subcomponents:

for-loop Particle Reset Loop for (let i = 0; i < numParticles; i++) { particles.push(new Particle()); }

Rebuilds the particle array from scratch to generate a fresh pattern

background(26, 70, 83);
Wipes the canvas clean by repainting the solid base color, clearing all existing trails
particles = [];
Empties the array, discarding every existing particle
particles.push(new Particle());
Adds a brand-new randomly positioned and colored particle, rebuilding the full set

📦 Key Variables

particles array

Holds every Particle object currently in the simulation; looped over each frame to update and draw them all

let particles = [];
numParticles number

Controls how many particles are created - directly affects visual density and performance

let numParticles = 1000;
noiseScale number

Scales down particle coordinates before sampling Perlin noise, controlling the size/smoothness of the swirling patterns

let noiseScale = 0.005;
maxSpeed number

Caps how fast any particle can travel per frame, keeping motion smooth rather than erratic

let maxSpeed = 2.5;
colors array

Stores the hex color palette that particles randomly pick from when created

let colors = ['#F4A261', '#E76F51', '#2A9D8F', '#264653', '#E9C46A'];

🔧 Potential Improvements (4)

Here are some ways this code could be enhanced:

PERFORMANCE Particle.update()

Every particle calls noise() every frame, and with 1000 particles at full window size this can get expensive on large or high-DPI displays.

💡 Consider using pixelDensity(1) in setup(), or reducing numParticles on smaller screens by scaling it with windowWidth * windowHeight.

STYLE setup() and windowResized() and mousePressed()

The particle-creation loop (clearing the array and pushing numParticles new Particles) is duplicated in three separate functions.

💡 Extract a helper function like function initParticles() { particles = []; for (...) particles.push(new Particle()); } and call it from all three places to avoid repeating the same code.

BUG Particle.update() edge wrapping

When a particle wraps from one edge to the opposite edge, p5.js draws a point at both the old and new position within the same frame without a stroke connecting them, so this is visually fine here, but if line() were ever used instead of point(), the wrap would cause a jarring line across the whole canvas.

💡 If you later switch from point() to drawing lines between previous and current positions, add a check to skip drawing the connecting line immediately after a wrap occurs.

FEATURE draw()

The flow field is static in time - the same noise pattern produces the same swirl shapes forever since only x,y are used as noise coordinates.

💡 Add a third noise dimension based on frameCount or millis(), e.g. noise(x*noiseScale, y*noiseScale, frameCount*0.001), so the flow field itself slowly evolves and shifts over time.

🔄 Code Flow

Code flow showing particle, setup, draw, windowresized, mousepressed

💡 Click on function names in the diagram to jump to their code

graph TD start[Start] --> setup[setup] setup --> init-loop[Particle Creation Loop] init-loop --> draw[draw loop] draw --> update-loop[Particle Update & Draw Loop] update-loop --> wrap-x[Horizontal Wrap] update-loop --> wrap-y[Vertical Wrap] update-loop --> noise-angle[Noise-to-Angle Conversion] draw --> windowresized[windowResized] draw --> mousepressed[mousePressed] windowresized --> resize-loop[Particle Rebuild Loop] mousepressed --> reset-loop[Particle Reset Loop] reset-loop --> init-loop click setup href "#fn-setup" click draw href "#fn-draw" click windowresized href "#fn-windowresized" click mousepressed href "#fn-mousepressed" click init-loop href "#sub-init-loop" click update-loop href "#sub-update-loop" click wrap-x href "#sub-wrap-x" click wrap-y href "#sub-wrap-y" click noise-angle href "#sub-noise-angle" click resize-loop href "#sub-resize-loop" click reset-loop href "#sub-reset-loop"

❓ Frequently Asked Questions

What kind of visual effects does the Animated Color Pattern - XeLseDai sketch create?

This sketch generates a vibrant and colorful animated pattern featuring smooth movements and swirling effects, driven by a Perlin noise flow field.

Is there any user interaction available in the XeLseDai sketch?

The sketch is primarily visual and does not include interactive elements for user input.

What creative coding concepts are showcased in the Animated Color Pattern - XeLseDai sketch?

It demonstrates the use of particle systems and Perlin noise to create dynamic and visually appealing animations.

Preview

Animated Color Pattern - xelsed.ai - p5.js creative coding sketch preview
Sketch Preview
Code flow diagram showing the structure of Animated Color Pattern - xelsed.ai - Code flow showing particle, setup, draw, windowresized, mousepressed
Code Flow Diagram