
Animated Particles Fountain - xelsed.ai

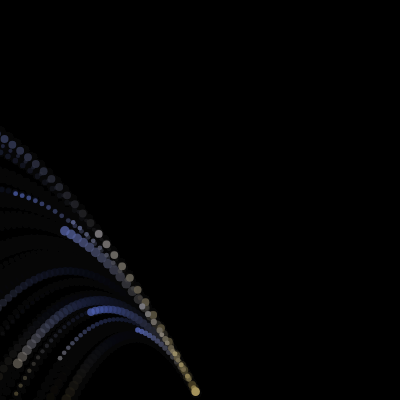
This sketch creates a glowing particle fountain that continuously launches colorful particles toward the mouse cursor from the bottom of the screen. Gravity pulls each particle back down while it fades out, and the particles shift color from hot red-yellow to cool blue as they slow down, creating a fiery, trailing fountain effect.

🧪 Try This!

Experiment with the code by making these changes:

  1. Supercharge the fountain — Spawning more particles per frame and giving them more speed makes the fountain look far more explosive and dense.
  2. Snow instead of fountain — Weakening gravity makes particles drift and hang in the air like snow instead of arcing sharply downward.
  3. Longer glowing trails — Lowering the background fade amount makes old particle positions linger much longer, creating dreamy light streaks.
Prefer the full editor? Open it there →

📖 About This Sketch

This sketch builds an interactive particle fountain: a stream of glowing dots erupts from the bottom of the canvas and arcs toward wherever the mouse is pointing, fading and cooling in color as gravity pulls them back down. It relies on p5.Vector for position, velocity, and acceleration math, an ES6 class to package each particle's behavior, and map() to translate a particle's speed into a shifting red-to-blue color. A semi-transparent background() call is used cleverly to leave soft motion trails instead of hard-edged flickering dots.

The code is organized around a Particle class with a constructor and three methods (update, display, isDead), plus the standard p5.js setup() and draw() functions and a windowResized() handler. Studying it teaches you how to manage a growing and shrinking array of objects safely with a reverse for-loop, how vector math produces natural-looking motion, and how a particle's lifespan can double as both its expiration timer and its transparency value.

⚙️ How It Works

  1. When the sketch loads, setup() creates a canvas that fills the browser window, places the fountain source at the bottom center, and defines a gentle downward gravity vector.
  2. Every frame, draw() paints a nearly-transparent black rectangle over the whole canvas instead of a solid background, which slowly darkens old particles into the background and creates glowing trails.
  3. Every third frame, a new Particle object is created at the fountain source with a velocity vector aimed at the current mouse position, so the fountain always fires toward wherever you move the cursor.
  4. The sketch loops backward through the particles array, calling update() to apply gravity and move each particle, and display() to draw it with a color based on how fast it's currently moving.
  5. Each particle's lifespan slowly counts down every frame, and isDead() checks whether that lifespan has run out or the particle has drifted far off-screen; dead particles are removed from the array with splice() so the array never grows forever.
  6. If the browser window is resized, windowResized() rebuilds the canvas to match and repositions the fountain source so it stays anchored to the new bottom-center of the screen.

🎓 Concepts You'll Learn

Particle systemsES6 classesp5.Vector math (velocity/acceleration)Array management with push/spliceColor mapping with map()Alpha transparency and trail effectsReverse for-loop for safe array removal

📝 Code Breakdown

Particle constructor()

The constructor runs once when a Particle object is created with `new Particle(...)`. It sets up all the starting values - position, velocity, acceleration, lifespan and size - that the update() and display() methods will later read and modify.

🔬 This aims every particle at the mouse. What happens if you remove the normalize() call entirely - would particles far from the mouse suddenly launch much faster than particles near it?

    this.vel = createVector(targetX - x, targetY - y);
    this.vel.normalize(); // Normalize it to get a unit vector (direction only)
constructor(x, y, gravityForce, targetX, targetY) {
    // Initial position of the particle
    this.pos = createVector(x, y);

    // Initial velocity: shoot towards the mouse position from the fountain source
    // Create a vector from the fountain source to the mouse
    this.vel = createVector(targetX - x, targetY - y);
    this.vel.normalize(); // Normalize it to get a unit vector (direction only)

    // Scale the velocity to control the initial speed of the particles
    let speed = random(8, 18); // Random speed for variation
    this.vel.mult(speed);

    // Acceleration (gravity) affecting the particle
    this.acc = gravityForce.copy();

    // Lifespan of the particle, used for alpha (transparency)
    this.lifespan = 255;

    // Random size for particle variation
    this.size = random(4, 10);

    // Store initial speed to help map colors more consistently
    this.initialSpeed = this.vel.mag();
  }
Line-by-line explanation (9 lines)

🔧 Subcomponents:

calculation Aim at Mouse this.vel = createVector(targetX - x, targetY - y);

Builds a vector pointing from the particle's start position toward the mouse so every particle launches in that direction

calculation Randomized Launch Speed let speed = random(8, 18); // Random speed for variation

Picks a random speed so particles don't all move at identical velocity, adding natural variation

this.pos = createVector(x, y);
Stores the particle's starting position as a p5.Vector - this is where the fountain launches from
this.vel = createVector(targetX - x, targetY - y);
Creates a vector pointing from the fountain source toward the mouse position by subtracting the coordinates
this.vel.normalize();
Shrinks the vector down to length 1 while keeping its direction, so it's a pure 'compass heading' with no speed baked in yet
let speed = random(8, 18); // Random speed for variation
Picks a random number between 8 and 18 to use as this particle's launch speed
this.vel.mult(speed);
Multiplies the direction vector by the random speed, turning it into a real velocity with both direction and magnitude
this.acc = gravityForce.copy();
Copies the global gravity vector so each particle has its own independent acceleration object to modify safely
this.lifespan = 255;
Starts the particle at full opacity (255), which will count down toward 0 over time
this.size = random(4, 10);
Gives each particle a random diameter between 4 and 10 pixels for visual variety
this.initialSpeed = this.vel.mag();
Records the particle's starting speed (magnitude) so display() can later compare current speed against it to pick a color
update()

update() is called once per particle, per frame, from inside draw(). It's the physics engine of the sketch: velocity accumulates acceleration, and position accumulates velocity - the same three-line pattern used in almost every particle system, from rain to fireworks to smoke.

update() {
    this.vel.add(this.acc); // Apply acceleration (gravity) to velocity
    this.pos.add(this.vel); // Apply velocity to position
    this.lifespan -= random(1, 4); // Decrease lifespan (decay transparency)
  }
Line-by-line explanation (3 lines)
this.vel.add(this.acc);
Adds gravity's acceleration to the current velocity every frame, which is how the particle gradually speeds up downward - this is Newtonian physics in three lines
this.pos.add(this.vel);
Moves the particle by adding its velocity to its position, the core motion update every frame
this.lifespan -= random(1, 4);
Reduces the particle's lifespan by a small random amount each frame, causing it to fade out and eventually die at slightly different rates

display()

display() runs every frame for every living particle. It shows a powerful pattern: instead of hardcoding a color, it derives the color from the particle's physics (its speed), which links the visuals directly to the simulation.

🔬 These three lines turn speed into color. What happens if you swap the output ranges of r and b so fast particles turn blue and slow ones turn red?

    let r = map(currentSpeed, 0, this.initialSpeed * 1.5, 0, 255);
    let g = map(currentSpeed, 0, this.initialSpeed * 1.5, 50, 200);
    let b = map(currentSpeed, 0, this.initialSpeed * 1.5, 255, 0);
display() {
    noStroke(); // Particles will not have an outline

    let currentSpeed = this.vel.mag(); // Get the current magnitude (speed) of the velocity

    // Map the particle's speed to a color range
    // Faster particles will be more towards red/yellow, slower towards blue
    let r = map(currentSpeed, 0, this.initialSpeed * 1.5, 0, 255);
    let g = map(currentSpeed, 0, this.initialSpeed * 1.5, 50, 200);
    let b = map(currentSpeed, 0, this.initialSpeed * 1.5, 255, 0);

    // Fill the particle with the calculated color and its current lifespan (alpha)
    fill(r, g, b, this.lifespan);

    // Draw the particle as an ellipse
    ellipse(this.pos.x, this.pos.y, this.size);
  }
Line-by-line explanation (7 lines)

🔧 Subcomponents:

calculation Speed-Based Color Mapping let r = map(currentSpeed, 0, this.initialSpeed * 1.5, 0, 255);

Converts the particle's current speed into red, green, and blue values so fast particles look hot and slow ones look cool

noStroke();
Turns off outlines so the particle is a soft filled dot with no border
let currentSpeed = this.vel.mag();
Calculates the particle's current speed as the length (magnitude) of its velocity vector
let r = map(currentSpeed, 0, this.initialSpeed * 1.5, 0, 255);
Converts speed into a red value: near-zero speed maps to 0 red, speeds close to 1.5x the starting speed map close to 255
let g = map(currentSpeed, 0, this.initialSpeed * 1.5, 50, 200);
Same idea for green, but the range is narrower (50-200) so green never fully disappears or fully saturates
let b = map(currentSpeed, 0, this.initialSpeed * 1.5, 255, 0);
Blue is mapped in reverse - slow particles get high blue, fast particles get low blue, creating the blue-to-red temperature shift
fill(r, g, b, this.lifespan);
Sets the fill color using the calculated RGB values, with the particle's lifespan doubling as its transparency (alpha)
ellipse(this.pos.x, this.pos.y, this.size);
Draws the particle as a circle at its current position with its randomly assigned size

isDead()

isDead() is a boolean helper method used by draw() to decide which particles to remove from the array. Keeping this logic inside the class (rather than scattered in draw()) keeps the code organized and easy to extend.

isDead() {
    // Particle is dead if its lifespan is less than 0
    // OR if it has gone significantly off-screen (to avoid tracking particles indefinitely)
    return this.lifespan < 0 ||
           this.pos.y > height + 50 || // Below the screen
           this.pos.x < -50 ||         // Left of the screen
           this.pos.x > width + 50;    // Right of the screen
  }
Line-by-line explanation (4 lines)

🔧 Subcomponents:

conditional Combined Death Check return this.lifespan < 0 || this.pos.y > height + 50 || this.pos.x < -50 || this.pos.x > width + 50;

Returns true if any one of four conditions is met: the particle faded out, or drifted off any edge of the canvas

return this.lifespan < 0 ||
First condition: the particle is considered dead once its lifespan counter drops below zero (fully faded out)
this.pos.y > height + 50 || // Below the screen
Second condition: the particle is dead if it falls more than 50 pixels below the bottom of the canvas
this.pos.x < -50 || // Left of the screen
Third condition: the particle is dead if it drifts 50 pixels past the left edge
this.pos.x > width + 50; // Right of the screen
Fourth condition: the particle is dead if it drifts 50 pixels past the right edge; together these prevent invisible particles from being tracked forever

setup()

setup() runs exactly once when the sketch starts, before draw() begins looping. It's the right place to size the canvas and give initial values to global vectors like gravity and fountainSource.

function setup() {
  createCanvas(windowWidth, windowHeight);
  // Fountain source starts at the bottom center of the canvas
  fountainSource = createVector(width / 2, height);
  // Define gravity: 0 horizontal force, 0.4 units downward (positive y)
  gravity = createVector(0, 0.4);
}
Line-by-line explanation (3 lines)
createCanvas(windowWidth, windowHeight);
Creates a canvas that fills the entire browser window using p5.js's built-in windowWidth and windowHeight variables
fountainSource = createVector(width / 2, height);
Places the fountain's origin point at horizontal center and the very bottom of the canvas
gravity = createVector(0, 0.4);
Defines a downward force vector with no horizontal push and a gentle 0.4 pull down each frame

draw()

draw() is the animation heartbeat of the sketch, running about 60 times per second. It's responsible for three jobs every frame: fading the old frame, spawning new particles, and updating/drawing/removing existing ones - a pattern used in virtually every p5.js particle system.

🔬 This spawns one particle every 3 frames. What happens if you change 3 to 1 (spawn every frame) or push multiple particles inside this block at once?

  if (frameCount % 3 === 0) {
    particles.push(new Particle(fountainSource.x, fountainSource.y, gravity, mouseX, mouseY));
  }
function draw() {
  // Semi-transparent background creates a trailing effect for particles
  background(0, 20);

  // Add new particles continuously
  // Create a new particle every 3 frames
  if (frameCount % 3 === 0) {
    particles.push(new Particle(fountainSource.x, fountainSource.y, gravity, mouseX, mouseY));
  }

  // Iterate through the particles array from end to beginning
  // This is important when removing elements with splice() to avoid skipping elements
  for (let i = particles.length - 1; i >= 0; i--) {
    let p = particles[i];
    p.update(); // Update the particle's state
    p.display(); // Display the particle

    // If the particle is dead, remove it from the array
    if (p.isDead()) {
      particles.splice(i, 1);
    }
  }
}
Line-by-line explanation (9 lines)

🔧 Subcomponents:

conditional Timed Particle Spawn if (frameCount % 3 === 0) {

Only creates a new particle every 3rd frame instead of every frame, controlling the fountain's density

for-loop Backward Particle Loop for (let i = particles.length - 1; i >= 0; i--) {

Updates, draws, and conditionally removes each particle - looping backward so splice() doesn't skip the next element

background(0, 20);
Draws a black rectangle over the whole canvas at low opacity (20 out of 255) instead of fully clearing it, so old frames fade slowly and leave glowing trails
if (frameCount % 3 === 0) {
frameCount increases by 1 every frame; using modulo 3 makes this condition true only on every third frame, throttling how often new particles spawn
particles.push(new Particle(fountainSource.x, fountainSource.y, gravity, mouseX, mouseY));
Creates a brand new Particle at the fountain source, aimed toward the current mouse position, and adds it to the end of the particles array
for (let i = particles.length - 1; i >= 0; i--) {
Loops through the array backward (from last index to 0) - this is essential because removing an item with splice() shifts every later index, which would break a forward loop
let p = particles[i];
Grabs a reference to the current particle so the following lines can call its methods
p.update();
Applies gravity and moves this particle one step, and decreases its lifespan
p.display();
Draws this particle at its new position with a color based on its current speed
if (p.isDead()) {
Checks whether this particle has faded out or drifted off-screen
particles.splice(i, 1);
Removes exactly one element at index i from the array, permanently deleting the dead particle so the array doesn't grow forever

windowResized()

windowResized() is a special p5.js function that automatically runs whenever the browser window changes size. It's essential for full-window sketches so the canvas and any position-dependent variables stay correctly aligned.

function windowResized() {
  resizeCanvas(windowWidth, windowHeight);
  // Recalculate fountain source to stay at the bottom center
  fountainSource.set(width / 2, height);
}
Line-by-line explanation (2 lines)
resizeCanvas(windowWidth, windowHeight);
A built-in p5.js function that resizes the existing canvas to match the browser window's new dimensions
fountainSource.set(width / 2, height);
Updates the existing fountainSource vector's x and y values in place using .set(), keeping it anchored to the bottom-center of the newly sized canvas

📦 Key Variables

particles array

Holds every currently-alive Particle object; grows as new particles spawn and shrinks as dead ones are removed via splice()

let particles = [];
gravity object

A p5.Vector representing the constant downward force applied to every particle's velocity each frame

gravity = createVector(0, 0.4);
fountainSource object

A p5.Vector storing the fixed launch point (bottom-center of the canvas) where all new particles are created

fountainSource = createVector(width / 2, height);

🔧 Potential Improvements (4)

Here are some ways this code could be enhanced:

BUG Particle constructor

If the mouse hasn't moved yet (mouseX and mouseY default to 0,0) and the fountain source is also near (0,0) in an unusual layout, or if the mouse is exactly at the fountain source, `targetX - x` and `targetY - y` can produce a zero-length vector, and calling normalize() on a zero vector can produce NaN values that make the particle behave erratically or vanish.

💡 Check the vector's magnitude before normalizing, e.g. `if (this.vel.mag() > 0) { this.vel.normalize(); } else { this.vel = createVector(0, -1); }` to provide a safe default direction.

PERFORMANCE Particle.display()

Three separate map() calls are computed every frame for every particle just to derive r, g, and b, which is a bit wasteful when the same input value and formula structure are reused three times.

💡 Precompute the normalized speed ratio once (e.g. `let t = constrain(currentSpeed / (this.initialSpeed * 1.5), 0, 1);`) and use lerp() or simple arithmetic on t for r, g, and b, reducing repeated map() overhead.

STYLE Throughout Particle class and draw()

Key tuning numbers like 8, 18, 4, 10, 0.4, 3, and 20 are hardcoded inline as 'magic numbers', making the sketch harder to tune and understand at a glance.

💡 Extract them into named constants at the top of the file (e.g. `const MIN_SPEED = 8; const MAX_SPEED = 18; const SPAWN_RATE = 3;`) so the fountain's behavior can be tuned in one place with clear names.

FEATURE draw() / missing mousePressed()

The fountain only reacts to mouse position, with no way for the user to trigger a special burst or change the fountain's intensity through clicking.

💡 Add a mousePressed() function that spawns a large burst of extra particles at once, giving the interaction a satisfying 'firework' moment on click.

🔄 Code Flow

Code flow showing constructor, update, display, isdead, setup, draw, windowresized

💡 Click on function names in the diagram to jump to their code

graph TD start[Start] --> setup[setup] setup --> draw[draw loop] draw --> spawncheck[spawn-check] spawncheck --> particleloop[particle-loop] particleloop --> update[update] update --> velocitytowardtarget[velocity-toward-target] update --> speedscale[speed-scale] update --> deathconditions[death-conditions] update --> display[display] display --> speedtocolor[speed-to-color] particleloop --> isdead[isdead] isdead --> draw click setup href "#fn-setup" click draw href "#fn-draw" click spawncheck href "#sub-timed-particle-spawn" click particleloop href "#sub-backward-particle-loop" click update href "#fn-update" click velocitytowardtarget href "#sub-aim-at-mouse" click speedscale href "#sub-randomized-launch-speed" click deathconditions href "#sub-combined-death-check" click display href "#fn-display" click speedtocolor href "#sub-speed-based-color-mapping"

❓ Frequently Asked Questions

What visual effects can I expect from the Animated Particles Fountain sketch?

The sketch creates a mesmerizing fountain of animated particles that shoot from a source and change color based on their speed, resulting in a dynamic and colorful display.

How can I interact with the Animated Particles Fountain sketch?

Users can interact with the sketch by moving their mouse, which causes the particles to shoot towards the mouse position, enhancing the visual experience.

What creative coding concepts are showcased in the Animated Particles Fountain sketch?

This sketch demonstrates particle systems, gravity effects, and dynamic color mapping based on particle speed, showcasing the principles of physics in creative coding.

Preview

Animated Particles Fountain - xelsed.ai - p5.js creative coding sketch preview
Sketch Preview
Code flow diagram showing the structure of Animated Particles Fountain - xelsed.ai - Code flow showing constructor, update, display, isdead, setup, draw, windowresized
Code Flow Diagram