
Animated Triangle Fade - xelsed.ai

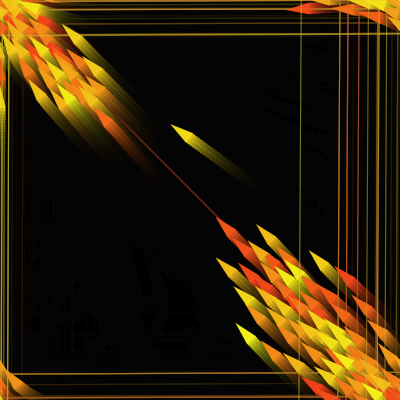
This sketch simulates a flock of 150 triangular boids that swarm, align, and cohere with one another while being drawn toward the mouse cursor. Each boid leaves a fading warm-colored trail, and the whole flock reacts fluidly to cursor movement using classic Craig Reynolds flocking rules.

🧪 Try This!

Experiment with the code by making these changes:

  1. Grow the flock — Increasing NUM_BOIDS creates a much denser, busier swarm on screen.
  2. Make boids much faster and twitchier — Raising maxSpeed and maxForce together makes the flock dart around more erratically and react faster to the mouse.
  3. Switch to a cool color palette — Changing the lerp() range in setup() shifts the flock from warm reds/yellows to cool blues/purples.
  4. Make trails last much longer — Lowering the background fade alpha causes old boid trails to linger for many more frames before disappearing.
Prefer the full editor? Open it there →

📖 About This Sketch

This sketch brings to life a classic flocking (boids) simulation: 150 small triangles swim around the canvas as a cohesive flock, avoiding collisions, matching each other's direction, staying close together, and all the while being pulled toward the mouse cursor. Warm gradient hues (red to yellow) and soft fading trails give the swarm an organic, fire-like quality. Under the hood it uses p5.Vector for physics-style steering forces, HSB color mode with alpha for the glowing trails, and object-oriented classes to manage each boid's behavior.

The code is organized around a Boid class that encapsulates position, velocity, and acceleration, plus separate methods for each flocking rule: separate(), align(), cohesion(), and attractedToMouse(). The global setup() and draw() functions simply create the flock and loop through it each frame calling flock(), update(), edges(), and show(). By studying this sketch you'll learn how steering behaviors combine additively into emergent group motion, how to use vector math for realistic movement, and how translucent background rectangles create trailing effects.

⚙️ How It Works

  1. When the sketch loads, setup() creates a full-window canvas, switches to HSB color mode so hues can be assigned easily, and spawns 150 Boid objects at random positions with a warm color gradient across them.
  2. Every frame, draw() paints a nearly-transparent black rectangle over the whole canvas instead of fully clearing it - this is what causes each boid's previous positions to linger briefly as fading trails.
  3. For every boid, flock() calculates four steering forces - separation (avoid crowding), alignment (match neighbors' direction), cohesion (move toward the group's center), and mouse attraction - and blends them together with different strength multipliers.
  4. update() adds the combined acceleration to the boid's velocity, caps it at maxSpeed, moves the boid, and records its position into a short trail history array.
  5. edges() wraps boids around the screen when they go off any edge, so the flock never disappears off-screen.
  6. show() draws the fading trail as a series of translucent line segments, then draws the boid itself as a small triangle rotated to face its direction of travel using push(), translate(), and rotate().

🎓 Concepts You'll Learn

Flocking / boids algorithmVector steering forcesObject-oriented classesHSB color mode with alphaTrail/fade effect via translucent backgroundpush/pop transforms with rotate

📝 Code Breakdown

setup()

setup() runs once at the start to prepare the canvas, set up the color system, and populate the initial array of boid objects that draw() will animate every frame.

🔬 This lerp() blends from hue 10 to hue 60 across the flock. What happens if you change the range to lerp(180, 300, ...) for cool blues and purples instead?

    // Warm gradient from red/orange to yellow (approx 10–60° hue)
    const hue = lerp(10, 60, i / (NUM_BOIDS - 1));
function setup() {
  createCanvas(windowWidth, windowHeight);
  colorMode(HSB, 360, 100, 100, 100); // HSB with alpha
  background(0); // solid black to start

  for (let i = 0; i < NUM_BOIDS; i++) {
    const x = random(width);
    const y = random(height);

    // Warm gradient from red/orange to yellow (approx 10–60° hue)
    const hue = lerp(10, 60, i / (NUM_BOIDS - 1));

    boids.push(new Boid(x, y, hue));
  }
}
Line-by-line explanation (7 lines)

🔧 Subcomponents:

for-loop Boid Creation Loop for (let i = 0; i < NUM_BOIDS; i++) {

Creates NUM_BOIDS boid objects at random positions with a hue that gradually shifts from red-orange to yellow

createCanvas(windowWidth, windowHeight);
Makes the canvas fill the entire browser window.
colorMode(HSB, 360, 100, 100, 100);
Switches color values to Hue/Saturation/Brightness/Alpha, each ranging 0-360 or 0-100, which makes it easy to pick warm hues and control transparency.
background(0);
Fills the canvas with solid black once, before any trails start forming.
const x = random(width);
Picks a random horizontal starting position for this boid.
const y = random(height);
Picks a random vertical starting position for this boid.
const hue = lerp(10, 60, i / (NUM_BOIDS - 1));
Interpolates a hue value between 10 (red-orange) and 60 (yellow) based on the boid's index, so the flock has a smooth color gradient.
boids.push(new Boid(x, y, hue));
Creates a new Boid object with its position and hue and adds it to the global boids array.
draw()

draw() is p5.js's animation loop, running about 60 times per second. Here it orchestrates the entire flock's behavior each frame by looping through every boid and calling its update methods in sequence.

🔬 This loop runs all four boid methods every frame. What happens if you comment out b.edges() - will boids fly off screen instead of wrapping around?

  for (let b of boids) {
    b.flock(boids);
    b.update();
    b.edges();
    b.show();
  }
function draw() {
  // Fade previous frame slightly to create trails
  // Very low alpha so trails are subtle but visible
  background(0, 0, 0, 12); // black, ~12% opacity

  for (let b of boids) {
    b.flock(boids);
    b.update();
    b.edges();
    b.show();
  }
}
Line-by-line explanation (5 lines)

🔧 Subcomponents:

for-loop Boid Update Loop for (let b of boids) {

Runs flocking logic, physics update, edge wrapping, and drawing for every boid each frame

background(0, 0, 0, 12); // black, ~12% opacity
Instead of fully clearing the canvas, this draws a nearly transparent black rectangle over everything, which slowly fades old trail lines instead of erasing them instantly.
b.flock(boids);
Calculates the combined steering forces (separation, alignment, cohesion, mouse attraction) for this boid based on all other boids.
b.update();
Applies the accumulated acceleration to velocity and position, and records the new position into the trail history.
b.edges();
Wraps the boid to the opposite side of the screen if it has moved past a boundary.
b.show();
Draws the boid's fading trail and its triangular body oriented toward its direction of travel.

windowResized()

windowResized() is a special p5.js callback that fires automatically when the browser window is resized, letting you keep the canvas responsive to different screen sizes.

function windowResized() {
  resizeCanvas(windowWidth, windowHeight);
  background(0);
}
Line-by-line explanation (2 lines)
resizeCanvas(windowWidth, windowHeight);
Automatically called by p5.js whenever the browser window changes size; this resizes the canvas to match the new window dimensions.
background(0);
Repaints the canvas solid black so no leftover trail artifacts appear stretched or misplaced after resizing.

applyForce()

This helper method centralizes how forces are added to a boid, following the classic 'force accumulator' pattern used in physics simulations - each behavior calls applyForce() independently.

applyForce(force) {
    this.acceleration.add(force);
  }
Line-by-line explanation (1 lines)
this.acceleration.add(force);
Adds a steering force vector to the boid's current acceleration, allowing multiple forces to accumulate before being applied in update().

flock()

flock() is the heart of the boids algorithm - it demonstrates how complex, lifelike group behavior emerges simply from summing several simple steering rules with different weights.

🔬 Each force has a different multiplier weight. What happens if you set the mouseForce multiplier to 3.0 - will the flock chase the cursor much more aggressively and lose its flocking shape?

    const separationForce = this.separate(boids).mult(1.5);
    const alignmentForce  = this.align(boids).mult(1.0);
    const cohesionForce   = this.cohesion(boids).mult(1.0);
    const mouseForce      = this.attractedToMouse().mult(0.8);
flock(boids) {
    const separationForce = this.separate(boids).mult(1.5);
    const alignmentForce  = this.align(boids).mult(1.0);
    const cohesionForce   = this.cohesion(boids).mult(1.0);
    const mouseForce      = this.attractedToMouse().mult(0.8);

    this.applyForce(separationForce);
    this.applyForce(alignmentForce);
    this.applyForce(cohesionForce);
    this.applyForce(mouseForce);
  }
Line-by-line explanation (6 lines)
const separationForce = this.separate(boids).mult(1.5);
Calculates the separation steering vector and amplifies it by 1.5, making avoiding collisions the strongest priority.
const alignmentForce = this.align(boids).mult(1.0);
Calculates the alignment steering vector at normal strength, encouraging matching neighbors' direction.
const cohesionForce = this.cohesion(boids).mult(1.0);
Calculates the cohesion steering vector at normal strength, pulling the boid toward the group's center.
const mouseForce = this.attractedToMouse().mult(0.8);
Calculates the mouse attraction force, weighted slightly less than separation but still significant.
this.applyForce(separationForce);
Adds the separation force into the boid's acceleration accumulator.
this.applyForce(mouseForce);
Adds the mouse attraction force last, completing the blend of all four behaviors.

update()

update() implements the classic physics integration pattern: acceleration changes velocity, velocity changes position, then acceleration resets - this is the core of nearly every particle or steering simulation.

update() {
    this.velocity.add(this.acceleration);
    this.velocity.limit(this.maxSpeed);
    this.position.add(this.velocity);
    this.acceleration.mult(0);

    // Update trail after moving
    this.trail.push(this.position.copy());
    if (this.trail.length > this.trailLength) {
      this.trail.shift();
    }
  }
Line-by-line explanation (7 lines)

🔧 Subcomponents:

conditional Trail Length Limiter if (this.trail.length > this.trailLength) {

Removes the oldest trail point once the trail array exceeds the desired maximum length

this.velocity.add(this.acceleration);
Applies the accumulated steering forces to the boid's velocity, changing its speed and direction.
this.velocity.limit(this.maxSpeed);
Caps velocity magnitude so the boid never exceeds its maximum speed, keeping motion controlled.
this.position.add(this.velocity);
Moves the boid by adding velocity to its current position.
this.acceleration.mult(0);
Resets acceleration to zero so forces don't accumulate infinitely across frames - fresh forces are calculated each frame in flock().
this.trail.push(this.position.copy());
Saves a copy of the current position into the trail history array (a copy is used so future position changes don't retroactively alter stored trail points).
if (this.trail.length > this.trailLength) {
Checks whether the trail has grown longer than the allowed maximum.
this.trail.shift();
Removes the oldest point from the front of the trail array, keeping the trail a fixed, sliding-window length.

edges()

edges() implements screen wrapping (as opposed to bouncing), a common technique in flocking sims and games like Asteroids so agents never permanently leave the visible area.

🔬 What happens visually if you increase margin to 100 - do boids stay invisible off-screen longer before wrapping back in?

    const margin = 10;
    if (this.position.x > width + margin)  this.position.x = -margin;
    if (this.position.x < -margin)         this.position.x = width + margin;
edges() {
    const margin = 10;
    if (this.position.x > width + margin)  this.position.x = -margin;
    if (this.position.x < -margin)         this.position.x = width + margin;
    if (this.position.y > height + margin) this.position.y = -margin;
    if (this.position.y < -margin)         this.position.y = height + margin;
  }
Line-by-line explanation (5 lines)

🔧 Subcomponents:

conditional Horizontal Wrap if (this.position.x > width + margin) this.position.x = -margin;

Teleports the boid to the opposite horizontal edge once it exits the right side (and vice versa)

conditional Vertical Wrap if (this.position.y > height + margin) this.position.y = -margin;

Teleports the boid to the opposite vertical edge once it exits the bottom (and vice versa)

const margin = 10;
A small buffer distance so boids visibly disappear off one edge before reappearing on the other, avoiding an abrupt pop at the exact boundary.
if (this.position.x > width + margin) this.position.x = -margin;
If the boid drifts past the right edge, it reappears just off the left edge.
if (this.position.x < -margin) this.position.x = width + margin;
If the boid drifts past the left edge, it reappears just off the right edge.
if (this.position.y > height + margin) this.position.y = -margin;
If the boid drifts past the bottom edge, it reappears just above the top.
if (this.position.y < -margin) this.position.y = height + margin;
If the boid drifts past the top edge, it reappears just below the bottom.

seek()

seek() is the fundamental 'move toward a point' steering behavior from Craig Reynolds' original steering behaviors research, reused here for both mouse attraction and cohesion.

seek(target) {
    const desired = p5.Vector.sub(target, this.position);
    const d = desired.mag();
    if (d === 0) return createVector(0, 0);

    desired.setMag(this.maxSpeed);
    const steer = p5.Vector.sub(desired, this.velocity);
    steer.limit(this.maxForce);
    return steer;
  }
Line-by-line explanation (6 lines)
const desired = p5.Vector.sub(target, this.position);
Computes the vector pointing from the boid's current position to the target it wants to move toward.
const d = desired.mag();
Measures the distance to the target.
if (d === 0) return createVector(0, 0);
Avoids errors when the boid is exactly at the target (a zero-length vector can't be normalized/scaled safely).
desired.setMag(this.maxSpeed);
Rescales the desired direction vector to have a length equal to maxSpeed, representing the ideal velocity.
const steer = p5.Vector.sub(desired, this.velocity);
Calculates the steering force needed to turn the current velocity into the desired velocity.
steer.limit(this.maxForce);
Caps how strong this steering force can be, so turns feel smooth rather than instant.

attractedToMouse()

This method shows how mouseX and mouseY globals let you make any element on the canvas react to cursor position, and how reusing seek() avoids duplicating steering math.

attractedToMouse() {
    if (mouseX < 0 || mouseX > width || mouseY < 0 || mouseY > height) {
      return createVector(0, 0);
    }
    const target = createVector(mouseX, mouseY);
    return this.seek(target);
  }
Line-by-line explanation (4 lines)

🔧 Subcomponents:

conditional Mouse Off-Canvas Check if (mouseX < 0 || mouseX > width || mouseY < 0 || mouseY > height) {

Disables mouse attraction whenever the cursor is outside the canvas bounds

if (mouseX < 0 || mouseX > width || mouseY < 0 || mouseY > height) {
Checks if the mouse cursor is currently outside the canvas boundaries.
return createVector(0, 0);
If the mouse is off-canvas, no attraction force is applied - returns a zero vector.
const target = createVector(mouseX, mouseY);
Creates a vector at the current mouse position to use as the seek target.
return this.seek(target);
Reuses the seek() method to compute a steering force pulling the boid toward the mouse.

separate()

separate() is one of the three classic Reynolds flocking rules - it prevents boids from overlapping by pushing away from anything too close, with force inversely proportional to distance for realistic crowding avoidance.

🔬 desiredSeparation sets the personal-space bubble around each boid. What happens visually if you change it to 60 - does the flock spread into a much sparser formation?

    const desiredSeparation = 25;
    const steer = createVector(0, 0);
    let count = 0;
separate(boids) {
    const desiredSeparation = 25;
    const steer = createVector(0, 0);
    let count = 0;

    for (let other of boids) {
      if (other === this) continue;

      const d = p5.Vector.dist(this.position, other.position);
      if (d > 0 && d < desiredSeparation) {
        let diff = p5.Vector.sub(this.position, other.position);
        diff.normalize();
        diff.div(d); // stronger repulsion when very close
        steer.add(diff);
        count++;
      }
    }

    if (count > 0) {
      steer.div(count);
    }

    if (steer.mag() > 0) {
      steer.setMag(this.maxSpeed);
      steer.sub(this.velocity);
      steer.limit(this.maxForce);
    }

    return steer;
  }
Line-by-line explanation (8 lines)

🔧 Subcomponents:

for-loop Neighbor Scan Loop for (let other of boids) {

Checks every other boid's distance and accumulates a repulsion vector from any that are too close

const desiredSeparation = 25;
Sets the minimum comfortable distance boids try to maintain from each other.
if (other === this) continue;
Skips comparing a boid against itself.
const d = p5.Vector.dist(this.position, other.position);
Measures the distance between this boid and another.
if (d > 0 && d < desiredSeparation) {
Only reacts to boids that are closer than the desired separation distance (and not exactly overlapping, which would cause division issues).
let diff = p5.Vector.sub(this.position, other.position);
Computes a vector pointing away from the nearby boid.
diff.div(d); // stronger repulsion when very close
Divides the normalized vector by the distance, so closer boids produce a much stronger push - an inverse relationship between distance and force.
steer.div(count);
Averages the accumulated repulsion vectors across however many close neighbors were found.
steer.setMag(this.maxSpeed);
Scales the average repulsion direction to full max speed, following the standard Reynolds steering formula (desired minus current velocity).

align()

align() is the second Reynolds rule - it makes boids match the direction their nearby flockmates are traveling, which is why the whole flock appears to turn together smoothly.

align(boids) {
    const neighborDist = 50;
    const sum = createVector(0, 0);
    let count = 0;

    for (let other of boids) {
      if (other === this) continue;

      const d = p5.Vector.dist(this.position, other.position);
      if (d > 0 && d < neighborDist) {
        sum.add(other.velocity);
        count++;
      }
    }

    if (count > 0) {
      sum.div(count);
      sum.setMag(this.maxSpeed);
      const steer = p5.Vector.sub(sum, this.velocity);
      steer.limit(this.maxForce);
      return steer;
    }

    return createVector(0, 0);
  }
Line-by-line explanation (5 lines)

🔧 Subcomponents:

for-loop Velocity Averaging Loop for (let other of boids) {

Sums up the velocities of nearby boids to find their average heading

const neighborDist = 50;
Sets how far away a boid looks to consider other boids its 'neighbors' for alignment purposes.
sum.add(other.velocity);
Accumulates the velocity vectors of all nearby boids.
sum.div(count);
Averages the summed velocities to get the typical direction neighbors are heading.
sum.setMag(this.maxSpeed);
Scales that average direction to the boid's max speed, representing the ideal aligned velocity.
const steer = p5.Vector.sub(sum, this.velocity);
Calculates the force needed to turn the boid's current velocity toward the average neighbor direction.

cohesion()

cohesion() is the third Reynolds rule - it keeps boids gravitating toward the center of their local group, which combined with separation and alignment creates the classic tight-but-not-overlapping flocking motion.

cohesion(boids) {
    const neighborDist = 50;
    const sum = createVector(0, 0);
    let count = 0;

    for (let other of boids) {
      if (other === this) continue;

      const d = p5.Vector.dist(this.position, other.position);
      if (d > 0 && d < neighborDist) {
        sum.add(other.position);
        count++;
      }
    }

    if (count > 0) {
      sum.div(count); // centroid of neighbors
      return this.seek(sum);
    }

    return createVector(0, 0);
  }
Line-by-line explanation (3 lines)

🔧 Subcomponents:

for-loop Position Averaging Loop for (let other of boids) {

Sums up the positions of nearby boids to find the center point of the local group

sum.add(other.position);
Accumulates the positions of all nearby boids.
sum.div(count); // centroid of neighbors
Averages the summed positions to find the centroid (center point) of the local group of boids.
return this.seek(sum);
Reuses seek() to steer the boid gently toward that centroid, pulling the flock together.

drawTrail()

drawTrail() demonstrates how storing a short history of past positions and drawing them with increasing opacity can simulate motion blur or comet-tail effects without any complex particle system.

🔬 What happens if you change strokeWeight(1.2) above this loop to strokeWeight(4) - do the trails become thick glowing ribbons?

    for (let i = 1; i < this.trail.length; i++) {
      const p1 = this.trail[i - 1];
      const p2 = this.trail[i];

      // Alpha increases toward the head of the trail
      const alpha = map(i, 1, this.trail.length - 1, 0, 55);
      stroke(this.hue, 80, 80, alpha);
      line(p1.x, p1.y, p2.x, p2.y);
    }
drawTrail() {
    if (this.trail.length < 2) return;

    noFill();
    strokeWeight(1.2);

    for (let i = 1; i < this.trail.length; i++) {
      const p1 = this.trail[i - 1];
      const p2 = this.trail[i];

      // Alpha increases toward the head of the trail
      const alpha = map(i, 1, this.trail.length - 1, 0, 55);
      stroke(this.hue, 80, 80, alpha);
      line(p1.x, p1.y, p2.x, p2.y);
    }
  }
Line-by-line explanation (6 lines)

🔧 Subcomponents:

for-loop Trail Segment Drawing Loop for (let i = 1; i < this.trail.length; i++) {

Draws a connected line for each pair of consecutive trail points, with increasing opacity toward the newest point

if (this.trail.length < 2) return;
Skips drawing if there aren't at least two points to connect with a line.
const p1 = this.trail[i - 1];
Gets the earlier of two consecutive trail points.
const p2 = this.trail[i];
Gets the later of two consecutive trail points.
const alpha = map(i, 1, this.trail.length - 1, 0, 55);
Maps the segment's index to an opacity value between 0 and 55, so older segments (lower i) are more transparent and newer ones near the boid's head are more visible.
stroke(this.hue, 80, 80, alpha);
Sets the line color using the boid's assigned warm hue with fixed saturation/brightness and the calculated fading alpha.
line(p1.x, p1.y, p2.x, p2.y);
Draws a line segment between the two trail points.

show()

show() ties together push/pop transformation state management with velocity.heading() to orient shapes along their direction of motion - a technique used constantly in games and simulations for things like spaceships, cars, and particles.

🔬 This defines a triangle with 3 vertices. What happens if you add a 4th vertex to make a diamond/kite shape instead - try adding vertex(0, 0) between the wings?

    const r = 6; // size
    beginShape();
    vertex(0, -r * 2);  // nose
    vertex(-r, r * 2);  // left wing
    vertex(r, r * 2);   // right wing
    endShape(CLOSE);
show() {
    // First draw the trail
    this.drawTrail();

    // Then draw the boid as a triangle
    push();
    translate(this.position.x, this.position.y);
    const angle = this.velocity.heading() + PI / 2; // point forward
    rotate(angle);

    noStroke();
    fill(this.hue, 90, 95, 95);

    const r = 6; // size
    beginShape();
    vertex(0, -r * 2);  // nose
    vertex(-r, r * 2);  // left wing
    vertex(r, r * 2);   // right wing
    endShape(CLOSE);

    pop();
  }
Line-by-line explanation (10 lines)
this.drawTrail();
Draws the fading trail lines behind the boid before drawing the boid itself, so the trail appears underneath.
push();
Saves the current drawing transformation state so translate/rotate below don't affect other boids.
translate(this.position.x, this.position.y);
Moves the coordinate origin to the boid's position, so the triangle can be drawn relative to (0,0).
const angle = this.velocity.heading() + PI / 2; // point forward
Calculates the angle of the boid's velocity vector and adds 90 degrees (PI/2) to correct for the triangle shape's default orientation, so its nose points in the direction of travel.
rotate(angle);
Rotates the coordinate system so the triangle drawn afterward is oriented in the boid's direction of movement.
fill(this.hue, 90, 95, 95);
Sets the boid's fill color using its assigned hue with high saturation and brightness and near-full opacity.
vertex(0, -r * 2); // nose
Defines the front tip of the triangle, pointing 'forward' after rotation.
vertex(-r, r * 2); // left wing
Defines the back-left corner of the triangle.
vertex(r, r * 2); // right wing
Defines the back-right corner of the triangle.
pop();
Restores the saved transformation state so subsequent boids aren't affected by this boid's translate/rotate.

📦 Key Variables

boids array

Holds all Boid instances that make up the flock; looped over every frame in draw()

let boids = [];
NUM_BOIDS number

Constant controlling how many boids are created in setup()

const NUM_BOIDS = 150;
this.position object

A p5.Vector storing the boid's current x/y location on the canvas

this.position = createVector(x, y);
this.velocity object

A p5.Vector storing the boid's current speed and direction of travel

this.velocity = p5.Vector.fromAngle(angle).mult(random(1, 2));
this.acceleration object

A p5.Vector accumulating steering forces each frame before being applied to velocity

this.acceleration = createVector(0, 0);
this.maxSpeed number

Caps how fast a boid can move, keeping motion controlled and readable

this.maxSpeed = 3;
this.maxForce number

Caps how strong steering forces can be, producing smooth rather than jerky turns

this.maxForce = 0.05;
this.hue number

Stores this boid's assigned color hue for the warm gradient effect

this.hue = hue;
this.trail array

Stores recent past positions used to draw the fading trail behind each boid

this.trail = [];
this.trailLength number

Maximum number of points kept in the trail history array

this.trailLength = 12;

🔧 Potential Improvements (4)

Here are some ways this code could be enhanced:

PERFORMANCE separate(), align(), cohesion()

Each of these methods loops through every other boid independently, so with 150 boids the flock() call performs roughly 150 x 150 x 3 = 67,500 distance calculations every frame, which won't scale well if NUM_BOIDS is increased significantly.

💡 Combine the three neighbor loops into a single pass that computes distance once per pair and accumulates separation, alignment, and cohesion sums together, or use a spatial grid/quadtree to only check nearby boids.

STYLE Boid class constructor

Magic numbers like desiredSeparation (25), neighborDist (50), and the force multipliers in flock() (1.5, 1.0, 1.0, 0.8) are hardcoded inline across multiple methods, making them hard to find and tune together.

💡 Lift these into named constants near the top of the file (e.g. const SEPARATION_WEIGHT = 1.5) so all tunable flocking parameters live in one place.

FEATURE Boid class

There's no interaction beyond simple mouse attraction - clicking, dragging, or key presses don't affect the flock in any way.

💡 Add a mousePressed() handler that spawns a temporary repulsion point (predator effect) or toggles between attraction and repulsion, adding more interactive variety to the sketch.

BUG attractedToMouse()

On touch devices, mouseX/mouseY remain at their last value (often 0,0) when there's no active touch, which could cause the whole flock to be constantly pulled toward the top-left corner unexpectedly.

💡 Track whether the mouse/touch has moved at least once (e.g. a hasInteracted boolean) and skip the mouse attraction force entirely until then.

🔄 Code Flow

Code flow showing setup, draw, windowresized, applyforce, flock, update, edges, seek, attractedtomouse, separate, align, cohesion, drawtrail, show

💡 Click on function names in the diagram to jump to their code

graph TD start[Start] --> setup[setup] setup --> draw[draw loop] draw --> boidloop[main-boid-loop] boidloop --> trailtrim[trail-trim] trailtrim --> wrapx[wrap-x] wrapx --> wrapy[wrap-y] wrapy --> mousecheck[mouse-bounds-check] mousecheck --> separate[separate] separate --> separateloop[separate-neighbor-loop] separateloop --> align[align] align --> alignloop[align-neighbor-loop] alignloop --> cohesion[cohesion] cohesion --> cohesionloop[cohesion-neighbor-loop] cohesionloop --> drawtrail[drawtrail] drawtrail --> trailsegmentloop[trail-segment-loop] trailsegmentloop --> show[show] show --> draw click setup href "#fn-setup" click draw href "#fn-draw" click boidloop href "#sub-main-boid-loop" click trailtrim href "#sub-trail-trim" click wrapx href "#sub-wrap-x" click wrapy href "#sub-wrap-y" click mousecheck href "#sub-mouse-bounds-check" click separate href "#fn-separate" click separateloop href "#sub-separate-neighbor-loop" click align href "#fn-align" click alignloop href "#sub-align-neighbor-loop" click cohesion href "#fn-cohesion" click cohesionloop href "#sub-cohesion-neighbor-loop" click drawtrail href "#fn-drawtrail" click trailsegmentloop href "#sub-trail-segment-loop" click show href "#fn-show"

❓ Frequently Asked Questions

What visual effects does the Animated Triangle Fade - XeLseDai sketch produce?

The sketch creates a mesmerizing flocking simulation with triangular boids that exhibit warm gradient colors and fading trails, set against a solid black background.

How can users interact with the Animated Triangle Fade - XeLseDai sketch?

Users can interact with the sketch by moving their mouse cursor, which attracts the boids and influences their movement behavior.

What creative coding concepts are demonstrated in the Animated Triangle Fade - XeLseDai sketch?

This sketch showcases flocking behavior in computer graphics through principles like separation, alignment, and cohesion, combined with attraction to the mouse cursor.

Preview

Animated Triangle Fade - xelsed.ai - p5.js creative coding sketch preview
Sketch Preview
Code flow diagram showing the structure of Animated Triangle Fade - xelsed.ai - Code flow showing setup, draw, windowresized, applyforce, flock, update, edges, seek, attractedtomouse, separate, align, cohesion, drawtrail, show
Code Flow Diagram