
Aplikasi Surat Masuk & Keluar

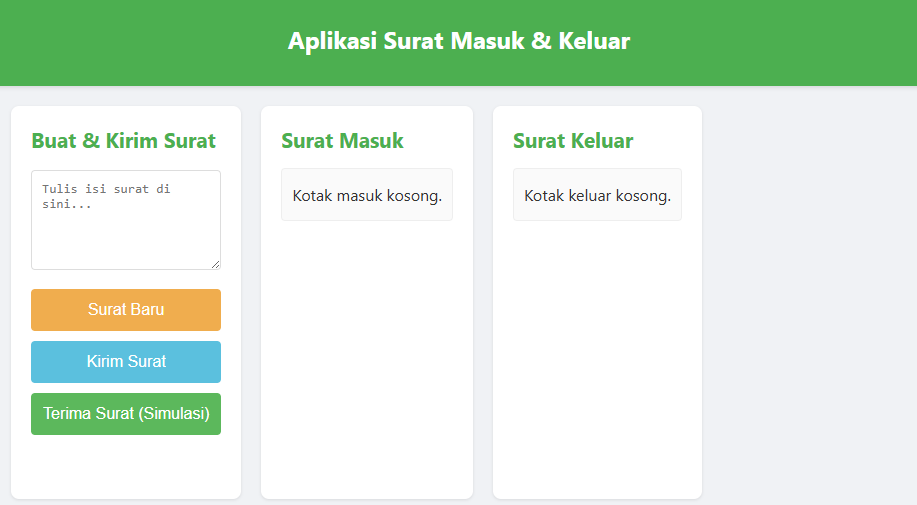
This is a DOM-based email/letter management application built with p5.js that allows users to compose, send, and receive simulated letters. The sketch manages two arrays (inbox and outbox) and dynamically creates HTML elements to display sent and received letters with timestamps.

🧪 Try This!

Experiment with the code by making these changes:

  1. Add a custom simulated letter — Add your own message to the list of random letters so it can be randomly received
  2. Change the empty message text — Customize what message appears when the inbox is empty
  3. Prevent textarea from clearing after send — Remove the line that clears the textarea so the letter stays visible after sending—useful for copying or editing
  4. Show timestamp in a different format — Change the timestamp format from the user's locale to a simpler format
Prefer the full editor? Open it there →

📖 About This Sketch

This sketch creates a working letter management application where users can write, send, and receive simulated emails. Instead of drawing graphics to a canvas, it uses p5.js's DOM manipulation functions like createDiv(), createButton(), and createElement() to build an interactive HTML interface with a textarea input, control buttons, and two letter containers that update in real-time.

The code is organized around two main data structures: inboxLetters and outboxLetters arrays that store letter objects with content, timestamps, and unique IDs. By studying this sketch you will learn how p5.js bridges HTML and JavaScript, how to manage application state with arrays of objects, and how to keep the DOM synchronized with your data using an updateUI() function that re-renders the interface whenever letters are added or removed.

⚙️ How It Works

  1. When the sketch loads, setup() runs once and checks for existing HTML elements in index.html. If they don't exist, it creates them dynamically using p5.js DOM functions: a header with the title, a controls section with a textarea and three buttons, an inbox container, and an outbox container. It then attaches event listeners to each button so clicks trigger letter functions.
  2. The user types a letter into the textarea and clicks 'Kirim Surat' (Send Letter). The sendLetter() function reads the textarea value, validates that it is not empty, creates a letter object with the text content and a timestamp, pushes it into the outboxLetters array, and then calls updateUI() to refresh the display.
  3. When the user clicks 'Terima Surat' (Receive Letter), the receiveLetter() function picks a random simulated letter from a list, creates a letter object with that text and timestamp, adds it to the inboxLetters array, and calls updateUI().
  4. The updateUI() function loops through both letter arrays, creates a new letterItem div for each letter with its timestamp and content, and inserts them into the inbox and outbox containers. If an array is empty, it displays a 'kotak kosong' (empty box) message instead.
  5. The 'Surat Baru' (New Letter) button clears the textarea so the user can start typing a fresh letter. Throughout, the DOM stays synchronized with the data: whenever you modify an array, updateUI() re-renders everything instantly.

🎓 Concepts You'll Learn

DOM manipulation (createDiv, createButton, select)Event handling (mousePressed, addEventListener)Arrays and objectsApplication state managementConditional renderingTimestamps and unique IDsHTML templating with template literals

📝 Code Breakdown

setup()

setup() runs once when the sketch loads. It prepares the entire DOM structure by either finding existing HTML elements or creating them dynamically. Notice the pattern: select() an element by id, then check if (!element) to decide whether to create it. This makes the code flexible—it works whether elements exist in index.html or need to be created from scratch. The function also stores a reference to the textarea in a global variable so other functions can access it later.

🔬 This block creates the inbox container and its child heading and list. What happens if you change 'Surat Masuk' to 'Surat Diterima'? How many places would you need to change to rename it everywhere?

  let inboxContainer = select('#inbox-container');
  if (!inboxContainer) {
    inboxContainer = createDiv().id('inbox-container').addClass('letter-box-container');
    inboxContainer.child(createElement('h2', 'Surat Masuk'));
    inboxContainer.child(createDiv().id('inbox').addClass('letter-list'));
  }
function setup() {
  // Tidak perlu canvas p5.js untuk aplikasi ini karena sepenuhnya berbasis DOM
  noCanvas();

  // Dapatkan elemen-elemen DOM yang sudah ada di index.html
  // Atau buat jika belum ada (untuk fleksibilitas)
  let app = select('#app');
  if (!app) app = createDiv().id('app');

  let header = select('#header');
  if (!header) {
    header = createDiv().id('header');
    header.child(createElement('h1', 'Aplikasi Surat Masuk & Keluar'));
  }

  let mainContent = select('#main-content');
  if (!mainContent) mainContent = createDiv().id('main-content');

  let controls = select('#controls');
  if (!controls) {
    controls = createDiv().id('controls');
    controls.child(createElement('h2', 'Buat & Kirim Surat'));
    letterContentInput = createElement('textarea').id('letter-content').attribute('placeholder', 'Tulis isi surat di sini...');
    controls.child(letterContentInput);
    controls.child(createButton('Surat Baru').id('new-letter-btn').mousePressed(createNewLetter));
    controls.child(createButton('Kirim Surat').id('send-letter-btn').mousePressed(sendLetter));
    controls.child(createButton('Terima Surat (Simulasi)').id('receive-letter-btn').mousePressed(receiveLetter));
  } else {
    // Jika #controls sudah ada, dapatkan referensi ke textarea
    letterContentInput = select('#letter-content');
    select('#new-letter-btn').mousePressed(createNewLetter);
    select('#send-letter-btn').mousePressed(sendLetter);
    select('#receive-letter-btn').mousePressed(receiveLetter);
  }

  let inboxContainer = select('#inbox-container');
  if (!inboxContainer) {
    inboxContainer = createDiv().id('inbox-container').addClass('letter-box-container');
    inboxContainer.child(createElement('h2', 'Surat Masuk'));
    inboxContainer.child(createDiv().id('inbox').addClass('letter-list'));
  }

  let outboxContainer = select('#outbox-container');
  if (!outboxContainer) {
    outboxContainer = createDiv().id('outbox-container').addClass('letter-box-container');
    outboxContainer.child(createElement('h2', 'Surat Keluar'));
    outboxContainer.child(createDiv().id('outbox').addClass('letter-list'));
  }

  // Pastikan semua kontainer ditambahkan ke main-content jika mereka baru
  if (!mainContent.child('#controls')) mainContent.child(controls);
  if (!mainContent.child('#inbox-container')) mainContent.child(inboxContainer);
  if (!mainContent.child('#outbox-container')) mainContent.child(outboxContainer);

  // Pastikan main-content ditambahkan ke app jika itu baru
  if (!app.child('#main-content')) app.child(mainContent);

  // Perbarui UI untuk menampilkan surat-surat awal
  updateUI();
}
Line-by-line explanation (7 lines)

🔧 Subcomponents:

function-call Disable p5.js Canvas noCanvas();

Tells p5.js not to create a graphics canvas since this is a DOM-only app

conditional Element Selection and Creation let app = select('#app'); if (!app) app = createDiv().id('app');

Checks if an element already exists in the HTML; if not, creates it dynamically for flexibility

conditional Controls Section Setup let controls = select('#controls'); if (!controls) { controls = createDiv().id('controls'); controls.child(createElement('h2', 'Buat & Kirim Surat')); letterContentInput = createElement('textarea').id('letter-content').attribute('placeholder', 'Tulis isi surat di sini...'); controls.child(letterContentInput); controls.child(createButton('Surat Baru').id('new-letter-btn').mousePressed(createNewLetter)); controls.child(createButton('Kirim Surat').id('send-letter-btn').mousePressed(sendLetter)); controls.child(createButton('Terima Surat (Simulasi)').id('receive-letter-btn').mousePressed(receiveLetter)); }

Creates the textarea input and three buttons, attaching callback functions to each button click

noCanvas();
Tells p5.js not to create a default drawing canvas because this app uses only DOM elements and HTML
let app = select('#app');
Searches the existing HTML for an element with id='app'; returns null if it doesn't exist
if (!app) app = createDiv().id('app');
If no #app element exists, creates a new div and assigns it the id 'app' for future reference
letterContentInput = createElement('textarea').id('letter-content').attribute('placeholder', 'Tulis isi surat di sini...');
Creates a textarea element, assigns it an id, adds placeholder text, and stores a reference in the global variable letterContentInput so other functions can read and clear it
controls.child(createButton('Surat Baru').id('new-letter-btn').mousePressed(createNewLetter));
Creates a button labeled 'Surat Baru', gives it an id, attaches the createNewLetter function to run when clicked, and adds it as a child of the controls container
if (!mainContent.child('#controls')) mainContent.child(controls);
Checks if the controls element is already a child of mainContent; if not, adds it to prevent duplicates
updateUI();
Calls the updateUI() function to render the current state of the inbox and outbox arrays to the screen
draw()

In a normal p5.js sketch, draw() runs 60 times per second and handles animation. In this sketch, draw() is empty because we are not drawing to a canvas—we are manipulating HTML elements instead. The interface updates only when buttons are clicked, not every frame. If you later added p5.js canvas graphics (like a visual representation of letters), you would add code here.

function draw() {
  // Fungsi draw() tidak aktif digunakan untuk grafis di sketsa ini
  // Ini bisa digunakan jika Anda menambahkan elemen p5.js canvas nanti
}
Line-by-line explanation (1 lines)
// Fungsi draw() tidak aktif digunakan untuk grafis di sketsa ini
This is a comment explaining that draw() is empty because the app is DOM-based, not canvas-based

createNewLetter()

This function is called when the 'Surat Baru' button is clicked. It is very simple: it empties the textarea and logs to the console. Notice how the function accesses the global letterContentInput variable to call .value() on it—this is why we stored a reference to the textarea in setup().

function createNewLetter() {
  letterContentInput.value('');
  console.log('Surat baru dibuat.');
}
Line-by-line explanation (2 lines)
letterContentInput.value('');
Clears the textarea by setting its value to an empty string, allowing the user to start typing a fresh letter
console.log('Surat baru dibuat.');
Prints a message to the browser console for debugging—helps you see that the button was clicked

sendLetter()

This function demonstrates the core pattern of state management in p5.js DOM apps: (1) read user input, (2) validate it, (3) add it to an array, (4) call updateUI() to sync the display with the data. Notice that Date.now() creates a unique id and new Date().toLocaleString() creates a human-friendly timestamp. Both are important for tracking and displaying letters properly.

🔬 This entire block controls what happens when the Send button is clicked. What happens if you remove the updateUI() line? Try it—the letter gets added to the array, but does the display update on screen?

  if (content) {
    // Tambahkan surat ke array outboxLetters
    outboxLetters.push({
      id: Date.now(), // ID unik berdasarkan timestamp
      content: content,
      timestamp: new Date().toLocaleString() // Waktu pengiriman
    });
    letterContentInput.value(''); // Kosongkan textarea setelah dikirim
    updateUI(); // Perbarui tampilan
    console.log('Surat dikirim:', content);
  } else {
    alert('Isi surat tidak boleh kosong!');
  }
function sendLetter() {
  let content = letterContentInput.value().trim(); // Ambil isi surat dan hapus spasi kosong
  if (content) {
    // Tambahkan surat ke array outboxLetters
    outboxLetters.push({
      id: Date.now(), // ID unik berdasarkan timestamp
      content: content,
      timestamp: new Date().toLocaleString() // Waktu pengiriman
    });
    letterContentInput.value(''); // Kosongkan textarea setelah dikirim
    updateUI(); // Perbarui tampilan
    console.log('Surat dikirim:', content);
  } else {
    alert('Isi surat tidak boleh kosong!');
  }
}
Line-by-line explanation (8 lines)

🔧 Subcomponents:

conditional Content Validation if (content) {

Checks that the textarea is not empty before creating and sending a letter

calculation Letter Object Creation outboxLetters.push({ id: Date.now(), // ID unik berdasarkan timestamp content: content, timestamp: new Date().toLocaleString() // Waktu pengiriman });

Creates a letter object with a unique timestamp-based id, the letter content, and a human-readable timestamp, then adds it to the outboxLetters array

let content = letterContentInput.value().trim();
Reads the text from the textarea using .value(), then .trim() removes leading and trailing whitespace so the user can't send a letter with only spaces
if (content) {
Checks if content is truthy (not empty); only executes the code block if the user actually typed something
outboxLetters.push({
Adds a new object to the outboxLetters array using the .push() method
id: Date.now(),
Creates a unique identifier using the current timestamp in milliseconds—useful if you later want to delete or edit specific letters
timestamp: new Date().toLocaleString()
Converts the current date and time to a human-readable string using the user's local format (e.g., '12/15/2024, 3:45:30 PM')
letterContentInput.value('');
Clears the textarea after the letter is sent so the user knows it worked and can start typing a new one
updateUI();
Calls updateUI() to refresh the outbox display immediately—the new letter appears on screen within milliseconds
} else { alert('Isi surat tidak boleh kosong!'); }
If the textarea is empty, shows a popup alert to the user telling them the letter content cannot be empty

receiveLetter()

This function simulates receiving an email by randomly picking a sample letter from an array and adding it to inboxLetters. It uses random() and floor() to pick a random index—a common p5.js pattern. The structure mirrors sendLetter(): create an object with id, content, and timestamp, push it into an array, call updateUI(). In a real app, this function might fetch messages from a server instead of using a hardcoded array.

🔬 This array holds all the simulated letters. Try adding your own letter text to this list—just add a comma after the last item and type a new string. What happens when you click Receive Letter again?

  let simulatedLetters = [
    "Selamat atas proyek baru Anda!",
    "Rapat tim dijadwalkan ulang besok jam 10 pagi.",
    "Pemberitahuan: Pemeliharaan sistem akan dilakukan malam ini.",
    "Halo, bagaimana kabar Anda hari ini?",
    "Mohon tinjau dokumen terlampir.",
    "Jangan lupa untuk menyerahkan laporan bulanan.",
    "Informasi terbaru mengenai kebijakan perusahaan.",
    "Undangan makan siang bersama tim.",
    "Pertanyaan mengenai jadwal pertemuan.",
    "Konfirmasi penerimaan dokumen."
  ];
function receiveLetter() {
  // Contoh isi surat simulasi
  let simulatedLetters = [
    "Selamat atas proyek baru Anda!",
    "Rapat tim dijadwalkan ulang besok jam 10 pagi.",
    "Pemberitahuan: Pemeliharaan sistem akan dilakukan malam ini.",
    "Halo, bagaimana kabar Anda hari ini?",
    "Mohon tinjau dokumen terlampir.",
    "Jangan lupa untuk menyerahkan laporan bulanan.",
    "Informasi terbaru mengenai kebijakan perusahaan.",
    "Undangan makan siang bersama tim.",
    "Pertanyaan mengenai jadwal pertemuan.",
    "Konfirmasi penerimaan dokumen."
  ];
  // Pilih isi surat secara acak
  let randomContent = simulatedLetters[floor(random(simulatedLetters.length))];

  // Tambahkan surat ke array inboxLetters
  inboxLetters.push({
    id: Date.now(),
    content: randomContent,
    timestamp: new Date().toLocaleString() // Waktu penerimaan
  });
  updateUI(); // Perbarui tampilan
  console.log('Surat diterima:', randomContent);
}
Line-by-line explanation (4 lines)

🔧 Subcomponents:

calculation Simulated Letters Array let simulatedLetters = [ "Selamat atas proyek baru Anda!", "Rapat tim dijadwalkan ulang besok jam 10 pagi.", "Pemberitahuan: Pemeliharaan sistem akan dilakukan malam ini.", "Halo, bagaimana kabar Anda hari ini?", "Mohon tinjau dokumen terlampir.", "Jangan lupa untuk menyerahkan laporan bulanan.", "Informasi terbaru mengenai kebijakan perusahaan.", "Undangan makan siang bersama tim.", "Pertanyaan mengenai jadwal pertemuan.", "Konfirmasi penerimaan dokumen." ];

Creates an array of 10 example letter texts that will be randomly selected when the user clicks Receive Letter

calculation Random Letter Selection let randomContent = simulatedLetters[floor(random(simulatedLetters.length))];

Picks a random index between 0 and 9, then uses it to select a random letter from the array

let simulatedLetters = [
Creates a local array containing 10 example letter texts to simulate incoming mail
let randomContent = simulatedLetters[floor(random(simulatedLetters.length))];
random(simulatedLetters.length) produces a decimal between 0 and 10; floor() rounds it down to 0-9; then we use that as an index to pick one of the 10 letters
inboxLetters.push({
Adds a new letter object to the inboxLetters array (received mail, not sent)
updateUI();
Refreshes the display so the new received letter appears in the inbox immediately

updateUI()

updateUI() is the heart of this app—it synchronizes the DOM display with the data in the inboxLetters and outboxLetters arrays. Every time a letter is sent or received, this function is called to re-render everything from scratch. This pattern is called 'reactive rendering' and is fundamental to modern web apps. Notice how it handles the empty state: if an array has no letters, it shows a placeholder message instead of blank space. The template literals (backticks with ${}) make it easy to mix HTML with JavaScript variables.

🔬 This loop creates a div for each letter in inboxLetters. What happens if you add another line to display letter.id alongside the timestamp? Try inserting a new <p> tag that shows the id.

    for (let letter of inboxLetters) {
      let letterItem = createDiv().addClass('letter-item');
      letterItem.html(`
        <p><strong>Diterima:</strong> ${letter.timestamp}</p>
        <p>${letter.content}</p>
      `);
      inboxDiv.child(letterItem);
    }
function updateUI() {
  let inboxDiv = select('#inbox');
  let outboxDiv = select('#outbox');

  // Kosongkan tampilan saat ini
  inboxDiv.html('');
  outboxDiv.html('');

  // Tampilkan surat masuk
  if (inboxLetters.length === 0) {
    inboxDiv.html('<p>Kotak masuk kosong.</p>');
  } else {
    for (let letter of inboxLetters) {
      let letterItem = createDiv().addClass('letter-item');
      letterItem.html(`
        <p><strong>Diterima:</strong> ${letter.timestamp}</p>
        <p>${letter.content}</p>
      `);
      inboxDiv.child(letterItem);
    }
  }

  // Tampilkan surat keluar
  if (outboxLetters.length === 0) {
    outboxDiv.html('<p>Kotak keluar kosong.</p>');
  } else {
    for (let letter of outboxLetters) {
      let letterItem = createDiv().addClass('letter-item');
      letterItem.html(`
        <p><strong>Dikirim:</strong> ${letter.timestamp}</p>
        <p>${letter.content}</p>
      `);
      outboxDiv.child(letterItem);
    }
  }
}
Line-by-line explanation (8 lines)

🔧 Subcomponents:

calculation Select Display Containers let inboxDiv = select('#inbox'); let outboxDiv = select('#outbox');

Finds the HTML elements where letters will be displayed

calculation Clear Previous Display inboxDiv.html(''); outboxDiv.html('');

Empties both containers so old letters don't duplicate when re-rendering

conditional Inbox Rendering if (inboxLetters.length === 0) { inboxDiv.html('<p>Kotak masuk kosong.</p>'); } else { for (let letter of inboxLetters) { let letterItem = createDiv().addClass('letter-item'); letterItem.html(` <p><strong>Diterima:</strong> ${letter.timestamp}</p> <p>${letter.content}</p> `); inboxDiv.child(letterItem); } }

Loops through all received letters and creates a div for each one, or shows an empty message if there are none

conditional Outbox Rendering if (outboxLetters.length === 0) { outboxDiv.html('<p>Kotak keluar kosong.</p>'); } else { for (let letter of outboxLetters) { let letterItem = createDiv().addClass('letter-item'); letterItem.html(` <p><strong>Dikirim:</strong> ${letter.timestamp}</p> <p>${letter.content}</p> `); outboxDiv.child(letterItem); } }

Loops through all sent letters and creates a div for each one, or shows an empty message if there are none

let inboxDiv = select('#inbox');
Finds the HTML div with id='inbox' where received letters will be displayed
inboxDiv.html('');
Clears the inbox div by setting its inner HTML to an empty string—removes all previous letters from display
if (inboxLetters.length === 0) {
Checks if the inbox array is empty (has zero letters)
inboxDiv.html('<p>Kotak masuk kosong.</p>');
If the inbox is empty, displays the message 'Kotak masuk kosong' to let the user know there are no letters
for (let letter of inboxLetters) {
Loops through every letter object in the inboxLetters array, processing each one
let letterItem = createDiv().addClass('letter-item');
Creates a new div element and adds the CSS class 'letter-item' so it gets styled from style.css
letterItem.html(` <p><strong>Diterima:</strong> ${letter.timestamp}</p> <p>${letter.content}</p> `);
Uses a template literal with backticks to insert the letter's timestamp and content into HTML, showing when it was received and what it says
inboxDiv.child(letterItem);
Adds the letterItem div as a child of inboxDiv so it appears on screen

windowResized()

p5.js automatically calls windowResized() whenever the browser window is resized. In canvas-based sketches, you would call resizeCanvas() here to redraw everything at the new size. In this DOM-based app, the CSS flexbox layout handles resizing automatically, so windowResized() is not needed. It is left empty as a placeholder in case you later add p5.js canvas graphics to the sketch.

function windowResized() {
  // Untuk aplikasi berbasis DOM dengan flexbox, windowResized() mungkin tidak perlu
  // karena layout akan menyesuaikan secara otomatis.
  // Jika ada elemen p5.js canvas, resizeCanvas() akan ditempatkan di sini.
}
Line-by-line explanation (1 lines)
// Untuk aplikasi berbasis DOM dengan flexbox, windowResized() mungkin tidak perlu
This comment explains that windowResized() is empty because the CSS uses flexbox, which automatically adapts to window size

📦 Key Variables

inboxLetters array

Stores all received letters as objects with id, content, and timestamp properties

let inboxLetters = [];
outboxLetters array

Stores all sent letters as objects with id, content, and timestamp properties

let outboxLetters = [];
letterContentInput object

Holds a reference to the textarea DOM element so other functions can read and clear the user's input

let letterContentInput;

🔧 Potential Improvements (5)

Here are some ways this code could be enhanced:

FEATURE updateUI()

No way to delete or reply to letters—they accumulate indefinitely

💡 Add a delete button to each letter div with an onclick handler that filters the letter out of the array and calls updateUI()

STYLE sendLetter() and receiveLetter()

Both functions duplicate the letter creation logic (id, content, timestamp properties)

💡 Extract a helper function createLetterObject(content) that returns the object, then call it from both sendLetter() and receiveLetter()

FEATURE setup()

All data (inboxLetters and outboxLetters) is lost if the user refreshes the page

💡 Use localStorage to save the arrays: localStorage.setItem('inbox', JSON.stringify(inboxLetters)) after each update, and load them in setup() with JSON.parse()

BUG setup()

The condition if (!mainContent.child('#controls')) uses an undefined method—p5.js div objects don't have a .child() method that returns a boolean

💡 Use select() instead: if (!select('#controls')) to safely check if an element exists

PERFORMANCE updateUI()

The entire DOM is cleared and re-rendered every time, even if only one letter was added—wasteful for large lists

💡 Instead of clearing and rebuilding, use a virtual DOM approach or only add the new letter div to the existing list

🔄 Code Flow

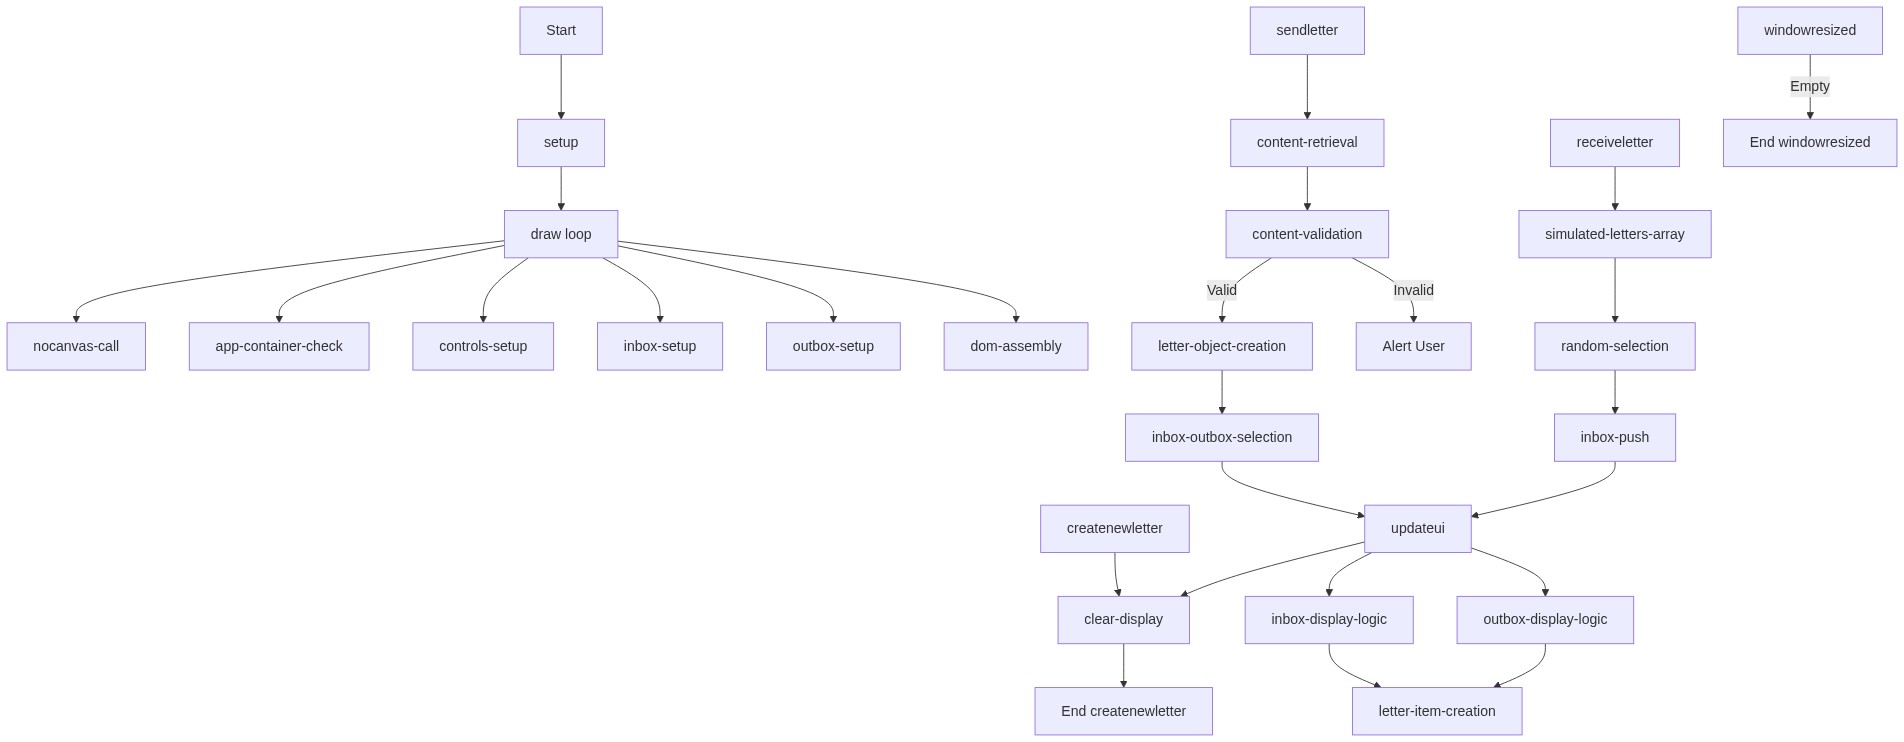
Code flow showing setup, draw, createnewletter, sendletter, receiveletter, updateui, windowresized

💡 Click on function names in the diagram to jump to their code

graph TD start[Start] --> setup[setup] setup --> draw[draw loop] draw --> nocanvas-setup[nocanvas-setup] draw --> element-selection[element-selection] draw --> controls-setup[controls-setup] click setup href "#fn-setup" click draw href "#fn-draw" click nocanvas-setup href "#sub-nocanvas-setup" click element-selection href "#sub-element-selection" click controls-setup href "#sub-controls-setup" controls-setup --> createnewletter[createnewletter] controls-setup --> sendletter[sendletter] controls-setup --> receiveletter[receiveletter] createnewletter --> clear-display[clear-display] createnewletter --> log[Log to Console] click createnewletter href "#fn-createnewletter" click clear-display href "#sub-clear-display" sendletter --> validation-check[validation-check] validation-check -->|Valid| letter-object-creation[letter-object-creation] letter-object-creation --> updateui[updateui] click sendletter href "#fn-sendletter" click validation-check href "#sub-validation-check" click letter-object-creation href "#sub-letter-object-creation" click updateui href "#fn-updateui" receiveletter --> simulated-letters-array[simulated-letters-array] simulated-letters-array --> random-selection[random-selection] random-selection --> updateui click receiveletter href "#fn-receiveletter" click simulated-letters-array href "#sub-simulated-letters-array" click random-selection href "#sub-random-selection" updateui --> select-containers[select-containers] updateui --> clear-display updateui --> inbox-rendering[inbox-rendering] updateui --> outbox-rendering[outbox-rendering] click select-containers href "#sub-select-containers" click inbox-rendering href "#sub-inbox-rendering" click outbox-rendering href "#sub-outbox-rendering" draw --> windowresized[windowresized] click windowresized href "#fn-windowresized"

❓ Frequently Asked Questions

What visual elements are presented in the p5.js sketch titled 'Sketch 2026-02-21 12:35'?

The sketch features a simple user interface for managing letters, including sections for incoming and outgoing letters, and interactive buttons for creating and sending letters.

How can users interact with the letter management application in this sketch?

Users can write letters in a textarea, create new letters, send them, and simulate receiving letters through interactive buttons.

What creative coding concepts does this p5.js sketch exemplify?

This sketch demonstrates DOM manipulation and event handling in p5.js, showcasing how to create an interactive web application without relying on a traditional canvas.

Preview

Aplikasi Surat Masuk & Keluar - p5.js creative coding sketch preview
Sketch Preview
Code flow diagram showing the structure of Aplikasi Surat Masuk & Keluar - Code flow showing setup, draw, createnewletter, sendletter, receiveletter, updateui, windowresized
Code Flow Diagram