backrooms

This sketch creates an immersive 3D backrooms-style exploration game where you navigate a procedurally-generated maze while being hunted by a monster. The game combines Three.js 3D rendering, a recursive backtracking maze algorithm, and Tone.js audio for an atmospheric horror experience.

🧪 Try This!

Experiment with the code by making these changes:

  1. Make the maze bigger and more complex — Increase MAZE_SIZE to generate a larger N×N grid with more twists and turns—the game will be harder to complete.
  2. Speed up the monster hunt — Double the MONSTER_SPEED so the creature closes distance faster and is more challenging.
  3. Make the monster detect you from farther away — Increase MONSTER_VIEW_DISTANCE so the monster spots and hunts you sooner, giving less time to hide.
  4. Change the wall color to bright red — Replace the dark blue-grey wall material with a bright red to create an eerie red-tinted maze.
  5. Make the background white instead of black — Change the scene background from almost-black to white, creating an unsettling bright maze instead of dark.
  6. Move the monster's starting position farther away — Change MONSTER_GROWL_DISTANCE to delay when you first hear the monster, building more suspense.
Prefer the full editor? Open it there →

📖 About This Sketch

This sketch builds a fully-realized first-person 3D game inspired by the creepy 'backrooms' internet phenomenon. You spawn in a procedurally-generated maze and must find the glowing green exit before a red monster hunts you down. The visuals use Three.js for 3D rendering (walls, floor, ceiling, and meshes), the maze is carved using recursive backtracking, the monster hunts using breadth-first-search pathfinding, and Tone.js generates unsettling ambient music and monster growls that trigger when danger is near.

The code is organized around game state management ('start', 'playing', 'caught', 'escaped'), player movement with collision detection, monster AI that pathfinds toward the player, and audio cues that reinforce atmosphere. By studying it you will learn how to integrate three major libraries (Three.js, Tone.js, p5.js), implement procedural level generation, build an AI opponent that can pathfind through complex environments, and handle complex game state and input management.

⚙️ How It Works

  1. When the sketch loads, preload() generates a new maze using recursive backtracking and initializes Tone.js synthesizers. A minimal p5 canvas is created, then Three.js scene, camera, renderer, lighting, and geometry are set up—walls, floor, and ceiling are created from the maze data, and the player and monster are placed as meshes.
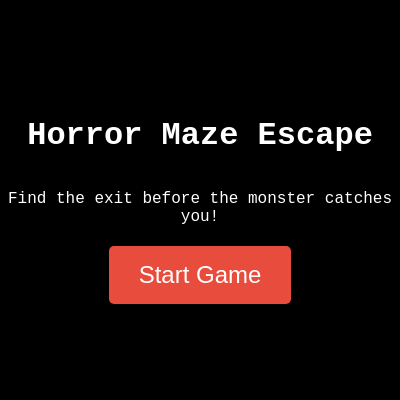
  2. The start screen displays an overlay with a 'Start Game' button. Clicking it transitions the game state to 'playing', hides the overlay, locks the mouse pointer, and begins the draw loop.
  3. Every frame, draw() updates player movement: WASD keys control forward/backward/left/right, and the mouse controls camera look direction. The player's new position is collision-checked against maze walls before being applied, preventing walking through walls.
  4. The monster AI runs updateMonster() each frame: if the player is within view distance, the monster calculates a pathfinding path to the player using BFS and follows it. When the player is close enough, a growl sound plays and loops.
  5. Every frame, checkGameOver() tests two end conditions: if the monster gets close enough, the game over screen appears with a loss message; if the player reaches the exit cell, the game shows an escape message.
  6. The overlay, crosshair, pointer lock state, and key handlers all integrate to create a seamless first-person experience—pressing ESC releases the mouse so you can click the button to restart or quit.

🎓 Concepts You'll Learn

Three.js 3D scene, camera, and renderingProcedural maze generation (recursive backtracking)Pathfinding algorithms (breadth-first search / BFS)Collision detection in 3D spaceGame state machinesPointer lock and first-person controlsTone.js audio synthesis and playbackMonster AI behavior

📝 Code Breakdown

preload()

preload() runs before setup() and is the perfect place to load assets and pre-compute expensive operations like maze generation. Tone.js instruments must be created before Tone.start() is called, which happens when the user interacts with the page.

function preload() {
  ambientSynth = new Tone.PolySynth(Tone.Synth, {
    oscillator: {
      type: "sawtooth"
    },
    envelope: {
      attack: 2,
      decay: 1,
      sustain: 1,
      release: 2
    },
    volume: -15
  }).toDestination();

  monsterGrowl = new Tone.Player({
    url: "https://p5js.org/assets/files/sound/monster.mp3",
    volume: -10,
    playbackRate: 0.8
  }).toDestination();

  mazeData = generateMaze(MAZE_SIZE, MAZE_SIZE);
  playerPosGrid = mazeData.playerStart;
  monsterPosGrid = mazeData.monsterStart;
  exitPosGrid = mazeData.exitPos;
}
Line-by-line explanation (6 lines)

🔧 Subcomponents:

calculation Ambient Synth Configuration ambientSynth = new Tone.PolySynth(Tone.Synth, { oscillator: { type: "sawtooth" }, envelope: { attack: 2, decay: 1, sustain: 1, release: 2 }, volume: -15 }).toDestination();

Creates a synthesizer that plays unsettling chords with a slow, eerie envelope—the 2-second attack makes notes fade in spookily

calculation Monster Growl Player monsterGrowl = new Tone.Player({ url: "https://p5js.org/assets/files/sound/monster.mp3", volume: -10, playbackRate: 0.8 }).toDestination();

Loads a sound file and slows it down (0.8x speed) to make it sound more menacing and low-pitched

calculation Maze Procedural Generation mazeData = generateMaze(MAZE_SIZE, MAZE_SIZE);

Generates the entire maze structure, player start position, monster start position, and exit location before setup() runs

ambientSynth = new Tone.PolySynth(Tone.Synth, {...}).toDestination();
Creates a polyphonic synthesizer (can play multiple notes at once) with a sawtooth oscillator and a slow envelope (2 seconds to attack, fade, sustain, and release). The -15 volume keeps it quiet so it doesn't overwhelm other sounds.
monsterGrowl = new Tone.Player({...}).toDestination();
Loads an audio file from a URL and plays it through Tone's audio graph. The playbackRate of 0.8 stretches the sound slower, making it deeper and more threatening.
mazeData = generateMaze(MAZE_SIZE, MAZE_SIZE);
Calls the maze generation function before p5's setup() to pre-compute the level. This must happen early so setup() can use the maze data to create 3D geometry.
playerPosGrid = mazeData.playerStart;
Stores the player's starting grid position (row and column) so setup() can place the camera there.
monsterPosGrid = mazeData.monsterStart;
Stores the monster's starting grid position so setup() can create the monster mesh in the right spot.
exitPosGrid = mazeData.exitPos;
Stores the exit's grid position so the game can check if the player reaches it and wins.
setup()

setup() initializes both p5 and Three.js, creating the 3D world, camera, lighting, materials, and meshes. Since Three.js does not integrate directly with p5, we create a tiny p5 canvas just to use p5's utility functions (like select() and createButton()), then append the Three.js renderer canvas to the page manually.

function setup() {
  createCanvas(1, 1);

  scene = new THREE.Scene();
  scene.background = new THREE.Color(0x0a0a0a);

  camera = new THREE.PerspectiveCamera(75, windowWidth / windowHeight, 0.1, 1000);
  camera.position.set(
    playerPosGrid.c * CELL_SIZE + CELL_SIZE / 2,
    PLAYER_HEIGHT / 2,
    playerPosGrid.r * CELL_SIZE + CELL_SIZE / 2
  );

  renderer = new THREE.WebGLRenderer({ antialias: true });
  renderer.setSize(windowWidth, windowHeight);
  select('body').elt.appendChild(renderer.domElement);

  const ambientLight = new THREE.AmbientLight(0x404040);
  scene.add(ambientLight);

  const directionalLight = new THREE.DirectionalLight(0xffffff, 0.5);
  directionalLight.position.set(1, 1, 0);
  scene.add(directionalLight);

  cubeGeometry = new THREE.BoxGeometry(CELL_SIZE, WALL_HEIGHT, CELL_SIZE);
  wallMaterial = new THREE.MeshPhongMaterial({ color: 0x2c3e50 });
  floorMaterial = new THREE.MeshPhongMaterial({ color: 0x1a1a1a });
  ceilingMaterial = new THREE.MeshPhongMaterial({ color: 0x1a1a1a });
  monsterMaterial = new THREE.MeshPhongMaterial({ color: 0xe74c3c });
  exitMaterial = new THREE.MeshPhongMaterial({ color: 0x27ae60, emissive: 0x27ae60, emissiveIntensity: 0.5 });

  createMazeGeometry(mazeData.maze);
  createFloorCeiling(mazeData.maze);

  playerMesh = new THREE.Mesh(new THREE.CylinderGeometry(CELL_SIZE / 4, CELL_SIZE / 4, PLAYER_HEIGHT, 16), new THREE.MeshBasicMaterial({ color: 0x00ff00, transparent: true, opacity: 0 }));
  playerMesh.position.copy(camera.position);
  scene.add(playerMesh);

  monsterMesh = new THREE.Mesh(new THREE.CylinderGeometry(CELL_SIZE / 3, CELL_SIZE / 3, MONSTER_HEIGHT, 16), monsterMaterial);
  monsterMesh.position.set(
    monsterPosGrid.c * CELL_SIZE + CELL_SIZE / 2,
    MONSTER_HEIGHT / 2,
    monsterPosGrid.r * CELL_SIZE + CELL_SIZE / 2
  );
  scene.add(monsterMesh);

  overlay = select('#game-overlay');
  crosshair = select('#crosshair');
  startButton = createButton('Start Game');
  startButton.parent(overlay);
  startButton.mouseClicked(startGame);

  Tone.start().then(() => {
    audioLoaded = true;
    console.log("Audio context started.");
  });
}
Line-by-line explanation (20 lines)

🔧 Subcomponents:

calculation Three.js Scene Initialization scene = new THREE.Scene(); scene.background = new THREE.Color(0x0a0a0a);

Creates the 3D scene and sets its background to almost black (0x0a0a0a) for an eerie atmosphere

calculation Camera Position and Properties camera = new THREE.PerspectiveCamera(75, windowWidth / windowHeight, 0.1, 1000); camera.position.set( playerPosGrid.c * CELL_SIZE + CELL_SIZE / 2, PLAYER_HEIGHT / 2, playerPosGrid.r * CELL_SIZE + CELL_SIZE / 2 );

Creates a camera with a 75-degree field of view and positions it at the player's starting location in the maze

calculation Scene Lighting const ambientLight = new THREE.AmbientLight(0x404040); scene.add(ambientLight); const directionalLight = new THREE.DirectionalLight(0xffffff, 0.5); directionalLight.position.set(1, 1, 0); scene.add(directionalLight);

Adds two lights: ambient light for overall brightness and a directional light for shadows and depth

calculation Material Definitions wallMaterial = new THREE.MeshPhongMaterial({ color: 0x2c3e50 }); floorMaterial = new THREE.MeshPhongMaterial({ color: 0x1a1a1a }); ceilingMaterial = new THREE.MeshPhongMaterial({ color: 0x1a1a1a }); monsterMaterial = new THREE.MeshPhongMaterial({ color: 0xe74c3c }); exitMaterial = new THREE.MeshPhongMaterial({ color: 0x27ae60, emissive: 0x27ae60, emissiveIntensity: 0.5 });

Defines how walls, floor, ceiling, monster, and exit look—the exit glows green because it has an emissive color

calculation Invisible Player Mesh playerMesh = new THREE.Mesh(new THREE.CylinderGeometry(CELL_SIZE / 4, CELL_SIZE / 4, PLAYER_HEIGHT, 16), new THREE.MeshBasicMaterial({ color: 0x00ff00, transparent: true, opacity: 0 }));

Creates an invisible cylinder mesh to represent the player for collision and distance checks (opacity 0 hides it)

createCanvas(1, 1);
Creates a tiny 1×1 p5 canvas just to initialize p5's DOM system—Three.js handles all the actual 3D rendering
scene = new THREE.Scene();
Creates the 3D world where all Three.js objects live
scene.background = new THREE.Color(0x0a0a0a);
Sets the background to a very dark grey (almost black) for a spooky atmosphere
camera = new THREE.PerspectiveCamera(75, windowWidth / windowHeight, 0.1, 1000);
Creates a camera with 75-degree field of view, proper aspect ratio, and renders objects from 0.1 to 1000 units away
camera.position.set(...playerPosGrid.c * CELL_SIZE..., PLAYER_HEIGHT / 2, ...playerPosGrid.r * CELL_SIZE...);
Places the camera at the player's starting grid position, centered in a cell and at eye height
renderer = new THREE.WebGLRenderer({ antialias: true });
Creates the WebGL renderer that draws the 3D scene—antialias smooths jagged edges
renderer.setSize(windowWidth, windowHeight);
Makes the Three.js canvas fill the entire window
select('body').elt.appendChild(renderer.domElement);
Uses p5's select() to find the HTML body and append the Three.js canvas to it
const ambientLight = new THREE.AmbientLight(0x404040);
Creates a soft ambient light so every surface has some brightness (0x404040 is dark grey, keeps atmosphere gloomy)
const directionalLight = new THREE.DirectionalLight(0xffffff, 0.5);
Creates a light source (like the sun) that shines from a direction, creating shadows and depth
cubeGeometry = new THREE.BoxGeometry(CELL_SIZE, WALL_HEIGHT, CELL_SIZE);
Defines the 3D shape of a wall cube—all walls share this geometry to save memory
wallMaterial = new THREE.MeshPhongMaterial({ color: 0x2c3e50 });
Creates a dark blue-grey material for walls—the Phong material reflects light naturally
exitMaterial = new THREE.MeshPhongMaterial({ color: 0x27ae60, emissive: 0x27ae60, emissiveIntensity: 0.5 });
Creates a glowing green material for the exit—the emissive property makes it glow even in dark areas
createMazeGeometry(mazeData.maze);
Calls a helper function to create 3D wall meshes from the maze data
createFloorCeiling(mazeData.maze);
Calls a helper function to create the floor and ceiling planes
playerMesh = new THREE.Mesh(new THREE.CylinderGeometry(...), new THREE.MeshBasicMaterial({ ...opacity: 0 }));
Creates an invisible cylinder to represent the player—used for collision and distance checks but never seen
monsterMesh = new THREE.Mesh(new THREE.CylinderGeometry(CELL_SIZE / 3, CELL_SIZE / 3, MONSTER_HEIGHT, 16), monsterMaterial);
Creates a visible red cylinder representing the monster, taller than the walls so it stands out
overlay = select('#game-overlay');
Uses p5's select() to grab the HTML element with id 'game-overlay' for later manipulation
startButton = createButton('Start Game');
Creates a p5 button that the player will click to begin
Tone.start().then(() => { audioLoaded = true; });
Tells Tone.js to initialize its audio system when ready; browser security requires user interaction first

startGame()

startGame() is the gateway from the menu to active gameplay. It transitions all three layers: game state, UI visibility, and the draw loop. The pointer lock is essential for immersive first-person control.

function startGame() {
  if (!audioLoaded) {
    console.warn("Audio context not yet started. Click again.");
    return;
  }
  gameState = 'playing';
  overlay.addClass('hidden');
  crosshair.addClass('active');
  requestPointerLock();
  playAmbientMusic();
  loop();
}
Line-by-line explanation (7 lines)

🔧 Subcomponents:

conditional Audio Ready Check if (!audioLoaded) { console.warn("Audio context not yet started. Click again."); return; }

Ensures Tone.js has initialized before starting music; returns early if not ready

calculation Game State Change gameState = 'playing';

Transitions the game from 'start' to 'playing' so the draw loop begins animating the game

calculation UI and Control Setup overlay.addClass('hidden'); crosshair.addClass('active'); requestPointerLock(); playAmbientMusic(); loop();

Hides the start overlay, shows the crosshair, locks the mouse to the window, plays music, and resumes the draw loop

if (!audioLoaded) {
Checks if the Tone.js audio context is ready; browser security delays this until user interaction
gameState = 'playing';
Changes the global game state so draw() knows to animate the game instead of waiting for input
overlay.addClass('hidden');
Adds the 'hidden' CSS class to the overlay, fading it out and hiding it from view
crosshair.addClass('active');
Adds the 'active' CSS class to the crosshair, making it visible in the center of the screen
requestPointerLock();
Locks the mouse cursor to the game window so you can look around without moving the cursor off-screen
playAmbientMusic();
Starts playing the eerie ambient chord progression
loop();
Resumes the p5 draw loop so the game animates (it was stopped by noLoop() during the start screen)

draw()

draw() is the heartbeat of the game—it runs 60 times per second. Every frame it processes input, calculates movement, checks collisions, updates the monster AI, and renders the scene. The collision detection using maze grid cells is more efficient than checking every possible wall mesh.

🔬 These four lines handle all input. What happens if you change PLAYER_SPEED to PLAYER_SPEED * 2 in each line? How much faster does the player move?

  if (moveForward) deltaZ -= PLAYER_SPEED;
  if (moveBackward) deltaZ += PLAYER_SPEED;
  if (moveLeft) deltaX -= PLAYER_SPEED;
  if (moveRight) deltaX += PLAYER_SPEED;
function draw() {
  if (gameState === 'start') {
    noLoop();
    return;
  }

  const direction = new THREE.Vector3();
  camera.getWorldDirection(direction);
  direction.y = 0;
  direction.normalize();

  const right = new THREE.Vector3();
  right.crossVectors(direction, camera.up).normalize();

  let deltaX = 0;
  let deltaZ = 0;

  if (moveForward) deltaZ -= PLAYER_SPEED;
  if (moveBackward) deltaZ += PLAYER_SPEED;
  if (moveLeft) deltaX -= PLAYER_SPEED;
  if (moveRight) deltaX += PLAYER_SPEED;

  const moveVector = new THREE.Vector3();
  moveVector.addScaledVector(direction, deltaZ);
  moveVector.addScaledVector(right, deltaX);

  if (moveVector.length() > 0) {
    const newPlayerX = camera.position.x + moveVector.x;
    const newPlayerZ = camera.position.z + moveVector.z;

    const currentCell = {
      c: Math.floor(camera.position.x / CELL_SIZE),
      r: Math.floor(camera.position.z / CELL_SIZE)
    };
    const nextCell = {
      c: Math.floor(newPlayerX / CELL_SIZE),
      r: Math.floor(newPlayerZ / CELL_SIZE)
    };

    if (mazeData.maze[nextCell.r][nextCell.c] !== 1) {
      camera.position.x = newPlayerX;
      camera.position.z = newPlayerZ;
      playerMesh.position.copy(camera.position);
    } else {
      const newPlayerXOnly = camera.position.x + moveVector.x;
      const newPlayerZOnly = camera.position.z + moveVector.z;

      if (mazeData.maze[currentCell.r][Math.floor(newPlayerXOnly / CELL_SIZE)] !== 1) {
        camera.position.x = newPlayerXOnly;
      }
      if (mazeData.maze[Math.floor(newPlayerZOnly / CELL_SIZE)][currentCell.c] !== 1) {
        camera.position.z = newPlayerZOnly;
      }
      playerMesh.position.copy(camera.position);
    }
  }

  playerPosGrid = {
    c: Math.floor(camera.position.x / CELL_SIZE),
    r: Math.floor(camera.position.z / CELL_SIZE)
  };

  updateMonster();

  checkGameOver();

  renderer.render(scene, camera);
}
Line-by-line explanation (19 lines)

🔧 Subcomponents:

conditional Game State Guard if (gameState === 'start') { noLoop(); return; }

Stops the draw loop if the game hasn't started yet, preventing animation before the player clicks Start

calculation Calculate Forward Direction const direction = new THREE.Vector3(); camera.getWorldDirection(direction); direction.y = 0; direction.normalize();

Gets the direction the camera is facing and flattens it to the horizontal plane for movement (y=0 prevents up/down drift)

calculation Calculate Right Direction const right = new THREE.Vector3(); right.crossVectors(direction, camera.up).normalize();

Uses a cross product to calculate the rightward direction perpendicular to where the camera is facing

conditional Movement Input Handling if (moveForward) deltaZ -= PLAYER_SPEED; if (moveBackward) deltaZ += PLAYER_SPEED; if (moveLeft) deltaX -= PLAYER_SPEED; if (moveRight) deltaX += PLAYER_SPEED;

Checks key flags set by onKeyDown/onKeyUp and accumulates movement deltas for forward/backward and left/right

conditional Wall Collision Detection if (mazeData.maze[nextCell.r][nextCell.c] !== 1) { camera.position.x = newPlayerX; camera.position.z = newPlayerZ; playerMesh.position.copy(camera.position); } else { // Slide movement }

Checks if the next cell is a wall (1 = wall, 0 = path); if clear, moves the player; if blocked, tries sliding along one axis

if (gameState === 'start') { noLoop(); return; }
Checks if the game has started; if not, stops the draw loop and exits early to avoid animating the game before the player is ready
const direction = new THREE.Vector3();
Creates a vector to store the direction the camera (player) is facing
camera.getWorldDirection(direction);
Retrieves the direction the camera is pointing in 3D space and stores it in the direction vector
direction.y = 0;
Flattens the direction vector to the ground plane so movement doesn't drift up or down when you look up or down
direction.normalize();
Scales the direction vector to length 1 so that multiplication by PLAYER_SPEED gives consistent movement speed
const right = new THREE.Vector3(); right.crossVectors(direction, camera.up).normalize();
Uses the cross product of forward and up vectors to calculate the rightward direction perpendicular to where you're facing
if (moveForward) deltaZ -= PLAYER_SPEED;
If the W key is pressed, accumulates negative deltaZ (moving forward in the forward direction)
const moveVector = new THREE.Vector3(); moveVector.addScaledVector(direction, deltaZ); moveVector.addScaledVector(right, deltaX);
Combines forward and right movement vectors into one vector—this lets you move diagonally smoothly
if (moveVector.length() > 0) {
Only processes collision checks if the player is actually trying to move (avoids unnecessary calculations)
const currentCell = { c: Math.floor(camera.position.x / CELL_SIZE), r: Math.floor(camera.position.z / CELL_SIZE) };
Converts the camera's continuous 3D position into discrete grid coordinates (which cell of the maze are you in)
const nextCell = { c: Math.floor(newPlayerX / CELL_SIZE), r: Math.floor(newPlayerZ / CELL_SIZE) };
Calculates which grid cell you would be in if you moved to the new position
if (mazeData.maze[nextCell.r][nextCell.c] !== 1) {
Checks the maze data: if the next cell is not a wall (!== 1, so it's 0 or 2), the movement is allowed
camera.position.x = newPlayerX; camera.position.z = newPlayerZ;
Updates the camera position (and thus the player) to the new location
playerMesh.position.copy(camera.position);
Syncs the invisible player mesh with the camera position so collision checks with the monster are accurate
} else { ... if (mazeData.maze[currentCell.r][Math.floor(newPlayerXOnly / CELL_SIZE)] !== 1) { camera.position.x = newPlayerXOnly; }
If the full movement hits a wall, tries moving only along the X axis or only along the Z axis to allow sliding along walls
playerPosGrid = { c: Math.floor(camera.position.x / CELL_SIZE), r: Math.floor(camera.position.z / CELL_SIZE) };
Updates the player's grid position so the monster AI knows where to chase
updateMonster();
Calls the monster AI function to update its position and behavior
checkGameOver();
Checks win/lose conditions (reached exit or monster caught player)
renderer.render(scene, camera);
Renders the 3D scene to the screen from the camera's viewpoint

updateMonster()

updateMonster() is the AI engine. It calculates distance, triggers pathfinding when the player is near, moves the monster along the computed path, and plays audio cues. The BFS pathfinding guarantees the shortest route through the maze.

function updateMonster() {
  const distToPlayer = playerMesh.position.distanceTo(monsterMesh.position);

  if (distToPlayer < MONSTER_VIEW_DISTANCE) {
    if (monsterPath.length === 0 || !monsterPath[monsterPath.length - 1] ||
      monsterPath[monsterPath.length - 1].r !== playerPosGrid.r ||
      monsterPath[monsterPath.length - 1].c !== playerPosGrid.c) {
      monsterPath = findPath(monsterPosGrid, playerPosGrid, mazeData.maze);
      if (monsterPath && monsterPath.length > 0) {
        monsterPath.shift();
      }
    }

    if (monsterPath && monsterPath.length > 0) {
      const targetCell = monsterPath[0];
      const targetX = targetCell.c * CELL_SIZE + CELL_SIZE / 2;
      const targetZ = targetCell.r * CELL_SIZE + CELL_SIZE / 2;

      const monsterVector = new THREE.Vector3(targetX - monsterMesh.position.x, 0, targetZ - monsterMesh.position.z);
      monsterVector.normalize().multiplyScalar(MONSTER_SPEED);

      monsterMesh.position.x += monsterVector.x;
      monsterMesh.position.z += monsterVector.z;

      if (monsterMesh.position.distanceTo(new THREE.Vector3(targetX, monsterMesh.position.y, targetZ)) < 0.5) {
        monsterPath.shift();
        monsterPosGrid = targetCell;
      }
    }
  } else {
    monsterPath = [];
  }

  if (distToPlayer < MONSTER_GROWL_DISTANCE && !monsterGrowl.isPlaying) {
    monsterGrowl.start();
  } else if (distToPlayer >= MONSTER_GROWL_DISTANCE && monsterGrowl.isPlaying) {
    monsterGrowl.stop();
  }
}
Line-by-line explanation (15 lines)

🔧 Subcomponents:

calculation Distance to Player const distToPlayer = playerMesh.position.distanceTo(monsterMesh.position);

Calculates how far the monster is from the player—this triggers pathfinding and sound effects

conditional Pathfinding Trigger if (distToPlayer < MONSTER_VIEW_DISTANCE) { ... monsterPath = findPath(...); }

If the player is within view distance, recalculates the path to the player whenever the path is empty or the player has moved to a different cell

conditional Follow Path Toward Player if (monsterPath && monsterPath.length > 0) { ... monsterMesh.position.x += monsterVector.x; monsterMesh.position.z += monsterVector.z; }

Moves the monster one step along the calculated path toward the player

conditional Monster Growl Sound if (distToPlayer < MONSTER_GROWL_DISTANCE && !monsterGrowl.isPlaying) { monsterGrowl.start(); }

Plays a menacing growl sound when the monster gets close enough

const distToPlayer = playerMesh.position.distanceTo(monsterMesh.position);
Calculates the 3D distance between the player and monster meshes
if (distToPlayer < MONSTER_VIEW_DISTANCE) {
Triggers the monster's hunting behavior only when the player is close enough (within MONSTER_VIEW_DISTANCE)
if (monsterPath.length === 0 || ... monsterPath[monsterPath.length - 1].r !== playerPosGrid.r || monsterPath[monsterPath.length - 1].c !== playerPosGrid.c) {
Recalculates the path if the monster has no path queued OR if the player has moved to a different grid cell
monsterPath = findPath(monsterPosGrid, playerPosGrid, mazeData.maze);
Calls BFS pathfinding to compute a new path from the monster to the player's current grid position
if (monsterPath && monsterPath.length > 0) { monsterPath.shift(); }
Removes the first cell of the path (the monster's current position) so the path starts at the next cell to move toward
const targetCell = monsterPath[0];
Gets the first cell in the remaining path—this is where the monster will move next
const targetX = targetCell.c * CELL_SIZE + CELL_SIZE / 2; const targetZ = targetCell.r * CELL_SIZE + CELL_SIZE / 2;
Converts the grid cell into continuous 3D coordinates (center of that cell) for smooth monster movement
const monsterVector = new THREE.Vector3(targetX - monsterMesh.position.x, 0, targetZ - monsterMesh.position.z);
Creates a vector pointing from the monster's current position toward the target cell
monsterVector.normalize().multiplyScalar(MONSTER_SPEED);
Normalizes the vector to length 1, then scales it by MONSTER_SPEED so the monster moves at a consistent speed
monsterMesh.position.x += monsterVector.x; monsterMesh.position.z += monsterVector.z;
Updates the monster's position by the calculated movement vector
if (monsterMesh.position.distanceTo(new THREE.Vector3(targetX, monsterMesh.position.y, targetZ)) < 0.5) {
Checks if the monster is close enough to the target cell (within 0.5 units); if so, marks that cell as reached
monsterPath.shift(); monsterPosGrid = targetCell;
Removes the reached cell from the path and updates the monster's grid position
} else { monsterPath = []; }
If the player is far away (beyond MONSTER_VIEW_DISTANCE), clears the path so the monster stops hunting
if (distToPlayer < MONSTER_GROWL_DISTANCE && !monsterGrowl.isPlaying) { monsterGrowl.start(); }
Plays the growl sound if the monster is close enough and the sound isn't already playing
} else if (distToPlayer >= MONSTER_GROWL_DISTANCE && monsterGrowl.isPlaying) { monsterGrowl.stop(); }
Stops the growl if the monster moves far away and the sound is still playing

checkGameOver()

checkGameOver() is the win/loss condition checker. It runs every frame to detect two end states: either the monster caught the player or the player reached the exit. Once triggered, it calls endGame() and stops further game updates.

function checkGameOver() {
  const distToMonster = playerMesh.position.distanceTo(monsterMesh.position);
  if (distToMonster < MONSTER_ATTACK_DISTANCE) {
    gameState = 'caught';
    endGame("GAME OVER! The monster caught you.", "#e74c3c");
    return;
  }

  const playerCell = {
    c: Math.floor(camera.position.x / CELL_SIZE),
    r: Math.floor(camera.position.z / CELL_SIZE)
  };
  if (playerCell.r === exitPosGrid.r && playerCell.c === exitPosGrid.c) {
    gameState = 'escaped';
    endGame("YOU ESCAPED THE MAZE!", "#27ae60");
    return;
  }
}
Line-by-line explanation (8 lines)

🔧 Subcomponents:

conditional Monster Catch Detection if (distToMonster < MONSTER_ATTACK_DISTANCE) { gameState = 'caught'; endGame(...); }

Tests if the monster is close enough to catch the player; if so, ends the game with a loss state

conditional Exit Detection if (playerCell.r === exitPosGrid.r && playerCell.c === exitPosGrid.c) { gameState = 'escaped'; endGame(...); }

Tests if the player has reached the exit cell; if so, ends the game with a win state

const distToMonster = playerMesh.position.distanceTo(monsterMesh.position);
Calculates how close the monster is to the player
if (distToMonster < MONSTER_ATTACK_DISTANCE) {
Checks if the monster has reached the attack distance (close enough to catch the player)
gameState = 'caught';
Changes the game state to 'caught' to signal a loss
endGame("GAME OVER! The monster caught you.", "#e74c3c");
Calls endGame() with a loss message and red color
const playerCell = { c: Math.floor(camera.position.x / CELL_SIZE), r: Math.floor(camera.position.z / CELL_SIZE) };
Converts the player's current position to grid coordinates
if (playerCell.r === exitPosGrid.r && playerCell.c === exitPosGrid.c) {
Checks if the player is in the same grid cell as the exit
gameState = 'escaped';
Changes the game state to 'escaped' to signal a win
endGame("YOU ESCAPED THE MAZE!", "#27ae60");
Calls endGame() with a win message and green color

endGame()

endGame() is the cleanup function called when win or loss conditions are met. It transitions the game back to a menu state by stopping animation, hiding gameplay UI, showing end messages, and silencing audio.

function endGame(message, color) {
  noLoop();
  overlay.removeClass('hidden');
  crosshair.removeClass('active');
  overlay.html(`<h1>${message}</h1><p>Press ESC to release mouse, then click "Start Game" to play again.</p>`);
  select('#game-overlay h1').style('color', color);
  ambientSynth.triggerRelease();
  monsterGrowl.stop();
  document.exitPointerLock();
}
Line-by-line explanation (8 lines)

🔧 Subcomponents:

calculation Stop Animation noLoop();

Stops the draw loop so the game freezes and no longer updates

calculation Show End Message overlay.removeClass('hidden'); crosshair.removeClass('active'); overlay.html(`<h1>${message}</h1><p>...</p>`);

Shows the end game overlay with the message and hides the crosshair

calculation Stop Audio ambientSynth.triggerRelease(); monsterGrowl.stop();

Releases the ambient music and stops any growling

noLoop();
Stops the p5 draw loop so the game no longer animates
overlay.removeClass('hidden');
Removes the 'hidden' class from the overlay, making it visible again
crosshair.removeClass('active');
Removes the 'active' class from the crosshair, hiding it
overlay.html(`<h1>${message}</h1><p>Press ESC to release mouse, then click "Start Game" to play again.</p>`);
Sets the overlay's HTML to display the game-over message and instructions using template literals to insert the message
select('#game-overlay h1').style('color', color);
Uses p5's select() to find the h1 element in the overlay and set its color to the provided hex color (red for loss, green for win)
ambientSynth.triggerRelease();
Fades out the ambient synth using its release envelope (2 seconds to fade)
monsterGrowl.stop();
Stops the growl sound if it's still playing
document.exitPointerLock();
Releases the pointer lock so the user can move the mouse freely again to click the restart button

playAmbientMusic()

playAmbientMusic() uses Tone.js to schedule a repeating chord progression. Each chord plays sequentially, and the timing ("4m" = 4 measures, "+0"/"+4m"/"+8m" = start times) creates an eerie, atmospheric loop.

function playAmbientMusic() {
  if (ambientSynth.state === 'started') {
    ambientSynth.triggerRelease();
  }
  ambientSynth.triggerAttackRelease(["C3", "Eb3", "G3"], "4m", "+0", 0.5);
  ambientSynth.triggerAttackRelease(["Db3", "E3", "Ab3"], "4m", "+4m", 0.5);
  ambientSynth.triggerAttackRelease(["C3", "Eb3", "G3"], "4m", "+8m", 0.5);

  if (playerMesh.position.distanceTo(monsterMesh.position) < MONSTER_GROWL_DISTANCE) {
    monsterGrowl.start();
  }
}
Line-by-line explanation (5 lines)

🔧 Subcomponents:

conditional Stop Previous Playback if (ambientSynth.state === 'started') { ambientSynth.triggerRelease(); }

Ensures no previous note is still playing before starting new chords

calculation Play Chord Progression ambientSynth.triggerAttackRelease(["C3", "Eb3", "G3"], "4m", "+0", 0.5); ambientSynth.triggerAttackRelease(["Db3", "E3", "Ab3"], "4m", "+4m", 0.5); ambientSynth.triggerAttackRelease(["C3", "Eb3", "G3"], "4m", "+8m", 0.5);

Schedules three eerie chords to play in sequence, each lasting 4 measures of time

if (ambientSynth.state === 'started') { ambientSynth.triggerRelease(); }
Checks if a previous note is still playing and releases it smoothly to avoid overlapping sounds
ambientSynth.triggerAttackRelease(["C3", "Eb3", "G3"], "4m", "+0", 0.5);
Plays a C minor chord (C3, Eb3, G3) starting immediately at time +0, lasting 4 measures, with velocity 0.5
ambientSynth.triggerAttackRelease(["Db3", "E3", "Ab3"], "4m", "+4m", 0.5);
Plays a different dark chord starting 4 measures later, also lasting 4 measures
ambientSynth.triggerAttackRelease(["C3", "Eb3", "G3"], "4m", "+8m", 0.5);
Repeats the first chord starting 8 measures later to create a simple, looping chord progression
if (playerMesh.position.distanceTo(monsterMesh.position) < MONSTER_GROWL_DISTANCE) { monsterGrowl.start(); }
If the monster is already close when the game starts, play the growl immediately

generateMaze()

generateMaze() uses recursive backtracking to carve a perfect maze (one solution path with no loops). Each cell is a 1 or 0 (wall or path), and the algorithm starts with all walls, then randomly carves paths by moving 2 cells at a time and breaking through the wall between them. This guarantees a solvable maze.

function generateMaze(rows, cols) {
  const maze = Array(rows).fill(0).map(() => Array(cols).fill(1));

  function isValid(r, c) {
    return r >= 0 && r < rows && c >= 0 && c < cols;
  }

  function shuffle(array) {
    for (let i = array.length - 1; i > 0; i--) {
      const j = Math.floor(Math.random() * (i + 1));
      [array[i], array[j]] = [array[j], array[i]];
    }
    return array;
  }

  function carve(r, c) {
    maze[r][c] = 0;

    const directions = shuffle([
      { dr: -2, dc: 0, wr: -1, wc: 0 },
      { dr: 2, dc: 0, wr: 1, wc: 0 },
      { dr: 0, dc: -2, wr: 0, wc: -1 },
      { dr: 0, dc: 2, wr: 0, wc: 1 }
    ]);

    for (const dir of directions) {
      const newR = r + dir.dr;
      const newC = c + dir.dc;
      const wallR = r + dir.wr;
      const wallC = c + dir.wc;

      if (isValid(newR, newC) && maze[newR][newC] === 1) {
        maze[wallR][wallC] = 0;
        carve(newR, newC);
      }
    }
  }

  const startR = Math.floor(Math.random() * rows);
  const startC = Math.floor(Math.random() * cols);
  carve(startR, startC);

  let playerStart = { r: startR, c: startC };
  let monsterStart = { r: startR, c: startC };
  while (monsterStart.r === playerStart.r && monsterStart.c === playerStart.c) {
    monsterStart = {
      r: Math.floor(Math.random() * rows),
      c: Math.floor(Math.random() * cols)
    };
    if (maze[monsterStart.r][monsterStart.c] === 1) {
      monsterStart = { r: startR, c: startC };
    }
  }

  let exitPos = { r: startR, c: startC };
  while ((exitPos.r === playerStart.r && exitPos.c === playerStart.c) || maze[exitPos.r][exitPos.c] === 1) {
    exitPos = {
      r: Math.floor(Math.random() * rows),
      c: Math.floor(Math.random() * cols)
    };
  }
  maze[exitPos.r][exitPos.c] = 2;

  return { maze, playerStart, monsterStart, exitPos };
}
Line-by-line explanation (13 lines)

🔧 Subcomponents:

calculation Initialize Maze Grid const maze = Array(rows).fill(0).map(() => Array(cols).fill(1));

Creates a 2D array filled with 1s (all walls) as the starting state

calculation Recursive Carving Algorithm function carve(r, c) { ... maze[r][c] = 0; ... carve(newR, newC); }

Recursively carves paths through the maze by moving 2 cells at a time and breaking through walls between them

calculation Fisher-Yates Shuffle function shuffle(array) { ... [array[i], array[j]] = [array[j], array[i]]; }

Randomizes the order of directions so the maze grows in random directions, creating varied paths

calculation Place Player and Monster let playerStart = { r: startR, c: startC }; ... while (monsterStart.r === playerStart.r && monsterStart.c === playerStart.c) { ... }

Places the player at the maze start and the monster at a different random path cell

calculation Place Exit let exitPos = { r: startR, c: startC }; while (...) { ... } maze[exitPos.r][exitPos.c] = 2;

Places the exit at a path cell different from the player start, marking it with value 2

const maze = Array(rows).fill(0).map(() => Array(cols).fill(1));
Creates a 2D grid where every cell is initially a wall (1). The fill(0) creates an outer array of length rows; the .map(() => Array(cols).fill(1)) creates a fresh inner array for each row to avoid reference issues.
function isValid(r, c) { return r >= 0 && r < rows && c >= 0 && c < cols; }
Helper function that checks if grid coordinates are within bounds
function shuffle(array) { ... [array[i], array[j]] = [array[j], array[i]]; }
A helper function that randomizes the order of array elements using the Fisher-Yates shuffle algorithm—essential for creating varied, random mazes
function carve(r, c) { maze[r][c] = 0; ... }
Recursive function that carves a path (sets cell to 0) and recursively carves into neighboring unvisited cells 2 steps away, breaking through walls
const directions = shuffle([...]);
Shuffles the four cardinal directions (up, down, left, right, each 2 steps) so the algorithm explores randomly
const newR = r + dir.dr; const newC = c + dir.dc; const wallR = r + dir.wr; const wallC = c + dir.wc;
Calculates the new cell 2 steps away (newR/newC) and the wall cell between the current and new cell (wallR/wallC) that needs to be broken
if (isValid(newR, newC) && maze[newR][newC] === 1) { maze[wallR][wallC] = 0; carve(newR, newC); }
Only carves if the target cell is valid and still a wall (unvisited); breaks the wall between and recursively carves from the new cell
const startR = Math.floor(Math.random() * rows); const startC = Math.floor(Math.random() * cols); carve(startR, startC);
Picks a random cell and starts carving from there, which will recursively carve the entire maze
let playerStart = { r: startR, c: startC };
Places the player at the starting cell of maze carving
while (monsterStart.r === playerStart.r && monsterStart.c === playerStart.c) { ... }
Loops until the monster is placed at a different cell than the player, ensuring they start apart
let exitPos = { r: startR, c: startC }; while ((exitPos.r === playerStart.r && exitPos.c === playerStart.c) || maze[exitPos.r][exitPos.c] === 1) { ... }
Loops until the exit is placed at a path cell (0 or 2) that is not the player's starting cell
maze[exitPos.r][exitPos.c] = 2;
Marks the exit cell with value 2 so it renders visually different (green, glowing) from regular paths
return { maze, playerStart, monsterStart, exitPos };
Returns an object containing the generated maze grid and the three starting positions for the game to use

findPath()

findPath() implements breadth-first search (BFS), a graph algorithm that finds the shortest path between two cells. It uses a queue to explore cells layer by layer, marking visited cells to avoid cycles, and stores parent pointers to reconstruct the path once the goal is found. BFS guarantees the shortest path in an unweighted grid.

function findPath(start, end, maze) {
  const rows = maze.length;
  const cols = maze[0].length;
  const queue = [];
  const visited = Array(rows).fill(0).map(() => Array(cols).fill(false));
  const parent = Array(rows).fill(0).map(() => Array(cols).fill(null));

  queue.push(start);
  visited[start.r][start.c] = true;

  while (queue.length > 0) {
    const current = queue.shift();

    if (current.r === end.r && current.c === end.c) {
      const path = [];
      let temp = end;
      while (temp !== null && temp !== start) {
        path.unshift(temp);
        temp = parent[temp.r][temp.c];
      }
      return path;
    }

    const directions = [
      { dr: -1, dc: 0 },
      { dr: 1, dc: 0 },
      { dr: 0, dc: -1 },
      { dr: 0, dc: 1 }
    ];

    for (const dir of directions) {
      const newR = current.r + dir.dr;
      const newC = current.c + dir.dc;

      if (newR >= 0 && newR < rows && newC >= 0 && newC < cols && maze[newR][newC] !== 1 && !visited[newR][newC]) {
        visited[newR][newC] = true;
        parent[newR][newC] = current;
        queue.push({ r: newR, c: newC });
      }
    }
  }
  return null;
}
Line-by-line explanation (11 lines)

🔧 Subcomponents:

calculation BFS Setup const queue = []; const visited = Array(rows).fill(0).map(() => Array(cols).fill(false)); const parent = Array(rows).fill(0).map(() => Array(cols).fill(null));

Initializes data structures for breadth-first search: a queue for cells to explore, a visited grid to avoid revisiting, and a parent grid to reconstruct the path

while-loop BFS Main Loop while (queue.length > 0) { const current = queue.shift(); ... for (const dir of directions) { ... queue.push(...); } }

Explores cells level by level, checking neighbors and enqueueing unvisited cells until the target is found

calculation Reconstruct Path const path = []; let temp = end; while (temp !== null && temp !== start) { path.unshift(temp); temp = parent[temp.r][temp.c]; } return path;

Works backward from the end cell using parent pointers to build the shortest path

const rows = maze.length; const cols = maze[0].length;
Extracts the dimensions of the maze grid
const queue = []; const visited = Array(rows).fill(0).map(() => Array(cols).fill(false)); const parent = Array(rows).fill(0).map(() => Array(cols).fill(null));
Initializes three 2D arrays: queue holds cells to explore, visited tracks which cells have been seen, and parent stores the path back to the start
queue.push(start); visited[start.r][start.c] = true;
Starts BFS by adding the start cell to the queue and marking it as visited
while (queue.length > 0) { const current = queue.shift(); }
Processes cells from the queue one at a time in FIFO order—this is what makes BFS explore by distance level
if (current.r === end.r && current.c === end.c) { ... return path; }
Checks if the current cell is the goal; if so, reconstructs and returns the path
const path = []; let temp = end; while (temp !== null && temp !== start) { path.unshift(temp); temp = parent[temp.r][temp.c]; }
Walks backward from the end cell using parent pointers, building a list of cells from end to start
path.unshift(temp);
Adds each cell to the front of the path array so the final path goes from start to end
const directions = [{ dr: -1, dc: 0 }, { dr: 1, dc: 0 }, { dr: 0, dc: -1 }, { dr: 0, dc: 1 }];
Defines the four cardinal neighbors (up, down, left, right) using 1-cell offsets (not 2-cell like maze generation)
if (newR >= 0 && newR < rows && newC >= 0 && newC < cols && maze[newR][newC] !== 1 && !visited[newR][newC]) {
Checks if a neighbor is in bounds, is not a wall (!== 1), and hasn't been visited; only then does it explore it
visited[newR][newC] = true; parent[newR][newC] = current; queue.push({ r: newR, c: newC });
Marks the neighbor as visited, records which cell it came from, and adds it to the queue to explore later
return null;
Returns null if no path is found (maze is unsolvable or start and end are unreachable from each other)

createMazeGeometry()

createMazeGeometry() converts the 2D maze data (a grid of 1s and 0s) into 3D Three.js meshes. Each wall cell becomes a cube positioned at the correct location in 3D space. The exit is marked with a different material so it glows green and stands out. This function is called once during setup() to build the entire maze geometry.

function createMazeGeometry(maze) {
  mazeWalls = [];

  for (let r = 0; r < maze.length; r++) {
    for (let c = 0; c < maze[r].length; c++) {
      if (maze[r][c] === 1) {
        const wall = new THREE.Mesh(cubeGeometry, wallMaterial);
        wall.position.set(c * CELL_SIZE + CELL_SIZE / 2, WALL_HEIGHT / 2, r * CELL_SIZE + CELL_SIZE / 2);
        scene.add(wall);
        mazeWalls.push(wall);
      } else if (maze[r][c] === 2) {
        const exit = new THREE.Mesh(cubeGeometry, exitMaterial);
        exit.position.set(c * CELL_SIZE + CELL_SIZE / 2, WALL_HEIGHT / 2, r * CELL_SIZE + CELL_SIZE / 2);
        scene.add(exit);
        mazeWalls.push(exit);
      }
    }
  }
}
Line-by-line explanation (7 lines)

🔧 Subcomponents:

for-loop Iterate Maze Grid for (let r = 0; r < maze.length; r++) { for (let c = 0; c < maze[r].length; c++) { ... } }

Loops through every cell of the maze grid

conditional Create Wall Mesh if (maze[r][c] === 1) { const wall = new THREE.Mesh(cubeGeometry, wallMaterial); wall.position.set(...); scene.add(wall); }

If the cell is a wall (1), creates a 3D cube mesh and adds it to the scene

conditional Create Exit Mesh else if (maze[r][c] === 2) { const exit = new THREE.Mesh(cubeGeometry, exitMaterial); exit.position.set(...); scene.add(exit); }

If the cell is an exit (2), creates a 3D cube with the glowing green material

mazeWalls = [];
Clears the array of walls (in case this function is called multiple times)
for (let r = 0; r < maze.length; r++) { for (let c = 0; c < maze[r].length; c++) {
Nested loops that iterate through every grid cell in the maze
if (maze[r][c] === 1) {
Checks if the current cell is a wall
const wall = new THREE.Mesh(cubeGeometry, wallMaterial);
Creates a 3D mesh using the pre-defined cube geometry and wall material
wall.position.set(c * CELL_SIZE + CELL_SIZE / 2, WALL_HEIGHT / 2, r * CELL_SIZE + CELL_SIZE / 2);
Positions the wall at the center of its grid cell—the formula converts grid coordinates to world coordinates
scene.add(wall); mazeWalls.push(wall);
Adds the wall mesh to the Three.js scene and stores a reference in the mazeWalls array
else if (maze[r][c] === 2) { const exit = new THREE.Mesh(cubeGeometry, exitMaterial);
If the cell is an exit (2), creates a mesh with the glowing green material

createFloorCeiling()

createFloorCeiling() creates two large plane meshes to form the bottom and top of the maze. Without these, the player could see through the bottom and top, breaking immersion. The planes are rotated to lie flat and positioned to sandwich the maze between them.

function createFloorCeiling(maze) {
  const rows = maze.length;
  const cols = maze[0].length;

  const floorGeometry = new THREE.PlaneGeometry(cols * CELL_SIZE, rows * CELL_SIZE);
  const floorMesh = new THREE.Mesh(floorGeometry, floorMaterial);
  floorMesh.rotation.x = -Math.PI / 2;
  floorMesh.position.set(cols * CELL_SIZE / 2, 0, rows * CELL_SIZE / 2);
  scene.add(floorMesh);

  const ceilingGeometry = new THREE.PlaneGeometry(cols * CELL_SIZE, rows * CELL_SIZE);
  const ceilingMesh = new THREE.Mesh(ceilingGeometry, ceilingMaterial);
  ceilingMesh.rotation.x = Math.PI / 2;
  ceilingMesh.position.set(cols * CELL_SIZE / 2, WALL_HEIGHT, rows * CELL_SIZE / 2);
  scene.add(ceilingMesh);
}
Line-by-line explanation (8 lines)

🔧 Subcomponents:

calculation Create Floor Plane const floorGeometry = new THREE.PlaneGeometry(cols * CELL_SIZE, rows * CELL_SIZE); const floorMesh = new THREE.Mesh(floorGeometry, floorMaterial); floorMesh.rotation.x = -Math.PI / 2; floorMesh.position.set(...); scene.add(floorMesh);

Creates a large horizontal plane beneath the maze and positions it as the floor

calculation Create Ceiling Plane const ceilingGeometry = new THREE.PlaneGeometry(cols * CELL_SIZE, rows * CELL_SIZE); const ceilingMesh = new THREE.Mesh(ceilingGeometry, ceilingMaterial); ceilingMesh.rotation.x = Math.PI / 2; ceilingMesh.position.set(...); scene.add(ceilingMesh);

Creates a large horizontal plane above the maze and positions it as the ceiling

const floorGeometry = new THREE.PlaneGeometry(cols * CELL_SIZE, rows * CELL_SIZE);
Creates a flat rectangular plane sized to cover the entire maze width and depth
const floorMesh = new THREE.Mesh(floorGeometry, floorMaterial);
Creates a mesh from the plane geometry and dark material
floorMesh.rotation.x = -Math.PI / 2;
Rotates the plane 90 degrees around the X-axis so it lies flat on the ground (planes are vertical by default in Three.js)
floorMesh.position.set(cols * CELL_SIZE / 2, 0, rows * CELL_SIZE / 2);
Positions the floor at the center of the maze, at Y=0 (ground level)
scene.add(floorMesh);
Adds the floor mesh to the 3D scene
const ceilingMesh = new THREE.Mesh(ceilingGeometry, ceilingMaterial);
Creates a mesh for the ceiling using the same dimensions and dark material
ceilingMesh.rotation.x = Math.PI / 2;
Rotates the ceiling plane 90 degrees the opposite direction so it faces downward into the maze
ceilingMesh.position.set(cols * CELL_SIZE / 2, WALL_HEIGHT, rows * CELL_SIZE / 2);
Positions the ceiling at the center of the maze, at Y=WALL_HEIGHT (above the walls)

windowResized()

windowResized() is called automatically by p5 whenever the window is resized. It ensures both the Three.js renderer and the overlay menu scale properly to the new dimensions, maintaining a responsive layout.

function windowResized() {
  if (camera && renderer) {
    camera.aspect = windowWidth / windowHeight;
    camera.updateProjectionMatrix();
    renderer.setSize(windowWidth, windowHeight);
  }
  if (overlay) {
    overlay.style('width', windowWidth + 'px');
    overlay.style('height', windowHeight + 'px');
  }
}
Line-by-line explanation (5 lines)

🔧 Subcomponents:

conditional Resize Three.js if (camera && renderer) { camera.aspect = windowWidth / windowHeight; camera.updateProjectionMatrix(); renderer.setSize(windowWidth, windowHeight); }

Updates the camera aspect ratio and renderer size when the window is resized

conditional Resize Overlay if (overlay) { overlay.style('width', windowWidth + 'px'); overlay.style('height', windowHeight + 'px'); }

Resizes the overlay div to match the new window size

if (camera && renderer) {
Checks that camera and renderer exist before trying to resize them
camera.aspect = windowWidth / windowHeight;
Updates the camera's aspect ratio to match the new window proportions
camera.updateProjectionMatrix();
Recalculates the camera's projection matrix based on the new aspect ratio
renderer.setSize(windowWidth, windowHeight);
Resizes the Three.js canvas to fill the new window size
overlay.style('width', windowWidth + 'px'); overlay.style('height', windowHeight + 'px');
Uses p5's .style() method to resize the overlay div to match the new window dimensions

requestPointerLock()

requestPointerLock() is a one-liner that activates the pointer lock API. This prevents the mouse from leaving the window and hides the cursor, allowing the player to look around freely without worrying about accidentally clicking outside the game.

function requestPointerLock() {
  document.body.requestPointerLock();
}
Line-by-line explanation (1 lines)
document.body.requestPointerLock();
Calls the browser's pointer lock API to lock the mouse cursor to the game window—this is essential for immersive first-person controls

pointerLockChange()

pointerLockChange() is a callback that fires whenever pointer lock is acquired or released. When acquired, it enables mouse movement and keyboard input. When released, it disables input and shows a pause menu if the game is playing. The code supports Chrome (pointerlockchange), Firefox (mozpointerlockchange), and Safari (webkitpointerlockchange) prefixes.

function pointerLockChange() {
  if (document.pointerLockElement === document.body ||
      document.mozPointerLockElement === document.body ||
      document.webkitPointerLockElement === document.body) {
    document.addEventListener('mousemove', onMouseMove, false);
    document.addEventListener('keydown', onKeyDown, false);
    document.addEventListener('keyup', onKeyUp, false);
    crosshair.addClass('active');
    document.body.style.cursor = 'none';
  } else {
    document.removeEventListener('mousemove', onMouseMove, false);
    document.removeEventListener('keydown', onKeyDown, false);
    document.removeEventListener('keyup', onKeyUp, false);
    crosshair.removeClass('active');
    document.body.style.cursor = 'default';
    if (gameState === 'playing') {
      overlay.removeClass('hidden');
      overlay.html('<h1>Paused</h1><p>Press ESC to release mouse, click "Start Game" to resume.</p>');
      select('#game-overlay h1').style('color', '#fff');
      startButton = createButton('Start Game');
      startButton.parent(overlay);
      startButton.mouseClicked(startGame);
      noLoop();
    }
  }
}

document.addEventListener('pointerlockchange', pointerLockChange, false);
document.addEventListener('mozpointerlockchange', pointerLockChange, false);
document.addEventListener('webkitpointerlockchange', pointerLockChange, false);
Line-by-line explanation (9 lines)

🔧 Subcomponents:

conditional Lock Acquired if (document.pointerLockElement === document.body || ...) { ... document.addEventListener('mousemove', onMouseMove, false); ... }

Detects when pointer lock is activated and enables mouse look controls by attaching event listeners

conditional Lock Released } else { document.removeEventListener('mousemove', onMouseMove, false); ... if (gameState === 'playing') { overlay.removeClass('hidden'); noLoop(); } }

Detects when pointer lock is released and pauses the game, showing a pause menu

calculation Register Pointer Lock Events document.addEventListener('pointerlockchange', pointerLockChange, false); document.addEventListener('mozpointerlockchange', pointerLockChange, false); document.addEventListener('webkitpointerlockchange', pointerLockChange, false);

Registers the pointerLockChange callback to fire whenever pointer lock state changes (supports Chrome, Firefox, Safari)

if (document.pointerLockElement === document.body || document.mozPointerLockElement === document.body || document.webkitPointerLockElement === document.body) {
Checks which pointer lock property the browser supports and if it's currently active on the body element
document.addEventListener('mousemove', onMouseMove, false);
Attaches the mouse move listener so camera look is controlled
document.addEventListener('keydown', onKeyDown, false); document.addEventListener('keyup', onKeyUp, false);
Attaches key event listeners for WASD movement input
crosshair.addClass('active'); document.body.style.cursor = 'none';
Shows the crosshair and hides the default cursor
} else {
Runs when pointer lock is released (ESC pressed or user clicks outside the window)
document.removeEventListener('mousemove', onMouseMove, false); document.removeEventListener('keydown', onKeyDown, false); document.removeEventListener('keyup', onKeyUp, false);
Removes all event listeners to stop processing input
crosshair.removeClass('active'); document.body.style.cursor = 'default';
Hides the crosshair and shows the default mouse cursor
if (gameState === 'playing') { overlay.removeClass('hidden'); ... noLoop(); }
If the game is in progress, shows a pause menu and stops the draw loop
document.addEventListener('pointerlockchange', pointerLockChange, false);
Registers the pointerLockChange callback to be called whenever pointer lock state changes

onMouseMove()

onMouseMove() implements first-person mouse look. It converts mouse movement into camera rotation angles, carefully handling browser compatibility and preventing gimbal lock by using the 'YXZ' rotation order. The clamped pitch prevents the camera from flipping.

function onMouseMove(event) {
  if (document.pointerLockElement !== document.body) return;

  const movementX = event.movementX || event.mozMovementX || event.webkitMovementX || 0;
  const movementY = event.movementY || event.mozMovementY || event.webkitMovementY || 0;

  const sensitivity = 0.002;

  cameraYaw -= movementX * sensitivity;
  cameraPitch -= movementY * sensitivity;

  cameraPitch = Math.max(-MAX_PITCH, Math.min(MAX_PITCH, cameraPitch));

  camera.rotation.order = 'YXZ';
  camera.rotation.y = cameraYaw;
  camera.rotation.x = cameraPitch;
}
Line-by-line explanation (9 lines)

🔧 Subcomponents:

conditional Pointer Lock Guard if (document.pointerLockElement !== document.body) return;

Exits early if pointer lock is not active, preventing mouse movement control when it shouldn't work

calculation Extract Mouse Movement const movementX = event.movementX || event.mozMovementX || event.webkitMovementX || 0; const movementY = event.movementY || event.mozMovementY || event.webkitMovementY || 0;

Gets the amount the mouse moved this frame, handling different browser APIs

calculation Update Camera Angles cameraYaw -= movementX * sensitivity; cameraPitch -= movementY * sensitivity; cameraPitch = Math.max(-MAX_PITCH, Math.min(MAX_PITCH, cameraPitch));

Updates rotation angles based on mouse movement and clamps pitch to prevent flipping

if (document.pointerLockElement !== document.body) return;
Checks if pointer lock is still active; if not, exits immediately to prevent processing input
const movementX = event.movementX || event.mozMovementX || event.webkitMovementX || 0;
Gets the mouse movement in the X direction, trying different browser APIs and defaulting to 0 if none exist
const movementY = event.movementY || event.mozMovementY || event.webkitMovementY || 0;
Gets the mouse movement in the Y direction with the same fallback logic
const sensitivity = 0.002;
Sets how fast the camera rotates in response to mouse movement—lower values = slower, higher = faster
cameraYaw -= movementX * sensitivity;
Updates the horizontal camera rotation (yaw) by the X mouse movement scaled by sensitivity
cameraPitch -= movementY * sensitivity;
Updates the vertical camera rotation (pitch) by the Y mouse movement scaled by sensitivity
cameraPitch = Math.max(-MAX_PITCH, Math.min(MAX_PITCH, cameraPitch));
Clamps pitch between -MAX_PITCH and +MAX_PITCH to prevent the camera from flipping upside down
camera.rotation.order = 'YXZ';
Sets the rotation order so yaw (Y) is applied first, then pitch (X)—this prevents gimbal lock
camera.rotation.y = cameraYaw; camera.rotation.x = cameraPitch;
Applies the yaw and pitch angles to the camera

onKeyDown()

onKeyDown() sets boolean flags for each movement key. These flags are read by draw() to accumulate movement. The escape key releases pointer lock, allowing the player to pause and interact with the UI. This event-driven approach is more efficient than polling every key every frame.

function onKeyDown(event) {
  switch (event.key.toLowerCase()) {
    case 'w':
      moveForward = true;
      break;
    case 's':
      moveBackward = true;
      break;
    case 'a':
      moveLeft = true;
      break;
    case 'd':
      moveRight = true;
      break;
    case 'escape':
      if (gameState === 'playing') {
        document.exitPointerLock();
      }
      break;
  }
}
Line-by-line explanation (6 lines)

🔧 Subcomponents:

switch-case WASD Key Processing case 'w': moveForward = true; break; case 's': moveBackward = true; break; case 'a': moveLeft = true; break; case 'd': moveRight = true; break;

Sets movement flags when WASD keys are pressed

conditional Escape Key Processing case 'escape': if (gameState === 'playing') { document.exitPointerLock(); } break;

Releases pointer lock when ESC is pressed during gameplay

switch (event.key.toLowerCase()) {
Converts the pressed key to lowercase and branches based on which key it is
case 'w': moveForward = true; break;
When W is pressed, sets the moveForward flag to true so draw() applies forward movement
case 's': moveBackward = true; break;
When S is pressed, sets the moveBackward flag to true for backward movement
case 'a': moveLeft = true; break;
When A is pressed, sets the moveLeft flag to true for leftward movement
case 'd': moveRight = true; break;
When D is pressed, sets the moveRight flag to true for rightward movement
case 'escape': if (gameState === 'playing') { document.exitPointerLock(); } break;
When ESC is pressed and the game is playing, releases the pointer lock (exits fullscreen mouse control)

onKeyUp()

onKeyUp() clears the movement flags set by onKeyDown(). Together, these two handlers implement smooth, responsive keyboard input—the player moves only while a key is held down and stops immediately when released.

function onKeyUp(event) {
  switch (event.key.toLowerCase()) {
    case 'w':
      moveForward = false;
      break;
    case 's':
      moveBackward = false;
      break;
    case 'a':
      moveLeft = false;
      break;
    case 'd':
      moveRight = false;
      break;
  }
}
Line-by-line explanation (5 lines)

🔧 Subcomponents:

switch-case WASD Key Release case 'w': moveForward = false; break; case 's': moveBackward = false; break; case 'a': moveLeft = false; break; case 'd': moveRight = false; break;

Clears movement flags when WASD keys are released

switch (event.key.toLowerCase()) {
Converts the released key to lowercase and branches based on which key it is
case 'w': moveForward = false; break;
When W is released, sets the moveForward flag to false so the player stops moving forward
case 's': moveBackward = false; break;
When S is released, sets the moveBackward flag to false
case 'a': moveLeft = false; break;
When A is released, sets the moveLeft flag to false
case 'd': moveRight = false; break;
When D is released, sets the moveRight flag to false

📦 Key Variables

scene THREE.Scene

The 3D world that contains all meshes, lights, and camera—everything visible in the game exists in this scene

scene = new THREE.Scene();
camera THREE.PerspectiveCamera

The player's viewpoint—defines position, direction, and field of view for rendering

camera = new THREE.PerspectiveCamera(75, windowWidth / windowHeight, 0.1, 1000);
renderer THREE.WebGLRenderer

Draws the 3D scene to the screen using WebGL—the engine that converts Three.js objects to pixels

renderer = new THREE.WebGLRenderer({ antialias: true });
playerMesh THREE.Mesh

An invisible cylinder representing the player—used for collision detection and distance checks with the monster

playerMesh = new THREE.Mesh(new THREE.CylinderGeometry(...), new THREE.MeshBasicMaterial({ opacity: 0 }));
monsterMesh THREE.Mesh

A visible red cylinder representing the monster entity that hunts the player

monsterMesh = new THREE.Mesh(new THREE.CylinderGeometry(CELL_SIZE / 3, CELL_SIZE / 3, MONSTER_HEIGHT, 16), monsterMaterial);
mazeWalls array

Stores references to all wall and exit meshes in the scene for potential future use (e.g., updating material properties)

let mazeWalls = [];
mazeData object

Contains the generated maze grid and start positions for player, monster, and exit

mazeData = generateMaze(MAZE_SIZE, MAZE_SIZE);
playerPosGrid object

The player's current grid position {r: row, c: column}—used for pathfinding and collision

playerPosGrid = { r: 5, c: 7 };
monsterPosGrid object

The monster's current grid position {r: row, c: column}—updated as monster moves

monsterPosGrid = { r: 2, c: 3 };
exitPosGrid object

The exit's fixed grid position {r: row, c: column}—used to detect win condition

exitPosGrid = { r: 14, c: 12 };
monsterPath array

Queue of grid cells the monster will walk through to chase the player—cleared and recalculated when player moves

let monsterPath = [];
gameState string

Current game state: 'start' (menu), 'playing' (active game), 'caught' (loss), or 'escaped' (win)

let gameState = 'start';
moveForward boolean

Flag set by onKeyDown/onKeyUp when W key is pressed/released—controls forward movement

let moveForward = false;
moveBackward boolean

Flag set by onKeyDown/onKeyUp when S key is pressed/released—controls backward movement

let moveBackward = false;
moveLeft boolean

Flag set by onKeyDown/onKeyUp when A key is pressed/released—controls leftward movement

let moveLeft = false;
moveRight boolean

Flag set by onKeyDown/onKeyUp when D key is pressed/released—controls rightward movement

let moveRight = false;
cameraYaw number

Camera's horizontal rotation angle (in radians)—updated by mouse X movement

let cameraYaw = 0;
cameraPitch number

Camera's vertical rotation angle (in radians)—updated by mouse Y movement and clamped to prevent flipping

let cameraPitch = 0;
ambientSynth Tone.PolySynth

Tone.js synthesizer that plays the eerie ambient chord progression

ambientSynth = new Tone.PolySynth(Tone.Synth, {...});
monsterGrowl Tone.Player

Tone.js audio player that plays and loops the monster growl sound when monster is near

monsterGrowl = new Tone.Player({ url: '...', volume: -10, playbackRate: 0.8 });
audioLoaded boolean

Flag indicating whether Tone.js audio context has been initialized—required before audio can play

let audioLoaded = false;
MAZE_SIZE number

The N in an N×N maze grid—determines maze dimensions and complexity

const MAZE_SIZE = 15;
CELL_SIZE number

The width/depth of a single maze grid cell in 3D units—scales the entire maze

const CELL_SIZE = 10;
WALL_HEIGHT number

Height of the maze walls in 3D units—determines how tall walls appear

const WALL_HEIGHT = CELL_SIZE;
PLAYER_SPEED number

How many units the player moves per frame in any direction—controls movement speed

const PLAYER_SPEED = 0.5;
MONSTER_SPEED number

How many units the monster moves per frame when chasing—controls hunt aggression

const MONSTER_SPEED = 0.2;
MONSTER_VIEW_DISTANCE number

How far away (in units) the monster can detect the player and begin hunting

const MONSTER_VIEW_DISTANCE = CELL_SIZE * 8;
MONSTER_GROWL_DISTANCE number

How far away (in units) the monster can be for the player to hear it growl

const MONSTER_GROWL_DISTANCE = CELL_SIZE * 4;
MONSTER_ATTACK_DISTANCE number

How close (in units) the monster must get to catch the player and trigger loss

const MONSTER_ATTACK_DISTANCE = CELL_SIZE * 1.5;

🔧 Potential Improvements (6)

Here are some ways this code could be enhanced:

BUG generateMaze() monster placement

The logic `if (maze[monsterStart.r][monsterStart.c] === 1) { monsterStart = { r: startR, c: startC }; }` resets the monster to the player's start position if a random cell happens to be a wall. This can cause the monster and player to start at the same location, breaking the game.

💡 Change the logic to `if (maze[monsterStart.r][monsterStart.c] !== 0) { continue; }` inside the while loop to ensure the monster always starts on a valid path cell.

PERFORMANCE updateMonster()

The monster recalculates its pathfinding path every frame when the player is in view distance, which is computationally expensive. BFS runs in O(rows × cols) time each call.

💡 Add a distance threshold: only recalculate the path if the player has moved more than 1-2 cells away, e.g., `if (monsterPath.length === 0 || lastPlayerCell !== playerPosGrid) { monsterPath = findPath(...); lastPlayerCell = playerPosGrid; }`

BUG onMouseMove()

The function does not update playerMesh.position when the camera rotates, only when the player moves. This can cause a mismatch between camera position (for input) and playerMesh position (for monster AI distance checks).

💡 Add `playerMesh.position.copy(camera.position);` at the end of onMouseMove() to keep the meshes synchronized even when only looking around.

STYLE setup()

Global variables for Three.js objects (scene, camera, renderer) make the code harder to refactor and test. All sketch-wide variables are mixed with local setup logic.

💡 Consider encapsulating Three.js objects in an object, e.g., `const threeScene = { scene, camera, renderer, ... };` to improve code organization.

FEATURE updateMonster()

When the player is outside view distance, the monster stops and does not move or patrol. The maze feels empty.

💡 Add idle behavior such as random wandering: when `distToPlayer >= MONSTER_VIEW_DISTANCE`, occasionally change direction or walk to random cells to make the monster feel more alive.

BUG draw() collision detection

Collision detection only checks if the next grid cell is a wall (value 1) but treats exit cells (value 2) as walls, preventing the player from walking on the exit.

💡 Change `if (mazeData.maze[nextCell.r][nextCell.c] !== 1)` to `if (mazeData.maze[nextCell.r][nextCell.c] === 0 || mazeData.maze[nextCell.r][nextCell.c] === 2)` to allow walking on both paths and the exit.

🔄 Code Flow

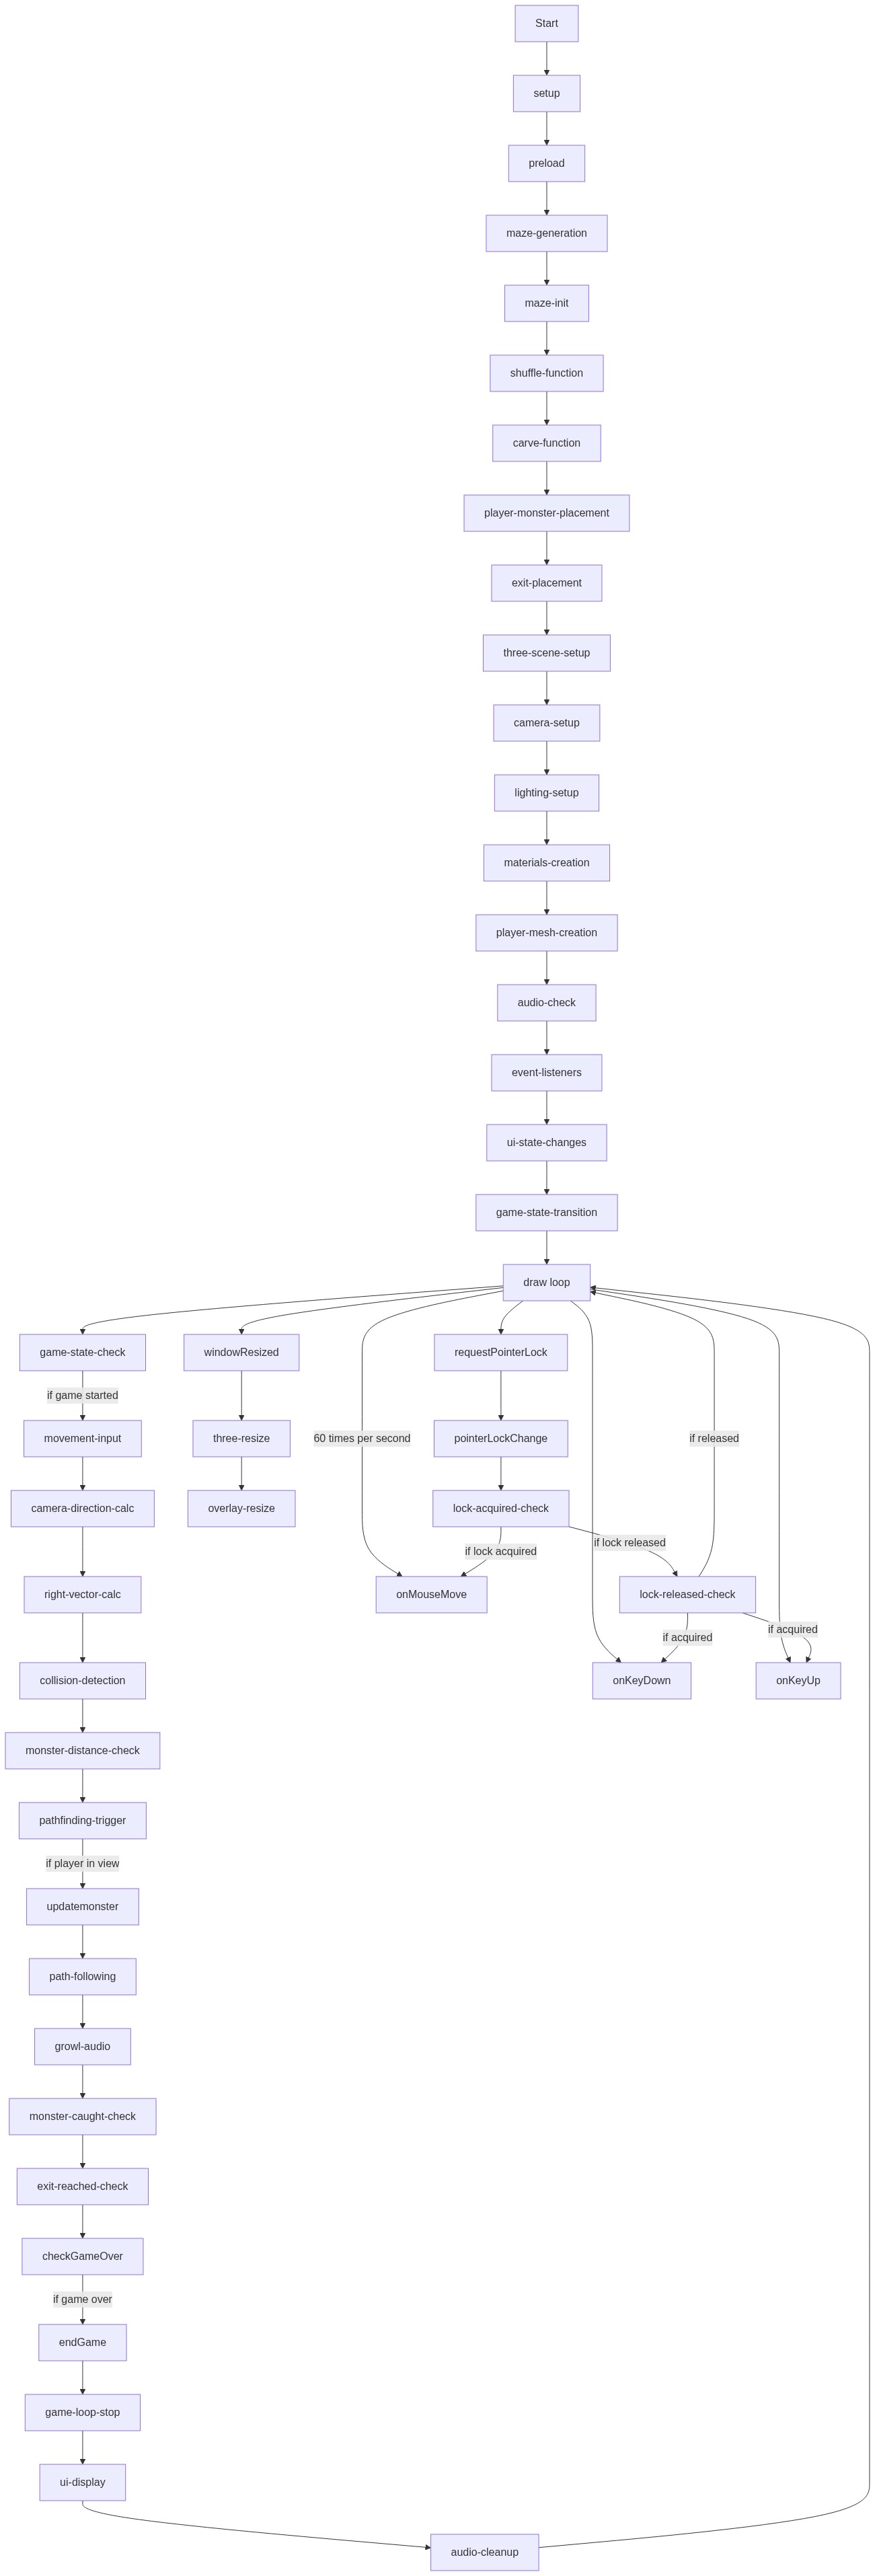
Code flow showing preload, setup, startgame, draw, updatemonster, checkgameover, endgame, playambientmusic, generatemaze, findpath, createmazegeometry, createfloorceiling, windowresized, requestpointerlock, pointerlockchange, onmousemove, onkeydown, onkeyup

💡 Click on function names in the diagram to jump to their code

graph TD start[Start] --> setup[setup] click setup href "#fn-setup" setup --> preload[preload] click preload href "#fn-preload" preload --> maze-generation[maze-generation] click maze-generation href "#sub-maze-generation" maze-generation --> maze-init[maze-init] click maze-init href "#sub-maze-init" maze-init --> shuffle-function[shuffle-function] click shuffle-function href "#sub-shuffle-function" shuffle-function --> carve-function[carve-function] click carve-function href "#sub-carve-function" carve-function --> player-monster-placement[player-monster-placement] click player-monster-placement href "#sub-player-monster-placement" player-monster-placement --> exit-placement[exit-placement] click exit-placement href "#sub-exit-placement" exit-placement --> three-scene-setup[three-scene-setup] click three-scene-setup href "#sub-three-scene-setup" three-scene-setup --> camera-setup[camera-setup] click camera-setup href "#sub-camera-setup" camera-setup --> lighting-setup[lighting-setup] click lighting-setup href "#sub-lighting-setup" lighting-setup --> materials-creation[materials-creation] click materials-creation href "#sub-materials-creation" materials-creation --> player-mesh-creation[player-mesh-creation] click player-mesh-creation href "#sub-player-mesh-creation" player-mesh-creation --> audio-check[audio-check] click audio-check href "#sub-audio-check" audio-check --> event-listeners[event-listeners] click event-listeners href "#sub-event-listeners" event-listeners --> ui-state-changes[ui-state-changes] click ui-state-changes href "#sub-ui-state-changes" ui-state-changes --> game-state-transition[game-state-transition] click game-state-transition href "#sub-game-state-transition" game-state-transition --> draw[draw loop] click draw href "#fn-draw" draw --> game-state-check[game-state-check] click game-state-check href "#sub-game-state-check" game-state-check -->|if game started| movement-input[movement-input] click movement-input href "#sub-movement-input" movement-input --> camera-direction-calc[camera-direction-calc] click camera-direction-calc href "#sub-camera-direction-calc" camera-direction-calc --> right-vector-calc[right-vector-calc] click right-vector-calc href "#sub-right-vector-calc" right-vector-calc --> collision-detection[collision-detection] click collision-detection href "#sub-collision-detection" collision-detection --> monster-distance-check[monster-distance-check] click monster-distance-check href "#sub-monster-distance-check" monster-distance-check --> pathfinding-trigger[pathfinding-trigger] click pathfinding-trigger href "#sub-pathfinding-trigger" pathfinding-trigger -->|if player in view| updatemonster[updatemonster] click updatemonster href "#fn-updatemonster" updatemonster --> path-following[path-following] click path-following href "#sub-path-following" path-following --> growl-audio[growl-audio] click growl-audio href "#sub-growl-audio" growl-audio --> monster-caught-check[monster-caught-check] click monster-caught-check href "#sub-monster-caught-check" monster-caught-check --> exit-reached-check[exit-reached-check] click exit-reached-check href "#sub-exit-reached-check" exit-reached-check --> checkgameover[checkGameOver] click checkgameover href "#fn-checkgameover" checkgameover -->|if game over| endgame[endGame] click endgame href "#fn-endgame" endgame --> game-loop-stop[game-loop-stop] click game-loop-stop href "#sub-game-loop-stop" game-loop-stop --> ui-display[ui-display] click ui-display href "#sub-ui-display" ui-display --> audio-cleanup[audio-cleanup] click audio-cleanup href "#sub-audio-cleanup" audio-cleanup --> draw draw -->|60 times per second| onmousemove[onMouseMove] click onmousemove href "#fn-onmousemove" draw --> onkeydown[onKeyDown] click onkeydown href "#fn-onkeydown" draw --> onkeyup[onKeyUp] click onkeyup href "#fn-onkeyup" draw --> windowresized[windowResized] click windowresized href "#fn-windowresized" windowresized --> three-resize[three-resize] click three-resize href "#sub-three-resize" three-resize --> overlay-resize[overlay-resize] click overlay-resize href "#sub-overlay-resize" draw --> requestpointerlock[requestPointerLock] click requestpointerlock href "#fn-requestpointerlock" requestpointerlock --> pointerlockchange[pointerLockChange] click pointerlockchange href "#fn-pointerlockchange" pointerlockchange --> lock-acquired-check[lock-acquired-check] click lock-acquired-check href "#sub-lock-acquired-check" lock-acquired-check -->|if lock acquired| onmousemove lock-acquired-check -->|if lock released| lock-released-check[lock-released-check] click lock-released-check href "#sub-lock-released-check" lock-released-check -->|if released| draw lock-released-check -->|if acquired| onkeydown lock-released-check -->|if acquired| onkeyup

❓ Frequently Asked Questions

What visual experience does the backrooms p5.js sketch offer?

The backrooms sketch creates a 3D maze environment with walls and a player navigating through it, enhanced by ambient sounds and a lurking monster.

How can users interact with the backrooms sketch?

Users can control the player's movement within the maze using keyboard inputs, trying to evade the monster and reach the exit.

What creative coding concepts are showcased in the backrooms sketch?

This sketch demonstrates 3D environment creation using Three.js, player movement mechanics, and audio integration with Tone.js to enhance the gaming experience.

Preview

backrooms - p5.js creative coding sketch preview
Sketch Preview
Code flow diagram showing the structure of backrooms - Code flow showing preload, setup, startgame, draw, updatemonster, checkgameover, endgame, playambientmusic, generatemaze, findpath, createmazegeometry, createfloorceiling, windowresized, requestpointerlock, pointerlockchange, onmousemove, onkeydown, onkeyup
Code Flow Diagram