BallBlaster

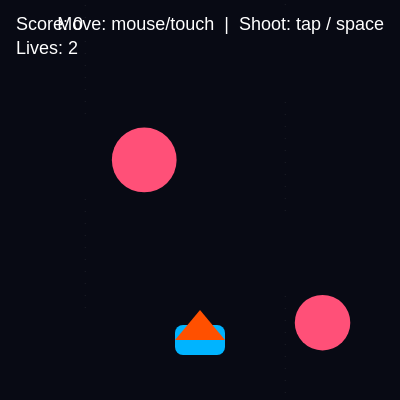
BallBlaster is a space shooter game where players control a laser-firing ship at the bottom of the canvas and destroy falling neon orbs to score points. The game tracks lives, spawns enemies at intervals, handles collisions between lasers and balls, and ends when all lives are lost.

🧪 Try This!

Experiment with the code by making these changes:

  1. Make the game harder by spawning balls faster — Lower spawnCooldown values spawn more enemies per second, increasing difficulty and pace
  2. Award more points per destroy — Higher point values make score climb faster and feel more rewarding
  3. Make the player ship glow cyan — Add a glow effect by drawing multiple semi-transparent circles behind the ship
  4. Make the player ship bigger and easier to control — Increasing the width and height makes the ship larger; increasing the lerp factor makes it respond instantly
  5. Make balls glow pink — Draw a larger semi-transparent circle before the solid ball to create a glowing effect
Prefer the full editor? Open it there →

📖 About This Sketch

BallBlaster is a fully playable arcade-style game that demonstrates professional game architecture in p5.js. You control a glowing blue ship at the bottom of the screen and fire cyan lasers upward to destroy falling neon balls before they reach you. The game uses three custom classes—Player, Laser, and Ball—to organize game entities, combines collision detection with physics-based movement, and manages game state through score, lives, and a game-over condition. This is an excellent example of how to structure a complete interactive game.

The code is organized into setup() which initializes the player, a draw() loop that updates all game entities and checks win/lose conditions, and three custom classes that encapsulate the behavior of each game object. By studying this sketch you will learn how to build reusable game entities as classes, how to manage multiple collections of objects with arrays, how to detect collisions between different types, and how to structure a complete game loop with score and lives mechanics.

⚙️ How It Works

  1. When the sketch loads, setup() creates a full-window canvas and initializes a single Player object positioned near the bottom center
  2. Every frame, draw() clears the background to black, draws an animated starfield, and updates all game entities if the game is still active
  3. The Player class tracks its position and smoothly follows the mouse using lerp(); the show() method draws a blue rectangle with an orange triangle pointing upward
  4. Lasers are created when the player clicks, taps, or presses space—they spawn at the player's position and move upward each frame until they leave the screen
  5. Balls spawn at random intervals at the top of the screen with random sizes and fall downward at varying speeds
  6. On every frame, handleCollisions() checks whether any laser touches any ball (using distance calculation) and any ball touches the player (using rectangle-circle collision); hits remove entities and update the score or lives
  7. The HUD displays the current score and lives in the top-left, and when lives reach zero, the game freezes and shows a game-over screen where pressing 'R' restarts everything

🎓 Concepts You'll Learn

Object-oriented programming with classesCollision detection (circle-circle and rectangle-circle)Game state managementArray iteration and removalVector mathematics and movementCooldown timersGame loop architecture

📝 Code Breakdown

setup()

setup() runs once when the sketch starts. Here it prepares the canvas and creates the player object that will be updated every frame.

function setup() {
  createCanvas(windowWidth, windowHeight);
  player = new Player();
}
Line-by-line explanation (2 lines)
createCanvas(windowWidth, windowHeight);
Creates a full-window canvas that adjusts to the browser size
player = new Player();
Creates a single Player object and stores it in the global player variable

draw()

draw() is the main game loop, running 60 times per second. It updates all entities, checks for collisions, and renders everything. The early return when gameOver is true is a pattern that stops updating when the game ends.

🔬 This check at the beginning of draw() prevents the game from updating when gameOver is true. What happens if you comment out the 'return' statement and let the game loop continue running behind the game-over screen?

  if (gameOver) {
    showGameOver();
    return;
  }
function draw() {
  background(8, 10, 20);
  drawStars();

  if (gameOver) {
    showGameOver();
    return;
  }

  player.update();
  player.show();

  updateLasers();
  updateBalls();
  handleCollisions();
  drawHUD();

  if (lives <= 0) {
    gameOver = true;
  }
}
Line-by-line explanation (13 lines)

🔧 Subcomponents:

conditional Early exit on game over if (gameOver) { showGameOver(); return; }

Stops updating game entities and displays the game-over screen instead

sequence Main game loop player.update(); player.show(); updateLasers(); updateBalls(); handleCollisions(); drawHUD();

Updates and draws all active game entities in order

conditional Loss condition check if (lives <= 0) { gameOver = true; }

Ends the game when the player runs out of lives

background(8, 10, 20);
Fills the canvas with a very dark blue-black, clearing everything drawn last frame
drawStars();
Draws the animated starfield background
if (gameOver) {
Checks if the game has ended
showGameOver();
Displays the game-over screen with final score and restart instructions
return;
Exits the draw function early, skipping all game updates
player.update();
Updates the player's position based on mouse movement
player.show();
Draws the player ship at its current position
updateLasers();
Moves all active lasers upward and removes those that leave the screen
updateBalls();
Moves all falling balls downward, spawns new ones at intervals, and removes those that reach the bottom
handleCollisions();
Checks for collisions between lasers and balls, and between balls and the player
drawHUD();
Displays the score and lives in the top-left corner and control instructions in the top-right
if (lives <= 0) {
Checks if the player has lost all lives
gameOver = true;
Sets the game-over flag, which causes the next frame to skip game updates and show the end screen

mousePressed()

mousePressed() is a p5.js built-in function that runs whenever the mouse button is clicked. Here it fires a laser, providing one input method for the player.

function mousePressed() {
  shootLaser();
}
Line-by-line explanation (1 lines)
shootLaser();
Calls the shootLaser function to create a new laser when the mouse is clicked

touchStarted()

touchStarted() is a p5.js function that runs when the user touches the screen on mobile or tablet devices. Returning false prevents unwanted scrolling behavior.

function touchStarted() {
  shootLaser();
  return false; // prevent mobile scrolling
}
Line-by-line explanation (2 lines)
shootLaser();
Calls the shootLaser function to create a new laser when the screen is touched
return false; // prevent mobile scrolling
Returning false tells the browser not to scroll the page when the user taps, keeping the game responsive

keyPressed()

keyPressed() runs whenever any key is pressed. This sketch uses it to fire lasers on space bar and restart on 'r', showing how to branch on different keys.

function keyPressed() {
  if (key === ' ' && !gameOver) {
    shootLaser();
  } else if (gameOver && key === 'r') {
    resetGame();
  }
}
Line-by-line explanation (4 lines)

🔧 Subcomponents:

conditional Space bar to shoot if (key === ' ' && !gameOver) {

Fires a laser when space is pressed during active gameplay

conditional R key to restart } else if (gameOver && key === 'r') {

Restarts the game when R is pressed after game over

if (key === ' ' && !gameOver) {
Checks if the pressed key is a space bar AND the game is not over
shootLaser();
Fires a laser during active gameplay
} else if (gameOver && key === 'r') {
Checks if the game is over AND the pressed key is 'r'
resetGame();
Resets all game variables and restarts the game

shootLaser()

shootLaser() demonstrates cooldown mechanics using millis() to track time. The if-statement acts as a gatekeeper, only creating a new Laser if enough time has passed. This is a core pattern in games to prevent input spam.

🔬 This cooldown system prevents spam by checking if enough time has passed. What happens if you change shotCooldown to 1 (almost no delay) or 1000 (one second between shots)? How does it change the feel of gameplay?

  const now = millis();
  if (now - lastShot < shotCooldown || gameOver) return;
function shootLaser() {
  const now = millis();
  if (now - lastShot < shotCooldown || gameOver) return;
  lasers.push(new Laser(player.pos.x, player.pos.y - player.height / 2));
  lastShot = now;
}
Line-by-line explanation (4 lines)

🔧 Subcomponents:

conditional Cooldown timer check if (now - lastShot < shotCooldown || gameOver) return;

Prevents shooting faster than the cooldown allows and blocks shooting after game over

const now = millis();
Gets the current time in milliseconds since the sketch started
if (now - lastShot < shotCooldown || gameOver) return;
Exits early if not enough time has passed since the last shot OR the game is over, preventing rapid-fire or post-game shots
lasers.push(new Laser(player.pos.x, player.pos.y - player.height / 2));
Creates a new Laser object at the top-center of the player ship and adds it to the lasers array
lastShot = now;
Updates lastShot to the current time, resetting the cooldown timer

updateLasers()

updateLasers() demonstrates the important pattern of iterating backward through an array when removing elements. Removing forward would cause elements to be skipped. It also shows how to update and render all objects of one type each frame.

🔬 This backward loop iterates through lasers and updates/draws each one. What happens if you add a line like laser.pos.x += sin(frameCount * 0.1) * 3 to make lasers wobble side-to-side as they travel?

  for (let i = lasers.length - 1; i >= 0; i--) {
    const laser = lasers[i];
    laser.update();
    laser.show();
function updateLasers() {
  for (let i = lasers.length - 1; i >= 0; i--) {
    const laser = lasers[i];
    laser.update();
    laser.show();
    if (laser.offscreen()) {
      lasers.splice(i, 1);
    }
  }
}
Line-by-line explanation (6 lines)

🔧 Subcomponents:

for-loop Backward iteration for (let i = lasers.length - 1; i >= 0; i--) {

Loops through lasers from end to start, allowing safe removal without skipping elements

conditional Remove offscreen lasers if (laser.offscreen()) { lasers.splice(i, 1); }

Removes lasers that have traveled off the top of the canvas to save memory

for (let i = lasers.length - 1; i >= 0; i--) {
Loops backward through the lasers array (from last to first), which is safe for removing elements during iteration
const laser = lasers[i];
Stores the current laser in a variable for easier access
laser.update();
Calls the laser's update() method to move it upward
laser.show();
Calls the laser's show() method to draw it at its new position
if (laser.offscreen()) {
Checks if the laser has moved above the top of the canvas
lasers.splice(i, 1);
Removes the offscreen laser from the array to prevent memory waste

updateBalls()

updateBalls() combines two important patterns: time-based spawning (like shootLaser) and array management. It spawns enemies at intervals and removes those that reach the bottom, penalizing missed shots.

🔬 This spawn logic creates a new ball every spawnCooldown milliseconds. What if you changed it to spawn 2 or 3 balls at once? Try adding another balls.push() line inside this block to spawn multiple enemies per interval.

  if (millis() - lastSpawn > spawnCooldown) {
    balls.push(new Ball());
    lastSpawn = millis();
  }
function updateBalls() {
  if (millis() - lastSpawn > spawnCooldown) {
    balls.push(new Ball());
    lastSpawn = millis();
  }
  for (let i = balls.length - 1; i >= 0; i--) {
    const ball = balls[i];
    ball.update();
    ball.show();
    if (ball.offscreen()) {
      balls.splice(i, 1);
      lives--;
    }
  }
}
Line-by-line explanation (10 lines)

🔧 Subcomponents:

conditional Spawn new balls if (millis() - lastSpawn > spawnCooldown) { balls.push(new Ball()); lastSpawn = millis(); }

Creates a new Ball at intervals defined by spawnCooldown

for-loop Update and draw all balls for (let i = balls.length - 1; i >= 0; i--) {

Loops backward through balls to safely update and remove them

conditional Penalty for missed balls if (ball.offscreen()) { balls.splice(i, 1); lives--; }

Removes balls that reach the bottom and deducts a life as penalty

if (millis() - lastSpawn > spawnCooldown) {
Checks if enough time has passed since the last ball was spawned
balls.push(new Ball());
Creates a new Ball object with random size and speed and adds it to the balls array
lastSpawn = millis();
Updates lastSpawn to the current time, resetting the spawn timer
for (let i = balls.length - 1; i >= 0; i--) {
Loops backward through the balls array
const ball = balls[i];
Stores the current ball in a variable
ball.update();
Calls the ball's update() method to move it downward
ball.show();
Calls the ball's show() method to draw it
if (ball.offscreen()) {
Checks if the ball has fallen below the bottom of the canvas
balls.splice(i, 1);
Removes the ball from the array
lives--;
Deducts one life as a penalty for missing the ball

handleCollisions()

handleCollisions() uses nested loops to check every combination of balls and lasers, then every ball against the player. The break statement is important: when a laser hits a ball, it exits the inner laser loop so we don't check that ball against more lasers. This is the collision-detection heart of the game.

🔬 This block awards points and removes both the laser and ball when they collide. What happens if you comment out the lasers.splice(j, 1) line so lasers can pass through multiple balls and destroy several at once?

      if (ball.hits(laser)) {
        score += 10;
        spawnBurst(ball.pos.x, ball.pos.y);
        balls.splice(i, 1);
        lasers.splice(j, 1);
        break;
      }
function handleCollisions() {
  for (let i = balls.length - 1; i >= 0; i--) {
    const ball = balls[i];
    // check lasers
    for (let j = lasers.length - 1; j >= 0; j--) {
      const laser = lasers[j];
      if (ball.hits(laser)) {
        score += 10;
        spawnBurst(ball.pos.x, ball.pos.y);
        balls.splice(i, 1);
        lasers.splice(j, 1);
        break;
      }
    }
    // check player collision
    if (ball.hitsPlayer(player)) {
      lives--;
      spawnBurst(ball.pos.x, ball.pos.y);
      balls.splice(i, 1);
    }
  }
}
Line-by-line explanation (14 lines)

🔧 Subcomponents:

nested-for-loop Laser-ball collision detection for (let j = lasers.length - 1; j >= 0; j--) {

Checks every laser against every ball for collisions

conditional Laser hit detection if (ball.hits(laser)) {

Removes both ball and laser, awards points, and spawns a visual effect

conditional Player-ball collision if (ball.hitsPlayer(player)) {

Removes the ball, deducts a life, and spawns a visual effect

for (let i = balls.length - 1; i >= 0; i--) {
Loops backward through all balls
const ball = balls[i];
Stores the current ball for easier access
for (let j = lasers.length - 1; j >= 0; j--) {
Nested loop: checks every laser against this ball
const laser = lasers[j];
Stores the current laser for easier access
if (ball.hits(laser)) {
Calls the ball's hits() method to check if this laser is close enough to the ball
score += 10;
Awards 10 points for destroying a ball
spawnBurst(ball.pos.x, ball.pos.y);
Spawns a visual explosion effect at the ball's position
balls.splice(i, 1);
Removes the destroyed ball from the array
lasers.splice(j, 1);
Removes the laser that was used (it can only hit one ball)
break;
Exits the inner laser loop to move to the next ball (since this laser is now gone)
if (ball.hitsPlayer(player)) {
Calls the ball's hitsPlayer() method to check if this ball has collided with the player ship
lives--;
Deducts one life when hit by a ball
spawnBurst(ball.pos.x, ball.pos.y);
Spawns a visual effect at the collision point
balls.splice(i, 1);
Removes the ball that hit the player

drawHUD()

drawHUD() displays the game's user interface—score, lives, and instructions. It demonstrates textSize(), textAlign(), and template literals for showing dynamic values.

function drawHUD() {
  fill(255);
  noStroke();
  textSize(18);
  textAlign(LEFT, TOP);
  text(`Score: ${score}`, 16, 16);
  text(`Lives: ${lives}`, 16, 40);

  textAlign(RIGHT, TOP);
  text("Move: mouse/touch  |  Shoot: tap / space", width - 16, 16);
}
Line-by-line explanation (8 lines)
fill(255);
Sets the text color to white
noStroke();
Removes any outline from text
textSize(18);
Sets the font size to 18 pixels
textAlign(LEFT, TOP);
Aligns text to the left horizontally and top vertically
text(`Score: ${score}`, 16, 16);
Displays the score 16 pixels from the left and 16 pixels from the top, using template literals to insert the current score value
text(`Lives: ${lives}`, 16, 40);
Displays the remaining lives below the score
textAlign(RIGHT, TOP);
Changes alignment to right so the control instructions align to the right edge
text("Move: mouse/touch | Shoot: tap / space", width - 16, 16);
Displays control instructions 16 pixels from the right edge at the top

showGameOver()

showGameOver() displays a modal-like screen when the game ends. The semi-transparent black rectangle creates a focus effect, and centered text shows game state. This function is called from draw() only when gameOver is true.

function showGameOver() {
  fill(0, 200);
  rect(0, 0, width, height);
  fill(255);
  textAlign(CENTER, CENTER);
  textSize(36);
  text("Game Over", width / 2, height / 2 - 40);
  textSize(20);
  text(`Final Score: ${score}`, width / 2, height / 2);
  text("Press 'R' to restart", width / 2, height / 2 + 40);
}
Line-by-line explanation (9 lines)
fill(0, 200);
Sets fill color to black with 200 alpha (semi-transparent)
rect(0, 0, width, height);
Draws a semi-transparent black rectangle over the entire canvas to dim the background
fill(255);
Changes fill color to white for the text
textAlign(CENTER, CENTER);
Centers text both horizontally and vertically
textSize(36);
Sets the title text size to 36 pixels
text("Game Over", width / 2, height / 2 - 40);
Displays 'Game Over' centered and above the middle of the screen
textSize(20);
Reduces text size to 20 pixels for the score and instructions
text(`Final Score: ${score}`, width / 2, height / 2);
Displays the final score centered in the middle of the screen
text("Press 'R' to restart", width / 2, height / 2 + 40);
Displays restart instructions below the score

resetGame()

resetGame() restores all game variables to their starting state, called when the player presses 'R' after losing. It demonstrates how to reset game state by reinitializing all global variables.

function resetGame() {
  score = 0;
  lives = 3;
  lasers = [];
  balls = [];
  gameOver = false;
}
Line-by-line explanation (5 lines)
score = 0;
Resets the score to zero
lives = 3;
Restores the player to three lives
lasers = [];
Clears all active lasers by creating an empty array
balls = [];
Clears all active balls by creating an empty array
gameOver = false;
Sets the gameOver flag to false so draw() resumes normal gameplay updates

spawnBurst()

spawnBurst() draws a temporary visual effect at collision points. It uses push() and pop() to isolate its transformations, a key pattern in p5.js for drawing localized effects without affecting other elements.

function spawnBurst(x, y) {
  push();
  translate(x, y);
  noFill();
  stroke(255, 200, 50, 150);
  circle(0, 0, 40);
  pop();
}
Line-by-line explanation (6 lines)
push();
Saves the current drawing settings (transformation, color, etc.) so they won't affect other drawings
translate(x, y);
Moves the origin (0,0) to the collision point, so shapes are drawn relative to that location
noFill();
Removes the fill color so only the stroke is visible
stroke(255, 200, 50, 150);
Sets the stroke color to yellow-orange with alpha 150 (semi-transparent)
circle(0, 0, 40);
Draws a circle with diameter 40 at the translated origin, creating a burst effect
pop();
Restores the previous drawing settings so subsequent drawings are unaffected

drawStars()

drawStars() creates an illusion of motion by animating point positions based on frameCount. Using modulo (%) to wrap coordinates around the screen is a clever way to create infinite scrolling effects. This is a great example of algorithmic animation that requires no stored state.

🔬 This loop creates an animated starfield using frameCount and modulo. What happens if you change frameCount * 0.3 to frameCount * 0.8 (faster) or frameCount * 0.1 (slower)? How does it change the sense of speed?

  for (let i = 0; i < 40; i++) {
    const sx = (frameCount * 0.3 + i * 200) % width;
    const sy = (i * 97 + frameCount * 0.4) % height;
    point(sx, sy);
function drawStars() {
  stroke(255, 30);
  for (let i = 0; i < 40; i++) {
    const sx = (frameCount * 0.3 + i * 200) % width;
    const sy = (i * 97 + frameCount * 0.4) % height;
    point(sx, sy);
  }
}
Line-by-line explanation (5 lines)

🔧 Subcomponents:

for-loop Star generation loop for (let i = 0; i < 40; i++) {

Generates and draws 40 stars with animated positions each frame

stroke(255, 30);
Sets the star color to white with low alpha (30), making them dim
for (let i = 0; i < 40; i++) {
Loops 40 times to draw 40 stars
const sx = (frameCount * 0.3 + i * 200) % width;
Calculates the x position of each star by combining the frame count (for animation), the star's index, and wrapping with modulo to loop around the canvas width
const sy = (i * 97 + frameCount * 0.4) % height;
Calculates the y position similarly, using a different formula (i * 97) so stars don't align in neat rows
point(sx, sy);
Draws a single pixel (point) at the calculated position

class Player

The Player class demonstrates object-oriented design: encapsulating the ship's position, dimensions, and behavior (update and show) into a single object. The update() method shows lerp for smooth motion, and show() demonstrates how to use translate() and rectMode() for clean drawing code.

🔬 The Player draws two shapes: a cyan rectangle and an orange triangle. What happens if you swap the fill colors by changing the first fill to orange and the second to cyan? Or try using completely different colors like fill(0, 255, 0) for green?

    fill(0, 180, 255);
    rectMode(CENTER);
    rect(0, 0, this.width, this.height, 8);
    fill(255, 80, 0);
    triangle(-this.width / 2, 0, this.width / 2, 0, 0, -this.height);
class Player {
  constructor() {
    this.pos = createVector(width / 2, height - 60);
    this.height = 30;
    this.width = 50;
  }

  update() {
    const targetX = constrain(mouseX || width / 2, this.width / 2, width - this.width / 2);
    this.pos.x = lerp(this.pos.x, targetX, 0.2);
  }

  show() {
    push();
    translate(this.pos.x, this.pos.y);
    noStroke();
    fill(0, 180, 255);
    rectMode(CENTER);
    rect(0, 0, this.width, this.height, 8);
    fill(255, 80, 0);
    triangle(-this.width / 2, 0, this.width / 2, 0, 0, -this.height);
    pop();
  }
}
Line-by-line explanation (18 lines)

🔧 Subcomponents:

constructor Player initialization constructor() {

Sets up the player's starting position and dimensions

method Position tracking update() {

Smoothly follows the mouse using lerp, with boundary constraints

method Ship rendering show() {

Draws the player ship as a blue rectangle with an orange triangular cannon

class Player {
Declares a new class called Player that encapsulates the player ship's data and behavior
constructor() {
The constructor method runs when new Player() is called; it initializes all properties
this.pos = createVector(width / 2, height - 60);
Sets the player's starting position to center-bottom of the canvas using a p5.Vector
this.height = 30;
Sets the player ship's height in pixels
this.width = 50;
Sets the player ship's width in pixels
update() {
The update method is called every frame to recalculate the player's position
const targetX = constrain(mouseX || width / 2, this.width / 2, width - this.width / 2);
Calculates the target x position from the mouse, defaulting to screen center if mouse is not provided, then constrains it so the ship stays within bounds
this.pos.x = lerp(this.pos.x, targetX, 0.2);
Smoothly interpolates the ship's x position toward the target using lerp with a factor of 0.2, creating a gliding motion rather than snappy tracking
show() {
The show method is called every frame to render the player
push();
Saves the current drawing state so transformations won't affect other objects
translate(this.pos.x, this.pos.y);
Moves the drawing origin to the player's position, so subsequent shapes are drawn relative to it
noStroke();
Removes outline from all shapes drawn in this method
fill(0, 180, 255);
Sets fill color to cyan blue for the main ship body
rectMode(CENTER);
Changes how rect() is interpreted so coordinates are from the center, not the corner
rect(0, 0, this.width, this.height, 8);
Draws a rounded rectangle (the ship's fuselage) centered at (0,0) with radius 8 for rounded corners
fill(255, 80, 0);
Changes fill color to orange for the cannon
triangle(-this.width / 2, 0, this.width / 2, 0, 0, -this.height);
Draws a triangle pointing upward to represent the cannon, with its base at the bottom center and apex above
pop();
Restores the previous drawing state

class Laser

The Laser class is minimal and self-contained: it knows its position, how to move itself upward, how to draw itself, and how to check if it's off-screen. This simplicity makes it easy to manage many lasers in an array.

class Laser {
  constructor(x, y) {
    this.pos = createVector(x, y);
    this.speed = 10;
    this.w = 4;
    this.h = 16;
  }

  update() {
    this.pos.y -= this.speed;
  }

  show() {
    push();
    translate(this.pos.x, this.pos.y);
    noStroke();
    fill(0, 255, 180);
    rectMode(CENTER);
    rect(0, 0, this.w, this.h, 4);
    pop();
  }

  offscreen() {
    return this.pos.y < -this.h;
  }
}
Line-by-line explanation (18 lines)

🔧 Subcomponents:

constructor Laser creation constructor(x, y) {

Initializes a laser at the given position with fixed speed and dimensions

method Movement update() {

Moves the laser upward each frame

method Boundary check offscreen() {

Returns true if the laser has traveled above the canvas

class Laser {
Declares the Laser class for projectiles fired by the player
constructor(x, y) {
Initializes a laser at coordinates (x, y) passed as arguments
this.pos = createVector(x, y);
Stores the laser's position as a p5.Vector
this.speed = 10;
Sets how many pixels the laser travels upward each frame
this.w = 4;
Sets the laser's width to 4 pixels (thin beam)
this.h = 16;
Sets the laser's height to 16 pixels
update() {
Called every frame to update the laser's position
this.pos.y -= this.speed;
Moves the laser upward by subtracting speed from its y position (lower y = higher on screen)
show() {
Called every frame to render the laser
push();
Saves drawing state
translate(this.pos.x, this.pos.y);
Moves the drawing origin to the laser's position
noStroke();
Removes outlines
fill(0, 255, 180);
Sets the laser color to cyan
rectMode(CENTER);
Centers rectangles on their coordinates
rect(0, 0, this.w, this.h, 4);
Draws a small cyan rectangle with rounded corners as the laser beam
pop();
Restores drawing state
offscreen() {
Returns true/false to indicate if the laser is out of bounds
return this.pos.y < -this.h;
Returns true if the laser's y position is above the canvas (less than negative height)

class Ball

The Ball class demonstrates two different collision detection techniques: circle-circle (hits method using distance) and circle-rectangle (hitsPlayer using constrain to find the closest point). These are fundamental patterns in game programming.

🔬 This collision uses distance between centers. What happens if you change the comparison to use multiplication instead of addition, like this.radius * laser.h / 2? Does the game feel too lenient or too strict?

  hits(laser) {
    return dist(this.pos.x, this.pos.y, laser.pos.x, laser.pos.y) < this.radius + laser.h / 2;
  }
class Ball {
  constructor() {
    this.radius = random(20, 40);
    this.pos = createVector(random(this.radius, width - this.radius), -this.radius);
    this.speed = random(2, 4.5);
  }

  update() {
    this.pos.y += this.speed;
  }

  show() {
    push();
    translate(this.pos.x, this.pos.y);
    noStroke();
    fill(255, 80, 120);
    circle(0, 0, this.radius * 2);
    pop();
  }

  hits(laser) {
    return dist(this.pos.x, this.pos.y, laser.pos.x, laser.pos.y) < this.radius + laser.h / 2;
  }

  hitsPlayer(player) {
    const closestX = constrain(this.pos.x, player.pos.x - player.width / 2, player.pos.x + player.width / 2);
    const closestY = constrain(this.pos.y, player.pos.y - player.height / 2, player.pos.y + player.height / 2);
    const d = dist(this.pos.x, this.pos.y, closestX, closestY);
    return d < this.radius;
  }

  offscreen() {
    return this.pos.y - this.radius > height;
  }
}
Line-by-line explanation (23 lines)

🔧 Subcomponents:

constructor Random ball generation constructor() {

Creates a ball with random size and speed at a random x position above the screen

method Circle-circle collision hits(laser) {

Uses distance calculation to detect if this ball touches a laser

method Circle-rectangle collision hitsPlayer(player) {

Finds the closest point on the player rect and checks distance to the ball center

method Bottom boundary check offscreen() {

Returns true if the ball has fallen below the canvas

class Ball {
Declares the Ball class for falling enemies
constructor() {
Initializes a new ball with randomized properties
this.radius = random(20, 40);
Sets a random radius between 20 and 40 pixels, making each ball a different size
this.pos = createVector(random(this.radius, width - this.radius), -this.radius);
Places the ball at a random x position above the screen (y = -radius) and ensures it stays within horizontal bounds
this.speed = random(2, 4.5);
Sets a random speed between 2 and 4.5 pixels per frame, so balls fall at different rates
update() {
Called every frame to update the ball's position
this.pos.y += this.speed;
Moves the ball downward by adding speed to its y position
show() {
Called every frame to render the ball
push();
Saves drawing state
translate(this.pos.x, this.pos.y);
Moves the drawing origin to the ball's position
noStroke();
Removes outlines
fill(255, 80, 120);
Sets the ball color to magenta-pink
circle(0, 0, this.radius * 2);
Draws a circle with diameter = radius * 2 (since circle's third parameter is diameter, not radius)
pop();
Restores drawing state
hits(laser) {
Checks if a laser has collided with this ball
return dist(this.pos.x, this.pos.y, laser.pos.x, laser.pos.y) < this.radius + laser.h / 2;
Uses dist() to calculate the distance between the ball center and laser center, returning true if they're close enough to collide (distance less than the sum of their radii)
hitsPlayer(player) {
Checks if this ball has collided with the rectangular player ship
const closestX = constrain(this.pos.x, player.pos.x - player.width / 2, player.pos.x + player.width / 2);
Finds the x coordinate on the player rectangle closest to the ball by clamping the ball's x within the rectangle's bounds
const closestY = constrain(this.pos.y, player.pos.y - player.height / 2, player.pos.y + player.height / 2);
Finds the y coordinate on the player rectangle closest to the ball
const d = dist(this.pos.x, this.pos.y, closestX, closestY);
Calculates the distance from the ball center to the closest point on the player rectangle
return d < this.radius;
Returns true if the ball's radius reaches the rectangle, indicating a collision
offscreen() {
Returns true/false to indicate if the ball has left the screen
return this.pos.y - this.radius > height;
Returns true if the bottom edge of the ball (pos.y + radius) is below the canvas

windowResized()

windowResized() is called automatically by p5.js whenever the browser window is resized. Here it updates both the canvas size and the player's position to adapt to the new layout.

function windowResized() {
  resizeCanvas(windowWidth, windowHeight);
  player.pos.set(width / 2, height - 60);
}
Line-by-line explanation (2 lines)
resizeCanvas(windowWidth, windowHeight);
Resizes the p5.js canvas to match the new window dimensions when the browser is resized
player.pos.set(width / 2, height - 60);
Recenters the player ship to the bottom-middle of the newly sized canvas

📦 Key Variables

player Player object

Stores the single Player instance that the game updates and renders each frame

let player;
lasers array

Holds all active Laser objects currently on screen; new ones are added when fired and removed when they travel off-screen or hit a ball

let lasers = [];
balls array

Holds all active Ball objects falling down the screen; new ones spawn at intervals and are removed when destroyed or reach the bottom

let balls = [];
score number

Tracks the player's current score, increasing by 10 for each ball destroyed

let score = 0;
lives number

Tracks the number of remaining lives; decreases when a ball reaches the bottom or hits the player, and the game ends when it reaches zero

let lives = 3;
lastShot number

Stores the timestamp (in milliseconds) of the last laser fired, used to enforce the firing cooldown

let lastShot = 0;
shotCooldown number

The minimum milliseconds that must pass between laser shots (prevents rapid-fire spam)

const shotCooldown = 180;
spawnCooldown number

The minimum milliseconds that must pass between ball spawns (controls game difficulty)

const spawnCooldown = 1200;
lastSpawn number

Stores the timestamp of the last ball spawned, used to enforce the spawn cooldown

let lastSpawn = 0;
gameOver boolean

Tracks whether the game has ended (when lives reach zero); controls whether draw() updates game entities or shows the end screen

let gameOver = false;

🔧 Potential Improvements (5)

Here are some ways this code could be enhanced:

BUG Ball constructor and collision detection

When a ball spawns at the edge with a large radius, it can spawn partially off-screen, making initial collisions feel unfair. The constrain in the Ball constructor uses this.radius but that value is set just before, so there's a risk if random() returns extreme values.

💡 The current code is actually fine, but you could make it more robust by calculating the safe spawn zone before creating the random position: const safeX = random(this.radius, width - this.radius) or clamping after: this.pos.x = constrain(this.pos.x, this.radius, width - this.radius).

FEATURE handleCollisions()

There is no visual or audio feedback when the player is hit by a ball, only the life counter decreases. The burst effect at collision is good, but the game could feel more punishing or dramatic with additional effects.

💡 Add a screen-shake effect, flash the background color, or briefly tint the HUD red when lives decrease. You could also add sound effects when balls are destroyed versus when the player is hit.

FEATURE Game mechanics

The difficulty never increases during a single game—spawn rate and ball speeds stay constant. Games feel more engaging if challenge escalates as the player succeeds.

💡 Gradually decrease spawnCooldown as score increases, or increase ball speed ranges based on waves. Example: spawnCooldown = max(300, 1200 - score / 50) makes enemies spawn faster as you score more points.

PERFORMANCE drawStars()

The starfield recalculates and redraws 40 points every single frame. For full-window canvases this is fine, but on very large or high-refresh displays it adds unnecessary computation.

💡 Pre-generate star positions in setup() and store them in an array, then just translate them in draw() based on frameCount, rather than recalculating every frame. Or cache the starfield to an offscreen graphics buffer and scroll it.

STYLE All event handlers (mousePressed, touchStarted, keyPressed)

shootLaser() is called from three different places (mouse, touch, spacebar) with the same logic. The cooldown check inside shootLaser() handles the filtering, which is good, but it means the game doesn't respond immediately to user input—it appears to 'ignore' clicks that arrive during cooldown.

💡 This is actually fine for a game, as cooldowns are expected. However, you could provide visual feedback (brief flash or sound) when the player tries to shoot during cooldown, making it clear that input was registered but blocked.

🔄 Code Flow

Code flow showing setup, draw, mousepressed, touchstarted, keypressed, shootlaser, updatelasers, updateballs, handlecollisions, drawhud, showgameover, resetgame, spawnburst, drawstars, player, laser, ball, windowresized

💡 Click on function names in the diagram to jump to their code

graph TD start[Start] --> setup[setup] setup --> draw[draw loop] draw --> game-over-check[game-over-check] game-over-check -->|if gameOver| showgameover[showGameOver] game-over-check -->|if not gameOver| game-loop[game-loop] game-loop --> updateballs[updateBalls] updateballs --> spawn-logic[spawn-logic] spawn-logic -->|create new Ball| ball-constructor[ball-constructor] updateballs --> ball-iteration[ball-iteration] ball-iteration -->|backward-loop| backward-loop[backward-loop] backward-loop -->|if ball.offscreen| life-penalty[life-penalty] life-penalty -->|deduct life| updateballs backward-loop -->|if not offscreen| ball-hits-player[ball-hits-player] ball-hits-player -->|if hit| player-collision[player-collision] ball-hits-player -->|if not hit| updateballs ball-iteration --> updateballs draw --> updatelasers[updateLasers] updatelasers -->|backward-loop| backward-loop backward-loop -->|if laser.offscreen| offscreen-removal[offscreen-removal] offscreen-removal --> updatelasers updatelasers --> laser-collision-loop[laser-collision-loop] laser-collision-loop -->|nested-loop| laser-hit[laser-hit] laser-hit -->|if hit| updateballs draw --> drawhud[drawHUD] draw --> drawstars[drawStars] draw -->|if gameOver| showgameover click setup href "#fn-setup" click draw href "#fn-draw" click game-over-check href "#sub-game-over-check" click game-loop href "#sub-game-loop" click updateballs href "#fn-updateballs" click spawn-logic href "#sub-spawn-logic" click ball-constructor href "#fn-ball-constructor" click ball-iteration href "#sub-ball-iteration" click backward-loop href "#sub-backward-loop" click life-penalty href "#sub-life-penalty" click ball-hits-player href "#sub-ball-hits-player" click updatelasers href "#fn-updatelasers" click offscreen-removal href "#sub-offscreen-removal" click laser-collision-loop href "#sub-laser-collision-loop" click laser-hit href "#sub-laser-hit" click drawhud href "#fn-drawhud" click drawstars href "#fn-drawstars"

❓ Frequently Asked Questions

What visual experience does the BallBlaster sketch offer?

The BallBlaster sketch creates a vibrant, starry night sky filled with falling neon orbs that players can shoot down with a laser ship, resulting in a visually dynamic and engaging game environment.

How can players interact with the BallBlaster game?

Players can control the laser ship using their mouse or touch, shoot lasers by tapping or pressing the space bar, and restart the game by pressing 'R' after a game over.

What creative coding concept does the BallBlaster sketch illustrate?

The sketch demonstrates collision detection and game mechanics through the interaction of player-controlled lasers and falling orbs, showcasing the fundamentals of game design in p5.js.

Preview

BallBlaster - p5.js creative coding sketch preview
Sketch Preview
Code flow diagram showing the structure of BallBlaster - Code flow showing setup, draw, mousepressed, touchstarted, keypressed, shootlaser, updatelasers, updateballs, handlecollisions, drawhud, showgameover, resetgame, spawnburst, drawstars, player, laser, ball, windowresized
Code Flow Diagram