big one

BIG ONE is a face-swapping and dress-up application that uses MediaPipe face detection to identify faces in videos, then overlays a source face image and optional outfit onto detected faces in real-time. Users can also add custom text overlays and record the result.

🧪 Try This!

Experiment with the code by making these changes:

  1. Change the login credentials — Modify the hardcoded username and password to test different credentials—customize them for your own project.
  2. Make the outfit completely opaque — Change the outfit opacity range so the outfit is always fully opaque, removing the transparency slider control.
  3. Position text at the bottom instead of top — Move the custom text overlay from the top of the video to the bottom by changing the y-coordinate.
  4. Make the face overlay fully opaque — Remove the transparency from the source face so it appears solid instead of blended with the video.
  5. Double the video frame rate for recording — Change the canvas capture from 30 fps to 60 fps for smoother recorded video (larger file size).
  6. Change the detected face finder from largest to first — Instead of always targeting the largest face, target the first detected face regardless of size.
Prefer the full editor? Open it there →

📖 About This Sketch

BIG ONE is a creative face-swapping and dress-up application built with p5.js and MediaPipe face detection. It loads a video file, detects all faces in each frame using computer vision, and seamlessly overlays a source face image plus optional outfit graphics onto the largest detected face. Users can customize text overlays, adjust outfit scale and position, and record the final composite video—making it a complete multimedia project that combines canvas rendering, real-time face detection, DOM manipulation, and media recording.

The code is organized into three main sections: a login system controlling access, DOM setup and file handling for images and videos, and a real-time draw loop that continuously sends video frames to the face detector, receives bounding boxes, and composites multiple layers (source face, outfit, text) onto the canvas. By studying it you will learn how to integrate external detection libraries, manage UI state with tabs and sliders, resize canvas dynamically, use graphics buffers for masking, and capture canvas output as downloadable video.

⚙️ How It Works

  1. On load, setup() initializes the p5.js canvas, hides it, and sets up all DOM elements: login form, tabs, file inputs, sliders for customization, and the MediaPipe face detection library from CDN.
  2. The user logs in with credentials (admin/123456789), then uploads a source face image and a target video file via file inputs.
  3. When the source face image is loaded, handleImageFile() triggers prepareSourceDetection(), which sends the image to the face detector and extracts the face region using a bounding box and elliptical mask.
  4. When the video is loaded, startProcessing() begins the draw loop: each frame, the video is displayed at full canvas size and sent to the face detector asynchronously.
  5. The onFaceResults() callback receives detection data; draw() finds the largest detected face by bounding box area and calls drawFaceOverlay() to composite the source face onto it.
  6. If an outfit image is loaded, drawOutfitOverlay() positions it below the face using sliders for scale, vertical offset, and opacity; drawOverlayText() renders custom text at the top with bold styling and stroke.
  7. The user can toggle recording via toggleRecording(), which captures the canvas stream at 30fps using MediaRecorder, then download the final video as a WebM file.

🎓 Concepts You'll Learn

Real-time face detection with MediaPipeCanvas rendering and compositingImage masking with graphics buffersDOM interaction and file input handlingResponsive canvas resizingMedia recording and downloadTab-based UI controlAsynchronous face detection callbacks

📝 Code Breakdown

setup()

setup() runs exactly once when the sketch starts. It initializes all DOM references, attaches event listeners, and loads the MediaPipe face detection library from CDN. Understanding this function teaches you how p5.js integrates with external JavaScript libraries and the HTML DOM.

function setup() {
  canvasElement = createCanvas(windowWidth, windowHeight);
  canvasElement.parent(document.body);
  canvasElement.hide();

  // Login elements
  loginSection = select('#login');
  appSection = select('#app');
  usernameInput = select('#username');
  passwordInput = select('#password');
  loginButton = select('#loginBtn');
  loginMessage = select('#loginMessage');
  loginButton.mousePressed(handleLogin);

  // Tab controls
  tabButtons = selectAll('.tab-btn');
  tabPanels = selectAll('.tab-panel');
  tabButtons.forEach((btn) => btn.mousePressed(() => switchTab(btn)));

  // App elements
  imageInput = select('#imageUpload');
  videoInput = select('#videoUpload');
  statusDiv = select('#status');
  processingButton = select('#startBtn');
  textInput = select('#textInput');
  textSizeSlider = select('#textSize');
  textColorInput = select('#textColor');

  outfitInput = select('#outfitUpload');
  outfitScaleSlider = select('#outfitScale');
  outfitOffsetSlider = select('#outfitOffset');
  outfitOpacitySlider = select('#outfitOpacity');
  clearOutfitButton = select('#clearOutfitBtn');

  imageInput.elt.addEventListener('change', handleImageFile);
  videoInput.elt.addEventListener('change', handleVideoFile);
  outfitInput.elt.addEventListener('change', handleOutfitFile);
  clearOutfitButton.mousePressed(() => {
    outfitImage = null;
    statusDiv.html('Outfit removed. Upload a new one to continue dressing up.');
  });

  processingButton.mousePressed(startProcessing);

  // Recording controls
  recordControls = select('#recordControls');
  recordButton = select('#recordBtn');
  downloadLink = select('#downloadLink');
  recordButton.mousePressed(toggleRecording);
  recordControls.style('display', 'none');
  downloadLink.style('display', 'none');

  if (window.FaceDetection) {
    faceDetection = new FaceDetection({
      locateFile: (file) =>
        `https://cdn.jsdelivr.net/npm/@mediapipe/face_detection@0.4.1646425229/${file}`,
    });

    faceDetection.setOptions({
      model: 'short',
      minDetectionConfidence: 0.5,
    });

    faceDetection.onResults(onFaceResults);
    faceDetectionReady = true;
  } else {
    console.error('MediaPipe Face Detection library not loaded.');
    statusDiv.html('Error: Face detection library not loaded.');
  }
}
Line-by-line explanation (9 lines)

🔧 Subcomponents:

calculation Canvas Creation and Setup canvasElement = createCanvas(windowWidth, windowHeight);

Creates a full-window canvas and hides it until video processing begins

calculation DOM Element References loginSection = select('#login');

Caches all HTML elements into variables so they can be controlled from JavaScript

calculation Event Listener Attachment imageInput.elt.addEventListener('change', handleImageFile);

Connects file input changes to handler functions that process uploaded files

conditional MediaPipe Face Detection Initialization if (window.FaceDetection) {

Checks if MediaPipe library loaded from CDN, then configures and activates it

canvasElement = createCanvas(windowWidth, windowHeight);
Creates a p5.js canvas sized to the entire window; stores the reference for later access
canvasElement.parent(document.body);
Ensures the canvas is placed directly in the HTML body element
canvasElement.hide();
Hides the canvas initially so the login form and controls are visible first
tabButtons = selectAll('.tab-btn');
Selects all tab buttons from the HTML and stores them in an array for later manipulation
tabButtons.forEach((btn) => btn.mousePressed(() => switchTab(btn)));
Attaches a click handler to each tab button that switches between Face Swap and Dress Up panels
imageInput.elt.addEventListener('change', handleImageFile);
When the user picks an image file, triggers handleImageFile() to process it
faceDetection = new FaceDetection({
Creates a new MediaPipe FaceDetection instance using a CDN URL for its model files
minDetectionConfidence: 0.5,
Sets the detector to require 50% confidence before reporting a face; adjusting this tunes sensitivity
faceDetection.onResults(onFaceResults);
Registers a callback function that fires whenever the detector finishes processing a frame

draw()

draw() runs 60 times per second and is the heartbeat of this app. It displays the video, finds the largest detected face, draws overlays onto it, and continuously feeds new frames to the face detector. Understanding this function teaches you how to integrate real-time external processing (MediaPipe) with p5.js rendering, handle async callbacks, and manage state flags to prevent race conditions.

🔬 This loop finds the biggest face. What happens if you change the condition to `if (area < largestArea)` to pick the smallest face instead? Or add `console.log(detections.length)` inside the loop to see how many faces are detected per frame?

  for (const det of detections) {
    const box = det.boundingBox;
    const w = box.width * width;
    const h = box.height * height;
    const area = w * h;
    if (area > largestArea) {
      largestArea = area;
      targetDetection = det;
    }
  }

🔬 This block controls how often frames are sent to the detector. What if you wrap it in `if (frameCount % 2 === 0)` to send frames every other frame instead of every frame? Would that speed up the main loop at the cost of less frequent detections?

  if (!isSendingToDetector && !isProcessingSourceImage) {
    isSendingToDetector = true;
    faceDetection.send({ image: videoElement.elt }).catch((err) => {
      console.error(err);
      isSendingToDetector = false;
    });
  }
function draw() {
  if (!videoElement || videoElement.elt.readyState < 2) return;

  if (width !== videoElement.width || height !== videoElement.height) {
    resizeCanvas(videoElement.width, videoElement.height);
  }

  image(videoElement, 0, 0, width, height);

  let targetDetection = null;
  let largestArea = 0;

  for (const det of detections) {
    const box = det.boundingBox;
    const w = box.width * width;
    const h = box.height * height;
    const area = w * h;
    if (area > largestArea) {
      largestArea = area;
      targetDetection = det;
    }
  }

  if (targetDetection && sourceFaceImage) {
    drawFaceOverlay(targetDetection);
  }

  if (targetDetection && outfitImage) {
    drawOutfitOverlay(targetDetection);
  }

  if (!isSendingToDetector && !isProcessingSourceImage) {
    isSendingToDetector = true;
    faceDetection.send({ image: videoElement.elt }).catch((err) => {
      console.error(err);
      isSendingToDetector = false;
    });
  }

  drawOverlayText();
}
Line-by-line explanation (11 lines)

🔧 Subcomponents:

conditional Video Readiness Guard if (!videoElement || videoElement.elt.readyState < 2) return;

Prevents drawing until video data is actually available; avoids crashes from empty frames

conditional Dynamic Canvas Resizing if (width !== videoElement.width || height !== videoElement.height) {

Matches canvas size to video dimensions so overlays align perfectly

for-loop Find Largest Detected Face for (const det of detections) {

Iterates through all detected faces and selects the one with the biggest bounding box area

conditional Asynchronous Face Detection Request if (!isSendingToDetector && !isProcessingSourceImage) {

Prevents overlapping detection requests by sending a new frame only when the previous result arrived

if (!videoElement || videoElement.elt.readyState < 2) return;
Exits early if no video is loaded or video data is not yet available, preventing crashes
if (width !== videoElement.width || height !== videoElement.height) {
Checks if canvas size has diverged from video size, which happens when video dimensions change
resizeCanvas(videoElement.width, videoElement.height);
Resizes the p5.js canvas to match the video, ensuring all coordinates align correctly
image(videoElement, 0, 0, width, height);
Draws the current video frame across the entire canvas as the base layer
for (const det of detections) {
Loops through all faces detected in this frame by the MediaPipe detector
const area = w * h;
Calculates the area of the bounding box (width × height) to compare face sizes
if (area > largestArea) {
Compares the current face's area to the largest seen so far; if bigger, makes it the target
if (targetDetection && sourceFaceImage) {
Only draws the source face overlay if a face was detected AND a source face image exists
isSendingToDetector = true;
Sets a flag to prevent sending another frame until the detector finishes processing this one
faceDetection.send({ image: videoElement.elt }) .catch((err) => {
Asynchronously sends the current video frame to the MediaPipe detector; if it fails, logs the error and resets the flag
drawOverlayText();
Draws the custom text overlay at the top of the video (if any text was entered)

handleLogin()

handleLogin() is called when the user clicks the login button. It demonstrates basic form validation and conditional UI transitions—hiding one section and showing another based on authentication state. In a real app, you would send credentials to a server instead of checking them locally.

function handleLogin() {
  const username = usernameInput.value().trim();
  const password = passwordInput.value().trim();

  if (!username || !password) {
    loginMessage.html('Please enter both username and password.');
    return;
  }

  if (username !== 'admin' || password !== '123456789') {
    loginMessage.html('Invalid credentials. Try username "admin" and password "123456789".');
    return;
  }

  isAuthenticated = true;
  loginMessage.html('');
  loginSection.hide();
  appSection.show();
  statusDiv.html('Welcome to BIG ONE! Upload a face image and a video.');
}
Line-by-line explanation (7 lines)

🔧 Subcomponents:

conditional Input Validation if (!username || !password) {

Checks that both fields have text before attempting authentication

conditional Credential Verification if (username !== 'admin' || password !== '123456789') {

Verifies the hardcoded credentials and shows an error message if they don't match

calculation UI Transition on Success loginSection.hide();

Hides the login form and shows the main app UI when authentication succeeds

const username = usernameInput.value().trim();
Reads the username input field and removes leading/trailing whitespace
const password = passwordInput.value().trim();
Reads the password input field and removes leading/trailing whitespace
if (!username || !password) {
Checks if either field is empty and shows an error message if so
if (username !== 'admin' || password !== '123456789') {
Verifies that both the username is 'admin' AND the password is '123456789'; if either is wrong, shows an error
isAuthenticated = true;
Sets the authentication flag to true, allowing other parts of the code to check user access
loginSection.hide();
Hides the login form so the user cannot see it anymore
appSection.show();
Shows the main app with tabs and controls now that the user is authenticated

handleImageFile()

handleImageFile() is triggered when the user selects an image via the file input. It demonstrates file handling in the browser, blob URL creation, and asynchronous image loading with p5.js's loadImage(). The callback pattern here is key—the image is loaded in the background while the app stays responsive.

function handleImageFile(event) {
  const file = event.target.files[0];
  if (!file) return;

  const objectURL = URL.createObjectURL(file);
  sourceFaceImage = null;
  processingButton.attribute('disabled', true);

  loadImage(objectURL, (img) => {
    sourceImage = img;
    statusDiv.html('Detecting face in the uploaded photo...');
    prepareSourceDetection(objectURL);
  });
}
Line-by-line explanation (8 lines)

🔧 Subcomponents:

calculation File Reading const file = event.target.files[0];

Extracts the selected file from the input element's file list

calculation Blob URL Creation const objectURL = URL.createObjectURL(file);

Creates a temporary URL that points to the file data in memory, allowing p5.js to load it

calculation Asynchronous Image Loading loadImage(objectURL, (img) => {

Loads the image asynchronously and calls a callback when complete, preventing the app from freezing

const file = event.target.files[0];
Gets the first (and only) file from the file input's files array
if (!file) return;
If no file was selected, exit early to avoid errors
const objectURL = URL.createObjectURL(file);
Creates a temporary URL (blob:...) that the browser can use to access the file data
sourceFaceImage = null;
Clears any previous source face so we detect fresh from the new image
processingButton.attribute('disabled', true);
Disables the Start button until face detection completes and succeeds
loadImage(objectURL, (img) => {
p5.js loads the image from the blob URL asynchronously; when done, the callback runs with the loaded image
sourceImage = img;
Stores the full loaded image for reference during face detection
prepareSourceDetection(objectURL);
Passes the blob URL to the face detection preparation function

prepareSourceDetection()

prepareSourceDetection() shows how to integrate a third-party library (MediaPipe) into p5.js. It creates a native Image element (not p5.Image), loads an image from a blob URL, and sends it to an external detector. The key insight is that different libraries expect different image formats—p5.Image for p5.js functions, and raw HTML Image elements for MediaPipe.

function prepareSourceDetection(url) {
  const imgEl = new Image();
  imgEl.onload = () => {
    if (!faceDetectionReady) {
      statusDiv.html('Face detector not ready yet. Please wait.');
      return;
    }
    isProcessingSourceImage = true;
    faceDetection.send({ image: imgEl }).catch((err) => {
      console.error(err);
      isProcessingSourceImage = false;
      statusDiv.html('Error running face detector on the photo.');
    });
  };
  imgEl.onerror = () => {
    statusDiv.html('Unable to read the uploaded photo. Try another file.');
  };
  imgEl.src = url;
}
Line-by-line explanation (7 lines)

🔧 Subcomponents:

calculation Native Image Element Creation const imgEl = new Image();

Creates a raw DOM Image element (not p5.Image) because MediaPipe expects native HTML elements

conditional Detector Readiness Check if (!faceDetectionReady) {

Prevents sending frames to the detector before it has finished loading from CDN

calculation Frame Submission to Detector faceDetection.send({ image: imgEl })

Sends the HTML Image element to MediaPipe's face detector asynchronously

const imgEl = new Image();
Creates a native JavaScript Image object (not p5.Image); MediaPipe requires the HTML native element
imgEl.onload = () => {
Defines a callback that runs when the image finishes loading from the blob URL
if (!faceDetectionReady) {
Checks if the MediaPipe library finished initializing; if not, shows a message and waits
isProcessingSourceImage = true;
Sets a flag so draw() knows not to send additional frames while this detection is in progress
faceDetection.send({ image: imgEl })
Sends the loaded image to MediaPipe's face detector; results arrive asynchronously in onFaceResults()
.catch((err) => {
If the detector throws an error (e.g., network failure), the catch block runs
imgEl.src = url;
Sets the blob URL as the image source, which triggers the onload callback when the image is ready

handleSourceFaceResults()

handleSourceFaceResults() is called when the MediaPipe detector finishes analyzing the source face image. It extracts the face region, crops it into an off-screen graphics buffer, and applies an elliptical mask to make edges blend smoothly. This teaches you bounding box math, off-screen rendering with createGraphics(), and image masking—three powerful techniques for compositing.

🔬 These four lines convert the normalized bounding box (values 0–1) into actual pixel coordinates. What happens if you multiply by 1.2 instead of 1.0 to crop a bigger region around the face (e.g., `let sw = box.width * imgW * 1.2;`)? Would you capture more hair and shoulders?

  let sx = (box.xCenter - box.width / 2) * imgW;
  let sy = (box.yCenter - box.height / 2) * imgH;
  let sw = box.width * imgW;
  let sh = box.height * imgH;
function handleSourceFaceResults(results) {
  const det = results && results.detections ? results.detections[0] : null;
  if (!det || !sourceImage) {
    statusDiv.html('No face detected in the photo. Please try another image.');
    sourceFaceImage = null;
    return;
  }

  const box = det.boundingBox;
  const imgW = sourceImage.width;
  const imgH = sourceImage.height;

  let sx = (box.xCenter - box.width / 2) * imgW;
  let sy = (box.yCenter - box.height / 2) * imgH;
  let sw = box.width * imgW;
  let sh = box.height * imgH;

  sx = constrain(sx, 0, imgW);
  sy = constrain(sy, 0, imgH);
  sw = constrain(sw, 1, imgW - sx);
  sh = constrain(sh, 1, imgH - sy);

  const faceG = createGraphics(sw, sh);
  faceG.image(sourceImage, -sx, -sy, imgW, imgH);

  const maskG = createGraphics(sw, sh);
  maskG.clear();
  maskG.noStroke();
  maskG.fill(255);
  maskG.ellipse(sw / 2, sh / 2, sw * 0.95, sh * 1.05);

  const croppedFace = faceG.get();
  croppedFace.mask(maskG);
  sourceFaceImage = croppedFace;

  statusDiv.html('Face found! Upload a video (or click Start Overlay).');
  if (videoElement) {
    processingButton.removeAttribute('disabled');
  }
}
Line-by-line explanation (12 lines)

🔧 Subcomponents:

conditional Detection Extraction and Validation const det = results && results.detections ? results.detections[0] : null;

Safely extracts the first detection from the results object, or null if no faces were found

calculation Bounding Box to Pixel Coordinates let sx = (box.xCenter - box.width / 2) * imgW;

Converts normalized bounding box coordinates (0-1) to actual pixel positions in the image

calculation Boundary Constraint sx = constrain(sx, 0, imgW);

Clamps the crop region so it never goes outside the image boundaries

calculation Graphics Buffer Cropping const faceG = createGraphics(sw, sh);

Creates an off-screen graphics buffer sized exactly to the face region

calculation Elliptical Mask Creation maskG.ellipse(sw / 2, sh / 2, sw * 0.95, sh * 1.05);

Draws a soft elliptical mask to make the cropped face edges blend smoothly

const det = results && results.detections ? results.detections[0] : null;
Safely extracts the first detected face; if no detections exist, det becomes null
if (!det || !sourceImage) {
If face detection failed or the source image is missing, shows an error and exits
const box = det.boundingBox;
Gets the face's bounding box (xCenter, yCenter, width, height all normalized 0-1)
let sx = (box.xCenter - box.width / 2) * imgW;
Converts the normalized x-center and width into pixel coordinates: (center - half-width) * image-width
sx = constrain(sx, 0, imgW);
Clamps sx between 0 and image width to ensure the crop stays inside the image
const faceG = createGraphics(sw, sh);
Creates an off-screen p5.Renderer (graphics buffer) sized exactly to the bounding box
faceG.image(sourceImage, -sx, -sy, imgW, imgH);
Draws the full source image into the graphics buffer, offset by (-sx, -sy) so only the face region is visible
const maskG = createGraphics(sw, sh);
Creates another graphics buffer to hold the mask (grayscale image used to control transparency)
maskG.ellipse(sw / 2, sh / 2, sw * 0.95, sh * 1.05);
Draws a white ellipse in the mask that is slightly smaller than the buffer (95-105% of face size)
const croppedFace = faceG.get();
Extracts a p5.Image from the graphics buffer containing the cropped face region
croppedFace.mask(maskG);
Applies the elliptical mask to make the edges of the face fade to transparency, blending it smoothly
sourceFaceImage = croppedFace;
Stores the final cropped, masked face image for use in the draw loop

drawFaceOverlay()

drawFaceOverlay() is called every frame to composite the source face onto the detected target face in the video. It scales the source face to match the target's width, positions it at the target's center using translate(), and applies a slight transparency so it blends naturally. This demonstrates scaling math, coordinate transforms, and the push/pop pattern for isolating drawing state.

🔬 This block moves the origin to the face center, then draws the source face offset by half its size (so it appears centered). What if you remove the `translate()` and `pop()` and instead draw at `image(sourceFaceImage, targetCenter.x - drawW / 2, targetCenter.y - drawH / 2, drawW, drawH)` without changing the origin? Would the overlay still appear in the same place?

  push();
  translate(targetCenter.x, targetCenter.y);
  tint(255, 235);
  image(sourceFaceImage, -drawW / 2, -drawH / 2, drawW, drawH);
  pop();
function drawFaceOverlay(det) {
  const box = det.boundingBox;
  const targetW = box.width * width;
  const targetCenter = createVector(box.xCenter * width, box.yCenter * height);

  const scaleFactor = targetW / sourceFaceImage.width;
  const drawW = sourceFaceImage.width * scaleFactor;
  const drawH = sourceFaceImage.height * scaleFactor;

  push();
  translate(targetCenter.x, targetCenter.y);
  tint(255, 235);
  image(sourceFaceImage, -drawW / 2, -drawH / 2, drawW, drawH);
  pop();
}
Line-by-line explanation (11 lines)

🔧 Subcomponents:

calculation Scale Factor Calculation const scaleFactor = targetW / sourceFaceImage.width;

Calculates how much to enlarge the source face to match the detected target face size

calculation Target Center Position const targetCenter = createVector(box.xCenter * width, box.yCenter * height);

Converts the normalized bounding box center into canvas pixel coordinates

calculation Translation and Drawing translate(targetCenter.x, targetCenter.y);

Moves the origin to the face center so the image draws centered on the target face

const box = det.boundingBox;
Gets the bounding box of the detected target face in the video
const targetW = box.width * width;
Converts the normalized box width (0-1) to actual pixels by multiplying by canvas width
const targetCenter = createVector(box.xCenter * width, box.yCenter * height);
Creates a p5.Vector at the center of the target face in canvas coordinates
const scaleFactor = targetW / sourceFaceImage.width;
Calculates the ratio needed to scale the source face to match the target face width
const drawW = sourceFaceImage.width * scaleFactor;
Calculates the final width the source face should be drawn at
const drawH = sourceFaceImage.height * scaleFactor;
Scales the height proportionally using the same scale factor (preserves aspect ratio)
push();
Saves the current drawing state (transform, tint, fill, etc.) before making changes
translate(targetCenter.x, targetCenter.y);
Moves the origin (0,0) to the center of the target face so the source face draws centered there
tint(255, 235);
Applies a slight tint and transparency (alpha 235) to the source face so it blends with the video
image(sourceFaceImage, -drawW / 2, -drawH / 2, drawW, drawH);
Draws the source face centered at the translated origin (offset by half width and height) at the calculated size
pop();
Restores the saved drawing state so subsequent draws are not affected by the translation and tint

drawOutfitOverlay()

drawOutfitOverlay() composites the outfit image below the detected face, with real-time control via three sliders. It demonstrates how to read HTML input values in p5.js, perform positioning math (face center + offset), and apply transparency. The key insight is that all three sliders update instantly every frame, making the outfit responsive to user interaction.

🔬 These three lines read slider values and convert them into numbers. What if you log these values to the console (`console.log('scale:', outfitScale, 'offset:', offsetY, 'opacity:', opacity)`) inside this function? You could then move the sliders and watch the console to see the exact values being read.

  const outfitScale = Number(outfitScaleSlider.value()) / 100;
  const offsetY = Number(outfitOffsetSlider.value());
  const opacity = Number(outfitOpacitySlider.value());
function drawOutfitOverlay(det) {
  const box = det.boundingBox;
  const faceWidth = box.width * width;
  const outfitScale = Number(outfitScaleSlider.value()) / 100;
  const offsetY = Number(outfitOffsetSlider.value());
  const opacity = Number(outfitOpacitySlider.value());

  const outfitW = faceWidth * outfitScale;
  const scaleFactor = outfitW / outfitImage.width;
  const outfitH = outfitImage.height * scaleFactor;

  const targetCenterX = box.xCenter * width;
  const targetCenterY = (box.yCenter * height) + (box.height * height * 0.6) + offsetY;

  push();
  translate(targetCenterX, targetCenterY);
  tint(255, opacity);
  image(outfitImage, -outfitW / 2, -outfitH / 2, outfitW, outfitH);
  pop();
}
Line-by-line explanation (8 lines)

🔧 Subcomponents:

calculation Slider Value Reading const outfitScale = Number(outfitScaleSlider.value()) / 100;

Converts slider value (50-200) to a decimal multiplier (0.5-2.0) for dynamic outfit sizing

calculation Vertical Positioning const targetCenterY = (box.yCenter * height) + (box.height * height * 0.6) + offsetY;

Positions outfit below the face center by adding 60% of face height, plus user offset from slider

const faceWidth = box.width * width;
Converts the normalized face width to canvas pixels
const outfitScale = Number(outfitScaleSlider.value()) / 100;
Reads the scale slider (50-200 pixels) and converts to a ratio (0.5-2.0) for multiplication
const offsetY = Number(outfitOffsetSlider.value());
Reads the vertical offset slider (-200 to 200 pixels) to adjust how far below the face the outfit appears
const opacity = Number(outfitOpacitySlider.value());
Reads the opacity slider (30-255) to control the outfit's transparency
const outfitW = faceWidth * outfitScale;
Calculates outfit width by scaling the face width by the slider ratio
const scaleFactor = outfitW / outfitImage.width;
Calculates the scaling ratio needed to draw the outfit at the target width
const targetCenterY = (box.yCenter * height) + (box.height * height * 0.6) + offsetY;
Positions the outfit below the face: face center + 60% of face height + user offset
tint(255, opacity);
Sets the outfit's transparency using the opacity slider value

drawOverlayText()

drawOverlayText() renders custom text onto every video frame at the top center. It reads from an input field and sliders in real-time, demonstrating how to integrate HTML form controls into p5.js drawing. The key techniques are textAlign() for centering, proportional strokeWeight() for scaling, and reading slider/input values every frame.

function drawOverlayText() {
  const message = textInput.value();
  if (!message) return;

  push();
  const size = Number(textSizeSlider.value());
  textAlign(CENTER, CENTER);
  textSize(size);
  fill(textColorInput.value());
  stroke(0, 150);
  strokeWeight(Math.max(size * 0.08, 2));
  textStyle(BOLD);
  text(message, width / 2, height * 0.1);
  pop();
}
Line-by-line explanation (10 lines)

🔧 Subcomponents:

conditional Empty Message Guard if (!message) return;

Exits early if no text was entered, avoiding rendering an invisible empty string

calculation Text Styling Configuration textAlign(CENTER, CENTER);

Centers the text both horizontally and vertically around its position

const message = textInput.value();
Reads the current text from the user's input field
if (!message) return;
If the input is empty, skip rendering to avoid drawing invisible text
const size = Number(textSizeSlider.value());
Reads the text size slider (12-120 pixels) and converts to a number
textAlign(CENTER, CENTER);
Sets text alignment so text is centered both horizontally and vertically at the given position
textSize(size);
Sets the font size using the slider value
fill(textColorInput.value());
Sets the text fill color to the value from the color input (hex color code)
stroke(0, 150);
Sets a dark semi-transparent stroke (outline) around the text for readability against any background
strokeWeight(Math.max(size * 0.08, 2));
Makes the stroke weight proportional to text size (8% of size, minimum 2 pixels) so it scales naturally
textStyle(BOLD);
Sets the text to bold for more impact
text(message, width / 2, height * 0.1);
Draws the text centered horizontally and positioned at 10% from the top of the canvas

toggleRecording()

toggleRecording() acts as a simple state-based dispatcher—it checks a boolean flag and calls one of two functions. This is a common pattern for button interactions that have two states (play/pause, on/off, start/stop).

function toggleRecording() {
  if (isRecording) {
    stopRecording();
  } else {
    startRecording();
  }
}
Line-by-line explanation (3 lines)

🔧 Subcomponents:

conditional Recording State Toggle if (isRecording) {

Checks the current recording state and calls the appropriate function

if (isRecording) {
Checks if a recording is currently in progress
stopRecording();
If recording, calls stopRecording() to end and save the video
startRecording();
If not recording, calls startRecording() to begin capturing the canvas

startRecording()

startRecording() captures the p5.js canvas as a live video stream and encodes it to WebM format using the browser's MediaRecorder API. This teaches you how to extract canvas pixels as a stream, handle asynchronous recording callbacks, combine binary data chunks, and create downloadable blobs—powerful techniques for any p5.js project that needs to save output.

🔬 When recording stops, this callback combines all chunks and creates a download link. What if you log the blob size (`console.log('Video size:', blob.size, 'bytes')`) to see how much data was recorded? Or add `statusDiv.html('Video ready! File size: ' + (blob.size / 1024 / 1024).toFixed(2) + ' MB')` to show the user?

    mediaRecorder.onstop = () => {
      if (recordedChunks.length === 0) return;
      const blob = new Blob(recordedChunks, { type: 'video/webm' });
      const url = URL.createObjectURL(blob);
      downloadLink.attribute('href', url);
      downloadLink.attribute('download', `big-one-${Date.now()}.webm`);
      downloadLink.style('display', 'block');
    };
function startRecording() {
  if (!canvasElement) return;
  if (!(canvasElement.elt && canvasElement.elt.captureStream)) {
    statusDiv.html('Recording not supported in this browser.');
    return;
  }

  try {
    const stream = canvasElement.elt.captureStream(30);
    recordedChunks = [];
    mediaRecorder = new MediaRecorder(stream, { mimeType: 'video/webm;codecs=vp9' });

    mediaRecorder.ondataavailable = (event) => {
      if (event.data && event.data.size > 0) {
        recordedChunks.push(event.data);
      }
    };

    mediaRecorder.onstop = () => {
      if (recordedChunks.length === 0) return;
      const blob = new Blob(recordedChunks, { type: 'video/webm' });
      const url = URL.createObjectURL(blob);
      downloadLink.attribute('href', url);
      downloadLink.attribute('download', `big-one-${Date.now()}.webm`);
      downloadLink.style('display', 'block');
    };

    mediaRecorder.start();
    isRecording = true;
    recordButton.html('Stop Recording');
    downloadLink.style('display', 'none');
    statusDiv.html('Recording canvas... Click "Stop Recording" to finish.');
  } catch (err) {
    console.error(err);
    statusDiv.html('Unable to start recording: ' + err.message);
  }
}
Line-by-line explanation (15 lines)

🔧 Subcomponents:

conditional Canvas and Browser Capability Check if (!(canvasElement.elt && canvasElement.elt.captureStream)) {

Verifies that captureStream() is available in the browser before attempting to use it

calculation Canvas Stream Capture const stream = canvasElement.elt.captureStream(30);

Captures the canvas as a live video stream at 30 frames per second

calculation MediaRecorder Initialization mediaRecorder = new MediaRecorder(stream, { mimeType: 'video/webm;codecs=vp9' });

Creates a recorder that will encode the canvas stream into WebM video format

calculation Data Collection Callback mediaRecorder.ondataavailable = (event) => {

Fires whenever the recorder has a chunk of video data ready; collects chunks into an array

calculation Finalization Callback mediaRecorder.onstop = () => {

Fires when recording stops; combines chunks into a blob and creates a download link

if (!canvasElement) return;
Exits early if no canvas exists (should not happen, but defensive programming)
if (!(canvasElement.elt && canvasElement.elt.captureStream)) {
Checks if the browser supports captureStream(); some older browsers don't have it
const stream = canvasElement.elt.captureStream(30);
Captures the p5.js canvas as a live video stream at 30 fps; returns a MediaStream object
recordedChunks = [];
Initializes an empty array to collect video data chunks as they become available
mediaRecorder = new MediaRecorder(stream, { mimeType: 'video/webm;codecs=vp9' });
Creates a MediaRecorder that will encode the canvas stream as WebM video with VP9 codec
mediaRecorder.ondataavailable = (event) => {
Registers a callback that fires whenever the recorder produces a chunk of encoded video data
if (event.data && event.data.size > 0) {
Checks that the chunk is not empty before adding it to the array
recordedChunks.push(event.data);
Appends this chunk to the array so it can be combined later
mediaRecorder.onstop = () => {
Registers a callback that fires when recording is explicitly stopped
const blob = new Blob(recordedChunks, { type: 'video/webm' });
Combines all recorded chunks into a single Blob (binary data) representing the complete video file
const url = URL.createObjectURL(blob);
Creates a temporary blob:// URL that points to the video data in memory
downloadLink.attribute('href', url);
Sets the download link's href to the blob URL so clicking it downloads the video
downloadLink.attribute('download', `big-one-${Date.now()}.webm`);
Sets the filename to include the current timestamp, ensuring unique filenames for multiple recordings
mediaRecorder.start();
Starts recording; from this point, all canvas drawing is captured
isRecording = true;
Sets the state flag so toggleRecording() knows a recording is in progress

stopRecording()

stopRecording() cleanly stops the MediaRecorder and resets the UI. The silent parameter is useful for internal cleanup calls that should not distract the user with status messages. It demonstrates defensive programming (checking that recorder exists) and state management (toggling isRecording flag).

function stopRecording(silent = false) {
  if (mediaRecorder && isRecording) {
    mediaRecorder.stop();
  }
  isRecording = false;
  recordButton.html('Start Recording');
  if (!silent) {
    statusDiv.html('Recording stopped. Click the download link to save your video.');
  }
}
Line-by-line explanation (6 lines)

🔧 Subcomponents:

conditional Recorder Termination if (mediaRecorder && isRecording) {

Safely stops the recorder only if it exists and is currently recording

function stopRecording(silent = false) {
Takes an optional silent parameter (default false); when true, suppresses status messages
if (mediaRecorder && isRecording) {
Checks that a recorder exists and is active before calling stop()
mediaRecorder.stop();
Stops the recording; triggers the onstop callback defined in startRecording()
isRecording = false;
Sets the state flag to false so toggleRecording() knows recording is no longer in progress
recordButton.html('Start Recording');
Updates the button text from 'Stop Recording' back to 'Start Recording'
if (!silent) {
Shows a status message unless silent mode is enabled (useful when stopping for cleanup)

handleVideoFile()

handleVideoFile() loads a video file into p5.js and prepares it for frame-by-frame processing. It demonstrates file input handling, p5.createVideo(), and the difference between p5.Renderer objects (videoElement) and their underlying HTML elements (.elt). The video is hidden because we draw it manually in draw() using image(videoElement, ...) rather than letting the browser display it.

function handleVideoFile(event) {
  const file = event.target.files[0];
  if (!file) return;
  if (videoElement) videoElement.remove();

  videoElement = createVideo(URL.createObjectURL(file));
  videoElement.size(width, height);
  videoElement.hide();
  videoElement.elt.muted = true;
  videoElement.volume(0);
  statusDiv.html('Video ready. Upload a face photo if you have not already.');

  if (sourceFaceImage) {
    processingButton.removeAttribute('disabled');
  }
}
Line-by-line explanation (8 lines)

🔧 Subcomponents:

calculation p5.Video Element Creation videoElement = createVideo(URL.createObjectURL(file));

Creates a p5.js video player from the uploaded file and stores it

calculation Video Configuration videoElement.elt.muted = true;

Mutes audio and hides the video element so only the canvas shows it

const file = event.target.files[0];
Extracts the first selected file from the video input
if (!file) return;
Exits early if no file was selected
if (videoElement) videoElement.remove();
If a video was already loaded, removes it from the DOM to prevent multiple videos playing
videoElement = createVideo(URL.createObjectURL(file));
p5.js loads the file as a video and returns a p5.Renderer object for video playback
videoElement.size(width, height);
Sizes the video to the current canvas dimensions (not visible yet, just sets internal size)
videoElement.hide();
Hides the video element from the DOM so only the canvas displays it
videoElement.elt.muted = true;
Accesses the underlying HTML video element and mutes its audio track
videoElement.volume(0);
Sets the volume to 0 as an extra safeguard (p5.js method)

handleOutfitFile()

handleOutfitFile() is simpler than handleImageFile() because the outfit does not need face detection—just load and store it. It reuses the same async loadImage() pattern you saw earlier, showing that callback-based file loading is the standard approach in p5.js.

function handleOutfitFile(event) {
  const file = event.target.files[0];
  if (!file) return;
  loadImage(URL.createObjectURL(file), (img) => {
    outfitImage = img;
    statusDiv.html('Outfit ready! Adjust size and position in the Dress Up tab.');
  });
}
Line-by-line explanation (4 lines)

🔧 Subcomponents:

calculation Asynchronous Outfit Loading loadImage(URL.createObjectURL(file), (img) => {

Loads the outfit image asynchronously and stores it once ready

const file = event.target.files[0];
Extracts the selected outfit image file
if (!file) return;
Exits if no file was selected
loadImage(URL.createObjectURL(file), (img) => {
p5.js loads the image asynchronously from the blob URL; when ready, the callback receives the loaded image
outfitImage = img;
Stores the loaded outfit image for use in drawOutfitOverlay()

switchTab()

switchTab() implements a tab system by toggling CSS classes. It's a common pattern: click a button, remove 'active' from everything, add 'active' to the clicked element and its associated panel. This teaches you HTML data attributes, the forEach loop for batch operations, and how CSS classes control visibility.

function switchTab(btn) {
  const target = btn.attribute('data-target');
  tabButtons.forEach((b) => b.removeClass('active'));
  tabPanels.forEach((panel) => panel.removeClass('active'));
  btn.addClass('active');
  select(`#${target}`).addClass('active');
}
Line-by-line explanation (5 lines)

🔧 Subcomponents:

calculation Active Class Toggle tabButtons.forEach((b) => b.removeClass('active'));

Removes the active class from all buttons and panels, then re-adds it to the clicked button and its target panel

const target = btn.attribute('data-target');
Reads the data-target attribute from the clicked button (e.g., 'faceTab' or 'dressTab')
tabButtons.forEach((b) => b.removeClass('active'));
Loops through all tab buttons and removes the 'active' class from each
tabPanels.forEach((panel) => panel.removeClass('active'));
Loops through all tab panels and removes the 'active' class from each, hiding them all
btn.addClass('active');
Adds the 'active' class back to the clicked button so it appears highlighted
select(`#${target}`).addClass('active');
Selects the panel matching the button's data-target and adds 'active' to show it

onFaceResults()

onFaceResults() is the callback registered with MediaPipe in setup(). Every time the detector finishes analyzing a frame, this function fires. The key insight is that it handles two different cases: source image analysis (one-time face extraction) and video frame analysis (continuous detection). By checking isProcessingSourceImage, it routes to the appropriate handler.

function onFaceResults(results) {
  if (isProcessingSourceImage) {
    handleSourceFaceResults(results);
    isProcessingSourceImage = false;
    return;
  }

  detections = results && results.detections ? results.detections : [];
  isSendingToDetector = false;
}
Line-by-line explanation (5 lines)

🔧 Subcomponents:

conditional Source Image vs. Video Frame Routing if (isProcessingSourceImage) {

Routes detection results to different handlers depending on whether we're processing the source image or a video frame

if (isProcessingSourceImage) {
Checks if the detector was analyzing the source face image (vs. a video frame)
handleSourceFaceResults(results);
If source image, processes results to extract and mask the face
isProcessingSourceImage = false;
Resets the flag so future detections are handled as video frames
detections = results && results.detections ? results.detections : [];
If video frame, stores the detections array (empty array if no results)
isSendingToDetector = false;
Clears the flag so draw() can send the next video frame to the detector

📦 Key Variables

canvasElement p5.Renderer

Stores the p5.js canvas object so it can be accessed, shown/hidden, and captured for recording

let canvasElement;
videoElement p5.Renderer or null

Holds the loaded video file; used in draw() to display frames and send to face detection

let videoElement = null;
sourceImage p5.Image or null

Stores the full loaded source face image before cropping; used during face detection extraction

let sourceImage = null;
sourceFaceImage p5.Image or null

Stores the cropped and masked source face image; drawn onto detected faces each frame

let sourceFaceImage = null;
outfitImage p5.Image or null

Stores the loaded outfit image; drawn below detected faces when present

let outfitImage = null;
isAuthenticated boolean

Tracks whether the user has successfully logged in; controls UI visibility

let isAuthenticated = false;
faceDetection MediaPipe FaceDetection object or null

The MediaPipe face detection instance; send frames to it and receives results

let faceDetection;
faceDetectionReady boolean

Flags whether the MediaPipe library has finished loading from CDN

let faceDetectionReady = false;
isSendingToDetector boolean

Prevents overlapping detection requests by blocking new frames while the detector is busy

let isSendingToDetector = false;
isProcessingSourceImage boolean

Signals that the detector is currently analyzing the source face image (not a video frame)

let isProcessingSourceImage = false;
detections array of MediaPipe detection objects

Stores all faces detected in the current video frame; used by draw() to find and overlay faces

let detections = [];
mediaRecorder MediaRecorder object or null

Handles canvas-to-video encoding during recording; created in startRecording()

let mediaRecorder = null;
recordedChunks array of Blob chunks

Collects encoded video data during recording; combined into a final file when recording stops

let recordedChunks = [];
isRecording boolean

Tracks whether canvas recording is currently in progress

let isRecording = false;

🔧 Potential Improvements (6)

Here are some ways this code could be enhanced:

BUG draw() and detectionsloop

If no faces are detected in a frame, the previous frame's targetDetection is reused, causing overlays to 'stick' on screen even when the person leaves the frame

💡 Initialize targetDetection to null at the start of draw() to ensure overlays only appear when faces are currently detected: `let targetDetection = null;` before the loop

PERFORMANCE draw() face detection submission

Every frame, even if the detector is still processing the previous frame, the code calls faceDetection.send(). While isSendingToDetector prevents duplicate callbacks, it still creates unnecessary work.

💡 Consider skipping frames by adding frameCount % 2 === 0 to send every other frame, reducing CPU load on slower machines while still detecting faces frequently enough for smooth overlays

STYLE Global variable declarations

DOM references (videoInput, imageInput, etc.) and state variables are mixed together at the top with no organization, making the code harder to read

💡 Group related variables: DOM references in one block, image/video state in another, face detection state in a third. Add comments like `// ===== DOM References =====` to separate sections

FEATURE Face detection sensitivity

The minDetectionConfidence is hardcoded to 0.5, giving users no control over whether the detector finds subtle or only obvious faces

💡 Add an HTML input range slider (e.g., id='confidenceSlider' min='0.3' max='0.9' step='0.1') and read its value in setup(): `minDetectionConfidence: Number(select('#confidenceSlider').value())`

BUG handleImageFile() and handleVideoFile()

If a user uploads an image without waiting for face detection to complete, then uploads a video, the processingButton state is inconsistent (it may be disabled from a failed previous detection)

💡 Always enable processingButton when a video is loaded, regardless of previous state: `processingButton.removeAttribute('disabled');` in handleVideoFile()

PERFORMANCE recordedChunks array

Recording long videos can accumulate thousands of chunks in memory, potentially causing memory issues on low-end devices

💡 Consider using a Recording API with timeslice: `mediaRecorder.start(1000)` to get chunks every second, then compress/stream them to a server instead of storing all in memory

🔄 Code Flow

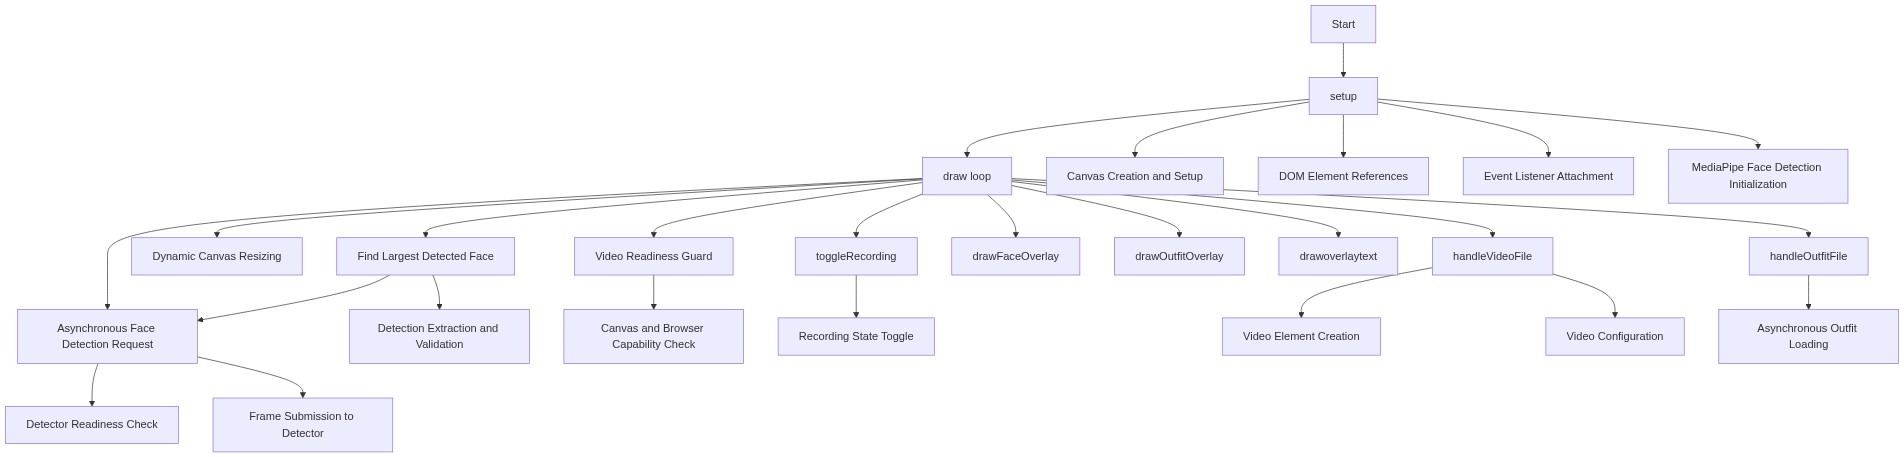
Code flow showing setup, draw, handlelogin, handleimagefile, preparesourcedetection, handlesourcefaceresults, drawfaceoverlay, drawoutfitoverlay, drawoverlaytext, togglerecording, startrecording, stoprecording, handlevideo, handleoutfitfile, switchTab, ononfaceresults

💡 Click on function names in the diagram to jump to their code

graph TD start[Start] --> setup[setup] setup --> draw[draw loop] click setup href "#fn-setup" click draw href "#fn-draw" setup --> canvas-init[Canvas Creation and Setup] setup --> dom-queries[DOM Element References] setup --> event-listeners[Event Listener Attachment] setup --> mediapipe-init[MediaPipe Face Detection Initialization] click canvas-init href "#sub-canvas-init" click dom-queries href "#sub-dom-queries" click event-listeners href "#sub-event-listeners" click mediapipe-init href "#sub-mediapipe-init" draw --> readiness-check[Video Readiness Guard] draw --> canvas-resize[Dynamic Canvas Resizing] draw --> largest-face-loop[Find Largest Detected Face] draw --> async-detection-send[Asynchronous Face Detection Request] draw --> handleVideoFile[handleVideoFile] draw --> handleOutfitFile[handleOutfitFile] draw --> drawFaceOverlay[drawFaceOverlay] draw --> drawOutfitOverlay[drawOutfitOverlay] draw --> drawOverlayText[drawoverlaytext] draw --> toggleRecording[toggleRecording] click readiness-check href "#sub-readiness-check" click canvas-resize href "#sub-canvas-resize" click largest-face-loop href "#sub-largest-face-loop" click async-detection-send href "#sub-async-detection-send" click handleVideoFile href "#fn-handlevideo" click handleOutfitFile href "#fn-handleoutfitfile" click drawFaceOverlay href "#fn-drawfaceoverlay" click drawOutfitOverlay href "#fn-drawoutfitoverlay" click drawOverlayText href "#fn-drawoverlaytext" click toggleRecording href "#fn-togglerecording" largest-face-loop --> async-detection-send largest-face-loop --> detection-extract[Detection Extraction and Validation] click detection-extract href "#sub-detection-extract" async-detection-send --> detector-readiness[Detector Readiness Check] async-detection-send --> detection-send[Frame Submission to Detector] click detector-readiness href "#sub-detector-readiness" click detection-send href "#sub-detection-send" readiness-check --> canvas-check[Canvas and Browser Capability Check] click canvas-check href "#sub-canvas-check" toggleRecording --> state-branch[Recording State Toggle] click state-branch href "#sub-state-branch" handleVideoFile --> video-creation[Video Element Creation] handleVideoFile --> video-config[Video Configuration] click video-creation href "#sub-video-creation" click video-config href "#sub-video-config" handleOutfitFile --> async-image-load[Asynchronous Outfit Loading] click async-image-load href "#sub-async-image-load"

❓ Frequently Asked Questions

What visual effects can users expect from the 'big one' p5.js sketch?

The 'big one' sketch creates a dynamic visual experience by incorporating face detection, allowing users to overlay images and text onto detected faces in real-time.

How can users interact with the 'big one' creative coding sketch?

Users can upload images or videos, adjust text properties, and apply outfits to enhance their visual creations, as well as switch between tabs for different functionalities.

What creative coding concepts are demonstrated in the 'big one' sketch?

This sketch showcases concepts such as real-time face detection, user input handling, and dynamic canvas rendering, emphasizing interactive multimedia experiences.

Preview

big one - p5.js creative coding sketch preview
Sketch Preview
Code flow diagram showing the structure of big one - Code flow showing setup, draw, handlelogin, handleimagefile, preparesourcedetection, handlesourcefaceresults, drawfaceoverlay, drawoutfitoverlay, drawoverlaytext, togglerecording, startrecording, stoprecording, handlevideo, handleoutfitfile, switchTab, ononfaceresults
Code Flow Diagram