
block stacker

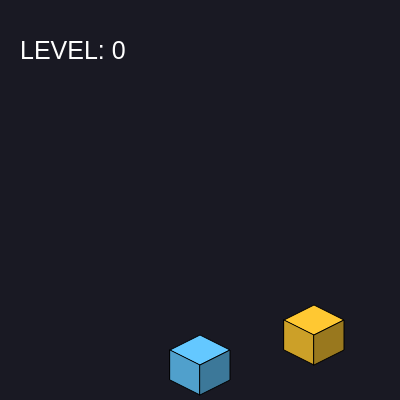
This sketch is a timing-based stacking game where players click to place glowing isometric cubes onto a rising tower. A golden block glides back and forth across the top, and players must click precisely when it's aligned with the block below—miss by too much and the tower collapses, ending the game.

🧪 Try This!

Experiment with the code by making these changes:

  1. Make the blocks wider — The moving block and placement tolerance are tied—if you change drawCube to draw wider cubes, placement becomes easier
  2. Start with hard difficulty — Lower initial speed makes the golden block move slower, giving more time to react
  3. Make blocks more forgiving — Increasing the accuracy threshold from 45 to 80 lets you place blocks even if you're pretty far off-center
  4. Rainbow towers instead of random colors — Use HSB color mode with hue based on score to cycle through the rainbow as you build
  5. Delay the camera follow — Change the score threshold from 11 to 20 so you build higher before the view starts scrolling
Prefer the full editor? Open it there →

📖 About This Sketch

This sketch recreates a classic mobile stacking game using p5.js. Players watch a golden block slide back and forth, then click to place it on the tower—but only if it's well-aligned with the block beneath it. The visuals are built entirely with p5.js isometric drawing: each cube is drawn as three shaded quadrilaterals that create a 3D illusion. The camera smoothly follows the tower as it grows, and the golden block accelerates each time you place it successfully, ramping up the difficulty.

The code is organized into a setup() that initializes the canvas and base block, a draw() function that handles game logic and rendering every frame, and helper functions for drawing cubes and restarting the game. By studying it, you will learn how to create a complete interactive game loop: collision detection, dynamic difficulty scaling, camera movement, and UI state management all working together.

⚙️ How It Works

  1. When the sketch loads, setup() creates a 400×600 canvas and places a single blue base block. The camera position (camY) starts at 0, and a restart button is hidden until the game ends.
  2. Every frame, draw() clears the background and moves the golden block horizontally by adding speed to currentX; when it hits either edge, dir flips to reverse direction.
  3. The camera lerps toward a target position if the score is 11 or higher, making the view rise smoothly as the tower grows and keeping the action centered on screen.
  4. All blocks (including the moving golden one) are drawn using drawCube(), which creates three quadrilaterals with lerpColor() shading to simulate depth—the top face is brightest, the left face darker, and the right face darkest.
  5. When the player clicks, mousePressed() measures the distance between the moving block and the topmost placed block; if accuracy is within 45 pixels, a new block is added, the score increments, and speed increases by 0.25 pixels per frame.
  6. If the click misses the tolerance, gameOver becomes true, the draw loop displays 'TOWER FELL!' and the final score, and the restart button appears. Clicking restart resets all variables and starts a fresh game.

🎓 Concepts You'll Learn

Game loop and state managementIsometric 3D drawing with 2D primitivesCollision detection and accuracy calculationCamera following and smooth lerp animationDynamic difficulty scalingColor interpolation with lerpColorUI button creation and visibility toggle

📝 Code Breakdown

drawCube(x, y, col)

This function demonstrates isometric 3D drawing: creating the illusion of depth using 2D quadrilaterals and shading. The translate(0, camY) line is the key to camera following—every cube shifts by the same amount, making the view scroll smoothly. lerpColor is used to darken faces, teaching color interpolation as a tool for visual depth.

🔬 These two quad() calls create the top and left faces. What if you swap the fill colors—put the bright color on the left face and the dark shade on the top? How does the 3D effect flip?

    // Top Face
    fill(col);
    quad(x, y, x + 30, y - 15, x + 60, y, x + 30, y + 15);
    // Left Face
    fill(lerpColor(col, color(0), 0.2));
    quad(x, y, x + 30, y + 15, x + 30, y + 45, x, y + 30);
var drawCube = function(x, y, col) {
    push(); // Use push() and pop() for 2D drawing state
    translate(0, camY); // Move everything based on camera
    
    // Top Face
    fill(col);
    quad(x, y, x + 30, y - 15, x + 60, y, x + 30, y + 15);
    // Left Face
    fill(lerpColor(col, color(0), 0.2));
    quad(x, y, x + 30, y + 15, x + 30, y + 45, x, y + 30);
    // Right Face
    fill(lerpColor(col, color(0), 0.4));
    quad(x + 30, y + 15, x + 60, y, x + 60, y + 30, x + 30, y + 45);
    
    pop(); // Restore drawing state
};
Line-by-line explanation (9 lines)

🔧 Subcomponents:

calculation Camera Translation translate(0, camY);

Offsets all cube drawing by the camera's Y position so the canvas scrolls up as towers grow

shape Top Face (Brightest) quad(x, y, x + 30, y - 15, x + 60, y, x + 30, y + 15);

Draws the top-facing surface of the cube in the original color for maximum brightness

shape Left Face (Medium Shade) fill(lerpColor(col, color(0), 0.2)); quad(x, y, x + 30, y + 15, x + 30, y + 45, x, y + 30);

Draws the left side slightly darkened with lerpColor to create depth perception

shape Right Face (Darkest) fill(lerpColor(col, color(0), 0.4)); quad(x + 30, y + 15, x + 60, y, x + 60, y + 30, x + 30, y + 45);

Draws the right side darker than the left to enhance the 3D isometric illusion

push();
Saves the current drawing state so transformations don't affect other code
translate(0, camY);
Shifts all drawing down by camY pixels—this creates the illusion that the camera is moving up as the tower grows
fill(col);
Sets the fill color to the passed-in color (col) for the top face
quad(x, y, x + 30, y - 15, x + 60, y, x + 30, y + 15);
Draws a quadrilateral (4-sided polygon) for the top of the cube in bright color—the four corners create a diamond shape
fill(lerpColor(col, color(0), 0.2));
lerpColor interpolates between the original color and black at 20%—darkening it slightly for the left face
quad(x, y, x + 30, y + 15, x + 30, y + 45, x, y + 30);
Draws the left side of the cube using the darker shade to make it recede visually
fill(lerpColor(col, color(0), 0.4));
Darkens the color to 40% toward black, making the right face darker than the left for extra depth
quad(x + 30, y + 15, x + 60, y, x + 60, y + 30, x + 30, y + 45);
Draws the right side of the cube in the darkest shade
pop();
Restores the drawing state so the translate(0, camY) doesn't affect any code outside this function
setup()

setup() runs exactly once when the sketch starts. It initializes your canvas, creates the first block, and sets up UI elements. All variables and buttons configured here persist throughout the game and are available to other functions.

function setup() {
    createCanvas(400, 600); // Create a canvas (adjust size as needed)
    // Start base block (now safe to call color() inside setup())
    blocks.push({x: 170, y: 350, color: color(100, 200, 255)});

    // Create the restart button
    restartButton = createButton('Restart Game');
    restartButton.mousePressed(restartSketch); // Attach the restart function
    
    // Style the button
    restartButton.style('font-size', '24px');
    restartButton.style('padding', '10px 20px');
    restartButton.style('background-color', '#4CAF50'); // Green
    restartButton.style('color', 'white');
    restartButton.style('border', 'none');
    restartButton.style('cursor', 'pointer');
    restartButton.style('border-radius', '5px');
    
    restartButton.hide(); // Hide it initially

    // Good practice for audio or WEBGL fonts
    userStartAudio(); 
}
Line-by-line explanation (6 lines)

🔧 Subcomponents:

calculation Canvas Setup createCanvas(400, 600);

Creates a 400-pixel-wide, 600-pixel-tall canvas—the play area for the game

calculation Base Block Initialization blocks.push({x: 170, y: 350, color: color(100, 200, 255)});

Adds the first blue block to the tower at the center-bottom, giving players something to stack on

calculation Restart Button Setup restartButton = createButton('Restart Game');

Creates an interactive HTML button element that appears when the game ends

createCanvas(400, 600);
Creates a 400×600 pixel canvas where all the game visuals are drawn
blocks.push({x: 170, y: 350, color: color(100, 200, 255)});
Adds an object with x, y, and color properties to the blocks array—this is the blue starting block centered near the bottom
restartButton = createButton('Restart Game');
Creates a clickable button with the label 'Restart Game' and stores it in the global restartButton variable
restartButton.mousePressed(restartSketch);
Links the button to the restartSketch() function so clicking it resets the game
restartButton.hide();
Hides the restart button initially—it only appears when gameOver becomes true
userStartAudio();
Initializes audio support; required by p5.sound before audio can play (though this sketch doesn't use sound yet)

draw()

draw() is the heartbeat of the game, running 60 times per second. It contains the core game loop: update camera position, render all blocks, move the active block, check for game over, and display UI. The lerp() function in the camera logic is particularly important—it smooths motion over multiple frames, making the camera feel responsive rather than robotic.

🔬 This camera logic triggers at score 11 and moves the camera up by 30 pixels per block. What happens if you change the multiplier from 30 to 50? To 15? How does it change when the view starts scrolling and how fast it moves?

    // 1. Camera Logic
    // If score is > 10, start pushing the camera down
    if (score >= 11) {
        var targetCam = (score - 10) * 30;
        camY = lerp(camY, targetCam, 0.1); 
    }

🔬 This is how the golden block moves back and forth. What if you change the boundary check to 360 and 0 instead of 340 and 0? What happens to the block's range of motion?

    // 3. Moving Block
    currentX += speed * dir;
    if (currentX > 340 || currentX < 0) { dir *= -1; }
function draw() {
    background(25, 25, 35); // Dark space theme
    
    // 1. Camera Logic
    // If score is > 10, start pushing the camera down
    if (score >= 11) {
        var targetCam = (score - 10) * 30;
        camY = lerp(camY, targetCam, 0.1); 
    }

    // 2. Draw Stack
    for (var i = 0; i < blocks.length; i++) {
        drawCube(blocks[i].x, blocks[i].y, blocks[i].color);
    }

    if (gameOver) {
        fill(255); textSize(40); textAlign(CENTER, CENTER); text("TOWER FELL!", width / 2, height / 2 - 50);
        textSize(20); text("Final Score: " + score, width / 2, height / 2 - 10);
        
        // Show and position the restart button when game is over
        restartButton.position(width / 2 - restartButton.width / 2, height / 2 + 50);
        restartButton.show();
        return;
    }

    // 3. Moving Block
    currentX += speed * dir;
    if (currentX > 340 || currentX < 0) { dir *= -1; }
    
    // The height of the new block is based on how many are in the list
    var currentHeight = 350 - (blocks.length * 30);
    drawCube(currentX, currentHeight, color(255, 200, 50));

    // UI
    fill(255); textSize(25); textAlign(LEFT, TOP);
    text("LEVEL: " + score, 20, 40);
}
Line-by-line explanation (12 lines)

🔧 Subcomponents:

conditional Camera Following Logic if (score >= 11) { var targetCam = (score - 10) * 30; camY = lerp(camY, targetCam, 0.1); }

Smoothly moves the camera upward as the tower grows past score 11, keeping the action visible

for-loop Draw All Placed Blocks for (var i = 0; i < blocks.length; i++) { drawCube(blocks[i].x, blocks[i].y, blocks[i].color); }

Loops through every block in the array and draws it at its stored position

conditional Game Over State if (gameOver) { ... return; }

Displays game-over text and the restart button, then exits draw early so no moving block is drawn

calculation Update Moving Block Position currentX += speed * dir;

Adds speed to currentX each frame, making the golden block glide left or right

conditional Bounce Moving Block at Edges if (currentX > 340 || currentX < 0) { dir *= -1; }

Reverses direction when the moving block reaches either side of the canvas

background(25, 25, 35);
Clears the canvas with a dark blue-gray color, erasing the previous frame
if (score >= 11) {
Checks if the player has stacked 11 or more blocks—once they have, the camera begins to follow
var targetCam = (score - 10) * 30;
Calculates the target camera position: each block past 10 moves the camera up by 30 pixels
camY = lerp(camY, targetCam, 0.1);
Smoothly interpolates camY toward targetCam at 10% per frame—lerp creates gentle animation instead of jarring jumps
for (var i = 0; i < blocks.length; i++) {
Starts a loop that runs once for each block in the blocks array
drawCube(blocks[i].x, blocks[i].y, blocks[i].color);
Calls drawCube for each placed block, passing its x, y, and color properties
if (gameOver) {
Checks if the tower fell—if true, display game-over visuals and stop the game loop
currentX += speed * dir;
Updates the moving block's horizontal position by adding (speed × direction) each frame
if (currentX > 340 || currentX < 0) { dir *= -1; }
When the moving block reaches x=340 (right edge) or x=0 (left edge), multiply dir by -1 to reverse direction
var currentHeight = 350 - (blocks.length * 30);
Calculates the Y position of the moving block: it sits 30 pixels above the topmost placed block
drawCube(currentX, currentHeight, color(255, 200, 50));
Draws the golden moving block at its current position
text("LEVEL: " + score, 20, 40);
Displays the current score in the top-left corner

mousePressed()

mousePressed() is p5.js's event handler for mouse clicks. This function demonstrates collision detection: you measure the distance between two objects (the moving block and the topmost placed block) and check if it's within a tolerance. This pattern is fundamental to interactive games. The speed increase also teaches dynamic difficulty—each success raises the challenge, keeping the game engaging.

🔬 This code checks if you clicked close enough to the block below. What happens if you change the threshold from 45 to 20? Or to 100? What's the easiest difficulty you can make it, and the hardest?

    var lastBlock = blocks[blocks.length - 1];
    var accuracy = abs(currentX - lastBlock.x);

    // Hit detection (must be within 45 pixels of the block below)
    if (accuracy < 45) {
function mousePressed() {
    if (gameOver) { 
        // If game is over, we only allow mouse clicks on the restart button
        // Not on the canvas itself to place new blocks
        return; 
    }
    
    var lastBlock = blocks[blocks.length - 1];
    var accuracy = abs(currentX - lastBlock.x);

    // Hit detection (must be within 45 pixels of the block below)
    if (accuracy < 45) {
        blocks.push({
            x: currentX,
            y: 350 - (blocks.length * 30),
            color: color(random(100, 255), 100, random(100, 255))
        });
        score++;
        speed += 0.25; // Speed up
    } else {
        gameOver = true;
    }
}
Line-by-line explanation (13 lines)

🔧 Subcomponents:

conditional Game Over Guard if (gameOver) { return; }

Prevents block placement after the game ends so only the restart button responds to clicks

calculation Calculate Accuracy var accuracy = abs(currentX - lastBlock.x);

conditional Hit Detection and Block Placement if (accuracy < 45) { ... }

If the moving block is within 45 pixels of the previous block, place it; otherwise end the game

calculation Difficulty Scaling speed += 0.25; // Speed up

Increases the speed of the moving block, making subsequent placements harder

if (gameOver) {
Checks if the game has already ended
return;
If the game is over, exit this function immediately—block placement is disabled
var lastBlock = blocks[blocks.length - 1];
Gets the topmost block from the blocks array using array index notation (length - 1)
var accuracy = abs(currentX - lastBlock.x);
Calculates the distance between the moving block and the last placed block using abs() to ignore sign
if (accuracy < 45) {
Checks if the player clicked while the moving block was within 45 pixels of the block below
blocks.push({
If the hit is accurate, creates a new block object and adds it to the blocks array
x: currentX,
Sets the new block's x position to wherever the moving block currently is
y: 350 - (blocks.length * 30),
Stacks the new block 30 pixels above the previous block (blocks.length is now one larger, so the math shifts higher)
color: color(random(100, 255), 100, random(100, 255))
Assigns a random purple-pink color by randomizing the red and blue channels while keeping green at 100
score++;
Adds 1 to the score
speed += 0.25;
Increases the moving block's speed by 0.25 pixels per frame, ramping up difficulty
} else {
If the player missed (accuracy >= 45), do the following:
gameOver = true;
Sets gameOver to true, triggering the game-end logic in draw()

restartSketch()

restartSketch() is called when the player clicks the restart button. It demonstrates state management: resetting every variable to its initial value. This is a common pattern in games—storing all state in variables means you can reset the entire game by resetting those variables. The function resets both numeric variables (speed, score, direction) and complex data (the blocks array and UI state).

function restartSketch() {
    score = 0;
    gameOver = false;
    speed = 4;
    currentX = 0;
    dir = 1;
    camY = 0;
    blocks = [];
    blocks.push({x: 170, y: 350, color: color(100, 200, 255)}); // Re-add the base block
    restartButton.hide(); // Hide the button after restart
}
Line-by-line explanation (9 lines)

🔧 Subcomponents:

calculation Reset All Game State score = 0; gameOver = false; speed = 4; currentX = 0; dir = 1; camY = 0;

Resets every game variable to its starting value so the next game begins fresh

calculation Clear and Rebuild Block Stack blocks = []; blocks.push({x: 170, y: 350, color: color(100, 200, 255)});

Empties the blocks array and re-adds only the blue base block

score = 0;
Resets the score to 0
gameOver = false;
Sets gameOver back to false so the game loop resumes
speed = 4;
Resets the moving block's speed to its initial value of 4 pixels per frame
currentX = 0;
Returns the moving block to the left edge
dir = 1;
Sets direction to 1, so the moving block initially slides right
camY = 0;
Resets the camera to the top of the canvas
blocks = [];
Clears the blocks array completely
blocks.push({x: 170, y: 350, color: color(100, 200, 255)});
Adds the blue base block back to the center-bottom
restartButton.hide();
Hides the restart button so it doesn't clutter the screen during gameplay

📦 Key Variables

blocks array

Stores all placed blocks as objects with x, y, and color properties. The stack grows each time the player places a block.

var blocks = [];
currentX number

The horizontal position of the moving golden block—updated every frame by adding speed*dir

var currentX = 0;
speed number

How many pixels the moving block travels per frame. Starts at 4 and increases by 0.25 after each successful placement.

var speed = 4;
dir number

Direction multiplier: 1 for moving right, -1 for moving left. Flips when the moving block hits an edge.

var dir = 1;
score number

The number of blocks successfully placed. Increments by 1 each time the player clicks accurately, displayed as 'LEVEL' on screen.

var score = 0;
gameOver boolean

Flag that tracks whether the tower has fallen. When true, draw() stops the game and shows the restart button.

var gameOver = false;
camY number

The camera's Y offset in pixels. Lerps toward a target value when score >= 11, making the view scroll up as the tower grows.

var camY = 0;
restartButton object

Stores the p5.js button object created in setup(). Shown when gameOver is true, hidden during gameplay.

let restartButton;

🔧 Potential Improvements (5)

Here are some ways this code could be enhanced:

BUG mousePressed()

When a block is placed, its y position is calculated as 350 - (blocks.length * 30), but blocks.length has already been incremented by push(), causing an off-by-one vertical error on the first placement

💡 Calculate y before pushing: var newY = 350 - (blocks.length * 30); then push with that value. Or calculate as 350 - ((blocks.length - 1) * 30) after push.

PERFORMANCE draw()

Every block in the tower is redrawn every frame even though only the camera position changes—for very tall towers (50+ blocks), this becomes wasteful

💡 Use createGraphics() to cache the tower, or only redraw blocks when camY changes significantly.

STYLE All functions

Global variables (blocks, currentX, speed, etc.) are declared with var instead of let/const, which is outdated ES5 style

💡 Replace var with let for variables that change (let blocks = []) and const for those that don't (const CANVAS_WIDTH = 400).

FEATURE mousePressed()

No visual or audio feedback when the player clicks—no 'hit' or 'miss' animation to celebrate or commiserate

💡 Add a flash effect or particle burst on accurate placement, and a shake or fade effect when the tower falls.

FEATURE setup() and draw()

No high score tracking—players can't see their best performance

💡 Store score in localStorage to persist across sessions, display 'Personal Best' on the game-over screen.

🔄 Code Flow

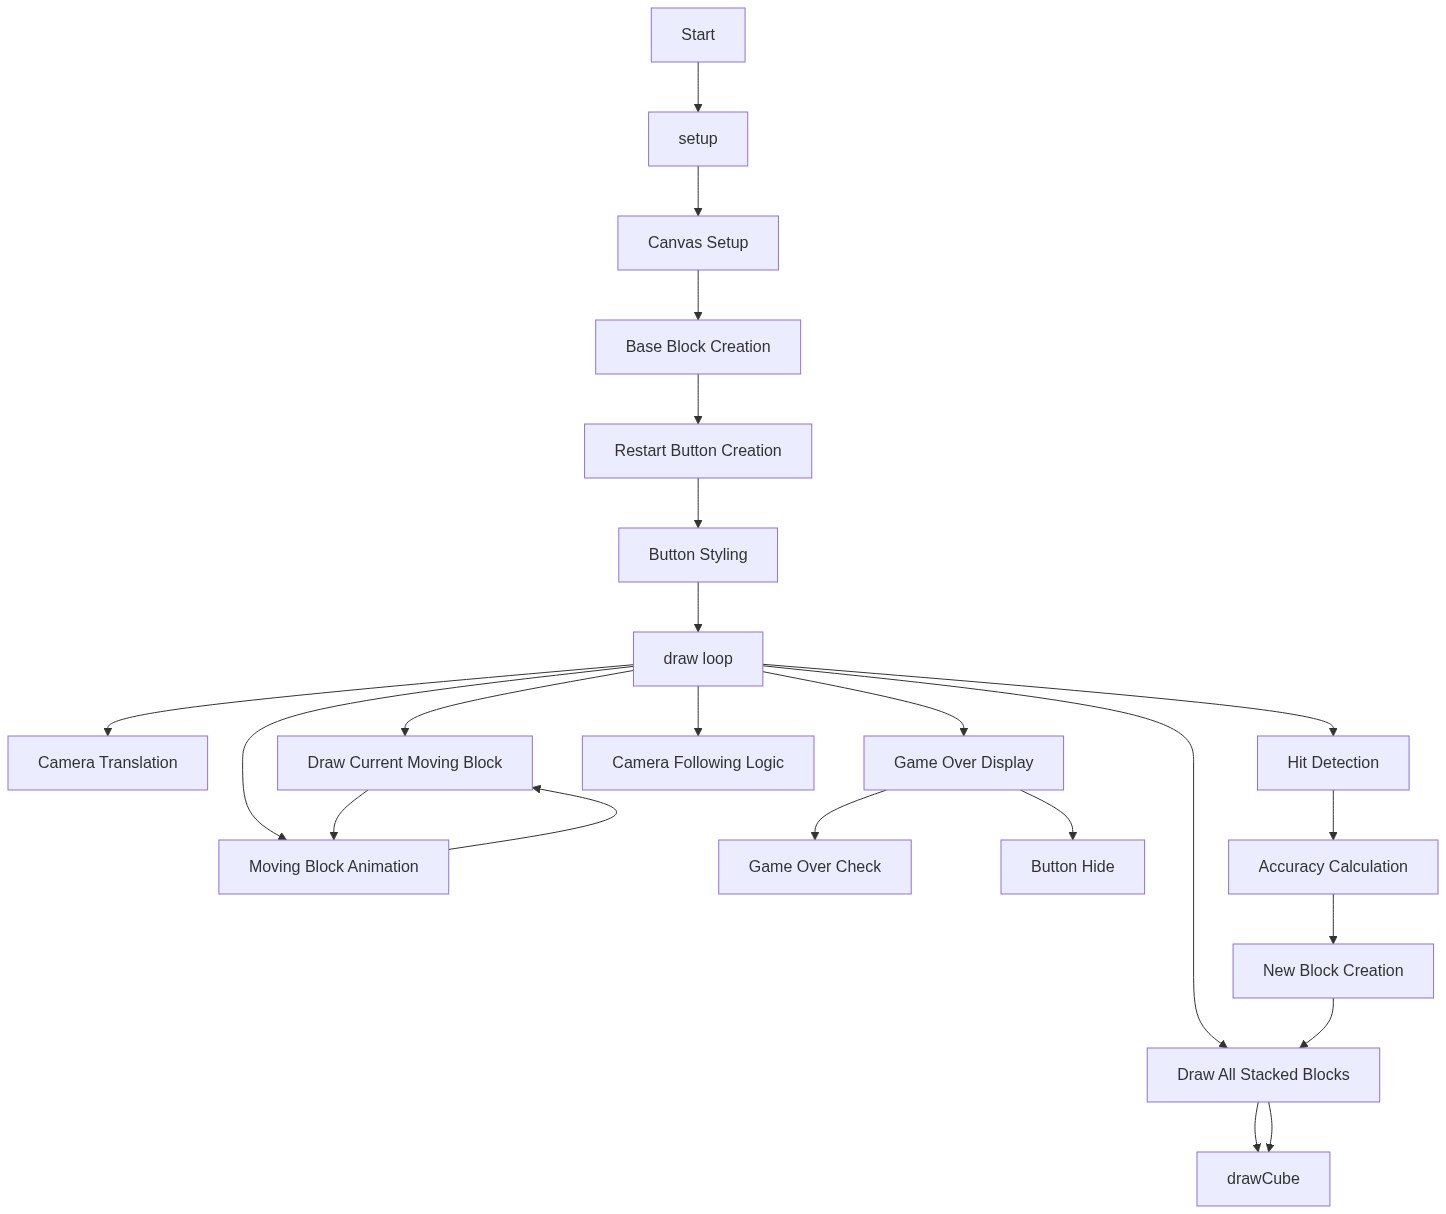
Code flow showing drawcube, setup, draw, mousepressed, restartsketch

💡 Click on function names in the diagram to jump to their code

graph TD start[Start] --> setup[setup] setup --> canvas-creation[Canvas Setup] canvas-creation --> base-block[Base Block Initialization] base-block --> button-creation[Restart Button Setup] button-creation --> draw[draw loop] draw --> camera-logic[Camera Following Logic] camera-logic --> stack-loop[Draw All Placed Blocks] stack-loop --> block-movement[Update Moving Block Position] block-movement --> edge-bounce[Bounce Moving Block at Edges] edge-bounce --> gameover-check[Game Over State] gameover-check --> gameover-guard[Game Over Guard] gameover-guard --> hit-detection[Hit Detection and Block Placement] hit-detection --> difficulty-scale[Difficulty Scaling] difficulty-scale --> draw gameover-check --> drawcube[drawcube] drawcube --> camera-translate[Camera Translation] camera-translate --> top-face[Top Face (Brightest)] top-face --> left-face[Left Face (Medium Shade)] left-face --> right-face[Right Face (Darkest)] click setup href "#fn-setup" click draw href "#fn-draw" click canvas-creation href "#sub-canvas-creation" click base-block href "#sub-base-block" click button-creation href "#sub-button-creation" click camera-logic href "#sub-camera-logic" click stack-loop href "#sub-stack-loop" click block-movement href "#sub-block-movement" click edge-bounce href "#sub-edge-bounce" click gameover-check href "#sub-gameover-check" click gameover-guard href "#sub-gameover-guard" click hit-detection href "#sub-hit-detection" click difficulty-scale href "#sub-difficulty-scale" click drawcube href "#fn-drawcube" click camera-translate href "#sub-camera-translate" click top-face href "#sub-top-face" click left-face href "#sub-left-face" click right-face href "#sub-right-face"

❓ Frequently Asked Questions

What visual experience does the block stacker sketch provide?

The block stacker sketch creates a visually engaging experience with glowing isometric cubes stacked into a towering column against a dark space-themed background.

How can users engage with the block stacker game?

Users can stack cubes by timing their placement as a golden block glides back and forth, and they can click the 'Restart Game' button to try for a higher score after the stack topples.

What creative coding concepts are showcased in the block stacker sketch?

This sketch demonstrates concepts such as 3D isometric drawing, camera manipulation for dynamic visuals, and interactive game mechanics for user engagement.

Preview

block stacker - p5.js creative coding sketch preview
Sketch Preview
Code flow diagram showing the structure of block stacker - Code flow showing drawcube, setup, draw, mousepressed, restartsketch
Code Flow Diagram