ca gam but i made it 3d lol

This sketch creates a 3D top-down car racing game where you steer your blue car between lanes to avoid red obstacle cars. The entire game world is rendered in 3D using WEBGL, tilted at a camera angle to create depth, while you accumulate points for surviving.

🧪 Try This!

Experiment with the code by making these changes:

  1. Change the camera tilt to straight overhead — Set CAMERA_TILT to 0 to remove the perspective effect and see the road from directly above instead of tilted.
  2. Make obstacles spawn twice as fast — Halve OBSTACLE_SPAWN_INTERVAL so obstacles appear every 50 frames instead of 100, making the game much harder.
  3. Make the player car bright neon green — Change the player car's color from blue to a vibrant green by editing the color in the Car constructor.
  4. Make the road darker asphalt — Change the road color from light gray (80) to a darker gray (40), making it look more like real asphalt.
  5. Increase car depth to make them chunky — Double CAR_DEPTH from 40 to 80 pixels so cars look thicker and more block-like in 3D.
  6. Let the player car steer even faster — Triple PLAYER_STEERING_SPEED to make the car respond to arrows much quicker.
Prefer the full editor? Open it there →

📖 About This Sketch

This sketch is a full 3D remake of a 2D car-dodging game. You control a blue car moving forward automatically on a three-lane road, steering left and right with arrow keys or touch to avoid oncoming red obstacles. The entire 3D world—the road, lane markings, and cars rendered as textured boxes—is tilted toward the viewer using rotateX() and a camera tilt constant, creating a convincing perspective effect that makes the flat road appear to recede into the distance.

The code is split into a game logic layer (the Car class, collision detection, obstacle spawning) and a 3D rendering layer (WEBGL transforms, box() shapes, lighting, camera angles). By studying it you will learn how to build a complete game loop with state management (menu, playing, gameOver), how to map 2D game coordinates into 3D world space for rendering, and how the draw loop orchestrates game updates and 3D display each frame.

⚙️ How It Works

  1. When the sketch loads, setup() creates a full-window WEBGL canvas, loads a font for UI text, and calls resetGame() to initialize the player car, empty obstacles array, and score to zero.
  2. In the draw loop, background() clears the canvas with a grass-green color, then push/pop creates a 3D context where rotateX(CAMERA_TILT) tilts the entire game world forward by ~30 degrees so the road appears to recede toward a vanishing point.
  3. Inside this tilted 3D world, drawRoad() renders the gray road surface, white shoulders, and animated yellow lane markings; playerCar.display() and each obstacle.display() render 3D boxes using the box() function with their colors and positions.
  4. If gameState is 'playing', updateGame() runs: the player car processes keyboard and touch input to accelerate, brake, and steer; obstacles move downward; collision detection triggers gameOver if the player hits anything; new obstacles spawn at intervals; and the score increments every 60 frames.
  5. A drawUI() function runs after the 3D world pops, translating the origin from WEBGL's center back to screen-space top-left to display menu text, HUD score, or game-over screen in crisp 2D on top of the 3D action.
  6. When the player crashes or presses a key on the menu, keyPressed() or mousePressed() detects it and transitions between game states.

🎓 Concepts You'll Learn

3D WEBGL renderingGame state managementCollision detection (AABB)Camera transforms (rotateX)Input handling (keyboard and touch)Object-oriented design (Car class)Animation loop and scoring

📝 Code Breakdown

setup()

setup() runs once at sketch start. The WEBGL renderer is critical here—it switches p5.js into 3D mode and places the origin at the canvas center instead of the top-left.

function setup() {
  // Use WEBGL renderer to enable 3D, keep canvas full window
  createCanvas(windowWidth, windowHeight, WEBGL);
  textFont(uiFont);
  resetGame();
}
Line-by-line explanation (3 lines)
createCanvas(windowWidth, windowHeight, WEBGL);
Creates a full-window canvas using the WEBGL renderer, which enables 3D drawing and transforms like rotateX(). Without WEBGL, box() and 3D functions won't work.
textFont(uiFont);
Sets the font for all text() calls to the Roboto font loaded in preload(), ensuring the menu and score text render correctly in WEBGL mode.
resetGame();
Calls the game reset function to initialize the player car, clear obstacles, and set score and frame counters to zero.

preload()

preload() runs before setup(). Use it to load assets (images, fonts, sounds) that your sketch needs to display immediately. Without preload(), text might not appear or look garbled in WEBGL.

function preload() {
  // Known-good WEBGL font from fontsource
  uiFont = loadFont(
    'https://cdn.jsdelivr.net/fontsource/fonts/roboto@latest/latin-400-normal.woff'
  );
}
Line-by-line explanation (1 lines)
uiFont = loadFont(
Loads a font file from a CDN before setup() runs. In WEBGL mode, the default system fonts don't render well, so loading a web font ensures crisp text for the menu and HUD.

draw()

draw() runs every frame (~60 fps). It clears the canvas, sets up the 3D camera angle and lighting, updates game state if needed, renders the 3D world, then overlays the 2D UI on top. The push/pop sandwich isolates 3D transforms from affecting 2D text.

🔬 These two lighting lines make the 3D boxes look dimensional. What happens if you remove them or change ambientLight(120) to ambientLight(0)? Will the cars still be visible?

  // Basic lighting so boxes look more 3D
  ambientLight(120);
  directionalLight(255, 255, 255, -0.3, -1, -0.3);
function draw() {
  background(100, 150, 100); // Green background (grass)

  // --- 3D world: road + cars ---
  push();

  // Tilt whole world around the center so the road is clearly visible
  rotateX(CAMERA_TILT);

  // Basic lighting so boxes look more 3D
  ambientLight(120);
  directionalLight(255, 255, 255, -0.3, -1, -0.3);

  drawRoad();

  if (gameState === 'playing') {
    updateGame();
  }

  displayGame(); // 3D cars and obstacles
  pop();

  // --- 2D UI overlay: text, instructions, score ---
  drawUI();
}
Line-by-line explanation (7 lines)

🔧 Subcomponents:

transformation 3D World Setup rotateX(CAMERA_TILT); ambientLight(120); directionalLight(255, 255, 255, -0.3, -1, -0.3);

Tilts the camera angle and adds lighting so 3D boxes appear dimensional rather than flat.

conditional Game State Check if (gameState === 'playing') { updateGame(); }

Only processes collisions, obstacles, and score when the game is active—menu and gameOver states skip game logic.

background(100, 150, 100); // Green background (grass)
Clears the canvas each frame with a green color simulating grass off the sides of the road.
push();
Saves the current transformation matrix. Everything after this will be transformed until pop() is called.
rotateX(CAMERA_TILT);
Rotates the entire 3D world forward by ~30 degrees, making the road recede toward the horizon so you see it from above-and-forward instead of straight down.
ambientLight(120);
Adds overall ambient lighting at brightness 120 so boxes aren't completely dark on their back sides.
directionalLight(255, 255, 255, -0.3, -1, -0.3);
Adds a directional light (like sunlight) coming from the upper-left, giving boxes shadows and depth cues so they look 3D.
if (gameState === 'playing') {
Checks the current game state. If playing, the game updates (obstacles move, collisions check). If menu or gameOver, nothing updates—only displays draw.
pop();
Restores the transformation matrix, undoing rotateX() so the 2D UI can be drawn without tilt.

updateGame()

updateGame() is the heart of the game logic. It runs each frame while gameState === 'playing'. It moves everything, checks for collisions, spawns new obstacles, and increments score. This function does not draw anything—it only updates numbers.

function updateGame() {
  // Update player car
  playerCar.update();

  // Scroll road based on player speed
  roadScrollY += playerCar.speed;
  if (roadScrollY > LANE_WIDTH) roadScrollY = 0; // Reset scroll for continuous effect
  if (roadScrollY < 0) roadScrollY = LANE_WIDTH;

  // Update obstacles
  for (let i = obstacles.length - 1; i >= 0; i--) {
    obstacles[i].update();

    // Check for collision with player car
    if (playerCar.checkCollision(obstacles[i])) {
      gameState = 'gameOver';
    }

    // Remove obstacles that go off-screen (in 2D y-space)
    if (obstacles[i].y > height + CAR_HEIGHT / 2) {
      obstacles.splice(i, 1);
    }
  }

  // Generate new obstacles
  if (frameCount - lastObstacleSpawnFrame > OBSTACLE_SPAWN_INTERVAL) {
    if (obstacles.length === 0 || obstacles[obstacles.length - 1].y < height - OBSTACLE_MIN_GAP) {
      generateObstacle();
      lastObstacleSpawnFrame = frameCount;
    }
  }

  // Increment score
  if (frameCount - lastScoreIncrementFrame > SCORE_INCREMENT_INTERVAL) {
    score++;
    lastScoreIncrementFrame = frameCount;
  }
}
Line-by-line explanation (8 lines)

🔧 Subcomponents:

for-loop Obstacle Update Loop for (let i = obstacles.length - 1; i >= 0; i--) { obstacles[i].update(); if (playerCar.checkCollision(obstacles[i])) { gameState = 'gameOver'; } if (obstacles[i].y > height + CAR_HEIGHT / 2) { obstacles.splice(i, 1); } }

Loops through all obstacles in reverse order, updates their position, checks collision with the player, and removes them if they go off-screen.

conditional Obstacle Spawn Check if (frameCount - lastObstacleSpawnFrame > OBSTACLE_SPAWN_INTERVAL) { if (obstacles.length === 0 || obstacles[obstacles.length - 1].y < height - OBSTACLE_MIN_GAP) { generateObstacle(); lastObstacleSpawnFrame = frameCount; } }

Spawns a new obstacle every OBSTACLE_SPAWN_INTERVAL frames, but only if there's enough vertical gap from the last obstacle to avoid crowding.

playerCar.update();
Calls the player car's update method, which processes keyboard/touch input to steer and accelerate/brake.
roadScrollY += playerCar.speed;
Animates the road's lane markings by scrolling them downward based on how fast the player is moving, creating the illusion of forward motion.
if (roadScrollY > LANE_WIDTH) roadScrollY = 0;
Resets the scroll position to create a seamless looping effect—the lane markings wrap around so they animate infinitely.
for (let i = obstacles.length - 1; i >= 0; i--) {
Loops through obstacles backward (from last to first) so you can safely remove them with splice() without skipping any.
if (playerCar.checkCollision(obstacles[i])) {
Checks if the player's bounding box overlaps with this obstacle. If yes, the game ends immediately.
if (obstacles[i].y > height + CAR_HEIGHT / 2) {
Checks if the obstacle has moved past the bottom of the screen. If so, removes it from the array to free memory.
if (frameCount - lastObstacleSpawnFrame > OBSTACLE_SPAWN_INTERVAL) {
Checks if enough frames have passed since the last obstacle spawn. If so, and if there's space, creates a new obstacle.
score++;
Increments the score by 1 every SCORE_INCREMENT_INTERVAL frames, rewarding the player for surviving.

displayGame()

displayGame() is a pure rendering function—it draws the 3D cars but does not change any game state. It is called inside the 3D context (after rotateX and lighting are set up), so all box() shapes inherit the tilt and lighting.

function displayGame() {
  // Draw 3D player car and obstacles (no text here)
  playerCar.display();

  for (let obstacle of obstacles) {
    obstacle.display();
  }
}
Line-by-line explanation (2 lines)
playerCar.display();
Calls the player car's display() method, which renders a 3D blue box at the player's current position.
for (let obstacle of obstacles) {
Loops through all active obstacles and calls their display() method to render each as a 3D red box.

drawRoad()

drawRoad() renders the static 3D backdrop—the road surface and shoulders—and the animated yellow lane markings that scroll to create the illusion of forward motion. It does not create new objects; it just draws shapes using rect() and line().

function drawRoad() {
  rectMode(CORNER);
  noStroke();

  // World origin is at the center; road runs from top to bottom in that space
  const left = -ROAD_WIDTH / 2;
  const top = -height / 2;

  // Draw road surface (gray)
  fill(80);
  rect(left, top, ROAD_WIDTH, height);

  // Draw road shoulders (white)
  fill(255);
  rect(left - 10, top, 10, height);          // Left shoulder
  rect(left + ROAD_WIDTH, top, 10, height);  // Right shoulder

  // Draw lane lines (dashed yellow)
  stroke(255, 255, 0);
  strokeWeight(5);
  let numDashes = height / LANE_WIDTH;

  for (let i = 0; i < numDashes; i++) {
    // Convert 0..height to -height/2..+height/2
    let yPos = (i * LANE_WIDTH + roadScrollY) % height - height / 2;
    line(-LANE_WIDTH / 2, yPos, -LANE_WIDTH / 2, yPos + LANE_WIDTH / 2);
    line(LANE_WIDTH / 2, yPos, LANE_WIDTH / 2, yPos + LANE_WIDTH / 2);
  }
  noStroke();
}
Line-by-line explanation (7 lines)

🔧 Subcomponents:

for-loop Animated Lane Marking Loop for (let i = 0; i < numDashes; i++) { let yPos = (i * LANE_WIDTH + roadScrollY) % height - height / 2; line(-LANE_WIDTH / 2, yPos, -LANE_WIDTH / 2, yPos + LANE_WIDTH / 2); line(LANE_WIDTH / 2, yPos, LANE_WIDTH / 2, yPos + LANE_WIDTH / 2); }

Draws animated dashed yellow lane lines that scroll downward each frame, driven by roadScrollY to create motion illusion.

rectMode(CORNER);
Sets rect() to draw from the top-left corner (instead of from the center), making coordinates easier to reason about.
const left = -ROAD_WIDTH / 2;
In WEBGL, the origin is at canvas center. This positions the road's left edge so the road is centered horizontally.
const top = -height / 2;
Positions the road's top edge so the road spans the full canvas height, starting from the top.
fill(80); rect(left, top, ROAD_WIDTH, height);
Draws the main road surface as a dark gray rectangle covering the full driving area.
fill(255); rect(left - 10, top, 10, height);
Draws white shoulders (off-road curbs) on the left side of the road for visual clarity.
let yPos = (i * LANE_WIDTH + roadScrollY) % height - height / 2;
Calculates each dashed line's position, adding roadScrollY to animate them downward, and using modulo (%) to wrap them infinitely.
line(-LANE_WIDTH / 2, yPos, -LANE_WIDTH / 2, yPos + LANE_WIDTH / 2);
Draws the left lane marking as a short vertical line at position yPos.

generateObstacle()

generateObstacle() is a factory function—it creates and populates new obstacle cars based on randomness and the current game state. It is called by updateGame() at intervals defined by OBSTACLE_SPAWN_INTERVAL.

function generateObstacle() {
  let lane = floor(random(3)); // 0, 1, or 2
  let xPos = width / 2 - ROAD_WIDTH / 2 + (lane + 0.5) * LANE_WIDTH;
  let yPos = -CAR_HEIGHT / 2; // Spawn above the screen

  let obstacleSpeed = random(playerCar.speed * OBSTACLE_SPEED_MULTIPLIER, playerCar.speed * 0.9);
  if (obstacleSpeed < 5) obstacleSpeed = 5; // Ensure obstacles have a minimum speed

  obstacles.push(new Car(xPos, yPos, false));
  obstacles[obstacles.length - 1].speed = obstacleSpeed;
}
Line-by-line explanation (6 lines)
let lane = floor(random(3));
Picks a random lane (0, 1, or 2) for the obstacle to spawn in, ensuring variety instead of always spawning in the same spot.
let xPos = width / 2 - ROAD_WIDTH / 2 + (lane + 0.5) * LANE_WIDTH;
Converts the lane number to an x-pixel position on the canvas so the obstacle is centered in its lane.
let yPos = -CAR_HEIGHT / 2;
Places the obstacle just above the top of the screen so it scrolls down into view smoothly.
let obstacleSpeed = random(playerCar.speed * OBSTACLE_SPEED_MULTIPLIER, playerCar.speed * 0.9);
Gives each obstacle a random speed between 80% and 90% of the player's current speed, creating variety and challenge.
if (obstacleSpeed < 5) obstacleSpeed = 5;
Ensures every obstacle moves at least 5 pixels per frame, preventing them from getting stuck or moving too slowly.
obstacles.push(new Car(xPos, yPos, false));
Creates a new Car object (not a player) and adds it to the obstacles array so it will be updated and displayed each frame.

resetGame()

resetGame() is a initialization/reset helper that runs once in setup() and again every time the player restarts after a game-over. It wipes all game state back to zero.

function resetGame() {
  playerCar = new Car(width / 2, height - CAR_HEIGHT / 2 - 20, true);
  obstacles = [];
  roadScrollY = 0;
  score = 0;
  lastObstacleSpawnFrame = 0;
  lastScoreIncrementFrame = 0;
}
Line-by-line explanation (5 lines)
playerCar = new Car(width / 2, height - CAR_HEIGHT / 2 - 20, true);
Creates a new blue player car centered horizontally and positioned near the bottom of the screen (its starting position).
obstacles = [];
Clears the obstacles array, removing all red cars so the player starts with a fresh, empty road.
roadScrollY = 0;
Resets the road's scroll position so the lane markings start from their initial animation state.
score = 0;
Resets the score to zero, giving the player a fresh start.
lastObstacleSpawnFrame = 0;
Resets the frame counter for obstacle spawning so the first obstacle appears on schedule.

drawUI()

drawUI() is a wrapper that translates from 3D WEBGL coordinates back to 2D screen coordinates for text rendering, then delegates to drawMenu(), drawHUD(), or drawGameOver() based on state. The push/pop sandwich isolates the coordinate change.

function drawUI() {
  push();
  // In WEBGL, origin is center; move it to top-left for UI drawing
  translate(-width / 2, -height / 2, 0);

  if (gameState === 'menu') {
    drawMenu();
  } else if (gameState === 'playing') {
    drawHUD();
  } else if (gameState === 'gameOver') {
    drawGameOver();
  }

  pop();
}
Line-by-line explanation (4 lines)

🔧 Subcomponents:

conditional Game State Display Check if (gameState === 'menu') { drawMenu(); } else if (gameState === 'playing') { drawHUD(); } else if (gameState === 'gameOver') { drawGameOver(); }

Displays the appropriate UI (menu, HUD, or game-over screen) based on the current game state.

push();
Saves the current transformation state (which is inside the rotated 3D world) so we can safely translate without affecting 3D geometry.
translate(-width / 2, -height / 2, 0);
Moves the origin from the WEBGL center back to the top-left corner, so text() draws in normal screen coordinates like in 2D mode.
if (gameState === 'menu') {
Checks if the game is in menu state. If so, displays the menu screen with title and instructions.
pop();
Restores the transformation, undoing the translate so the 3D world coordinates are restored for the next frame.

drawMenu()

drawMenu() displays the title and instructions when gameState === 'menu'. It is called by drawUI() only during the menu phase.

function drawMenu() {
  fill(0);
  textSize(48);
  textAlign(CENTER, CENTER);
  text("Car Game 3D", width / 2, height / 2 - 50);
  textSize(24);
  text("Press SPACE / arrows / WASD or click/touch to Start", width / 2, height / 2 + 20);
}
Line-by-line explanation (4 lines)
fill(0);
Sets the text color to black so it's visible on the green grass background.
textSize(48);
Makes the title text large (48 pixels) so it dominates the screen.
textAlign(CENTER, CENTER);
Centers the text both horizontally and vertically around the coordinates passed to text().
text("Car Game 3D", width / 2, height / 2 - 50);
Draws the title text at the center of the screen, 50 pixels above the vertical center.

drawHUD()

drawHUD() is the in-game heads-up display. It shows only the score and is called by drawUI() when gameState === 'playing'.

function drawHUD() {
  fill(0);
  textSize(24);
  textAlign(LEFT, TOP);
  text("Score: " + score, 10, 10);
}
Line-by-line explanation (4 lines)
fill(0);
Sets text color to black for visibility against the green background.
textSize(24);
Makes the score text readable but not huge, so it doesn't dominate the gameplay view.
textAlign(LEFT, TOP);
Aligns the text to the top-left so coordinates (10, 10) place it in the top-left corner of the screen.
text("Score: " + score, 10, 10);
Displays the current score in the top-left corner, updated each frame as the score variable changes.

drawGameOver()

drawGameOver() displays the game-over screen with the final score and restart instructions. It is called by drawUI() when gameState === 'gameOver'.

function drawGameOver() {
  fill(0);
  textSize(48);
  textAlign(CENTER, CENTER);
  text("GAME OVER", width / 2, height / 2 - 50);
  textSize(32);
  text("Score: " + score, width / 2, height / 2);
  textSize(24);
  text("Press SPACE / arrows / WASD or click/touch to Restart", width / 2, height / 2 + 50);
}
Line-by-line explanation (3 lines)
text("GAME OVER", width / 2, height / 2 - 50);
Displays the game-over message in large text above center.
text("Score: " + score, width / 2, height / 2);
Displays the final score at the screen center in medium text.
text("Press SPACE / arrows / WASD or click/touch to Restart", width / 2, height / 2 + 50);
Shows restart instructions below the score in smaller text.

keyPressed()

keyPressed() is a p5.js callback that runs whenever any key is pressed. It checks the key's code against the startKeys array and transitions between game states. This allows menu and restart navigation.

function keyPressed() {
  // Keys that should start / restart the game:
  // SPACE, arrows, WASD
  const startKeys = [
    32,           // SPACE
    UP_ARROW,
    DOWN_ARROW,
    LEFT_ARROW,
    RIGHT_ARROW,
    65, 68, 83, 87 // A, D, S, W keyCodes
  ];

  if (gameState === 'menu' && startKeys.includes(keyCode)) {
    resetGame();
    gameState = 'playing';
  } else if (gameState === 'gameOver' && startKeys.includes(keyCode)) {
    resetGame();
    gameState = 'playing';
  }
}
Line-by-line explanation (3 lines)

🔧 Subcomponents:

conditional Menu to Playing Transition if (gameState === 'menu' && startKeys.includes(keyCode)) { resetGame(); gameState = 'playing'; }

Detects when the player presses a start key on the menu and transitions to the playing state.

conditional GameOver to Playing Transition } else if (gameState === 'gameOver' && startKeys.includes(keyCode)) { resetGame(); gameState = 'playing'; }

Detects when the player presses a restart key after crashing and transitions back to playing.

const startKeys = [
Defines an array of key codes that should trigger a game start or restart (SPACE and arrow/WASD keys).
if (gameState === 'menu' && startKeys.includes(keyCode)) {
Checks if the game is in the menu and the pressed key is one of the start keys.
resetGame(); gameState = 'playing';
Resets all game variables and transitions to the playing state, starting the game.

mousePressed()

mousePressed() is a p5.js callback that runs when the mouse or touch screen is pressed. It provides an alternative input method for starting or restarting the game, improving accessibility on mobile devices.

function mousePressed() {
  if (gameState === 'menu' || gameState === 'gameOver') {
    resetGame();
    gameState = 'playing';
  }
}
Line-by-line explanation (2 lines)
if (gameState === 'menu' || gameState === 'gameOver') {
Checks if the game is on the menu or game-over screen. If so, the click should start/restart the game.
resetGame(); gameState = 'playing';
Resets the game state and transitions to playing, allowing mouse/touch to start the game from either screen.

windowResized()

windowResized() is a p5.js callback that runs whenever the browser window is resized. It ensures the canvas and player car stay properly positioned on the new screen size, maintaining a responsive experience on mobile and desktop.

function windowResized() {
  resizeCanvas(windowWidth, windowHeight);
  // Re-position player car if needed on resize (still using 2D-style coords)
  playerCar.x = width / 2;
  playerCar.y = height - CAR_HEIGHT / 2 - 20;
}
Line-by-line explanation (3 lines)
resizeCanvas(windowWidth, windowHeight);
Resizes the canvas to match the new window dimensions when the browser window is resized or rotated.
playerCar.x = width / 2;
Re-centers the player car horizontally on the new canvas so it doesn't get stuck at the old edge.
playerCar.y = height - CAR_HEIGHT / 2 - 20;
Re-positions the player car's vertical position to stay near the bottom of the new canvas.

Car class

The Car class encapsulates all behavior for both the player and obstacle cars. It uses the isPlayer flag to branch behavior: players respond to keyboard/touch input, obstacles just move downward. The display() method converts 2D screen coordinates into 3D world coordinates for rendering with box(). The checkCollision() method uses AABB (axis-aligned bounding box) collision detection in 2D screen space.

🔬 This block controls acceleration, braking, and friction. What happens if you change PLAYER_ACCELERATION to a much higher value like 0.5 or 1.0? Will the car feel snappier?

      if (keyIsDown(UP_ARROW) || keyIsDown(87)) { // UP_ARROW or 'W' key
        this.speed += PLAYER_ACCELERATION;
      } else if (keyIsDown(DOWN_ARROW) || keyIsDown(83)) { // DOWN_ARROW or 'S' key
        this.speed -= PLAYER_BRAKING;
      } else {
        // Apply friction if no acceleration/braking
        if (this.speed > 0) this.speed -= PLAYER_FRICTION;
        if (this.speed < 0) this.speed += PLAYER_FRICTION;
      }

🔬 These lines keep the player car on the road. What happens if you remove the constrain() line entirely? Can the car drive off into the grass?

      // Keep player car within road boundaries
      let roadLeft = width / 2 - ROAD_WIDTH / 2;
      let roadRight = width / 2 + ROAD_WIDTH / 2;
      this.x = constrain(this.x, roadLeft + CAR_WIDTH / 2, roadRight - CAR_WIDTH / 2);
class Car {
  constructor(x, y, isPlayer = true) {
    this.x = x;
    this.y = y;
    this.speed = 0;
    this.isPlayer = isPlayer;
    this.color = isPlayer ? color(0, 0, 255) : color(255, 0, 0); // Blue for player, Red for obstacles
    this.lane = 1; // 0: left, 1: center, 2: right
  }

  update() {
    if (this.isPlayer) {
      // Handle player input: forward/backward speed
      if (keyIsDown(UP_ARROW) || keyIsDown(87)) { // UP_ARROW or 'W' key
        this.speed += PLAYER_ACCELERATION;
      } else if (keyIsDown(DOWN_ARROW) || keyIsDown(83)) { // DOWN_ARROW or 'S' key
        this.speed -= PLAYER_BRAKING;
      } else {
        // Apply friction if no acceleration/braking
        if (this.speed > 0) this.speed -= PLAYER_FRICTION;
        if (this.speed < 0) this.speed += PLAYER_FRICTION;
      }

      // Clamp speed
      this.speed = constrain(this.speed, -PLAYER_MAX_SPEED / 2, PLAYER_MAX_SPEED);

      // --- Steering (left/right) ---
      // Always allow some steering, even if speed is ~0
      let steerAmount = PLAYER_STEERING_SPEED * max(abs(this.speed), 5); // min steering base

      if (keyIsDown(LEFT_ARROW) || keyIsDown(65)) { // LEFT_ARROW or 'A' key
        this.x -= steerAmount;
      } else if (keyIsDown(RIGHT_ARROW) || keyIsDown(68)) { // RIGHT_ARROW or 'D' key
        this.x += steerAmount;
      }

      // Mouse/Touch steering (left half of screen steers left, right half steers right)
      if (mouseIsPressed || touches.length > 0) {
        let touchX = mouseIsPressed ? mouseX : touches[0].x;
        if (touchX < width / 2) {
          this.x -= steerAmount;
        } else {
          this.x += steerAmount;
        }
      }

      // Keep player car within road boundaries
      let roadLeft = width / 2 - ROAD_WIDTH / 2;
      let roadRight = width / 2 + ROAD_WIDTH / 2;
      this.x = constrain(this.x, roadLeft + CAR_WIDTH / 2, roadRight - CAR_WIDTH / 2);
    } else {
      // Obstacles just move down
      this.y += this.speed;
    }
  }

  display() {
    // Map 2D screen coords (this.x, this.y) to 3D world coords centered at (0,0,0)
    const worldX = this.x - width / 2;
    const worldY = this.y - height / 2;

    push();
    translate(worldX, worldY, CAR_DEPTH / 2); // lift slightly above road plane (z=0)
    noStroke();

    // Car body
    fill(this.color);
    box(CAR_WIDTH, CAR_HEIGHT, CAR_DEPTH);

    // Simple darker roof for a bit of detail
    fill(0, 0, 0, 80);
    translate(0, -CAR_HEIGHT * 0.15, 0);
    box(CAR_WIDTH * 0.8, CAR_HEIGHT * 0.4, CAR_DEPTH * 1.05);

    pop();
  }

  // Simple AABB collision detection in 2D screen space
  checkCollision(otherCar) {
    let dX = abs(this.x - otherCar.x);
    let dY = abs(this.y - otherCar.y);

    return (dX < CAR_WIDTH && dY < CAR_HEIGHT);
  }
}
Line-by-line explanation (13 lines)

🔧 Subcomponents:

calculation Car Constructor constructor(x, y, isPlayer = true) { ... }

Initializes a new Car object with position, speed, color, and player/obstacle type.

calculation Car Update Method update() { ... }

Updates the car's speed and position each frame based on player input or autonomous obstacle behavior.

calculation Car Display Method display() { ... }

Renders the car as a 3D box with a darker roof, translated and positioned in 3D world space.

calculation Collision Detection Method checkCollision(otherCar) { ... }

Returns true if this car's bounding box overlaps with another car's, indicating a crash.

constructor(x, y, isPlayer = true) {
The constructor initializes a new Car with an x and y position, and a boolean flag indicating if it's player-controlled.
this.color = isPlayer ? color(0, 0, 255) : color(255, 0, 0);
Sets the car's color to blue if it's the player, or red if it's an obstacle.
if (keyIsDown(UP_ARROW) || keyIsDown(87)) {
Checks if the up arrow or 'W' key is being held down, indicating forward acceleration.
this.speed += PLAYER_ACCELERATION;
Increases the car's speed when accelerating. The amount is defined by the PLAYER_ACCELERATION constant.
this.speed = constrain(this.speed, -PLAYER_MAX_SPEED / 2, PLAYER_MAX_SPEED);
Clamps the speed to a range: minimum is half max speed in reverse, maximum is PLAYER_MAX_SPEED forward.
let steerAmount = PLAYER_STEERING_SPEED * max(abs(this.speed), 5);
Calculates how far the car steers horizontally. Steering scales with speed, but has a minimum base so you can steer even at low speeds.
if (touchX < width / 2) {
Checks if the touch point is on the left half of the screen, which steers the car left.
this.x = constrain(this.x, roadLeft + CAR_WIDTH / 2, roadRight - CAR_WIDTH / 2);
Keeps the player car within the road boundaries so it can't drive off the sides.
const worldX = this.x - width / 2;
Converts the car's 2D screen coordinate (where 0 is left edge) to 3D world coordinate (where 0 is center).
translate(worldX, worldY, CAR_DEPTH / 2);
Moves the origin to the car's position in 3D space and lifts it slightly above the road plane so it's visible.
fill(this.color); box(CAR_WIDTH, CAR_HEIGHT, CAR_DEPTH);
Draws the main car body as a 3D box with the car's color (blue or red).
let dX = abs(this.x - otherCar.x);
Calculates the horizontal distance between this car and another car for collision detection.
return (dX < CAR_WIDTH && dY < CAR_HEIGHT);
Returns true if both the horizontal AND vertical distance are within the car dimensions, meaning they overlap (collision).

📦 Key Variables

ROAD_WIDTH number

Defines the pixel width of the playable road area; the road is divided into three equal lanes.

const ROAD_WIDTH = 400;
LANE_WIDTH number

The width of each individual lane; calculated as ROAD_WIDTH / 3 so lane markings and spawning are consistent.

const LANE_WIDTH = ROAD_WIDTH / 3;
CAR_WIDTH number

The pixel width of cars; used for drawing boxes and collision detection.

const CAR_WIDTH = 50;
CAR_HEIGHT number

The pixel height of cars; used for drawing boxes and collision detection.

const CAR_HEIGHT = 80;
CAR_DEPTH number

The Z-axis thickness of 3D car boxes; makes them appear as solid blocks in 3D space rather than flat squares.

const CAR_DEPTH = 40;
PLAYER_MAX_SPEED number

The maximum speed the player car can accelerate to; prevents runaway speed and keeps the game playable.

const PLAYER_MAX_SPEED = 10;
PLAYER_ACCELERATION number

How much the player's speed increases per frame when holding the up arrow; controls how quickly the car speeds up.

const PLAYER_ACCELERATION = 0.2;
PLAYER_STEERING_SPEED number

How many pixels the car steers left or right per frame when holding arrow keys; controls steering responsiveness.

const PLAYER_STEERING_SPEED = 0.1;
OBSTACLE_SPAWN_INTERVAL number

Number of frames to wait between spawning new obstacle cars; controls difficulty by setting obstacle frequency.

const OBSTACLE_SPAWN_INTERVAL = 100;
OBSTACLE_MIN_GAP number

Minimum vertical pixel distance between spawned obstacles; prevents them from spawning too close together.

const OBSTACLE_MIN_GAP = 200;
playerCar object (Car instance)

The player's blue car object; updated each frame with input and checked for collisions.

let playerCar;
obstacles array of Car objects

Array of all active red obstacle cars currently on the road; checked for collisions and removed when off-screen.

let obstacles = [];
roadScrollY number

Vertical offset for animating the lane markings; incremented by player speed to create scrolling effect.

let roadScrollY = 0;
score number

The player's current score; incremented every SCORE_INCREMENT_INTERVAL frames and displayed in the HUD.

let score = 0;
gameState string

Current game state: 'menu' (title screen), 'playing' (active game), or 'gameOver' (crash); controls which UI and game logic runs.

let gameState = 'menu';
CAMERA_TILT number (radians)

The rotateX angle that tilts the camera forward; creates perspective effect making road recede into distance.

const CAMERA_TILT = Math.PI / 6;
uiFont p5.Font object

Loaded font used for rendering text in WEBGL mode; ensures crisp, readable menu and HUD text.

let uiFont;

🔧 Potential Improvements (6)

Here are some ways this code could be enhanced:

BUG Car.checkCollision()

Collision detection uses screen coordinates (2D) but ignores the Z-axis depth of 3D boxes, so cars can collide through each other if viewed from certain angles or if boxes are rendered at different Z depths.

💡 Either stick to pure 2D collision (current approach is fine for this game), or implement true 3D AABB collision that checks all three axes (dX, dY, dZ). For now, document that collision is 2D-only for performance.

PERFORMANCE drawRoad() lane marking loop

The lane marking loop recalculates yPos and draws lines every frame even if they're off-screen. For very tall windows, this is inefficient.

💡 Add early-exit conditions: only draw dashes that are within the viewport (yPos > -height/2 && yPos < height/2) to skip off-screen calculations.

STYLE Car class

The steering logic is complex with separate keyboard, arrow key, and touch/mouse handling scattered across many if-statements, making it hard to extend.

💡 Extract steering into a separate method: getSteerAmount() and applySteeringInput() to reduce nesting and improve readability.

FEATURE Obstacle spawning

All obstacles spawn in the three lanes at predictable x positions, making the game less challenging after a few runs.

💡 Add subtle random horizontal jitter to obstacle x positions when they spawn, or vary their spawn width to create more unpredictable patterns.

BUG windowResized()

If the window is resized while an obstacle is on screen, the obstacles' positions are not recalculated—they use old canvas dimensions in their display() calculations, causing visual glitches.

💡 Store canvas dimensions in global constants (canvasWidth, canvasHeight) and update them in windowResized() so all coordinate calculations stay consistent.

FEATURE Game logic

There is no difficulty progression; obstacles always spawn at the same rate regardless of score.

💡 Increase OBSTACLE_SPAWN_INTERVAL difficulty dynamically: decrease it by 5 every 500 points to make the game harder as the player survives longer.

🔄 Code Flow

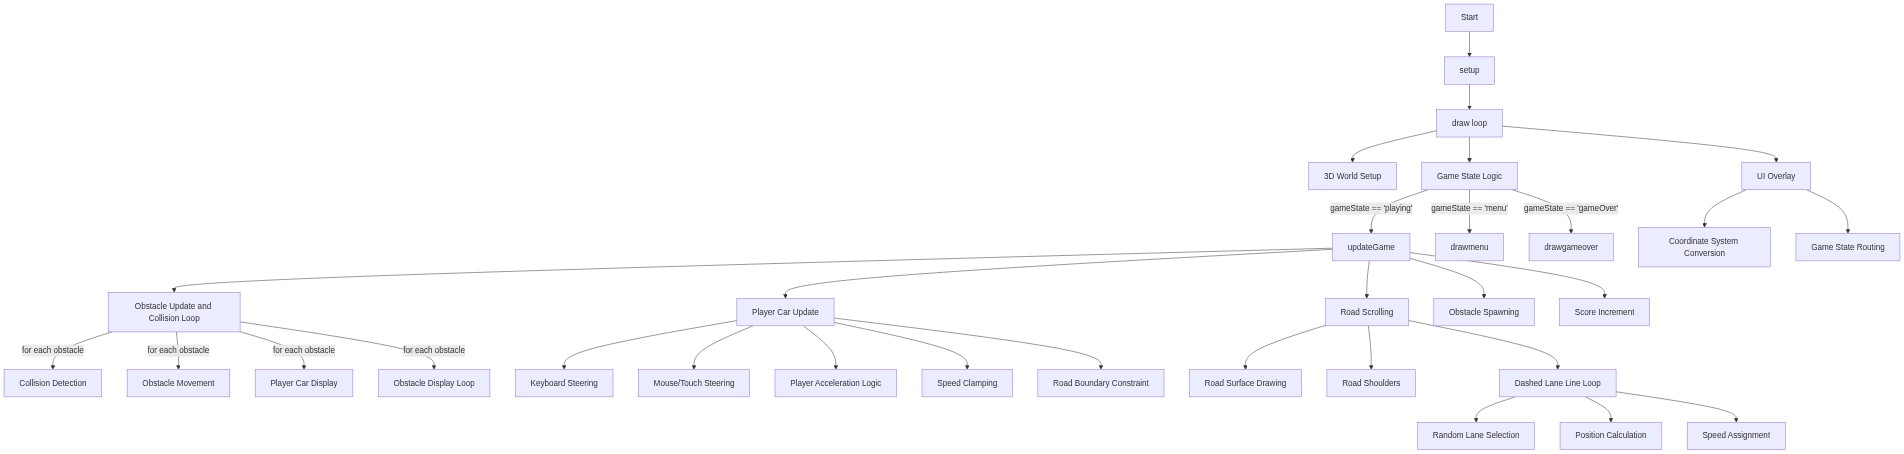
Code flow showing setup, preload, draw, updategame, displaygame, drawroad, generateobstacle, resetgame, drawui, drawmenu, drawhud, drawgameover, keypressed, mousepressed, windowresized, car

💡 Click on function names in the diagram to jump to their code

graph TD start[Start] --> setup[setup] setup --> preload[preload] setup --> resetgame[resetGame] setup --> draw[draw loop] click setup href "#fn-setup" click preload href "#fn-preload" click resetgame href "#fn-resetgame" draw --> 3dsetup[3D World Setup] draw --> gameupdatecheck[Game State Check] draw --> displaygame[displayGame] draw --> drawroad[drawRoad] draw --> drawui[drawUI] click draw href "#fn-draw" click 3dsetup href "#sub-3d-setup" click gameupdatecheck href "#sub-game-update-check" click displaygame href "#fn-displaygame" click drawroad href "#fn-drawroad" click drawui href "#fn-drawui" gameupdatecheck -->|gameState === 'playing'| updategame[updateGame] gameupdatecheck -->|else| stateconditional[Game State Display Check] click updategame href "#fn-updategame" click stateconditional href "#sub-state-conditional" updategame --> obstacleloop[Obstacle Update Loop] updategame --> spawncheck[Obstacle Spawn Check] click obstacleloop href "#sub-obstacle-loop" click spawncheck href "#sub-spawn-check" obstacleloop -->|for each obstacle| car[Car] car --> updatemethod[Car Update Method] car --> displaymethod[Car Display Method] car --> collisionmethod[Collision Detection Method] click car href "#fn-car" click updatemethod href "#sub-update-method" click displaymethod href "#sub-display-method" click collisionmethod href "#sub-collision-method" spawncheck -->|if enough gap| generateobstacle[generateObstacle] click generateobstacle href "#fn-generateobstacle" drawui -->|gameState === 'menu'| drawmenu[drawMenu] drawui -->|gameState === 'playing'| drawhud[drawHUD] drawui -->|gameState === 'gameOver'| drawgameover[drawGameOver] click drawmenu href "#fn-drawmenu" click drawhud href "#fn-drawhud" click drawgameover href "#fn-drawgameover" keypressed[keyPressed] --> stateTransitionMenu[Menu to Playing Transition] keypressed --> stateTransitionGameOver[GameOver to Playing Transition] click keypressed href "#fn-keypressed" click stateTransitionMenu href "#sub-state-transition-menu" click stateTransitionGameOver href "#sub-state-transition-gameover" mousepressed[mousePressed] -->|alternative input| drawui click mousepressed href "#fn-mousepressed" windowresized[windowResized] -->|maintain responsiveness| draw click windowresized href "#fn-windowresized"

❓ Frequently Asked Questions

What visual experience does the 'ca gam but I made it 3d lol' sketch provide?

The sketch creates a dynamic 3D racing game environment where players navigate a road while avoiding obstacles, featuring colorful cars and a tilted camera perspective.

How do users interact with the 'ca gam but I made it 3d lol' sketch?

Users can control the player car's speed and steering using keyboard inputs to avoid obstacles and score points.

What creative coding concepts are showcased in this 3D sketch?

The sketch demonstrates concepts such as 3D rendering with p5.js, object-oriented programming through the Car class, and game mechanics including speed, acceleration, and obstacle generation.

Preview

ca gam  but i made it 3d lol - p5.js creative coding sketch preview
Sketch Preview
Code flow diagram showing the structure of ca gam  but i made it 3d lol - Code flow showing setup, preload, draw, updategame, displaygame, drawroad, generateobstacle, resetgame, drawui, drawmenu, drawhud, drawgameover, keypressed, mousepressed, windowresized, car
Code Flow Diagram