
Challange of the day-Fabric

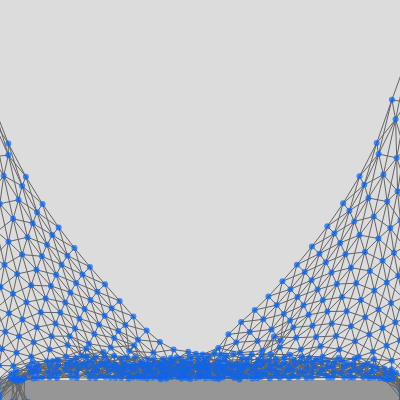
This sketch simulates a realistic cloth hanging from two fixed points at the top, made of hundreds of tiny particles connected by springs. The cloth sways under gravity, and dragging your mouse over it pulls and stretches the fabric in real time, demonstrating physics-based animation using the Matter.js engine.

🧪 Try This!

Experiment with the code by making these changes:

  1. Make the cloth heavier — Higher gravity pulls the cloth down more aggressively, making it sag and droop further.
  2. Make the cloth springy — Lower stiffness makes springs more elastic; the cloth will bounce and oscillate longer when you pull it.
  3. Make the cloth wider and taller — More particles create a larger, more detailed cloth, but slow down the simulation (try these and see performance).
  4. Change the cloth color to red — The RGB values (0, 100, 255) create blue; change them to (255, 0, 0) for red, or (0, 255, 0) for green.
  5. Make springs visible (increase line thickness) — Thicker spring lines make the mesh structure obvious and the cloth look more like a wire frame.
Prefer the full editor? Open it there →

📖 About This Sketch

This sketch creates a hanging cloth made of 600 particles (30×20 grid) connected by springs, all governed by the Matter.js physics engine. When you move your mouse over the fabric, it responds instantly—dragging stretches the cloth, and it settles back down with realistic rippling motion. It is a stunning example of how combining many simple physics rules (gravity, spring forces, damping) creates convincing emergent behavior.

The code is structured around three core ideas: particle creation in setup(), physics simulation in draw() via Matter.js Engine.update(), and constraint definition that connects particles into springs. By studying it you will learn how to build a particle system, apply physics forces at scale, use constraints to link bodies together, and add mouse interaction to a Matter.js world—skills that power cloth simulations, rope physics, and soft-body dynamics in professional games and visualizations.

⚙️ How It Works

  1. When the sketch loads, setup() creates a Matter.js engine and world with gravity. A nested loop then builds the cloth grid: 30 columns × 20 rows of circular particles. The two top-corner particles are marked as static (immovable) to anchor the cloth.
  2. For each particle, setup() creates three types of springs: horizontal constraints linking left neighbors, vertical constraints linking particles above, and diagonal constraints connecting diagonally adjacent particles for stability.
  3. Every frame, draw() calls Engine.update(engine), which advances the physics simulation: gravity pulls all particles down, springs push and pull neighbors toward their target lengths, and damping gradually slows motion.
  4. Mouse interaction is handled by MouseConstraint: when you click and drag over the canvas, a temporary spring connects your mouse position to the nearest particle, letting you tug the cloth in real time.
  5. The cloth is drawn each frame by iterating through all particles and constraints: gray lines show the springs connecting particles, and blue circles represent the particles themselves.
  6. Because the two top corners are static, the cloth hangs naturally—gravity stretches it, springs resist stretching, and damping smooths out oscillations until motion settles.

🎓 Concepts You'll Learn

Particle systemsPhysics engine (Matter.js)Spring constraintsMouse interaction and draggingNested loops and 2D arraysStatic vs dynamic bodies

📝 Code Breakdown

setup()

setup() runs once when the sketch starts. It initializes the Matter.js engine, builds the cloth particle grid, creates all the springs that hold it together, adds a ground floor, and sets up mouse interaction. This function demonstrates nested loops for building 2D grids, constraint creation for soft-body physics, and Matter.js API patterns you'll use in any physics-based sketch.

🔬 This line decides which particles are anchored. Currently only the two top corners are static. What happens if you change it to j === 0 (making the entire top row static) or remove the (i === 0 || i === numCols - 1) check? How does it change where the cloth can move?

      // Make the top-left and top-right particles static (fixed)
      const isStatic = (j === 0 && (i === 0 || i === numCols - 1));
function setup() {
  createCanvas(windowWidth, windowHeight);
  // Tip: Use windowWidth/windowHeight for responsive canvas

  // Initialize Matter.js engine and world
  engine = Engine.create();
  world = engine.world;
  world.gravity.y = 1; // Standard gravity

  // Create the cloth particles
  for (let j = 0; j < numRows; j++) {
    cloth[j] = [];
    for (let i = 0; i < numCols; i++) {
      const x = (width / 2) - ((numCols * particleSpacing) / 2) + i * particleSpacing;
      const y = 50 + j * particleSpacing; // Start cloth higher up

      // Make the top-left and top-right particles static (fixed)
      const isStatic = (j === 0 && (i === 0 || i === numCols - 1));

      // Create a particle (circle body)
      const particle = Bodies.circle(x, y, particleRadius, {
        isStatic: isStatic,
        friction: 0.1,
        restitution: 0.2,
        density: 0.001 // Make particles light
      });
      World.add(world, particle);
      cloth[j][i] = particle;

      // Create constraints (springs) between particles
      if (i > 0) {
        // Horizontal constraint
        const hConstraint = Constraint.create({
          bodyA: particle,
          bodyB: cloth[j][i - 1],
          length: particleSpacing,
          stiffness: stiffness,
          damping: damping
        });
        World.add(world, hConstraint);
        constraints.push(hConstraint);
      }
      if (j > 0) {
        // Vertical constraint
        const vConstraint = Constraint.create({
          bodyA: particle,
          bodyB: cloth[j - 1][i],
          length: particleSpacing,
          stiffness: stiffness,
          damping: damping
        });
        World.add(world, vConstraint);
        constraints.push(vConstraint);
      }
      // Add diagonal constraints for better stability (optional)
      if (i > 0 && j > 0) {
        const diagLength = dist(0, 0, particleSpacing, particleSpacing);
        // Diagonal top-left
        const diag1 = Constraint.create({
          bodyA: particle,
          bodyB: cloth[j - 1][i - 1],
          length: diagLength,
          stiffness: stiffness,
          damping: damping
        });
        World.add(world, diag1);
        constraints.push(diag1);

        // Diagonal top-right (only if not on right edge)
        if (i < numCols - 1) {
          const diag2 = Constraint.create({
            bodyA: particle,
            bodyB: cloth[j - 1][i + 1],
            length: diagLength,
            stiffness: stiffness,
            damping: damping
          });
          World.add(world, diag2);
          constraints.push(diag2);
        }
      }
    }
  }

  // Create a ground body
  const ground = Bodies.rectangle(width / 2, height - 10, width, 20, { isStatic: true });
  World.add(world, ground);

  // Add mouse interaction
  // FIX: Revert to the original, correct syntax for Matter.js v0.20.0.
  // Matter.js 0.20.0 expects the HTML element directly as the argument for Mouse.create().
  const canvasMouse = Mouse.create(canvas.elt);
  canvasMouse.pixelRatio = pixelDensity(); // Adjust for high-DPI screens
  mouseConstraint = MouseConstraint.create(engine, {
    mouse: canvasMouse,
    constraint: {
      stiffness: 0.2, // How strong the mouse drag is
      render: {
        visible: false // Don't draw the mouse constraint line
      }
    }
  });
  World.add(world, mouseConstraint);
}
Line-by-line explanation (19 lines)

🔧 Subcomponents:

for-loop Nested Cloth Grid Loop for (let j = 0; j < numRows; j++) { ... for (let i = 0; i < numCols; i++) { ... } }

Builds a 2D grid of particles (rows × columns) positioned and spaced evenly across the canvas

calculation Particle Body Creation const particle = Bodies.circle(x, y, particleRadius, { isStatic, friction, restitution, density });

Creates a Matter.js circle body with physics properties; marks top corners as static to anchor the cloth

conditional Spring Constraint Creation if (i > 0) { ... } if (j > 0) { ... } if (i > 0 && j > 0) { ... }

Builds horizontal, vertical, and diagonal springs linking particles together to form a connected mesh

calculation Mouse Interaction Setup const canvasMouse = Mouse.create(canvas.elt); ... mouseConstraint = MouseConstraint.create(engine, { ... });

Configures Matter.js mouse tracking so dragging the canvas pulls particles toward your cursor

createCanvas(windowWidth, windowHeight);
Creates a canvas that fills the entire browser window, making the simulation responsive to screen size
engine = Engine.create();
Creates a Matter.js physics engine that will calculate forces, collisions, and constraint resolution every frame
world = engine.world;
Gets a reference to the physics world (the container holding all bodies and constraints)
world.gravity.y = 1;
Sets gravity strength—a positive value pulls particles downward, creating the hanging-cloth effect
for (let j = 0; j < numRows; j++) {
Outer loop iterates through each row (top to bottom) of the cloth grid
for (let i = 0; i < numCols; i++) {
Inner loop iterates through each column (left to right) for the current row, creating a 2D grid
const x = (width / 2) - ((numCols * particleSpacing) / 2) + i * particleSpacing;
Calculates the x position of each particle so the cloth is centered horizontally on the canvas
const y = 50 + j * particleSpacing;
Calculates the y position (starting 50 pixels from the top) and increasing downward with each row
const isStatic = (j === 0 && (i === 0 || i === numCols - 1));
Marks only the two top-corner particles as static (unmovable), so they anchor the cloth in place
const particle = Bodies.circle(x, y, particleRadius, { isStatic: isStatic, friction: 0.1, restitution: 0.2, density: 0.001 });
Creates a circular physics body at position (x, y) with properties that control how it bounces and drags through the air
World.add(world, particle);
Adds the newly created particle to the physics world so it is simulated and can collide/interact
cloth[j][i] = particle;
Stores the particle in a 2D array so we can reference it later when creating springs and drawing
if (i > 0) { const hConstraint = Constraint.create({ bodyA: particle, bodyB: cloth[j][i - 1], ... }); }
Creates a horizontal spring between the current particle and its left neighbor, pulling them toward particleSpacing distance apart
if (j > 0) { const vConstraint = Constraint.create({ bodyA: particle, bodyB: cloth[j - 1][i], ... }); }
Creates a vertical spring between the current particle and the one above it, maintaining vertical structure
if (i > 0 && j > 0) { const diagLength = dist(0, 0, particleSpacing, particleSpacing); ... }
Adds diagonal springs to prevent shearing—these springs preserve the cloth's grid structure and prevent collapse
const ground = Bodies.rectangle(width / 2, height - 10, width, 20, { isStatic: true });
Creates an invisible static floor at the bottom of the canvas to catch the cloth and prevent it from falling infinitely
const canvasMouse = Mouse.create(canvas.elt);
Tells Matter.js to track your mouse position on the p5 canvas element, converting screen coordinates to physics coordinates
canvasMouse.pixelRatio = pixelDensity();
Adjusts mouse tracking for high-resolution displays (like Retina screens) so dragging feels accurate
mouseConstraint = MouseConstraint.create(engine, { mouse: canvasMouse, constraint: { stiffness: 0.2, ... } });
Creates a temporary spring between your mouse and whichever particle you click, letting you drag the cloth interactively
draw()

draw() is the animation loop—it runs 60 times per second. Each frame clears the canvas, steps the physics simulation forward, and redraws everything at new positions. This is where p5.js and Matter.js collaborate: p5 handles graphics, Matter.js handles physics. Engine.update() is the magic line that makes the cloth move and respond to gravity and springs.

🔬 This nested loop draws every particle as a circle. What if you only drew every second particle—say, change the inner loop to for (let i = 0; i < numCols; i += 2) so it skips particles? Or what if you made particles bigger by changing particleRadius * 2 to particleRadius * 4? How does the visual change?

  // Draw particles (circles)
  fill(0, 100, 255, 180); // Semi-transparent blue
  noStroke();
  for (let j = 0; j < numRows; j++) {
    for (let i = 0; i < numCols; i++) {
      const particle = cloth[j][i];
      circle(particle.position.x, particle.position.y, particleRadius * 2);
    }
  }

🔬 The springs are drawn with stroke(100) and strokeWeight(1), making them subtle. What happens if you increase strokeWeight(1) to strokeWeight(3) so springs are much more visible? Or try changing stroke(100) to stroke(200) for lighter springs?

  // Draw constraints (springs)
  stroke(100);
  strokeWeight(1);
  for (let c of constraints) {
    const a = c.bodyA.position;
    const b = c.bodyB.position;
    line(a.x, a.y, b.x, b.y);
  }
function draw() {
  background(220);

  // Update the Matter.js engine
  Engine.update(engine);

  // Draw the ground (optional)
  fill(150);
  noStroke();
  rectMode(CENTER);
  rect(width / 2, height - 10, width, 20);

  // Draw constraints (springs)
  stroke(100);
  strokeWeight(1);
  for (let c of constraints) {
    const a = c.bodyA.position;
    const b = c.bodyB.position;
    line(a.x, a.y, b.x, b.y);
  }

  // Draw particles (circles)
  fill(0, 100, 255, 180); // Semi-transparent blue
  noStroke();
  for (let j = 0; j < numRows; j++) {
    for (let i = 0; i < numCols; i++) {
      const particle = cloth[j][i];
      circle(particle.position.x, particle.position.y, particleRadius * 2);
    }
  }
}
Line-by-line explanation (17 lines)

🔧 Subcomponents:

calculation Physics Simulation Step Engine.update(engine);

Advances the Matter.js physics simulation by one frame—applies gravity, resolves springs, and updates all particle positions

for-loop Spring Drawing Loop for (let c of constraints) { const a = c.bodyA.position; const b = c.bodyB.position; line(a.x, a.y, b.x, b.y); }

Iterates through all springs and draws a gray line between each pair of connected particles

for-loop Particle Drawing Loop for (let j = 0; j < numRows; j++) { for (let i = 0; i < numCols; i++) { const particle = cloth[j][i]; circle(...); } }

Iterates through the entire cloth grid and draws each particle as a semi-transparent blue circle at its current physics position

background(220);
Clears the entire canvas to light gray, erasing the previous frame so animation appears smooth
Engine.update(engine);
The heart of the simulation: Matter.js calculates forces (gravity, spring tension), resolves constraints, and updates every particle's position and velocity
fill(150);
Sets the fill color to a medium gray for the ground rectangle
noStroke();
Removes the outline so the ground fills the entire rectangle with no border
rectMode(CENTER);
Changes how rectangles are positioned—CENTER means the coordinates specify the rect's center, not its top-left corner
rect(width / 2, height - 10, width, 20);
Draws a 20-pixel-tall ground rectangle at the bottom of the canvas (centered horizontally, just barely visible)
stroke(100);
Sets the line color to dark gray for drawing the springs
strokeWeight(1);
Makes lines very thin (1 pixel) so springs are delicate and don't overpower the visual
for (let c of constraints) {
Iterates through every spring constraint that was created in setup()
const a = c.bodyA.position;
Gets the current x,y position of the first particle connected by this spring
const b = c.bodyB.position;
Gets the current x,y position of the second particle connected by this spring
line(a.x, a.y, b.x, b.y);
Draws a line segment between the two particle positions, visualizing the spring
fill(0, 100, 255, 180);
Sets fill color to a semi-transparent blue (180 alpha = 70% opaque) so particles glow slightly and show depth
for (let j = 0; j < numRows; j++) {
Outer loop iterates through each row of the cloth
for (let i = 0; i < numCols; i++) {
Inner loop iterates through each column, visiting every particle in the grid
const particle = cloth[j][i];
Retrieves the particle object from the 2D cloth array at row j, column i
circle(particle.position.x, particle.position.y, particleRadius * 2);
Draws a circle at the particle's current physics position; the diameter is particleRadius * 2, so 6 pixels (since particleRadius = 3)

windowResized()

windowResized() is a p5.js built-in function that triggers automatically whenever the browser window is resized. Currently it only resizes the canvas, but the cloth particles remain at their original screen positions. For a production sketch, you might want to rebuild the cloth or translate all particle positions to keep the cloth centered after a resize.

function windowResized() {
  resizeCanvas(windowWidth, windowHeight);
  // Re-center the cloth or adjust its position if needed
  // For simplicity, we'll keep the current x-centering, but you might want to rebuild the cloth
}
Line-by-line explanation (1 lines)
resizeCanvas(windowWidth, windowHeight);
When the browser window is resized, this adjusts the p5 canvas to match the new screen dimensions so the sketch fills the entire window

touchStarted()

touchStarted() is a p5.js event function that fires when the user touches the screen on mobile devices. Returning false prevents the browser's default touch actions (scrolling, pinch-zoom), making touch dragging feel smooth and responsive in the cloth simulation.

function touchStarted() {
  return false;
}
Line-by-line explanation (1 lines)
return false;
Returning false tells the browser NOT to use its default touch behavior (like scrolling or zooming), so touch input goes entirely to the p5 canvas and Matter.js mouse constraint

📦 Key Variables

engine Matter.Engine

The Matter.js physics engine object that handles all force calculations, collision detection, and constraint resolution

let engine;
world Matter.World

The physics world contained within the engine—holds all bodies (particles) and constraints (springs) and applies global properties like gravity

let world;
cloth array of arrays (2D array)

A 2D grid (rows × columns) storing references to all particle bodies so they can be accessed by position: cloth[row][column]

let cloth = [];
constraints array

A flat array holding all spring constraint objects created between particles, used in draw() to visualize springs and stored for physics simulation

let constraints = [];
numCols number

The width of the cloth grid in particles (30 creates a 30-particle-wide cloth)

const numCols = 30;
numRows number

The height of the cloth grid in particles (20 creates a 20-particle-tall cloth)

const numRows = 20;
particleSpacing number

The distance in pixels between adjacent particles—used to calculate particle positions and set spring lengths

const particleSpacing = 15;
particleRadius number

The collision radius of each particle in pixels (used by Matter.js physics); drawn with diameter particleRadius * 2

const particleRadius = 3;
stiffness number

Controls how strongly springs resist stretching (0.01–0.2 range); higher values = stiffer, less elastic cloth

const stiffness = 0.05;
damping number

Controls how quickly oscillations fade; higher values reduce bouncing and settle motion faster

const damping = 0.01;
mouseConstraint Matter.MouseConstraint

A Matter.js object that creates a temporary spring between your mouse and particles you drag, enabling interactive pulling of the cloth

let mouseConstraint;

🔧 Potential Improvements (4)

Here are some ways this code could be enhanced:

FEATURE windowResized()

When the window resizes, the cloth particles stay in their original positions instead of re-centering or rebuilding

💡 After resizing the canvas, translate all particle positions or rebuild the cloth grid to keep it centered and responsive. Currently large window changes can push the cloth off-screen.

PERFORMANCE setup() - constraint creation loop

Creating diagonal constraints for every particle adds significant computational overhead, especially with large numCols/numRows values

💡 Consider making diagonal constraints optional via a boolean toggle, or only creating them for a subset of the cloth (e.g., every other row/column) to improve frame rate on slower devices.

BUG draw() - constraint and particle loops

Both the constraint and particle loops iterate through thousands of objects every frame, but there is no early exit or culling for off-screen elements

💡 Add a check to skip drawing springs and particles that are far off-screen, reducing draw calls and improving performance on large grids.

STYLE setup()

The isStatic calculation is dense: const isStatic = (j === 0 && (i === 0 || i === numCols - 1))

💡 Break this into a separate helper function like isTopCorner(j, i) to make the intent clearer and allow easier modifications (e.g., anchor multiple points).

🔄 Code Flow

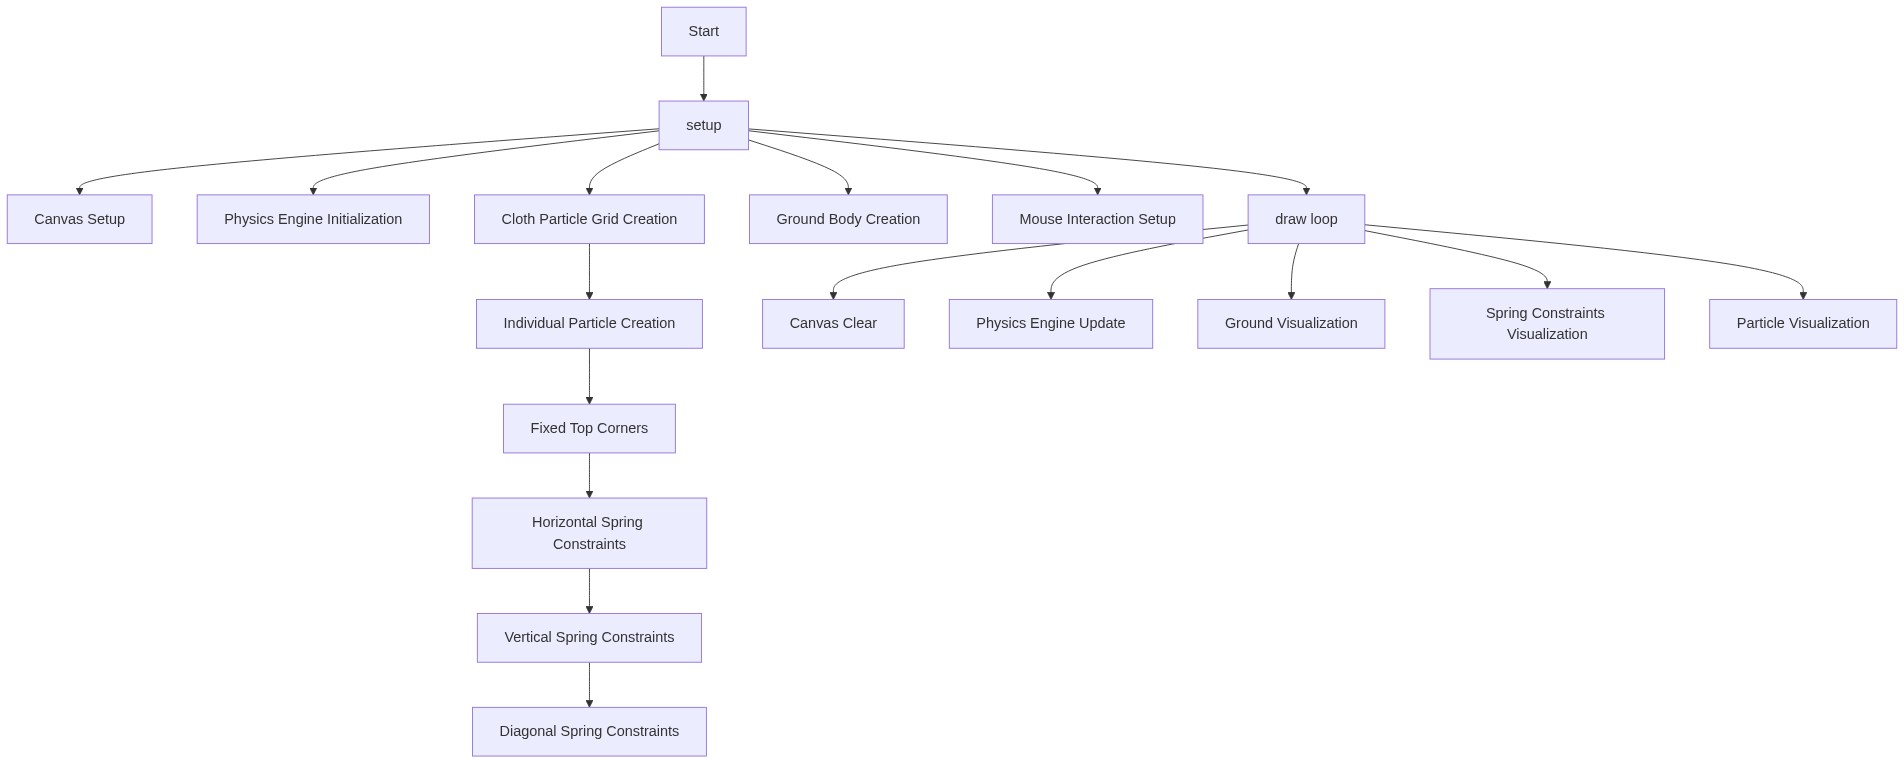
Code flow showing setup, draw, windowresized, touchstarted

💡 Click on function names in the diagram to jump to their code

graph TD start[Start] --> setup[setup] setup --> draw[draw loop] draw --> physicsupdate[Physics Simulation Step] draw --> constraintdrawing[Spring Drawing Loop] draw --> particledrawing[Particle Drawing Loop] physicsupdate --> draw constraintdrawing --> draw particledrawing --> draw setup --> clothgridcreation[Cloth Grid Creation] setup --> particlecreation[Particle Body Creation] setup --> constraintcreation[Spring Constraint Creation] setup --> mouseinteractionsetup[Mouse Interaction Setup] click setup href "#fn-setup" click draw href "#fn-draw" click physicsupdate href "#sub-physics-update" click constraintdrawing href "#sub-constraint-drawing" click particledrawing href "#sub-particle-drawing" click clothgridcreation href "#sub-cloth-grid-creation" click particlecreation href "#sub-particle-creation" click constraintcreation href "#sub-constraint-creation" click mouseinteractionsetup href "#sub-mouse-interaction-setup"

❓ Frequently Asked Questions

What visual effect does the p5.js cloth simulation sketch create?

The sketch visually simulates a soft, hanging cloth made of connected particles that sway and ripple, mimicking realistic fabric movement.

How can users interact with the cloth simulation in this sketch?

Users can interact by moving their mouse over the cloth, which allows them to tug and stretch the fabric, watching it react and settle in real time.

What creative coding concept is demonstrated in this p5.js sketch?

This sketch demonstrates the use of physics simulation, specifically through the Matter.js library, to create realistic movement and interaction in a digital fabric environment.

Preview

Challange of the day-Fabric - p5.js creative coding sketch preview
Sketch Preview
Code flow diagram showing the structure of Challange of the day-Fabric - Code flow showing setup, draw, windowresized, touchstarted
Code Flow Diagram