CHAT GPT PART 2

Chat Stella is an interactive chatbot interface built with p5.js that responds to user messages with keyword-based replies, generates visual art, and speaks responses aloud using text-to-speech synthesis. The sketch combines DOM elements for chat interaction with p5.js graphics to create a playful conversational experience.

🧪 Try This!

Experiment with the code by making these changes:

  1. Add a new keyword response — Expand the stellaResponses array with a new object to make Stella respond to a custom keyword like 'coffee' or 'robot'.
  2. Speed up Stella's response — Change the thinking delay so Stella responds instantly (0 milliseconds) instead of after 0.5–1.5 seconds.
  3. Change Stella's default language to Spanish — Stella will speak in Spanish by default—users can still switch languages by saying 'speak english'.
  4. Disable speech synthesis — Comment out the line that makes Stella speak, so she only displays text messages without audio.
Prefer the full editor? Open it there →

📖 About This Sketch

Chat Stella is a keyword-based chatbot that blends p5.js graphics with web DOM elements to create an engaging conversation interface. When you type messages, Stella responds with text, generates visual art on demand using createGraphics(), and speaks her replies aloud using the p5.Speech library—a real-time demonstration of how creative coding goes far beyond the canvas.

The code is organized into setup() to initialize the chat interface and p5.Speech, draw() to render a subtle background gradient, and helper functions that handle message parsing, image generation, and DOM manipulation. By studying it, you'll learn how to bridge p5.js graphics with HTML elements, implement keyword matching for conversational AI, use createGraphics() to generate images programmatically, and orchestrate text-to-speech synthesis—four powerful techniques that transform static sketches into interactive digital experiences.

⚙️ How It Works

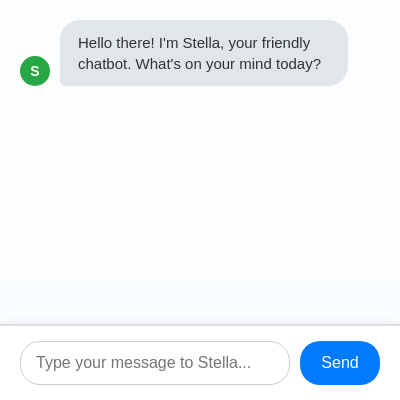
  1. When the sketch loads, setup() creates a canvas, initializes p5.Speech for text-to-speech, and retrieves references to the HTML chat input, send button, and conversation log. Stella greets the user with an initial message displayed in the conversation log.
  2. Every frame, draw() renders a simple light-blue gradient background that sits behind the chat interface, creating a soft visual foundation for the conversation.
  3. When the user types a message and presses Enter or clicks Send, sendMessage() captures the input and displays it as a user message bubble in the conversation log.
  4. The sketch then calls generateBotResponse(), which loops through the stellaResponses array comparing the user's message against keyword lists. If a match is found, it returns either a text response, a generated image, or a language change command.
  5. If the response is an image, generateImage() creates a p5.Graphics object and draws one of four visual styles (circle, square, gradient, or random art) at 250×180 pixels, then converts it to a data URL for display.
  6. After a random delay simulating thinking time (500–1500 ms), the response appears as a Stella message bubble in the log. If it's text, p5.Speech automatically speaks the reply aloud in the current language. The conversation log scrolls to reveal the newest message.

🎓 Concepts You'll Learn

Keyword matching and conditional logicDOM manipulation and p5.js integrationText-to-speech synthesis (p5.Speech)Graphics generation with createGraphics()Asynchronous timing with setTimeoutArray iteration and object propertiesCanvas gradients and color interpolation

📝 Code Breakdown

setup()

setup() runs once at the start and is where you initialize your canvas, load libraries, and attach event listeners. Here it bridges p5.js (the canvas) with HTML (the chat input) and preps text-to-speech. Notice the defensive programming: checking if p5.Speech exists prevents crashes if the library fails to load.

function setup() {
  createCanvas(windowWidth, windowHeight);
  background(240); // Canvas will be a background

  // --- Debugging console logs ---
  console.log("p5:", p5);
  console.log("p5.sound:", typeof p5.sound); // Check type, not just value
  console.log("p5.Speech:", typeof p5.Speech); // Check type
  // --- End Debugging ---

  // Initialize p5.Speech for Stella's responses
  if (typeof p5.Speech !== 'undefined') { // Check if p5.Speech class is available
    stellaSpeech = new p5.Speech();
    stellaSpeech.setLang('en-US'); // Default language
    stellaSpeech.setRate(1); // Normal speaking rate
    stellaSpeech.setPitch(1); // Normal pitch
  } else {
    console.error("p5.Speech library (from p5.sound) not loaded correctly. Speech synthesis will be disabled.");
    // Create a dummy object to prevent further crashes if p5.Speech is undefined
    stellaSpeech = {
      setLang: function() {},
      setRate: function() {},
      setPitch: function() {},
      speaking: function() { return false; },
      stop: function() {},
      speak: function(text) { console.warn("Speech synthesis disabled: " + text); }
    };
  }

  // Start the audio context on user gesture (send button click or enter key)
  // This is required by browsers for audio to play.
  userStartAudio();

  // Get DOM elements for chat interface and log
  userInput = select('#user-input');
  sendButton = select('#send-button');
  conversationLogDiv = select('#conversation-log');

  // Event listener for sending messages
  sendButton.mousePressed(sendMessage);
  userInput.elt.addEventListener('keydown', (event) => {
    if (event.key === 'Enter') {
      sendMessage();
    }
  });

  // Stella's initial greeting
  addMessage("Stella", "Hello there! I'm Stella, your friendly chatbot. What's on your mind today?", false);
}
Line-by-line explanation (13 lines)

🔧 Subcomponents:

initialization Canvas Creation createCanvas(windowWidth, windowHeight);

Creates a full-window canvas that serves as the background for the chat interface

conditional p5.Speech Availability Check if (typeof p5.Speech !== 'undefined') {

Safely tests whether the p5.Speech library loaded before attempting to use it, preventing crashes

error-handling Fallback Speech Object stellaSpeech = { setLang: function() {}, ... };

Creates a dummy object with no-op methods if p5.Speech fails, so the sketch continues running

DOM-access DOM Element Selection userInput = select('#user-input');

Retrieves references to HTML elements so the sketch can read user input and display responses

event-handling Message Send Listeners sendButton.mousePressed(sendMessage);

Attaches click and Enter-key handlers to trigger message sending

createCanvas(windowWidth, windowHeight);
Creates a canvas that fills the entire browser window, serving as a subtle background behind the chat interface
console.log("p5:", p5);
Logs the p5 library object to the browser console for debugging; helps verify p5.js loaded correctly
if (typeof p5.Speech !== 'undefined') {
Checks whether the p5.Speech class exists before using it; prevents crashes if the library didn't load
stellaSpeech = new p5.Speech();
Creates a new text-to-speech object that Stella will use to speak her responses aloud
stellaSpeech.setLang('en-US');
Sets Stella's default speaking language to English (United States); can be changed later by user keywords
stellaSpeech.setRate(1);
Sets the speech rate to 1 (normal speed); values < 1 are slower, values > 1 are faster
stellaSpeech.setPitch(1);
Sets the pitch to 1 (normal); values < 1 lower the pitch, values > 1 raise it
stellaSpeech = { setLang: function() {}, ... };
If p5.Speech failed to load, creates a dummy object with empty methods so later calls don't crash
userStartAudio();
Initializes the browser's audio context; required on user interaction (like clicking Send) before audio can play
userInput = select('#user-input');
Uses p5.js's select() to grab the HTML input field element so we can read what the user types
sendButton.mousePressed(sendMessage);
Calls sendMessage() whenever the Send button is clicked
if (event.key === 'Enter') { sendMessage(); }
Lets users press Enter to send a message instead of clicking the button
addMessage("Stella", "Hello there! I'm Stella...", false);
Displays Stella's greeting message when the sketch first loads
draw()

draw() runs 60 times per second by default. In this sketch, it's minimal—just rendering a subtle background gradient. The real action happens in the DOM (the chat bubbles), but the canvas provides visual appeal. The bottom rectangle at 70% height creates a layered effect.

function draw() {
  // The canvas is mostly a background; conversation happens in DOM elements.
  // For now, let's just make it a simple gradient.
  background(220, 240, 255);
  noStroke();
  fill(180, 220, 255);
  rect(0, height * 0.7, width, height * 0.3);
}
Line-by-line explanation (4 lines)

🔧 Subcomponents:

drawing Main Background background(220, 240, 255);

Clears the canvas and fills it with a light blue-gray color every frame

drawing Accent Rectangle rect(0, height * 0.7, width, height * 0.3);

Draws a slightly darker blue rectangle in the bottom 30% of the canvas for visual depth

background(220, 240, 255);
Fills the entire canvas with RGB(220, 240, 255), a soft light-blue color, every frame
noStroke();
Removes the outline from the next shape so the rectangle appears as a solid filled area
fill(180, 220, 255);
Sets the fill color to RGB(180, 220, 255), a slightly darker blue than the background
rect(0, height * 0.7, width, height * 0.3);
Draws a rectangle at the bottom 30% of the canvas (starting at y = 70% of height) spanning the full width, creating a gradient illusion

addMessage()

addMessage() is the UI workhorse: it builds DOM elements (div, avatar, bubble), detects whether the message is an image or text, and displays it accordingly. For generated images, it converts a p5.Graphics object to a base64 data URL so browsers can display it. For text, it triggers p5.Speech to speak aloud. Finally, it auto-scrolls the chat to the newest message.

🔬 This code either shows an image or text. What if you removed the else block entirely so text messages DON'T appear in bubbles? Try it—what breaks, and why?

  if (message instanceof p5.Graphics) {
    // If it's a p5.Graphics object, convert to image and append
    // toDataURL() converts the canvas content to a base64 encoded image string
    let imgElement = createImg(message.elt.toDataURL(), 'Generated Image');
    imgElement.addClass('generated-image'); // Add a class for styling
    messageBubble.child(imgElement);
  } else {
    // Otherwise, treat as text
    messageBubble.html(message);
function addMessage(sender, message, isUser) {
  let messageContainer = createElement('div');
  messageContainer.addClass('message-container');
  if (isUser) {
    messageContainer.addClass('user');
  } else {
    messageContainer.addClass('bot');
  }

  let avatar = createElement('div', sender.charAt(0));
  avatar.addClass('message-avatar');

  let messageBubble = createElement('div');
  messageBubble.addClass('message-bubble');

  if (message instanceof p5.Graphics) {
    // If it's a p5.Graphics object, convert to image and append
    // toDataURL() converts the canvas content to a base64 encoded image string
    let imgElement = createImg(message.elt.toDataURL(), 'Generated Image');
    imgElement.addClass('generated-image'); // Add a class for styling
    messageBubble.child(imgElement);
  } else {
    // Otherwise, treat as text
    messageBubble.html(message);
    // If Stella is speaking, make her say the message
    if (!isUser) {
      if (stellaSpeech && stellaSpeech.speaking()) { // Guard calls with the dummy object
        stellaSpeech.stop();
      }
      if (stellaSpeech) { // Guard calls with the dummy object
        stellaSpeech.speak(message);
      }
    }
  }

  if (isUser) {
    messageContainer.child(messageBubble);
    messageContainer.child(avatar);
  } else {
    messageContainer.child(avatar);
    messageContainer.child(messageBubble);
  }

  conversationLogDiv.child(messageContainer);

  // Scroll to the bottom of the conversation log
  conversationLogDiv.elt.scrollTop = conversationLogDiv.elt.scrollHeight;
}
Line-by-line explanation (16 lines)

🔧 Subcomponents:

DOM-creation Message Container let messageContainer = createElement('div');

Creates a wrapper div that will hold the avatar and message bubble

DOM-creation Avatar Element let avatar = createElement('div', sender.charAt(0));

Creates a small div displaying the first letter of the sender's name (e.g., 'U' for User, 'S' for Stella)

DOM-creation Message Bubble let messageBubble = createElement('div');

Creates the container for the actual message content (text or image)

conditional Image vs. Text Detection if (message instanceof p5.Graphics) {

Determines whether the message is a generated image or text, and handles each differently

conversion Graphics to Image let imgElement = createImg(message.elt.toDataURL(), 'Generated Image');

Converts a p5.Graphics object to a base64 image string and embeds it in an img tag

speech Text-to-Speech stellaSpeech.speak(message);

Triggers Stella to speak the text message aloud using the p5.Speech library

DOM-manipulation Auto-Scroll conversationLogDiv.elt.scrollTop = conversationLogDiv.elt.scrollHeight;

Scrolls the chat window to the bottom so the newest message is always visible

let messageContainer = createElement('div');
Creates a new div element that will hold both the avatar and message bubble
messageContainer.addClass('message-container');
Adds the CSS class 'message-container' for styling (padding, margins, layout)
if (isUser) { messageContainer.addClass('user'); }
If this is a user message, adds the 'user' class for right-aligned styling; otherwise adds 'bot' for left-aligned
let avatar = createElement('div', sender.charAt(0));
Creates a small div showing the first character of the sender's name (e.g., 'U' or 'S')
avatar.addClass('message-avatar');
Adds CSS styling to make the avatar a small circle with the initial inside
let messageBubble = createElement('div');
Creates the container that will hold the message content (text or image)
if (message instanceof p5.Graphics) {
Checks if the message is a p5.Graphics object (a generated image) rather than a string
let imgElement = createImg(message.elt.toDataURL(), 'Generated Image');
Converts the p5.Graphics drawing to a data URL (base64 image) and embeds it in an img tag
messageBubble.child(imgElement);
Adds the image element as a child of the message bubble
messageBubble.html(message);
If the message is text, sets it as the HTML content of the bubble (this is the else case)
if (stellaSpeech && stellaSpeech.speaking()) { stellaSpeech.stop(); }
If Stella is already speaking, stop her before starting a new message to avoid overlapping voices
stellaSpeech.speak(message);
Triggers p5.Speech to speak the message text aloud in the current language and voice settings
if (isUser) { messageContainer.child(messageBubble); messageContainer.child(avatar); }
For user messages, adds bubble first then avatar (right-aligned layout)
} else { messageContainer.child(avatar); messageContainer.child(messageBubble); }
For Stella messages, adds avatar first then bubble (left-aligned layout)
conversationLogDiv.child(messageContainer);
Appends the entire message container to the conversation log so it appears on screen
conversationLogDiv.elt.scrollTop = conversationLogDiv.elt.scrollHeight;
Scrolls the chat window to the bottom, ensuring the newest message is always visible to the user

generateImage()

generateImage() demonstrates the power of createGraphics(): a hidden canvas you can draw to, then export as an image. The switch statement routes to four different visual styles. For gradients, lerpColor() smoothly blends between colors. This function returns a p5.Graphics object, which addMessage() then converts to a data URL for display in the chat.

🔬 This loop draws a gradient by interpolating between two random colors for every row. What happens if you move the c1 and c2 color definitions OUTSIDE the loop (before the for statement) so they don't change every row? How would the gradient look different?

      for (let y = 0; y < imgHeight; y++) {
        let inter = map(y, 0, imgHeight, 0, 1);
        let c1 = color(random(255), random(255), random(255));
        let c2 = color(random(255), random(255), random(255));
        let c = lerpColor(c1, c2, inter);
        img.stroke(c);
        img.line(0, y, imgWidth, y);
      }

🔬 This draws 15 random circles. What if you changed random(20, 80) to random(20, 40) so all circles are smaller? Or random(60, 100) to make them huge? Experiment with the size range.

      for (let i = 0; i < 15; i++) {
        img.ellipse(random(imgWidth), random(imgHeight), random(20, 80));
      }
function generateImage(imageType) {
  let imgWidth = 250;
  let imgHeight = 180;
  let img = createGraphics(imgWidth, imgHeight);
  img.background(255);
  img.textAlign(CENTER, CENTER);
  img.textSize(18);
  img.fill(0);
  img.noStroke();

  switch (imageType) {
    case "circle":
      img.fill(random(255), random(255), random(255));
      img.ellipse(imgWidth / 2, imgHeight / 2, imgWidth * 0.7);
      img.fill(0);
      img.text("Here's a Circle!", imgWidth / 2, imgHeight * 0.15);
      break;
    case "square":
      img.fill(random(255), random(255), random(255));
      img.rectMode(CENTER);
      img.rect(imgWidth / 2, imgHeight / 2, imgWidth * 0.6);
      img.fill(0);
      img.text("Here's a Square!", imgWidth / 2, imgHeight * 0.15);
      break;
    case "gradient":
      for (let y = 0; y < imgHeight; y++) {
        let inter = map(y, 0, imgHeight, 0, 1);
        let c1 = color(random(255), random(255), random(255));
        let c2 = color(random(255), random(255), random(255));
        let c = lerpColor(c1, c2, inter);
        img.stroke(c);
        img.line(0, y, imgWidth, y);
      }
      img.fill(0);
      img.text("Here's a Gradient!", imgWidth / 2, imgHeight * 0.15);
      break;
    case "random":
      img.background(random(255));
      img.fill(random(255), random(255), random(255), 150);
      img.noStroke();
      for (let i = 0; i < 15; i++) {
        img.ellipse(random(imgWidth), random(imgHeight), random(20, 80));
      }
      img.fill(0);
      img.text("Some Random Art for you!", imgWidth / 2, imgHeight * 0.15);
      break;
    default:
      img.fill(0);
      img.text("Oops, I don't know how to make that image yet!", imgWidth / 2, imgHeight / 2);
      break;
  }
  return img;
}
Line-by-line explanation (16 lines)

🔧 Subcomponents:

initialization Graphics Canvas Creation let img = createGraphics(imgWidth, imgHeight);

Creates an off-screen p5.Graphics canvas (250×180 pixels) where the image will be drawn

switch-case Image Type Router switch (imageType) {

Routes to one of four image-generation routines based on the imageType parameter

case Circle Image case "circle": img.fill(...); img.ellipse(...); break;

Draws a random-colored circle with a label

for-loop Gradient Line Loop for (let y = 0; y < imgHeight; y++) {

Draws horizontal lines with gradually interpolated colors to create a smooth gradient

for-loop Random Ellipse Loop for (let i = 0; i < 15; i++) {

Draws 15 randomly positioned and sized circles to create abstract art

let imgWidth = 250;
Sets the generated image width to 250 pixels; tune this in the sketch to make images wider or narrower
let imgHeight = 180;
Sets the generated image height to 180 pixels; tune this to make images taller or shorter
let img = createGraphics(imgWidth, imgHeight);
Creates an off-screen p5.Graphics canvas (not visible on the main canvas) where we'll draw the image
img.background(255);
Fills the graphics canvas with white (255) as the starting background
img.textAlign(CENTER, CENTER);
Centers text horizontally and vertically on the point where it's drawn
img.textSize(18);
Sets the font size to 18 pixels for the label text
switch (imageType) {
Checks the imageType parameter and picks one of four drawing routines (circle, square, gradient, or random)
case "circle": img.fill(random(255), random(255), random(255)); img.ellipse(imgWidth / 2, imgHeight / 2, imgWidth * 0.7); break;
For circles: fills with a random RGB color, draws an ellipse at the center with diameter 70% of image width, then adds a label
case "square": img.rectMode(CENTER); img.rect(imgWidth / 2, imgHeight / 2, imgWidth * 0.6); break;
For squares: switches to CENTER rect mode (so coordinates specify the center, not corner), draws a square at the center
for (let y = 0; y < imgHeight; y++) {
For gradients: loops through every row of pixels (y coordinate) from top to bottom
let inter = map(y, 0, imgHeight, 0, 1);
Converts the y position (0 to imgHeight) into a value between 0 and 1, which lerpColor() uses to blend between two colors
let c = lerpColor(c1, c2, inter);
Interpolates between two random colors based on the inter value, creating a smooth color transition down the image
img.line(0, y, imgWidth, y);
Draws a horizontal line at height y with the interpolated color, creating a gradient stripe
for (let i = 0; i < 15; i++) {
For random art: loops 15 times to draw 15 random circles
img.ellipse(random(imgWidth), random(imgHeight), random(20, 80));
Draws a circle at a random position with a random size between 20 and 80 pixels in diameter
return img;
Returns the completed p5.Graphics object so it can be displayed in the chat

generateBotResponse()

generateBotResponse() is the AI brain of Stella. It loops through keyword lists, does case-insensitive substring matching, and routes to three outcomes: text responses, image generation, or language changes. This is a simple but effective pattern for chatbots—sophisticated AI might use ML models, but keyword matching is fast, transparent, and easy to modify.

function generateBotResponse(message) {
  let lowerMessage = message.toLowerCase();

  // Check for keyword-based responses, including image generation and language change
  for (let responseObj of stellaResponses) {
    for (let keyword of responseObj.keywords) {
      if (lowerMessage.includes(keyword)) {
        if (responseObj.response === "__GENERATE_IMAGE__") {
          return generateImage(responseObj.imageType); // Return p5.Graphics object
        } else if (responseObj.response === "__CHANGE_LANGUAGE__") {
          if (stellaSpeech) { // Guard calls with the dummy object
            stellaSpeech.setLang(responseObj.lang); // Change Stella's speaking language
          }
          return `My speaking language has been set to ${responseObj.langName}. Try saying something in ${responseObj.langName}!`;
        }
        else {
          return responseObj.response; // Return string
        }
      }
    }
  }

  // If no keywords matched, return a random default text response
  return random(defaultResponses);
}
Line-by-line explanation (11 lines)

🔧 Subcomponents:

string-processing Case-Insensitive Input let lowerMessage = message.toLowerCase();

Converts the user's input to lowercase so keyword matching is case-insensitive (e.g., 'Hello' matches 'hello')

for-loop Response Array Loop for (let responseObj of stellaResponses) {

Iterates through each response object in the stellaResponses array

for-loop Keyword Loop for (let keyword of responseObj.keywords) {

Iterates through all keywords in the current response object

conditional Keyword Matching if (lowerMessage.includes(keyword)) {

Checks if the user's message contains the keyword (case-insensitive)

conditional Image Generation Route if (responseObj.response === "__GENERATE_IMAGE__") {

Detects if the matched keyword should trigger image generation and returns a p5.Graphics object

conditional Language Change Route } else if (responseObj.response === "__CHANGE_LANGUAGE__") {

Detects if the matched keyword is a language change command and updates Stella's speech language

conditional Default Response return random(defaultResponses);

If no keywords matched, returns a random generic response from the defaultResponses array

let lowerMessage = message.toLowerCase();
Converts the entire user message to lowercase so 'Hello' and 'HELLO' both match keyword 'hello'
for (let responseObj of stellaResponses) {
Loops through each object in the stellaResponses array (each contains keywords and a response)
for (let keyword of responseObj.keywords) {
Loops through all keywords in the current response object (e.g., ['hello', 'hi', 'hey'])
if (lowerMessage.includes(keyword)) {
Checks if the lowercased user message contains this keyword as a substring
if (responseObj.response === "__GENERATE_IMAGE__") {
If the matched keyword is tagged for image generation, calls generateImage() and returns the p5.Graphics object
return generateImage(responseObj.imageType);
Calls generateImage() with the imageType (circle, square, gradient, random) and returns the result
} else if (responseObj.response === "__CHANGE_LANGUAGE__") {
If the matched keyword is a language change command, updates Stella's voice language
stellaSpeech.setLang(responseObj.lang);
Changes the language code (e.g., 'es-ES' for Spanish) so subsequent speech synthesis uses the new language
return `My speaking language has been set to ${responseObj.langName}...`;
Returns a confirmation message telling the user which language was selected
} else { return responseObj.response; }
If it's a regular text response, returns the stored response string as-is
return random(defaultResponses);
If no keywords matched anywhere, picks a random generic response to keep the conversation flowing

sendMessage()

sendMessage() orchestrates the entire chat flow: grab user input, validate it, display it, generate a response, wait a bit, then display the response. The setTimeout() mimics human thinking time, making Stella feel less robotic. The instanceof check handles both images and text elegantly.

🔬 Right now, the user message appears immediately but Stella's response is delayed. What if you wrapped the first addMessage() call in a setTimeout too? How would the chat feel different—would it be more natural, or less?

    // Display user's message
    addMessage("User", message, true);

    // Get Stella's response (could be text, an image, or a language change confirmation)
    let botResponse = generateBotResponse(message);

    // Simulate thinking time for Stella
    setTimeout(() => {
function sendMessage() {
  let message = userInput.value().trim();
  if (message.length > 0) {
    // Display user's message
    addMessage("User", message, true);

    // Get Stella's response (could be text, an image, or a language change confirmation)
    let botResponse = generateBotResponse(message);

    // Simulate thinking time for Stella
    setTimeout(() => {
      // If it's an image, add it directly. Otherwise, add text.
      if (botResponse instanceof p5.Graphics) {
        addMessage("Stella", botResponse, false);
      } else {
        // For text responses, Stella will speak via addMessage function
        addMessage("Stella", botResponse, false);
      }
    }, random(500, 1500)); // Stella responds between 0.5 and 1.5 seconds

    userInput.value(''); // Clear the input field
  }
}
Line-by-line explanation (8 lines)

🔧 Subcomponents:

DOM-access Get User Input let message = userInput.value().trim();

Retrieves the text from the input field and removes leading/trailing whitespace

conditional Non-Empty Validation if (message.length > 0) {

Prevents sending empty messages (just whitespace) to avoid clutter in the chat

function-call Display User Message addMessage("User", message, true);

Immediately shows the user's message in the chat bubble

function-call Generate Bot Response let botResponse = generateBotResponse(message);

Calls generateBotResponse() to determine what Stella should say or show

async Thinking Delay setTimeout(() => { ... }, random(500, 1500));

Delays Stella's response by a random 0.5–1.5 seconds to simulate thinking and feel more natural

conditional Display Bot Response if (botResponse instanceof p5.Graphics) {

Checks if the response is an image or text and displays it accordingly

DOM-manipulation Clear Input userInput.value('');

Empties the input field so the user can type the next message

let message = userInput.value().trim();
Reads the text from the input field and strips whitespace from both ends
if (message.length > 0) {
Only proceeds if the message has at least one character (prevents sending empty or whitespace-only messages)
addMessage("User", message, true);
Immediately displays the user's message in a chat bubble on the right side
let botResponse = generateBotResponse(message);
Calls generateBotResponse() to figure out what Stella should say or show (stored but not displayed yet)
setTimeout(() => { ... }, random(500, 1500));
Schedules a callback to run after a random delay between 500 and 1500 milliseconds (0.5–1.5 seconds)
if (botResponse instanceof p5.Graphics) {
Checks if the response is a p5.Graphics object (an image) or a string (text)
addMessage("Stella", botResponse, false);
Displays Stella's response (text or image) in a chat bubble on the left side
userInput.value('');
Clears the input field by setting its value to an empty string, ready for the next message

windowResized()

windowResized() is a special p5.js function that p5 calls automatically whenever the browser window is resized. It's good practice to include it even in sketches where the canvas isn't critical—it prevents visual glitches and keeps your sketch responsive.

function windowResized() {
  resizeCanvas(windowWidth, windowHeight);
}
Line-by-line explanation (1 lines)
resizeCanvas(windowWidth, windowHeight);
Resizes the p5.js canvas to match the browser window's new dimensions when the user resizes their browser

📦 Key Variables

userInput p5.Renderer

Stores a reference to the HTML input element (#user-input) so the sketch can read what the user types

let userInput;
sendButton p5.Renderer

Stores a reference to the Send button (#send-button) so the sketch can attach click event listeners to it

let sendButton;
conversationLogDiv p5.Renderer

Stores a reference to the conversation log container (#conversation-log) where all chat messages are appended

let conversationLogDiv;
stellaSpeech p5.Speech

Stores the p5.Speech object used for text-to-speech synthesis—allows Stella to speak her responses aloud

let stellaSpeech;
stellaResponses array of objects

Array of keyword-response pairs. Each object contains keywords (array), a response (string or special tag), and optional imageType or lang properties for image generation and language switching

const stellaResponses = [ { keywords: ['hello', 'hi'], response: 'Hello there!' }, ... ]
defaultResponses array of strings

Array of generic fallback responses used when the user's message doesn't match any keywords

const defaultResponses = [ 'That\'s an interesting thought!', 'I\'m not sure...' ]

🔧 Potential Improvements (6)

Here are some ways this code could be enhanced:

BUG generateBotResponse() - nested loop structure

The function returns immediately upon finding the first keyword match, which could cause unexpected behavior if a later keyword in the array is more relevant. For example, if both 'draw' and 'draw a circle' match, whichever appears first in stellaResponses wins.

💡 Either sort keywords by specificity (longest first) or keep a priority/weight field in each response object and choose the best match instead of the first match.

PERFORMANCE generateImage() - gradient case

The gradient loop generates two new random colors for every single row (imgHeight times). This wastes computation if the same row is drawn multiple times or if colors should be pre-computed.

💡 Move the random color generation outside the loop or cache results if gradients are generated frequently. This is minor but scales poorly for larger images.

STYLE sendMessage() - response handling

The code checks `if (botResponse instanceof p5.Graphics)` in both the setTimeout callback and potentially elsewhere. There's duplication and inconsistency in how images vs. text are handled across functions.

💡 Create a helper function `displayResponse(response)` that handles both image and text rendering in one place, reducing duplication and making future edits easier.

FEATURE stellaResponses array

There is no way to rank or weight keyword matches. If a user says 'draw a circle with a gradient', both 'draw a circle' and 'gradient' could match, but the first one found always wins.

💡 Add an optional `priority` field to response objects so Stella picks the most specific match. Or implement fuzzy string matching to detect multi-keyword intent.

BUG addMessage() - speech synthesis guard

The code checks `if (stellaSpeech)` before calling `stellaSpeech.speak()`, but if the dummy object was created (because p5.Speech failed to load), the speak() method exists but does nothing. Users won't realize speech failed.

💡 Log a warning when Stella attempts to speak but the library is unavailable, or visually indicate to the user that speech is disabled.

PERFORMANCE setup() and draw()

The canvas is created and a gradient is drawn every frame, but the DOM chat elements are static and never cleared. For long conversations, the DOM will accumulate many message elements, slowing down the page.

💡 Implement a message history limit (e.g., keep only the last 50 messages in the DOM) and remove old messages to keep the page responsive.

🔄 Code Flow

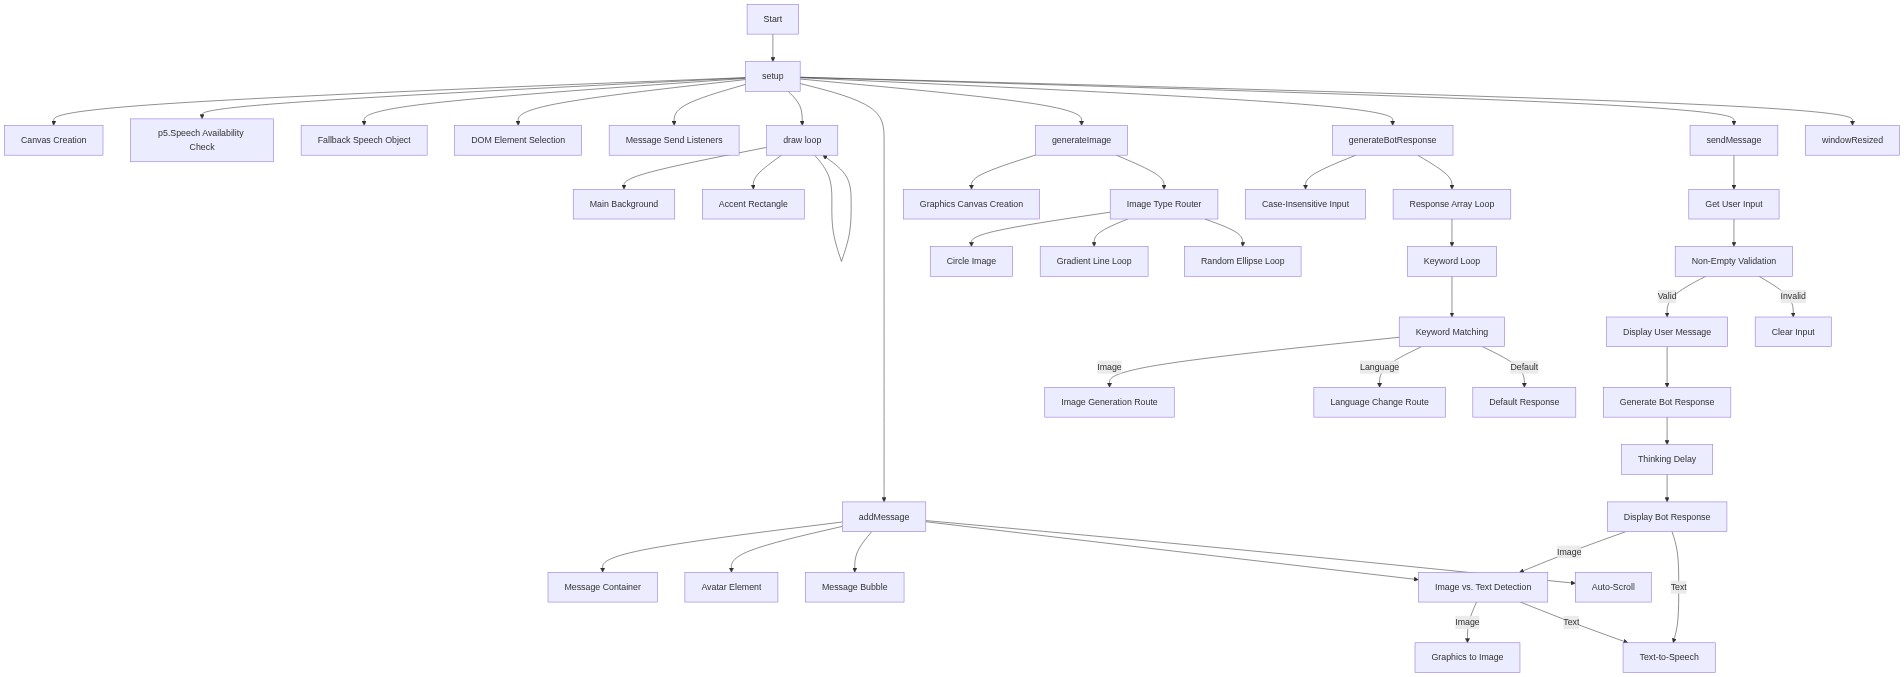
Code flow showing setup, draw, addmessage, generateimage, generatebotresponse, sendmessage, windowresized

💡 Click on function names in the diagram to jump to their code

graph TD start[Start] --> setup[setup] setup --> canvas-setup[Canvas Creation] setup --> speech-check[p5.Speech Availability Check] setup --> dummy-fallback[Fallback Speech Object] setup --> dom-selectors[DOM Element Selection] setup --> event-listeners[Message Send Listeners] setup --> draw[draw loop] click setup href "#fn-setup" click canvas-setup href "#sub-canvas-setup" click speech-check href "#sub-speech-check" click dummy-fallback href "#sub-dummy-fallback" click dom-selectors href "#sub-dom-selectors" click event-listeners href "#sub-event-listeners" draw --> background-color[Main Background] draw --> accent-rect[Accent Rectangle] draw --> draw click draw href "#fn-draw" click background-color href "#sub-background-color" click accent-rect href "#sub-accent-rect" setup --> addmessage[addMessage] addmessage --> container-creation[Message Container] addmessage --> avatar-creation[Avatar Element] addmessage --> message-bubble[Message Bubble] addmessage --> graphics-check[Image vs. Text Detection] graphics-check -->|Image| graphics-to-image[Graphics to Image] graphics-check -->|Text| speech-trigger[Text-to-Speech] addmessage --> scroll-to-bottom[Auto-Scroll] click addmessage href "#fn-addmessage" click container-creation href "#sub-container-creation" click avatar-creation href "#sub-avatar-creation" click message-bubble href "#sub-message-bubble" click graphics-check href "#sub-graphics-check" click graphics-to-image href "#sub-graphics-to-image" click speech-trigger href "#sub-speech-trigger" click scroll-to-bottom href "#sub-scroll-to-bottom" setup --> generateimage[generateImage] generateimage --> graphics-setup[Graphics Canvas Creation] generateimage --> switch-statement[Image Type Router] switch-statement --> circle-case[Circle Image] switch-statement --> gradient-loop[Gradient Line Loop] switch-statement --> random-art-loop[Random Ellipse Loop] click generateimage href "#fn-generateimage" click graphics-setup href "#sub-graphics-setup" click switch-statement href "#sub-switch-statement" click circle-case href "#sub-circle-case" click gradient-loop href "#sub-gradient-loop" click random-art-loop href "#sub-random-art-loop" setup --> generatebotresponse[generateBotResponse] generatebotresponse --> lowercase-conversion[Case-Insensitive Input] generatebotresponse --> outer-loop[Response Array Loop] outer-loop --> inner-loop[Keyword Loop] inner-loop --> keyword-check[Keyword Matching] keyword-check -->|Image| image-route[Image Generation Route] keyword-check -->|Language| language-route[Language Change Route] keyword-check -->|Default| fallback[Default Response] click generatebotresponse href "#fn-generatebotresponse" click lowercase-conversion href "#sub-lowercase-conversion" click outer-loop href "#sub-outer-loop" click inner-loop href "#sub-inner-loop" click keyword-check href "#sub-keyword-check" click image-route href "#sub-image-route" click language-route href "#sub-language-route" click fallback href "#sub-fallback" setup --> sendmessage[sendMessage] sendmessage --> input-retrieval[Get User Input] input-retrieval --> empty-check[Non-Empty Validation] empty-check -->|Valid| user-display[Display User Message] empty-check -->|Invalid| input-clear[Clear Input] user-display --> response-generation[Generate Bot Response] response-generation --> thinking-delay[Thinking Delay] thinking-delay --> response-display[Display Bot Response] response-display -->|Image| graphics-check response-display -->|Text| speech-trigger click sendmessage href "#fn-sendmessage" click input-retrieval href "#sub-input-retrieval" click empty-check href "#sub-empty-check" click user-display href "#sub-user-display" click response-generation href "#sub-response-generation" click thinking-delay href "#sub-thinking-delay" click response-display href "#sub-response-display" setup --> windowresized[windowResized] click windowresized href "#fn-windowresized"

❓ Frequently Asked Questions

What visual elements does the CHAT GPT PART 2 sketch display?

The sketch features a chatbot interface where users can see the conversation log and interact with Stella, the chatbot, through text input.

How can users interact with the CHAT GPT PART 2 sketch?

Users can type their messages into the input field and click the send button to receive responses from Stella, making it an interactive chatting experience.

What creative coding concept is demonstrated in the CHAT GPT PART 2 sketch?

This sketch showcases keyword-based responses and speech synthesis, illustrating how to create a simple conversational AI using p5.js.

Preview

CHAT GPT  PART 2 - p5.js creative coding sketch preview
Sketch Preview
Code flow diagram showing the structure of CHAT GPT  PART 2 - Code flow showing setup, draw, addmessage, generateimage, generatebotresponse, sendmessage, windowresized
Code Flow Diagram