CORBUN FACE REVIAL FR FR FR

This sketch creates a playful face reveal prank that uses the user's camera as a trick. The viewer sees a title screen, clicks to 'reveal' a face, and discovers the prank: their own camera feed appears with red text saying 'NOPE YOU INSTEAD!' for 10 seconds before returning to the start.

🧪 Try This!

Experiment with the code by making these changes:

  1. Change the prank text — Replace 'NOPE YOU INSTEAD!' with your own message to customize the prank reveal
  2. Make the prank last longer — Change the timer from 10 seconds to 15 seconds so users can't skip the prank as quickly
  3. Make the text glow — Add shadow or glow effects by drawing the text multiple times in different colors around the main text
  4. Change the start screen text — Modify the title and instructions to set up a different prank or joke
Prefer the full editor? Open it there →

📖 About This Sketch

This sketch creates a humorous face reveal prank using p5.js video capture and state management. The viewer starts on a title screen, clicks to trigger the 'reveal,' and is surprised to see their own camera feed with the text 'NOPE YOU INSTEAD!' displayed in bold red. The sketch teaches three powerful p5.js techniques: video input using createCapture(), managing multiple UI states with a state variable, and building responsive layouts that adapt to any screen size.

The code is organized into a setup() function that initializes the camera, a draw() function that displays either the start screen or the camera screen depending on the current state, and input handlers (mousePressed and touchStarted) that let users trigger the prank on both desktop and mobile. By studying this sketch, you will learn how to capture live video, manage UI flow with states, handle user input across devices, and use p5.js transforms to flip and position video feeds.

⚙️ How It Works

  1. When the sketch loads, setup() creates a full-screen canvas, captures the user's camera feed using createCapture(VIDEO), and hides the default video element so the camera data can be drawn on the canvas instead.
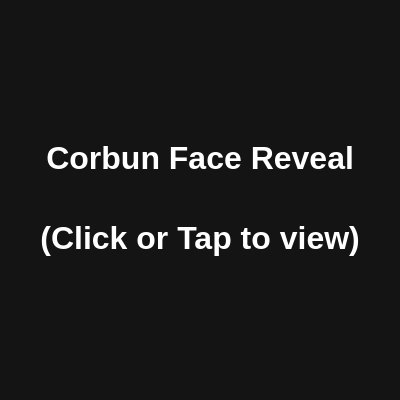
  2. The draw() function continuously checks the state variable: if state is 0, it displays the title screen with the text 'Corbun Face Reveal (Click or Tap to view)' centered on a dark background.
  3. When the user clicks or taps anywhere on the screen, either mousePressed() or touchStarted() changes state to 1 and records the current time in timerStart.
  4. Once state is 1, draw() calculates the correct aspect ratio to fill the entire canvas with the camera video (accounting for different screen and camera dimensions), then draws the video flipped horizontally to create a mirror effect.
  5. On top of the video, draw() displays the red text 'NOPE YOU INSTEAD!' with a black outline as the prank reveal.
  6. After 10 seconds have elapsed (millis() - timerStart > 10000), state automatically resets to 0, returning to the start screen so the prank can be played again.
  7. The windowResized() function keeps the canvas full-screen even if the browser window is resized, and both input handlers return false to prevent default browser behavior.

🎓 Concepts You'll Learn

Video captureState managementResponsive designCanvas transformsUser input handlingTimer-based events

📝 Code Breakdown

setup()

setup() runs once when the sketch starts. It is the perfect place to initialize the canvas, load media like videos or images, and set default styling that will apply to the rest of the sketch.

function setup() {
  createCanvas(windowWidth, windowHeight);
  
  // Initialize the user's camera in the background
  video = createCapture(VIDEO);
  video.hide(); // Hide the default HTML element so we can draw it in the canvas
  
  // Set up text styling
  textAlign(CENTER, CENTER);
  textStyle(BOLD);
}
Line-by-line explanation (5 lines)

🔧 Subcomponents:

calculation Full-Screen Canvas createCanvas(windowWidth, windowHeight);

Creates a canvas that fills the entire browser window

calculation Camera Initialization video = createCapture(VIDEO);

Requests and stores the user's camera feed as a p5.js object

calculation Text Configuration textAlign(CENTER, CENTER); textStyle(BOLD);

Centers all text and makes it bold for consistent styling

createCanvas(windowWidth, windowHeight);
Creates a canvas that is as wide and tall as the entire browser window, using p5.js global variables that always contain the window dimensions
video = createCapture(VIDEO);
Asks the browser to access the user's camera and returns a video object that contains the live camera feed data
video.hide();
Hides the default HTML video element that p5.js creates—we will draw the camera feed on the canvas ourselves instead
textAlign(CENTER, CENTER);
Makes all text drawn after this point center around the coordinates you give it, instead of starting from them
textStyle(BOLD);
Makes all text drawn after this point bold for emphasis
draw()

draw() is called 60 times per second and contains all the visual logic. By checking the state variable, we create different screens. The aspect ratio calculation ensures the video always fills the screen on any device. The timer countdown demonstrates how millis() (milliseconds since the sketch started) can trigger events after a delay.

🔬 This code stretches the camera feed to fill the screen without distorting it. What happens if you delete the if-else block and replace it with just drawW = width; and drawH = height;? Will the video be stretched or fit perfectly?

    // Calculate aspect ratio to make the video cover the whole screen nicely
    let vRatio = video.width / video.height || 4/3;
    let cRatio = width / height;
    let drawW, drawH;

    if (vRatio > cRatio) {
      drawH = height;
      drawW = height * vRatio;
    } else {
      drawW = width;
      drawH = width / vRatio;
    }

🔬 These lines flip the video to create a mirror effect—the scale(-1, 1) does the flipping. What happens if you change it to scale(1, -1) to flip vertically instead, or scale(-1, -1) to flip both ways?

    push();
    imageMode(CENTER);
    translate(width, 0);
    scale(-1, 1);
    image(video, width / 2, height / 2, drawW, drawH);
    pop();
function draw() {
  background(20);

  if (state === 0) {
    // === INITIAL SCREEN ===
    fill(255);
    noStroke();
    textSize(min(width, height) * 0.08); // Responsive text size
    text("Corbun Face Reveal\n\n(Click or Tap to view)", width / 2, height / 2);
    
  } else if (state === 1) {
    // === CAMERA SCREEN ===
    
    // Calculate aspect ratio to make the video cover the whole screen nicely
    let vRatio = video.width / video.height || 4/3;
    let cRatio = width / height;
    let drawW, drawH;

    if (vRatio > cRatio) {
      drawH = height;
      drawW = height * vRatio;
    } else {
      drawW = width;
      drawH = width / vRatio;
    }

    // Draw the video as a mirror (flipped horizontally)
    push();
    imageMode(CENTER);
    translate(width, 0);
    scale(-1, 1);
    image(video, width / 2, height / 2, drawW, drawH);
    pop();

    // Draw the prank text overlay
    fill(255, 50, 50); // Red text
    stroke(0);         // Black outline
    strokeWeight(8);
    textSize(min(width, height) * 0.1);
    text("NOPE YOU INSTEAD!", width / 2, height / 2);

    // Timer check: if 10 seconds (10000 milliseconds) have passed, reset the game
    if (millis() - timerStart > 10000) {
      state = 0;
    }
  }
}
Line-by-line explanation (23 lines)

🔧 Subcomponents:

conditional Start Screen Display if (state === 0) {

Shows the title and instructions when state is 0

calculation Aspect Ratio Calculation let vRatio = video.width / video.height || 4/3; let cRatio = width / height;

Calculates the proportions of the video feed and canvas to scale the video correctly

conditional Video Scaling Logic if (vRatio > cRatio) { drawH = height; drawW = height * vRatio; } else { drawW = width; drawH = width / vRatio; }

Decides how to stretch or squash the video so it fills the entire screen without distortion

calculation Horizontal Flip Transform translate(width, 0); scale(-1, 1);

Mirrors the video horizontally so it looks like a selfie camera view

conditional Auto-Reset Timer if (millis() - timerStart > 10000) { state = 0; }

Checks if 10 seconds have passed and automatically returns to the start screen

background(20);
Clears the canvas with a very dark gray color (20 on a 0–255 scale), creating the dark background seen in both screens
if (state === 0) {
Checks if the state variable equals 0—if true, draw the start screen
fill(255);
Sets the color to white (255 is full brightness) so the title text will be white
noStroke();
Removes the outline around text so only the filled letters are visible
textSize(min(width, height) * 0.08);
Calculates the text size as 8% of whichever is smaller—the screen width or height—so text stays readable on any screen
text("Corbun Face Reveal\n\n(Click or Tap to view)", width / 2, height / 2);
Draws the title centered on screen; \n creates line breaks so the instruction appears below the title
let vRatio = video.width / video.height || 4/3;
Divides the video's width by its height to get the aspect ratio (how wide compared to tall); if the camera hasn't loaded yet, defaults to 4/3
let cRatio = width / height;
Calculates the aspect ratio of the canvas in the same way, so we can compare them
if (vRatio > cRatio) {
If the video is wider (relative to height) than the canvas, scale based on height to avoid empty space on the sides
drawH = height; drawW = height * vRatio;
Makes the drawn video as tall as the screen and stretches the width to match the video's aspect ratio
push();
Saves the current canvas state (position, rotation, scale, etc.) so changes don't affect later drawing
imageMode(CENTER);
Tells image() to position the video around its center point instead of from its top-left corner
translate(width, 0);
Moves the origin point to the top-right corner of the canvas (width pixels to the right, 0 down)
scale(-1, 1);
Flips the canvas horizontally by multiplying the x-axis by -1 (the 1 keeps the y-axis normal), creating a mirror effect
image(video, width / 2, height / 2, drawW, drawH);
Draws the video feed at the center of the canvas with the calculated width and height
pop();
Restores the canvas to the state saved by push(), so future drawing is not flipped
fill(255, 50, 50);
Sets the text color to red (high red value, low green and blue) for the prank text
stroke(0);
Sets the outline color to black (0 is no brightness) so text has a dark outline
strokeWeight(8);
Makes the outline 8 pixels thick for maximum visibility and impact
textSize(min(width, height) * 0.1);
Calculates the prank text size as 10% of the smaller screen dimension, making it large and commanding
text("NOPE YOU INSTEAD!", width / 2, height / 2);
Draws the red text centered on screen over the camera feed
if (millis() - timerStart > 10000) {
Checks if the current time minus the time the camera started is greater than 10000 milliseconds (10 seconds)
state = 0;
If 10 seconds have passed, changes state back to 0 to return to the start screen

windowResized()

windowResized() is a special p5.js function that automatically runs whenever the user resizes their browser window. It ensures that your canvas stays full-screen and responsive.

function windowResized() {
  resizeCanvas(windowWidth, windowHeight);
}
Line-by-line explanation (1 lines)
resizeCanvas(windowWidth, windowHeight);
When the browser window is resized, updates the canvas to match the new window dimensions so it stays full-screen

mousePressed()

mousePressed() is a special p5.js function that runs whenever the user clicks the mouse on desktop. By returning false, we prevent the browser's default click behavior from interfering with our sketch.

function mousePressed() {
  if (state === 0) {
    state = 1;
    timerStart = millis(); // Start the 10 second countdown
  }
  return false; // Prevent default browser behavior
}
Line-by-line explanation (4 lines)

🔧 Subcomponents:

conditional State Trigger if (state === 0) { state = 1; timerStart = millis();

Changes to camera screen and starts the timer when user clicks from start screen

if (state === 0) {
Only respond to a click if we are currently on the start screen (state 0)
state = 1;
Changes state to 1, which tells draw() to show the camera screen on the next frame
timerStart = millis();
Records the current number of milliseconds since the sketch started—this becomes the reference point for counting down 10 seconds
return false;
Tells the browser not to do its default action for mouse clicks, preventing unwanted behavior like text selection

touchStarted()

touchStarted() is a special p5.js function that runs whenever the user touches the screen on mobile or tablet devices. By using both mousePressed() and touchStarted() with the same logic, your sketch works on both desktop and mobile. Returning false prevents the browser from firing both functions.

function touchStarted() {
  if (state === 0) {
    state = 1;
    timerStart = millis(); // Start the 10 second countdown
  }
  return false; // Prevent double-firing with mousePressed
}
Line-by-line explanation (4 lines)

🔧 Subcomponents:

conditional State Trigger (Mobile) if (state === 0) { state = 1; timerStart = millis();

Changes to camera screen and starts the timer when user taps from start screen on mobile

if (state === 0) {
Only respond to a tap if we are currently on the start screen (state 0)
state = 1;
Changes state to 1, which tells draw() to show the camera screen on the next frame
timerStart = millis();
Records the current milliseconds to start the 10-second countdown
return false;
Returns false to prevent the browser from double-firing both touchStarted() and mousePressed() on the same tap

📦 Key Variables

video object

Stores the live camera feed from the user's device—contains the video data that gets drawn to the canvas

let video;
video = createCapture(VIDEO);
state number

Tracks which screen the user is viewing: 0 = start screen, 1 = camera prank screen. Used by draw() to decide what to display

let state = 0;
timerStart number

Records the millisecond timestamp when the camera screen activates—used to calculate when 10 seconds have passed and auto-reset

let timerStart = 0;

🔧 Potential Improvements (5)

Here are some ways this code could be enhanced:

FEATURE draw() - camera screen

No visual indicator of how much time is left on the 10-second countdown

💡 Add a countdown timer display or progress bar that shows the user how long the reveal will last before auto-resetting

STYLE draw() - start screen

The title text could be more visually engaging and match the prank theme

💡 Add animated colors, size pulsing, or additional decorative text to make the start screen more eye-catching and fun

PERFORMANCE draw() - video scaling

The aspect ratio calculation and scaling happen every single frame even though camera dimensions don't change

💡 Calculate drawW and drawH once in setup() or store them in variables that only update when the canvas is resized, reducing unnecessary math each frame

BUG setup() - video capture

If the user denies camera permission, the video object exists but contains no data, which could cause visual glitches or errors

💡 Add a check to test if video.width exists before using it, and display an error message if camera access is denied

FEATURE input handling

Users can only trigger the prank by clicking/tapping on the canvas—there is no keyboard option

💡 Add a keyPressed() function that also triggers state = 1, allowing users to press Enter or Spacebar to activate the prank

🔄 Code Flow

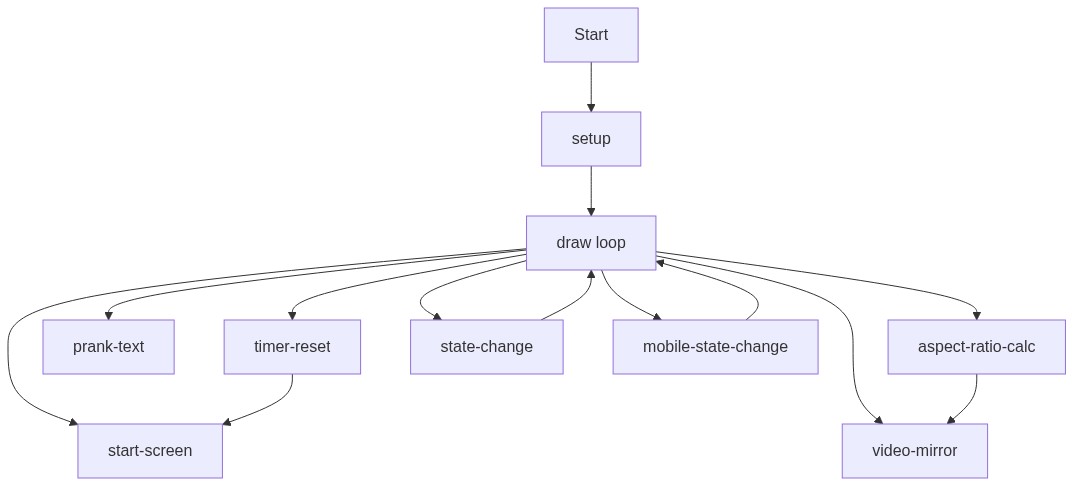
Code flow showing setup, draw, windowresized, mousepressed, touchstarted

💡 Click on function names in the diagram to jump to their code

graph TD start[Start] --> setup[setup] setup --> draw[draw loop] draw --> canvas-creation[canvas-creation] draw --> video-capture[video-capture] draw --> text-styling[text-styling] draw --> start-screen[start-screen] draw --> aspect-ratio-calc[aspect-ratio-calc] draw --> video-scale-logic[video-scale-logic] draw --> video-flip[video-flip] draw --> timer-check[timer-check] draw --> state-change[state-change] draw --> state-change-touch[state-change-touch] canvas-creation --> draw video-capture --> draw text-styling --> draw start-screen --> state-change start-screen --> state-change-touch aspect-ratio-calc --> video-scale-logic video-scale-logic --> video-flip timer-check --> start-screen state-change --> timer-check state-change-touch --> timer-check click setup href "#fn-setup" click draw href "#fn-draw" click canvas-creation href "#sub-canvas-creation" click video-capture href "#sub-video-capture" click text-styling href "#sub-text-styling" click start-screen href "#sub-start-screen" click aspect-ratio-calc href "#sub-aspect-ratio-calc" click video-scale-logic href "#sub-video-scale-logic" click video-flip href "#sub-video-flip" click timer-check href "#sub-timer-check" click state-change href "#sub-state-change" click state-change-touch href "#sub-state-change-touch"

❓ Frequently Asked Questions

What visual experience does the CORBUN FACE REVEAL sketch provide?

The sketch features a fun interactive display where users can see their camera feed mirrored on the screen, accompanied by a humorous text overlay.

How can users interact with the CORBUN FACE REVEAL sketch?

Users can interact by clicking or tapping the screen, which transitions from a start screen to a camera view for a playful surprise.

What creative coding techniques are showcased in the CORBUN FACE REVEAL sketch?

The sketch utilizes real-time video capture, responsive text sizing, and state management to create an engaging and dynamic user experience.

Preview

CORBUN FACE REVIAL FR FR FR - p5.js creative coding sketch preview
Sketch Preview
Code flow diagram showing the structure of CORBUN FACE REVIAL FR FR FR - Code flow showing setup, draw, windowresized, mousepressed, touchstarted
Code Flow Diagram