
Don't go too hard on the speaker bro🫠

This sketch turns your microphone into a live visual instrument: a swarm of colorful little 'cars' chases your mouse and bounces off each other, a spectrum analyzer and pulsing circle react to sound in real time, and a goofy stickman starts dancing whenever the room gets loud enough.

πŸ§ͺ Try This!

Experiment with the code by making these changes:

  1. Grow the swarm β€” Increasing NUM_CARS spawns far more cars swarming and colliding around your mouse.
  2. Make the stickman easier to trigger β€” Lowering loudnessThreshold means even quiet background noise sets off the dance.
  3. Longer motion trails β€” Lowering the background's alpha value makes previous frames fade out much more slowly, leaving longer glowing trails behind every car.
Prefer the full editor? Open it there β†’

πŸ“– About This Sketch

This sketch creates a playful audio-reactive scene: fifty small vehicle-shaped particles swarm toward your mouse cursor using vector-based attraction forces, bounce off each other with simple circle-collision physics, and leave glowing trails thanks to a semi-transparent background. Layered on top, a live FFT spectrum analyzer paints colorful bars across the bottom of the screen, a center circle pulses with the microphone's volume, and a hand-drawn stickman springs into a waving, kicking dance whenever the sound gets loud enough. It combines p5.sound's p5.AudioIn and p5.FFT with p5.Vector math, HSB color cycling, and simple trigonometric animation (sin/cos) to make something that feels alive and responsive to noise.

The code is organized around a global draw() loop that updates and displays an array of Car objects (a full ES6 class with its own attraction, movement, wrapping, and collision logic), then layers the audio visualization and stickman on top each frame. By studying it you'll learn how to read microphone input and spectrum data with p5.sound, how basic circle-based collision detection and response works, how vector attraction can simulate flocking-like behavior, and how a sine wave can drive a simple skeletal animation.

βš™οΈ How It Works

  1. When the sketch loads, setup() creates a full-window canvas, starts the microphone via p5.AudioIn, sets up an FFT analyzer, switches to HSB color mode, and spawns 50 Car objects at random positions.
  2. Every frame, draw() paints a translucent black rectangle over the whole canvas instead of a solid background, which fades old frames slowly and creates glowing motion trails behind the cars.
  3. Each Car updates its position, gets pulled toward the mouse by a small attraction force, checks itself against every other car for a circle-based collision, and is drawn as a rotated rectangle with little headlights.
  4. The sketch reads the microphone's volume with mic.getLevel(); when it crosses loudnessThreshold, isDancing turns true and a countdown timer keeps the stickman dancing for exactly DANCE_DURATION frames.
  5. While dancing, drawStickman() uses sin(frameCount * ...) to oscillate the arm and leg angles over time, producing a continuous waving and kicking motion drawn with simple line() and ellipse() calls.
  6. Finally, draw() reads fft.analyze() to get frequency data and renders it as colored bars, plus a center ellipse whose size is mapped from the current volume, so the whole scene visibly pulses with sound.

πŸŽ“ Concepts You'll Learn

Audio input & FFT analysis (p5.sound)Vector-based attraction/steeringCircle collision detection & responseClass-based object design (ES6 classes)Trigonometric animation with sin/cosHSB color mode & alpha trailsWindow resize handling

πŸ“ Code Breakdown

setup()

setup() runs once when the sketch starts. It's the right place to request microphone permission, configure audio analysis tools, and populate arrays of objects before the animation loop begins.

function setup() {
  createCanvas(windowWidth, windowHeight);
  
  // Click to start audio - this is crucial for web audio to work
  userStartAudio();
  
  mic = new p5.AudioIn();
  mic.start();
  
  fft = new p5.FFT();
  fft.setInput(mic);
  
  colorMode(HSB, 360, 100, 100, 100);

  // Initialize cars with random positions and a unique ID
  for (let i = 0; i < NUM_CARS; i++) {
    cars.push(new Car(random(width), random(height), i));
  }
}
Line-by-line explanation (9 lines)

πŸ”§ Subcomponents:

for-loop Spawn Cars Loop for (let i = 0; i < NUM_CARS; i++) {

Creates NUM_CARS Car objects at random positions and adds them to the cars array

createCanvas(windowWidth, windowHeight);
Makes the canvas fill the entire browser window.
userStartAudio();
Tells the browser it's okay to start the audio context - browsers require this to be tied to user interaction for audio to actually play or be captured.
mic = new p5.AudioIn();
Creates an audio input object representing the user's microphone.
mic.start();
Requests microphone access from the browser and begins capturing audio.
fft = new p5.FFT();
Creates a Fast Fourier Transform analyzer, which breaks incoming sound into its frequency components.
fft.setInput(mic);
Tells the FFT analyzer to analyze the microphone's audio stream rather than the default master output.
colorMode(HSB, 360, 100, 100, 100);
Switches color values from default RGB to Hue-Saturation-Brightness with a 0-360 hue range and 0-100 ranges for saturation, brightness, and alpha - handy for rainbow color cycling.
for (let i = 0; i < NUM_CARS; i++) {
Loops NUM_CARS times to create that many Car objects.
cars.push(new Car(random(width), random(height), i));
Creates a new Car at a random position on screen, tagged with a unique id, and adds it to the cars array.

draw()

draw() is the heart of every p5.js sketch - it runs continuously (about 60 times per second) and is where you read live input like audio, update object state, and render the current frame.

πŸ”¬ This block decides when the stickman starts dancing. What happens if you remove the '&& !isDancing' condition so it can restart the timer even mid-dance?

  if (vol > loudnessThreshold && !isDancing) {
    isDancing = true;
    danceTimer = DANCE_DURATION; // Start the dance timer
  }

πŸ”¬ This loop only draws every 4th frequency bin for performance. What do you predict happens to the bar density if you change 'i += 4' to 'i += 1'?

  for (let i = 0; i < spectrum.length; i += 4) {
    let x = map(i, 0, spectrum.length, 0, width);
    let h = map(spectrum[i], 0, 255, 0, height * 0.8);
    let hue = map(i, 0, spectrum.length, 0, 360);
function draw() {
  background(0, 0, 10, 20); // Fading background for a cool trail effect
  
  // Update and display cars
  for (let i = 0; i < cars.length; i++) {
    let carA = cars[i];

    carA.update();
    carA.attract(mouseX, mouseY); // Cars are attracted to the mouse

    // Check for collisions with other cars
    // We start 'j' from 'i + 1' to avoid duplicate checks and self-collision
    for (let j = i + 1; j < cars.length; j++) {
      let carB = cars[j];
      carA.checkCollision(carB);
    }

    carA.display();
  }

  let spectrum = fft.analyze();
  let vol = mic.getLevel(); // Get the overall volume level (0 to 1)
  
  // Check for loud noise to trigger the stickman dance
  if (vol > loudnessThreshold && !isDancing) {
    isDancing = true;
    danceTimer = DANCE_DURATION; // Start the dance timer
  }

  // Draw the stickman if currently dancing
  if (isDancing) {
    // Position the stickman below the spectrum bars, scaled up
    drawStickman(width / 2, height / 2 + 100, 1.5); 
    danceTimer--; // Countdown the dance timer
    if (danceTimer <= 0) {
      isDancing = false; // Stop dancing when timer runs out
    }
  }

  // Draw spectrum bars (existing audio visualization)
  noStroke();
  for (let i = 0; i < spectrum.length; i += 4) {
    let x = map(i, 0, spectrum.length, 0, width);
    let h = map(spectrum[i], 0, 255, 0, height * 0.8);
    let hue = map(i, 0, spectrum.length, 0, 360);
    
    fill(hue, 80, 90, 80);
    rect(x, height - h, width / spectrum.length * 4 - 2, h);
  }
  
  // Center circle based on volume (existing audio visualization)
  let size = map(vol, 0, 0.5, 50, 400);
  fill(frameCount % 360, 70, 90, 50);
  ellipse(width / 2, height / 2, size);
  
  // Instructions
  fill(0, 0, 100);
  textSize(14);
  textAlign(CENTER, TOP);
  text('Click to enable audio β€’ Make some noise!', width / 2, 20);
}
Line-by-line explanation (14 lines)

πŸ”§ Subcomponents:

for-loop Update & Collide Cars for (let i = 0; i < cars.length; i++) {

Updates every car's motion, attracts it to the mouse, checks collisions against all later cars, and draws it

for-loop Pairwise Collision Check for (let j = i + 1; j < cars.length; j++) {

Compares carA against every car that comes after it in the array so each pair is only checked once

conditional Loudness Trigger if (vol > loudnessThreshold && !isDancing) {

Starts the dance sequence when the microphone volume exceeds the threshold and the stickman isn't already dancing

conditional Dance Timer Countdown if (isDancing) {

While dancing, draws the stickman and counts down until the dance duration expires

for-loop Spectrum Bars Loop for (let i = 0; i < spectrum.length; i += 4) {

Draws a colored bar for every 4th frequency bin returned by the FFT analyzer

background(0, 0, 10, 20); // Fading background for a cool trail effect
Draws a nearly-transparent dark rectangle over the whole canvas instead of fully clearing it, so old frames fade out slowly and moving shapes leave trails.
carA.update();
Moves this car forward based on its current velocity and handles edge-wrapping and collision timers.
carA.attract(mouseX, mouseY); // Cars are attracted to the mouse
Pulls the car's velocity slightly toward the current mouse position every frame.
carA.checkCollision(carB);
Tests whether this car overlaps carB and, if so, applies a simple bounce response to both.
carA.display();
Draws the car as a rotated rectangle with headlights at its current position and heading.
let spectrum = fft.analyze();
Asks the FFT analyzer for the current frequency spectrum, returned as an array of values from 0-255.
let vol = mic.getLevel(); // Get the overall volume level (0 to 1)
Gets a single number representing the overall loudness of the microphone input right now.
if (vol > loudnessThreshold && !isDancing) {
Only starts a new dance if the volume is loud enough AND the stickman isn't already mid-dance.
drawStickman(width / 2, height / 2 + 100, 1.5);
Draws the animated stickman near the center of the screen, scaled 1.5x larger than its base size.
danceTimer--; // Countdown the dance timer
Decreases the remaining dance time by one frame each time draw() runs.
let x = map(i, 0, spectrum.length, 0, width);
Converts the frequency bin index into an x-coordinate spread evenly across the canvas width.
let h = map(spectrum[i], 0, 255, 0, height * 0.8);
Converts the amplitude at that frequency into a bar height, capped at 80% of the screen height.
let size = map(vol, 0, 0.5, 50, 400);
Maps the current volume (0 to roughly 0.5) to a circle diameter between 50 and 400 pixels.
fill(frameCount % 360, 70, 90, 50);
Uses frameCount as a hue value that cycles through the full 0-360 range over time, giving the center circle a constantly shifting rainbow color.

drawStickman()

This function shows how to fake procedural animation without any external assets: by feeding frameCount into sin()/cos(), a static line can become a limb that swings smoothly forever.

πŸ”¬ This is what makes the legs kick. What happens visually if you speed up the multiplier from 0.2 to 0.6, or widen the swing from PI/4 to PI/2?

  let legLength = 60;
  let legAngle = sin(frameCount * 0.2) * PI / 4; // Angle oscillates between -PI/4 and PI/4
  line(0, bodyLength, -legLength * sin(legAngle), bodyLength + legLength * cos(legAngle)); // Left leg
  line(0, bodyLength, legLength * sin(legAngle), bodyLength + legLength * cos(legAngle)); // Right leg
function drawStickman(x, y, scale = 1) {
  push();
  translate(x, y);
  scale(scale);
  stroke(255); // White stickman
  strokeWeight(2);
  noFill();

  // Head
  let headSize = 20;
  ellipse(0, -headSize / 2, headSize, headSize);

  // Body
  let bodyLength = 50;
  line(0, 0, 0, bodyLength);

  // Arms - animate with sine wave for waving motion
  let armLength = 40;
  let armAngle = sin(frameCount * 0.15) * PI / 6; // Angle oscillates between -PI/6 and PI/6
  line(0, bodyLength * 0.2, -armLength * cos(armAngle), bodyLength * 0.2 - armLength * sin(armAngle)); // Left arm
  line(0, bodyLength * 0.2, armLength * cos(armAngle), bodyLength * 0.2 - armLength * sin(armAngle)); // Right arm

  // Legs - animate with sine wave for kicking motion
  let legLength = 60;
  let legAngle = sin(frameCount * 0.2) * PI / 4; // Angle oscillates between -PI/4 and PI/4
  line(0, bodyLength, -legLength * sin(legAngle), bodyLength + legLength * cos(legAngle)); // Left leg
  line(0, bodyLength, legLength * sin(legAngle), bodyLength + legLength * cos(legAngle)); // Right leg

  pop();
}
Line-by-line explanation (9 lines)
push();
Saves the current drawing style and coordinate system so changes made here don't leak into the rest of draw().
translate(x, y);
Moves the origin (0,0) to the stickman's position, so all the body parts below can be drawn relative to that point.
scale(scale);
Uniformly scales everything drawn afterward, making the whole stickman bigger or smaller.
ellipse(0, -headSize / 2, headSize, headSize);
Draws the head as a circle positioned just above the body's starting point.
line(0, 0, 0, bodyLength);
Draws a straight vertical line representing the torso.
let armAngle = sin(frameCount * 0.15) * PI / 6; // Angle oscillates between -PI/6 and PI/6
Uses a sine wave driven by frameCount to produce a smoothly oscillating angle, which is what makes the arms appear to wave back and forth over time.
line(0, bodyLength * 0.2, -armLength * cos(armAngle), bodyLength * 0.2 - armLength * sin(armAngle)); // Left arm
Draws the left arm using trigonometry (cos/sin) to convert the oscillating angle into an x,y endpoint, so the arm swings like a pendulum.
let legAngle = sin(frameCount * 0.2) * PI / 4; // Angle oscillates between -PI/4 and PI/4
A second, slightly faster sine wave drives the legs so they kick with a different rhythm than the arms wave.
pop();
Restores the drawing style and coordinate system that was saved by push(), so later shapes in draw() aren't affected by translate/scale.

Car constructor()

The constructor runs once when 'new Car(...)' is called, setting up all the starting properties (position, velocity, size, color, id) that the other methods will read and modify every frame.

constructor(x, y, id) {
    this.pos = createVector(x, y); // Position of the car
    this.vel = createVector(random(-2, 2), random(-2, 2)); // Initial random velocity
    this.sizeW = random(15, 30); // Car width
    this.sizeH = this.sizeW * 0.6; // Car height, maintaining aspect ratio
    this.color = color(random(150, 255), random(100, 200), random(200, 255), 150);
    this.heading = this.vel.heading(); // Initial orientation of the car
    this.id = id; // Unique ID for collision tracking
    this.colliding = false; // Flag to indicate if the car is currently colliding
    this.collisionTimer = 0; // Timer for the collision visual effect
    this.maxSpeed = 3; // Maximum speed of the car
    this.turnSpeed = 0.1; // How fast the car can turn (in radians)
    this.attractionForce = 0.1; // How strongly the car is attracted to the mouse
  }
Line-by-line explanation (6 lines)
this.pos = createVector(x, y); // Position of the car
Creates a p5.Vector to store the car's x,y position, so it can be moved and math'd on as a single object.
this.vel = createVector(random(-2, 2), random(-2, 2)); // Initial random velocity
Gives the car a random starting velocity in both x and y, so cars don't all move identically at first.
this.sizeW = random(15, 30); // Car width
Picks a random width for this car, so the swarm has visual variety.
this.color = color(random(150, 255), random(100, 200), random(200, 255), 150);
Since colorMode is HSB, this generates a random hue/saturation/brightness combination with partial transparency (150 out of 100... note this is actually clamped).
this.heading = this.vel.heading(); // Initial orientation of the car
Calculates the angle of the initial velocity vector so the car can be drawn facing the direction it's moving.
this.id = id; // Unique ID for collision tracking
Stores a unique number for this car so collision checks can tell two Car objects apart even if their other properties match.

attract()

This is a simplified 'seek' steering behavior, a foundational idea in autonomous agent simulations (like Craig Reynolds' Boids): compute the direction to a goal, scale it down, and blend it into the current velocity.

πŸ”¬ This is a classic 'steering' force. What happens if you set desired's magnitude to a much larger number, like 1 instead of this.attractionForce (0.1)?

    let desired = p5.Vector.sub(target, this.pos);
    desired.setMag(this.attractionForce); // Scale the force
    this.vel.add(desired);
attract(tx, ty) {
    let target = createVector(tx, ty);
    let desired = p5.Vector.sub(target, this.pos);
    desired.setMag(this.attractionForce); // Scale the force
    this.vel.add(desired);
    this.vel.limit(this.maxSpeed); // Limit the car's speed
  }
Line-by-line explanation (5 lines)
let target = createVector(tx, ty);
Wraps the target coordinates (usually the mouse) into a vector for math operations.
let desired = p5.Vector.sub(target, this.pos);
Computes the vector pointing from the car's position to the target - this is the direction the car 'wants' to move.
desired.setMag(this.attractionForce); // Scale the force
Shrinks that direction vector down to a small fixed length, so the pull toward the target is gentle rather than instant.
this.vel.add(desired);
Adds the small attraction force to the car's existing velocity, gradually steering it toward the target.
this.vel.limit(this.maxSpeed); // Limit the car's speed
Caps the velocity's length so the car never exceeds its top speed, no matter how much force has accumulated.

update()

update() is called every frame for every car and is responsible for moving it, smoothly rotating it to face its direction of travel, keeping it on screen, and managing temporary visual states like the collision flash.

πŸ”¬ These four lines make cars wrap around the screen edges like Pac-Man. What do you think happens if you delete this block entirely - where do the cars end up after chasing your mouse to a corner?

    if (this.pos.x < 0) this.pos.x = width;
    if (this.pos.x > width) this.pos.x = 0;
    if (this.pos.y < 0) this.pos.y = height;
    if (this.pos.y > height) this.pos.y = 0;
update() {
    this.pos.add(this.vel); // Move the car

    // Update the car's heading to match its velocity direction
    if (this.vel.mag() > 0.1) { // Only update if car is moving significantly
      let desiredHeading = this.vel.heading();
      let angleDiff = desiredHeading - this.heading;

      // Ensure angleDiff is within -PI to PI for the shortest turn
      if (angleDiff > PI) angleDiff -= TWO_PI;
      if (angleDiff < -PI) angleDiff += TWO_PI;

      // Smoothly turn towards the desired heading
      this.heading += constrain(angleDiff, -this.turnSpeed, this.turnSpeed);
    }

    // Wrap cars around the edges of the canvas
    if (this.pos.x < 0) this.pos.x = width;
    if (this.pos.x > width) this.pos.x = 0;
    if (this.pos.y < 0) this.pos.y = height;
    if (this.pos.y > height) this.pos.y = 0;

    // Manage the collision effect timer
    if (this.colliding) {
      this.collisionTimer--;
      if (this.collisionTimer <= 0) {
        this.colliding = false;
        // Reset car color after collision effect
        this.color = color(random(150, 255), random(100, 200), random(200, 255), 150);
      }
    }
  }
Line-by-line explanation (8 lines)

πŸ”§ Subcomponents:

conditional Smooth Heading Turn if (this.vel.mag() > 0.1) { // Only update if car is moving significantly

Only rotates the car's visual heading when it's actually moving fast enough to have a meaningful direction

conditional Edge Wrapping if (this.pos.x < 0) this.pos.x = width;

Teleports the car to the opposite edge when it goes off any side of the canvas

conditional Collision Flash Timer if (this.colliding) {

Counts down the collision visual effect and resets the car's color once it expires

this.pos.add(this.vel); // Move the car
Adds the velocity vector to the position vector, moving the car one step per frame - the core of all motion in this sketch.
if (this.vel.mag() > 0.1) { // Only update if car is moving significantly
Checks the length (magnitude) of the velocity vector; if the car is barely moving, skip rotating it (prevents jittery spinning when nearly still).
let angleDiff = desiredHeading - this.heading;
Finds the difference between where the car is currently facing and where its velocity says it should face.
if (angleDiff > PI) angleDiff -= TWO_PI;
Corrects the angle difference so the car always turns the short way around the circle, instead of spinning the long way when angles wrap past 180 degrees.
this.heading += constrain(angleDiff, -this.turnSpeed, this.turnSpeed);
Turns the car gradually toward its target heading, limited by turnSpeed, so rotation looks smooth instead of snapping instantly.
if (this.pos.x < 0) this.pos.x = width;
If the car drifts off the left edge, it reappears on the right edge - this is called 'wrapping' and keeps cars on screen forever.
if (this.colliding) {
If this car is currently flagged as colliding (showing its red flash), count down its timer.
this.color = color(random(150, 255), random(100, 200), random(200, 255), 150);
Once the collision flash ends, gives the car a brand new random color so it looks fresh again.

display()

display() uses push()/translate()/rotate()/pop() - the standard p5.js pattern for drawing an object at its own position and orientation without affecting anything drawn afterward.

display() {
    push(); // Save current drawing style and transformations
    translate(this.pos.x, this.pos.y); // Move origin to car's position
    rotate(this.heading); // Rotate by the car's heading

    // Draw collision flash if colliding
    if (this.colliding) {
      fill(255, 0, 0); // Red flash
      rectMode(CENTER);
      rect(0, 0, this.sizeW * 1.2, this.sizeH * 1.2); // Slightly larger red rectangle
    } else {
      fill(this.color);
      rectMode(CENTER);
      rect(0, 0, this.sizeW, this.sizeH); // Draw the car body
    }

    // Optional: Draw simple "headlights" for direction indication
    fill(255, 255, 100); // Yellow color for headlights
    rectMode(CORNERS); // Draw headlights from corner coordinates
    rect(this.sizeW / 2 - 2, -this.sizeH / 2 + 2, this.sizeW / 2, this.sizeH / 2 - 2);
    rect(this.sizeW / 2 - 2, this.sizeH / 2 - 2, this.sizeW / 2, -this.sizeH / 2 + 2);

    pop(); // Restore original drawing style and transformations
  }
Line-by-line explanation (5 lines)

πŸ”§ Subcomponents:

conditional Collision Flash vs Normal Body if (this.colliding) {

Draws a larger red rectangle when colliding, or the car's normal color otherwise

translate(this.pos.x, this.pos.y); // Move origin to car's position
Shifts the drawing origin to the car's location so all shapes drawn next are relative to the car, not the canvas corner.
rotate(this.heading); // Rotate by the car's heading
Rotates the coordinate system so the car's rectangle is drawn pointing in its direction of travel.
fill(255, 0, 0); // Red flash
Sets the fill color to bright red for the collision flash effect.
rect(0, 0, this.sizeW * 1.2, this.sizeH * 1.2); // Slightly larger red rectangle
Draws a rectangle 20% bigger than normal, centered on the car, making the collision flash visually 'pop'.
rect(this.sizeW / 2 - 2, -this.sizeH / 2 + 2, this.sizeW / 2, this.sizeH / 2 - 2);
Draws a small yellow rectangle near the front-right corner of the car body to represent a headlight, using CORNERS mode where the two coordinate pairs define opposite corners.

checkCollision()

This method demonstrates a simplified, non-physically-accurate collision response (reverse velocity plus separation) that's common in creative coding because it looks convincing without needing full rigid-body physics math.

πŸ”¬ This is the 'bounce' response. What happens to how cars behave if you remove the random nudge lines entirely - do you think cars might get stuck oscillating in place?

      this.vel.mult(-1);
      otherCar.vel.mult(-1);

      // Add a slight random nudge to prevent cars from getting perfectly stuck
      this.vel.add(p5.Vector.random2D().mult(0.5));
      otherCar.vel.add(p5.Vector.random2D().mult(0.5));
checkCollision(otherCar) {
    // Avoid self-collision or checking already colliding cars
    if (this.id === otherCar.id || this.colliding || otherCar.colliding) return;

    // Simplified collision detection: treat cars as circles
    // Radius is half of the car's larger dimension
    let r1 = max(this.sizeW, this.sizeH) / 2;
    let r2 = max(otherCar.sizeW, otherCar.sizeH) / 2;
    let d = p5.Vector.dist(this.pos, otherCar.pos); // Distance between car centers

    if (d < r1 + r2) {
      // Collision detected!
      this.colliding = true;
      otherCar.colliding = true;
      this.collisionTimer = 30; // Collision effect lasts for 30 frames
      otherCar.collisionTimer = 30;

      // Basic elastic collision response: reverse velocities
      // More advanced physics would use conservation of momentum and energy
      this.vel.mult(-1);
      otherCar.vel.mult(-1);

      // Add a slight random nudge to prevent cars from getting perfectly stuck
      this.vel.add(p5.Vector.random2D().mult(0.5));
      otherCar.vel.add(p5.Vector.random2D().mult(0.5));

      // Separate cars slightly to prevent immediate re-collision in the next frame
      let overlap = (r1 + r2) - d;
      let collisionNormal = p5.Vector.sub(this.pos, otherCar.pos);
      collisionNormal.normalize();
      collisionNormal.mult(overlap / 2); // Move each car half the overlap distance

      this.pos.add(collisionNormal);
      otherCar.pos.sub(collisionNormal);

      // Temporarily change colors to indicate collision
      this.color = color(255, 0, 0, 200);
      otherCar.color = color(255, 0, 0, 200);
    }
  }
Line-by-line explanation (9 lines)

πŸ”§ Subcomponents:

conditional Early Exit Guard if (this.id === otherCar.id || this.colliding || otherCar.colliding) return;

Skips the collision check entirely if it's the same car or either car is already mid-collision

conditional Collision Response if (d < r1 + r2) {

Fires when the distance between two car centers is less than the sum of their radii, meaning their circles overlap

if (this.id === otherCar.id || this.colliding || otherCar.colliding) return;
Bails out early if this is the same car, or either car is already showing a collision flash, avoiding redundant or repeated collisions.
let r1 = max(this.sizeW, this.sizeH) / 2;
Approximates this car's shape as a circle by using half its largest dimension as a radius - simpler than exact rectangle-rectangle collision.
let d = p5.Vector.dist(this.pos, otherCar.pos); // Distance between car centers
Calculates the straight-line distance between the two cars' center points.
if (d < r1 + r2) {
Two circles overlap exactly when the distance between their centers is less than the sum of their radii - this is the classic circle-collision test.
this.vel.mult(-1);
Reverses this car's velocity completely, a crude but effective way to simulate a bounce.
this.vel.add(p5.Vector.random2D().mult(0.5));
Adds a small random push in a random direction, which helps prevent two cars from getting stuck bouncing back and forth in a straight line forever.
let overlap = (r1 + r2) - d;
Calculates exactly how much the two circles are overlapping.
collisionNormal.mult(overlap / 2); // Move each car half the overlap distance
Scales the direction-between-cars vector by half the overlap amount, so each car can be nudged apart just enough to stop touching.
this.color = color(255, 0, 0, 200);
Immediately changes this car's stored color to red as an additional visual cue that a collision just happened.

windowResized()

windowResized() is a special p5.js function that's automatically called whenever the browser window size changes, letting you keep the canvas and its contents properly fitted to the viewport.

function windowResized() {
  resizeCanvas(windowWidth, windowHeight);
  // Reinitialize cars on resize to fit new canvas dimensions
  cars = [];
  for (let i = 0; i < NUM_CARS; i++) {
    cars.push(new Car(random(width), random(height), i));
  }
}
Line-by-line explanation (3 lines)

πŸ”§ Subcomponents:

for-loop Recreate Cars Loop for (let i = 0; i < NUM_CARS; i++) {

Rebuilds the entire cars array with fresh random positions that fit the newly resized canvas

resizeCanvas(windowWidth, windowHeight);
Resizes the canvas to match the browser window whenever it changes size (e.g. resizing the browser or rotating a phone).
cars = [];
Empties the existing cars array completely, discarding all old Car objects.
cars.push(new Car(random(width), random(height), i));
Creates a brand new set of cars positioned randomly within the new canvas dimensions.

πŸ“¦ Key Variables

mic object

Holds the p5.AudioIn object representing the microphone input stream.

let mic;
fft object

Holds the p5.FFT analyzer used to break the microphone's audio into frequency data.

let fft;
cars array

Stores all the Car objects that make up the swarm; updated and redrawn every frame.

let cars = [];
NUM_CARS number

Constant controlling how many Car objects are created at startup and on resize.

const NUM_CARS = 50;
loudnessThreshold number

The volume level (0-1) the microphone must exceed to trigger the stickman's dance.

let loudnessThreshold = 0.2;
isDancing boolean

Tracks whether the stickman is currently in its dancing animation state.

let isDancing = false;
danceTimer number

Counts down frames remaining in the current dance sequence; when it hits 0, dancing stops.

let danceTimer = 0;
DANCE_DURATION number

Constant defining how many frames (roughly 2 seconds at 60fps) each dance sequence lasts.

const DANCE_DURATION = 120;

πŸ”§ Potential Improvements (4)

Here are some ways this code could be enhanced:

BUG setup()

userStartAudio() and mic.start() are called immediately inside setup(), but browsers typically require an actual user gesture (like a click) before allowing audio context to start or microphone access to be granted, so audio may silently fail to initialize on load.

πŸ’‘ Wrap the mic setup in a mousePressed() function, or check mic.enabled/getAudioContext().state and prompt the user with a visible 'click to start' overlay until the context resumes.

PERFORMANCE draw() collision loop

The nested loop in draw() checks every pair of cars every frame, which is O(n^2) - fine for 50 cars but would slow down significantly if NUM_CARS were pushed into the hundreds.

πŸ’‘ For larger swarms, use spatial partitioning (a grid or quadtree) so each car only checks collisions against nearby neighbors instead of every other car.

STYLE Car constructor and update()

The random color expression color(random(150, 255), random(100, 200), random(200, 255), 150) is duplicated in both the constructor and update(), making it easy for the two copies to drift out of sync if edited.

πŸ’‘ Extract it into a small helper method like randomCarColor() on the Car class (or a standalone function) and call it from both places.

FEATURE draw() instructions text

The on-screen text always says 'Click to enable audio' even after audio has successfully started, which can confuse users who already granted mic access.

πŸ’‘ Track an audioReady boolean once mic.start() succeeds and change the instruction text (or hide it) once audio is actively running.

πŸ”„ Code Flow

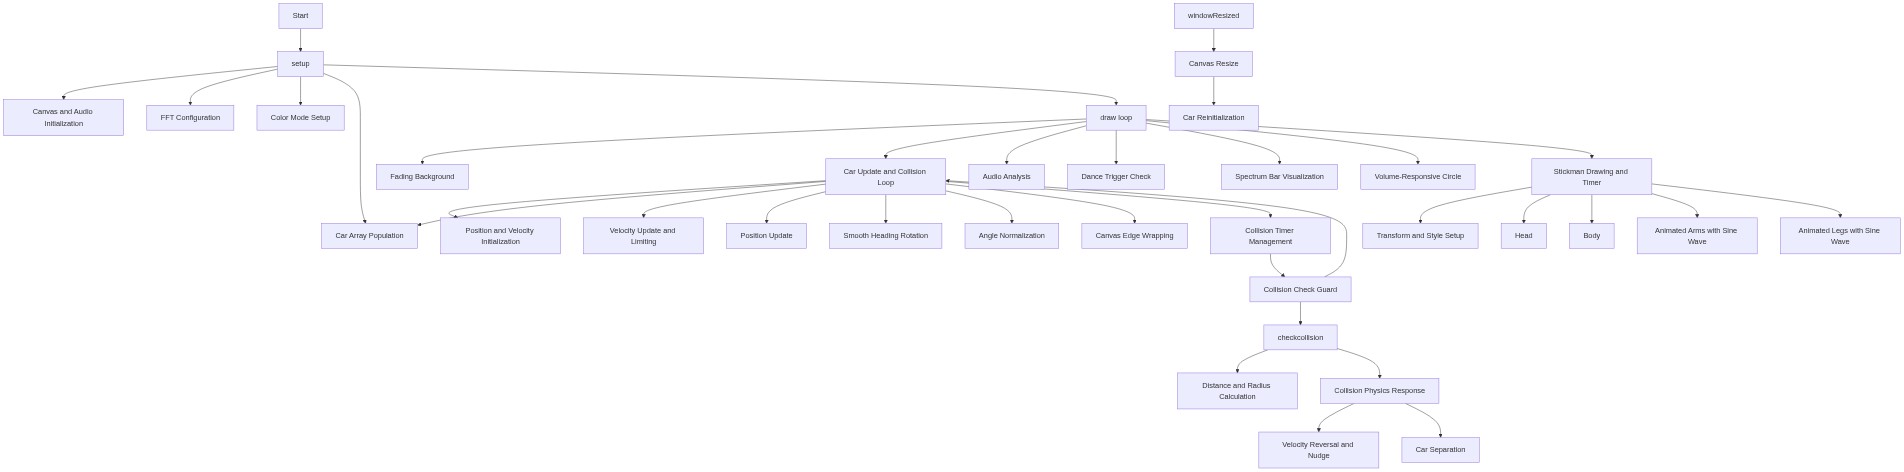
Code flow showing setup, draw, drawstickman, constructor, attract, update, display, checkcollision, windowresized

πŸ’‘ Click on function names in the diagram to jump to their code

graph TD start[Start] --> setup[setup] setup --> setup-car-loop[setup-car-loop] setup-car-loop --> draw[draw loop] click setup href "#fn-setup" click setup-car-loop href "#sub-setup-car-loop" draw --> car-update-loop[car-update-loop] car-update-loop --> dance-trigger[dance-trigger] car-update-loop --> spectrum-loop[spectrum-loop] click draw href "#fn-draw" click car-update-loop href "#sub-car-update-loop" click dance-trigger href "#sub-dance-trigger" click spectrum-loop href "#sub-spectrum-loop" dance-trigger -->|if loudness > threshold| dance-countdown[dance-countdown] dance-countdown --> drawstickman[drawstickman] dance-countdown -->|countdown| dance-countdown click dance-countdown href "#sub-dance-countdown" click drawstickman href "#fn-drawstickman" car-update-loop -->|for each car| update[update] update --> attract[attract] update --> display[display] click update href "#fn-update" click attract href "#fn-attract" click display href "#fn-display" attract --> heading-conditional[heading-conditional] attract --> wrap-conditionals[wrap-conditionals] heading-conditional -->|if moving fast| update wrap-conditionals -->|if off canvas| update display --> collision-timer-conditional[collision-timer-conditional] collision-timer-conditional -->|if collision flash active| collision-flash-conditional[collision-flash-conditional] collision-flash-conditional -->|draw larger red rectangle| display collision-timer-conditional -->|else| display car-update-loop --> collision-inner-loop[collision-inner-loop] collision-inner-loop -->|for each car A| collision-detected[collision-detected] collision-detected -->|if overlap| checkcollision[checkcollision] checkcollision -->|reverse velocity| update click collision-inner-loop href "#sub-collision-inner-loop" click collision-detected href "#sub-collision-detected" click checkcollision href "#fn-checkcollision" windowresized[windowresized] --> resize-recreate-loop[resize-recreate-loop] resize-recreate-loop --> setup-car-loop click windowresized href "#fn-windowresized" click resize-recreate-loop href "#sub-resize-recreate-loop"

❓ Frequently Asked Questions

What visual elements can I expect to see in the 'Don't go too hard on the speaker bro' sketch?

The sketch features dancing stickman animations triggered by audio volume, along with colorful, moving cars that react to mouse movement and collisions.

How can I interact with this p5.js sketch?

Users can interact by clicking to start the audio input, which activates the dancing stickman when loud sounds are detected, while also controlling the movement of the cars with their mouse.

What coding techniques does this creative coding sketch showcase?

This sketch demonstrates audio analysis for interactivity, object-oriented programming through car behavior, and visual effects like fading backgrounds and dynamic animations.

Preview

Don't go too hard on the speaker bro🫠 - p5.js creative coding sketch preview
Sketch Preview
Code flow diagram showing the structure of Don't go too hard on the speaker bro🫠 - Code flow showing setup, draw, drawstickman, constructor, attract, update, display, checkcollision, windowresized
Code Flow Diagram