
dummy

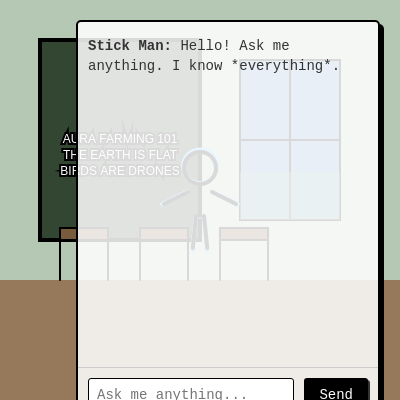
This sketch creates an interactive stick man character in a retro school classroom setting who spreads hilariously false information through a chat interface. Players move the stick man around with WASD keys, press F to make him smile, and ask him questions to receive intentionally bad "facts" paired with awkward rhymes.

🧪 Try This!

Experiment with the code by making these changes:

  1. Make the stick man move faster — Doubling the moveSpeed constant makes the character zip across the canvas at double speed with each key press.
  2. Change the stick man's color to purple — Modifying the color() call in the final drawStickMan() invocation changes the character's outline from black to purple.
  3. Make the smile last longer — Increasing the 1500 millisecond timeout makes the stick man grin for 3 seconds instead of 1.5 seconds when you press F.
  4. Change the wall color to bright yellow — Modifying the fill color of the wall rect() call changes the background color from retro green-grey to bright yellow.
  5. Make the stick man's head bigger — Increasing the headRadius scale multiplier from 0.2 to 0.35 makes the head proportionally larger relative to the body.
Prefer the full editor? Open it there →

📖 About This Sketch

This sketch combines p5.js drawing, keyboard input, and DOM manipulation to create a satirical chatbot experience. A stick man avatar sits in a pixel-art classroom complete with desks, a blackboard, and a window, rendered using basic shapes like rectangles, ellipses, lines, and arcs. The character speaks through a chat interface triggered by user messages, delivering ridiculous 'facts' about topics like flat earth, flying through carrots, and birds as government drones—each response cleverly paired with an intentional rhyming couplet. The stick man moves smoothly across the canvas with arrow keys and can smile on command, demonstrating how p5.js sketches can blend canvas graphics with HTML DOM elements for hybrid interactive experiences.

The code is organized into a setup() function that initializes the canvas and chat DOM elements, a draw() function that renders the classroom scene and animated stick man with a blue glow effect every frame, and helper functions like drawStickMan() that use translate(), scale, and push/pop to create reusable character graphics. You will learn how to layer 2D graphics with web elements, respond to keyboard input with context awareness (detecting when the chat input is focused), manage state variables for animations (like the isSmiling flag), and use structured data arrays to implement a keyword-matching chatbot that delivers contextual responses.

⚙️ How It Works

  1. When the sketch loads, setup() creates a full-window canvas, positions a stick man in the center, and initializes a chat interface by selecting HTML divs and dynamically creating an input field and send button using p5.js DOM functions like createInput() and createButton().
  2. Every frame, draw() clears nothing and continuously renders a layered school background: a retro light green wall, brown floor, dark green blackboard with chalk text, a four-pane window showing sky and trees, and three desks with simple brown rectangles and legs.
  3. The stick man is drawn at the center of the screen at each frame using drawStickMan(), which uses translate() to position the origin, then draws a head (ellipse), optional smile (arc), body, arms, and legs (all lines). Two additional semi-transparent copies drawn slightly larger create a blue glow effect by calling drawStickMan() twice with reduced alpha values.
  4. When the player presses W/A/S/D keys (if the chat input is not focused), the keyPressed() function updates stickManX and stickManY by the moveSpeed constant, causing the stick man to glide across the canvas each frame.
  5. Pressing F sets isSmiling to true for 1500 milliseconds, triggering the arc() smile to appear in the next draw() call, then automatically reset.
  6. When the user types a message and presses Enter or clicks Send, sendMessage() extracts the text, searches through themedBadInfo keywords to find a contextual topic, picks a random even index to grab a rhyming response pair, and displays both the user message and stick man's reply in the chat div with a 500ms delay for conversational pacing.

🎓 Concepts You'll Learn

Canvas and DOM integrationKeyboard input and event handlingTransform matrices (translate, push/pop)2D vector-based drawing (lines, ellipses, arcs)Conditional rendering and state managementGlow effects through layered transparencyString matching and array indexing for chatbot logicsetTimeout for delayed animations

📝 Code Breakdown

setup()

setup() is p5.js's initialization function that runs once at the very start. Use it to create your canvas, prepare variables, set up event listeners, and configure your DOM elements. Since this sketch blends canvas graphics with HTML, setup() does double duty: setting up the p5.js canvas AND hooking up the chat interface from index.html to JavaScript functions.

function setup() {
  createCanvas(windowWidth, windowHeight);
  // Initialize stick man position to the center of the canvas
  stickManX = width / 2;
  stickManY = height / 2;
  // No noLoop(), so draw() runs continuously for movement

  // --- Chat Interface Setup ---
  // Select the chat container divs from index.html
  chatMessagesDiv = select('#chat-messages');
  const chatInputAreaDiv = select('#chat-input-area');

  // Create input field and send button using p5.js DOM functions
  chatInput = createInput();
  chatInput.attribute('placeholder', 'Ask me anything...');
  chatInput.parent(chatInputAreaDiv); // Attach to the #chat-input-area div

  sendButton = createButton('Send');
  sendButton.parent(chatInputAreaDiv); // Attach to the #chat-input-area div

  // Add event listeners
  sendButton.mousePressed(sendMessage);
  chatInput.changed(sendMessage); // Send message on Enter key press in input field
}
Line-by-line explanation (12 lines)

🔧 Subcomponents:

function-call Canvas creation createCanvas(windowWidth, windowHeight);

Sets up a canvas that fills the entire window, allowing the stick man scene to expand responsively

function-call DOM element selection chatMessagesDiv = select('#chat-messages');

Grabs the HTML div from index.html where chat messages will be displayed

function-call Input field creation chatInput = createInput();

Dynamically creates a text input element using p5.js, which gets appended to the chat interface

function-call Button creation sendButton = createButton('Send');

Creates a clickable button labeled 'Send' that users press to submit messages

function-call Event listener attachment sendButton.mousePressed(sendMessage);

Links the send button and input field to the sendMessage() function so messages are transmitted when the user interacts

createCanvas(windowWidth, windowHeight);
Creates a p5.js canvas that stretches the full width and height of the browser window, providing the drawing surface for the stick man and classroom
stickManX = width / 2;
Sets the stick man's initial horizontal position to the center of the canvas by dividing the canvas width in half
stickManY = height / 2;
Sets the stick man's initial vertical position to the center of the canvas by dividing the canvas height in half
chatMessagesDiv = select('#chat-messages');
Uses p5.js's select() function to grab the HTML element with id 'chat-messages' from index.html, storing it in a variable so we can add chat text to it later
const chatInputAreaDiv = select('#chat-input-area');
Selects the HTML div where the input field and button will live, allowing us to attach p5.js DOM elements to a specific container
chatInput = createInput();
Dynamically creates a text input field using p5.js, which becomes a variable we can read from and clear later
chatInput.attribute('placeholder', 'Ask me anything...');
Sets the placeholder text inside the input field—the gray hint text that disappears when you type
chatInput.parent(chatInputAreaDiv);
Tells p5.js to attach the input field as a child of the chatInputAreaDiv HTML element, positioning it correctly in the chat interface
sendButton = createButton('Send');
Creates a clickable button element with the label 'Send' that will trigger the sendMessage() function
sendButton.parent(chatInputAreaDiv);
Attaches the send button to the chat input area div so it sits next to the input field in the interface
sendButton.mousePressed(sendMessage);
Registers sendMessage() as a callback function that runs whenever the send button is clicked
chatInput.changed(sendMessage);
Registers sendMessage() to trigger when the user presses Enter in the input field (the 'changed' event on an input)
draw()

draw() is the p5.js animation loop that runs 60 times per second (or more). In this sketch, it renders a static background every frame (the classroom) plus the stick man whose position changes based on keyboard input. Even though the background doesn't animate, redrawing it every frame ensures the stick man appears on top correctly. This is a common pattern: redraw static elements + animate objects within them to create layered scenes.

🔬 The three text() calls write lessons on the blackboard. Each line is offset vertically by adding different amounts to the Y coordinate. What happens if you change the last number (0.08) to 0.02? Do the lines get closer together or further apart?

  text("AURA FARMING 101", blackboardX + blackboardW / 2, blackboardY + blackboardH / 2);
  text("THE EARTH IS FLAT", blackboardX + blackboardW / 2, blackboardY + blackboardH / 2 + min(width, height) * 0.04);
  text("BIRDS ARE DRONES", blackboardX + blackboardW / 2, blackboardY + blackboardH / 2 + min(width, height) * 0.08);
function draw() {
  // --- Draw School Background ---
  // Wall (retro light green/grey)
  fill(180, 200, 180);
  noStroke();
  rect(0, 0, width, height * 0.7);

  // Floor (retro brown)
  fill(150, 120, 90);
  rect(0, height * 0.7, width, height * 0.3);

  // Blackboard
  fill(50, 70, 50); // Dark green
  stroke(0);
  strokeWeight(4);
  const blackboardX = width * 0.1;
  const blackboardY = height * 0.1;
  const blackboardW = width * 0.4;
  const blackboardH = height * 0.5;
  rect(blackboardX, blackboardY, blackboardW, blackboardH);

  // Chalk text on blackboard (responsive size)
  fill(255); // White chalk
  textSize(min(width, height) * 0.03);
  textAlign(CENTER, CENTER);
  text("AURA FARMING 101", blackboardX + blackboardW / 2, blackboardY + blackboardH / 2);
  text("THE EARTH IS FLAT", blackboardX + blackboardW / 2, blackboardY + blackboardH / 2 + min(width, height) * 0.04);
  text("BIRDS ARE DRONES", blackboardX + blackboardW / 2, blackboardY + blackboardH / 2 + min(width, height) * 0.08);

  // Window
  fill(100, 150, 200); // Blue sky
  stroke(0);
  strokeWeight(2);
  const windowX = width * 0.6;
  const windowY = height * 0.15;
  const windowW = width * 0.25;
  const windowH = height * 0.4;
  rect(windowX, windowY, windowW, windowH);
  line(windowX, windowY + windowH / 2, windowX + windowW, windowY + windowH / 2); // Horizontal pane
  line(windowX + windowW / 2, windowY, windowX + windowW / 2, windowY + windowH); // Vertical pane
  // Simple "outside" view - faint green for trees
  fill(135, 180, 135, 100);
  noStroke();
  rect(windowX, windowY + windowH * 0.7, windowW, windowH * 0.3);

  // Desks (simplified - a few rows)
  fill(120, 90, 60); // Brown desk top
  stroke(0);
  strokeWeight(2);
  const deskWidth = width * 0.12;
  const deskHeight = height * 0.03;
  const legHeight = height * 0.1;
  const floorLineY = height * 0.7;

  // Desk Row 1
  rect(width * 0.15, floorLineY - deskHeight - legHeight, deskWidth, deskHeight);
  line(width * 0.15, floorLineY - legHeight, width * 0.15, floorLineY);
  line(width * 0.15 + deskWidth, floorLineY - legHeight, width * 0.15 + deskWidth, floorLineY);

  rect(width * 0.35, floorLineY - deskHeight - legHeight, deskWidth, deskHeight);
  line(width * 0.35, floorLineY - legHeight, width * 0.35, floorLineY);
  line(width * 0.35 + deskWidth, floorLineY - legHeight, width * 0.35 + deskWidth, floorLineY);

  rect(width * 0.55, floorLineY - deskHeight - legHeight, deskWidth, deskHeight);
  line(width * 0.55, floorLineY - legHeight, width * 0.55, floorLineY);
  line(width * 0.55 + deskWidth, floorLineY - legHeight, width * 0.55 + deskWidth, floorLineY);
  // --- End School Background ---

  // Define scale for the stick man based on canvas size
  const stickManScale = min(width, height) * 0.2;
  const stickManStrokeWeight = stickManScale * 0.05;

  // Define the blue glow color
  const blueGlowColor = color(100, 200, 255); // A nice, bright blue

  // Draw the glow around the stick man
  drawStickMan(stickManX, stickManY, stickManScale * 1.05, blueGlowColor, 50, stickManStrokeWeight); // Fainter, slightly larger
  drawStickMan(stickManX, stickManY, stickManScale * 1.025, blueGlowColor, 100, stickManStrokeWeight); // Less faint, slightly larger

  // Draw the main stick man (black outline)
  drawStickMan(stickManX, stickManY, stickManScale, color(0), 255, stickManStrokeWeight); // Main stick man (full opacity, black)
}
Line-by-line explanation (35 lines)

🔧 Subcomponents:

shape-drawing Wall background rect(0, 0, width, height * 0.7);

Fills the upper 70% of the screen with a retro light green-grey color to simulate a classroom wall

shape-drawing Floor background rect(0, height * 0.7, width, height * 0.3);

Fills the lower 30% of the screen with brown color to represent wooden flooring

shape-drawing Blackboard drawing rect(blackboardX, blackboardY, blackboardW, blackboardH);

Draws a dark green rectangle positioned on the left side of the classroom as a teaching board

text-drawing Blackboard text text("AURA FARMING 101", blackboardX + blackboardW / 2, blackboardY + blackboardH / 2);

Writes white chalk-colored text centered on the blackboard with misleading lesson titles

shape-drawing Window with panes rect(windowX, windowY, windowW, windowH);

Draws a blue rectangle representing a window, with lines dividing it into four panes

shape-drawing Classroom desks rect(width * 0.15, floorLineY - deskHeight - legHeight, deskWidth, deskHeight);

Draws the top surface of a desk, with accompanying lines for legs to complete the 3D illusion

function-call Stick man glow effect drawStickMan(stickManX, stickManY, stickManScale * 1.05, blueGlowColor, 50, stickManStrokeWeight);

Renders semi-transparent copies of the stick man at slightly larger scales to create a blue halo effect

function-call Main stick man drawing drawStickMan(stickManX, stickManY, stickManScale, color(0), 255, stickManStrokeWeight);

Draws the final, fully opaque black stick man on top of the glow layers

// --- Draw School Background ---
A comment marking the start of the background drawing section—helps organize code visually
fill(180, 200, 180);
Sets the fill color to a muted green-grey (RGB values 180, 200, 180) that resembles retro wallpaper
noStroke();
Disables the outline stroke for the next shape so it fills cleanly without a border
rect(0, 0, width, height * 0.7);
Draws a rectangle from the top-left corner covering the full width and 70% of the height—the classroom wall
fill(150, 120, 90);
Changes the fill color to a warm brown (RGB 150, 120, 90) for the floor appearance
rect(0, height * 0.7, width, height * 0.3);
Draws the floor rectangle starting 70% down the canvas and filling the remaining 30% height—creates the wall-floor division
fill(50, 70, 50);
Sets the fill to a dark forest green (RGB 50, 70, 50) for a chalkboard color
stroke(0);
Enables a black stroke (outline) for all subsequent shapes—the blackboard will have a dark frame
strokeWeight(4);
Makes the stroke thickness 4 pixels, creating a bold retro border around the blackboard
const blackboardX = width * 0.1;
Calculates the blackboard's left edge at 10% from the left side of the canvas, making it responsive to window resize
rect(blackboardX, blackboardY, blackboardW, blackboardH);
Draws the dark green blackboard rectangle using the calculated positions and dimensions
fill(255);
Changes fill color to white (RGB 255, 255, 255)—the color of chalk
textSize(min(width, height) * 0.03);
Sets the text size to 3% of whichever dimension is smaller (width or height), ensuring text scales properly on different screen sizes
textAlign(CENTER, CENTER);
Aligns all subsequent text to be centered horizontally and vertically around the x,y coordinate provided to text()
text("AURA FARMING 101", blackboardX + blackboardW / 2, blackboardY + blackboardH / 2);
Draws the first line of white chalk text centered on the blackboard—a satirical class title
const windowX = width * 0.6;
Positions the window's left edge at 60% across the canvas, placing it on the right side of the classroom scene
fill(100, 150, 200);
Sets fill to a sky blue (RGB 100, 150, 200) for the window glass
strokeWeight(2);
Reduces stroke thickness to 2 pixels for the window frame—thinner than the blackboard border
rect(windowX, windowY, windowW, windowH);
Draws the blue window rectangle representing glass panes
line(windowX, windowY + windowH / 2, windowX + windowW, windowY + windowH / 2);
Draws a horizontal line across the middle of the window, dividing it into top and bottom panes
line(windowX + windowW / 2, windowY, windowX + windowW / 2, windowY + windowH);
Draws a vertical line down the center of the window, completing the four-pane cross-division
fill(135, 180, 135, 100);
Sets fill to a faded green (RGB 135, 180, 135) with 100/255 alpha (40% opacity), simulating trees outside seen through glass
rect(windowX, windowY + windowH * 0.7, windowW, windowH * 0.3);
Draws a semi-transparent rectangle in the lower 30% of the window to represent distant trees, adding depth
const deskWidth = width * 0.12;
Calculates desk width as 12% of canvas width, keeping desks proportional to screen size
const deskHeight = height * 0.03;
Sets desk top thickness to 3% of canvas height—a thin horizontal line to represent the desk surface
const legHeight = height * 0.1;
Defines desk leg length as 10% of canvas height, giving desks realistic proportions
const floorLineY = height * 0.7;
Stores the Y coordinate where the wall meets the floor (70% down), used to position desks correctly
rect(width * 0.15, floorLineY - deskHeight - legHeight, deskWidth, deskHeight);
Draws the tabletop of the first desk, positioned at 15% from the left, with math to place it above the floor line
line(width * 0.15, floorLineY - legHeight, width * 0.15, floorLineY);
Draws the left leg of the desk from below the table to the floor, creating a vertical support
// Define scale for the stick man based on canvas size
Comment indicating the start of stick man rendering calculations
const stickManScale = min(width, height) * 0.2;
Calculates the stick man's overall size as 20% of the smaller screen dimension, ensuring he scales appropriately on all devices
const blueGlowColor = color(100, 200, 255);
Creates a p5.js color object with RGB values for a bright cyan blue used for the glow effect
drawStickMan(stickManX, stickManY, stickManScale * 1.05, blueGlowColor, 50, stickManStrokeWeight);
Draws the outermost glow layer at 105% scale with alpha 50 (very faint), creating the halo effect's outer ring
drawStickMan(stickManX, stickManY, stickManScale * 1.025, blueGlowColor, 100, stickManStrokeWeight);
Draws a middle glow layer at 102.5% scale with alpha 100 (semi-transparent), adding depth to the halo
drawStickMan(stickManX, stickManY, stickManScale, color(0), 255, stickManStrokeWeight);
Draws the final, fully opaque black stick man (alpha 255 = completely visible) on top of the glow layers

drawStickMan()

drawStickMan() is a reusable helper function that the main draw() calls three times per frame—once for each glow layer and once for the final character. By parameterizing position, scale, color, and alpha, the same function creates the glow effect and main character without code duplication. This demonstrates a key creative coding principle: write once, reuse many times with different parameters. The push() and pop() sandwich ensures each call doesn't interfere with others.

🔬 These lines draw both arms. The left arm starts at x = -scale * 0.15. What happens if you change that to -scale * 0.25? Do the arms move inward or outward? Try changing both arms to see them move symmetrically.

  // 4. Arms
  const armLength = scale * 0.3; // 30% of stick man scale for arm length
  line(-scale * 0.15, -scale * 0.1, -scale * 0.15 - armLength, scale * 0.05); // Left arm (slightly angled)
  line(scale * 0.15, -scale * 0.1, scale * 0.15 + armLength, scale * 0.05); // Right arm (slightly angled)
function drawStickMan(x, y, scale, strokeColor, alpha, weight) {
  push(); // Isolate transformations for this stick man instance
  translate(x, y); // Move the origin to the current stick man position
  stroke(strokeColor, alpha); // Set stroke color with given alpha (for glow)
  strokeWeight(weight); // Set stroke weight
  noFill(); // No fill for the head

  // 1. Head
  const headRadius = scale * 0.2; // 20% of stick man scale for head size
  ellipse(0, -scale * 0.4, headRadius * 2, headRadius * 2); // Positioned above the center

  // 2. Smile (conditional) - Only draw smile on the main, non-glow stick man
  // The smile will inherit the strokeColor and alpha from the main stick man call
  if (isSmiling && alpha === 255) {
    const smileY = -scale * 0.3; // Slightly below head center
    const smileWidth = headRadius * 0.8;
    const smileHeight = headRadius * 0.4;
    arc(0, smileY, smileWidth, smileHeight, 0, PI); // Arc from 0 to PI (top half of an ellipse)
  }

  // 3. Body
  const bodyLength = scale * 0.4; // 40% of stick man scale for body length
  line(0, -scale * 0.2, 0, scale * 0.2); // From bottom of head to waist

  // 4. Arms
  const armLength = scale * 0.3; // 30% of stick man scale for arm length
  line(-scale * 0.15, -scale * 0.1, -scale * 0.15 - armLength, scale * 0.05); // Left arm (slightly angled)
  line(scale * 0.15, -scale * 0.1, scale * 0.15 + armLength, scale * 0.05); // Right arm (slightly angled)

  // 5. Legs
  const legLength = scale * 0.4; // 40% of stick man scale for leg length
  line(-scale * 0.05, scale * 0.2, -scale * 0.05 - legLength * 0.1, scale * 0.2 + legLength); // Left leg (slightly angled)
  line(scale * 0.05, scale * 0.2, scale * 0.05 + legLength * 0.1, scale * 0.2 + legLength); // Right leg (slightly angled)

  pop(); // Restore previous transformations
}
Line-by-line explanation (25 lines)

🔧 Subcomponents:

transformation Transformation isolation push();

Saves the current drawing state so translate() and other transforms only affect this stick man, not the global context

transformation Origin repositioning translate(x, y);

Moves the coordinate origin (0,0) to the stick man's position, so all subsequent drawings are relative to him

styling Stroke configuration stroke(strokeColor, alpha);

Sets the line color and transparency for all lines and arcs that follow

shape-drawing Head drawing ellipse(0, -scale * 0.4, headRadius * 2, headRadius * 2);

Draws the stick man's head as a circle positioned above the body center

conditional Conditional smile if (isSmiling && alpha === 255) {

Only renders the smile if the global isSmiling flag is true AND alpha is fully opaque (avoiding glow layers getting a smile)

shape-drawing Body line line(0, -scale * 0.2, 0, scale * 0.2);

Draws a vertical line from the head down to the waist, representing the torso

shape-drawing Arms lines line(-scale * 0.15, -scale * 0.1, -scale * 0.15 - armLength, scale * 0.05);

Draws two angled lines extending left and right from the torso to represent arms

shape-drawing Legs lines line(-scale * 0.05, scale * 0.2, -scale * 0.05 - legLength * 0.1, scale * 0.2 + legLength);

Draws two angled lines extending down from the waist to represent legs

function drawStickMan(x, y, scale, strokeColor, alpha, weight) {
Declares a function that accepts six parameters: position (x, y), size (scale), visual style (strokeColor, alpha, weight) to make the function reusable for different sized stick men and effects
push();
Saves the current transformation matrix and drawing state so that translate() below doesn't affect other parts of the sketch
translate(x, y);
Moves the coordinate system's origin (0, 0) to the given (x, y) position—everything drawn from now on is relative to this point, simplifying stick man drawing
stroke(strokeColor, alpha);
Sets the color and transparency of all lines and outlines drawn after this point—the parameters passed in control the glow or main character appearance
strokeWeight(weight);
Sets how thick the lines are in pixels—passed in as a parameter so glow layers can use thinner or thicker strokes if needed
noFill();
Disables fill for all shapes (like ellipse) so they are drawn as outlines only, not solid blocks
const headRadius = scale * 0.2;
Calculates head size as 20% of the scale parameter, ensuring the head is proportional to the stick man's overall size
ellipse(0, -scale * 0.4, headRadius * 2, headRadius * 2);
Draws a circle (ellipse with equal width and height) at y = -scale * 0.4 (above center) with diameter = headRadius * 2
if (isSmiling && alpha === 255) {
Checks two conditions: isSmiling is true (user pressed F) AND alpha is 255 (fully opaque, meaning this is the main stick man, not a glow layer)
const smileY = -scale * 0.3;
Calculates the Y position of the smile as 30% above the stick man's center, placing it inside the head area
const smileWidth = headRadius * 0.8;
Sets smile width to 80% of head radius, making it narrower than the head itself
const smileHeight = headRadius * 0.4;
Sets smile height to 40% of head radius, creating a gentle curve
arc(0, smileY, smileWidth, smileHeight, 0, PI);
Draws an arc (partial circle) at the calculated position from 0 radians to PI radians, which is the top half of an ellipse—the classic smile shape
// 3. Body
Comment marking the start of the body drawing section
const bodyLength = scale * 0.4;
Calculates body length as 40% of scale (though this variable is computed but not actually used in the line() call—a minor inefficiency)
line(0, -scale * 0.2, 0, scale * 0.2);
Draws a vertical line from (0, -scale * 0.2) to (0, scale * 0.2)—a straight torso centered at the origin
// 4. Arms
Comment marking the arm drawing section
const armLength = scale * 0.3;
Calculates arm length as 30% of scale for proportional sizing
line(-scale * 0.15, -scale * 0.1, -scale * 0.15 - armLength, scale * 0.05);
Draws the left arm as a line from a point on the torso slanting down-left and outward, creating an angled appearance
line(scale * 0.15, -scale * 0.1, scale * 0.15 + armLength, scale * 0.05);
Draws the right arm as a line from the opposite side of the torso slanting down-right and outward, mirroring the left arm
// 5. Legs
Comment marking the leg drawing section
const legLength = scale * 0.4;
Calculates leg length as 40% of scale, making legs proportional to the stick man's size
line(-scale * 0.05, scale * 0.2, -scale * 0.05 - legLength * 0.1, scale * 0.2 + legLength);
Draws the left leg from the left side of the waist downward and slightly outward, creating a natural stance
line(scale * 0.05, scale * 0.2, scale * 0.05 + legLength * 0.1, scale * 0.2 + legLength);
Draws the right leg from the right side of the waist downward and slightly outward, balancing the left leg
pop();
Restores the transformation matrix and drawing state saved by push(), so translate() and stroke() no longer affect subsequent drawing

keyPressed()

keyPressed() is a p5.js event handler that fires automatically every time a key is pressed. This sketch demonstrates context-aware input: movement is disabled when the chat input is focused, allowing users to type without accidentally moving the character. The WASD movement is immediate (happens as soon as the key is detected), while the smile animation is delayed using setTimeout, showing two different patterns for keyboard-triggered actions.

🔬 These if-else statements handle the four cardinal directions. What happens if you swap the += and -= operators? For example, change 'stickManY -= moveSpeed' to 'stickManY += moveSpeed'. Does the W key now move down instead of up?

    if (key === 'W' || key === 'w') {
      stickManY -= moveSpeed; // Move up
    } else if (key === 'S' || key === 's') {
      stickManY += moveSpeed; // Move down
    } else if (key === 'A' || key === 'a') {
      stickManX -= moveSpeed; // Move left
    } else if (key === 'D' || key === 'd') {
      stickManX += moveSpeed; // Move right
function keyPressed() {
  // Check which key was pressed and update stick man's position
  // Only move if the chat input is not focused
  if (document.activeElement !== chatInput.elt) {
    if (key === 'W' || key === 'w') {
      stickManY -= moveSpeed; // Move up
    } else if (key === 'S' || key === 's') {
      stickManY += moveSpeed; // Move down
    } else if (key === 'A' || key === 'a') {
      stickManX -= moveSpeed; // Move left
    } else if (key === 'D' || key === 'd') {
      stickManX += moveSpeed; // Move right
    } else if (key === 'F' || key === 'f') { // New condition for 'aura farm' smile
      isSmiling = true;
      setTimeout(() => {
        isSmiling = false;
      }, 1500); // Smile for 1.5 seconds
    }
  }
}
Line-by-line explanation (15 lines)

🔧 Subcomponents:

conditional Input focus check if (document.activeElement !== chatInput.elt) {

Prevents keyboard movement when the user is typing in the chat input—allows text entry without accidentally moving the character

conditional WASD key handling if (key === 'W' || key === 'w') {

Detects W key presses (uppercase or lowercase) and triggers upward movement

conditional F key smile trigger } else if (key === 'F' || key === 'f') {

Sets the isSmiling flag to true when F is pressed, triggering a smile in drawStickMan()

function-call Automatic smile reset setTimeout(() => {

Uses JavaScript setTimeout to automatically reset isSmiling to false after 1500ms, making the smile temporary

function keyPressed() {
p5.js calls this function automatically every time a key is pressed on the keyboard
if (document.activeElement !== chatInput.elt) {
Checks if the currently focused HTML element is NOT the chat input field—if true, allow movement; if false (user is typing), skip movement to avoid interference
if (key === 'W' || key === 'w') {
Tests if the pressed key is 'W' (uppercase) or 'w' (lowercase)—case-insensitive movement input
stickManY -= moveSpeed;
Subtracts moveSpeed from stickManY, moving the stick man up by that many pixels (in p5.js, lower Y values mean higher on screen)
} else if (key === 'S' || key === 's') {
Tests if the pressed key is 'S' or 's' for downward movement
stickManY += moveSpeed;
Adds moveSpeed to stickManY, moving the stick man down (higher Y = lower on screen)
} else if (key === 'A' || key === 'a') {
Tests if the pressed key is 'A' or 'a' for leftward movement
stickManX -= moveSpeed;
Subtracts moveSpeed from stickManX, moving the stick man left (lower X = further left)
} else if (key === 'D' || key === 'd') {
Tests if the pressed key is 'D' or 'd' for rightward movement
stickManX += moveSpeed;
Adds moveSpeed to stickManX, moving the stick man right (higher X = further right)
} else if (key === 'F' || key === 'f') {
Tests if the pressed key is 'F' or 'f' to trigger the smile animation
isSmiling = true;
Sets the isSmiling flag to true, which causes drawStickMan() to render an arc smile on the next frame
setTimeout(() => {
Calls the JavaScript setTimeout function with a callback—the callback will execute after a delay (1500ms in this case)
isSmiling = false;
Inside the timeout callback, sets isSmiling back to false, causing the smile to disappear on subsequent frames
}, 1500);
Specifies the timeout delay: 1500 milliseconds = 1.5 seconds before the smile resets

windowResized()

windowResized() is a p5.js lifecycle function that executes whenever the user resizes their browser window. This sketch uses it to expand the canvas and re-center the stick man so the experience remains centered on the screen. Without this function, the sketch would keep its original size and positioning—a jarring experience on a resized window. This is essential for responsive design in p5.js.

function windowResized() {
  resizeCanvas(windowWidth, windowHeight);
  // Re-center the stick man when the window is resized
  stickManX = width / 2;
  stickManY = height / 2;
  // No need to call draw() here, as it's already looping
}
Line-by-line explanation (4 lines)

🔧 Subcomponents:

function-call Canvas resize resizeCanvas(windowWidth, windowHeight);

Updates the p5.js canvas to match the new browser window dimensions

calculation Stick man recentering stickManX = width / 2;

Recalculates and resets the stick man's position to the center of the newly resized canvas

function windowResized() {
p5.js calls this function automatically whenever the browser window is resized
resizeCanvas(windowWidth, windowHeight);
Updates the p5.js canvas dimensions to match the new browser window size—windowWidth and windowHeight are p5.js variables that always hold the current window dimensions
stickManX = width / 2;
Recalculates the stick man's X position as half the new canvas width, centering him horizontally
stickManY = height / 2;
Recalculates the stick man's Y position as half the new canvas height, centering him vertically

sendMessage()

sendMessage() demonstrates a complete chatbot flow: capture input, validate it, search for context (keywords), select an appropriate response from a data structure, and display it with DOM manipulation. The dual loops (topic → keyword) are a common pattern for hierarchical data searching. The use of setTimeout creates perceived personality—the stick man 'thinks' before responding, making the interaction feel more natural than instant replies.

function sendMessage() {
  const userMessage = chatInput.value().trim();
  if (userMessage !== '') {
    // Display user message
    const userP = createElement('p', `<strong>You:</strong> ${userMessage}`);
    userP.addClass('user-message');
    userP.parent(chatMessagesDiv);

    let responsesArray = genericBadInfo; // Start with generic bad facts as fallback
    let themedResponseFound = false; // Flag to track if a themed response was found

    // Convert user message to lowercase for case-insensitive keyword matching
    const lowerCaseUserMessage = userMessage.toLowerCase();

    // Loop through themed bad info to find a relevant (but wrong) answer
    for (const topic of themedBadInfo) {
      for (const keyword of topic.keywords) {
        if (lowerCaseUserMessage.includes(keyword)) {
          responsesArray = topic.responses;
          themedResponseFound = true; // Set flag
          break; // Found a keyword, stop checking this topic
        }
      }
      if (themedResponseFound) {
        break; // Found a themed response, stop checking other topics
      }
    }

    // Pick a random EVEN index from the chosen responses array
    // This ensures we get a rhyming pair (response and its follow-up)
    const randomIndex = floor(random(responsesArray.length / 2)) * 2;
    const firstResponse = responsesArray[randomIndex];
    const secondResponse = responsesArray[randomIndex + 1];

    // Combine them for the stick man's full rhyming response
    const stickManResponse = firstResponse + " " + secondResponse;

    // Display stick man's response after a slight delay for a more conversational feel
    setTimeout(() => {
      const stickManP = createElement('p', `<strong>Stick Man:</strong> ${stickManResponse}`);
      stickManP.addClass('stickman-message');
      stickManP.parent(chatMessagesDiv);
      // Scroll to the bottom of the chat messages
      chatMessagesDiv.elt.scrollTop = chatMessagesDiv.elt.scrollHeight;
    }, 500); // 0.5 second delay

    // Clear input field
    chatInput.value('');
    // Scroll to the bottom of the chat messages
    chatMessagesDiv.elt.scrollTop = chatMessagesDiv.elt.scrollHeight;
  }
}
Line-by-line explanation (28 lines)

🔧 Subcomponents:

calculation User message extraction const userMessage = chatInput.value().trim();

Reads text from the chat input field and removes leading/trailing whitespace

conditional Message validation if (userMessage !== '') {

Ensures the user typed something before processing—prevents sending empty messages

dom-creation User message display const userP = createElement('p', `<strong>You:</strong> ${userMessage}`);

Creates an HTML paragraph element to display the user's message in the chat div

for-loop Keyword matching loop for (const topic of themedBadInfo) {

Iterates through the themedBadInfo array to find a topic matching the user's message via keyword search

calculation Random even index selection const randomIndex = floor(random(responsesArray.length / 2)) * 2;

Picks a random even number from the responses array to ensure a complete rhyming pair is selected

string-concat Response combination const stickManResponse = firstResponse + " " + secondResponse;

Combines the two rhyming responses into one complete message from the stick man

function-call Delayed stick man response setTimeout(() => {

Waits 500ms before displaying the stick man's response, creating a conversational back-and-forth feel

function sendMessage() {
Defines the function that runs when the user sends a chat message via button click or Enter key
const userMessage = chatInput.value().trim();
Reads the text from the chat input field (.value()), removes whitespace from both ends (.trim()), and stores it in a variable
if (userMessage !== '') {
Checks that the message is not empty—if it's empty, the entire function body is skipped
const userP = createElement('p', `<strong>You:</strong> ${userMessage}`);
Creates an HTML paragraph element with the user's message text, using template literals to embed the userMessage variable
userP.addClass('user-message');
Adds the CSS class 'user-message' to the paragraph, which styles it with right-alignment and blue color (defined in style.css)
userP.parent(chatMessagesDiv);
Appends the user message paragraph to the chat messages div, making it visible in the chat interface
let responsesArray = genericBadInfo;
Initializes responsesArray to the genericBadInfo array as a fallback—if no keywords match, the stick man will respond with a random generic bad fact
let themedResponseFound = false;
Creates a flag variable to track whether a themed (keyword-matched) response has been found—used to exit nested loops early
const lowerCaseUserMessage = userMessage.toLowerCase();
Converts the user message to all lowercase for case-insensitive keyword matching—so 'EARTH', 'Earth', and 'earth' all match the 'earth' keyword
for (const topic of themedBadInfo) {
Iterates through each topic object in the themedBadInfo array using a for...of loop
for (const keyword of topic.keywords) {
For each topic, iterates through its keywords array to check if any keyword appears in the user's message
if (lowerCaseUserMessage.includes(keyword)) {
Uses the includes() method to check if the lowercase user message contains the current keyword—returns true or false
responsesArray = topic.responses;
If a keyword is found, updates responsesArray to the responses for this specific topic instead of the generic fallback
themedResponseFound = true;
Sets the flag to true to indicate a themed response was found, allowing the outer loop to break and avoid checking other topics
break;
Breaks out of the inner keyword loop—no need to check more keywords for this topic if one already matched
if (themedResponseFound) {
After the inner loop, checks the flag—if true, breaks out of the outer topic loop to avoid checking other topics
const randomIndex = floor(random(responsesArray.length / 2)) * 2;
Selects a random even index by: dividing array length by 2, picking a random number in that range, flooring it, then multiplying by 2—ensures pairs of rhyming responses are selected together
const firstResponse = responsesArray[randomIndex];
Accesses the response at the random even index—the first part of the rhyming pair
const secondResponse = responsesArray[randomIndex + 1];
Accesses the next index (randomIndex + 1)—the second part of the rhyming pair
const stickManResponse = firstResponse + " " + secondResponse;
Combines both responses into a single string with a space between them
setTimeout(() => {
Schedules a callback function to run after a delay (500ms specified later)—creates a pause before the stick man's response appears
const stickManP = createElement('p', `<strong>Stick Man:</strong> ${stickManResponse}`);
After the delay, creates a paragraph element with the stick man's response text
stickManP.addClass('stickman-message');
Adds the 'stickman-message' CSS class for red text and left alignment (defined in style.css)
stickManP.parent(chatMessagesDiv);
Appends the stick man's response paragraph to the chat div, making it visible
chatMessagesDiv.elt.scrollTop = chatMessagesDiv.elt.scrollHeight;
Scrolls the chat messages div to the bottom so the newest message is visible (.elt accesses the underlying HTML element)
}, 500);
Specifies the delay time: 500 milliseconds before the callback executes
chatInput.value('');
Clears the text from the chat input field, preparing it for the next message
chatMessagesDiv.elt.scrollTop = chatMessagesDiv.elt.scrollHeight;
Immediately scrolls the chat to the bottom after the user message appears, before the stick man response is shown

📦 Key Variables

stickManX number

Stores the horizontal (left-right) position of the stick man on the canvas—updated by WASD keys

let stickManX = width / 2;
stickManY number

Stores the vertical (up-down) position of the stick man on the canvas—updated by WASD keys

let stickManY = height / 2;
moveSpeed number

Constant that defines how many pixels the stick man moves per key press

const moveSpeed = 8;
chatInput object

Stores a reference to the p5.js input element created in setup()—allows reading user text and clearing the field

let chatInput = createInput();
sendButton object

Stores a reference to the p5.js button element that triggers sendMessage() when clicked

let sendButton = createButton('Send');
chatMessagesDiv object

Stores a reference to the HTML div where chat messages appear—allows appending paragraphs for user and stick man text

let chatMessagesDiv = select('#chat-messages');
isSmiling boolean

Flag that tracks whether the stick man should currently display a smile—set to true by F key, automatically reset to false after 1.5 seconds

let isSmiling = false;
genericBadInfo array

Array of generic bad facts and rhyming couplets used as fallback responses when user input doesn't match any themed keywords

const genericBadInfo = [...];
themedBadInfo array of objects

Array of topic objects, each containing keywords (array) and themed responses (array of rhyming couplets) for contextual chatbot replies

const themedBadInfo = [{keywords: [...], responses: [...]}, ...];

🔧 Potential Improvements (5)

Here are some ways this code could be enhanced:

BUG drawStickMan() head drawing

The variable 'bodyLength' is calculated but never used—it's computed on line 'const bodyLength = scale * 0.4;' but the body line uses hard-coded scale values instead

💡 Either remove the unused bodyLength calculation or refactor the body line to use bodyLength for consistency: line(0, -bodyLength/2, 0, bodyLength/2)

PERFORMANCE draw()

Background is redrawn every frame even though it never changes—desks, walls, blackboard, and window are all static scenery

💡 Create a graphics buffer in setup() (createGraphics()), draw the background once into it, then simply display that buffer in draw() each frame. This reduces repeated calculations significantly.

STYLE sendMessage()

Nested for loops with break statements are hard to read—the keyword search logic could be clearer

💡 Extract keyword matching into a separate helper function, e.g., 'findTopicForKeyword(userMessage)' that returns the matching topic or null. This makes sendMessage() easier to read and test.

FEATURE keyPressed()

The stick man can move outside the canvas boundaries and disappear—no collision detection or boundary checking

💡 Add constrain() calls after updating stickManX and stickManY to keep the character within canvas bounds: stickManX = constrain(stickManX, 0, width);

BUG sendMessage() keyword matching

If a user's message contains multiple keywords from different topics, only the first matching topic is used due to the break statement—edges of randomness may make responses feel repetitive

💡 Store ALL matching topics and randomly pick one, rather than using the first. This allows richer, more varied responses to ambiguous questions.

🔄 Code Flow

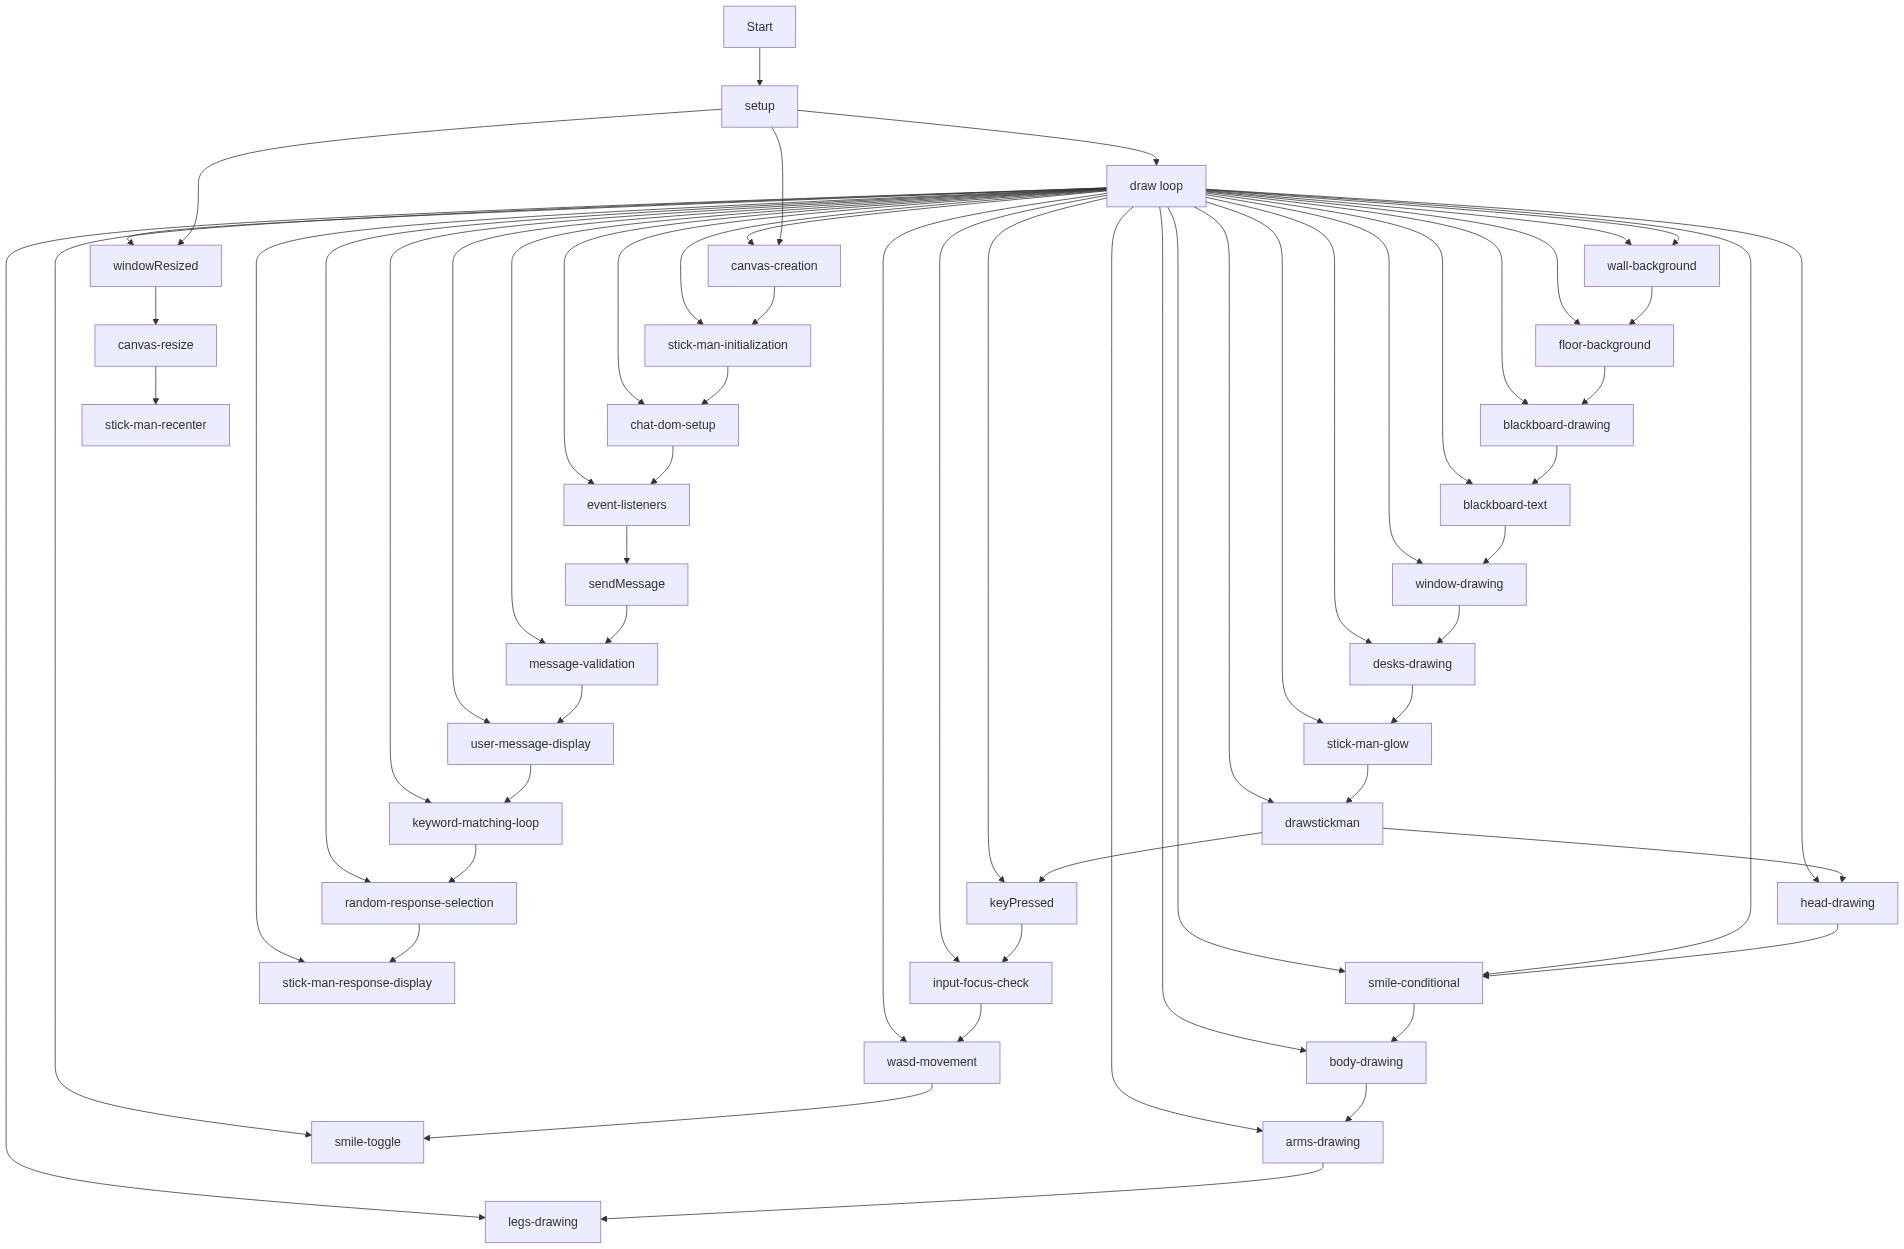
Code flow showing setup, draw, drawstickman, keypressed, windowresized, sendmessage

💡 Click on function names in the diagram to jump to their code

graph TD start[Start] --> setup[setup] setup --> canvas-init[Canvas Initialization] setup --> dom-selection[DOM Element Selection] setup --> input-creation[Input Field Creation] setup --> button-creation[Button Creation] setup --> event-listeners[Event Listeners Attachment] setup --> draw[draw loop] click setup href "#fn-setup" click canvas-init href "#sub-canvas-init" click dom-selection href "#sub-dom-selection" click input-creation href "#sub-input-creation" click button-creation href "#sub-button-creation" click event-listeners href "#sub-event-listeners" draw --> wall-bg[Wall Background] draw --> floor-bg[Floor Background] draw --> blackboard[Blackboard Drawing] draw --> chalk-text[Chalk Text Drawing] draw --> window[Window Drawing] draw --> desks[Desks Drawing] draw --> glow-layers[Stick Man Glow Effect] draw --> main-stickman[Main Stick Man Drawing] draw --> keypressed[keyPressed] draw --> windowresized[windowResized] click draw href "#fn-draw" click wall-bg href "#sub-wall-bg" click floor-bg href "#sub-floor-bg" click blackboard href "#sub-blackboard" click chalk-text href "#sub-chalk-text" click window href "#sub-window" click desks href "#sub-desks" click glow-layers href "#sub-glow-layers" click main-stickman href "#sub-main-stickman" click keypressed href "#fn-keypressed" click windowresized href "#fn-windowresized" keypressed --> focus-check[Input Focus Check] keypressed --> wasd-movement[WASD Movement Handling] keypressed --> f-smile[F Key Smile Trigger] keypressed --> smile-timeout[Automatic Smile Reset] click focus-check href "#sub-focus-check" click wasd-movement href "#sub-wasd-movement" click f-smile href "#sub-f-smile" click smile-timeout href "#sub-smile-timeout" windowresized --> canvas-resize[Canvas Resize] windowresized --> recenter-stickman[Stick Man Recenter] click canvas-resize href "#sub-canvas-resize" click recenter-stickman href "#sub-recenter-stickman" sendmessage[sendMessage] --> message-input[User Message Extraction] sendmessage --> empty-check[Empty Message Check] sendmessage --> user-display[User Message Display] sendmessage --> keyword-matching[Keyword Matching Loop] sendmessage --> random-index[Random Index Selection] sendmessage --> response-concatenation[Response Concatenation] sendmessage --> delayed-display[Delayed Stick Man Response] click sendmessage href "#fn-sendmessage" click message-input href "#sub-message-input" click empty-check href "#sub-empty-check" click user-display href "#sub-user-display" click keyword-matching href "#sub-keyword-matching" click random-index href "#sub-random-index" click response-concatenation href "#sub-response-concatenation" click delayed-display href "#sub-delayed-display"

❓ Frequently Asked Questions

What visual elements does the p5.js sketch 'dummy' create?

The sketch features a stick figure that visually represents the humorous and absurd information it conveys, using simple shapes and animations.

How can users interact with the 'dummy' sketch?

Users can input chat messages that trigger responses from the stick man, allowing for a playful interaction with the ridiculous facts presented.

What creative coding concepts are showcased in the 'dummy' sketch?

The sketch demonstrates random content generation and basic animation techniques, highlighting how to create engaging interactions and humorous narratives in coding.

Preview

dummy - p5.js creative coding sketch preview
Sketch Preview
Code flow diagram showing the structure of dummy - Code flow showing setup, draw, drawstickman, keypressed, windowresized, sendmessage
Code Flow Diagram