
extreamly very fun amazing super fun crazy cool game

This sketch creates a timed image reveal game that displays one image for 10 minutes, then automatically switches to a second image. A countdown timer in the top-right corner tracks the remaining wait time, teaching canvas resizing, DOM manipulation, and time-based state changes.

🧪 Try This!

Experiment with the code by making these changes:

  1. Change the countdown to 30 seconds for testing — Set WAIT_TIME to 30000 milliseconds so you can see the image switch happen immediately instead of waiting 10 minutes
  2. Show the timer only on countdown expiration — Move timerDiv.hide() outside the else block so the timer disappears before the image switches, creating suspense
  3. Make the timer text semi-transparent red — Change the timer color from white to red so it stands out more during the countdown
  4. Position the timer in the center top of the screen — Move the timer from the top-right to the top-center so it's more prominent during the countdown
Prefer the full editor? Open it there →

📖 About This Sketch

This sketch builds a waiting game: it shows the first image while counting down 10 minutes, then reveals the second image when time expires. The countdown timer displays in the top-right corner using semi-transparent white text. This is a perfect teaching sketch because it combines p5.js canvas management with DOM element creation, image loading from URLs, time-based animation, and responsive window resizing—five core skills for building interactive projects.

The code is organized into setup() which configures the canvas, loads two images from the web, and creates a timer display element; draw() which runs every frame to update the countdown and switch images based on elapsed time; and windowResized() which keeps everything centered when the browser window resizes. By studying it, you will learn how millis() tracks time, how conditional logic creates state changes, and how p5.js DOM methods (createImg, createDiv, style, show, hide) let you blend canvas graphics with HTML elements.

⚙️ How It Works

  1. When the sketch loads, setup() creates a full-screen canvas, loads two images from external URLs, and creates a timer display as an HTML div element positioned absolutely above everything else.
  2. The draw() function runs 60 times per second, calculating how many milliseconds have elapsed since startTime using millis().
  3. The elapsed time is converted into minutes and seconds, then formatted with leading zeros (e.g., '09:35') and displayed in the timer div.
  4. An if-else statement checks whether elapsedTime is still less than WAIT_TIME (10 minutes = 600,000 milliseconds); if so, img1 displays and img2 hides; otherwise img2 displays and the timer hides.
  5. The windowResized() function listens for browser window resize events and calls resizeCanvas() to keep the canvas filling the entire window.

🎓 Concepts You'll Learn

Time-based animationmillis() and elapsed timeConditional state switchingDOM manipulationImage loading from URLsWindow responsivenessCSS styling from JavaScript

📝 Code Breakdown

setup()

setup() runs once when the sketch starts. It is the ideal place to load images, create DOM elements, and set initial values. Notice how we use .hide() on both images at the start—the draw() function will show them conditionally on each frame.

🔬 This code positions the timer in the top-right corner. What happens if you change 'right' to 'left' on the last line? Where does the timer move?

  timerDiv.style('position', 'absolute');
  timerDiv.style('top', '15px');
  timerDiv.style('right', '20px');
function setup() {
  createCanvas(windowWidth, windowHeight);
  
  const url1 = 'https://encrypted-tbn0.gstatic.com/images?q=tbn:ANd9GcSgOLhscWLJ0cu5ZvaiLGuM5FnpRgfqHSki-w&s';
  const url2 = 'https://m.media-amazon.com/images/I/61PsAlzDFZL.jpg';
  
  img1 = createImg(url1, "first image");
  img2 = createImg(url2, "second image");
  
  // Style the images to act like a flat fullscreen presentation 
  // Added z-index: 1 to ensure they stay behind our new timer
  let baseStyle = 'position: absolute; top: 50%; left: 50%; transform: translate(-50%, -50%); width: 100vw; height: 100vh; object-fit: contain; pointer-events: none; z-index: 1;';
  
  img1.style(baseStyle);
  img2.style(baseStyle);
  
  // Hide them initially
  img1.hide();
  img2.hide();
  
  // Create a DOM element for the timer so it sits completely on top of the images
  timerDiv = createDiv('');
  timerDiv.style('position', 'absolute');
  timerDiv.style('top', '15px');
  timerDiv.style('right', '20px');
  timerDiv.style('color', 'rgba(255, 255, 255, 0.5)'); // Semi-transparent white
  timerDiv.style('font-family', 'monospace');
  timerDiv.style('font-size', '20px');
  timerDiv.style('z-index', '10'); // Ensures it stays above everything
  
  // Start the timer
  startTime = millis();
}
Line-by-line explanation (9 lines)

🔧 Subcomponents:

calculation Image Loading img1 = createImg(url1, "first image");

Loads the first image from a URL and stores it as a p5.js image object that can be shown/hidden

calculation Image Styling img1.style(baseStyle);

Applies CSS styles to center the image and make it fill the screen responsively

calculation Timer DOM Element Creation timerDiv = createDiv('');

Creates an HTML div element that will display the countdown timer above the images

createCanvas(windowWidth, windowHeight);
Creates a p5.js canvas that fills the entire browser window using dynamic width and height values
const url1 = 'https://encrypted-tbn0.gstatic.com/images?q=tbn:ANd9GcSgOLhscWLJ0cu5ZvaiLGuM5FnpRgfqHSki-w&s';
Stores the URL of the first image as a string constant
img1 = createImg(url1, "first image");
createImg() loads an image from a URL and returns a p5.Renderer object; the second argument is alt text for accessibility
let baseStyle = 'position: absolute; top: 50%; left: 50%; transform: translate(-50%, -50%); width: 100vw; height: 100vh; object-fit: contain; pointer-events: none; z-index: 1;';
Defines a CSS style string that centers the image on screen, makes it fill the viewport, and prevents it from blocking mouse clicks
img1.style(baseStyle);
The .style() method applies the CSS string to img1, positioning and sizing it like a fullscreen presentation
img1.hide();
The .hide() method hides img1 by setting its display to 'none'; it will be shown later by the draw loop
timerDiv = createDiv('');
Creates an empty HTML div element that will hold the countdown timer text
timerDiv.style('z-index', '10');
Sets z-index to 10, making the timer appear above the images (which have z-index 1)
startTime = millis();
Records the current time in milliseconds when setup() runs; this becomes the reference point for calculating elapsed time

draw()

draw() runs 60 times per second, making it the heartbeat of your sketch. This is where you calculate animations, update displays, and respond to time or user input. The if-else block is the key teaching moment: one condition controls which image the user sees, demonstrating how time-based logic creates interactive experiences.

🔬 This if-else statement switches between two states when WAIT_TIME milliseconds pass. What happens if you swap img1 and img2 in the first branch (show img2 during the countdown instead of img1)? Does the countdown timer still appear?

  if (elapsedTime < WAIT_TIME) {
    // ---- STATE 1: SHOW FIRST IMAGE ----
    img1.show();
    img2.hide();
  } else {
    // ---- STATE 2: SHOW SECOND IMAGE ----
    img1.hide();
    img2.show();
    timerDiv.hide(); // Hide the timer completely when the 10 minutes are up
  }
function draw() {
  // Pure black background
  background(0);
  
  let elapsedTime = millis() - startTime;
  
  // Calculate time remaining
  let timeLeft = max(0, WAIT_TIME - elapsedTime);
  let minutes = floor(timeLeft / 60000);
  let seconds = floor((timeLeft % 60000) / 1000);
  
  // Update the timer text (nf() pads the numbers with zeros, e.g., "09:05")
  timerDiv.html(nf(minutes, 2) + ':' + nf(seconds, 2));
  
  if (elapsedTime < WAIT_TIME) {
    // ---- STATE 1: SHOW FIRST IMAGE ----
    img1.show();
    img2.hide();
  } else {
    // ---- STATE 2: SHOW SECOND IMAGE ----
    img1.hide();
    img2.show();
    timerDiv.hide(); // Hide the timer completely when the 10 minutes are up
  }
}
Line-by-line explanation (9 lines)

🔧 Subcomponents:

calculation Elapsed Time Calculation let elapsedTime = millis() - startTime;

Calculates how many milliseconds have passed since the sketch started by subtracting the start time from the current time

calculation Time Remaining Calculation let timeLeft = max(0, WAIT_TIME - elapsedTime);

Subtracts elapsed time from the total wait time, using max(0, ...) to prevent negative numbers

calculation Time Formatting let minutes = floor(timeLeft / 60000);

Converts milliseconds to minutes by dividing by 60000 and using floor() to round down to a whole number

conditional Image State Switch if (elapsedTime < WAIT_TIME) {

Compares elapsed time to the wait time and shows/hides images accordingly, switching states exactly when 10 minutes passes

background(0);
Clears the canvas with pure black (RGB value 0) on every frame, creating a dark backdrop for the images
let elapsedTime = millis() - startTime;
millis() returns the current time in milliseconds since the sketch started; subtracting startTime gives you how many milliseconds have passed
let timeLeft = max(0, WAIT_TIME - elapsedTime);
Calculates remaining time by subtracting elapsed from total; max(0, ...) ensures the result never goes negative after 10 minutes
let minutes = floor(timeLeft / 60000);
Converts milliseconds to minutes by dividing by 60000 (milliseconds per minute) and rounding down with floor()
let seconds = floor((timeLeft % 60000) / 1000);
The modulo operator % gives the remainder after dividing by 60000, which is the leftover milliseconds; divide by 1000 to convert to seconds
timerDiv.html(nf(minutes, 2) + ':' + nf(seconds, 2));
nf(number, digits) formats a number with leading zeros (e.g., '09' instead of '9'); this creates the MM:SS timer display like '09:35'
if (elapsedTime < WAIT_TIME) {
Checks whether the countdown is still active; if true, show img1; when false (after 10 minutes), switch to img2
img1.show();
Makes img1 visible on the canvas by setting its display to 'block'
timerDiv.hide();
When time expires, hides the timer div by setting its display to 'none', leaving only the second image on screen

windowResized()

windowResized() is a built-in p5.js function that automatically triggers whenever the browser window is resized. By calling resizeCanvas() here, the canvas stays responsive and centered. Without this function, the canvas would stop at its original size if the window grows or shrinks.

function windowResized() {
  resizeCanvas(windowWidth, windowHeight);
}
Line-by-line explanation (1 lines)
resizeCanvas(windowWidth, windowHeight);
Resizes the p5.js canvas to match the browser window's current width and height, ensuring the canvas always fills the screen

📦 Key Variables

img1 p5.Renderer

Stores the first image object loaded from a URL; displayed during the 10-minute countdown

let img1;
img2 p5.Renderer

Stores the second image object loaded from a URL; displayed after the countdown expires

let img2;
startTime number

Records the millisecond value when setup() runs; used to calculate elapsed time in draw()

let startTime;
WAIT_TIME number

Stores the total countdown duration in milliseconds (600000 = 10 minutes); used to determine when to switch images

const WAIT_TIME = 600000;
timerDiv p5.Renderer

Stores the HTML div element that displays the countdown timer text in the top-right corner

let timerDiv;

🔧 Potential Improvements (4)

Here are some ways this code could be enhanced:

BUG setup() image loading

External image URLs may fail to load or be blocked by CORS policies, leaving images blank without any error message to the user

💡 Add error handling: use createImg(url, alt, errorCallback) to show a fallback message or use base64-encoded images / local image files instead

PERFORMANCE draw()

The timer text is updated every frame (60 times per second) even though it only visually changes once per second; this is wasteful

💡 Only update timerDiv.html() when seconds change: store the previous seconds value and only call .html() when it differs

STYLE setup()

CSS styles are applied via individual .style() calls, making the code verbose and hard to maintain

💡 Define a reusable CSS object or class in index.html and apply it once, or create a helper function that applies multiple styles at once

FEATURE draw()

The sketch provides no visual feedback when the image transition happens—the user just sees the image switch with no animation

💡 Add a fade-out effect by gradually reducing img1's opacity as the countdown nears zero, creating a smoother transition between images

🔄 Code Flow

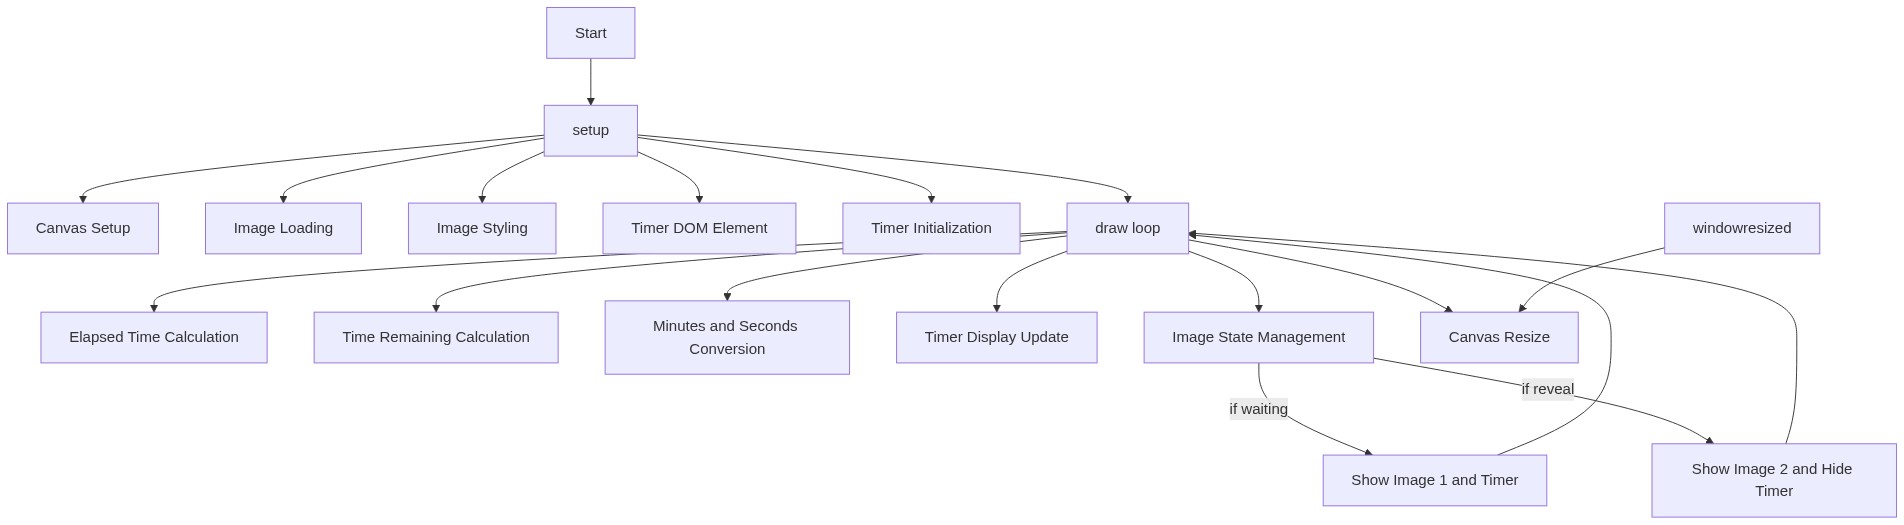
Code flow showing setup, draw, windowresized

💡 Click on function names in the diagram to jump to their code

graph TD start[Start] --> setup[setup] setup --> image-loading[Image Loading] setup --> image-styling[Image Styling] setup --> timer-dom-creation[Timer DOM Element Creation] setup --> draw[draw loop] draw --> elapsed-calculation[Elapsed Time Calculation] draw --> time-remaining-calc[Time Remaining Calculation] draw --> time-formatting[Time Formatting] draw --> state-switch[Image State Switch] state-switch -->|if elapsed time < wait time| showImage[Show Image] state-switch -->|else| hideImage[Hide Image] showImage --> draw hideImage --> draw draw --> draw setup -->|window resized| windowresized[windowResized] windowresized --> resizeCanvas[Resize Canvas] click setup href "#fn-setup" click draw href "#fn-draw" click image-loading href "#sub-image-loading" click image-styling href "#sub-image-styling" click timer-dom-creation href "#sub-timer-dom-creation" click elapsed-calculation href "#sub-elapsed-calculation" click time-remaining-calc href "#sub-time-remaining-calc" click time-formatting href "#sub-time-formatting" click state-switch href "#sub-state-switch"

❓ Frequently Asked Questions

What visual experience does the 'extremely very fun amazing super fun crazy cool game' sketch provide?

This sketch displays two images sequentially, with a countdown timer overlay, creating an engaging visual experience against a pure black background.

Is there any user interaction available in this creative coding sketch?

The sketch currently does not offer interactive elements; it simply transitions between two images based on a timer.

What creative coding concepts are showcased in this p5.js sketch?

The sketch demonstrates timing and state management by using a countdown timer to control the display of images.

Preview

extreamly very fun amazing super fun crazy cool game - p5.js creative coding sketch preview
Sketch Preview
Code flow diagram showing the structure of extreamly very fun amazing super fun crazy cool game - Code flow showing setup, draw, windowresized
Code Flow Diagram