
Feelings and Emotions

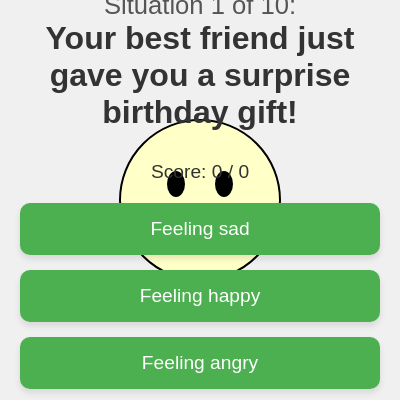
This is an interactive educational game that teaches children to identify emotions by presenting real-life situations and asking them to select the correct emotional response from three choices. The sketch displays animated emoji-like faces that change expressions to match the emotion being taught, with a scoring system that tracks correct answers and provides immediate visual feedback.

🧪 Try This!

Experiment with the code by making these changes:

  1. Change a situation scenario — Modify the text of any situation to create new real-life examples for children to learn from
  2. Add a new emotion — Add an 11th emotion scenario by inserting a new object into the situationsData array with a different emotion and drawing case
  3. Change button colors
  4. Make the face bigger — Increase the multiplier in the faceSize calculation to make the emoji face larger on the canvas
  5. Speed up the game — Reduce the delay before advancing to the next question so the game moves faster
Prefer the full editor? Open it there →

📖 About This Sketch

This sketch creates an engaging emotion-learning game for children that combines real-world scenarios with visual emoji-like faces. It uses p5.js DOM elements (createButton, createDiv, html) to build an interactive quiz interface, the canvas drawing functions (ellipse, arc, line, stroke, fill) to animate expressive faces, and conditional logic to track correct answers and provide immediate feedback. The game teaches emotional literacy by asking children to match situations to feelings and showing them the correct emotion's facial expression.

The code is organized into three core sections: a data structure (situationsData array) that holds all game scenarios and correct answers, setup functions that build the UI once, and handler functions that manage game flow (displaySituation, checkAnswer, endGame, restartGame). By reading this sketch, you will learn how to organize game logic with data arrays, build interactive UI with p5.js DOM methods, draw responsive graphics using translate and proportional sizing, and manage game state across multiple rounds.

⚙️ How It Works

  1. When the sketch loads, setup() creates a full-screen canvas and builds the entire game interface using p5.js DOM functions: a situation display area, progress indicator, three answer buttons, and a hidden restart button. All elements are styled with inline CSS through the .style() method and centered using flexbox.
  2. displaySituation() reads from the situationsData array to populate the current scenario, displays the situation text to the child, updates the score counter, and sets the three answer options as button labels.
  3. drawEmotionAnimation() draws a simple yellow face on the canvas and uses a switch statement to modify the mouth, eyebrows, and cheeks based on the emotion type—happy gets an upward arc, sad gets a downward arc, surprised gets a wide-open ellipse, and so on.
  4. When the child clicks an answer button, checkAnswer() compares the chosen index to the correct answer stored in the data, changes button colors to show right (green) and wrong (red) answers, increments the score, and displays 'Correct!' or the correction text.
  5. After a 2-second delay (using setTimeout), the game automatically advances to the next situation, or if all 10 situations are complete, endGame() hides the buttons and shows the final score with a 'Play Again' button.
  6. windowResized() responds to screen size changes by resizing the canvas and redrawing the face animation so the game stays readable on any device.

🎓 Concepts You'll Learn

DOM manipulation with p5.jsData-driven game designState management across framesConditional rendering with switch statementsResponsive canvas drawing with translate and proportional sizingEvent handling and button interactionScore tracking and game flow control

📝 Code Breakdown

setup()

setup() runs once when the sketch starts. It builds the entire user interface by creating DOM elements (divs and buttons), styling them with CSS properties through the .style() method, and connecting click handlers to game logic. This game separates the p5.js canvas (for drawing faces) from the p5.js DOM layer (for text and buttons), which is a powerful pattern for combining graphics and interactivity.

function setup() {
  createCanvas(windowWidth, windowHeight);
  background(220); // Initial canvas background

  // Create main container for UI elements to center them
  // Using p5.js DOM functions is crucial here, not raw document.createElement
  // https://p5js.org/reference/#/p5/createDiv
  const uiContainer = createDiv('');
  uiContainer.style('display', 'flex');
  uiContainer.style('flex-direction', 'column');
  uiContainer.style('align-items', 'center');
  uiContainer.style('justify-content', 'center');
  uiContainer.style('position', 'absolute');
  uiContainer.style('top', '0');
  uiContainer.style('left', '0');
  uiContainer.style('width', '100%');
  uiContainer.style('height', '100%');
  uiContainer.style('padding', '20px');
  uiContainer.style('box-sizing', 'border-box'); // Include padding in element's total width and height

  // Situation Display (text and drawing)
  situationDisplay = createDiv('');
  situationDisplay.style('font-size', '2em');
  situationDisplay.style('margin-bottom', '30px');
  situationDisplay.style('text-align', 'center');
  situationDisplay.style('max-width', '800px'); // Limit width for readability
  situationDisplay.parent(uiContainer); // Attach to the UI container

  // Progress Indicator
  progressIndicator = createDiv('');
  progressIndicator.style('font-size', '1.2em');
  progressIndicator.style('margin-bottom', '20px');
  progressIndicator.parent(uiContainer);

  // Buttons container
  const buttonsContainer = createDiv('');
  buttonsContainer.style('display', 'grid');
  buttonsContainer.style('grid-template-columns', '1fr');
  buttonsContainer.style('gap', '15px');
  buttonsContainer.style('width', '100%');
  buttonsContainer.style('max-width', '400px'); // Limit button width
  buttonsContainer.parent(uiContainer);

  // Multiple Choice Buttons
  for (let i = 0; i < 3; i++) {
    // https://p5js.org/reference/#/p5/createButton
    const button = createButton('');
    button.style('padding', '15px 25px');
    button.style('font-size', '1.2em');
    button.style('cursor', 'pointer');
    button.style('border', 'none');
    button.style('border-radius', '10px');
    button.style('background-color', '#4CAF50'); // Green
    button.style('color', 'white');
    button.style('transition', 'background-color 0.3s ease');
    button.mousePressed(() => checkAnswer(i)); // Use p5.js mousePressed
    // Use p5.js style() method, not raw DOM style
    button.mouseOver(() => button.style('background-color', '#45a049')); // Darker green on hover
    button.mouseOut(() => button.style('background-color', '#4CAF50'));
    button.parent(buttonsContainer);
    optionButtons.push(button);
  }

  // Feedback Display
  feedbackDisplay = createDiv('');
  feedbackDisplay.style('font-size', '1.5em');
  feedbackDisplay.style('margin-top', '20px');
  feedbackDisplay.style('font-weight', 'bold');
  feedbackDisplay.parent(uiContainer);

  // Restart Button (hidden initially)
  restartButton = createButton('Play Again');
  restartButton.style('padding', '15px 25px');
  restartButton.style('font-size', '1.2em');
  restartButton.style('cursor', 'pointer');
  restartButton.style('border', 'none');
  restartButton.style('border-radius', '10px');
  restartButton.style('background-color', '#008CBA'); // Blue
  restartButton.style('color', 'white');
  restartButton.style('transition', 'background-color 0.3s ease');
  restartButton.mousePressed(restartGame);
  restartButton.mouseOver(() => restartButton.style('background-color', '#007ba7'));
  restartButton.mouseOut(() => restartButton.style('background-color', '#008CBA'));
  restartButton.style('margin-top', '30px');
  restartButton.hide(); // Hide initially
  restartButton.parent(uiContainer);

  displaySituation(currentSituationIndex);
}
Line-by-line explanation (6 lines)

🔧 Subcomponents:

DOM styling Flexbox UI Container uiContainer.style('display', 'flex');

Creates a centered column layout that vertically and horizontally aligns all game elements (situation, buttons, feedback) in the middle of the screen

for-loop Create Three Answer Buttons for (let i = 0; i < 3; i++) {

Loops three times to create three answer option buttons and adds them to the optionButtons array so they can be updated later

createCanvas(windowWidth, windowHeight);
Creates a canvas that fills the entire browser window so the face animation and background are visible
const uiContainer = createDiv('');
Creates an empty p5.js DOM element (a div) that will hold all the game UI text and buttons so they can be styled and positioned together
uiContainer.style('display', 'flex');
Enables flexbox layout mode on the container so child elements (situation, buttons) can be centered and aligned vertically
for (let i = 0; i < 3; i++) {
Loops three times, creating one button for each of the three answer options
button.mousePressed(() => checkAnswer(i));
Attaches a click handler to each button that calls checkAnswer with the button's index (0, 1, or 2) so the game knows which option was chosen
displaySituation(currentSituationIndex);
Calls the displaySituation function to show the first game scenario and populate the buttons with the first three answer options
draw()

draw() is normally called 60 times per second, but in this game it stays empty because all animation and updates happen in dedicated functions like displaySituation() and drawEmotionAnimation(). This is a valid pattern when you are mixing canvas graphics with DOM elements.

function draw() {
  // The canvas background is updated in drawEmotionAnimation,
  // so this draw loop can remain empty or be used for more dynamic effects.
  // The UI elements are positioned with CSS and p5.js DOM functions.
}
Line-by-line explanation (1 lines)
// The canvas background is updated in drawEmotionAnimation,
The comment explains that most of the visual updates happen in other functions, not in draw(), because the game relies on DOM elements for the UI

displaySituation()

displaySituation() is the function that populates the entire game screen with a new question. It reads data from the situationsData array, updates all the DOM elements (situation text, buttons, progress), and triggers the face animation. Every time a player answers correctly or incorrectly, displaySituation() is called again to load the next scenario.

🔬 This code uses template literals (backticks) to insert dynamic values like index and situation.situation. What happens if you change the font-size from 0.8em to 1.5em, or remove the <strong> tags around situation.situation?

  situationDisplay.html(`
    <div style="font-size: 0.8em; color: #555;">Situation ${index + 1} of ${situationsData.length}:</div>
    <strong>${situation.situation}</strong>
  `);
function displaySituation(index) {
  // End game if all situations are completed
  if (index >= situationsData.length) {
    endGame();
    return;
  }

  const situation = situationsData[index];

  // Clear previous feedback and enable buttons
  feedbackDisplay.html(''); // https://p5js.org/reference/#/p5.Element/html
  restartButton.hide();
  optionButtons.forEach(button => {
    button.removeAttribute('disabled'); // Re-enable buttons
    button.style('background-color', '#4CAF50'); // Reset button color
    // Re-attach hover effects
    button.mouseOver(() => button.style('background-color', '#45a049'));
    button.mouseOut(() => button.style('background-color', '#4CAF50'));
  });

  // Update situation text
  situationDisplay.html(`
    <div style="font-size: 0.8em; color: #555;">Situation ${index + 1} of ${situationsData.length}:</div>
    <strong>${situation.situation}</strong>
  `);

  // Update progress indicator
  progressIndicator.html(`Score: ${score} / ${index}`);

  // Set button options
  situation.options.forEach((option, i) => {
    optionButtons[i].html(option);
  });

  // Draw the emotion animation on the p5.js canvas
  drawEmotionAnimation(situation.animation);
}
Line-by-line explanation (9 lines)

🔧 Subcomponents:

conditional Game Completion Check if (index >= situationsData.length) {

Stops loading new situations and triggers the end-game screen when all 10 scenarios have been completed

for-loop Reset All Buttons optionButtons.forEach(button => {

Loops through all three buttons to clear their disabled state and reset their colors to green, preparing them for the next question

for-loop Populate Button Labels situation.options.forEach((option, i) => {

Loops through the three answer options from the data and sets each button's text label

if (index >= situationsData.length) {
Checks whether we have already shown all 10 situations; if so, the game is over
const situation = situationsData[index];
Retrieves the current situation object from the data array using the index, which contains the scenario text, answer options, and correct answer
feedbackDisplay.html('');
Clears the feedback message from the previous question so the new question has a blank feedback area
button.removeAttribute('disabled');
Re-enables all buttons (removes the disabled attribute) so they can be clicked again for the new question
button.style('background-color', '#4CAF50');
Resets all buttons back to green, removing any red or grey colors from the previous question
situationDisplay.html(`...${situation.situation}...`);
Updates the text display to show the current situation's description—uses template literals to insert the dynamic situation text
progressIndicator.html(`Score: ${score} / ${index}`);
Updates the progress display to show the current score and which question number this is (e.g., 'Score: 3 / 5')
optionButtons[i].html(option);
Sets each button's label text to one of the three answer options for this question
drawEmotionAnimation(situation.animation);
Calls the drawing function and passes the emotion type (e.g., 'happy', 'sad') so the face expression matches the situation

drawEmotionAnimation()

drawEmotionAnimation() is the visual heart of the game—it uses p5.js drawing functions to create emoji-like faces that show different emotions. The key technique is translate(), which shifts the coordinate system so all proportions can be relative to faceSize (using multipliers like faceSize * 0.15) rather than hard-coded pixel values. This makes the animation responsive: the face automatically scales up or down when you resize the window. The switch statement is perfect for this kind of pattern matching—for each emotion string, draw the corresponding facial features.

🔬 The switch statement draws different mouth shapes for happy and sad. The happy case uses arc(..., 0, PI) for an upward curve, while sad uses arc(..., PI, TWO_PI) for a downward curve. What happens if you swap these two arc angles—putting the downward curve in the happy case?

  switch (emotionType) {
    case "happy":
      arc(0, faceSize * 0.1, faceSize * 0.3, faceSize * 0.2, 0, PI);
      break;
    case "sad":
      arc(0, faceSize * 0.2, faceSize * 0.3, faceSize * 0.2, PI, TWO_PI);
      break;
function drawEmotionAnimation(emotionType) {
  // Clear canvas
  background(240); // Lighter background for the animation area

  // Draw a simple face and change elements based on emotion
  let faceX = width / 2;
  let faceY = height / 2;
  let faceSize = min(width, height) * 0.4; // Responsive face size

  push();
  translate(faceX, faceY);

  // Face color
  fill(255, 255, 200); // Light yellow
  stroke(0);
  strokeWeight(2);
  ellipse(0, 0, faceSize, faceSize); // Face circle

  // Eyes
  fill(0);
  ellipse(-faceSize * 0.15, -faceSize * 0.1, faceSize * 0.1, faceSize * 0.15);
  ellipse(faceSize * 0.15, -faceSize * 0.1, faceSize * 0.1, faceSize * 0.15);

  // Mouth
  noFill();
  stroke(0);
  strokeWeight(3);

  switch (emotionType) {
    case "happy":
      arc(0, faceSize * 0.1, faceSize * 0.3, faceSize * 0.2, 0, PI);
      break;
    case "sad":
      arc(0, faceSize * 0.2, faceSize * 0.3, faceSize * 0.2, PI, TWO_PI);
      break;
    case "angry":
      arc(0, faceSize * 0.15, faceSize * 0.2, faceSize * 0.1, PI, TWO_PI); // Angry frown
      line(-faceSize * 0.15, -faceSize * 0.2, -faceSize * 0.05, -faceSize * 0.15); // Angry eyebrows
      line(faceSize * 0.15, -faceSize * 0.2, faceSize * 0.05, -faceSize * 0.15);
      break;
    case "surprised":
      ellipse(0, faceSize * 0.15, faceSize * 0.15, faceSize * 0.18); // Wide open mouth
      break;
    case "scared":
      arc(0, faceSize * 0.1, faceSize * 0.3, faceSize * 0.2, PI, TWO_PI); // Frown
      line(-faceSize * 0.1, -faceSize * 0.15, -faceSize * 0.2, -faceSize * 0.2); // Raised eyebrows
      line(faceSize * 0.1, -faceSize * 0.15, faceSize * 0.2, -faceSize * 0.2);
      break;
    case "confused":
      arc(0, faceSize * 0.15, faceSize * 0.1, faceSize * 0.05, PI, TWO_PI); // Small frown
      strokeWeight(1);
      line(-faceSize * 0.1, -faceSize * 0.1, -faceSize * 0.2, -faceSize * 0.15); // Raised eyebrow
      line(faceSize * 0.1, -faceSize * 0.15, faceSize * 0.2, -faceSize * 0.1);
      break;
    case "excited":
      arc(0, faceSize * 0.1, faceSize * 0.4, faceSize * 0.3, 0, PI); // Big smile
      fill(0);
      ellipse(-faceSize * 0.1, -faceSize * 0.15, faceSize * 0.05, faceSize * 0.08); // Smaller, brighter eyes
      ellipse(faceSize * 0.1, -faceSize * 0.15, faceSize * 0.05, faceSize * 0.08);
      break;
    case "proud":
      arc(0, faceSize * 0.1, faceSize * 0.3, faceSize * 0.2, 0, PI); // Smile
      strokeWeight(1);
      line(-faceSize * 0.15, -faceSize * 0.2, -faceSize * 0.05, -faceSize * 0.18); // Slight eyebrow raise
      line(faceSize * 0.15, -faceSize * 0.2, faceSize * 0.05, -faceSize * 0.18);
      break;
    case "shy":
      arc(0, faceSize * 0.2, faceSize * 0.2, faceSize * 0.1, PI, TWO_PI); // Small closed mouth
      fill(255, 180, 180, 100); // Blushing cheeks
      noStroke();
      ellipse(-faceSize * 0.2, faceSize * 0.1, faceSize * 0.1);
      ellipse(faceSize * 0.2, faceSize * 0.1, faceSize * 0.1);
      break;
    case "calm":
      line(-faceSize * 0.15, faceSize * 0.15, faceSize * 0.15, faceSize * 0.15); // Straight line mouth
      break;
    default:
      // Default neutral face
      line(-faceSize * 0.15, faceSize * 0.15, faceSize * 0.15, faceSize * 0.15);
      break;
  }

  pop();
}
Line-by-line explanation (10 lines)

🔧 Subcomponents:

switch-case Emotion Expression Switch switch (emotionType) {

Routes to different drawing code for each of the 10 emotions, changing the mouth shape and eyebrow position to create distinct facial expressions

switch-case Happy Expression case "happy":

Draws an upward-curving arc for a smile to show happiness

switch-case Sad Expression case "sad":

Draws a downward-curving arc for a frown to show sadness

background(240);
Clears the canvas with a light gray color before drawing the new face, preventing trails from the old expression
let faceX = width / 2;
Calculates the x position of the face center as the midpoint of the canvas width
let faceSize = min(width, height) * 0.4;
Calculates a responsive face size that is 40% of the smaller canvas dimension, so it scales properly on different screen sizes
push();
Saves the current drawing settings (translation, rotation, fill color) before applying transforms
translate(faceX, faceY);
Moves the coordinate system so that (0,0) is at the face center instead of the top-left corner; all subsequent drawing coordinates are relative to this point
fill(255, 255, 200);
Sets the fill color to light yellow (RGB: 255, 255, 200) for the face circle
ellipse(0, 0, faceSize, faceSize);
Draws a circular face at the center (0, 0) with diameter equal to faceSize; because of translate(), this is at the canvas center
switch (emotionType) {
Compares the emotionType parameter (e.g., 'happy', 'sad') to ten different cases to draw the appropriate mouth and eyebrow combination
case "happy": arc(0, faceSize * 0.1, faceSize * 0.3, faceSize * 0.2, 0, PI);
Draws an upward smile: an arc from 0 radians to PI (180 degrees), positioned slightly below center, creating the happy expression
pop();
Restores the drawing settings saved by push(), undoing the translate so subsequent code uses the original coordinate system

checkAnswer()

checkAnswer() is the core game logic function that executes when a child clicks an answer button. It compares the clicked button's index to the correct answer, updates the score, disables the buttons to prevent additional clicks, applies visual feedback colors, displays a message, and sets a timer to automatically load the next question. The setTimeout pattern here is crucial: it lets the child see the feedback briefly before the screen changes.

🔬 This loop uses if-else to color three different buttons: green for correct, red for the wrong choice, grey for other wrong answers. What happens if you remove the 'else if (i === chosenIndex)' part so wrong answers are never shown in red?

  // Highlight correct and incorrect answers
  optionButtons.forEach((button, i) => {
    if (i === correctIndex) {
      button.style('background-color', '#4CAF50'); // Green for correct answer
    } else if (i === chosenIndex) {
      button.style('background-color', '#f44336'); // Red for the chosen, incorrect answer
    } else {
      button.style('background-color', '#cccccc'); // Grey for unchosen incorrect answers
    }
  });
function checkAnswer(chosenIndex) {
  clearTimeout(feedbackTimeout); // Clear any pending feedback timeout

  const situation = situationsData[currentSituationIndex];
  const correctIndex = situation.correct;

  // Disable all buttons to prevent multiple clicks
  optionButtons.forEach(button => {
    button.attribute('disabled', ''); // https://p5js.org/reference/#/p5.Element/attribute
    button.mouseOver(() => {}); // Remove hover effect
    button.mouseOut(() => {});
  });

  // Highlight correct and incorrect answers
  optionButtons.forEach((button, i) => {
    if (i === correctIndex) {
      button.style('background-color', '#4CAF50'); // Green for correct answer
    } else if (i === chosenIndex) {
      button.style('background-color', '#f44336'); // Red for the chosen, incorrect answer
    } else {
      button.style('background-color', '#cccccc'); // Grey for unchosen incorrect answers
    }
  });

  // Provide feedback and update score
  if (chosenIndex === correctIndex) {
    score++;
    feedbackDisplay.html('Correct!');
    feedbackDisplay.style('color', '#4CAF50');
  } else {
    feedbackDisplay.html('Incorrect. The correct emotion is ' + situation.emotion + '.');
    feedbackDisplay.style('color', '#f44336');
  }

  // Update progress indicator
  progressIndicator.html(`Score: ${score} / ${currentSituationIndex + 1}`);

  // Set a timeout to advance to the next situation after a delay
  feedbackTimeout = setTimeout(() => {
    currentSituationIndex++;
    displaySituation(currentSituationIndex);
  }, 2000); // 2-second delay
}
Line-by-line explanation (14 lines)

🔧 Subcomponents:

for-loop Disable All Buttons optionButtons.forEach(button => {

Loops through all three buttons and disables them (adds the disabled attribute) so the child cannot click multiple times or change their answer

for-loop Highlight Correct and Incorrect optionButtons.forEach((button, i) => {

Loops through buttons and colors them: green for correct, red for the chosen wrong answer, grey for unchosen wrong answers—visual feedback on the question result

conditional Check Answer Correctness if (chosenIndex === correctIndex) {

Compares the index the child clicked to the correct answer index and updates the score and feedback message accordingly

clearTimeout(feedbackTimeout);
Cancels any pending timeout (from a previous question) before setting a new one, preventing old code from running unexpectedly
const situation = situationsData[currentSituationIndex];
Retrieves the current situation data object so we can access the correct answer index
const correctIndex = situation.correct;
Stores the index (0, 1, or 2) of the correct answer option for this question
button.attribute('disabled', '');
Adds a disabled attribute to each button using p5.js, which prevents further clicks and triggers CSS styling for disabled buttons
button.mouseOver(() => {});
Replaces the hover effect with an empty function so buttons don't respond to mouse movement once the question is answered
if (i === correctIndex) {
Checks whether the button's index matches the correct answer index
button.style('background-color', '#4CAF50');
Colors the correct answer button green so the child can see which answer was right
} else if (i === chosenIndex) {
Checks whether this button is the one the child clicked
button.style('background-color', '#f44336');
Colors the child's chosen (but wrong) answer red so they see their mistake
if (chosenIndex === correctIndex) {
Checks whether the clicked index equals the correct index to determine if the answer is right or wrong
score++;
Increments the score by 1 if the answer is correct
feedbackDisplay.html('Correct!');
Shows the positive feedback message 'Correct!' if the answer is right
feedbackDisplay.style('color', '#4CAF50');
Styles the feedback text green to match the correct answer color
feedbackTimeout = setTimeout(() => { ... }, 2000);
Sets a 2-second delay before advancing to the next situation; stores the timeout ID so it can be cancelled if needed

endGame()

endGame() is called when the player completes all 10 situations. It cleans up the screen by hiding the answer buttons, clearing the progress indicator, and displaying a summary of the final score. It then reveals the 'Play Again' button to let the child start a new game.

function endGame() {
  clearTimeout(feedbackTimeout); // Clear any pending feedback timeout

  // Clear canvas
  background(240);

  // Hide buttons
  optionButtons.forEach(button => button.hide()); // https://p5js.org/reference/#/p5.Element/hide

  // Display final score
  situationDisplay.html(`
    <div style="font-size: 0.8em; color: #555;">Game Over!</div>
    <strong>You scored ${score} out of ${situationsData.length} situations!</strong>
  `);
  progressIndicator.html(''); // Clear progress
  feedbackDisplay.html(''); // Clear feedback

  // Show restart button
  restartButton.show(); // https://p5js.org/reference/#/p5.Element/show
}
Line-by-line explanation (5 lines)

🔧 Subcomponents:

for-loop Hide All Answer Buttons optionButtons.forEach(button => button.hide());

Loops through all three answer buttons and hides them so only the final score and restart button are visible

clearTimeout(feedbackTimeout);
Cancels any pending timeout so the next question doesn't load after the game has ended
background(240);
Clears the canvas to show a clean background for the end-game screen
optionButtons.forEach(button => button.hide());
Hides all three answer buttons so they no longer appear on screen—only the final score is shown
situationDisplay.html(`...You scored ${score} out of ${situationsData.length}...`);
Updates the main display to show 'Game Over!' and the final score, using template literals to insert the score and total number of situations
restartButton.show();
Makes the 'Play Again' button visible so the child can restart the game

restartGame()

restartGame() is the reset function that runs when the child clicks the 'Play Again' button. It resets all game variables (index and score) back to their starting values, unhides the answer buttons, and calls displaySituation to load the first question fresh.

function restartGame() {
  currentSituationIndex = 0;
  score = 0;
  feedbackDisplay.html('');
  optionButtons.forEach(button => button.show()); // Show buttons again
  restartButton.hide();
  displaySituation(currentSituationIndex);
}
Line-by-line explanation (6 lines)

🔧 Subcomponents:

for-loop Show All Answer Buttons optionButtons.forEach(button => button.show());

Loops through all three buttons and makes them visible again so the game can be played

currentSituationIndex = 0;
Resets the question counter back to 0 so the game starts from the first situation
score = 0;
Resets the score back to 0 so each new game starts with no points
feedbackDisplay.html('');
Clears any remaining feedback text from the previous game
optionButtons.forEach(button => button.show());
Makes all three answer buttons visible again after they were hidden on the end screen
restartButton.hide();
Hides the 'Play Again' button since the game is now active
displaySituation(currentSituationIndex);
Calls displaySituation to load and display the first game question

windowResized()

windowResized() is a special p5.js function that automatically runs whenever the browser window is resized. This game uses it to keep the face animation responsive—when the window changes size, the canvas is resized and the face is redrawn using the new dimensions, so it always looks good at any screen size.

function windowResized() {
  resizeCanvas(windowWidth, windowHeight); // https://p5js.org/reference/#/p5/resizeCanvas
  // Redraw the animation if the canvas size changes
  if (currentSituationIndex < situationsData.length) {
    drawEmotionAnimation(situationsData[currentSituationIndex].animation);
  }
}
Line-by-line explanation (3 lines)

🔧 Subcomponents:

conditional Conditional Redraw Check if (currentSituationIndex < situationsData.length) {

Only redraws the emotion animation if a question is currently displayed (not if the game has ended)

resizeCanvas(windowWidth, windowHeight);
Resizes the p5.js canvas to match the new window dimensions when the browser is resized
if (currentSituationIndex < situationsData.length) {
Checks whether the game is still in progress (not at the end screen) before redrawing
drawEmotionAnimation(situationsData[currentSituationIndex].animation);
Redraws the current emotion face so it scales properly and remains visible with the new canvas size

📦 Key Variables

situationsData array of objects

An array containing all 10 game scenarios, each with a situation description, three answer options, the index of the correct answer, and the emotion type for the animation

const situationsData = [{ emotion: "Happy", situation: "...", options: [...], correct: 1, animation: "happy" }, ...]
currentSituationIndex number

Tracks which question the player is currently on (0-9), and is used to access the current situation from situationsData

let currentSituationIndex = 0;
score number

Keeps track of how many questions the player has answered correctly throughout the game

let score = 0;
feedbackTimeout timeout ID

Stores the ID of the setTimeout that advances to the next question, so it can be cancelled if needed

let feedbackTimeout;
situationDisplay p5.js DOM element (div)

A p5.js DOM element that displays the current situation text

situationDisplay = createDiv('');
progressIndicator p5.js DOM element (div)

A p5.js DOM element that displays the current score and question number

progressIndicator = createDiv('');
optionButtons array of p5.js button elements

An array of three p5.js buttons that represent the three answer options for each question

let optionButtons = [];
feedbackDisplay p5.js DOM element (div)

A p5.js DOM element that displays feedback messages like 'Correct!' or 'Incorrect. The correct emotion is...'

feedbackDisplay = createDiv('');
restartButton p5.js button element

A p5.js button that appears on the end-game screen and allows the player to start a new game

restartButton = createButton('Play Again');

🔧 Potential Improvements (6)

Here are some ways this code could be enhanced:

BUG checkAnswer() button color reset

When a new question loads after an answer, the buttons are reset to green via displaySituation(), but if the user resizes the window during the 2-second delay before the next question, the button colors may not update correctly because the previous answer colors take precedence

💡 Clear button styling more thoroughly in displaySituation() by explicitly removing inline styles before reapplying them, or use CSS classes instead of inline styles

PERFORMANCE displaySituation() button mouseOver/mouseOut handlers

Every time displaySituation() runs, it re-attaches the same mouseOver and mouseOut handlers to each button inside a forEach loop, creating multiple identical event listeners instead of reusing them

💡 Create the hover effect handlers once in setup() and store them as functions, then reference them in displaySituation() instead of creating new arrow functions each time

STYLE situationsData array

Many of the answer options always place the correct answer at index 1, making it predictable; a more educational game would randomize the positions of correct answers

💡 Shuffle the options array for each situation dynamically in displaySituation() so children cannot learn a pattern (e.g., always choosing the middle button)

FEATURE drawEmotionAnimation()

The face animation is static—it doesn't update between frames, and does not use the p5.js draw loop for animation

💡 Move face drawing to the draw() loop and add subtle animations like blinking eyes or swaying the face slightly to make the emotion expressions feel more lively and engaging

BUG endGame()

If the game ends but the window is resized, windowResized() will not redraw because the condition checks currentSituationIndex < situationsData.length, which is false at the end

💡 Store a 'gameActive' flag and use it in windowResized() to decide whether to redraw, or always redraw the canvas to a neutral background if the game has ended

STYLE setup() and checkAnswer()

Hover effect handlers are re-created multiple times and attached with inline .mouseOver() and .mouseOut() calls rather than using CSS for better performance and maintainability

💡 Define button states using CSS classes (':hover', ':disabled') instead of managing effects in JavaScript, or use a single event listener pattern

🔄 Code Flow

Code flow showing setup, draw, displaysituation, drawemotionanimation, checkanswer, endgame, restartgame, windowresized

💡 Click on function names in the diagram to jump to their code

graph TD start[Start] --> setup[setup] setup --> draw[draw loop] draw --> displaysituation[displaySituation] draw --> drawemotionanimation[drawEmotionAnimation] click setup href "#fn-setup" click draw href "#fn-draw" click displaysituation href "#fn-displaysituation" click drawemotionanimation href "#fn-drawemotionanimation" setup --> ui-container-flex[UI Container Flex] click ui-container-flex href "#sub-ui-container-flex" displaysituation --> button-loop[Button Loop] displaysituation --> option-loop[Option Loop] displaysituation --> end-game-check[End Game Check] displaysituation --> redraw-conditional[Redraw Conditional Check] click button-loop href "#sub-button-loop" click option-loop href "#sub-option-loop" click end-game-check href "#sub-end-game-check" click redraw-conditional href "#sub-redraw-conditional" button-loop --> disable-loop[Disable Loop] click disable-loop href "#sub-disable-loop" end-game-check -->|if completed| endgame[endGame] end-game-check -->|if not completed| drawemotionanimation drawemotionanimation --> switch-statement[Switch Statement] click switch-statement href "#sub-switch-statement" switch-statement --> happy-case[Happy Case] switch-statement --> sad-case[Sad Case] click happy-case href "#sub-happy-case" click sad-case href "#sub-sad-case" checkanswer[checkAnswer] --> score-conditional[Score Conditional] checkanswer --> highlight-loop[Highlight Loop] checkanswer --> disable-loop checkanswer --> setTimeout[Set Timeout] click checkanswer href "#fn-checkanswer" click score-conditional href "#sub-score-conditional" click highlight-loop href "#sub-highlight-loop" endgame --> hide-loop[Hide Loop] click hide-loop href "#sub-hide-loop" restartgame[restartGame] --> show-loop[Show Loop] click restartgame href "#fn-restartgame" click show-loop href "#sub-show-loop" windowresized[windowResized] --> redraw-conditional click windowresized href "#fn-windowresized"

❓ Frequently Asked Questions

What visual elements does the Feelings and Emotions sketch create?

The sketch visually represents different emotions through animations and illustrations that correspond to various situations that evoke those feelings.

In what ways can users engage with the Feelings and Emotions sketch?

Users can interact by selecting emotions based on given scenarios, allowing them to explore and understand their feelings better.

What creative coding concepts are showcased in this p5.js sketch?

This sketch demonstrates the use of data structures to manage emotional scenarios and animations, as well as event handling for user interactions.

Preview

Feelings and Emotions - p5.js creative coding sketch preview
Sketch Preview
Code flow diagram showing the structure of Feelings and Emotions - Code flow showing setup, draw, displaysituation, drawemotionanimation, checkanswer, endgame, restartgame, windowresized
Code Flow Diagram