First to come

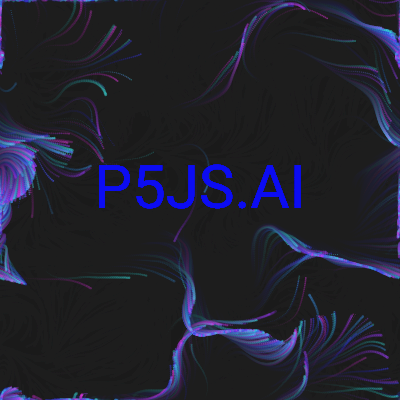
This sketch creates an animated steam effect using thousands of particles that flow and swirl across the canvas, guided by Perlin noise. The particles react to mouse and touch input, parting away from your cursor like wisps of smoke around the glowing "P5JS.AI" logo.

🧪 Try This!

Experiment with the code by making these changes:

  1. Change the particle colors — The particleHues array defines available colors. Add warm hues like 30 (orange) or 0 (red) for a sunset effect, or try monochrome with [240, 241, 242] for pale blue.
  2. Make particles bigger and fewer — Fewer, larger particles reveal the flow field structure more clearly and run faster on slow devices. Each particle becomes more visible.
  3. Tighten the flow field for chaotic swirls — Lower flowFieldScale values create large, graceful swirls; higher values create tight, chaotic turbulence. Try 0.05 for intense spirals.
  4. Faster, more energetic animation — Increase flowFieldSpeed for rapid noise changes and faster particle motion. The animation becomes more frantic and hypnotic.
  5. Stronger touch repulsion — Increase touchInfluenceRadius and touchInfluenceForce to make particles explode away from your fingers with a larger, more dramatic effect.
  6. No fade trails—sharp motion — Increase the alpha value in the trail fade to make particle trails more visible and persistent, or set it to 100 for instant background resets.
Prefer the full editor? Open it there →

📖 About This Sketch

This sketch animates 2500 particles that drift like steam across the canvas in mesmerizing, organic patterns. The magic comes from three core p5.js techniques: Perlin noise to guide particle movement in a flowing field, HSB color mode to create vibrant blues and purples with transparency, and real-time touch interaction that repels particles away from your fingers or mouse. The result feels alive—like wisps of colored smoke responding to your every gesture.

The code is organized into three layers: initialization in setup(), a per-frame update loop in draw() that moves all particles and applies forces, and helper functions for window resizing and touch handling. By reading it, you will learn how Perlin noise creates natural-looking flow patterns, how to build a particle system with velocity and acceleration, and how to detect multi-touch input and apply physics-based repulsion forces.

⚙️ How It Works

  1. When the sketch loads, setup() creates a full-window canvas, initializes 2500 particles at random positions with hues drawn from a custom palette of blues and purples, and sets the color mode to HSB for easier hue manipulation.
  2. Every frame, draw() clears the canvas slightly with a semi-transparent dark overlay, creating fading trails that give the particles an ethereal steam-like appearance.
  3. For each particle, the sketch samples a Perlin noise field at the particle's position to get a flow direction. This direction is converted to velocity components (vx and vy) using trigonometry, and the particle smoothly interpolates toward this velocity using lerp().
  4. When you touch or click the canvas, the sketch calculates the distance from each particle to every touch point. Particles within the influence radius are repelled away using angle and distance-based forces, as if pushed by wind.
  5. Particles wrap around canvas edges, creating a seamless looping effect. Finally, each particle is drawn as a small circle with its hue, brightness, and alpha values, and the "P5JS.AI" logo is rendered in vibrant blue text at the center.
  6. When the window resizes, all particles are regenerated to fit the new canvas dimensions, keeping the animation responsive.

🎓 Concepts You'll Learn

Perlin noiseParticle systemsFlow fieldsHSB color modeVelocity and accelerationTouch and mouse interactionTrigonometry (sin/cos/atan2)Lerp interpolation

📝 Code Breakdown

preload()

preload() is a special p5.js function that runs before setup(). Use it to load fonts, images, and sounds—anything your sketch needs before it can start drawing.

function preload() {
  // Load the Roboto font using the reliable Fontsource CDN
  robotoFont = loadFont('https://unpkg.com/@fontsource/roboto@latest/files/roboto-latin-400-normal.woff');
}
Line-by-line explanation (1 lines)
robotoFont = loadFont('https://unpkg.com/@fontsource/roboto@latest/files/roboto-latin-400-normal.woff');
Loads an external font file from a CDN before setup() runs. preload() always runs first in p5.js, guaranteeing the font is ready before we try to use it in text rendering.

setup()

setup() runs once when the sketch starts. Use it to initialize the canvas, set global drawing modes, and prepare your data structures. Here, we create and populate the particles array—the heart of the animation.

🔬 This loop creates particles with random positions. What happens if you replace random(width) with width/2 and random(height) with height/2? Where will all particles spawn?

  for (let i = 0; i < numParticles; i++) {
    particles.push({
      x: random(width),
      y: random(height),
      vx: 0,
      vy: 0,
      hue: random(particleHues),
function setup() {
  // Create a canvas that fills the window, handling tablet landscape orientation
  createCanvas(windowWidth, windowHeight);
  textFont(robotoFont); // Set the font for text
  colorMode(HSB, 360, 100, 100, 100); // Use HSB color mode for consistent grayscale
  background(0, 0, 10); // Dark background
  noStroke(); // Particles will be drawn without an outline

  // Initialize particles with random positions, colors from our palette, and sizes
  for (let i = 0; i < numParticles; i++) {
    particles.push({
      x: random(width),
      y: random(height),
      vx: 0, // Initial velocity x
      vy: 0, // Initial velocity y
      hue: random(particleHues), // Assign a random hue from our custom palette
      brightness: random(80, 100), // Light gray to white for steam
      alpha: random(20, 50),     // Transparency for steam effect
      size: random(1, 3) // Random particle size
    });
  }
}
Line-by-line explanation (15 lines)

🔧 Subcomponents:

configuration HSB Color Mode colorMode(HSB, 360, 100, 100, 100); // Use HSB color mode for consistent grayscale

Switches from RGB to HSB (Hue, Saturation, Brightness) mode with ranges 0–360, 0–100, 0–100, 0–100. This makes hue-based particle colors trivial to manage.

for-loop Particle Creation Loop for (let i = 0; i < numParticles; i++) { particles.push({...}); }

Creates 2500 particle objects with random positions, hues from the custom palette, and transparency values, populating the particles array.

createCanvas(windowWidth, windowHeight);
Creates a canvas that fills the entire browser window. windowWidth and windowHeight are special p5.js variables that auto-update if the user resizes.
textFont(robotoFont); // Set the font for text
Sets the text rendering font to the Roboto font we loaded in preload(). All text drawn later will use this font.
colorMode(HSB, 360, 100, 100, 100); // Use HSB color mode for consistent grayscale
Switches from RGB to HSB color mode. The ranges 360, 100, 100, 100 mean hues 0–360°, saturation 0–100, brightness 0–100, alpha 0–100. This makes it easier to change particle colors by hue.
background(0, 0, 10); // Dark background
Fills the canvas with a very dark color: hue 0 (irrelevant), saturation 0 (grayscale), brightness 10 (nearly black), alpha 100 (opaque).
noStroke(); // Particles will be drawn without an outline
Disables stroke (outline) for all shapes drawn after this line. Particles will be filled circles with no border.
for (let i = 0; i < numParticles; i++) {
Loops 2500 times (the value of numParticles), creating one particle on each iteration.
particles.push({
Creates a new object and adds it to the particles array. Each object represents one particle with its own position, velocity, color, and size.
x: random(width),
Sets the particle's x position to a random value between 0 and the canvas width.
y: random(height),
Sets the particle's y position to a random value between 0 and the canvas height.
vx: 0, // Initial velocity x
Initializes horizontal velocity to 0. The particle will start stationary; the draw loop will update this based on the flow field.
vy: 0, // Initial velocity y
Initializes vertical velocity to 0, same as vx.
hue: random(particleHues), // Assign a random hue from our custom palette
Picks a random hue from the particleHues array (e.g., 210, 270, 180, 240, 300). This ensures all particles use colors from our chosen palette.
brightness: random(80, 100), // Light gray to white for steam
Randomizes brightness between 80 and 100, creating light, glowing particles that look like steam or smoke.
alpha: random(20, 50), // Transparency for steam effect
Randomizes transparency (alpha) between 20 and 50, making particles semi-transparent so they blend and create a wispy effect.
size: random(1, 3) // Random particle size
Randomizes each particle's diameter between 1 and 3 pixels, creating visual variety in the particle cloud.

draw()

draw() is the heart of every p5.js animation. It runs 60 times per second, updating all particles and redrawing them. The magic of animation is that tiny changes to position each frame create the illusion of movement. Here, Perlin noise provides organic flow directions, and touch input adds interactivity.

🔬 This is the core of the animation—Perlin noise creates the flow angle. What happens if you replace TWO_PI * 2 with TWO_PI? What if you multiply noise() by 4 instead of 2? Try both and describe how the flow pattern changes.

    let angle = noise(p.x * flowFieldScale, p.y * flowFieldScale, frameCount * flowFieldSpeed) * TWO_PI * 2;
    let flowVx = cos(angle) * particleSpeed; // Convert angle to x velocity
    let flowVy = sin(angle) * particleSpeed; // Convert angle to y velocity

🔬 These lines make particles flee from your touch. What happens if you change atan2(p.y - t.y, p.x - t.x) to atan2(t.y - p.y, t.x - p.x)? Try it and see if particles are attracted or repelled.

      let d = dist(p.x, p.y, t.x, t.y); // Distance from particle to touch
      if (d < touchInfluenceRadius && d > 0) { // If within influence radius and not at the exact touch point
        // Calculate angle from touch to particle
        let angleToTouch = atan2(p.y - t.y, p.x - t.x);
function draw() {
  // Create subtle trails by drawing a semi-transparent rectangle over the canvas
  // This gives the "steam" a fading, ethereal quality
  fill(0, 0, 10, 5); // Dark background, low alpha (5 out of 100)
  rect(0, 0, width, height); // Cover the entire canvas

  for (let p of particles) {
    // Get a vector from a Perlin noise field to guide the particle's movement
    // noise() takes x, y, and an optional third dimension (frameCount for animation)
    // The result is mapped to an angle (0 to TWO_PI * 2 for more dynamic flow)
    let angle = noise(p.x * flowFieldScale, p.y * flowFieldScale, frameCount * flowFieldSpeed) * TWO_PI * 2;
    let flowVx = cos(angle) * particleSpeed; // Convert angle to x velocity
    let flowVy = sin(angle) * particleSpeed; // Convert angle to y velocity

    // Smoothly interpolate the particle's velocity towards the flow field vector
    p.vx = lerp(p.vx, flowVx, 0.1);
    p.vy = lerp(p.vy, flowVy, 0.1);

    // React to touch/mouse input
    let touchPoints = [];
    if (mouseIsPressed) {
      touchPoints.push({ x: mouseX, y: mouseY }); // Add mouse as a touch point
    }
    for (let t of touches) {
      touchPoints.push({ x: t.x, y: t.y }); // Add all active touches
    }

    for (let t of touchPoints) {
      let d = dist(p.x, p.y, t.x, t.y); // Distance from particle to touch
      if (d < touchInfluenceRadius && d > 0) { // If within influence radius and not at the exact touch point
        // Calculate angle from touch to particle
        let angleToTouch = atan2(p.y - t.y, p.x - t.x);
        // Map distance to force magnitude (stronger closer to touch)
        let forceMagnitude = map(d, 0, touchInfluenceRadius, touchInfluenceForce, 0);
        // Apply force to particle velocity, pushing it away from the touch
        p.vx += cos(angleToTouch) * forceMagnitude;
        p.vy += sin(angleToTouch) * forceMagnitude;
      }
    }

    // Update particle position based on velocity
    p.x += p.vx;
    p.y += p.vy;

    // Wrap particles around the edges of the canvas
    if (p.x < 0) p.x = width;
    if (p.x > width) p.x = 0;
    if (p.y < 0) p.y = height;
    if (p.y > height) p.y = 0;

    // Draw the particle with its individual vibrant hue from our palette
    // HSB: p.hue (from palette), Saturation 75 (vibrant), p.brightness (for light/dark variations), p.alpha (for transparency)
    fill(p.hue, 75, p.brightness, p.alpha);
    circle(p.x, p.y, p.size);
  }

  // Draw the logo text "P5JS.AI"
  // Use min(width, height) for responsive text sizing on various screens
  textSize(min(width, height) * 0.15); // Adjust multiplier for desired size
  textAlign(CENTER, CENTER); // Center the text horizontally and vertically
  textFont(robotoFont); // Apply the loaded font
  fill(240, 95, 95); // Vibrant deep blue text (Hue 240, Saturation 95, Brightness 95)
  noStroke(); // Ensure text has no outline
  // Position slightly above the center to leave room for the steam below/around
  text("P5JS.AI", width / 2, height / 2 - min(width, height) * 0.05);
}

Line-by-line explanation (30 lines)

🔧 Subcomponents:

configuration Trail Fade Effect fill(0, 0, 10, 5); // Dark background, low alpha (5 out of 100) rect(0, 0, width, height); // Cover the entire canvas

Instead of clearing the canvas completely with background(), this draws a nearly transparent dark rectangle, allowing previous particle positions to fade slowly and create motion trails.

calculation Perlin Noise Flow Field let angle = noise(p.x * flowFieldScale, p.y * flowFieldScale, frameCount * flowFieldSpeed) * TWO_PI * 2; let flowVx = cos(angle) * particleSpeed; // Convert angle to x velocity let flowVy = sin(angle) * particleSpeed; // Convert angle to y velocity

Samples a 3D Perlin noise field at the particle's location to get a smooth, organic flow direction. The third dimension (frameCount) animates the field over time.

calculation Smooth Velocity Lerp p.vx = lerp(p.vx, flowVx, 0.1); p.vy = lerp(p.vy, flowVy, 0.1);

Gradually blends the particle's current velocity toward the flow field velocity using lerp(). This prevents jerky motion and creates smooth, continuous curves.

conditional Touch Point Collection let touchPoints = []; if (mouseIsPressed) { touchPoints.push({ x: mouseX, y: mouseY }); // Add mouse as a touch point } for (let t of touches) { touchPoints.push({ x: t.x, y: t.y }); // Add all active touches }

Builds an array of all active touch/click points. Checks mouseIsPressed for mouse, and iterates the touches array for multi-touch events.

for-loop Touch Repulsion Loop for (let t of touchPoints) { let d = dist(p.x, p.y, t.x, t.y); // Distance from particle to touch if (d < touchInfluenceRadius && d > 0) { // If within influence radius and not at the exact touch point // Calculate angle from touch to particle let angleToTouch = atan2(p.y - t.y, p.x - t.x); // Map distance to force magnitude (stronger closer to touch) let forceMagnitude = map(d, 0, touchInfluenceRadius, touchInfluenceForce, 0); // Apply force to particle velocity, pushing it away from the touch p.vx += cos(angleToTouch) * forceMagnitude; p.vy += sin(angleToTouch) * forceMagnitude; } }

For each touch point, calculates if the particle is within the influence radius, then computes a repulsion force that pushes the particle away. Closer particles are pushed harder.

conditional Canvas Edge Wrapping if (p.x < 0) p.x = width; if (p.x > width) p.x = 0; if (p.y < 0) p.y = height; if (p.y > height) p.y = 0;

When a particle exits one edge of the canvas, it reappears on the opposite edge, creating a seamless looping toroidal space.

fill(0, 0, 10, 5); // Dark background, low alpha (5 out of 100)
Sets the fill color to nearly black with very low opacity (alpha = 5). When we draw a rectangle with this fill, it will slightly darken the canvas without completely erasing it.
rect(0, 0, width, height); // Cover the entire canvas
Draws a rectangle covering the entire canvas, creating a semi-transparent overlay. This gradually fades older particle positions, leaving ghostly trails.
for (let p of particles) {
Loops through every particle in the particles array. The 'p' variable is a shorthand reference to each particle object.
let angle = noise(p.x * flowFieldScale, p.y * flowFieldScale, frameCount * flowFieldSpeed) * TWO_PI * 2;
Calls Perlin noise with three inputs: particle position (scaled), and time (frameCount scaled). The noise result (0–1) is scaled to an angle (0–2π×2, or 0–4π). This creates organic, flowing movement.
let flowVx = cos(angle) * particleSpeed; // Convert angle to x velocity
Converts the angle to a horizontal velocity component using cosine. Multiplying by particleSpeed (2) controls how fast particles move along the flow.
let flowVy = sin(angle) * particleSpeed; // Convert angle to y velocity
Converts the angle to a vertical velocity component using sine. Together with flowVx, this is a 2D velocity vector pointing in the flow direction.
p.vx = lerp(p.vx, flowVx, 0.1);
Smoothly blends the particle's current vx toward the flow field's flowVx. The 0.1 (10%) means it moves 10% of the way toward the target each frame—slower blending feels smoother.
p.vy = lerp(p.vy, flowVy, 0.1);
Same as above for the vertical component. Together, these two lines create smooth, natural-looking motion that gradually follows the flow field.
if (mouseIsPressed) {
Checks if the mouse is currently pressed down. If true, we add the mouse position as a touch point that will repel particles.
touchPoints.push({ x: mouseX, y: mouseY }); // Add mouse as a touch point
Creates an object with mouse position and adds it to the touchPoints array. This allows mouse and touch to be handled the same way.
for (let t of touches) {
Loops through the touches array, which p5.js automatically populates with all active finger touches on mobile/tablet devices.
touchPoints.push({ x: t.x, y: t.y }); // Add all active touches
Adds each active touch's position to the touchPoints array, so we can process all touches the same way.
let d = dist(p.x, p.y, t.x, t.y); // Distance from particle to touch
Calculates the Euclidean distance from the particle to the touch point using p5's dist() function. d will be 0 if touching, large if far away.
if (d < touchInfluenceRadius && d > 0) { // If within influence radius and not at the exact touch point
Checks if the particle is within the influence radius (100 pixels) AND not exactly at the touch point (d > 0 avoids division by zero). Only particles in this range are affected.
let angleToTouch = atan2(p.y - t.y, p.x - t.x);
Calculates the angle FROM the touch TO the particle using atan2(). This angle points away from the touch, which is the direction we want to push the particle.
let forceMagnitude = map(d, 0, touchInfluenceRadius, touchInfluenceForce, 0);
Maps the particle's distance to a force strength: particles at distance 0 get full force (0.5), particles at distance 100 get zero force. Closer = stronger push.
p.vx += cos(angleToTouch) * forceMagnitude;
Adds a repulsive x-force to the particle's velocity. The x-component is calculated using cosine of the angle away from the touch.
p.vy += sin(angleToTouch) * forceMagnitude;
Adds a repulsive y-force. Together with the x-component, this pushes the particle directly away from the touch point with strength proportional to distance.
p.x += p.vx;
Updates the particle's x position by adding its velocity. If vx = 2, the particle moves 2 pixels right this frame.
p.y += p.vy;
Updates the particle's y position by adding its vertical velocity. Together with x += vx, this moves the particle to its new location.
if (p.x < 0) p.x = width;
If the particle goes off the left edge (x < 0), teleport it to the right edge (x = width). This creates a looping, toroidal space.
if (p.x > width) p.x = 0;
If the particle goes off the right edge, teleport it to the left edge. Particles now wrap around horizontally.
if (p.y < 0) p.y = height;
If the particle goes off the top, teleport it to the bottom. Particles now wrap around vertically too.
if (p.y > height) p.y = 0;
If the particle goes off the bottom, teleport it to the top. The four wrapping statements together create seamless looping.
fill(p.hue, 75, p.brightness, p.alpha);
Sets the fill color using the particle's hue, saturation 75 (vibrant), brightness, and alpha. Each particle gets its own color based on its stored values.
circle(p.x, p.y, p.size);
Draws a circle at the particle's current position with its size diameter. This is the visible particle—the result of all the motion and forces above.
textSize(min(width, height) * 0.15); // Adjust multiplier for desired size
Sets text size to 15% of the smaller canvas dimension (width or height). This makes the text responsive—larger on big screens, smaller on phones.
textAlign(CENTER, CENTER); // Center the text horizontally and vertically
Aligns text so that the x, y position we provide is the text's center, not its top-left corner.
fill(240, 95, 95); // Vibrant deep blue text (Hue 240, Saturation 95, Brightness 95)
Sets the text color to hue 240 (deep blue in HSB), full saturation (vibrant), and full brightness (bright). The next text() call will use this color.
text("P5JS.AI", width / 2, height / 2 - min(width, height) * 0.05);
Draws the "P5JS.AI" logo text at the center of the canvas (width/2, height/2), then shifts it up slightly by 5% of the screen size to look centered above the particle effect.

touchMoved()

touchMoved() is a p5.js event function that fires whenever the user moves a finger on the canvas. By returning false, we prevent the browser's default scrolling behavior and keep the canvas in focus. This is essential for smooth touch interaction on mobile.

function touchMoved() {
  // Prevent default browser behavior (scrolling) when touching the canvas
  return false;
}
Line-by-line explanation (1 lines)
return false;
Tells the browser NOT to perform its default action (page scrolling) when the user touches the canvas. This lets the sketch capture the touch without the page jumping around.

windowResized()

windowResized() is called automatically by p5.js whenever the browser or device window changes size. For responsive sketches, use this function to adapt your canvas and data structures. Here, we regenerate particles so they fill the new screen proportionally.

function windowResized() {
  // Resize the canvas when the window (or tablet orientation) changes
  resizeCanvas(windowWidth, windowHeight);
  // Reinitialize particles to fit the new canvas size, creating a fresh flow
  particles = [];
  for (let i = 0; i < numParticles; i++) {
    particles.push({
      x: random(width),
      y: random(height),
      vx: 0,
      vy: 0,
      hue: random(particleHues), // Assign a random hue from our custom palette
      brightness: random(80, 100),
      alpha: random(20, 50),
      size: random(1, 3)
    });
  }
}
Line-by-line explanation (5 lines)

🔧 Subcomponents:

for-loop Particle Reinitialization Loop for (let i = 0; i < numParticles; i++) { particles.push({...}); }

Recreates all particles with new random positions to fit the resized canvas.

resizeCanvas(windowWidth, windowHeight);
Resizes the p5.js canvas to match the new window dimensions. This is called automatically when the user rotates a tablet or resizes the browser.
particles = [];
Empties the particles array, discarding all old particles. This allows us to regenerate fresh particles for the new canvas size.
for (let i = 0; i < numParticles; i++) {
Loops 2500 times, creating new particles with random positions within the new canvas dimensions.
x: random(width),
New particle x position is random within the resized canvas width—ensures particles fit the screen.
y: random(height),
New particle y position is random within the resized canvas height.

📦 Key Variables

robotoFont p5.Font

Stores the loaded Roboto font object used for rendering the 'P5JS.AI' text on screen.

let robotoFont;
particles array

Holds 2500 particle objects. Each particle tracks position (x, y), velocity (vx, vy), color (hue, brightness, alpha), and size.

let particles = [];
numParticles number

The count of particles to create and animate. Higher values create denser visuals but slower performance.

let numParticles = 2500;
flowFieldScale number

Controls how 'zoomed in' the Perlin noise field is. Smaller values = larger, broader flow patterns; larger values = tight, chaotic swirls.

let flowFieldScale = 0.01;
flowFieldSpeed number

Controls how fast the Perlin noise field evolves over time. Higher values = faster animation and more dynamic motion.

let flowFieldSpeed = 0.005;
particleSpeed number

The base speed at which particles move along the flow field. Higher = faster motion.

let particleSpeed = 2;
touchInfluenceRadius number

The distance in pixels around a touch/click where particles are pushed away. Larger radius = bigger repulsion zone.

let touchInfluenceRadius = 100;
touchInfluenceForce number

The strength of the repulsion force when a particle is within the touch radius. Higher = particles explode away faster.

let touchInfluenceForce = 0.5;
particleHues array

An array of hue values (0–360 in HSB) that define the color palette. All particles pick their hue randomly from this array.

let particleHues = [210, 270, 180, 240, 300];

🔧 Potential Improvements (5)

Here are some ways this code could be enhanced:

PERFORMANCE draw() function, particle loop

Every frame, the sketch loops through 2500 particles and checks distance to all touch points. With many touches, this becomes O(n*m) operations, which can drop frame rate.

💡 Cache the touchPoints array or limit the maximum number of touch points processed per frame to improve performance on mobile with multiple simultaneous touches.

BUG draw() function, touch repulsion

The condition 'd > 0' prevents force when distance is exactly 0, but floating-point arithmetic rarely gives exactly 0. Particles at the exact touch point might not be repelled smoothly.

💡 Change 'd > 0' to 'd > 1' or 'd > 0.1' to avoid micro-distances where math breaks down. Alternatively, clamp forceMagnitude to avoid negative or undefined values.

STYLE Variable declarations at the top

The particleHues array is a magic value—users must know to edit it to customize colors. It's not listed as a tunable.

💡 Add particleHues to the tunables section in documentation, or create a dedicated 'palette' variable with inline comments explaining HSB hue ranges (e.g., '0 = red, 120 = green, 240 = blue').

FEATURE setup() and windowResized()

Particle colors are assigned once at initialization and never change. The palette feels static over long viewing.

💡 Modify particles to gradually shift hue each frame using hue = (p.hue + 0.5) % 360 in the draw loop, or randomly reassign hues on resize for a dynamic color-shifting effect.

BUG draw() function, trail fade

The semi-transparent rectangle approach for trails can accumulate rounding errors and create slight darkening over time, making the canvas gradually dim.

💡 Use a fixed background() call every N frames (e.g., every 30 frames) to reset the canvas and prevent subtle drift, or use a pixel-based approach with much lower alpha.

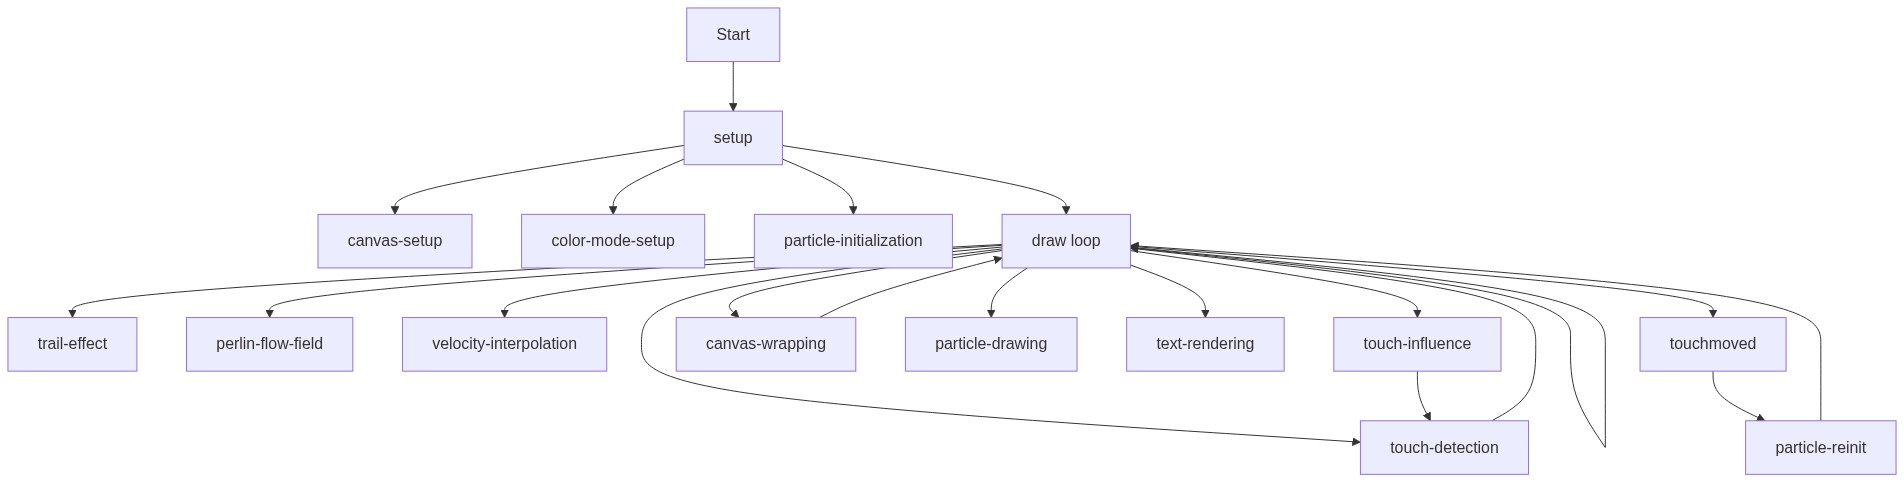
🔄 Code Flow

Code flow showing preload, setup, draw, touchmoved, windowresized

💡 Click on function names in the diagram to jump to their code

graph TD start[Start] --> setup[setup] click setup href "#fn-setup" setup --> colormode[colormode-setup] click colormode href "#sub-colormode-setup" colormode --> particleinit[particle-initialization-loop] click particleinit href "#sub-particle-initialization-loop" particleinit --> draw[draw loop] click draw href "#fn-draw" draw --> trail[trail-effect] click trail href "#sub-trail-effect" draw --> perlin[perlin-noise-flow] click perlin href "#sub-perlin-noise-flow" draw --> velocity[velocity-interpolation] click velocity href "#sub-velocity-interpolation" draw --> touch[touch-detection] click touch href "#sub-touch-detection" touch --> repulsion[repulsion-force] click repulsion href "#sub-repulsion-force" draw --> edge[edge-wrapping] click edge href "#sub-edge-wrapping" draw --> draw setup --> windowresize[windowresized] click windowresize href "#fn-windowresized" windowresize --> particlereinit[particle-reinit-loop] click particlereinit href "#sub-particle-reinit-loop" particlereinit --> setup

❓ Frequently Asked Questions

What visual effects can I expect from the 'First to come' p5.js sketch?

This sketch creates a mesmerizing animation of steamy wisps, represented by vibrant, colorful particles that flow dynamically across the canvas.

How can I interact with the 'First to come' animation?

Users can influence the movement of the particles by touching or clicking on the canvas, which affects the particles within a specified radius around the touch point.

What creative coding techniques are showcased in this p5.js sketch?

The sketch demonstrates the use of particle systems, flow fields, and HSB color manipulation to create an engaging visual experience.

Preview

First to come - p5.js creative coding sketch preview
Sketch Preview
Code flow diagram showing the structure of First to come - Code flow showing preload, setup, draw, touchmoved, windowresized
Code Flow Diagram