
FNAF

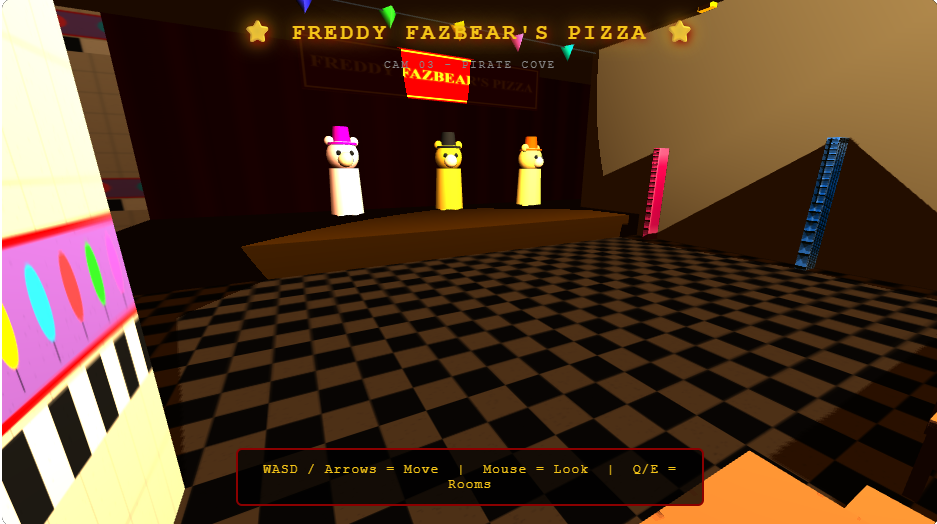
This sketch creates a interactive 3D recreation of Freddy Fazbear's Pizza using Three.js, featuring a dining hall with an animatronic stage, tables, Pirate Cove alcove, and restrooms. Players navigate with WASD/arrow keys, look around with the mouse, and switch between security camera views with Q/E, experiencing the iconic FNAF location in first-person perspective.

🧪 Try This!

Experiment with the code by making these changes:

  1. Make the bear bigger — Change the scale of all bear parts—the body radius, head radius, and hat will all proportionally grow, creating a more imposing animatronic.
  2. Change the wall color scheme — The wall texture generates with a cream base and purple balloon band—swap to a different color palette for a completely different pizzeria aesthetic.
  3. Make lights flicker more dramatically — Increase the flicker range so lights become much brighter and dimmer, intensifying the creepy atmosphere.
  4. Change the camera starting position — Move the default camera view to look at the stage from a different angle—try closer to the stage or further back.
  5. Speed up the animatronic head movement — The heads currently rotate slowly—increase the sine wave frequency to make them look more frantic and unsettling.
Prefer the full editor? Open it there →

📖 About This Sketch

This sketch builds a complete 3D environment faithful to Five Nights at Freddy's using Three.js, the popular WebGL library. The main hall features a stage with three animatronic characters (Freddy, Chica, and Bonnie), dining tables with pizza boxes, a Pirate Cove alcove with a mysterious curtain, and restroom doors. Procedurally generated textures create a worn, grimy pizzeria aesthetic, while dynamic lighting—including flickering ceiling lights and a stage spotlight—establishes atmosphere and mood.

The code is organized into texture generators, material definitions, geometry helpers, room construction, lighting setup, and an interactive camera system. By studying it, you will learn how to generate textures with canvas 2D drawing, construct complex scenes with primitives, implement first-person camera controls with pointer lock, switch between predefined viewpoints, and use lights to create mood and shadow depth.

⚙️ How It Works

  1. When the sketch loads, Three.js creates a WebGL renderer attached to the canvas, sets up a scene with dark fog and a brownish background, and positions a perspective camera at eye level in the main hall.
  2. Four texture generator functions paint procedural patterns onto canvas elements—checkerboard floors, tiled walls with balloon decorations, purple curtains, and text-based signs—and convert these into reusable Three.js textures.
  3. Helper functions box() and cyl() simplify adding geometry to the scene: box() creates rectangular solids with shadow casting, cyl() creates cylinders for poles and light fixtures.
  4. The main hall is constructed as a large bounding box with walls, ceiling, and floor. The stage (back wall) features three bear animatronics created by makeBear(), which assembles body parts (cylinder body, sphere head, smaller spheres for ears and eyes, cone hat) into a group and positions it in the scene.
  5. Dining tables are procedurally placed in a grid using makeTable(), which creates a tabletop, four legs, a pizza box on top, and two chairs with seat backs and legs.
  6. Pirate Cove is a gated alcove on the left with curtains hiding a fourth bear (Foxy). The right side features a restroom area with tiled walls and gender-labeled doors.
  7. Seven colored cone flags and a banner string create a celebratory pennant decoration across the stage area.
  8. The lighting system includes ambient light for base illumination, five point lights mounted on the ceiling (one central, four at corners) that flicker randomly each 1-3 seconds to create tension, a spotlight targeting the stage, and a blue point light in Pirate Cove for eerie atmosphere.
  9. The animate() loop runs at 60fps, updating the camera position based on WASD/arrow key input clamped within room boundaries, applying mouse-look via yaw and pitch quaternions, animating animatronic heads with slow sine-wave rotations, and flickering lights by multiplying their intensity by a random factor.
  10. Q and E keys switch between four predefined camera positions (CAM 01–04), each with a label describing the viewed area.

🎓 Concepts You'll Learn

Three.js scene graph and groupsProcedural texture generation with Canvas 2DFirst-person camera control with pointer lockQuaternion-based camera rotationDynamic lighting and flickering effectsCollision detection and boundary clampingMaterial mapping and texture wrapping

📝 Code Breakdown

makeCheckerTexture()

This function demonstrates procedural texture generation—creating an image by code instead of loading a file. The Canvas 2D API lets you draw shapes, lines, gradients, and text. By converting the result to a Three.js CanvasTexture, you can apply it to 3D geometry, making it repeatable and efficient.

🔬 This nested loop creates the checkerboard. What if you change the modulo check from (r + c) % 2 === 0 to just r % 2 === 0? How would the pattern change?

  for (let r = 0; r < squares; r++) {
    for (let c = 0; c < squares; c++) {
      ctx.fillStyle = (r + c) % 2 === 0 ? c1 : c2;
      ctx.fillRect(c * sq, r * sq, sq, sq);
    }
  }
function makeCheckerTexture(size = 512, c1 = '#1a1a1a', c2 = '#d8d0c0', squares = 8) {
  const cv = document.createElement('canvas');
  cv.width = cv.height = size;
  const ctx = cv.getContext('2d');
  const sq = size / squares;
  for (let r = 0; r < squares; r++) {
    for (let c = 0; c < squares; c++) {
      ctx.fillStyle = (r + c) % 2 === 0 ? c1 : c2;
      ctx.fillRect(c * sq, r * sq, sq, sq);
    }
  }
  // grunge overlay
  ctx.fillStyle = 'rgba(0,0,0,0.12)';
  for (let i = 0; i < 3000; i++) {
    ctx.fillRect(Math.random() * size, Math.random() * size, Math.random() * 3 + 1, 1);
  }
  const t = new THREE.CanvasTexture(cv);
  t.wrapS = t.wrapT = THREE.RepeatWrapping;
  return t;
}
Line-by-line explanation (10 lines)

🔧 Subcomponents:

for-loop Checkerboard Pattern Loop for (let r = 0; r < squares; r++) { for (let c = 0; c < squares; c++) { ctx.fillStyle = (r + c) % 2 === 0 ? c1 : c2; ctx.fillRect(c * sq, r * sq, sq, sq); } }

Creates an alternating checkerboard pattern by testing if row+column is even or odd, filling alternating squares with two colors

for-loop Grunge Overlay Loop for (let i = 0; i < 3000; i++) { ctx.fillRect(Math.random() * size, Math.random() * size, Math.random() * 3 + 1, 1); }

Adds 3000 tiny random lines across the texture to create a worn, dirty, aged appearance

const cv = document.createElement('canvas');
Creates an invisible canvas element in memory—not visible on screen, just used for drawing.
cv.width = cv.height = size;
Sets the canvas to square dimensions (512x512 by default) so texture is not distorted.
const ctx = cv.getContext('2d');
Gets the 2D drawing context—this is the tool you use to paint on the canvas with fill, stroke, text, etc.
const sq = size / squares;
Calculates the pixel width of each checkerboard square (512 / 8 = 64 pixels per square by default).
ctx.fillStyle = (r + c) % 2 === 0 ? c1 : c2;
Alternates colors: if row + column is even, use color c1 (dark), else use color c2 (light), creating the classic checkerboard pattern.
ctx.fillRect(c * sq, r * sq, sq, sq);
Draws a square at position (column*squareSize, row*squareSize) with the chosen color.
ctx.fillStyle = 'rgba(0,0,0,0.12)';
Sets color to semi-transparent black (12% opacity) for the grime overlay—you'll barely see it, but it adds realism.
ctx.fillRect(Math.random() * size, Math.random() * size, Math.random() * 3 + 1, 1);
Draws a tiny random line (1-3 pixels wide, 1 pixel tall) at a random position to simulate dirt scratches.
const t = new THREE.CanvasTexture(cv);
Converts the canvas image into a Three.js texture object that can be applied to 3D materials.
t.wrapS = t.wrapT = THREE.RepeatWrapping;
Tells Three.js to tile (repeat) this texture across surfaces instead of stretching it—important for seamless tiling.

makeWallTexture()

This function shows how to layer multiple elements—base tiles, grout lines, decorative balloon strips, and grime—all drawn on a single canvas. The result is a complex, detailed texture built from simple shapes. Positioning elements using percentages (like bY = size * 0.55) makes the texture scalable: it looks right whether size is 256, 512, or 1024.

🔬 These two loops draw vertical and horizontal grout lines. What happens if you change tileSize from 64 to 32 or 128? How does the tile density change?

  for (let x = 0; x <= size; x += tileSize) { ctx.beginPath(); ctx.moveTo(x,0); ctx.lineTo(x,size); ctx.stroke(); }
  for (let y = 0; y <= size; y += tileSize) { ctx.beginPath(); ctx.moveTo(0,y); ctx.lineTo(size,y); ctx.stroke(); }
function makeWallTexture(size = 512) {
  const cv = document.createElement('canvas');
  cv.width = cv.height = size;
  const ctx = cv.getContext('2d');
  // tile base
  ctx.fillStyle = '#c8c0b0';
  ctx.fillRect(0, 0, size, size);
  // tile grout lines
  const tileSize = 64;
  ctx.strokeStyle = '#999890';
  ctx.lineWidth = 2;
  for (let x = 0; x <= size; x += tileSize) { ctx.beginPath(); ctx.moveTo(x,0); ctx.lineTo(x,size); ctx.stroke(); }
  for (let y = 0; y <= size; y += tileSize) { ctx.beginPath(); ctx.moveTo(0,y); ctx.lineTo(size,y); ctx.stroke(); }
  // balloon border strip (purple band)
  const bY = size * 0.55;
  const bH = size * 0.12;
  ctx.fillStyle = '#cc0000'; ctx.fillRect(0, bY - 4, size, bH + 8);
  ctx.fillStyle = '#7b4fc4'; ctx.fillRect(0, bY, size, bH);
  // balloons
  const colors = ['#22cc22','#cc44cc','#ff6600','#ffcc00','#22aaff','#ff3344'];
  const bCount = 8;
  for (let i = 0; i < bCount; i++) {
    const bx = (i + 0.5) * (size / bCount);
    const by = bY + bH * 0.45;
    const r = bH * 0.3;
    ctx.fillStyle = colors[i % colors.length];
    ctx.beginPath(); ctx.ellipse(bx, by, r * 0.75, r, 0, 0, Math.PI * 2); ctx.fill();
    ctx.strokeStyle = '#000'; ctx.lineWidth = 1;
    ctx.beginPath(); ctx.moveTo(bx, by + r); ctx.lineTo(bx, by + r * 1.6); ctx.stroke();
  }
  // checkered border strip below
  const chY = bY + bH + 8;
  const chH = size * 0.08;
  const chSq = chH;
  const cols = Math.ceil(size / chSq);
  for (let c = 0; c < cols; c++) {
    ctx.fillStyle = c % 2 === 0 ? '#111' : '#eee';
    ctx.fillRect(c * chSq, chY, chSq, chH);
  }
  // grime
  ctx.fillStyle = 'rgba(0,0,0,0.08)';
  for (let i = 0; i < 1500; i++) {
    ctx.fillRect(Math.random() * size, Math.random() * size, Math.random() * 2 + 1, 1);
  }
  const t = new THREE.CanvasTexture(cv);
  t.wrapS = t.wrapT = THREE.RepeatWrapping;
  return t;
}
Line-by-line explanation (7 lines)

🔧 Subcomponents:

for-loop Grout Line Grid for (let x = 0; x <= size; x += tileSize) { ctx.beginPath(); ctx.moveTo(x,0); ctx.lineTo(x,size); ctx.stroke(); } for (let y = 0; y <= size; y += tileSize) { ctx.beginPath(); ctx.moveTo(0,y); ctx.lineTo(size,y); ctx.stroke(); }

Draws a grid of vertical and horizontal lines to represent grout between tiles

for-loop Balloon Drawing Loop for (let i = 0; i < bCount; i++) { const bx = (i + 0.5) * (size / bCount); const by = bY + bH * 0.45; const r = bH * 0.3; ctx.fillStyle = colors[i % colors.length]; ctx.beginPath(); ctx.ellipse(bx, by, r * 0.75, r, 0, 0, Math.PI * 2); ctx.fill(); ctx.strokeStyle = '#000'; ctx.lineWidth = 1; ctx.beginPath(); ctx.moveTo(bx, by + r); ctx.lineTo(bx, by + r * 1.6); ctx.stroke(); }

Creates 8 colorful balloons evenly spaced across the wall with stems drawn as lines

const bY = size * 0.55;
Positions the balloon band at 55% down the wall texture (middle area).
const bH = size * 0.12;
Balloon band height is 12% of the texture—narrow enough to be a decorative strip.
ctx.fillStyle = '#cc0000'; ctx.fillRect(0, bY - 4, size, bH + 8);
Draws a red border around the balloon band for emphasis.
ctx.fillStyle = '#7b4fc4'; ctx.fillRect(0, bY, size, bH);
Fills the balloon band itself with purple—the main visible band color.
const bx = (i + 0.5) * (size / bCount);
Spaces each balloon evenly—for 8 balloons, puts the i-th balloon at position (i + 0.5) / 8 across the width.
ctx.beginPath(); ctx.ellipse(bx, by, r * 0.75, r, 0, 0, Math.PI * 2); ctx.fill();
Draws an ellipse (wider than tall) to represent a balloon's round shape.
ctx.beginPath(); ctx.moveTo(bx, by + r); ctx.lineTo(bx, by + r * 1.6); ctx.stroke();
Draws a line from the bottom of the balloon downward to represent the string or stem.

makeCurtainTexture()

This function teaches canvas gradients and line rendering. The horizontal gradient simulates how light catches a curved curtain, while the vertical lines simulate fabric folds. Together they create the illusion of depth on a flat 2D texture.

🔬 The gradient has 4 color stops, creating a valley effect (dark → bright → dark → darker). What happens if you swap the middle two stops, so bright comes at 0.6 and dark at 0.4? How would the curtain look?

  const grad = ctx.createLinearGradient(0, 0, 256, 0);
  grad.addColorStop(0, '#5a0070'); grad.addColorStop(0.4, '#7b00aa');
  grad.addColorStop(0.6, '#5a0070'); grad.addColorStop(1, '#3d004d');
function makeCurtainTexture() {
  const cv = document.createElement('canvas');
  cv.width = 256; cv.height = 512;
  const ctx = cv.getContext('2d');
  const grad = ctx.createLinearGradient(0, 0, 256, 0);
  grad.addColorStop(0, '#5a0070'); grad.addColorStop(0.4, '#7b00aa');
  grad.addColorStop(0.6, '#5a0070'); grad.addColorStop(1, '#3d004d');
  ctx.fillStyle = grad; ctx.fillRect(0, 0, 256, 512);
  ctx.strokeStyle = 'rgba(180,0,255,0.3)'; ctx.lineWidth = 6;
  for (let x = 0; x < 256; x += 20) { ctx.beginPath(); ctx.moveTo(x, 0); ctx.lineTo(x, 512); ctx.stroke(); }
  return new THREE.CanvasTexture(cv);
}
Line-by-line explanation (9 lines)

🔧 Subcomponents:

calculation Gradient Color Stops const grad = ctx.createLinearGradient(0, 0, 256, 0); grad.addColorStop(0, '#5a0070'); grad.addColorStop(0.4, '#7b00aa'); grad.addColorStop(0.6, '#5a0070'); grad.addColorStop(1, '#3d004d');

Creates a smooth horizontal color transition from dark purple to bright purple and back, giving the curtain depth

for-loop Curtain Fold Lines for (let x = 0; x < 256; x += 20) { ctx.beginPath(); ctx.moveTo(x, 0); ctx.lineTo(x, 512); ctx.stroke(); }

Draws vertical lines every 20 pixels to simulate fabric folds in the curtain

cv.width = 256; cv.height = 512;
Creates a portrait-oriented canvas (taller than wide) suitable for a curtain texture.
const grad = ctx.createLinearGradient(0, 0, 256, 0);
Creates a gradient that transitions horizontally from x=0 to x=256 (left to right).
grad.addColorStop(0, '#5a0070');
At 0% (left edge), start with dark purple.
grad.addColorStop(0.4, '#7b00aa');
At 40% across, brighten to vivid purple—the highlight of the curtain.
grad.addColorStop(0.6, '#5a0070');
At 60%, return to dark purple—creates a valley/shadow effect.
grad.addColorStop(1, '#3d004d');
At 100% (right edge), darken to deep purple for contrast.
ctx.fillStyle = grad; ctx.fillRect(0, 0, 256, 512);
Fills the entire canvas with the gradient, creating a smooth color transition.
ctx.strokeStyle = 'rgba(180,0,255,0.3)';
Sets line color to semi-transparent magenta—will be used for fold lines.
for (let x = 0; x < 256; x += 20) { ctx.beginPath(); ctx.moveTo(x, 0); ctx.lineTo(x, 512); ctx.stroke(); }
Draws vertical lines every 20 pixels from top to bottom, creating the look of fabric gathered into folds.

makeSignTexture()

This is a reusable function factory—you call it multiple times with different text to generate different signs. It demonstrates parameterization: instead of hardcoding one sign, the function accepts arguments, making it flexible and DRY (Don't Repeat Yourself).

🔬 The sign has a background fill, then a border stroke on top. What if you swap the order—call strokeRect BEFORE fillRect? How would the appearance change?

  ctx.fillStyle = bg; ctx.fillRect(0, 0, 512, 128);
  ctx.strokeStyle = fg; ctx.lineWidth = 4;
  ctx.strokeRect(6, 6, 500, 116);
function makeSignTexture(text, bg='#8B0000', fg='#f5c518') {
  const cv = document.createElement('canvas');
  cv.width = 512; cv.height = 128;
  const ctx = cv.getContext('2d');
  ctx.fillStyle = bg; ctx.fillRect(0, 0, 512, 128);
  ctx.strokeStyle = fg; ctx.lineWidth = 4;
  ctx.strokeRect(6, 6, 500, 116);
  ctx.fillStyle = fg; ctx.font = 'bold 36px serif';
  ctx.textAlign = 'center'; ctx.textBaseline = 'middle';
  ctx.fillText(text, 256, 64);
  return new THREE.CanvasTexture(cv);
}
Line-by-line explanation (8 lines)

🔧 Subcomponents:

calculation Border Rectangle ctx.strokeRect(6, 6, 500, 116);

Draws a decorative border frame around the sign, leaving 6-pixel margin on all sides

calculation Centered Text ctx.textAlign = 'center'; ctx.textBaseline = 'middle'; ctx.fillText(text, 256, 64);

Centers text horizontally and vertically on the sign (256, 64 is the canvas center)

function makeSignTexture(text, bg='#8B0000', fg='#f5c518') {
Accepts three parameters: text (required), bg/fg colors (optional, defaulting to dark red background and gold foreground).
cv.width = 512; cv.height = 128;
Creates a wide, short canvas suitable for a rectangular sign.
ctx.fillStyle = bg; ctx.fillRect(0, 0, 512, 128);
Fills the entire canvas with the background color (dark red by default).
ctx.strokeStyle = fg; ctx.lineWidth = 4;
Sets the border color to the foreground (gold by default) and thickness to 4 pixels.
ctx.strokeRect(6, 6, 500, 116);
Draws a border frame starting 6 pixels from the edge, 500 pixels wide and 116 pixels tall—leaves a margin all around.
ctx.font = 'bold 36px serif';
Sets text to bold, 36-pixel height, and serif font (like Times New Roman)—looks classic and pizzeria-like.
ctx.textAlign = 'center'; ctx.textBaseline = 'middle';
Anchors text at its center point instead of the usual top-left, making it easy to place in the middle of the canvas.
ctx.fillText(text, 256, 64);
Draws the text at x=256, y=64 (the exact center of the 512×128 canvas).

box()

This helper function encapsulates the common pattern of creating a rectangular mesh, positioning it, and adding it to the scene. By using a helper, the main code stays clean and readable—compare 'box(1.4, 0.08, 0.8, woodMat, x, 0.8, z)' (one line) to the six lines it would take without the helper.

function box(w, h, d, mat, x, y, z, rx=0, ry=0) {
  const m = new THREE.Mesh(new THREE.BoxGeometry(w, h, d), mat);
  m.position.set(x, y, z);
  m.rotation.x = rx; m.rotation.y = ry;
  m.castShadow = true; m.receiveShadow = true;
  scene.add(m); return m;
}
Line-by-line explanation (5 lines)
const m = new THREE.Mesh(new THREE.BoxGeometry(w, h, d), mat);
Creates a rectangular 3D box with width w, height h, depth d, and applies the material mat to it.
m.position.set(x, y, z);
Places the box at coordinates (x, y, z) in 3D space.
m.rotation.x = rx; m.rotation.y = ry;
Rotates the box around the X axis (pitch) and Y axis (yaw) by rx and ry radians—optional, default to 0.
m.castShadow = true; m.receiveShadow = true;
Enables shadow casting and receiving—the box will cast a shadow on surfaces below it and be darkened by shadows from other objects.
scene.add(m); return m;
Adds the box to the 3D scene and returns it so the caller can store a reference if needed.

cyl()

Similar to box(), this is a shorthand for creating cylinders. Cylinders are useful for poles, light fixtures, animatronic bodies, and decorative elements. The segmentation parameter allows you to trade detail for performance.

function cyl(rt, rb, h, seg, mat, x, y, z) {
  const m = new THREE.Mesh(new THREE.CylinderGeometry(rt, rb, h, seg), mat);
  m.position.set(x, y, z); m.castShadow = true; scene.add(m); return m;
}
Line-by-line explanation (3 lines)
const m = new THREE.Mesh(new THREE.CylinderGeometry(rt, rb, h, seg), mat);
Creates a cylinder with top radius rt, bottom radius rb, height h, and seg segments (more segments = smoother sides), and applies material mat.
m.position.set(x, y, z);
Places the cylinder at position (x, y, z).
m.castShadow = true; scene.add(m);
Enables shadow casting and adds the cylinder to the scene.

makeBear()

This function builds a complex character by composing simple shapes—cylinders, spheres—into a hierarchy using a THREE.Group(). By grouping, you can move all parts together with one position.set() call. The function is parameterized by position (x, z) and colors, allowing you to create multiple bears quickly with different appearances.

🔬 This forEach creates ears at x = -0.28 and +0.28. What happens if you change these to -0.5 and +0.5? How much bigger is the head distance?

  [-.28, .28].forEach(ex => {
    const ear = new THREE.Mesh(new THREE.SphereGeometry(0.12, 8, 8), new THREE.MeshLambertMaterial({ color }));
    ear.position.set(ex, 1.72, 0); g.add(ear);
  });
function makeBear(x, z, color, hatColor) {
  const g = new THREE.Group();
  // body
  const body = new THREE.Mesh(new THREE.CylinderGeometry(0.35, 0.4, 1.1, 16), new THREE.MeshLambertMaterial({ color }));
  body.position.y = 0.55; g.add(body);
  // head
  const head = new THREE.Mesh(new THREE.SphereGeometry(0.38, 16, 12), new THREE.MeshLambertMaterial({ color }));
  head.position.y = 1.4; g.add(head);
  // ears
  [-.28, .28].forEach(ex => {
    const ear = new THREE.Mesh(new THREE.SphereGeometry(0.12, 8, 8), new THREE.MeshLambertMaterial({ color }));
    ear.position.set(ex, 1.72, 0); g.add(ear);
  });
  // eyes
  [-.14, .14].forEach(ex => {
    const eye = new THREE.Mesh(new THREE.SphereGeometry(0.06, 8, 8), new THREE.MeshLambertMaterial({ color: 0x111111 }));
    eye.position.set(ex, 1.44, 0.32); g.add(eye);
  });
  // muzzle
  const muz = new THREE.Mesh(new THREE.SphereGeometry(0.18, 12, 8), new THREE.MeshLambertMaterial({ color: 0xc8a478 }));
  muz.position.set(0, 1.3, 0.3); g.add(muz);
  // hat
  const hat = new THREE.Mesh(new THREE.CylinderGeometry(0.18, 0.22, 0.4, 16), new THREE.MeshLambertMaterial({ color: hatColor }));
  hat.position.y = 1.85; g.add(hat);
  const brim = new THREE.Mesh(new THREE.CylinderGeometry(0.35, 0.35, 0.05, 16), new THREE.MeshLambertMaterial({ color: hatColor }));
  brim.position.y = 1.66; g.add(brim);
  // legs
  [-.18, .18].forEach(lx => {
    const leg = new THREE.Mesh(new THREE.CylinderGeometry(0.1, 0.1, 0.6, 8), new THREE.MeshLambertMaterial({ color }));
    leg.position.set(lx, 0.0, 0); g.add(leg);
  });
  g.position.set(x, 0.65, z);
  scene.add(g); return g;
}
Line-by-line explanation (9 lines)

🔧 Subcomponents:

for-loop Ear Placement [-.28, .28].forEach(ex => { const ear = new THREE.Mesh(new THREE.SphereGeometry(0.12, 8, 8), new THREE.MeshLambertMaterial({ color })); ear.position.set(ex, 1.72, 0); g.add(ear); });

Creates two identical ears positioned symmetrically on either side of the head

for-loop Eye Placement [-.14, .14].forEach(ex => { const eye = new THREE.Mesh(new THREE.SphereGeometry(0.06, 8, 8), new THREE.MeshLambertMaterial({ color: 0x111111 })); eye.position.set(ex, 1.44, 0.32); g.add(eye); });

Creates two identical dark eyes positioned on the face, forward-facing

for-loop Leg Placement [-.18, .18].forEach(lx => { const leg = new THREE.Mesh(new THREE.CylinderGeometry(0.1, 0.1, 0.6, 8), new THREE.MeshLambertMaterial({ color })); leg.position.set(lx, 0.0, 0); g.add(leg); });

Creates two identical legs positioned symmetrically below the body

const g = new THREE.Group();
Creates a container group—think of it as a folder where all bear parts (body, head, limbs) will be stored together.
const body = new THREE.Mesh(new THREE.CylinderGeometry(0.35, 0.4, 1.1, 16), new THREE.MeshLambertMaterial({ color }));
Creates the body as a cylinder (wider at bottom, narrower at top for a bear shape) with the specified color.
body.position.y = 0.55; g.add(body);
Moves the body up 0.55 units and adds it to the group—relative positioning keeps everything organized.
const head = new THREE.Mesh(new THREE.SphereGeometry(0.38, 16, 12), new THREE.MeshLambertMaterial({ color }));
Creates a sphere for the head with the same color as the body.
head.position.y = 1.4; g.add(head);
Positions the head above the body (relative to group origin).
[-.28, .28].forEach(ex => { const ear = ...; ear.position.set(ex, 1.72, 0); g.add(ear); });
Uses forEach to create two ears: one at x=-0.28 (left) and one at x=0.28 (right), both at the same height.
const eye = new THREE.Mesh(new THREE.SphereGeometry(0.06, 8, 8), new THREE.MeshLambertMaterial({ color: 0x111111 }));
Eyes are small spheres with a dark color (0x111111 is nearly black)—always dark, regardless of the bear's color.
g.position.set(x, 0.65, z);
Positions the entire group (all bear parts together) at world coordinates (x, y=0.65, z).
scene.add(g); return g;
Adds the complete bear to the 3D scene and returns it so the caller can store a reference.

makeTable()

This function demonstrates nested loops with relative positioning. Each table is placed at (x, z), and all its parts (legs, top, chairs, chair legs) are positioned relative to that origin using offset arrays. This makes the function reusable: call makeTable three times with different (x, z) values to create three identical dining setups.

🔬 This creates four legs by iterating over corner offsets. What if you add a fifth offset like [0, 0] to the array? What would that create in the middle of the table?

  [[-0.5, -0.3],[0.5,-0.3],[-0.5,0.3],[0.5,0.3]].forEach(([dx,dz]) => {
    box(0.06, 0.8, 0.06, woodMat, x+dx, 0.4, z+dz);
  });
function makeTable(x, z) {
  box(1.4, 0.08, 0.8, woodMat, x, 0.8, z);
  [[-0.5, -0.3],[0.5,-0.3],[-0.5,0.3],[0.5,0.3]].forEach(([dx,dz]) => {
    box(0.06, 0.8, 0.06, woodMat, x+dx, 0.4, z+dz);
  });
  // pizza box on table
  box(0.5, 0.06, 0.5, redMat, x, 0.87, z);
  // chairs
  [[-1.1, 0],[1.1,0]].forEach(([dx,dz]) => {
    box(0.5, 0.05, 0.5, woodMat, x+dx, 0.5, z+dz);
    box(0.5, 0.5, 0.06, woodMat, x+dx, 0.75, z+dz+0.22);
    [[-0.2,-0.22],[0.2,-0.22],[-0.2,0.22],[0.2,0.22]].forEach(([lx,lz]) => {
      box(0.05,0.5,0.05,woodMat,x+dx+lx,0.25,z+dz+lz);
    });
  });
}
Line-by-line explanation (7 lines)

🔧 Subcomponents:

for-loop Four Table Legs [[-0.5, -0.3],[0.5,-0.3],[-0.5,0.3],[0.5,0.3]].forEach(([dx,dz]) => { box(0.06, 0.8, 0.06, woodMat, x+dx, 0.4, z+dz); });

Creates four legs at the corners of the table using relative offsets

for-loop Two Chairs [[-1.1, 0],[1.1,0]].forEach(([dx,dz]) => { box(0.5, 0.05, 0.5, woodMat, x+dx, 0.5, z+dz); box(0.5, 0.5, 0.06, woodMat, x+dx, 0.75, z+dz+0.22); [[-0.2,-0.22],[0.2,-0.22],[-0.2,0.22],[0.2,0.22]].forEach(([lx,lz]) => { box(0.05,0.5,0.05,woodMat,x+dx+lx,0.25,z+dz+lz); }); });

Creates two chairs (one on each side of the table), each with a seat, backrest, and four legs

box(1.4, 0.08, 0.8, woodMat, x, 0.8, z);
Creates the tabletop: 1.4 units wide, 0.08 thick, 0.8 deep, positioned at (x, 0.8, z).
[[-0.5, -0.3],[0.5,-0.3],[-0.5,0.3],[0.5,0.3]].forEach(([dx,dz]) => {
Iterates over four offsets: (-0.5, -0.3), (0.5, -0.3), (-0.5, 0.3), (0.5, 0.3)—one for each corner of the table.
box(0.5, 0.06, 0.5, redMat, x, 0.87, z);
Adds a red pizza box on top of the table (slightly higher than the tabletop at y=0.87).
[[-1.1, 0],[1.1,0]].forEach(([dx,dz]) => {
Iterates over two positions: one on each side of the table (left and right) to place two chairs.
box(0.5, 0.05, 0.5, woodMat, x+dx, 0.5, z+dz);
Creates the chair seat—a thin box positioned at each chair location.
box(0.5, 0.5, 0.06, woodMat, x+dx, 0.75, z+dz+0.22);
Creates the chair backrest—a tall, thin vertical box behind the seat.
[[-0.2,-0.22],[0.2,-0.22],[-0.2,0.22],[0.2,0.22]].forEach(([lx,lz]) => { box(0.05,0.5,0.05,woodMat,x+dx+lx,0.25,z+dz+lz); });
Creates four small legs for each chair, positioned at the four corners of the seat.

ceilLight()

This function combines a light (invisible but illuminates the scene) with a visual mesh (a small box that you can see). The light and the visual representation are positioned at the same spot, creating the illusion of a realistic light fixture on the ceiling.

function ceilLight(x, z, intensity=1.5) {
  const pl = new THREE.PointLight(0xffe8b0, intensity, 12);
  pl.position.set(x, ROOM_H - 0.3, z);
  pl.castShadow = true;
  scene.add(pl);
  // Light fixture
  box(0.3, 0.15, 0.3, yellowMat, x, ROOM_H - 0.08, z);
}
Line-by-line explanation (4 lines)
const pl = new THREE.PointLight(0xffe8b0, intensity, 12);
Creates a point light (glowing from a single point in all directions) with warm yellow color (0xffe8b0), the specified intensity, and a range of 12 units.
pl.position.set(x, ROOM_H - 0.3, z);
Places the light near the ceiling, 0.3 units below the actual ceiling height.
pl.castShadow = true;
Enables shadow casting from this light—objects will cast shadows onto the floor.
box(0.3, 0.15, 0.3, yellowMat, x, ROOM_H - 0.08, z);
Adds a small yellow box directly below the light to represent the light fixture's physical appearance.

animate()

This is the core loop that brings the scene to life. It handles three major systems: lighting effects (flicker), player control (movement and look), and animation (head turning). By reading it carefully, you understand how p5.js-like animation loops work with three.js: check input, update state, render the result.

🔬 This flicker system uses a random multiplier fl between 0.85 and 1.15. What if you changed it to 0.5 + Math.random() * 0.5, giving a range of 0.5 to 1.0? How much darker and more dramatic would the flicker be?

  flickerTimer -= dt;
  if (flickerTimer <= 0) {
    const fl = 0.85 + Math.random() * 0.3;
    scene.children.forEach(c => { if (c.isLight && c.type !== 'SpotLight') c.intensity *= fl; });
    flickerTimer = 1 + Math.random() * 3;
  }

🔬 These four if-statements build the movement direction from multiple keys. What if you only had the first two (W/up and S/down)? The player could only move forward and backward—how would that change the gameplay feel?

  if (keys['w'] || keys['arrowup'])    dir.addScaledVector(forward,  1);
  if (keys['s'] || keys['arrowdown'])  dir.addScaledVector(forward, -1);
  if (keys['a'] || keys['arrowleft'])  dir.addScaledVector(right,   -1);
  if (keys['d'] || keys['arrowright']) dir.addScaledVector(right,    1);
function animate() {
  requestAnimationFrame(animate);
  const dt = clock.getDelta();
  const t = clock.getElapsedTime();

  // Flicker
  flickerTimer -= dt;
  if (flickerTimer <= 0) {
    const fl = 0.85 + Math.random() * 0.3;
    scene.children.forEach(c => { if (c.isLight && c.type !== 'SpotLight') c.intensity *= fl; });
    flickerTimer = 1 + Math.random() * 3;
  }

  // Movement
  const speed = 5 * dt;
  const forward = new THREE.Vector3(-Math.sin(yaw), 0, -Math.cos(yaw));
  const right   = new THREE.Vector3( Math.cos(yaw), 0, -Math.sin(yaw));
  dir.set(0,0,0);
  if (keys['w'] || keys['arrowup'])    dir.addScaledVector(forward,  1);
  if (keys['s'] || keys['arrowdown'])  dir.addScaledVector(forward, -1);
  if (keys['a'] || keys['arrowleft'])  dir.addScaledVector(right,   -1);
  if (keys['d'] || keys['arrowright']) dir.addScaledVector(right,    1);
  if (dir.length() > 0) dir.normalize();
  camera.position.addScaledVector(dir, speed);
  // Clamp inside room
  camera.position.x = Math.max(-HALL_W/2+0.5, Math.min(HALL_W/2-0.5, camera.position.x));
  camera.position.z = Math.max(-HALL_D/2+0.5, Math.min(HALL_D/2+4,   camera.position.z));
  camera.position.y = 1.7;

  // Look
  const qYaw   = new THREE.Quaternion().setFromAxisAngle(new THREE.Vector3(0,1,0), yaw);
  const qPitch = new THREE.Quaternion().setFromAxisAngle(new THREE.Vector3(1,0,0), pitch);
  camera.quaternion.copy(qYaw).multiply(qPitch);

  // Animatronic heads slowly turning
  scene.children.forEach((obj, i) => {
    if (obj.isGroup) {
      obj.rotation.y = Math.sin(t * 0.4 + i) * 0.3;
    }
  });

  renderer.render(scene, camera);
}
Line-by-line explanation (19 lines)

🔧 Subcomponents:

conditional Light Flicker System flickerTimer -= dt; if (flickerTimer <= 0) { const fl = 0.85 + Math.random() * 0.3; scene.children.forEach(c => { if (c.isLight && c.type !== 'SpotLight') c.intensity *= fl; }); flickerTimer = 1 + Math.random() * 3; }

Periodically dims all non-spotlight lights by a random amount to create tension and flickering

calculation Camera Movement Input Handling const speed = 5 * dt; const forward = new THREE.Vector3(-Math.sin(yaw), 0, -Math.cos(yaw)); const right = new THREE.Vector3( Math.cos(yaw), 0, -Math.sin(yaw)); dir.set(0,0,0); if (keys['w'] || keys['arrowup']) dir.addScaledVector(forward, 1); if (keys['s'] || keys['arrowdown']) dir.addScaledVector(forward, -1); if (keys['a'] || keys['arrowleft']) dir.addScaledVector(right, -1); if (keys['d'] || keys['arrowright']) dir.addScaledVector(right, 1); if (dir.length() > 0) dir.normalize(); camera.position.addScaledVector(dir, speed);

Reads WASD/arrow keys, calculates movement direction based on camera yaw, and moves the camera forward/backward/left/right

calculation Room Boundary Clamping camera.position.x = Math.max(-HALL_W/2+0.5, Math.min(HALL_W/2-0.5, camera.position.x)); camera.position.z = Math.max(-HALL_D/2+0.5, Math.min(HALL_D/2+4, camera.position.z)); camera.position.y = 1.7;

Prevents the camera from leaving the room—keeps it within bounds horizontally, maintains eye height at 1.7

calculation Camera Look (Yaw/Pitch) const qYaw = new THREE.Quaternion().setFromAxisAngle(new THREE.Vector3(0,1,0), yaw); const qPitch = new THREE.Quaternion().setFromAxisAngle(new THREE.Vector3(1,0,0), pitch); camera.quaternion.copy(qYaw).multiply(qPitch);

Combines yaw (left/right look) and pitch (up/down look) into a single rotation applied to the camera

for-loop Animatronic Head Movement scene.children.forEach((obj, i) => { if (obj.isGroup) { obj.rotation.y = Math.sin(t * 0.4 + i) * 0.3; } });

Rotates all group objects (the animatronics) side-to-side with a slowly varying sine wave, creating eerie looking animation

requestAnimationFrame(animate);
Schedules this function to run again next frame (60 times per second), creating the animation loop.
const dt = clock.getDelta();
Gets the time elapsed since the last frame in seconds—used to make movement speed frame-rate independent.
const t = clock.getElapsedTime();
Gets total elapsed time since start—used to drive sine-wave animations like the turning heads.
flickerTimer -= dt;
Decreases the flickering timer—when it reaches 0, a flicker happens.
const fl = 0.85 + Math.random() * 0.3;
Generates a random multiplier between 0.85 and 1.15 to adjust light intensity (dimming or brightening).
scene.children.forEach(c => { if (c.isLight && c.type !== 'SpotLight') c.intensity *= fl; });
Loops through all objects in the scene, and for each light (except spotlights), multiplies its intensity to create flicker.
flickerTimer = 1 + Math.random() * 3;
Resets the timer to a random value between 1 and 4 seconds—the next flicker will happen after this duration.
const speed = 5 * dt;
Movement distance per frame = 5 units/second × delta time. If dt is 0.016s (60fps), speed ≈ 0.08 units/frame.
const forward = new THREE.Vector3(-Math.sin(yaw), 0, -Math.cos(yaw));
Calculates the forward direction based on yaw (horizontal camera rotation)—uses sine/cosine to convert angle to direction vector.
const right = new THREE.Vector3( Math.cos(yaw), 0, -Math.sin(yaw));
Calculates the right direction perpendicular to forward—allows strafing left and right.
if (keys['w'] || keys['arrowup']) dir.addScaledVector(forward, 1);
If W or up-arrow is pressed, add the forward direction to the movement vector.
if (dir.length() > 0) dir.normalize();
If the player is moving, normalize the direction vector so diagonal movement isn't faster than cardinal directions.
camera.position.addScaledVector(dir, speed);
Updates the camera position: move in the accumulated direction at the calculated speed.
camera.position.x = Math.max(-HALL_W/2+0.5, Math.min(HALL_W/2-0.5, camera.position.x));
Clamps X position between -10+0.5 and 10-0.5, preventing escape to the left or right.
const qYaw = new THREE.Quaternion().setFromAxisAngle(new THREE.Vector3(0,1,0), yaw);
Creates a rotation around the Y axis (vertical) by yaw radians—controls left/right look.
const qPitch = new THREE.Quaternion().setFromAxisAngle(new THREE.Vector3(1,0,0), pitch);
Creates a rotation around the X axis by pitch radians—controls up/down look.
camera.quaternion.copy(qYaw).multiply(qPitch);
Applies both rotations to the camera: copy yaw, then multiply by pitch to combine them into one rotation.
if (obj.isGroup) { obj.rotation.y = Math.sin(t * 0.4 + i) * 0.3; }
For each group (animatronic), set its Y rotation to a sine wave: varies from -0.3 to +0.3 radians as time progresses, with each group offset slightly by index i.
renderer.render(scene, camera);
Draws the scene to the canvas using the current camera view.

📦 Key Variables

canvas HTMLElement

Reference to the <canvas> element in the HTML where Three.js renders the 3D scene

const canvas = document.getElementById('canvas');
renderer THREE.WebGLRenderer

The Three.js rendering engine that converts 3D geometry and lighting into 2D pixels on the canvas

const renderer = new THREE.WebGLRenderer({ canvas, antialias: true });
scene THREE.Scene

The 3D world container that holds all geometry, lights, and cameras—everything visible lives in the scene

const scene = new THREE.Scene();
camera THREE.PerspectiveCamera

The viewpoint—defines where the viewer is positioned and what direction they're looking, and controls perspective distortion

const camera = new THREE.PerspectiveCamera(75, window.innerWidth / window.innerHeight, 0.1, 100);
HALL_W number

Width of the main dining hall (20 units)—used to clamp camera movement and size walls

const HALL_W = 20;
HALL_D number

Depth of the main dining hall (18 units)—used to clamp camera movement and size walls

const HALL_D = 18;
ROOM_H number

Height of the ceiling (5 units)—used to position lights, doors, and the camera eye level

const ROOM_H = 5;
keys object

A key-value map tracking which keys are currently pressed (e.g., keys['w'] is true if W is held)

const keys = {};
pitch number

Camera rotation around X axis (up/down look)—ranges from -1.2 to 1.2 radians, controlled by mouse movement

let pitch = 0;
yaw number

Camera rotation around Y axis (left/right look)—controlled by mouse movement, wraps continuously

let yaw = 0;
locked boolean

Tracks whether pointer lock is active (mouse captured)—allows mouselook to work

let locked = false;
dir THREE.Vector3

Accumulator for movement direction—built from WASD input, normalized, then applied to camera position

const dir = new THREE.Vector3();
clock THREE.Clock

Timer that tracks elapsed time—provides dt (delta time) for frame-rate-independent movement and t (total time) for animations

const clock = new THREE.Clock();
flickerTimer number

Countdown timer for light flicker—decrements each frame, triggers a flicker when it reaches 0, then resets randomly

let flickerTimer = 0;

🔧 Potential Improvements (5)

Here are some ways this code could be enhanced:

PERFORMANCE animate() light flicker system

forEach loops through ALL scene children every frame looking for lights—with many objects, this becomes expensive. Better to maintain a separate lights array.

💡 Create a global array of lights during initialization: const lights = []; lights.push(pl) whenever a light is created. Then in animate(), only loop through lights: lights.forEach(light => { if(light.type !== 'SpotLight') light.intensity *= fl; });

BUG animate() camera movement clamping

Camera can wander into the Pirate Cove and Restrooms alcoves and get stuck because the clamping bounds don't account for those offset areas.

💡 Use more sophisticated collision detection (e.g., check distance to specific blocked zones) instead of simple axis-aligned box clamping, or refine the clamp boundaries to exclude alcove entrances.

STYLE makeWallTexture() and other texture generators

Magic numbers everywhere (0.55, 0.12, size * 0.08, bCount = 8) make the code hard to tweak—unclear what each number controls.

💡 Extract these as named parameters at the top of each function: const balloonBandY = size * 0.55; const balloonBandHeight = size * 0.12; const balloonCount = 8;

FEATURE Scene initialization

No sound effects or ambient audio—a pizzeria/FNAF scene would greatly benefit from background music and sound cues.

💡 Integrate p5.sound or Three.js audio (THREE.Audio, THREE.PositionalAudio) to play eerie background music, footstep sounds on movement, or animatronic audio cues.

BUG makeBear() and scene.children loop in animate()

The animatronic head turning applies to ALL groups in the scene, not just bears—sign textures and other groups might also rotate unintentionally.

💡 Mark bear groups with a custom property (e.g., bear.isBear = true) during creation, then check for it in animate(): if(obj.isGroup && obj.isBear) { ... }

🔄 Code Flow

Code flow showing makecheckertexture, makewalltexture, makecurtaintexture, makesigntexture, box, cyl, makebear, maketable, ceillight, animate

💡 Click on function names in the diagram to jump to their code

graph TD start[Start] --> setup[setup] setup --> draw[draw loop] draw --> animate[animate] animate --> flicker[flicker-system] flicker --> animate animate --> movement[movement-system] movement --> boundary[boundary-clamp] boundary --> look[look-system] look --> animate animate --> animatronic[animatronic-animation] animatronic --> animate animate --> makecheckertexture[makecheckertexture] makecheckertexture --> checkerboard[checkerboard-loop] checkerboard --> grunge[grunge-overlay] grunge --> makecheckertexture makecheckertexture --> draw click setup href "#fn-setup" click draw href "#fn-draw" click animate href "#fn-animate" click makecheckertexture href "#fn-makecheckertexture" click checkerboard href "#sub-checkerboard-loop" click grunge href "#sub-grunge-overlay" draw --> makewalltexture[makewalltexture] makewalltexture --> grout[grout-grid] grout --> balloon[balloon-loop] balloon --> makewalltexture makewalltexture --> draw click makewalltexture href "#fn-makewalltexture" click grout href "#sub-grout-grid" click balloon href "#sub-balloon-loop" draw --> makecurtaintexture[makecurtaintexture] makecurtaintexture --> gradient[gradient-setup] gradient --> folds[curtain-folds] folds --> makecurtaintexture makecurtaintexture --> draw click makecurtaintexture href "#fn-makecurtaintexture" click gradient href "#sub-gradient-setup" click folds href "#sub-curtain-folds" draw --> makesigntexture[makesigntexture] makesigntexture --> border[border-rect] border --> centered[centered-text] centered --> makesigntexture makesigntexture --> draw click makesigntexture href "#fn-makesigntexture" click border href "#sub-border-rect" click centered href "#sub-centered-text" draw --> box[box] box --> draw click box href "#fn-box" draw --> cyl[cyl] cyl --> draw click cyl href "#fn-cyl" draw --> makebear[makebear] makebear --> ear[ear-loop] ear --> eye[eye-loop] eye --> leg[leg-loop] leg --> makebear makebear --> draw click makebear href "#fn-makebear" click ear href "#sub-ear-loop" click eye href "#sub-eye-loop" click leg href "#sub-leg-loop" draw --> maketable[maketable] maketable --> tablelegs[table-legs] tablelegs --> chair[chair-loop] chair --> maketable maketable --> draw click maketable href "#fn-maketable" click tablelegs href "#sub-table-legs" click chair href "#sub-chair-loop" draw --> ceillight[ceillight] ceillight --> draw click ceillight href "#fn-ceillight"

❓ Frequently Asked Questions

What visual experience does the FNAF sketch provide?

The FNAF sketch creates a dark, atmospheric 3D environment inspired by Freddy Fazbear's Pizza, featuring fog and a spooky color palette.

How can users interact with the FNAF sketch?

Users can move around the environment using the WASD keys or arrow keys, look around with the mouse, and switch between rooms using the Q and E keys.

What creative coding techniques are showcased in this FNAF sketch?

This sketch demonstrates the use of 3D rendering with Three.js, including scene composition, camera manipulation, and fog effects to enhance immersion.

Preview

FNAF - p5.js creative coding sketch preview
Sketch Preview
Code flow diagram showing the structure of FNAF - Code flow showing makecheckertexture, makewalltexture, makecurtaintexture, makesigntexture, box, cyl, makebear, maketable, ceillight, animate
Code Flow Diagram