
Food

This sketch is an interactive emoji-catching game where players move a basket to catch falling food emojis while avoiding disasters and hazards. When bad emojis are caught, police officers, cars, helicopters, fire trucks, and tow trucks arrive to respond to the chaos in an escalating comedy of emergency vehicles.

🧪 Try This!

Experiment with the code by making these changes:

  1. Make good emojis much rarer — Change the 0.7 probability to 0.2 so only 20% of non-tulip/spider drops are food; now bad emojis dominate and the game becomes much harder
  2. Double the police car's speed — Police cars drive much faster across the screen, making the chaos even more comedic and sudden
  3. Make customers instantly leave after catching food — Change customerGrabDuration to 0 so customers don't pause—they catch the food and immediately walk off, speeding up the game flow
  4. Slow down the fire effect to linger longer — Increase explosionDuration so fires burn for 3 seconds instead of 1, making the chaos last longer on screen
  5. Make helicopter rotors spin faster — Increase helicopterRotorSpeed to make the spinning rotor animation more intense and visually exciting
Prefer the full editor? Open it there →

📖 About This Sketch

This sketch creates a fast-paced, emoji-based game where food and disasters fall from the sky and you control a basket to catch them. The game is visually delightful because every catch of a bad emoji triggers a dramatic response: police officers arrive to arrest offenders, police cars drive across the screen, helicopters crash and explode, fire trucks spray water, and tow trucks haul away the wreckage. Under the hood, it combines arrays, object state machines, collision detection, and drawing functions to create a complex, multi-layered interactive experience.

The code is organized into a setup() function that initializes the canvas and catcher, a draw() function that runs the game loop, and a suite of helper functions that spawn and manage different object types (droplets, customers, police, vehicles). By studying it, you'll learn how to manage multiple independent actors with different states and behaviors, how to detect collisions between different object types, and how to create emergent visual comedy through layered interactions.

⚙️ How It Works

  1. When the sketch loads, setup() creates a full-window canvas, positions the catcher (basket emoji) at the bottom-center, and defines a consistent ground level for all figures and vehicles.
  2. Every frame, draw() calls playGame(), which spawns random emojis at the top of the canvas (food 56% of the time, other bad items 24%, tulips 10%, spiders 10%) and updates all falling droplets by moving them downward.
  3. When a droplet collides with the catcher basket, a check determines if it's good (food) or bad: good emojis spawn a customer figure who walks in, does a 'grabbing' animation showing the food, then leaves; bad emojis reduce lives and trigger chaos.
  4. Bad emojis spawn offenders (red-shirted figures) and police officers (blue-shirted figures) who walk to the offender, stand there 'arresting' them, then walk off together. Tulips additionally spawn police cars that drive across the screen, explode in the middle, and drive off. Spiders spawn police helicopters that fly across, descend to the ground, explode, spawn fire trucks that spray water, which then spawn tow trucks that haul away the wreckage.
  5. All these objects—customers, offenders, police, cars, helicopters, fire trucks, tow trucks—are stored in separate arrays and updated and drawn each frame based on their current state (entering, leaving, arresting, driving, exploding, spraying, towing). The game displays the score (good catches), lives (bad catches remaining), and counts of each entity type.
  6. The player controls the catcher basket by moving the mouse, dragging, or touching the screen, and the canvas resizes responsively, recalculating positions for all figures and vehicles.

🎓 Concepts You'll Learn

State machines and finite statesCollision detection (AABB bounding boxes)Object arrays and managementAnimation and frame-based timingResponsive canvas and window resizingInteractive input handling (mouse, touch, drag)

📝 Code Breakdown

setup()

setup() runs once at the start and initializes all variables and object properties. The catcher object stores x, y, width, and height so we can check collisions with falling droplets using AABB bounding-box math. figureGroundY is a global constant that ensures all figures and ground vehicles share the same standing level, creating visual coherence.

function setup() {
  createCanvas(windowWidth, windowHeight);
  textSize(32);
  textAlign(CENTER, CENTER);
  rectMode(CENTER);
  ellipseMode(CENTER);

  catcher = {
    x: width / 2,
    y: height - catcherHeight / 2 - 20,
    width: catcherWidth,
    height: catcherHeight
  };

  figureGroundY = height - 50;

  policeCarY = figureGroundY - policeCarHeight / 2 - 10;
  fireTruckY = figureGroundY - fireTruckHeight / 2 - 10;
  towTruckY = figureGroundY - towTruckHeight / 2 - 10;
}
Line-by-line explanation (8 lines)

🔧 Subcomponents:

initialization Canvas and text setup createCanvas(windowWidth, windowHeight);

Creates a canvas that fills the entire window, setting the stage for all drawings

initialization Catcher object creation catcher = { x: width / 2, y: height - catcherHeight / 2 - 20, width: catcherWidth, height: catcherHeight };

Creates the basket object at the bottom-center of the canvas with width and height properties for collision detection

initialization Figure ground level figureGroundY = height - 50;

Establishes a consistent Y position where all walking figures and ground vehicles stand

createCanvas(windowWidth, windowHeight);
Creates a full-window canvas that will hold all game drawings
textSize(32);
Sets the default text size for emoji drawing (32 pixels)
textAlign(CENTER, CENTER);
Aligns all text (including emojis) to their center point rather than top-left, making positioning easier
rectMode(CENTER);
Positions all rectangles from their center, not their corner—essential for vehicles and figures
ellipseMode(CENTER);
Positions all circles and ellipses from their center—consistent with rect mode
catcher = { x: width / 2, y: height - catcherHeight / 2 - 20, width: catcherWidth, height: catcherHeight };
Creates the catcher object with x, y, width, and height properties; positioned at bottom-center with padding
figureGroundY = height - 50;
Defines a single Y position 50 pixels from the bottom where all figures and ground vehicles stand
policeCarY = figureGroundY - policeCarHeight / 2 - 10;
Positions police cars slightly above the ground level for visual alignment
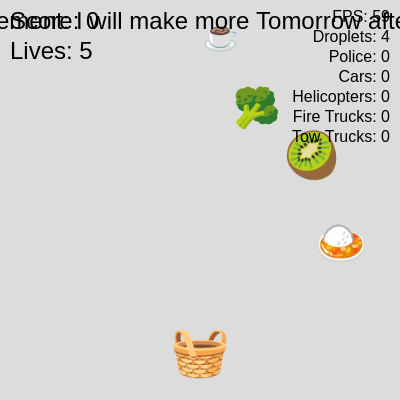
draw()

draw() is p5.js's main game loop, running 60 times per second by default. Each frame, we clear the canvas with background(), call playGame() to update all logic, and then display debug info and UI. The order matters: background() must come first so previous frames don't create trails.

🔬 These lines display debug info about the game state. What happens if you comment out (add // before) the FPS line? Can you add a new text line to display the score or lives?

  text(`FPS: ${floor(getFrameRate())}`, width - 10, 10);
  text(`Droplets: ${droplets.length}`, width - 10, 30);
  text(`Police: ${policeOfficers.length}`, width - 10, 50);
function draw() {
  background(220);

  playGame();

  fill(0);
  textSize(16);
  textAlign(RIGHT, TOP);
  text(`FPS: ${floor(getFrameRate())}`, width - 10, 10);
  text(`Droplets: ${droplets.length}`, width - 10, 30);
  text(`Police: ${policeOfficers.length}`, width - 10, 50);
  text(`Cars: ${policeCars.length}`, width - 10, 70);
  text(`Helicopters: ${policeHelicopters.length}`, width - 10, 90);
  text(`Fire Trucks: ${fireTrucks.length}`, width - 10, 110);
  text(`Tow Trucks: ${towTrucks.length}`, width - 10, 130);
  
  fill(0);
  textSize(24);
  textAlign(CENTER, TOP);
  text("Announcement: I will make more Tomorrow after school.", width / 2, 10);

  textAlign(CENTER, CENTER);
}
Line-by-line explanation (6 lines)

🔧 Subcomponents:

drawing Clear canvas background(220);

Erases the previous frame with a light gray color so drawings don't accumulate

function-call Game loop playGame();

Calls the main game logic function that updates all objects and handles collisions

drawing Debug stats text(`FPS: ${floor(getFrameRate())}`, width - 10, 10);

Displays frame rate and object counts in the top-right corner for performance monitoring

background(220);
Fills the entire canvas with light gray (220), erasing the previous frame so movement is visible
playGame();
Calls the main game function that spawns droplets, updates all objects, detects collisions, and draws everything
fill(0);
Sets the text color to black for the debug stats
textSize(16);
Sets text size to 16 pixels for the small debug info in the corner
textAlign(RIGHT, TOP);
Aligns debug text to the right edge and top of the screen
text(`FPS: ${floor(getFrameRate())}`, width - 10, 10);
Displays the frame rate (frames per second) 10 pixels from the right and top edges

playGame()

playGame() is the heart of the game loop. It spawns droplets, updates them, detects collisions with the catcher, and handles responses. The AABB collision check is the key mechanic: it tests whether two axis-aligned rectangles overlap by checking if one box is NOT completely to the left, right, above, or below the other. Looping backward through arrays (i--, i >= 0) is essential when removing items during iteration, because removing an item shifts the indices of items you haven't processed yet.

🔬 These four lines compute the bounding box of the droplet. What happens if you change the division-by-2 to division-by-3? Will droplets be easier or harder to catch (the box will be smaller)?

    let dLeft = droplet.x - droplet.size / 2;
    let dRight = droplet.x + droplet.size / 2;
    let dTop = droplet.y - droplet.size / 2;
    let dBottom = droplet.y + droplet.size / 2;
function playGame() {
  if (random(1) < dropletSpawnChance && droplets.length < maxDroplets) {
    spawnDroplet();
  }

  for (let i = droplets.length - 1; i >= 0; i--) {
    let droplet = droplets[i];
    droplet.y += droplet.speed;

    textSize(droplet.size);
    text(droplet.emoji, droplet.x, droplet.y);

    let dLeft = droplet.x - droplet.size / 2;
    let dRight = droplet.x + droplet.size / 2;
    let dTop = droplet.y - droplet.size / 2;
    let dBottom = droplet.y + droplet.size / 2;

    let cLeft = catcher.x - catcher.width / 2;
    let cRight = catcher.x + catcher.width / 2;
    let cTop = catcher.y - catcher.height / 2;
    let cBottom = catcher.y + catcher.height / 2;

    if (dLeft < cRight && dRight > cLeft && dTop < cBottom && dBottom > cTop) {
      if (droplet.isGood) {
        score++;
        spawnCustomer(catcher.x, catcher.y, droplet.emoji);
      } else {
        lives--;
        if (droplet.emoji === '🌷') {
          spawnPoliceCar();
        } else if (droplet.emoji === '🕷️') {
          spawnPoliceHelicopter();
        } else {
          let offender = spawnOffender(catcher.x, catcher.y);
          spawnPoliceOfficer(offender);
        }
      }
      droplets.splice(i, 1);
    }

    if (droplet.y > height + droplet.size / 2) {
      if (droplet.isGood) {
        missedGood++;
      }
      droplets.splice(i, 1);
    }
  }

  // ... [customer, police officer, police car, helicopter, fire truck, tow truck loops follow] ...

  textSize(48);
  text(catcherEmoji, catcher.x, catcher.y);

  fill(0);
  textSize(24);
  textAlign(LEFT, TOP);
  text(`Score: ${score}`, 10, 10);
  text(`Lives: ${lives}`, 10, 40);
  textAlign(CENTER, CENTER);
}
Line-by-line explanation (11 lines)

🔧 Subcomponents:

conditional Droplet spawning if (random(1) < dropletSpawnChance && droplets.length < maxDroplets) { spawnDroplet(); }

Randomly spawns a new droplet if under the spawn chance threshold and under the max droplet limit

for-loop Update and draw droplets for (let i = droplets.length - 1; i >= 0; i--) { ... }

Iterates backward through the droplet array, moving each emoji down, drawing it, and checking collisions

conditional AABB collision detection if (dLeft < cRight && dRight > cLeft && dTop < cBottom && dBottom > cTop) { ... }

Checks if droplet bounding box overlaps with catcher bounding box using axis-aligned bounding-box math

conditional Good emoji handling if (droplet.isGood) { score++; spawnCustomer(...); }

Increments score and spawns a happy customer when food is caught

conditional Bad emoji handling if (droplet.emoji === '🌷') { spawnPoliceCar(); } else if (droplet.emoji === '🕷️') { spawnPoliceHelicopter(); } else { ... }

Decrements lives and spawns appropriate emergency vehicles based on the bad emoji type

conditional Off-screen droplet removal if (droplet.y > height + droplet.size / 2) { ... droplets.splice(i, 1); }

Removes droplets that fall below the screen to prevent memory bloat

if (random(1) < dropletSpawnChance && droplets.length < maxDroplets) {
Uses random(1) to get a number 0–1; if less than spawn chance (e.g., 0.03 = 3%), spawn a droplet, but only if we're under the max limit
spawnDroplet();
Calls the function that creates a new emoji with random properties and adds it to the droplets array
for (let i = droplets.length - 1; i >= 0; i--) {
Loops backward through the droplet array (from end to start) so removing items during iteration doesn't skip any
droplet.y += droplet.speed;
Moves the droplet down each frame by adding its speed to its y position
text(droplet.emoji, droplet.x, droplet.y);
Draws the emoji at its current position using the text() function
let dLeft = droplet.x - droplet.size / 2;
Calculates the left edge of the droplet's bounding box for collision detection
if (dLeft < cRight && dRight > cLeft && dTop < cBottom && dBottom > cTop) {
Checks AABB overlap: droplet must be on all sides of catcher (left < cRight AND right > cLeft AND top < cBottom AND bottom > cTop)
if (droplet.isGood) {
If the droplet has isGood = true (it's food), increment score and spawn a customer
if (droplet.emoji === '🌷') { spawnPoliceCar(); }
Checks if the bad emoji is a tulip and spawns a police car if so
droplets.splice(i, 1);
Removes the droplet from the array after collision or falling off-screen
text(`Score: ${score}`, 10, 10);
Displays the current score at the top-left of the screen

spawnDroplet()

spawnDroplet() creates a new emoji object with randomized properties and adds it to the droplets array. The probability logic is a waterfall: check for tulip (10%), then spider (10%), then split the remaining 80% into 70% good and 30% other bad. This allows precise control over game difficulty. Each droplet is an object with emoji, position, size, speed, and an isGood flag that determines behavior on collision.

function spawnDroplet() {
  let emoji;
  let isGood;

  if (random(1) < 0.1) {
    emoji = '🌷';
    isGood = false;
  } else if (random(1) < 0.1) {
    emoji = '🕷️';
    isGood = false;
  } else {
    if (random(1) < 0.7) {
      emoji = random(goodEmojis);
      isGood = true;
    } else {
      emoji = random(otherBadEmojis);
      isGood = false;
    }
  }

  let size = random(30, 60);
  let speed = random(2, 6);
  let x = random(size / 2, width - size / 2);
  let y = -size / 2;

  droplets.push({
    emoji: emoji,
    x: x,
    y: y,
    size: size,
    speed: speed,
    isGood: isGood
  });
}
Line-by-line explanation (10 lines)

🔧 Subcomponents:

conditional Tulip spawn (10% chance) if (random(1) < 0.1) { emoji = '🌷'; isGood = false; }

10% chance to spawn a tulip, which is bad and triggers a police car

conditional Spider spawn (10% chance) else if (random(1) < 0.1) { emoji = '🕷️'; isGood = false; }

10% chance to spawn a spider, which is bad and triggers a police helicopter

conditional Food vs. other bad (80% split) if (random(1) < 0.7) { emoji = random(goodEmojis); isGood = true; }

Of the remaining 80%, 70% are good food emojis and 30% are other bad emojis

if (random(1) < 0.1) {
10% chance (0.1 out of 1.0) to spawn a tulip
emoji = '🌷';
Sets the emoji to a tulip (which looks like a flower)
isGood = false;
Marks the tulip as bad, so catching it will reduce lives and spawn a police car
else if (random(1) < 0.1) {
Another 10% chance for a spider (only if not tulip)
emoji = random(goodEmojis);
Picks a random food emoji from the goodEmojis array
let size = random(30, 60);
Randomly sizes each droplet between 30 and 60 pixels
let speed = random(2, 6);
Randomly speeds each droplet between 2 and 6 pixels per frame
let x = random(size / 2, width - size / 2);
Randomly places the droplet horizontally, constrained so it doesn't spawn off-screen
let y = -size / 2;
Starts the droplet above the top of the canvas (negative y)
droplets.push({ ... });
Adds the new droplet object to the droplets array so it will be updated and drawn

spawnCustomer()

spawnCustomer() creates a happy figure that walks in from the side when you catch a good emoji. The customer has a state machine with three states: 'entering' (walks toward target), 'grabbing' (shows the food emoji and pauses), and 'leaving' (walks off-screen). The targetX is constrained so customers don't spawn off-screen, and they remember the grabbedEmoji so the grabbing animation can display it.

function spawnCustomer(catcherX, catcherY, grabbedEmoji) {
  let size = random(30, 50);
  let entrySide = random(['left', 'right']);
  let startX = entrySide === 'left' ? -size / 2 : width + size / 2; 
  
  let targetX = constrain(catcherX + random(-catcher.width / 2, catcher.width / 2), size / 2, width - size / 2);
  let y = figureGroundY;

  customers.push({
    x: startX,
    y: y,
    size: size,
    state: 'entering',
    targetX: targetX,
    speed: customerWalkSpeed,
    grabEmoji: grabbedEmoji,
    grabStartTime: 0,
    bodyColor: skinColor,
    headColor: skinColor,
    shirtColor: customerShirtColor,
    isPolice: false
  });
}
Line-by-line explanation (6 lines)

🔧 Subcomponents:

initialization Random entry direction let entrySide = random(['left', 'right']);

Customers enter from a random side of the screen

initialization Target walking position let targetX = constrain(catcherX + random(-catcher.width / 2, catcher.width / 2), size / 2, width - size / 2);

Sets where the customer will walk to (near the catcher, with random offset, but constrained on-screen)

let size = random(30, 50);
Randomizes customer size between 30 and 50 pixels
let entrySide = random(['left', 'right']);
Picks a random side (left or right) for the customer to walk in from
let startX = entrySide === 'left' ? -size / 2 : width + size / 2;
If left side, start off-screen to the left; if right side, start off-screen to the right
let targetX = constrain(catcherX + random(-catcher.width / 2, catcher.width / 2), size / 2, width - size / 2);
Sets target x near the catcher (with random offset), but constrains it to stay on-screen
let y = figureGroundY;
Places the customer at the ground level where all figures stand
customers.push({ ... });
Creates the customer object with all properties and adds it to the customers array

spawnOffender()

spawnOffender() creates a red-shirted criminal figure when you catch a bad emoji. Unlike customers, offenders spawn at a fixed location (on the ground near the catcher) and immediately enter the 'arrested' state with zero speed. This function returns a reference to the offender so spawnPoliceOfficer() can link the two together, creating the visual relationship where the officer stands with the offender.

function spawnOffender(catcherX, catcherY) {
  let size = random(30, 50);
  let offenderX = constrain(catcherX + random(-catcher.width / 2, catcher.width / 2), size / 2, width - size / 2);
  let offenderY = figureGroundY;

  offenders.push({
    x: offenderX,
    y: offenderY,
    size: size,
    state: 'arrested',
    targetX: offenderX,
    speed: 0,
    bodyColor: skinColor,
    headColor: skinColor,
    shirtColor: offenderShirtColor,
    isPolice: false
  });
  return offenders[offenders.length - 1];
}
Line-by-line explanation (6 lines)
let size = random(30, 50);
Randomizes the offender's size between 30 and 50 pixels
let offenderX = constrain(catcherX + random(-catcher.width / 2, catcher.width / 2), size / 2, width - size / 2);
Positions the offender near the catcher with a random offset, constrained on-screen
let offenderY = figureGroundY;
Places the offender at the ground level with all other figures
state: 'arrested',
The offender starts in an 'arrested' state, meaning they're caught and waiting for police
shirtColor: offenderShirtColor,
Offenders wear a red shirt to visually distinguish them from customers (blue) and police (dark blue)
return offenders[offenders.length - 1];
Returns a reference to the newly created offender so the caller can link it to a police officer

spawnPoliceOfficer()

spawnPoliceOfficer() creates a blue-shirted police officer and immediately links them to an offender. The key is offenderRef, which is a reference (not a copy) to the offender object, so when the officer moves or is removed, we can update or remove the linked offender too. The arrestStartTime records when the arrest begins, and the main loop checks if millis() > arrestStartTime + arrestDuration to know when to transition to the 'leaving' state.

function spawnPoliceOfficer(offenderRef) {
  let size = random(30, 50);
  let officerX = offenderRef.x + random(-size/2, size/2);
  let officerY = figureGroundY;

  policeOfficers.push({
    x: officerX,
    y: officerY,
    size: size,
    state: 'arresting',
    targetX: officerX,
    speed: 0,
    arrestStartTime: millis(),
    offenderRef: offenderRef,
    bodyColor: skinColor,
    headColor: skinColor,
    shirtColor: policeShirtColor,
    isPolice: true
  });
  
  if (offenderRef) {
    offenderRef.state = 'arrested';
  }
}
Line-by-line explanation (8 lines)

🔧 Subcomponents:

initialization Officer spawn near offender let officerX = offenderRef.x + random(-size/2, size/2);

Spawns the officer right next to the offender with a small random offset

initialization Arrest timer start arrestStartTime: millis(),

Records the current time so the officer knows when to stop arresting and start leaving

initialization Officer-offender link offenderRef: offenderRef,

Stores a reference to the offender so the officer can position and remove them together

let size = random(30, 50);
Randomizes the officer's size between 30 and 50 pixels
let officerX = offenderRef.x + random(-size/2, size/2);
Positions the officer right next to the offender they're arresting
state: 'arresting',
Officer immediately enters 'arresting' state, standing with the offender
arrestStartTime: millis(),
Records the current time in milliseconds so we can check when arrestDuration has elapsed
offenderRef: offenderRef,
Stores a reference to the offender so the officer knows who to move with
shirtColor: policeShirtColor,
Officer wears a dark blue police uniform shirt
isPolice: true
Marks this figure as police so drawFigure() can add a police hat
if (offenderRef) { offenderRef.state = 'arrested'; }
Ensures the offender is in 'arrested' state so they stay still and are drawn with the officer

spawnPoliceCar()

spawnPoliceCar() creates a police car that drives across the screen in response to catching a tulip. The car has three states: 'driving' (moves toward the center), 'exploding' (fire effect displays), and 'leaving' (moves off-screen). lightState and lightToggleTime implement a blinking red-blue light effect. The car has a width and height for collision detection with figures.

function spawnPoliceCar() {
  let direction = random(['left', 'right']);
  let startX = direction === 'left' ? width + policeCarWidth / 2 : -policeCarWidth / 2;

  policeCars.push({
    x: startX,
    y: policeCarY,
    width: policeCarWidth,
    height: policeCarHeight,
    speed: policeCarSpeed,
    direction: direction,
    lightState: 0,
    lightToggleTime: 0,
    state: 'driving',
    explosionStartTime: 0
  });
}
Line-by-line explanation (4 lines)
let direction = random(['left', 'right']);
Randomly chooses which direction the car drives from
let startX = direction === 'left' ? width + policeCarWidth / 2 : -policeCarWidth / 2;
If driving left, start off-screen to the right; if driving right, start off-screen to the left
state: 'driving',
Car begins in 'driving' state, moving across the screen toward the middle
lightState: 0,
Lights start in state 0 (red), and toggle between 0 and 1 to create a blinking effect

spawnPoliceHelicopter()

spawnPoliceHelicopter() creates an animated police helicopter that responds to catching a spider. It has multiple states: 'flying' (move horizontally with spinning rotors), 'descending' (fall to the ground), 'exploding' (fire effect), 'waitingForFireTruck', 'beingSprayed', 'waitingForTowTruck', 'beingTowed', and 'leaving'. The rotorAngle is a variable that rotates continuously, creating the spinning rotor animation during flight. This triggers a cascade: explosion → fire truck → tow truck, creating a comedic chain of escalating emergency response.

function spawnPoliceHelicopter() {
  let direction = random(['left', 'right']);
  let startX = direction === 'left' ? width + policeHelicopterWidth / 2 : -policeHelicopterWidth / 2;

  policeHelicopters.push({
    x: startX,
    y: policeHelicopterY,
    width: policeHelicopterWidth,
    height: policeHelicopterHeight,
    speed: policeHelicopterFlyingSpeed,
    descentSpeed: policeHelicopterDescentSpeed,
    direction: direction,
    lightState: 0,
    lightToggleTime: 0,
    rotorAngle: 0,
    state: 'flying',
    descentStartTime: 0,
    explosionStartTime: 0
  });
}
Line-by-line explanation (3 lines)
let direction = random(['left', 'right']);
Helicopter flies from a random side
rotorAngle: 0,
Initializes rotor angle at 0; this will spin during the 'flying' state to animate the rotor
state: 'flying',
Helicopter begins flying horizontally; it transitions to 'descending' at the middle, then 'exploding'

spawnFireTruck()

spawnFireTruck() creates a fire truck that responds to a helicopter explosion. It takes a targetX parameter (the helicopter's position) and drives toward it from the appropriate side. The truck has three states: 'entering' (drive to target), 'spraying' (draw water spray effect), and 'leaving' (drive off-screen). After spraying, it spawns a tow truck to haul the helicopter away, continuing the escalation chain.

function spawnFireTruck(targetX) {
  let direction = targetX < width / 2 ? 'right' : 'left';
  let startX = direction === 'left' ? width + fireTruckWidth / 2 : -fireTruckWidth / 2;

  fireTrucks.push({
    x: startX,
    y: fireTruckY,
    width: fireTruckWidth,
    height: fireTruckHeight,
    speed: fireTruckSpeed,
    direction: direction,
    targetX: targetX,
    lightState: 0,
    lightToggleTime: 0,
    state: 'entering',
    sprayingStartTime: 0
  });
}
Line-by-line explanation (3 lines)
let direction = targetX < width / 2 ? 'right' : 'left';
Determines which side the fire truck should enter from based on the helicopter's x position
targetX: targetX,
The fire truck will drive to this x position (where the helicopter is) and stop to spray water
state: 'entering',
Fire truck starts in 'entering' state, driving toward the target helicopter

spawnTowTruck()

spawnTowTruck() creates the final vehicle in the escalation chain. It receives a reference to the helicopter and will drive to its location, attach to it, and tow it off-screen. The key mechanic is helicopterRef: the truck maintains a reference to the helicopter so it can position and move it during the 'towing' state, and then remove both together when the truck leaves the screen. This creates the visual comedy of the helicopter being dragged away.

function spawnTowTruck(helicopterRef) {
  let direction = helicopterRef.x < width / 2 ? 'right' : 'left';
  let startX = direction === 'left' ? width + towTruckWidth / 2 : -towTruckWidth / 2;

  towTrucks.push({
    x: startX,
    y: towTruckY,
    width: towTruckWidth,
    height: towTruckHeight,
    speed: towTruckSpeed,
    direction: direction,
    targetX: helicopterRef.x,
    lightState: 0,
    lightToggleTime: 0,
    state: 'entering',
    towingStartTime: 0,
    helicopterRef: helicopterRef
  });
}
Line-by-line explanation (4 lines)

🔧 Subcomponents:

initialization Helicopter reference helicopterRef: helicopterRef

Stores a reference to the helicopter so the tow truck can move and remove it together

let direction = helicopterRef.x < width / 2 ? 'right' : 'left';
Determines which side the tow truck enters from based on helicopter position
targetX: helicopterRef.x,
The tow truck will drive to the helicopter's x position
helicopterRef: helicopterRef
Stores a reference to the helicopter so the truck can attach to it and move it while towing
state: 'entering',
Tow truck starts in 'entering' state, driving toward the helicopter

drawFigure()

drawFigure() is a helper function that draws a generic human figure (customer, offender, or police) using rectangles and ellipses. The key is that the figure object stores color properties (bodyColor, headColor, shirtColor) and a state, allowing one function to draw many different types. The walking animation uses frameCount % 20 < 10 to create a 20-frame cycle where the legs swing back and forth. For police, it adds a hat to make them visually distinct.

function drawFigure(fig) {
  let legOffset = 0;
  if (fig.state === 'entering' || fig.state === 'leaving') {
    legOffset = (frameCount % 20 < 10) ? 2 : -2;
  }
  
  fill(fig.bodyColor);
  noStroke();
  rect(fig.x, fig.y + fig.size / 4, fig.size * 0.6, fig.size * 0.8);
  
  fill(fig.headColor);
  ellipse(fig.x, fig.y - fig.size / 4, fig.size * 0.5);
  
  fill(fig.shirtColor);
  rect(fig.x, fig.y + fig.size * 0.25, fig.size * 0.6, fig.size * 0.4);

  fill(fig.headColor);
  rect(fig.x - fig.size * 0.15 + legOffset, fig.y + fig.size * 0.65, fig.size * 0.2, fig.size * 0.5);
  rect(fig.x + fig.size * 0.15 - legOffset, fig.y + fig.size * 0.65, fig.size * 0.2, fig.size * 0.5);

  if (fig.isPolice) {
    fill(fig.shirtColor);
    rect(fig.x, fig.y - fig.size * 0.6, fig.size * 0.7, fig.size * 0.2);
    rect(fig.x, fig.y - fig.size * 0.75, fig.size * 0.4, fig.size * 0.3);
  }
}
Line-by-line explanation (9 lines)

🔧 Subcomponents:

conditional Walking leg animation if (fig.state === 'entering' || fig.state === 'leaving') { legOffset = (frameCount % 20 < 10) ? 2 : -2; }

Makes legs swing back and forth while entering or leaving, creating a walking illusion

conditional Police hat drawing if (fig.isPolice) { rect(...); rect(...); }

Draws a hat on police officers to visually distinguish them from customers and offenders

let legOffset = 0;
Initializes leg animation offset to 0
if (fig.state === 'entering' || fig.state === 'leaving') {
Only animate legs when the figure is walking (entering or leaving)
legOffset = (frameCount % 20 < 10) ? 2 : -2;
Uses frameCount to alternate leg offset every 10 frames (20-frame cycle), creating a walking swing
rect(fig.x, fig.y + fig.size / 4, fig.size * 0.6, fig.size * 0.8);
Draws the body (torso) as a rectangle, positioned below the head
ellipse(fig.x, fig.y - fig.size / 4, fig.size * 0.5);
Draws the head as a circle above the body
fill(fig.shirtColor);
Changes fill color to the shirt color (blue for customers, red for offenders, dark blue for police)
rect(fig.x, fig.y + fig.size * 0.25, fig.size * 0.6, fig.size * 0.4);
Draws the shirt over the body
rect(fig.x - fig.size * 0.15 + legOffset, fig.y + fig.size * 0.65, fig.size * 0.2, fig.size * 0.5);
Draws the left leg, offset by legOffset to create walking animation
if (fig.isPolice) {
Only draws the hat if this is a police officer (isPolice = true)

drawPoliceCar()

drawPoliceCar() draws a dark blue police car with blinking red-and-blue lights on top. The blinking is powered by millis(), which returns the current time in milliseconds. By comparing millis() to a stored lightToggleTime, we can create time-based animations without a separate timer. The light configuration flips based on lightState, creating the classic police siren effect.

🔬 This code draws alternating red and blue lights. What happens if you swap all the color fills so red and blue are reversed? The light pattern will flip! Or try using the same color twice—then the lights won't appear to alternate.

    if (car.lightState === 0) {
      fill(policeLightRed);
      rect(car.x - car.width / 4, car.y - car.height / 2, car.width / 6, car.height / 4);
      fill(policeLightBlue);
      rect(car.x + car.width / 4, car.y - car.height / 2, car.width / 6, car.height / 4);
    } else {
      fill(policeLightBlue);
      rect(car.x - car.width / 4, car.y - car.height / 2, car.width / 6, car.height / 4);
      fill(policeLightRed);
      rect(car.x + car.width / 4, car.y - car.height / 2, car.width / 6, car.height / 4);
    }
function drawPoliceCar(car) {
  fill(policeCarColor);
  noStroke();
  rect(car.x, car.y, car.width, car.height);

  if (car.state === 'driving' || car.state === 'leaving') {
    if (millis() > car.lightToggleTime) {
      car.lightState = 1 - car.lightState;
      car.lightToggleTime = millis() + 200;
    }

    noStroke();
    if (car.lightState === 0) {
      fill(policeLightRed);
      rect(car.x - car.width / 4, car.y - car.height / 2, car.width / 6, car.height / 4);
      fill(policeLightBlue);
      rect(car.x + car.width / 4, car.y - car.height / 2, car.width / 6, car.height / 4);
    } else {
      fill(policeLightBlue);
      rect(car.x - car.width / 4, car.y - car.height / 2, car.width / 6, car.height / 4);
      fill(policeLightRed);
      rect(car.x + car.width / 4, car.y - car.height / 2, car.width / 6, car.height / 4);
    }
    stroke(0);
  }
}
Line-by-line explanation (8 lines)

🔧 Subcomponents:

conditional Blinking light logic if (millis() > car.lightToggleTime) { car.lightState = 1 - car.lightState; car.lightToggleTime = millis() + 200; }

Toggles between red and blue lights every 200 milliseconds

conditional Light state drawing if (car.lightState === 0) { fill(policeLightRed); ... } else { fill(policeLightBlue); ... }

Draws lights in one configuration when lightState is 0, the opposite when 1

fill(policeCarColor);
Sets fill to dark blue for the car body
rect(car.x, car.y, car.width, car.height);
Draws the main car body as a dark blue rectangle
if (car.state === 'driving' || car.state === 'leaving') {
Only draw lights when the car is driving or leaving (not while exploding)
if (millis() > car.lightToggleTime) {
Checks if enough time has passed (200ms) to toggle the lights
car.lightState = 1 - car.lightState;
Flips lightState between 0 and 1 (if 0, becomes 1; if 1, becomes 0)
car.lightToggleTime = millis() + 200;
Schedules the next toggle for 200 milliseconds from now
if (car.lightState === 0) {
If lightState is 0, draw red left and blue right
rect(car.x - car.width / 4, car.y - car.height / 2, car.width / 6, car.height / 4);
Draws a light on the left side of the car roof

drawPoliceHelicopter()

drawPoliceHelicopter() draws a police helicopter with spinning tail and main rotors using transform operations (push, translate, rotate, pop). These are crucial p5.js functions: push() saves the drawing state, translate() moves the coordinate system, rotate() spins it around the origin, and pop() restores the previous state. By translating to the tail rotor's position and rotating, we create the spinning effect. The same technique is used for the main rotor. Lights blink using the same time-based toggle as the police car.

function drawPoliceHelicopter(helicopter) {
  push();
  translate(helicopter.x, helicopter.y);

  fill(helicopterBodyColor);
  noStroke();
  rect(0, 0, helicopter.width, helicopter.height, 10);

  fill(helicopterGlassColor);
  rect(helicopter.width * 0.25, -helicopter.height * 0.1, helicopter.width * 0.3, helicopter.height * 0.7, 5);

  fill(helicopterBodyColor);
  rect(-helicopter.width * 0.5, 0, helicopter.width * 0.5, helicopter.height * 0.2);
  rect(-helicopter.width * 0.7, -helicopter.height * 0.3, helicopter.height * 0.2, helicopter.height * 0.6);

  if (helicopter.state === 'flying') {
    helicopter.rotorAngle += helicopterRotorSpeed;
    push();
    translate(-helicopter.width * 0.7, -helicopter.height * 0.3);
    rotate(helicopter.rotorAngle);
    fill(helicopterRotorColor);
    rect(0, 0, helicopter.height * 0.05, helicopter.height * 0.4);
    rect(0, 0, helicopter.height * 0.4, helicopter.height * 0.05);
    pop();
  }

  if (helicopter.state === 'flying') {
    push();
    translate(helicopter.width * 0.1, -helicopter.height * 0.5);
    rotate(helicopter.rotorAngle);
    fill(helicopterRotorColor);
    rect(0, 0, policeHelicopterWidth * 0.8, 5);
    rect(0, 0, 5, policeHelicopterWidth * 0.8);
    pop();
  }

  if (helicopter.state === 'flying' || helicopter.state === 'descending') {
    if (millis() > helicopter.lightToggleTime) {
      helicopter.lightState = 1 - helicopter.lightState;
      helicopter.lightToggleTime = millis() + 200;
    }

    noStroke();
    if (helicopter.lightState === 0) {
      fill(policeLightRed);
      ellipse(helicopter.width * 0.1, -helicopter.height * 0.3, 10);
      fill(policeLightBlue);
      ellipse(helicopter.width * 0.3, -helicopter.height * 0.3, 10);
    } else {
      fill(policeLightBlue);
      ellipse(helicopter.width * 0.1, -helicopter.height * 0.3, 10);
      fill(policeLightRed);
      ellipse(helicopter.width * 0.3, -helicopter.height * 0.3, 10);
    }
  }
  
  pop();
}
Line-by-line explanation (9 lines)

🔧 Subcomponents:

conditional Spinning rotor animation if (helicopter.state === 'flying') { helicopter.rotorAngle += helicopterRotorSpeed; ... rotate(helicopter.rotorAngle); ... }

Rotates the tail and main rotors continuously while the helicopter is flying

drawing Coordinate transform push(); translate(helicopter.x, helicopter.y);

Moves the coordinate system so we can draw relative to the helicopter's position

push();
Saves the current transform state so changes don't affect other drawings
translate(helicopter.x, helicopter.y);
Moves the origin (0,0) to the helicopter's position, so all subsequent drawing is relative to it
fill(helicopterBodyColor);
Sets fill to dark blue for the helicopter body
rect(0, 0, helicopter.width, helicopter.height, 10);
Draws the main body as a rounded rectangle, now at local (0, 0) which is the helicopter's global position
fill(helicopterGlassColor);
Sets fill to semi-transparent blue for the cabin window
if (helicopter.state === 'flying') {
Only spin rotors while flying; they stop on the ground
helicopter.rotorAngle += helicopterRotorSpeed;
Increments the rotor angle each frame, making it spin
push(); translate(-helicopter.width * 0.7, -helicopter.height * 0.3); rotate(helicopter.rotorAngle);
Saves state, moves to tail rotor position, and rotates by the rotor angle
pop();
Restores the transform state so the main rotor drawing isn't affected by the tail rotor transform

drawFireTruck()

drawFireTruck() draws a red fire truck with a dark blue cabin and an angled-up ladder. The ladder is drawn using rotate(-PI/6), which rotates the local coordinate system 30 degrees counterclockwise before drawing the ladder rectangle. Using -PI/6 instead of a direct angle like 30 * PI/180 shows that p5.js works in radians. The truck has blinking lights like the police car, implemented with the same time-based toggle pattern.

function drawFireTruck(truck) {
  push();
  translate(truck.x, truck.y);

  fill(fireTruckColor);
  noStroke();
  rect(0, 0, truck.width, truck.height, 5);

  fill(policeCarColor);
  rect(truck.width * 0.35, -truck.height * 0.1, truck.width * 0.3, truck.height * 0.7, 3);

  fill(policeLightRed);
  rect(-truck.width * 0.25, -truck.height * 0.5, truck.width * 0.4, truck.height * 0.4, 3);

  push();
  translate(-truck.width * 0.25, -truck.height * 0.5);
  rotate(-PI / 6);
  fill(200);
  rect(0, 0, truck.height * 0.2, truck.width * 0.4);
  pop();

  if (millis() > truck.lightToggleTime) {
    truck.lightState = 1 - truck.lightState;
    truck.lightToggleTime = millis() + 200;
  }

  noStroke();
  if (truck.lightState === 0) {
    fill(policeLightRed);
    ellipse(truck.width * 0.1, -truck.height * 0.3, 10);
    fill(policeLightBlue);
    ellipse(truck.width * 0.3, -truck.height * 0.3, 10);
  } else {
    fill(policeLightBlue);
    ellipse(truck.width * 0.1, -truck.height * 0.3, 10);
    fill(policeLightRed);
    ellipse(truck.width * 0.3, -truck.height * 0.3, 10);
  }
  stroke(0);

  pop();
}
Line-by-line explanation (9 lines)

🔧 Subcomponents:

drawing Angled ladder rotate(-PI / 6);

Rotates the ladder by 30 degrees (PI/6 radians) to create an angled-up appearance

push();
Saves the current transform state
translate(truck.x, truck.y);
Moves the origin to the truck's position so everything is drawn relative to it
fill(fireTruckColor);
Sets fill to red for the fire truck body
rect(0, 0, truck.width, truck.height, 5);
Draws the main truck body as a red rectangle
fill(policeCarColor);
Sets fill to dark blue for the cabin
fill(policeLightRed);
Sets fill to red for the ladder base
rotate(-PI / 6);
Rotates by -30 degrees (negative = counterclockwise, so up-and-left), angling the ladder upward
fill(200);
Sets fill to gray for the ladder
rect(0, 0, truck.height * 0.2, truck.width * 0.4);
Draws the angled ladder as a thin rectangle

drawWaterSpray()

drawWaterSpray() is a simple visual effect that draws a semi-transparent blue triangle from the fire truck's ladder to the helicopter on the ground, simulating water spray. The triangle widens as it falls (from sprayX at the top to a wider base at figureGroundY), creating perspective. This function is called only during the fire truck's 'spraying' state, making the effect appear and disappear as the truck's state changes.

function drawWaterSpray(truck) {
  noStroke();
  fill(waterSprayColor);
  let sprayX = truck.x - truck.width * 0.25;
  let sprayY = truck.y - truck.height * 0.5;

  triangle(
    sprayX, sprayY,
    sprayX - truck.width * 0.5, figureGroundY - policeHelicopterHeight / 2,
    sprayX - truck.width * 0.1, figureGroundY - policeHelicopterHeight / 2
  );
}
Line-by-line explanation (5 lines)
noStroke();
Removes the outline so the water spray triangle is filled only
fill(waterSprayColor);
Sets fill to semi-transparent blue for the water effect
let sprayX = truck.x - truck.width * 0.25;
Calculates the x position of the ladder (where water sprays from)
let sprayY = truck.y - truck.height * 0.5;
Calculates the y position of the ladder top
triangle( ... );
Draws a triangle: from the ladder tip, spreading down to the helicopter's ground position, creating a fan-like water spray effect

drawTowTruck()

drawTowTruck() draws a yellow tow truck with a dark blue cabin, a gray towing arm, and a hook. The key feature is the direction-aware horizontal flip: scale(-1, 1) flips the truck so when moving left, it faces left (cabin on the left side of the body) instead of always facing right. This creates visual correctness without rewriting all the drawing code for each direction.

function drawTowTruck(truck) {
  push();
  translate(truck.x, truck.y);

  if (truck.direction === 'left') {
    scale(-1, 1);
  }

  fill(towTruckColor);
  noStroke();
  rect(0, 0, truck.width, truck.height, 5);

  fill(policeCarColor);
  rect(-truck.width * 0.3, -truck.height * 0.1, truck.width * 0.3, truck.height * 0.7, 3);

  fill(200);
  rect(truck.width * 0.3, -truck.height * 0.4, truck.width * 0.4, truck.height * 0.2);
  rect(truck.width * 0.5, -truck.height * 0.3, truck.height * 0.1, truck.height * 0.4);

  if (millis() > truck.lightToggleTime) {
    truck.lightState = 1 - truck.lightState;
    truck.lightToggleTime = millis() + 200;
  }

  noStroke();
  if (truck.lightState === 0) {
    fill(policeLightRed);
    ellipse(-truck.width * 0.1, -truck.height * 0.3, 10);
    fill(policeLightBlue);
    ellipse(truck.width * 0.1, -truck.height * 0.3, 10);
  } else {
    fill(policeLightBlue);
    ellipse(-truck.width * 0.1, -truck.height * 0.3, 10);
    fill(policeLightRed);
    ellipse(truck.width * 0.1, -truck.height * 0.3, 10);
  }
  stroke(0);

  pop();
}
Line-by-line explanation (8 lines)

🔧 Subcomponents:

conditional Horizontal flip for direction if (truck.direction === 'left') { scale(-1, 1); }

Flips the truck horizontally when moving left, so the cabin is always on the correct side

push();
Saves the current transform state
translate(truck.x, truck.y);
Moves the origin to the truck's position
if (truck.direction === 'left') { scale(-1, 1); }
If moving left, flips the truck horizontally (scale x by -1) so it faces the correct direction
fill(towTruckColor);
Sets fill to yellow/gold for the tow truck body
rect(0, 0, truck.width, truck.height, 5);
Draws the main truck body
fill(200);
Sets fill to gray for the towing arm and hook
rect(truck.width * 0.3, -truck.height * 0.4, truck.width * 0.4, truck.height * 0.2);
Draws the towing arm extending from the right side of the truck
rect(truck.width * 0.5, -truck.height * 0.3, truck.height * 0.1, truck.height * 0.4);
Draws the hook at the end of the towing arm

drawFireEffect()

drawFireEffect() creates an animated explosion effect using random particles. The key insight is using map() to fade intensity over time: as elapsed time increases, intensity decreases, and all fire particles shrink and fade. The fire color randomly alternates between red-orange and yellow-orange to create flicker. Each frame draws fresh random particles at slightly different positions, creating the illusion of a flickering, spreading fire that dies down as the explosion duration elapses.

function drawFireEffect(obj) {
  let elapsed = millis() - obj.explosionStartTime;
  let intensity = map(elapsed, 0, explosionDuration, 1, 0);

  if (obj.state === 'beingSprayed') {
    elapsed = millis() - obj.explosionStartTime - (explosionDuration - sprayingDuration);
    intensity = map(elapsed, 0, sprayingDuration, 1, 0);
  }

  if (intensity > 0) {
    noStroke();
    for (let i = 0; i < 15; i++) {
      let fireX = obj.x + random(-obj.width / 3, obj.width / 3);
      let fireY = obj.y - obj.height / 2 + random(-10, 10);

      let fireSize = random(10, 30) * intensity;
      let alpha = map(intensity, 0, 1, 0, 200);

      if (random(1) < 0.5) {
        fill(255, random(100, 200), 0, alpha);
      } else {
        fill(255, 255, random(0, 100), alpha);
      }
      ellipse(fireX, fireY, fireSize, fireSize * random(0.5, 1.5));
    }
  }
}
Line-by-line explanation (9 lines)

🔧 Subcomponents:

calculation Intensity fade-out let intensity = map(elapsed, 0, explosionDuration, 1, 0);

Maps elapsed time from 0 to explosionDuration onto a value that fades from 1 to 0, creating a fading fire effect

for-loop Draw fire particles for (let i = 0; i < 15; i++) { ... }

Draws 15 random orange/yellow circles each frame to create a flickering fire effect

let elapsed = millis() - obj.explosionStartTime;
Calculates how many milliseconds have elapsed since the explosion started
let intensity = map(elapsed, 0, explosionDuration, 1, 0);
Maps elapsed time (0 to explosionDuration) to intensity (1 to 0), so intensity starts at 1 and fades to 0
if (obj.state === 'beingSprayed') {
Special handling for helicopters being sprayed by water—fire fades faster
for (let i = 0; i < 15; i++) {
Loops 15 times to draw 15 fire particles each frame
let fireX = obj.x + random(-obj.width / 3, obj.width / 3);
Randomly positions fire horizontally around the object (within ±width/3)
let fireSize = random(10, 30) * intensity;
Creates random fire sizes (10–30 pixels) that shrink as intensity decreases, making fire fade out
let alpha = map(intensity, 0, 1, 0, 200);
Maps intensity (0 to 1) to opacity (0 to 200), making fire fade to transparent
fill(255, random(100, 200), 0, alpha);
Sets fire color to red-orange with random green component and fading alpha
ellipse(fireX, fireY, fireSize, fireSize * random(0.5, 1.5));
Draws an ellipse (fire particle) with random height-to-width ratio to create flickering shapes

checkCollision()

checkCollision() implements AABB (axis-aligned bounding-box) collision detection, the most common and efficient method for 2D games. The test is elegant: two boxes overlap if and only if the first box is NOT completely to the left, right, above, or below the second. So we check the opposite: left edge < right edge AND right edge > left edge (horizontal overlap) AND top edge < bottom edge AND bottom edge > top edge (vertical overlap). This function is used when police cars or helicopters hit figures to remove them from play.

function checkCollision(objA, objB) {
  let carLeft = objA.x - objA.width / 2;
  let carRight = objA.x + objA.width / 2;
  let carTop = objA.y - objA.height / 2;
  let carBottom = objA.y + objA.height / 2;

  let figureLeft = objB.x - objB.size * 0.3;
  let figureRight = objB.x + objB.size * 0.3;
  let figureTop = objB.y - objB.size / 4;
  let figureBottom = objB.y + objB.size / 4 + objB.size * 0.4;

  return carLeft < figureRight && carRight > figureLeft && carTop < figureBottom && carBottom > figureTop;
}
Line-by-line explanation (6 lines)

🔧 Subcomponents:

calculation AABB overlap check return carLeft < figureRight && carRight > figureLeft && carTop < figureBottom && carBottom > figureTop;

Tests if two axis-aligned bounding boxes overlap by checking all four sides

let carLeft = objA.x - objA.width / 2;
Calculates the left edge of the vehicle (police car or helicopter)
let carRight = objA.x + objA.width / 2;
Calculates the right edge of the vehicle
let carTop = objA.y - objA.height / 2;
Calculates the top edge of the vehicle
let carBottom = objA.y + objA.height / 2;
Calculates the bottom edge of the vehicle
let figureLeft = objB.x - objB.size * 0.3;
Calculates the left edge of the figure (customer or offender)
return carLeft < figureRight && carRight > figureLeft && carTop < figureBottom && carBottom > figureTop;
Returns true if boxes overlap: car must be to the left of figure's right AND to the right of figure's left AND above figure's bottom AND below figure's top. If all four conditions are true, they collide.

touchMoved()

touchMoved() handles continuous touch input on mobile devices. When the player's finger moves on the screen, p5.js calls touchMoved() repeatedly with the updated touches array. By checking touches[0].x (the first finger's x position), we track the catcher horizontally. constrain() ensures the catcher doesn't move off-screen. Returning false prevents the browser from scrolling the page, keeping the game playable on mobile.

function touchMoved() {
  if (touches.length > 0) {
    catcher.x = touches[0].x;
    catcher.x = constrain(catcher.x, catcher.width / 2, width - catcher.width / 2);
  }
  return false;
}
Line-by-line explanation (4 lines)
if (touches.length > 0) {
Checks if there is at least one touch on the screen
catcher.x = touches[0].x;
Sets the catcher x position to the first touch's x coordinate
catcher.x = constrain(catcher.x, catcher.width / 2, width - catcher.width / 2);
Constrains the catcher to stay on-screen (left boundary = width/2, right boundary = width - width/2)
return false;
Returns false to prevent default scroll behavior on mobile devices

mousePressed()

mousePressed() is called once when the mouse button is clicked. It moves the catcher to the click position and constrains it on-screen. This gives the player click-to-move control on desktop.

function mousePressed() {
  catcher.x = mouseX;
  catcher.x = constrain(catcher.x, catcher.width / 2, width - catcher.width / 2);
}
Line-by-line explanation (2 lines)
catcher.x = mouseX;
Sets the catcher x position to where the mouse was clicked
catcher.x = constrain(catcher.x, catcher.width / 2, width - catcher.width / 2);
Constrains the catcher to stay on-screen

mouseDragged()

mouseDragged() is called repeatedly while the mouse button is held down and the mouse moves. This gives smooth, continuous tracking of the catcher as the player drags it horizontally across the screen.

function mouseDragged() {
  catcher.x = mouseX;
  catcher.x = constrain(catcher.x, catcher.width / 2, width - catcher.width / 2);
}
Line-by-line explanation (2 lines)
catcher.x = mouseX;
Sets the catcher x position to the current mouse x while dragging
catcher.x = constrain(catcher.x, catcher.width / 2, width - catcher.width / 2);
Constrains the catcher to stay on-screen

windowResized()

windowResized() is called whenever the browser window is resized. It updates the canvas size and recalculates all positions (catcher, figures, vehicles) so they scale responsively. This keeps the game playable at any screen size.

function windowResized() {
  resizeCanvas(windowWidth, windowHeight);
  catcher.x = width / 2;
  catcher.y = height - catcherHeight / 2 - 20;

  figureGroundY = height - 50;
  policeCarY = figureGroundY - policeCarHeight / 2 - 10;
  fireTruckY = figureGroundY - fireTruckHeight / 2 - 10;
  towTruckY = figureGroundY - towTruckHeight / 2 - 10;
}
Line-by-line explanation (5 lines)
resizeCanvas(windowWidth, windowHeight);
Resizes the canvas to match the new window dimensions
catcher.x = width / 2;
Recenters the catcher horizontally
catcher.y = height - catcherHeight / 2 - 20;
Repositions the catcher vertically relative to the new height
figureGroundY = height - 50;
Recalculates the ground level for all figures relative to the new canvas height
policeCarY = figureGroundY - policeCarHeight / 2 - 10;
Recalculates police car y position relative to the new ground level

📦 Key Variables

goodEmojis array

Stores food and drink emoji strings that are worth catching for points

const goodEmojis = ['🧅', '🥩', '🍛', '🍞', ...];
badEmojis array

Stores all bad emoji strings (disasters, weather, cutlery, tulips, spiders)

const badEmojis = ['🌪️', '⚡️', '☄️', '💥', ...];
otherBadEmojis array

Stores bad emojis excluding tulips and spiders (used for general bad emoji spawning)

const otherBadEmojis = ['🌪️', '⚡️', '☄️', '💥', ...];
droplets array

Stores all falling emoji objects (emoji, x, y, size, speed, isGood)

let droplets = [];
customers array

Stores happy customer figures that walk in after catching good emojis

let customers = [];
offenders array

Stores red-shirted criminal figures spawned when bad emojis are caught

let offenders = [];
policeOfficers array

Stores blue-shirted police figures that arrest offenders

let policeOfficers = [];
policeCars array

Stores police cars that drive across the screen in response to tulips

let policeCars = [];
policeHelicopters array

Stores police helicopters that fly, descend, and explode in response to spiders

let policeHelicopters = [];
fireTrucks array

Stores fire trucks that spray water on exploded helicopters

let fireTrucks = [];
towTrucks array

Stores tow trucks that haul away sprayed helicopters

let towTrucks = [];
catcher object

Stores the basket object with x, y, width, height for collision detection

let catcher = { x: width/2, y: height-50, width: 100, height: 50 };
score number

Counts the number of good emojis (food) the player has caught

let score = 0;
lives number

Counts remaining lives; decreases each time a bad emoji is caught

let lives = 5;
missedGood number

Counts the number of good emojis that fell off-screen without being caught

let missedGood = 0;
figureGroundY number

The y position where all walking figures and ground vehicles stand; set relative to canvas height

let figureGroundY = height - 50;
dropletSpawnChance number

Probability (0–1) that a droplet spawns each frame; higher = more frequent spawning

const dropletSpawnChance = 0.03;
maxDroplets number

Maximum number of droplets allowed on screen at once; prevents lag

const maxDroplets = 20;
customerGrabDuration number

Milliseconds a customer pauses while 'grabbing' the food before leaving

const customerGrabDuration = 1000;
customerWalkSpeed number

Pixels per frame customers move horizontally when entering or leaving

const customerWalkSpeed = 2;
arrestDuration number

Milliseconds a police officer stands with an offender before walking away

const arrestDuration = 2500;
policeWalkSpeed number

Pixels per frame police officers and offenders move when leaving

const policeWalkSpeed = 1.25;
policeCarSpeed number

Pixels per frame police cars move horizontally across the screen

const policeCarSpeed = 8;
explosionDuration number

Milliseconds the fire effect displays after car or helicopter crashes

const explosionDuration = 1000;
policeHelicopterFlyingSpeed number

Pixels per frame the helicopter moves horizontally while flying

const policeHelicopterFlyingSpeed = 4;
policeHelicopterDescentSpeed number

Pixels per frame the helicopter falls when descending to the ground

const policeHelicopterDescentSpeed = 1;
helicopterRotorSpeed number

Radians per frame the helicopter rotors spin

const helicopterRotorSpeed = 0.1;
fireTruckSpeed number

Pixels per frame fire trucks move horizontally

const fireTruckSpeed = 5;
sprayingDuration number

Milliseconds the fire truck sprays water on the helicopter

const sprayingDuration = 1500;
towTruckSpeed number

Pixels per frame tow trucks move horizontally

const towTruckSpeed = 4;
towingDuration number

Milliseconds the tow truck spends 'hooking up' before driving away with the helicopter

const towingDuration = 1500;

🔧 Potential Improvements (6)

Here are some ways this code could be enhanced:

PERFORMANCE playGame() droplet loop

Looping backward through droplets every frame is correct for removal, but AABB collision checks are computed even for droplets far from the catcher, wasting CPU cycles

💡 Add a quick distance check before full AABB: if (dist(droplet.x, droplet.y, catcher.x, catcher.y) > droplet.size + catcher.width) continue; This skips expensive AABB for distant droplets.

BUG spawnDroplet() probability logic

The probability calculations call random() multiple times independently, making the actual distribution slightly unpredictable. For example, if the first random(1) < 0.1 check fails, a second independent random(1) < 0.1 check is made, but now only 90% of the 80% remaining drops get checked, not a clean 10%+10%+80% split

💡 Use a single random value: let r = random(1); if (r < 0.1) { tulip } else if (r < 0.2) { spider } else if (r < 0.9) { good } else { bad }. This guarantees exact probability splits.

STYLE playGame() police car/helicopter spawning section

The bad emoji handling uses nested if-else chains that are hard to follow: if tulip, else if spider, else general bad. As more bad emoji types are added, this cascade grows unwieldy

💡 Use a switch statement or a lookup object: const badEmojiBehavior = { '🌷': spawnPoliceCar, '🕷️': spawnPoliceHelicopter, ... }; This makes adding new bad emoji types cleaner.

BUG drawFigure() walking animation

Walking animation uses frameCount, which increases every frame. For slow-motion or high-framerate devices, legs may move differently relative to actual time

💡 Use millis() instead: let legOffset = (floor(millis() / 100) % 2 === 0) ? 2 : -2; This makes walking speed consistent across all framerates.

FEATURE Game initialization

The game has no win/lose condition—lives can go negative, and there's no way to reset or restart

💡 Add a game-over check in playGame(): if (lives <= 0) { text('GAME OVER! Final Score: ' + score, width/2, height/2); noLoop(); }. Also add a button or key press to restart.

PERFORMANCE drawFireEffect() fire particles

The function draws 15 random fire particles every frame, calling random() 45+ times per explosion. With multiple explosions, this is expensive

💡 Pre-compute fire particles at the start of the explosion state and animate them, rather than generating new random ones every frame. Or reduce the particle count from 15 to 8 and see if visual quality is acceptable.

🔄 Code Flow

Code flow showing setup, draw, playgame, spawndroplet, spawncustomer, spawnoffender, spawnpoliceofficer, spawnpolicecar, spawnpolicehelicopter, spawnfiretruck, spawntowttruck, drawfigure, drawpolicecar, drawpolicehelicopter, drawfiretruck, drawwaterspray, drawtowttruck, drawfireeffect, checkcollision, touchmoved, mousepressed, mousedragged, windowresized

💡 Click on function names in the diagram to jump to their code

graph TD start[Start] --> setup[setup] setup --> canvas-creation[Canvas and text setup] setup --> catcher-init[Catcher object creation] setup --> ground-level[Figure ground level] setup --> draw[draw loop] click setup href "#fn-setup" click canvas-creation href "#sub-canvas-creation" click catcher-init href "#sub-catcher-init" click ground-level href "#sub-ground-level" draw --> background-clear[Clear canvas] draw --> game-logic[Game loop] draw --> debug-display[Debug stats] click draw href "#fn-draw" click background-clear href "#sub-background-clear" click game-logic href "#sub-game-logic" click debug-display href "#sub-debug-display" game-logic --> droplet-spawn[Droplet spawning] game-logic --> droplet-update-loop[Update and draw droplets] click droplet-spawn href "#sub-droplet-spawn" click droplet-update-loop href "#sub-droplet-update-loop" droplet-spawn --> tulip-chance[Tulip spawn (10% chance)] droplet-spawn --> spider-chance[Spider spawn (10% chance)] droplet-spawn --> good-vs-bad-split[Food vs. other bad (80% split)] click tulip-chance href "#sub-tulip-chance" click spider-chance href "#sub-spider-chance" click good-vs-bad-split href "#sub-good-vs-bad-split" droplet-update-loop --> aabb-collision[AABB collision detection] droplet-update-loop --> off-screen-removal[Off-screen droplet removal] click aabb-collision href "#sub-aabb-collision" click off-screen-removal href "#sub-off-screen-removal" aabb-collision --> good-emoji-response[Good emoji handling] aabb-collision --> bad-emoji-response[Bad emoji handling] click good-emoji-response href "#sub-good-emoji-response" click bad-emoji-response href "#sub-bad-emoji-response" good-emoji-response --> spawncustomer[spawnCustomer] bad-emoji-response --> spawnoffender[spawnOffender] click spawncustomer href "#fn-spawncustomer" click spawnoffender href "#fn-spawnoffender" spawncustomer --> entry-side[Random entry direction] spawncustomer --> target-position[Target walking position] click entry-side href "#sub-entry-side" click target-position href "#sub-target-position" spawnoffender --> officer-positioning[Officer spawn near offender] spawnoffender --> arrest-timer[Arrest timer start] spawnoffender --> offender-linking[Officer-offender link] click officer-positioning href "#sub-officer-positioning" click arrest-timer href "#sub-arrest-timer" click offender-linking href "#sub-offender-linking" spawncustomer --> drawfigure[drawFigure] spawnoffender --> drawfigure click drawfigure href "#fn-drawfigure" drawfigure --> walking-animation[Walking leg animation] drawfigure --> police-hat[Police hat drawing] click walking-animation href "#sub-walking-animation" click police-hat href "#sub-police-hat"

❓ Frequently Asked Questions

What visual elements does the Food sketch showcase?

The Food sketch visually presents a variety of food and drink emojis falling from the top of the screen, while incorporating police and emergency vehicles as part of the scene.

How can users interact with the Food sketch?

Users interact by controlling a basket emoji to catch falling food emojis, aiming to avoid the bad emojis that will cost them lives.

What creative coding concepts are demonstrated in the Food sketch?

The sketch demonstrates concepts such as emoji-based dynamic animations, object arrays for managing multiple elements, and collision detection for interactive gameplay.

Preview

Food - p5.js creative coding sketch preview
Sketch Preview
Code flow diagram showing the structure of Food - Code flow showing setup, draw, playgame, spawndroplet, spawncustomer, spawnoffender, spawnpoliceofficer, spawnpolicecar, spawnpolicehelicopter, spawnfiretruck, spawntowttruck, drawfigure, drawpolicecar, drawpolicehelicopter, drawfiretruck, drawwaterspray, drawtowttruck, drawfireeffect, checkcollision, touchmoved, mousepressed, mousedragged, windowresized
Code Flow Diagram