
fun fps

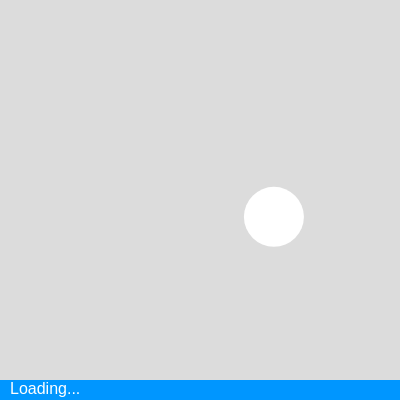
This sketch animates a soft red ball bouncing around a responsive canvas while a bright blue loading bar steadily fills across the bottom. The canvas automatically resizes when you resize the window, and the ball adapts its collision detection to avoid the loading bar area.

🧪 Try This!

Experiment with the code by making these changes:

  1. Make the ball bounce faster — Increase the initial velocity range so the ball moves further each frame, creating rapid chaotic motion.
  2. Change the ball color to cyan — The ball instantly becomes a bright cyan-blue instead of soft red, completely transforming the visual tone.
  3. Speed up the loading bar fill — The blue progress bar advances faster, creating a sense of urgency and completing before the ball bounces as much.
  4. Remove the loading bar text — The 'Loading...' text disappears, giving the bar a cleaner minimalist look while keeping the visual progress animation.
  5. Make the background dark — The gray background becomes deep navy, creating high contrast with the red ball and blue loading bar for a more dramatic aesthetic.
  6. Prevent the ball from slowing down on bounces — The ball maintains consistent speed by multiplying velocity by -0.95 instead of -1, making bounces feel more realistic with subtle friction.
Prefer the full editor? Open it there →

📖 About This Sketch

This sketch creates two animated elements working in harmony: a red ball that bounces off all four canvas edges, and a bright blue loading bar that fills from left to right along the bottom. The visual appeal comes from the contrast between the chaotic ball motion and the methodical loading bar progress—it feels like the ball is loading something mysterious. The code uses p5.js velocity physics for smooth animation, collision detection to bounce the ball, and the windowResized() function to make the entire sketch responsive to window size changes.

The code is organized into three main functions: setup() initializes the canvas and ball properties, draw() animates the ball and loading bar every frame, and windowResized() handles responsive behavior when the window size changes. By studying this sketch you will learn how to combine multiple animated elements, how to adjust collision boundaries for complex layouts, and how to make interactive sketches that adapt to any screen size.

⚙️ How It Works

  1. When the sketch loads, setup() creates a canvas that fills the entire window, places the ball at the center with a random initial velocity, and prepares the text styling for the loading bar.
  2. Every frame, draw() clears the background and updates the ball's position by adding its velocity values to its coordinates.
  3. Two collision detection checks reverse the ball's velocity when it approaches canvas edges, accounting for the ball's radius and the loading bar area at the bottom.
  4. The loading bar width grows linearly by adding loadingSpeed pixels each frame, capped at the canvas width so it eventually fills completely.
  5. Two rectangles are drawn—a gray background bar and a blue progress bar on top—with white text overlaid.
  6. If the user resizes their window, windowResized() automatically adjusts the canvas dimensions and re-centers the ball.

🎓 Concepts You'll Learn

Animation loopCollision detection with radiusVelocity physicsResponsive canvas resizingMultiple animated elementsCanvas coordinate system

📝 Code Breakdown

setup()

setup() is called once when the sketch starts. It's where you prepare your canvas size, initialize variables, and set default styling. Everything you do here happens before the first frame draws.

🔬 These lines set the ball's starting speed. What happens if you change 5 to 10? To 0.5? How does the initial velocity range affect the animation?

  ballVX = random(-5, 5); // Random horizontal speed between -5 and 5
  ballVY = random(-5, 5); // Random vertical speed between -5 and 5
function setup() {
  // Create a canvas that fills the entire window
  createCanvas(windowWidth, windowHeight);
  
  // Initialize the ball at the center of the canvas with a random initial velocity
  ballX = width / 2;
  ballY = height / 2;
  ballVX = random(-5, 5); // Random horizontal speed between -5 and 5
  ballVY = random(-5, 5); // Random vertical speed between -5 and 5
  
  // Set styling for the ball
  noStroke(); // No border for the ball
  fill(255, 100, 100); // Reddish color for the ball
  
  // Set styling for the loading bar text
  textSize(16); // Font size for the loading text
  textAlign(LEFT, CENTER); // Align text to the left and vertically center
}
Line-by-line explanation (9 lines)

🔧 Subcomponents:

function-call Canvas Initialization createCanvas(windowWidth, windowHeight);

Creates a canvas that fills the entire browser window using windowWidth and windowHeight variables

calculation Ball Position Setup ballX = width / 2;

Places the ball at the horizontal center of the canvas

calculation Random Velocity Assignment ballVX = random(-5, 5);

Gives the ball a random starting horizontal velocity between -5 and 5 pixels per frame

function-call Visual Styling fill(255, 100, 100);

Sets the fill color to a soft red (RGB: 255, 100, 100) for all shapes drawn after this line

createCanvas(windowWidth, windowHeight);
Creates a drawing canvas that automatically matches the current browser window size using p5.js global variables
ballX = width / 2;
Sets the ball's starting horizontal position to the exact center of the canvas (width divided by 2)
ballY = height / 2;
Sets the ball's starting vertical position to the exact center of the canvas
ballVX = random(-5, 5);
Picks a random velocity between -5 and 5 for horizontal movement, giving the ball a unique starting direction each time
ballVY = random(-5, 5);
Picks a random velocity between -5 and 5 for vertical movement, creating unpredictable diagonal motion
noStroke();
Removes the black outline that p5.js normally draws around shapes
fill(255, 100, 100);
Sets the color for all filled shapes to a soft red by specifying RGB values
textSize(16);
Sets the font size for any text drawn later to 16 pixels
textAlign(LEFT, CENTER);
Aligns text so its left edge starts at the x position and it centers vertically around the y position

draw()

draw() runs 60 times per second and is where all animation and rendering happens. Every frame, we update positions, check for collisions, and redraw everything. The order matters: background() must come first to clear the old frame, then we update and draw.

🔬 This code bounces the ball off left and right edges by flipping ballVX. What happens if you change *= -1 to *= -0.8 so the ball loses a little speed with each bounce? Or *= -1.1 to gain speed?

  if (ballX + ballRadius > width || ballX - ballRadius < 0) {
    ballVX *= -1; // Reverse horizontal velocity
  }

🔬 The loading bar grows by multiplying frameCount by loadingSpeed. What happens if you remove the min() line entirely and use just the first line? (The bar will stretch beyond the canvas!) Why is min() there?

  let currentLoadingWidth = frameCount * loadingSpeed;
  
  // Use min() to ensure the loading bar never exceeds the width of the canvas.
  // This makes it fill the screen and then stay full.
  currentLoadingWidth = min(currentLoadingWidth, width);
function draw() {
  background(220); // Clear the background each frame (light gray)
  
  // --- Ball Animation ---
  
  // Update the ball's position based on its velocity
  ballX += ballVX;
  ballY += ballVY;
  
  // Check for collisions with the canvas edges (left/right)
  // If the ball hits an edge, reverse its horizontal velocity
  if (ballX + ballRadius > width || ballX - ballRadius < 0) {
    ballVX *= -1; // Reverse horizontal velocity
  }
  
  // Check for collisions with the canvas edges (top/bottom)
  // Note: The bottom edge is adjusted to accommodate the loading bar
  if (ballY + ballRadius > height - loadingBarHeight || ballY - ballRadius < 0) {
    ballVY *= -1; // Reverse vertical velocity
  }
  
  // Draw the ball at its current position
  circle(ballX, ballY, ballRadius * 2); // circle(x, y, diameter)
  
  // --- Infinite Fake Loading Bar ---
  
  // Calculate the current width of the loading bar progress.
  // It will grow by 'loadingSpeed' pixels per frame.
  let currentLoadingWidth = frameCount * loadingSpeed;
  
  // Use min() to ensure the loading bar never exceeds the width of the canvas.
  // This makes it fill the screen and then stay full.
  currentLoadingWidth = min(currentLoadingWidth, width);
  
  // Draw the background of the loading bar (gray)
  fill(180);
  rect(0, height - loadingBarHeight, width, loadingBarHeight); // rect(x, y, width, height)
  
  // Draw the progress part of the loading bar (blue)
  fill(0, 150, 255);
  rect(0, height - loadingBarHeight, currentLoadingWidth, loadingBarHeight);
  
  // Draw the loading text on top of the loading bar
  fill(255); // White text
  text(loadingText, 10, height - loadingBarHeight / 2); // Position text at bottom-left
}
Line-by-line explanation (16 lines)

🔧 Subcomponents:

calculation Velocity-Based Position Update ballX += ballVX;

Moves the ball horizontally by adding its velocity to its current position each frame

conditional Left/Right Boundary Collision if (ballX + ballRadius > width || ballX - ballRadius < 0) {

Detects when the ball's edge crosses left or right canvas boundaries and reverses horizontal motion

conditional Top/Bottom Boundary Collision if (ballY + ballRadius > height - loadingBarHeight || ballY - ballRadius < 0) {

Detects when the ball's edge crosses top or bottom boundaries (accounting for the loading bar) and reverses vertical motion

function-call Circle Rendering circle(ballX, ballY, ballRadius * 2);

Draws the red ball at its current position with diameter equal to twice the radius

calculation Loading Bar Progress Calculation let currentLoadingWidth = frameCount * loadingSpeed;

Calculates how wide the progress bar should be based on frame count and loading speed

function-call Loading Bar Width Cap currentLoadingWidth = min(currentLoadingWidth, width);

Prevents the loading bar from growing wider than the canvas by using the min() function

function-call Background Loading Bar rect(0, height - loadingBarHeight, width, loadingBarHeight);

Draws the gray background rectangle for the loading bar across the bottom of the canvas

function-call Progress Loading Bar rect(0, height - loadingBarHeight, currentLoadingWidth, loadingBarHeight);

Draws the blue progress bar on top of the gray background, growing in width each frame

background(220);
Clears the canvas with a light gray color (RGB value 220, 220, 220) to remove what was drawn last frame and start fresh
ballX += ballVX;
Adds the horizontal velocity to the ball's x position, moving it left or right depending on the sign of ballVX
ballY += ballVY;
Adds the vertical velocity to the ball's y position, moving it up or down
if (ballX + ballRadius > width || ballX - ballRadius < 0) {
Checks if the ball's right edge (ballX + radius) passed the right canvas edge OR if its left edge (ballX - radius) passed the left edge at x=0
ballVX *= -1;
Multiplies the horizontal velocity by -1, flipping its sign to reverse the horizontal direction
if (ballY + ballRadius > height - loadingBarHeight || ballY - ballRadius < 0) {
Checks if the ball's bottom edge passed the bottom (accounting for the loading bar) OR if its top edge passed y=0
ballVY *= -1;
Multiplies the vertical velocity by -1 to reverse the vertical direction
circle(ballX, ballY, ballRadius * 2);
Draws a circle at the ball's current position with a diameter of ballRadius × 2 (diameter = 2 × radius)
let currentLoadingWidth = frameCount * loadingSpeed;
Calculates the loading bar width by multiplying frameCount (total frames since start) by loadingSpeed, creating steady linear growth
currentLoadingWidth = min(currentLoadingWidth, width);
Uses min() to ensure the loading bar never gets wider than the canvas width, making it fill completely and stay full
fill(180);
Sets the fill color to gray (RGB 180, 180, 180) for the background loading bar rectangle
rect(0, height - loadingBarHeight, width, loadingBarHeight);
Draws the gray background bar at the bottom of the canvas: starting at (0, height - loadingBarHeight), spanning full width, with height of loadingBarHeight pixels
fill(0, 150, 255);
Sets the fill color to bright blue (RGB: 0, 150, 255) for the progress bar
rect(0, height - loadingBarHeight, currentLoadingWidth, loadingBarHeight);
Draws the blue progress bar directly on top of the gray one, but only as wide as currentLoadingWidth so it grows each frame
fill(255);
Sets the fill color to white (RGB 255, 255, 255) for the text about to be drawn
text(loadingText, 10, height - loadingBarHeight / 2);
Draws the string 'Loading...' 10 pixels from the left edge, vertically centered on the loading bar

windowResized()

windowResized() is a p5.js lifecycle function that fires automatically whenever the user resizes their browser window. Without it, the canvas would stay the original size. By calling resizeCanvas() here, we ensure the animation always fills the entire window and adapts smoothly.

🔬 When you resize the window, this function re-centers the ball. What happens if you remove the ballX and ballY lines? Try resizing the window—where does the ball end up?

  resizeCanvas(windowWidth, windowHeight); // Adjust the canvas size to the new window dimensions
  
  // Re-initialize ball position to keep it centered on resize
  ballX = width / 2;
  ballY = height / 2;
// This function is called automatically whenever the browser window is resized
function windowResized() {
  resizeCanvas(windowWidth, windowHeight); // Adjust the canvas size to the new window dimensions
  
  // Re-initialize ball position to keep it centered on resize
  ballX = width / 2;
  ballY = height / 2;
}
Line-by-line explanation (4 lines)

🔧 Subcomponents:

function-call Canvas Resize Handler resizeCanvas(windowWidth, windowHeight);

Automatically adjusts the canvas dimensions to match the new window size when resized

calculation Ball Position Reset ballX = width / 2;

Re-centers the ball horizontally on the newly resized canvas

function windowResized() {
This is a special p5.js function that is called automatically whenever the browser window is resized—you don't call it yourself
resizeCanvas(windowWidth, windowHeight);
Adjusts the canvas to match the new browser window dimensions, using p5.js global variables that update automatically
ballX = width / 2;
Re-centers the ball horizontally on the newly sized canvas to prevent it from being off-center after a resize
ballY = height / 2;
Re-centers the ball vertically to ensure consistent starting position after window resize

📦 Key Variables

ballX number

Stores the horizontal position of the ball's center on the canvas

let ballX = 200;
ballY number

Stores the vertical position of the ball's center on the canvas

let ballY = 150;
ballVX number

Horizontal velocity—how many pixels the ball moves left or right each frame (negative is left, positive is right)

let ballVX = 3;
ballVY number

Vertical velocity—how many pixels the ball moves up or down each frame (negative is up, positive is down)

let ballVY = -2;
ballRadius number

The ball's radius in pixels; used for drawing (diameter = radius × 2) and collision detection calculations

let ballRadius = 30;
loadingBarHeight number

The height in pixels of the loading bar at the bottom of the screen—controls visual thickness

let loadingBarHeight = 20;
loadingText string

The text displayed on the loading bar, such as 'Loading...'

let loadingText = "Loading...";
loadingSpeed number

How many pixels the loading bar progress advances per frame—controls fill rate speed

let loadingSpeed = 2;
currentLoadingWidth number

Calculated each frame as the current width of the blue progress bar based on frameCount and loadingSpeed

let currentLoadingWidth = frameCount * loadingSpeed;

🔧 Potential Improvements (4)

Here are some ways this code could be enhanced:

BUG draw() collision detection

If ballRadius changes after setup, the loading bar height is not accounted for in the initial velocity check. With a very large ball and high velocity, the ball can briefly tunnel through the bottom edge before bouncing, especially when resizing.

💡 Add a safety check: constrain ballY to stay within valid bounds using ballY = constrain(ballY, ballRadius, height - loadingBarHeight - ballRadius) after collision checks to ensure the ball never gets stuck outside the play area.

STYLE All functions

Global variables ballX, ballY, ballVX, ballVY would benefit from being declared with let at the top of the file, not just initialized. Currently they're implicitly global, which could cause confusion.

💡 Add explicit declarations at the top: let ballX, ballY, ballVX, ballVY; before setup(). This makes the code cleaner and follows JavaScript best practices.

FEATURE draw()

The loading bar fills indefinitely even after reaching 100%, which is visually complete but logically nonsensical—a real loading bar would show completion or reset.

💡 Add visual feedback when loadingSpeed reaches 100%: check if currentLoadingWidth === width and change loadingText to 'Complete!' or reset both to 0 to loop the animation.

PERFORMANCE draw()

The fill() function is called multiple times unnecessarily (once for the ball in setup, then again in draw for each element). This is minor but not optimized.

💡 Move the ball color fill() call inside draw() before circle() is drawn, ensuring colors are set immediately before use. This consolidates styling and makes the code flow clearer.

🔄 Code Flow

Code flow showing setup, draw, windowresized

💡 Click on function names in the diagram to jump to their code

graph TD start[Start] --> setup[setup] setup --> draw[draw loop] click setup href "#fn-setup" click draw href "#fn-draw" setup --> canvas-creation[Canvas Initialization] click canvas-creation href "#sub-canvas-creation" setup --> ball-position-init[Ball Position Setup] click ball-position-init href "#sub-ball-position-init" setup --> ball-velocity-init[Random Velocity Assignment] click ball-velocity-init href "#sub-ball-velocity-init" setup --> styling-setup[Visual Styling] click styling-setup href "#sub-styling-setup" draw --> position-update[Velocity-Based Position Update] click position-update href "#sub-position-update" draw --> horizontal-collision[Left/Right Boundary Collision] click horizontal-collision href "#sub-horizontal-collision" draw --> vertical-collision[Top/Bottom Boundary Collision] click vertical-collision href "#sub-vertical-collision" draw --> ball-drawing[Circle Rendering] click ball-drawing href "#sub-ball-drawing" draw --> loading-width-calc[Loading Bar Progress Calculation] click loading-width-calc href "#sub-loading-width-calc" draw --> loading-width-cap[Loading Bar Width Cap] click loading-width-cap href "#sub-loading-width-cap" draw --> background-bar-draw[Background Loading Bar] click background-bar-draw href "#sub-background-bar-draw" draw --> progress-bar-draw[Progress Loading Bar] click progress-bar-draw href "#sub-progress-bar-draw" draw --> windowresized[windowResized] click windowresized href "#fn-windowresized" windowresized --> canvas-resize[Canvas Resize Handler] click canvas-resize href "#sub-canvas-resize" windowresized --> ball-recenter[Ball Position Reset] click ball-recenter href "#sub-ball-recenter" horizontal-collision --> position-update vertical-collision --> position-update position-update --> ball-drawing loading-width-calc --> loading-width-cap loading-width-cap --> progress-bar-draw background-bar-draw --> progress-bar-draw canvas-resize --> ball-recenter ball-recenter --> position-update

❓ Frequently Asked Questions

What visual elements are present in the fun fps sketch?

The sketch features a soft red ball that bounces around the screen and a bright blue loading bar that fills along the bottom, creating a playful and dynamic visual experience.

Can users interact with the fun fps sketch, and how?

Users can resize the window to see the animation adapt smoothly to different screen sizes, enhancing the interactive experience.

What creative coding concepts does the fun fps sketch illustrate?

This sketch demonstrates basic physics principles such as collision detection and response, along with dynamic resizing of the canvas in a creative coding context.

Preview

fun fps - p5.js creative coding sketch preview
Sketch Preview
Code flow diagram showing the structure of fun fps - Code flow showing setup, draw, windowresized
Code Flow Diagram