geo dash

This sketch creates a Geometry Dash-inspired game where a player controls a square that jumps over incoming red spike obstacles. The game features continuous scrolling, collision detection, score tracking, and rhythmic sound effects using the p5.sound library.

🧪 Try This!

Experiment with the code by making these changes:

  1. Make spikes wider — Wider spikes are harder to jump over and change how the obstacles look visually
  2. Speed up the game — Higher scrollSpeed makes obstacles rush toward you faster, increasing difficulty
  3. Make the player jump higher — More negative jump velocity gives bigger, easier-to-control jumps
  4. Change the sky color — The first three numbers in background() are red, green, and blue—adjust them to paint any color
  5. Spawn obstacles more often — Lower the spawn frame count to make obstacles appear more frequently
Prefer the full editor? Open it there →

📖 About This Sketch

This sketch recreates the core mechanics of Geometry Dash: a player square that stays fixed on the left while obstacles scroll toward it from the right. You click or press Space to make the player jump, and you earn points by successfully dodging each red spike. The game uses three core p5.js techniques: object-oriented programming with classes (Player, Ground, Obstacle), collision detection using axis-aligned bounding boxes (AABB), and the p5.sound library to play rhythmic audio cues that pulse with the game's tempo.

The code is organized around a game state machine: the sketch shows a start screen until you click, then runs the gameplay loop that updates the player's gravity and jump physics, scrolls obstacles onto the screen, checks collisions, and tracks your score. By studying it you will learn how to structure a complete interactive game, manage multiple game objects in arrays, and integrate sound into a visual experience.

⚙️ How It Works

  1. When the sketch loads, setup() creates a canvas sized to your window, initializes the Player and Ground objects, and configures a sine wave oscillator from p5.sound that will play the background beat.
  2. The draw() function checks the game state: if the game hasn't started, it shows the start screen; if you've hit an obstacle, it shows the game-over screen; otherwise it runs the gameplay loop.
  3. In gameplay, updateBeat() plays a rhythmic beeping sound at regular intervals by fading the oscillator's amplitude in and out. The player's update() method applies gravity to make the player fall, and you can call jump() to apply an upward velocity.
  4. Each frame, the game loops through all obstacles, calls their update() method to move them left by scrollSpeed pixels, and draws them. The player.collidesWith() method checks if the player's bounding box overlaps any obstacle's box.
  5. When an obstacle moves completely off the left edge of the screen, it is removed from the obstacles array and your score increases by 1. New obstacles spawn every 60 frames with a 50% chance, creating a stream of incoming threats.
  6. If you collide with an obstacle, gameIsOver becomes true, the beat sound stops, and the screen shows your final score. Click or press Space to restart and try again.

🎓 Concepts You'll Learn

Object-oriented programming with ES6 classesCollision detection (AABB bounding boxes)Game state managementPhysics simulation (gravity and velocity)Array management (splice to remove elements)Sound synthesis with p5.sound oscillatorsCanvas resizing with windowResized()

📝 Code Breakdown

setup()

setup() runs once when the sketch first loads. This is where you initialize the canvas size, create objects that last the whole game, and prepare audio and text settings. Everything you set up here will be available in the draw() loop.

function setup() {
  createCanvas(windowWidth, windowHeight);
  player = new Player();
  ground = new Ground(0, height - 50, width, 50); // Ground at the bottom

  // --- p5.sound initialization ---
  // userStartAudio() is essential for audio to play, especially in browsers
  // that block autoplay. It's usually called on a user gesture.
  userStartAudio(); // https://p5js.org/reference/p5/userStartAudio/
  beatOsc = new p5.Oscillator('sine'); // Create a sine wave oscillator
  beatOsc.freq(440); // Set frequency to A4 (440 Hz)
  beatOsc.amp(0); // Start silent
  beatOsc.start(); // Start the oscillator (but it's silent)
  // --- End p5.sound initialization ---

  textAlign(CENTER, CENTER);
  textSize(32);
  fill(255); // White text
}
Line-by-line explanation (9 lines)

🔧 Subcomponents:

function-call Canvas and object initialization createCanvas(windowWidth, windowHeight);

Sets up a canvas that fills your entire window and creates the Player and Ground objects

function-call p5.sound oscillator setup beatOsc = new p5.Oscillator('sine');

Creates a sine wave sound generator that will produce the rhythmic beat during gameplay

createCanvas(windowWidth, windowHeight);
Creates a canvas that covers your entire window—the game will resize if you stretch your browser
player = new Player();
Creates a new Player object with starting position, size, and physics properties
ground = new Ground(0, height - 50, width, 50);
Creates a green ground rectangle at the bottom of the canvas, 50 pixels tall
userStartAudio();
Tells the browser that audio is about to play—many browsers require a user action before allowing sound
beatOsc = new p5.Oscillator('sine');
Creates a sine wave oscillator (a pure electronic tone generator) for the background beat
beatOsc.freq(440);
Sets the oscillator's frequency to 440 Hz, which is the musical note A4 (a pleasant middle pitch)
beatOsc.amp(0);
Sets the oscillator's volume to 0 so it starts silent—we'll turn it on during gameplay
beatOsc.start();
Starts the oscillator running in the background, but inaudibly because its amplitude is 0
textAlign(CENTER, CENTER);
Centers all text both horizontally and vertically around the coordinates you provide
draw()

draw() is the main game loop, executing about 60 times per second. This is where all the action happens: checking game state, updating positions, detecting collisions, spawning new obstacles, and drawing everything. Notice how the obstacle loop goes backward (i--) so we can safely remove items from the array during iteration—this is a common pattern in game development.

🔬 This loop handles every obstacle and checks collisions one by one. What happens if you remove the collision check entirely—just delete the if-statement? Will the game still let obstacles scroll by?

    for (let i = obstacles.length - 1; i >= 0; i--) {
      obstacles[i].update();
      obstacles[i].draw();

      // Check collision with player
      if (player.collidesWith(obstacles[i])) {
        gameIsOver = true;
        beatOsc.amp(0); // Stop beat sound on game over
        console.log("Game Over! Score: " + score);
      }

🔬 This code removes off-screen obstacles and increases your score. What happens if you delete the score++ line? Will obstacles still disappear, or will they pile up?

      // Remove obstacles that have moved off-screen and update score
      if (obstacles[i].isOffScreen()) {
        obstacles.splice(i, 1); // Remove from array
        score++;
function draw() {
  background(50, 100, 150); // Sky color

  if (!gameStarted) {
    drawStartScreen(); // Show start screen
  } else if (gameIsOver) {
    drawGameOverScreen(); // Show game over screen
  } else {
    // Game is playing
    updateBeat(); // Play a beat sound

    // Update and draw player
    player.update();
    player.draw();

    // Update and draw ground
    ground.draw();

    // Update and draw obstacles
    for (let i = obstacles.length - 1; i >= 0; i--) {
      obstacles[i].update();
      obstacles[i].draw();

      // Check collision with player
      if (player.collidesWith(obstacles[i])) {
        gameIsOver = true;
        beatOsc.amp(0); // Stop beat sound on game over
        console.log("Game Over! Score: " + score);
      }

      // Remove obstacles that have moved off-screen and update score
      if (obstacles[i].isOffScreen()) {
        obstacles.splice(i, 1); // Remove from array
        score++;
      }
    }

    // Generate new obstacles periodically
    // Every 60 frames (approx. 1 second at 60fps), with a 50% chance
    if (frameCount % 60 === 0 && random(1) < 0.5) {
      obstacles.push(new Obstacle(width, ground.y));
    }

    // Display current score
    text("Score: " + score, width / 2, 50);
  }
}
Line-by-line explanation (13 lines)

🔧 Subcomponents:

conditional Game state management if (!gameStarted) { ... } else if (gameIsOver) { ... } else { ... }

Routes the game to show start screen, game-over screen, or active gameplay based on game state

for-loop Obstacle update and collision loop for (let i = obstacles.length - 1; i >= 0; i--)

Iterates through obstacles backwards (so we can safely remove them) to update, draw, check collisions, and manage scoring

conditional Random obstacle spawn if (frameCount % 60 === 0 && random(1) < 0.5)

Spawns a new obstacle every 60 frames (roughly 1 second) with a 50% random chance

background(50, 100, 150); // Sky color
Fills the entire canvas with a blue color each frame, erasing the previous frame so animations appear smooth
if (!gameStarted) {
Checks if the game hasn't started yet—if true, show the start screen instead of gameplay
} else if (gameIsOver) {
If the game started but then ended, show the game-over screen with your final score
} else {
Otherwise, the game is actively running—execute all gameplay logic
updateBeat(); // Play a beat sound
Calls the function that manages the rhythmic beeping sound throughout the game
player.update(); player.draw();
Updates the player's position (applying gravity and velocity) then draws the orange square at its new location
ground.draw();
Redraws the green ground rectangle—it doesn't move, so update() is not needed
for (let i = obstacles.length - 1; i >= 0; i--) {
Loops through the obstacles array backwards (from last to first) so we can safely remove obstacles during the loop
obstacles[i].update(); obstacles[i].draw();
Moves each obstacle left by scrollSpeed pixels and draws it on the canvas
if (player.collidesWith(obstacles[i])) { gameIsOver = true;
Checks if the player's bounding box overlaps this obstacle's bounding box—if so, end the game immediately
if (obstacles[i].isOffScreen()) { obstacles.splice(i, 1); // Remove from array score++;
If the obstacle has scrolled completely off the left edge, remove it from the array and add 1 to your score
if (frameCount % 60 === 0 && random(1) < 0.5) { obstacles.push(new Obstacle(width, ground.y));
Every 60 frames (about 1 second at 60 fps), flip a coin with random()—if it's heads (< 0.5), add a new obstacle at the right edge
text("Score: " + score, width / 2, 50);
Draws your current score as white text in the top center of the canvas

updateBeat()

This function is called every frame and manages the p5.sound oscillator to create rhythmic beeping. It uses millis() to track time in a game-independent way, ensuring beats happen at precise intervals. The amp() method with three arguments lets you schedule volume changes in the future, which is perfect for creating short, snappy sound effects.

// Function to play a short beat sound
function updateBeat() {
  let currentTime = millis(); // Current sketch time in milliseconds
  if (currentTime - lastBeatTime > beatInterval) {
    // Fade in the beat sound quickly
    beatOsc.amp(beatVolume, 0.05); // https://p5js.org/reference/p5.Oscillator/amp/
    // Fade out after 50ms (relative to the sketch's time)
    beatOsc.amp(0, 0.2, currentTime + 50);
    lastBeatTime = currentTime;
  }
}
Line-by-line explanation (5 lines)

🔧 Subcomponents:

conditional Beat timing check if (currentTime - lastBeatTime > beatInterval)

Compares the elapsed time since the last beat to decide if it's time to play a new beat

let currentTime = millis();
Gets the current time in milliseconds since the sketch started—used to track when the last beat played
if (currentTime - lastBeatTime > beatInterval) {
Checks if enough time has passed since lastBeatTime—if so, it's time to play a new beat sound
beatOsc.amp(beatVolume, 0.05);
Fades the oscillator volume up to beatVolume (0.5) over 0.05 seconds, creating a beep-in effect
beatOsc.amp(0, 0.2, currentTime + 50);
Schedules the oscillator to fade out to silence over 0.2 seconds, starting 50 milliseconds from now—this creates a short beep that doesn't overlap the next one
lastBeatTime = currentTime;
Records the current time as the last beat time, so the next beat won't play until beatInterval has passed again

drawStartScreen()

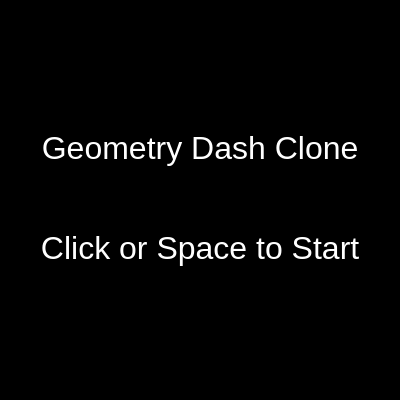
This simple function creates the menu screen shown before gameplay starts. It's called from draw() when gameStarted is false, and it uses width/2 and height/2 to center text relative to the canvas size, so it works even if the window is resized.

// Draw the start screen
function drawStartScreen() {
  background(0); // Black background
  fill(255);
  text("Geometry Dash Clone", width / 2, height / 2 - 50);
  text("Click or Space to Start", width / 2, height / 2 + 50);
}
Line-by-line explanation (4 lines)
background(0);
Fills the canvas with black (color 0 means black in RGB)
fill(255);
Sets the text color to white (255 means maximum brightness for red, green, and blue)
text("Geometry Dash Clone", width / 2, height / 2 - 50);
Draws the title text centered horizontally, positioned 50 pixels above the vertical center
text("Click or Space to Start", width / 2, height / 2 + 50);
Draws the instruction text centered horizontally, positioned 50 pixels below the vertical center

drawGameOverScreen()

This function creates the game-over screen shown when you collide with an obstacle. Notice the fourth argument (150) in background()—this is the alpha value, controlling transparency. With an alpha less than 255, the background becomes see-through, creating a nice overlay effect that doesn't completely block the gameplay behind it.

// Draw the game over screen
function drawGameOverScreen() {
  background(255, 0, 0, 150); // Semi-transparent red overlay
  fill(255);
  text("GAME OVER!", width / 2, height / 2 - 50);
  text("Final Score: " + score, width / 2, height / 2);
  text("Click or Space to Restart", width / 2, height / 2 + 50);
}
Line-by-line explanation (5 lines)
background(255, 0, 0, 150);
Fills the canvas with red that is only 150/255 opaque (59% transparent)—you can see the previous frame through it
fill(255);
Sets the text color to white so it stands out against the red overlay
text("GAME OVER!", width / 2, height / 2 - 50);
Draws the 'GAME OVER!' message centered horizontally, 50 pixels above center
text("Final Score: " + score, width / 2, height / 2);
Displays your final score by concatenating the string 'Final Score: ' with the actual score number
text("Click or Space to Restart", width / 2, height / 2 + 50);
Prompts the player to click or press Space to restart the game

mousePressed()

mousePressed() is a p5.js built-in function that p5 calls automatically whenever the mouse button is clicked. It's perfect for game controls because it responds instantly to user input. This function routes clicks to different game states (start, restart, or jump during gameplay), which is the pattern you'll use in almost every interactive p5.js game.

// Handle mouse clicks
function mousePressed() {
  if (!gameStarted) {
    gameStarted = true;
    resetGame(); // Start the game
  } else if (gameIsOver) {
    resetGame(); // Restart the game
  } else {
    player.jump(); // Player jumps
  }
}
Line-by-line explanation (7 lines)

🔧 Subcomponents:

conditional Game state routing if (!gameStarted) { ... } else if (gameIsOver) { ... } else { ... }

Routes mouse clicks to start, restart, or jump based on the current game state

if (!gameStarted) {
Checks if the game hasn't started yet—if so, clicking will begin gameplay
gameStarted = true;
Sets gameStarted to true so the next draw() will enter the gameplay loop instead of showing the start screen
resetGame(); // Start the game
Calls resetGame() to initialize all game variables before starting
} else if (gameIsOver) {
If the game has already started but ended, clicking will restart it
resetGame(); // Restart the game
Resets the game state without needing to set gameStarted again (it's already true)
} else {
If the game is actively running, a click makes the player jump
player.jump(); // Player jumps
Calls the player's jump() method, applying upward velocity if the player isn't already in the air

keyPressed()

keyPressed() is another p5.js built-in that fires whenever any key is pressed. The global variable 'key' tells you which character was pressed, so you check key === ' ' to detect the spacebar specifically. This function duplicates mousePressed() logic, giving players two input methods—both mouse and keyboard—which makes the game more accessible.

// Handle key presses (especially for spacebar)
function keyPressed() {
  if (!gameStarted && key === ' ') {
    gameStarted = true;
    resetGame(); // Start the game
  } else if (gameIsOver && key === ' ') {
    resetGame(); // Restart the game
  } else if (key === ' ') {
    player.jump(); // Player jumps
  }
}
Line-by-line explanation (6 lines)

🔧 Subcomponents:

conditional Spacebar detection and routing if (!gameStarted && key === ' ')

Checks if the spacebar was pressed and routes it to start, restart, or jump based on game state

if (!gameStarted && key === ' ') {
Checks if both conditions are true: the game hasn't started AND the pressed key is a space character
gameStarted = true;
Sets gameStarted to true, transitioning to the gameplay loop
resetGame(); // Start the game
Initializes the game state for the first time
} else if (gameIsOver && key === ' ') {
If the game ended and the spacebar was pressed, restart the game
} else if (key === ' ') {
Otherwise, if the game is running and the spacebar was pressed, jump
player.jump(); // Player jumps
Calls the player's jump() method to apply upward velocity

resetGame()

resetGame() is called whenever you start or restart the game. It recreates or clears all the main game objects and variables. By bundling reset logic into one function, you avoid bugs and make it easy to change the reset behavior later. Notice how it also resets audio (lastBeatTime and beatOsc.amp), which would be easy to forget if reset logic was scattered throughout the code.

// Reset game state
function resetGame() {
  player = new Player();
  obstacles = [];
  score = 0;
  gameIsOver = false;
  lastBeatTime = millis(); // Reset beat timer
  beatOsc.amp(beatVolume); // Start beat sound again
}
Line-by-line explanation (6 lines)
player = new Player();
Creates a fresh Player object with default starting position and physics, discarding the old one
obstacles = [];
Empties the obstacles array, removing all spikes so the game starts clean
score = 0;
Resets your score to zero
gameIsOver = false;
Sets gameIsOver to false so the gameplay loop will run instead of the game-over screen
lastBeatTime = millis();
Records the current time as the new baseline for beat timing, so the beat rhythm resets when you restart
beatOsc.amp(beatVolume);
Turns the oscillator back on to full volume (0.5) so the beat sound resumes

windowResized()

windowResized() is a p5.js built-in that fires whenever the user resizes their browser window. Without this function, the canvas would stay its original size and won't adapt. By resizing the canvas and repositioning game objects to stay on the ground, the game stays playable and visually correct at any window size.

// Adjust canvas size when the window is resized
function windowResized() {
  resizeCanvas(windowWidth, windowHeight);
  // Adjust player and ground positions to stay at the bottom
  player.y = height - 50 - player.size;
  ground.y = height - 50;
  ground.w = width;
}
Line-by-line explanation (4 lines)
resizeCanvas(windowWidth, windowHeight);
Resizes the canvas to match the new window dimensions whenever the window is stretched or shrunk
player.y = height - 50 - player.size;
Recalculates the player's y position so it stays on the ground even after the canvas height changes
ground.y = height - 50;
Updates the ground's y position to stay at the bottom of the new canvas
ground.w = width;
Stretches the ground to match the new canvas width

Player class

The Player class is the heart of the game. It manages position, velocity, gravity, jumping, rendering, and collision detection. Notice how update() applies physics (gravity) while draw() only renders—this separation of logic and visuals is essential for keeping code organized. The AABB collision detection is simple but effective: it checks if two axis-aligned rectangles overlap by comparing their edges.

🔬 This is where gravity and falling happen. What happens if you comment out this.vy += this.gravity? Will the player still fall, or will they float in mid-air forever?

  update() {
    this.vy += this.gravity; // Apply gravity
    this.y += this.vy; // Update position

    // Prevent player from falling through the ground
    if (this.y >= height - 50 - this.size) {
      this.y = height - 50 - this.size;
      this.vy = 0;
      this.isJumping = false;
    }
  }
// --- Player Class ---
class Player {
  constructor() {
    this.size = 40;
    this.x = width / 4; // Player stays at a fixed X position
    this.y = height - 50 - this.size; // Positioned above the ground
    this.vy = 0; // Vertical velocity
    this.gravity = 0.6; // Gravity effect
    this.isJumping = false;
  }

  jump() {
    if (!this.isJumping) {
      this.vy = -12; // Apply upward velocity
      this.isJumping = true;
    }
  }

  update() {
    this.vy += this.gravity; // Apply gravity
    this.y += this.vy; // Update position

    // Prevent player from falling through the ground
    if (this.y >= height - 50 - this.size) {
      this.y = height - 50 - this.size;
      this.vy = 0;
      this.isJumping = false;
    }
  }

  draw() {
    fill(255, 200, 0); // Orange color for the player cube
    stroke(255);
    strokeWeight(3);
    rectMode(CORNER);
    rect(this.x, this.y, this.size, this.size, 5); // Rounded corners for style
  }

  // Simple Axis-Aligned Bounding Box (AABB) collision detection
  collidesWith(obstacle) {
    return (
      this.x < obstacle.x + obstacle.w &&
      this.x + this.size > obstacle.x &&
      this.y < obstacle.y && // Player's top is above obstacle's base
      this.y + this.size > obstacle.y - obstacle.h // Player's bottom is below obstacle's peak
    );
  }
}
Line-by-line explanation (21 lines)

🔧 Subcomponents:

function-call Player constructor constructor() { ... }

Initializes all properties of a new Player instance: position, size, velocity, gravity, and jump state

function-call Jump method jump() { ... }

Applies upward velocity to the player if they're not already jumping, preventing double-jumps

function-call Update method update() { ... }

Applies gravity, updates vertical position, and prevents falling through the ground

function-call Draw method draw() { ... }

Renders the player as an orange square with a white border

function-call Collision detection method collidesWith(obstacle) { ... }

Checks if the player's bounding box overlaps an obstacle's bounding box

this.size = 40;
Sets the player's width and height to 40 pixels—a square
this.x = width / 4;
Positions the player 1/4 of the way across the screen, fixed horizontally
this.y = height - 50 - this.size;
Positions the player on the ground: canvas height minus ground height minus player size
this.vy = 0; // Vertical velocity
Starts with zero vertical velocity—the player is standing still
this.gravity = 0.6; // Gravity effect
Every frame, gravity is added to vertical velocity, pulling the player downward
this.isJumping = false;
Tracks whether the player is currently in the air—prevents double-jumping
jump() {
This method is called when the player clicks or presses spacebar
if (!this.isJumping) {
Only allows jumping if the player is NOT already in the air
this.vy = -12; // Apply upward velocity
Sets velocity to -12 (negative = upward in p5.js). This is the jump's initial power
this.isJumping = true;
Marks the player as jumping so they can't double-jump
this.vy += this.gravity; // Apply gravity
Each frame, add gravity (0.6) to velocity, slowly pulling the player downward
this.y += this.vy; // Update position
Update the player's vertical position by their current velocity—negative vy moves up, positive vy moves down
if (this.y >= height - 50 - this.size) {
Checks if the player has reached or fallen below the ground level
this.y = height - 50 - this.size;
Clamps the player to exactly the ground level, preventing them from sinking into it
this.vy = 0;
Resets vertical velocity to 0 so the player stops bouncing
this.isJumping = false;
Marks the player as no longer jumping, allowing them to jump again next time
fill(255, 200, 0); // Orange color for the player cube
Sets the fill color to orange (255 red, 200 green, 0 blue)
stroke(255);
Sets the outline color to white
strokeWeight(3);
Sets the outline thickness to 3 pixels
rect(this.x, this.y, this.size, this.size, 5);
Draws a square at the player's position with 5-pixel rounded corners for a softer look
return ( this.x < obstacle.x + obstacle.w && this.x + this.size > obstacle.x && this.y < obstacle.y && this.y + this.size > obstacle.y - obstacle.h );
Checks four conditions for AABB collision: player's left is left of obstacle's right, player's right is right of obstacle's left, player's top is above obstacle's base, and player's bottom is below obstacle's peak. All four must be true for a collision.

Ground class

The Ground class is one of the simplest in this sketch—it stores position and size, and has only a draw() method. It doesn't need update() because the ground doesn't move. This class is a good example of separating your game objects into logical pieces, even if they don't do much. Later, you could add features like animated patterns or parallax scrolling.

// --- Ground Class ---
class Ground {
  constructor(x, y, w, h) {
    this.x = x;
    this.y = y;
    this.w = w;
    this.h = h;
  }

  draw() {
    fill(100, 150, 100); // Green color for the ground
    noStroke();
    rectMode(CORNER);
    rect(this.x, this.y, this.w, this.h);
  }
}
Line-by-line explanation (9 lines)
constructor(x, y, w, h) {
Takes four parameters: x position, y position, width, and height
this.x = x;
Stores the x coordinate
this.y = y;
Stores the y coordinate
this.w = w;
Stores the width
this.h = h;
Stores the height
fill(100, 150, 100); // Green color for the ground
Sets the fill color to green (RGB 100, 150, 100)
noStroke();
Disables outlines so the ground rectangle has a clean, solid look
rectMode(CORNER);
Tells p5.js to interpret the x and y as the top-left corner (not the center)
rect(this.x, this.y, this.w, this.h);
Draws a rectangle at the stored position and size

Obstacle class

The Obstacle class represents the red spikes that scroll from right to left. Its update() method changes x position, and its draw() method renders a triangle. The isOffScreen() check is crucial for the game loop—it tells draw() when to remove the obstacle and increment the score. Notice how this class could easily be expanded to support different obstacle types (blocks, tall spikes, etc.) by checking the type property in draw() and update().

🔬 This triangle() call places three points. The third point is at this.y - this.h, which puts it above the base. What happens if you change this.y - this.h to this.y + this.h instead? Will the spike point downward?

      triangle(
        this.x, this.y, // Bottom-left
        this.x + this.w, this.y, // Bottom-right
        this.x + this.w / 2, this.y - this.h // Top-center
      );
// --- Obstacle Class ---
class Obstacle {
  constructor(x, groundY) {
    this.x = x;
    // Changed to always be a 'spike'
    this.type = 'spike';
    this.groundY = groundY; // Y position of the ground

    // Set size and position based on type (now always spike)
    if (this.type === 'spike') {
      this.w = 40;
      this.h = 40; // Height of the spike triangle
      this.y = groundY; // Spike base is on the ground
    }
    // Block and tallBlock cases are removed as they are no longer generated
  }

  update() {
    this.x -= scrollSpeed; // Move obstacle left
  }

  draw() {
    fill(200, 50, 50); // Red color for obstacles
    noStroke();

    if (this.type === 'spike') {
      // Draw a triangle for the spike
      triangle(
        this.x, this.y, // Bottom-left
        this.x + this.w, this.y, // Bottom-right
        this.x + this.w / 2, this.y - this.h // Top-center
      );
    }
    // Block and tallBlock drawing cases are removed
  }

  // Check if obstacle has moved off the left side of the screen
  isOffScreen() {
    return this.x + this.w < 0;
  }
}
Line-by-line explanation (13 lines)

🔧 Subcomponents:

function-call Obstacle constructor constructor(x, groundY) { ... }

Initializes a new obstacle at position x with type 'spike' and size properties

function-call Update method update() { ... }

Moves the obstacle left each frame by subtracting scrollSpeed from its x position

function-call Draw method draw() { ... }

Renders the obstacle as a red triangle pointing upward

function-call Off-screen check isOffScreen() { ... }

Returns true if the obstacle has completely scrolled past the left edge of the canvas

constructor(x, groundY) {
Takes two parameters: the starting x position and the ground's y position
this.x = x;
Stores the x position (typically width, placing the obstacle at the right edge)
this.type = 'spike';
Sets the obstacle type to 'spike'—this code currently only generates spikes
this.groundY = groundY;
Stores the ground's y position for reference
if (this.type === 'spike') {
Checks if the type is 'spike' (it always is in this version)
this.w = 40;
Sets the spike's base width to 40 pixels
this.h = 40; // Height of the spike triangle
Sets the spike's height to 40 pixels
this.y = groundY; // Spike base is on the ground
Places the spike's base at the ground level
this.x -= scrollSpeed; // Move obstacle left
Subtracts scrollSpeed from x each frame, moving the obstacle toward the left edge
fill(200, 50, 50); // Red color for obstacles
Sets the fill color to red (RGB 200, 50, 50)
noStroke();
Disables outlines for a clean appearance
triangle( this.x, this.y, // Bottom-left this.x + this.w, this.y, // Bottom-right this.x + this.w / 2, this.y - this.h // Top-center );
Draws a triangle: two corners on the ground (left and right), one corner pointing upward (center)
return this.x + this.w < 0;
Returns true if the right edge of the obstacle has moved past the left edge of the canvas (x < 0)

📦 Key Variables

player object (Player class)

Stores the current Player instance with properties like position, velocity, and jumping state

let player;
ground object (Ground class)

Stores the Ground instance that represents the floor the player stands on

let ground;
obstacles array of objects (Obstacle class)

Stores all currently active obstacles (red spikes) on screen—new ones are added, old ones are removed

let obstacles = [];
scrollSpeed number

How many pixels obstacles move left each frame—higher values make the game harder

let scrollSpeed = 5;
score number

Tracks how many obstacles the player has successfully dodged

let score = 0;
gameIsOver boolean

Flag that indicates whether the player has collided with an obstacle (true = game ended)

let gameIsOver = false;
gameStarted boolean

Flag that indicates whether gameplay has begun (false = showing start screen)

let gameStarted = false;
beatOsc object (p5.Oscillator)

A sine wave sound generator from p5.sound that produces the rhythmic beat

let beatOsc;
beatInterval number (milliseconds)

How many milliseconds between each beat sound—higher values = slower beat

let beatInterval = 600;
lastBeatTime number (milliseconds)

Tracks when the last beat was played, used to determine when the next beat should play

let lastBeatTime = 0;
beatVolume number (0 to 1)

The volume level of the beat sound—0.5 means 50% volume

let beatVolume = 0.5;

🔧 Potential Improvements (5)

Here are some ways this code could be enhanced:

BUG Player.collidesWith() method

Collision detection doesn't account for the obstacle's actual triangle shape—it treats the entire bounding box as a collision zone, even the empty space below the spike point

💡 For more precise collisions with spike triangles, use pixel-perfect collision detection or calculate point-to-triangle distance instead of simple AABB overlap

PERFORMANCE draw() loop - obstacle spawning

The sketch spawns obstacles randomly with a 50% chance every 60 frames, which can feel unpredictable and create clusters of obstacles

💡 Use a consistent spawn timer (e.g., spawn every 80 frames) instead of random chance, or track consecutive spawns to ensure even spacing

STYLE Obstacle class constructor

The code comments 'Block and tallBlock cases are removed' but the if-statement checking this.type === 'spike' is unnecessary since type is always 'spike'

💡 Remove the if-statement and directly set this.w, this.h, and this.y without checking the type, or expand the code to support multiple obstacle types (blocks, tall spikes) for variety

FEATURE resetGame() and draw()

The game has no difficulty progression—scrollSpeed and obstacle spawn rate never increase, so the game doesn't get harder over time

💡 Increase scrollSpeed slightly for every N obstacles passed, or gradually lower beatInterval to make the music faster as difficulty ramps up

FEATURE draw() game loop

The game doesn't display how many obstacles are yet to spawn or show any visual feedback when the player is near an obstacle

💡 Add a small indicator showing the player's remaining air time (visual feedback on jump status) or a distance counter to the next obstacle

🔄 Code Flow

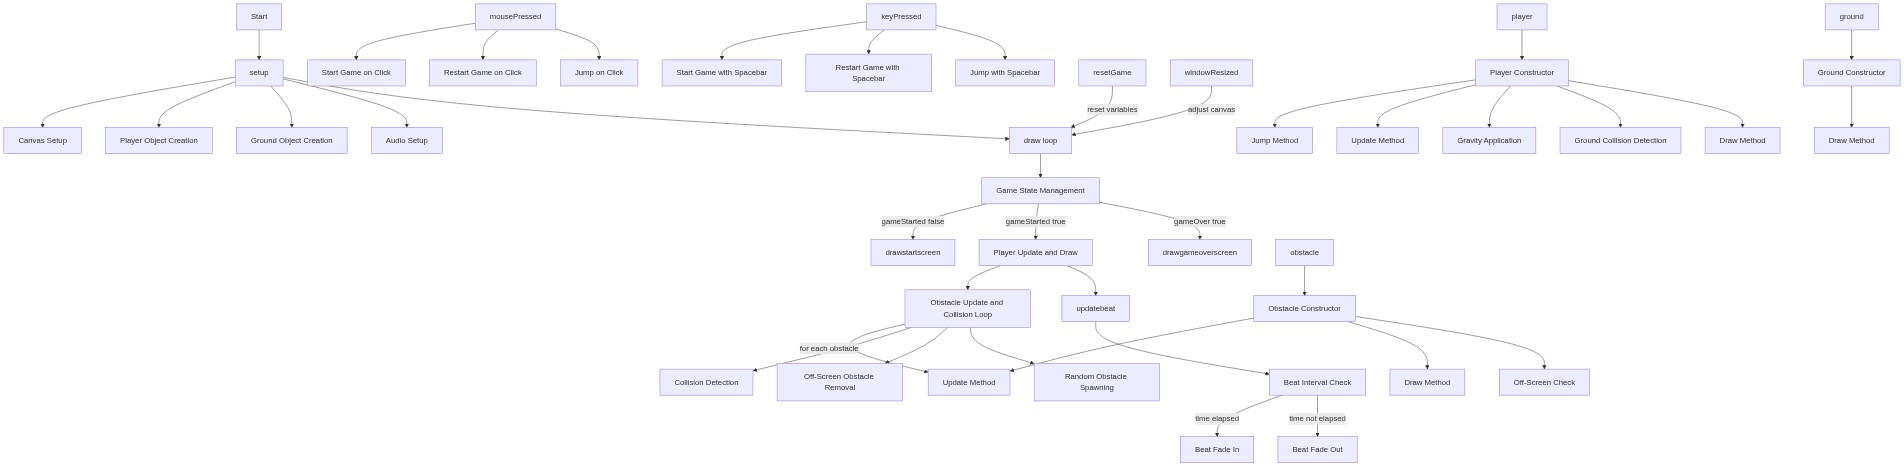
Code flow showing setup, draw, updatebeat, drawstartscreen, drawgameoverscreen, mousepressed, keypressed, resetgame, windowresized, player, ground, obstacle

💡 Click on function names in the diagram to jump to their code

graph TD start[Start] --> setup[setup] setup --> canvas-creation[Canvas Creation] setup --> sound-init[Sound Initialization] setup --> draw[draw loop] click setup href "#fn-setup" click canvas-creation href "#sub-canvas-creation" click sound-init href "#sub-sound-init" draw --> game-state-check[Game State Check] draw --> obstacle-loop[Obstacle Loop] draw --> updatebeat[Update Beat] draw --> drawstartscreen[Draw Start Screen] draw --> drawgameoverscreen[Draw Game Over Screen] click draw href "#fn-draw" click game-state-check href "#sub-game-state-check" click obstacle-loop href "#sub-obstacle-loop" click updatebeat href "#fn-updatebeat" click drawstartscreen href "#fn-drawstartscreen" click drawgameoverscreen href "#fn-drawgameoverscreen" game-state-check -->|if gameStarted is false| drawstartscreen game-state-check -->|if gameOver is true| drawgameoverscreen game-state-check -->|if game is active| obstacle-loop obstacle-loop -->|for each obstacle| update-obs[Update Obstacle] obstacle-loop -->|for each obstacle| draw-obs[Draw Obstacle] obstacle-loop -->|for each obstacle| collision-method[Collision Detection] obstacle-loop -->|for each obstacle| offscreen-check[Off-Screen Check] click update-obs href "#sub-update-obs" click draw-obs href "#sub-draw-obs" click collision-method href "#sub-collision-method" click offscreen-check href "#sub-offscreen-check" update-obs -->|update x position| obstacle-loop draw-obs -->|render triangle| obstacle-loop collision-method -->|check overlap| obstacle-loop offscreen-check -->|remove obstacle if true| obstacle-loop updatebeat --> time-check[Time Check] time-check -->|if time for new beat| updatebeat mousepressed[mousePressed] --> start-check[Start Check] mousepressed --> jump-method[Jump Method] click mousepressed href "#fn-mousepressed" click start-check href "#sub-start-check" click jump-method href "#sub-jump-method" start-check -->|if game not started| resetgame[Reset Game] start-check -->|if game is active| jump-method start-check -->|if game over| resetgame keypressed[keyPressed] --> spacebar-check[Spacebar Check] spacebar-check -->|if spacebar pressed| start-check click keypressed href "#fn-keypressed" click spacebar-check href "#sub-spacebar-check" resetgame -->|reset game variables| resetgame click resetgame href "#fn-resetgame" windowresized[windowResized] -->|resize canvas| windowresized click windowresized href "#fn-windowresized" player[Player Class] --> constructor[Constructor] constructor --> update-method[Update Method] constructor --> draw-method[Draw Method] constructor --> collision-method[Collision Method] click player href "#fn-player" click constructor href "#sub-constructor" click update-method href "#sub-update-method" click draw-method href "#sub-draw-method" click collision-method href "#sub-collision-method" obstacle[Obstacle Class] --> constructor-obs[Constructor] constructor-obs --> update-obs constructor-obs --> draw-obs constructor-obs --> offscreen-check click obstacle href "#fn-obstacle" click constructor-obs href "#sub-constructor-obs" click update-obs href "#sub-update-obs" click draw-obs href "#sub-draw-obs" click offscreen-check href "#sub-offscreen-check" ground[Ground Class] --> draw-ground[Draw Method] click ground href "#fn-ground" click draw-ground href "#sub-draw-ground"

❓ Frequently Asked Questions

What visual elements are featured in the geo dash p5.js sketch?

The geo dash sketch creates a vibrant game environment with a player character, ground, and moving obstacles against a stylized sky background.

How can users interact with the geo dash sketch?

Users can start the game, control the player character's movements, and attempt to avoid obstacles to increase their score.

What creative coding concepts does the geo dash sketch illustrate?

This sketch demonstrates concepts such as game mechanics, collision detection, and sound integration using p5.js.

Preview

geo dash - p5.js creative coding sketch preview
Sketch Preview
Code flow diagram showing the structure of geo dash - Code flow showing setup, draw, updatebeat, drawstartscreen, drawgameoverscreen, mousepressed, keypressed, resetgame, windowresized, player, ground, obstacle
Code Flow Diagram