Glowing Bouncing Ball with Fading Trail - xelsed.ai

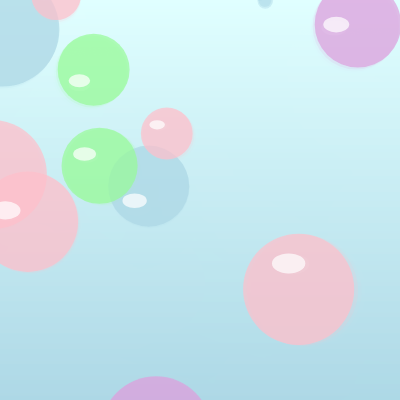
This sketch fills the screen with soft pastel bubbles that rise from the bottom, wobble side to side using Perlin noise, and shimmer with an animated highlight. When a bubble drifts off the top of the screen it 'pops', releasing a small burst of fading particles, while a smooth vertical gradient fills the background behind everything.

🧪 Try This!

Experiment with the code by making these changes:

  1. Speed up bubble spawning — Lowering the modulo number makes new bubbles appear far more frequently, quickly crowding the screen.
  2. Bigger particle bursts — Increasing the loop count spawns many more particles every time a bubble pops, turning a subtle sparkle into a dramatic explosion.
  3. Add a new pastel color — Editing an entry in the pastelColors array changes what colors bubbles are randomly assigned.
Prefer the full editor? Open it there →

📖 About This Sketch

This sketch simulates a field of translucent pastel bubbles that continuously rise up the screen, wobble gently from side to side, and catch the light with an animated shine highlight. When a bubble floats past the top edge it pops, scattering a handful of small particles that shrink and fade away. The whole scene sits on top of a smooth vertical color gradient, and new bubbles keep spawning from the bottom roughly once per second, so the animation never runs out of subjects.

The code is organized around two ES6 classes - Bubble and BurstParticle - each with its own constructor, update(), and display() methods, plus a draw() loop that manages two parallel arrays and removes objects once they expire. By studying it you'll learn how to use Perlin noise (noise()) for organic-looking motion instead of pure randomness, how to build a simple particle system with array splicing, and how to fake a vertical gradient by drawing one colored line per pixel row.

⚙️ How It Works

  1. When the sketch loads, setup() creates a full-window canvas, defines the two gradient colors, and fills the bubbles array with 15 Bubble objects ready to animate.
  2. Every frame, draw() first repaints the vertical gradient background, then loops backward through the bubbles array calling update() and display() on each one so they rise, wobble, and shine.
  3. If a bubble's update() method detects it has floated above the top of the canvas, it flags itself as popped; draw() then spawns 10 BurstParticle objects at that bubble's position and removes the bubble from the array with splice().
  4. A second backward loop updates and displays every burst particle, shrinking its remaining lifespan each frame and removing it from the array once its life reaches zero.
  5. Perlin noise (noise()) drives both the bubble's horizontal wobble and the slow rotation of its shine highlight, giving the motion a smooth, organic feel instead of jittery randomness.
  6. Every 60 frames, draw() pushes a brand-new Bubble into the array so the scene keeps refilling itself as older bubbles pop and disappear.

🎓 Concepts You'll Learn

ES6 classesPerlin noise animationParticle systemsArray splice for object removalColor interpolation with lerpColorAlpha transparencyAnimation loop (draw)

📝 Code Breakdown

setup()

setup() runs exactly once when the sketch begins. It's the right place to size the canvas, prepare reusable color objects, and populate any starting arrays before the animation loop takes over.

function setup() {
  // Create a canvas that fills the entire window
  createCanvas(windowWidth, windowHeight);

  // Initialize gradient colors
  gradientColor1 = color(224, 255, 255); // Azure (very light blue)
  gradientColor2 = color(173, 216, 230); // Light Blue

  // Generate initial bubbles
  for (let i = 0; i < 15; i++) {
    bubbles.push(new Bubble());
  }
}
Line-by-line explanation (5 lines)

🔧 Subcomponents:

for-loop Initial Bubble Creation for (let i = 0; i < 15; i++) {

Fills the bubbles array with 15 Bubble objects before the animation starts

createCanvas(windowWidth, windowHeight);
Makes the canvas fill the entire browser window instead of a fixed size.
gradientColor1 = color(224, 255, 255); // Azure (very light blue)
Stores the top color of the background gradient in a p5.Color object so it doesn't need to be recreated every frame.
gradientColor2 = color(173, 216, 230); // Light Blue
Stores the bottom color of the background gradient.
for (let i = 0; i < 15; i++) {
Repeats 15 times to create the initial batch of bubbles.
bubbles.push(new Bubble());
Creates a brand-new Bubble object and adds it to the end of the bubbles array.

draw()

draw() runs continuously at the sketch's frame rate. Here it demonstrates the common pattern of looping backward through arrays so elements can be safely removed mid-loop with splice(), which is essential for any particle or object-pool system.

🔬 This loop decides how many particles appear when a bubble pops. What happens if you change 10 to 2? To 50? Watch how the burst effect changes from a tiny sparkle to a small explosion.

      for (let j = 0; j < 10; j++) {
        burstParticles.push(new BurstParticle(bubble.x, bubble.y, bubble.color));
      }
function draw() {
  // Draw the background gradient
  drawGradientBackground();

  // Update and display bubbles
  for (let i = bubbles.length - 1; i >= 0; i--) {
    let bubble = bubbles[i];
    bubble.update();
    bubble.display();

    // If bubble has popped, create burst particles and remove it
    if (bubble.isPopped()) {
      // Create burst particles
      for (let j = 0; j < 10; j++) {
        burstParticles.push(new BurstParticle(bubble.x, bubble.y, bubble.color));
      }
      bubbles.splice(i, 1); // Remove the popped bubble
    }
  }

  // Update and display burst particles
  for (let i = burstParticles.length - 1; i >= 0; i--) {
    let particle = burstParticles[i];
    particle.update();
    particle.display();

    // Remove dead particles
    if (particle.isDead()) {
      burstParticles.splice(i, 1);
    }
  }

  // Periodically add new bubbles
  if (frameCount % 60 === 0) { // Add a new bubble every 60 frames (approx 1 second)
    bubbles.push(new Bubble());
  }
}
Line-by-line explanation (11 lines)

🔧 Subcomponents:

for-loop Bubble Update/Display Loop for (let i = bubbles.length - 1; i >= 0; i--) {

Walks the bubbles array backward so items can be safely removed with splice() while looping

conditional Popped Bubble Check if (bubble.isPopped()) {

Detects when a bubble has floated off-screen and converts it into a burst of particles

for-loop Burst Particle Spawner for (let j = 0; j < 10; j++) {

Creates 10 new BurstParticle objects at the popped bubble's location

for-loop Particle Update/Display Loop for (let i = burstParticles.length - 1; i >= 0; i--) {

Updates, draws, and removes expired burst particles

conditional Periodic Bubble Spawner if (frameCount % 60 === 0) { // Add a new bubble every 60 frames (approx 1 second)

Adds a fresh bubble roughly once per second using the modulo operator on frameCount

drawGradientBackground();
Repaints the vertical gradient every frame, which also erases the previous frame's drawing (acting like background()).
for (let i = bubbles.length - 1; i >= 0; i--) {
Loops backward through the bubbles array - this is important because splice() shifts indexes, and looping backward avoids skipping elements.
bubble.update();
Calls the Bubble's own update method to move it upward and apply wobble.
bubble.display();
Draws the bubble and its shine highlight at its current position.
if (bubble.isPopped()) {
Checks whether this bubble has floated off the top of the screen.
for (let j = 0; j < 10; j++) {
Creates 10 particles for the pop effect.
burstParticles.push(new BurstParticle(bubble.x, bubble.y, bubble.color));
Spawns each particle at the bubble's last position, using the bubble's own color so the burst matches.
bubbles.splice(i, 1); // Remove the popped bubble
Removes exactly one element at index i from the bubbles array, deleting the popped bubble for good.
if (particle.isDead()) {
Checks whether a particle's lifespan has run out.
burstParticles.splice(i, 1);
Removes the expired particle from the array so it stops being drawn.
if (frameCount % 60 === 0) { // Add a new bubble every 60 frames (approx 1 second)
frameCount increases by 1 every frame; the modulo operator makes this true only every 60th frame, spacing out new bubble spawns.

drawGradientBackground()

This function shows how to build a custom gradient by manually interpolating colors row by row with lerpColor(), since p5.js has no built-in gradient function. It's a useful technique whenever you need more control than background() or fill() alone provide.

🔬 This loop draws one line per pixel row for a smooth gradient. What happens visually - and to performance - if you change 'y++' to 'y += 4' so it skips rows?

  for (let y = 0; y <= height; y++) {
    // Interpolate colors based on y position
    let inter = map(y, 0, height, 0, 1);
    let c = lerpColor(gradientColor1, gradientColor2, inter);
    stroke(c);
    line(0, y, width, y);
  }
function drawGradientBackground() {
  noFill();
  for (let y = 0; y <= height; y++) {
    // Interpolate colors based on y position
    let inter = map(y, 0, height, 0, 1);
    let c = lerpColor(gradientColor1, gradientColor2, inter);
    stroke(c);
    line(0, y, width, y);
  }
}
Line-by-line explanation (6 lines)

🔧 Subcomponents:

for-loop Gradient Line Drawing for (let y = 0; y <= height; y++) {

Draws one horizontal line per pixel row, each colored slightly differently, to fake a smooth vertical gradient

noFill();
Turns off shape fill since we're only drawing lines (which use stroke, not fill).
for (let y = 0; y <= height; y++) {
Loops through every single pixel row of the canvas from top to bottom.
let inter = map(y, 0, height, 0, 1);
Converts the current row number into a 0-to-1 progress value (0 at the top, 1 at the bottom).
let c = lerpColor(gradientColor1, gradientColor2, inter);
Blends between the two gradient colors based on that progress value, producing a smooth transition color for this row.
stroke(c);
Sets the line color to the blended color calculated above.
line(0, y, width, y);
Draws a full-width horizontal line at the current row y, using the blended color.

Bubble constructor

A constructor runs once when 'new Bubble()' is called. Randomizing values here (size, speed, color, noise offsets) is the key trick behind making many objects look unique even though they all come from the same class.

constructor() {
    this.radius = random(20, 60); // Random size
    this.x = random(this.radius, width - this.radius); // Random horizontal position
    this.y = height + this.radius; // Start from bottom of screen
    this.speed = random(0.5, 2.5); // Random rising speed
    this.color = random(pastelColors); // Random pastel color
    this.alpha = 180; // Translucency (0-255)

    // Perlin noise offsets for wobble and shine animation
    this.wobbleOffset = random(1000);
    this.shineOffset = random(2000);

    this.popped = false; // Flag to check if bubble has popped
  }
Line-by-line explanation (9 lines)
this.radius = random(20, 60); // Random size
Picks a random size between 20 and 60 pixels for this bubble's radius.
this.x = random(this.radius, width - this.radius); // Random horizontal position
Places the bubble at a random x position, keeping it far enough from the edges that it doesn't get clipped.
this.y = height + this.radius; // Start from bottom of screen
Starts the bubble just below the bottom edge of the canvas so it rises into view.
this.speed = random(0.5, 2.5); // Random rising speed
Gives each bubble its own random upward speed, so they don't all move in lockstep.
this.color = random(pastelColors); // Random pastel color
Picks one random color object from the pastelColors array to use for this bubble.
this.alpha = 180; // Translucency (0-255)
Sets how transparent the bubble's fill color is.
this.wobbleOffset = random(1000);
Gives this bubble a random starting point along the Perlin noise curve, so different bubbles wobble differently even though they share the same noise function.
this.shineOffset = random(2000);
Same idea as wobbleOffset, but used to animate the position of the shine highlight independently.
this.popped = false; // Flag to check if bubble has popped
Starts as false; will be set to true once the bubble floats off the top of the screen.

Bubble.update()

This method shows the classic Perlin noise animation pattern: keep a slowly-incrementing 'time' variable (wobbleOffset), feed it into noise(), then map() the smooth 0-1 output into whatever range you need. This produces organic motion that random() alone cannot.

🔬 This block controls the wobble motion. What happens if you multiply radius by 0.6 instead of 0.2, or raise wobbleSpeed to 0.1? Try both and compare how erratic the bubbles look.

    let wobbleMagnitude = this.radius * 0.2; // Wobble up to 20% of its radius
    let wobbleSpeed = 0.02;
    this.x += map(noise(this.wobbleOffset), 0, 1, -wobbleMagnitude, wobbleMagnitude);
    this.wobbleOffset += wobbleSpeed;
update() {
    this.y -= this.speed; // Move bubble up

    // Wobble horizontally using Perlin noise
    let wobbleMagnitude = this.radius * 0.2; // Wobble up to 20% of its radius
    let wobbleSpeed = 0.02;
    this.x += map(noise(this.wobbleOffset), 0, 1, -wobbleMagnitude, wobbleMagnitude);
    this.wobbleOffset += wobbleSpeed;

    // Update shine offset for animation
    this.shineOffset += 0.03;

    // Check if bubble has gone off the top of the screen
    if (this.y < -this.radius) {
      this.popped = true;
    }
  }
Line-by-line explanation (8 lines)

🔧 Subcomponents:

conditional Off-Screen Pop Check if (this.y < -this.radius) {

Marks the bubble as popped once it has completely floated above the visible canvas

this.y -= this.speed; // Move bubble up
Subtracts the speed from y each frame, moving the bubble upward (since y decreases going up).
let wobbleMagnitude = this.radius * 0.2; // Wobble up to 20% of its radius
Calculates how far the bubble can sway sideways, scaled to its own size so bigger bubbles wobble more in absolute pixels.
let wobbleSpeed = 0.02;
Controls how quickly the noise offset advances, which controls how fast the wobble changes direction.
this.x += map(noise(this.wobbleOffset), 0, 1, -wobbleMagnitude, wobbleMagnitude);
Reads a smooth Perlin noise value (always between 0 and 1) and remaps it to a range from -wobbleMagnitude to +wobbleMagnitude, then adds it to x for a smooth side-to-side drift.
this.wobbleOffset += wobbleSpeed;
Advances the noise input slightly each frame so the next call to noise() returns a smoothly changing value instead of a jumpy one.
this.shineOffset += 0.03;
Advances a separate noise offset used to animate the shine highlight's position.
if (this.y < -this.radius) {
Checks if the bubble has moved completely above the top edge of the canvas (accounting for its own radius).
this.popped = true;
Flags the bubble as popped so draw() will remove it and spawn burst particles.

Bubble.display()

display() separates 'what the object looks like' from 'how it moves' (which lives in update()). Using cos()/sin() with an angle is the standard way to place something at a point around a circle - a technique used everywhere from clock hands to orbiting particles.

display() {
    noStroke();
    fill(this.color.r, this.color.g, this.color.b, this.alpha);
    circle(this.x, this.y, this.radius * 2); // Draw the main bubble

    // Draw subtle shine highlight
    // Position the shine slightly offset from the center
    let shineSizeFactor = 0.6; // Shine size relative to bubble radius
    let shineOffsetFactor = 0.5; // Offset distance from bubble center

    // Animate shine position slightly
    let shineAngle = map(noise(this.shineOffset), 0, 1, 0, TWO_PI);
    let shineX = this.x + cos(shineAngle) * shineOffsetFactor * this.radius;
    let shineY = this.y + sin(shineAngle) * shineOffsetFactor * this.radius;

    fill(255, 255, 255, 180); // White, semi-transparent for shine
    ellipse(shineX, shineY, this.radius * shineSizeFactor, this.radius * shineSizeFactor * 0.6); // Elongated ellipse for shine
  }
Line-by-line explanation (7 lines)
fill(this.color.r, this.color.g, this.color.b, this.alpha);
Sets the fill color using this bubble's assigned pastel color and its transparency level.
circle(this.x, this.y, this.radius * 2); // Draw the main bubble
Draws the bubble body as a circle - note circle() takes diameter, so radius is doubled.
let shineAngle = map(noise(this.shineOffset), 0, 1, 0, TWO_PI);
Uses Perlin noise to smoothly pick an angle (in radians) around the bubble for the highlight to sit at, causing it to slowly drift around the bubble's edge over time.
let shineX = this.x + cos(shineAngle) * shineOffsetFactor * this.radius;
Uses trigonometry (cos) to convert the angle into an x offset from the bubble's center.
let shineY = this.y + sin(shineAngle) * shineOffsetFactor * this.radius;
Uses sin to convert the same angle into a y offset, placing the highlight at a point on a circle around the bubble center.
fill(255, 255, 255, 180); // White, semi-transparent for shine
Switches to a translucent white fill for the glossy highlight.
ellipse(shineX, shineY, this.radius * shineSizeFactor, this.radius * shineSizeFactor * 0.6); // Elongated ellipse for shine
Draws a squashed (elongated) ellipse rather than a circle, which reads visually as a glassy highlight rather than a flat dot.

Bubble.isPopped()

This is a small 'getter' method - a clean way to expose an object's internal state (this.popped) without letting outside code directly modify it.

isPopped() {
    return this.popped;
  }
Line-by-line explanation (1 lines)
return this.popped;
Simply reports whether this bubble's popped flag has been set to true, letting draw() know whether it should be removed.

BurstParticle constructor

This constructor demonstrates passing data (x, y, color) from one object (the popped Bubble) into a new object, which is how effects can inherit context from whatever triggered them.

constructor(x, y, color) {
    this.x = x;
    this.y = y;
    this.color = color;
    this.radius = random(2, 8); // Initial size of particle
    this.life = random(30, 60); // Lifespan in frames (approx 0.5 to 1 second)

    // Random velocity to spread particles out
    this.vx = random(-2, 2);
    this.vy = random(-2, 2);
  }
Line-by-line explanation (7 lines)
this.x = x;
Places the new particle at the x position passed in - this is the popped bubble's location.
this.y = y;
Places the new particle at the y position of the popped bubble.
this.color = color;
Reuses the popped bubble's color so the burst visually matches the bubble that created it.
this.radius = random(2, 8); // Initial size of particle
Gives each particle a small random size.
this.life = random(30, 60); // Lifespan in frames (approx 0.5 to 1 second)
Gives each particle a random lifespan, so they don't all disappear at exactly the same moment.
this.vx = random(-2, 2);
Random horizontal velocity so particles spread out in different directions.
this.vy = random(-2, 2);
Random vertical velocity, completing a random 2D direction and speed for the particle.

BurstParticle.update()

This is the simplest possible physics update: position changes by velocity every frame, no acceleration or gravity involved, which keeps the burst effect light and snappy.

update() {
    this.x += this.vx;
    this.y += this.vy;
    this.life--; // Decrease lifespan
  }
Line-by-line explanation (3 lines)
this.x += this.vx;
Moves the particle horizontally based on its random velocity.
this.y += this.vy;
Moves the particle vertically based on its random velocity.
this.life--; // Decrease lifespan
Counts down the particle's remaining life by 1 every frame, eventually reaching zero.

BurstParticle.display()

Mapping a countdown value (life) directly to alpha transparency is a very common and reusable trick for making anything fade out gracefully instead of vanishing instantly.

🔬 The fade-out uses map() to turn remaining life into transparency. What happens if you raise the top alpha value from 200 to 255, or lower it to 80?

    let particleAlpha = map(this.life, 0, 60, 0, 200);
    fill(this.color.r, this.color.g, this.color.b, particleAlpha);
    circle(this.x, this.y, this.radius * 2);
display() {
    noStroke();
    // Fade particle as its life decreases
    let particleAlpha = map(this.life, 0, 60, 0, 200);
    fill(this.color.r, this.color.g, this.color.b, particleAlpha);
    circle(this.x, this.y, this.radius * 2);
  }
Line-by-line explanation (3 lines)
let particleAlpha = map(this.life, 0, 60, 0, 200);
Converts the remaining life (0 to 60) into an alpha transparency value (0 to 200), so the particle visibly fades out as its life runs down.
fill(this.color.r, this.color.g, this.color.b, particleAlpha);
Applies the particle's color with the calculated fading transparency.
circle(this.x, this.y, this.radius * 2);
Draws the particle as a small circle at its current position.

BurstParticle.isDead()

Pairing a simple boolean check like this with array splicing in the main draw() loop is the standard pattern for managing any temporary object's lifecycle in p5.js.

isDead() {
    return this.life <= 0;
  }
Line-by-line explanation (1 lines)
return this.life <= 0;
Reports true once the particle's countdown timer has reached zero or below, signaling draw() to remove it from the array.

windowResized()

windowResized() is a special p5.js function that p5 calls automatically on browser resize, similar to how setup() and draw() are called automatically. It's the standard way to keep full-window sketches responsive.

function windowResized() {
  resizeCanvas(windowWidth, windowHeight);
  // Re-initialize gradient colors in case dimensions change significantly
  gradientColor1 = color(224, 255, 255);
  gradientColor2 = color(173, 216, 230);
}
Line-by-line explanation (3 lines)
resizeCanvas(windowWidth, windowHeight);
A built-in p5.js event that fires automatically whenever the browser window changes size; this line resizes the canvas to match the new window dimensions.
gradientColor1 = color(224, 255, 255);
Recreates the top gradient color object, keeping it consistent after a resize.
gradientColor2 = color(173, 216, 230);
Recreates the bottom gradient color object after a resize.

📦 Key Variables

bubbles array

Holds every active Bubble object currently rising on screen; objects are added on a timer and removed once they pop.

let bubbles = [];
burstParticles array

Holds every active BurstParticle from all pop effects currently fading out; objects are added when a bubble pops and removed once their life expires.

let burstParticles = [];
pastelColors array

A fixed palette of four pastel colors (as plain {r,g,b} objects) that bubbles randomly choose from.

const pastelColors = [{ r: 255, g: 192, b: 203 }];
gradientColor1 object

Stores the p5.Color used at the top of the background gradient.

let gradientColor1 = color(224, 255, 255);
gradientColor2 object

Stores the p5.Color used at the bottom of the background gradient.

let gradientColor2 = color(173, 216, 230);

🔧 Potential Improvements (4)

Here are some ways this code could be enhanced:

PERFORMANCE drawGradientBackground()

The gradient is redrawn every single frame by calling line() once per pixel row (potentially 1000+ draw calls per frame on a tall window), which is expensive and unnecessary since the gradient never changes.

💡 Render the gradient once into an offscreen graphics buffer (createGraphics) or a CSS/canvas background, then just image() it each frame - or use the raw canvas drawingContext.createLinearGradient() for a single native gradient fill.

BUG windowResized()

After a resize, existing bubbles keep their old x/y coordinates, which can leave them positioned outside the new canvas bounds (e.g. off to the side if the window shrinks).

💡 Optionally re-clamp each bubble's x position within the new width after resizing, e.g. bubble.x = constrain(bubble.x, bubble.radius, width - bubble.radius).

STYLE draw() and setup()

Magic numbers like 60 (spawn interval), 15 (initial bubble count), and 10 (burst particle count) are scattered inline, making them harder to find and tune.

💡 Extract them into named constants at the top of the file, e.g. const SPAWN_INTERVAL = 60; const BURST_PARTICLE_COUNT = 10;, and reference those instead.

FEATURE draw() / mousePressed

The sketch has no user interaction - bubbles only pop automatically when they reach the top of the screen.

💡 Add a mousePressed() function that checks dist(mouseX, mouseY, bubble.x, bubble.y) against bubble.radius for each bubble, letting the user manually pop bubbles by clicking on them.

🔄 Code Flow

Code flow showing setup, draw, drawgradientbackground, bubble, bubbleupdate, bubbledisplay, bubbleispopped, burstparticle, burstparticleupdate, burstparticledisplay, burstparticleisdead, windowresized

💡 Click on function names in the diagram to jump to their code

graph TD start[Start] --> setup[setup] setup --> draw[draw loop] draw --> initialbubbleloop[Initial Bubble Creation] initialbubbleloop --> bubbleloop[Bubble Update/Display Loop] bubbleloop --> popcheck[Popped Bubble Check] popcheck -->|Bubble Popped| burstspawnloop[Burst Particle Spawner] burstspawnloop --> particleloop[Particle Update/Display Loop] particleloop -->|Particle Expired| burstparticleisdead[Burst Particle is Dead] draw --> spawncheck[Periodic Bubble Spawner] draw --> gradientloop[Gradient Line Drawing] gradientloop --> draw bubbleloop -->|Off-Screen| offscreencheck[Off-Screen Pop Check] offscreencheck -->|Mark as Popped| popcheck click setup href "#fn-setup" click draw href "#fn-draw" click initialbubbleloop href "#sub-initial-bubble-loop" click bubbleloop href "#sub-bubble-loop" click popcheck href "#sub-pop-check" click burstspawnloop href "#sub-burst-spawn-loop" click particleloop href "#sub-particle-loop" click burstparticleisdead href "#sub-burst-particle-is-dead" click spawncheck href "#sub-spawn-timer" click gradientloop href "#sub-gradient-loop" click offscreencheck href "#sub-offscreen-check"

❓ Frequently Asked Questions

What visual effects does the Glowing Bouncing Ball sketch create?

The sketch features a luminous cyan-blue ball that bounces around a dark canvas, leaving behind a ghostly fading trail, enhanced by a soft gradient glow effect.

Can users interact with the Glowing Bouncing Ball sketch, and if so, how?

While the sketch primarily runs autonomously, users can resize the window to change the canvas dimensions, impacting the ball's movement area.

What creative coding concepts are demonstrated in the Glowing Bouncing Ball sketch?

The sketch illustrates simple physics for wall bouncing, along with techniques for creating gradients and particle effects to enhance visual aesthetics.

Preview

Glowing Bouncing Ball with Fading Trail - xelsed.ai - p5.js creative coding sketch preview
Sketch Preview
Code flow diagram showing the structure of Glowing Bouncing Ball with Fading Trail - xelsed.ai - Code flow showing setup, draw, drawgradientbackground, bubble, bubbleupdate, bubbledisplay, bubbleispopped, burstparticle, burstparticleupdate, burstparticledisplay, burstparticleisdead, windowresized
Code Flow Diagram