
hacker typer

This sketch simulates a hacker terminal that types out neon-green code and system messages on a black background. Every time you press a key, a new word from a pre-written code snippet appears on screen, with lines breaking randomly to mimic real terminal output, and a blinking cursor marks where new text will appear.

🧪 Try This!

Experiment with the code by making these changes:

  1. Change the glow color to bright cyan — The fill() function sets text color using RGB values—this makes green into cyan by swapping the red and blue channels
  2. Make new lines appear more often — Lowering the line break probability makes each line longer before it wraps, creating fewer but longer terminal statements
  3. Use a blinking pipe instead of underscore — The underscore is just a character—replacing it with a pipe or block character changes the cursor's visual style
  4. Slow down the cursor blink — The cursor toggles every 30 frames; increasing this number makes the blink slower and more dramatic
Prefer the full editor? Open it there →

📖 About This Sketch

This sketch brings the iconic 'hacker typer' aesthetic to life: a black terminal filled with neon-green text that grows with every key press. The visual appeal comes from the monospace font, glowing green color, and the blinking cursor that mimics a real command line. The code uses p5.js text rendering, keyboard event handling, and simple animation to create an immersive typing experience.

The code is organized into three functions: setup() initializes the canvas and prepares the code words, draw() renders the scrolling text and blinking cursor sixty times per second, and keyPressed() fires when you hit a key to add new words to the terminal. You will learn how to split strings into arrays, handle keyboard input, create dynamic line breaks, and build a scrolling display that only shows what fits on screen.

⚙️ How It Works

  1. When the sketch loads, setup() creates a full-window canvas, sets the font to monospace, chooses neon green as the text color, and splits the code string into an array of individual words.
  2. Every frame, draw() clears the canvas with a black background, then loops through all stored lines and draws them as text on screen, showing only as many lines as fit in the window.
  3. The cursor blinks by toggling a boolean variable every 30 frames—when true, an underscore is drawn at the end of the last line to show where text will appear next.
  4. When you press any key, keyPressed() takes the next word from the words array and adds it to the current line—or starts a new line with a 15% probability, creating the illusion of code breaking into new statements.
  5. As more words accumulate, the display automatically scrolls, only rendering lines that fit within the window height, preventing the sketch from showing lines that have scrolled off the top.
  6. When the sketch reaches the end of the code array, it loops back to the beginning, so you can keep typing forever.

🎓 Concepts You'll Learn

Keyboard event handlingText rendering and fontsString splitting and arraysConditional logic and randomnessScrolling viewportState management with animation

📝 Code Breakdown

setup()

setup() runs once when the sketch loads. It's the perfect place to initialize your canvas, set styling options, and prepare data like the words array that will be used by draw() and keyPressed().

function setup() {
  createCanvas(windowWidth, windowHeight);
  textFont("monospace");
  textSize(18);
  fill(0,255,70);
  words = code.split(/\s+/);
}
Line-by-line explanation (5 lines)
createCanvas(windowWidth, windowHeight);
Creates a canvas that fills the entire browser window, making the terminal feel immersive and full-screen
textFont("monospace");
Sets the font to monospace, which is the classic teletype font used in real terminals and makes code look authentic
textSize(18);
Sets the size of all text to 18 pixels tall—large enough to read clearly but small enough to fit many lines
fill(0,255,70);
Sets the text color using RGB values: 0 red, 255 green, 70 blue creates the iconic neon green glow
words = code.split(/\s+/);
Splits the code string by whitespace using a regex pattern, creating an array where each element is a single word or line break
draw()

draw() is the animation loop, running 60 times per second. It handles all the visual rendering: clearing the screen, calculating which lines fit, drawing visible text, and animating the cursor. This is where you see the real-time effect of the words that keyPressed() adds to the lines array.

🔬 This loop draws every visible line. What happens if you change the 20 (left margin) to 100? Or try changing (i - start + 1) to (i - start) and watch the top line position shift—why does adding 1 move it down by one line?

  for (let i = start; i < lines.length; i++) {
    text(lines[i], 20, (i - start + 1) * lineHeight);
  }

🔬 This makes the cursor blink by toggling every 30 frames. What happens if you change 30 to 15? The cursor will blink twice as fast. What if you change it to 60? It will blink half as fast.

  if (frameCount % 30 === 0) {
    cursorBlink = !cursorBlink;
  }
function draw() {
  background(0);

  let lineHeight = 22;

  // determine scroll start
  let maxLines = floor(height / lineHeight);
  let start = max(0, lines.length - maxLines);

  for (let i = start; i < lines.length; i++) {
    text(lines[i], 20, (i - start + 1) * lineHeight);
  }

  // blinking cursor
  if (cursorBlink) {
    let lastLine = lines.length - 1;
    let startIndex = max(0, lines.length - maxLines);
    text("_", 20 + textWidth(lines[lastLine]), (lastLine - startIndex + 1) * lineHeight);
  }

  if (frameCount % 30 === 0) {
    cursorBlink = !cursorBlink;
  }
}
Line-by-line explanation (11 lines)

🔧 Subcomponents:

calculation Scrolling Viewport Logic let maxLines = floor(height / lineHeight); let start = max(0, lines.length - maxLines);

Calculates which lines are visible on screen by figuring out the first line to render based on total lines and window height

for-loop Text Rendering Loop for (let i = start; i < lines.length; i++) { text(lines[i], 20, (i - start + 1) * lineHeight); }

Loops through only the visible lines and draws each one at the correct vertical position on screen

conditional Cursor Toggle Timer if (frameCount % 30 === 0) { cursorBlink = !cursorBlink; }

Every 30 frames (twice per second), flips the cursorBlink boolean to create the blinking animation

background(0);
Clears the canvas to pure black (RGB value 0) before drawing anything, erasing the previous frame so text doesn't trail
let lineHeight = 22;
Defines the vertical spacing between lines in pixels—used to position each line correctly and calculate how many lines fit on screen
let maxLines = floor(height / lineHeight);
Divides the canvas height by lineHeight and rounds down to find the maximum number of lines that can fit on screen at once
let start = max(0, lines.length - maxLines);
Calculates the index of the first line to draw—if you have 100 lines but only 30 fit, start drawing from line 70, not line 0
for (let i = start; i < lines.length; i++) {
Loops from the first visible line to the last line in the array, so only visible lines get drawn
text(lines[i], 20, (i - start + 1) * lineHeight);
Draws the current line as text 20 pixels from the left edge, positioned vertically by multiplying (i - start) by lineHeight to space them evenly
if (cursorBlink) {
Only draws the cursor if cursorBlink is true; when it's false (half the time due to the toggle below), the cursor disappears
let lastLine = lines.length - 1;
Stores the index of the very last line in the lines array so the cursor can be positioned at the end of that line
text("_", 20 + textWidth(lines[lastLine]), (lastLine - startIndex + 1) * lineHeight);
Draws an underscore at the end of the last line—20 pixels left margin, plus the width of all text on that line, ensures it appears right after the words
if (frameCount % 30 === 0) {
frameCount increments every frame; when it's divisible by 30, this triggers (30 times per second at 60 FPS means twice per second)
cursorBlink = !cursorBlink;
The ! operator flips the boolean—true becomes false, false becomes true—creating the on-off blink effect

keyPressed()

keyPressed() is a built-in p5.js function that fires automatically whenever the user presses any key. This is where the interactivity lives—each key press pulls a new word and decides whether to continue the current line or start a fresh one, using randomness to mimic how real terminal output looks.

🔬 This loop resets the words. What happens if you change >= to > ? Or what if you change index = 0 to index = 1 so it skips the first word on the second cycle?

  if (index >= words.length) {
    index = 0;
  }
function keyPressed() {

  if (index >= words.length) {
    index = 0;
  }

  let word = words[index];
  index++;

  // randomly create new lines like real code
  if (random() < 0.15) {
    lines.push(word + " ");
  } else {
    lines[lines.length - 1] += word + " ";
  }
}
Line-by-line explanation (8 lines)

🔧 Subcomponents:

conditional Array Loop Detection if (index >= words.length) { index = 0; }

Resets the index to 0 when it reaches the end of the words array, allowing the code to cycle infinitely

conditional Random Line Break if (random() < 0.15) { lines.push(word + " "); } else { lines[lines.length - 1] += word + " "; }

Uses randomness to decide whether the word starts a new line (15% chance) or gets appended to the current line (85% chance)

if (index >= words.length) {
Checks if the index has gone past the last word in the array, meaning we've used all the code words
index = 0;
Resets index back to 0 so the next key press will pull the first word again, creating an infinite loop through the code
let word = words[index];
Gets the current word from the words array at position index
index++;
Increments index by 1 so the next time keyPressed() is called, it will grab the next word
if (random() < 0.15) {
random() returns a decimal from 0 to 1; if it's less than 0.15 (15% chance), the code inside the if block runs
lines.push(word + " ");
push() adds a new element to the end of the lines array—the word with a space becomes a brand-new line
} else {
If random() was 0.15 or higher (85% chance), this else block runs instead
lines[lines.length - 1] += word + " ";
lines.length - 1 is the index of the last line; += appends the word and space to the end of that line instead of creating a new one

windowResized()

windowResized() fires automatically when the user resizes their browser window. Without it, the canvas would stay at the old size and look broken. This function keeps the terminal experience full-screen and responsive on any screen size.

function windowResized() {
  resizeCanvas(windowWidth, windowHeight);
}
Line-by-line explanation (1 lines)
resizeCanvas(windowWidth, windowHeight);
p5.js's built-in variables windowWidth and windowHeight update when the browser window changes—this line resizes the canvas to match, keeping the sketch full-screen

📦 Key Variables

code string

Contains all the hacker-style text and pseudo-code that will be typed out word by word when you press keys—the source material for the entire simulation

let code = `import sys\nconst fs = require('fs')\n...`;
words array

Stores every individual word and line break from the code string, created by splitting on whitespace—keyPressed() loops through this array to pull words

let words = ['import', 'sys', 'const', 'fs', ...];
index number

Tracks which word in the words array should be typed next—increments with every key press and resets to 0 when it reaches the end

let index = 0;
lines array

Stores complete lines of text that have been typed on screen—each element is a string representing one line, and new lines are added or appended by keyPressed()

let lines = ['import sys', 'const fs = require("fs")'];
cursorBlink boolean

A true/false flag that toggles every 30 frames to create the blinking cursor animation—when true the cursor is drawn, when false it's hidden

let cursorBlink = true;

🔧 Potential Improvements (4)

Here are some ways this code could be enhanced:

BUG draw() - cursor positioning

The cursor is positioned using textWidth(lines[lastLine]) which measures the full line, but lines may have trailing spaces that don't add visual width consistently

💡 Trim trailing spaces before measuring: `let trimmedLine = lines[lastLine].trimEnd(); text("_", 20 + textWidth(trimmedLine), ...)`

PERFORMANCE draw() - text rendering

Every frame, the sketch calls textWidth() on the last line to position the cursor, even when that line hasn't changed

💡 Cache the cursor x position and only recalculate it when a new word is added (in keyPressed()), not every frame

STYLE code string

The code string contains placeholder text like 'connecting to secure server' mixed with actual pseudo-code, which feels inconsistent

💡 Either make the entire string realistic code snippets, or lean fully into hacker movie dialogue—consistency makes it more immersive

FEATURE keyPressed()

Every key press types the next word—there's no way to control the speed or batch multiple words with one keystroke

💡 Add a 'type speed' option where each key press types multiple words, or add a spacebar shortcut to type 5 words at once

🔄 Code Flow

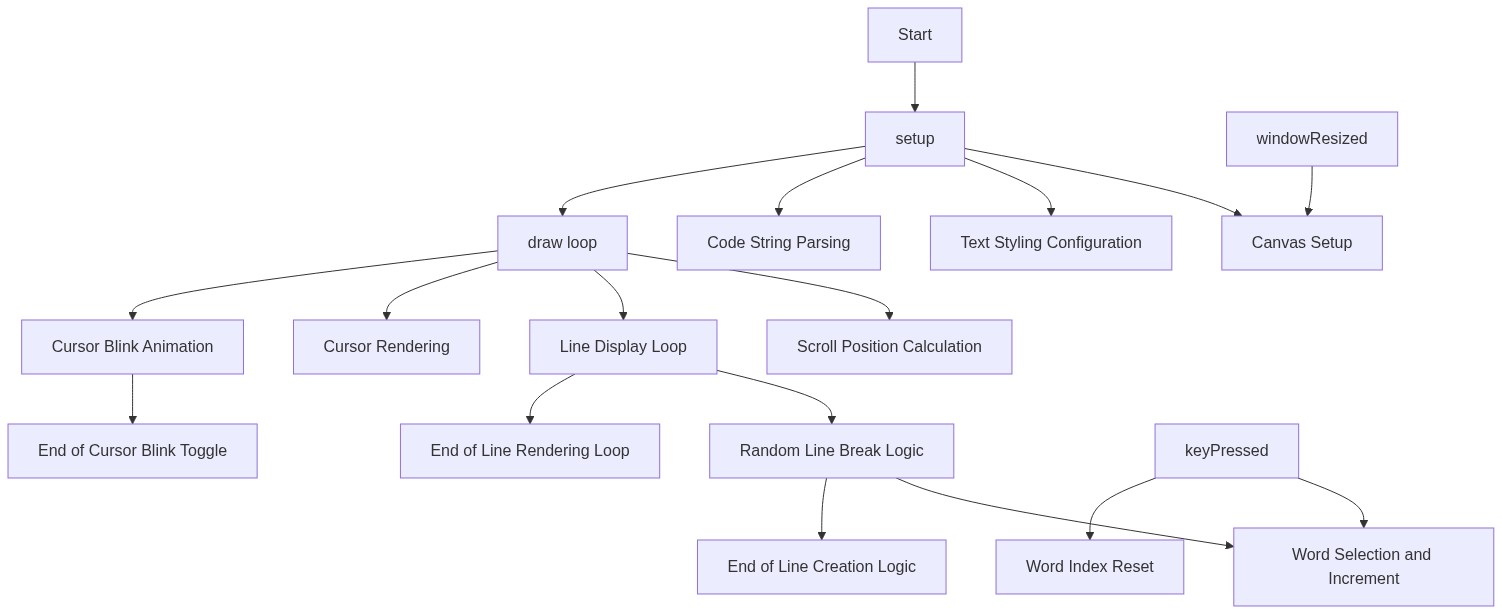
Code flow showing setup, draw, keypressed, windowresized

💡 Click on function names in the diagram to jump to their code

graph TD start[Start] --> setup[setup] setup --> draw[draw loop] draw --> scrollcalculation[scroll-calculation] draw --> textrenderloop[text-render-loop] draw --> cursorblinklogic[cursor-blink-logic] draw --> cursortoggle[cursor-toggle] draw --> loopcheck[loop-check] draw --> linebreaklogic[line-break-logic] scrollcalculation --> draw textrenderloop --> draw cursorblinklogic --> draw cursortoggle --> cursorblinklogic loopcheck --> linebreaklogic linebreaklogic --> draw click setup href "#fn-setup" click draw href "#fn-draw" click scrollcalculation href "#sub-scroll-calculation" click textrenderloop href "#sub-text-render-loop" click cursorblinklogic href "#sub-cursor-blink-logic" click cursortoggle href "#sub-cursor-toggle" click loopcheck href "#sub-loop-check" click linebreaklogic href "#sub-line-break-logic"

❓ Frequently Asked Questions

What visual experience does the hacker typer sketch provide?

The hacker typer sketch creates a visually immersive experience with an endlessly scrolling stream of neon green 'code' on a black background, simulating a cyber console with a blinking terminal cursor.

How can users interact with the hacker typer sketch?

Users can interact with the sketch by typing on their keyboard, which generates new lines of hacker-style code that appear in real-time.

What creative coding concept is showcased in the hacker typer sketch?

The sketch demonstrates the concept of dynamic text generation and animation, where user input influences the evolving display of simulated code.

Preview

hacker typer - p5.js creative coding sketch preview
Sketch Preview
Code flow diagram showing the structure of hacker typer - Code flow showing setup, draw, keypressed, windowresized
Code Flow Diagram