
hit the blocks

This is a classic arcade-style shooter game where players control a rotating blue square, aim with the mouse, and fire projectiles to destroy red enemy squares spawning from the screen edges. The game ends when an enemy reaches the player, with score tracking and sound effects included.

🧪 Try This!

Experiment with the code by making these changes:

  1. Make the player much bigger — Larger player is easier to see and less likely to get hit by enemies unexpectedly
  2. Speed up the game dramatically — Enemies spawn twice as often and projectiles travel faster, making the game much harder
  3. Change the player's color to green — A visual customization that makes your player stand out with a different color scheme
  4. Make enemies spawn from one side only — Enemies now only appear from the top edge, creating a predictable incoming wave pattern instead of random spawning
  5. Increase score per hit to 50 points — Destroying enemies feels more rewarding with a higher score multiplier
Prefer the full editor? Open it there →

📖 About This Sketch

This sketch creates a fully functional arcade shooter game combining multiple p5.js techniques: player rotation using atan2(), projectile motion with velocity components, collision detection between circles and rectangles, and procedural sound effects using the p5.sound library. The game demonstrates how to organize complex interactive systems using object-oriented programming with ES6 classes, and how to manage game state transitions between playing and game-over screens.

The code is organized into a setup() and draw() function that manage the game loop, plus three custom classes—Player, Projectile, and Enemy—that encapsulate the behavior of each game object. By studying it, you will learn how to build the foundational systems of any arcade game: player input handling, spawning and managing arrays of game objects, detecting collisions between different shapes, and playing audio feedback for player actions.

⚙️ How It Works

  1. When the sketch loads, setup() creates a full-window canvas, initializes a Player object at the center, and starts three silent oscillators (the p5.sound library requires audio to be pre-started in preload() and kept running to play sound effects).
  2. Every frame, draw() clears the background and checks the gameState: if playing, it updates and draws the player, spawns one new enemy every 60 frames, and updates all projectiles and enemies.
  3. The player rotates to face the mouse using atan2(mouseY - playerY, mouseX - playerX), which converts the angle between two points into radians that rotate() understands.
  4. When the mouse is clicked, mousePressed() creates a new Projectile at the player's position, calculating its velocity components using cos(angle) and sin(angle) to aim it in the direction the player is facing.
  5. Every frame, projectiles move by adding velocity to position, and the code checks collision with each enemy using distance calculation (for circle-rectangle collision). When a projectile hits an enemy, both are removed and the score increases by 10.
  6. Enemies spawn at random screen edges and move toward the player using the same angle calculation. If an enemy reaches the player, hitsPlayer() detects the rectangle-rectangle collision, the gameState changes to 'gameOver', and a game-over sound plays.
  7. On the game-over screen, pressing 'R' calls restartGame() to reset all variables and return to the playing state.

🎓 Concepts You'll Learn

Game state managementObject-oriented programming with ES6 classesCollision detection (circle-rectangle and rectangle-rectangle)Trigonometry for aiming (atan2, cos, sin)Velocity and vector-based motionProcedural sound synthesis with p5.soundArray manipulation and iterationResponsive canvas resizing

📝 Code Breakdown

preload()

preload() runs once before setup() and is designed for loading resources like images, sounds, and fonts. With p5.sound, oscillators must be created and started in preload() (or setup()), then controlled later by fading their amplitude in and out. The three different waveforms (sine, triangle, square) produce different timbres: sine is smooth, triangle is mellow, and square is buzzy.

🔬 These three lines create the shoot sound. Try changing the frequency from 440 to 220 (twice as low) or 880 (twice as high)—what pitch do you hear when you shoot?

  shootSound = new p5.Oscillator();
  shootSound.setType('sine');
  shootSound.freq(440); // A4
  shootSound.amp(0);
  shootSound.start();
function preload() {
  // Create simple procedural sounds using p5.Sound
  // Shoot sound: short, sharp tone
  shootSound = new p5.Oscillator();
  shootSound.setType('sine');
  shootSound.freq(440); // A4
  shootSound.amp(0);
  shootSound.start(); // Start oscillator, but keep amplitude at 0

  // Hit sound: short, high-pitched tone
  hitSound = new p5.Oscillator();
  hitSound.setType('triangle');
  hitSound.freq(880); // A5
  hitSound.amp(0);
  hitSound.start(); // Start oscillator, but keep amplitude at 0

  // Game Over sound: lower, sustained tone
  gameOverSound = new p5.Oscillator();
  gameOverSound.setType('square');
  gameOverSound.freq(220); // A3
  gameOverSound.amp(0);
  gameOverSound.start(); // Start oscillator, but keep amplitude at 0
}
Line-by-line explanation (5 lines)

🔧 Subcomponents:

calculation Shoot Sound Initialization shootSound = new p5.Oscillator(); shootSound.setType('sine'); shootSound.freq(440); shootSound.amp(0); shootSound.start();

Creates a sine-wave oscillator at 440 Hz (musical note A4) that starts silently and is ready to fade in when the player shoots

calculation Hit Sound Initialization hitSound = new p5.Oscillator(); hitSound.setType('triangle'); hitSound.freq(880); hitSound.amp(0); hitSound.start();

Creates a triangle-wave oscillator at 880 Hz (A5, one octave higher) for a high-pitched collision feedback sound

calculation Game Over Sound Initialization gameOverSound = new p5.Oscillator(); gameOverSound.setType('square'); gameOverSound.freq(220); gameOverSound.amp(0); gameOverSound.start();

Creates a square-wave oscillator at 220 Hz (A3, one octave lower) for a deep game-over tone

shootSound = new p5.Oscillator();
Creates a new oscillator object—this generates sound waves that will play when triggered
shootSound.setType('sine');
Sets the oscillator to produce a smooth sine wave; other options are 'triangle', 'square', or 'sawtooth' for different timbres
shootSound.freq(440); // A4
Sets the frequency to 440 Hz, which is the musical note A4 (the standard tuning reference in music)
shootSound.amp(0);
Sets amplitude to 0, meaning the sound is currently silent; this is required before calling start()
shootSound.start(); // Start oscillator, but keep amplitude at 0
Starts the oscillator running in the background—it remains inaudible until we fade its amplitude in later
setup()

setup() runs once when the sketch starts. It is where you initialize global state: create the canvas, set up objects, and prepare resources. Using windowWidth and windowHeight makes the game responsive, resizing with the browser—the windowResized() function handles this dynamically.

function setup() {
  createCanvas(windowWidth, windowHeight); // Create canvas using responsive window dimensions
  player = new Player(width / 2, height / 2); // Initialize player in the center
  userStartAudio(); // Required to enable audio playback in browsers
}
Line-by-line explanation (3 lines)
createCanvas(windowWidth, windowHeight);
Creates a canvas that fills the entire browser window using responsive dimensions
player = new Player(width / 2, height / 2);
Instantiates a new Player object at the center of the canvas—width/2 and height/2 calculate the center point
userStartAudio();
A p5.sound function that allows audio to play; modern browsers require user interaction (like clicking) to enable sound, and this helper makes that work seamlessly

draw()

draw() is called 60 times per second and is where all animation and interaction happens. By clearing the background every frame and redrawing everything, we create the illusion of motion. The nested loops for projectile-enemy collisions and enemy-player collisions demonstrate a common game programming pattern: checking every object against every other object. This is called an O(n²) algorithm and works fine for dozens of objects but becomes slow with thousands—advanced games use spatial data structures to optimize this.

🔬 This loop ends the game as soon as ONE enemy reaches the player. What if you wanted the player to survive hitting one enemy? Try adding a health system by creating a variable like let health = 3 outside draw(), and change the game-over condition to only trigger when health <= 0.

    // Iterate through enemies (backwards to safely remove elements)
    for (let i = enemies.length - 1; i >= 0; i--) {
      enemies[i].update(); // Move enemy towards player
      enemies[i].show();   // Draw enemy

      // Check collision with player
      if (enemies[i].hitsPlayer(player)) {
        // Game Over condition
        gameState = 'gameOver';
function draw() {
  background(220); // Light gray background for the game area

  if (gameState === 'playing') {
    // Update and show player
    player.update();
    player.show();

    // Spawn enemies every 60 frames (approx. 1 second at 60 FPS)
    if (frameCount % 60 === 0) {
      enemies.push(new Enemy()); // Add a new enemy to the game
    }

    // Iterate through projectiles (backwards to safely remove elements)
    for (let i = projectiles.length - 1; i >= 0; i--) {
      projectiles[i].update(); // Move projectile
      projectiles[i].show();   // Draw projectile

      // Check collision with enemies
      for (let j = enemies.length - 1; j >= 0; j--) {
        if (projectiles[i].hits(enemies[j])) {
          score += 10; // Increase score on hit
          // Play hit sound
          hitSound.amp(0.7, 0.05); // Fade in to 0.7 amplitude over 0.05 seconds
          hitSound.amp(0, 0.1, 0.05); // Fade out to 0 amplitude over 0.1 seconds, starting 0.05s later
          projectiles.splice(i, 1); // Remove projectile
          enemies.splice(j, 1);     // Remove enemy
          break; // Projectile hit one enemy, so it's gone
        }
      }

      // Remove projectiles that go off-screen
      if (projectiles[i].offScreen()) {
        projectiles.splice(i, 1);
      }
    }

    // Iterate through enemies (backwards to safely remove elements)
    for (let i = enemies.length - 1; i >= 0; i--) {
      enemies[i].update(); // Move enemy towards player
      enemies[i].show();   // Draw enemy

      // Check collision with player
      if (enemies[i].hitsPlayer(player)) {
        // Game Over condition
        gameState = 'gameOver';
        // Play game over sound
        gameOverSound.amp(0.6, 0.1); // Fade in to 0.6 amplitude over 0.1 seconds
        gameOverSound.amp(0, 0.5, 0.2); // Fade out to 0 amplitude over 0.5 seconds, starting 0.2s later
        break; // Game is over, no need to check other enemies
      }
    }

    // Display current score
    textSize(32);
    fill(0);
    text('Score: ' + score, 10, 30);
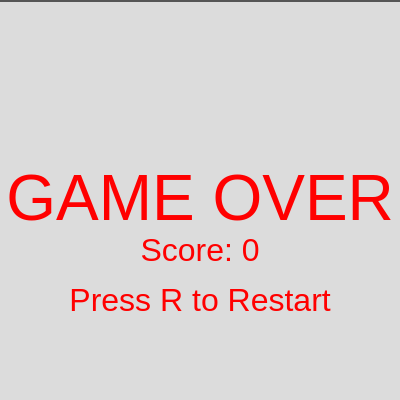
  } else if (gameState === 'gameOver') {
    // Display Game Over screen
    textSize(64);
    fill(255, 0, 0); // Red text
    textAlign(CENTER, CENTER);
    text('GAME OVER', width / 2, height / 2);
    textSize(32);
    text('Score: ' + score, width / 2, height / 2 + 50);
    text('Press R to Restart', width / 2, height / 2 + 100);
  }
}
Line-by-line explanation (24 lines)

🔧 Subcomponents:

conditional Enemy Spawn Loop if (frameCount % 60 === 0) { enemies.push(new Enemy()); // Add a new enemy to the game }

Creates one new enemy every 60 frames (approximately one per second at 60 FPS) to provide steady game difficulty progression

for-loop Projectile Collision Detection for (let i = projectiles.length - 1; i >= 0; i--) { projectiles[i].update(); // Move projectile projectiles[i].show(); // Draw projectile // Check collision with enemies for (let j = enemies.length - 1; j >= 0; j--) { if (projectiles[i].hits(enemies[j])) { score += 10; // Increase score on hit hitSound.amp(0.7, 0.05); // Fade in to 0.7 amplitude over 0.05 seconds hitSound.amp(0, 0.1, 0.05); // Fade out to 0 amplitude over 0.1 seconds, starting 0.05s later projectiles.splice(i, 1); // Remove projectile enemies.splice(j, 1); // Remove enemy break; // Projectile hit one enemy, so it's gone } } if (projectiles[i].offScreen()) { projectiles.splice(i, 1); } }

Iterates backwards through all projectiles, moves them, checks collisions with enemies, and removes off-screen bullets—backwards iteration allows safe element removal

for-loop Enemy Update and Collision Detection for (let i = enemies.length - 1; i >= 0; i--) { enemies[i].update(); // Move enemy towards player enemies[i].show(); // Draw enemy // Check collision with player if (enemies[i].hitsPlayer(player)) { // Game Over condition gameState = 'gameOver'; gameOverSound.amp(0.6, 0.1); // Fade in to 0.6 amplitude over 0.1 seconds gameOverSound.amp(0, 0.5, 0.2); // Fade out to 0 amplitude over 0.5 seconds, starting 0.2s later break; // Game is over, no need to check other enemies } }

Updates all enemies toward the player, checks if any collide with the player to trigger game over, and plays the game-over sound

conditional Game Over Display } else if (gameState === 'gameOver') { // Display Game Over screen textSize(64); fill(255, 0, 0); // Red text textAlign(CENTER, CENTER); text('GAME OVER', width / 2, height / 2); textSize(32); text('Score: ' + score, width / 2, height / 2 + 50); text('Press R to Restart', width / 2, height / 2 + 100); }

When the game state is 'gameOver', displays large red text in the center of the canvas showing the final score and restart instructions

background(220); // Light gray background for the game area
Fills the entire canvas with light gray; calling this every frame creates a 'clear' effect, erasing the previous frame's drawings
if (gameState === 'playing') {
Checks if the game is currently in the 'playing' state; if true, run all game logic; otherwise, show the game-over screen
player.update(); player.show();
Updates the player's position and aiming angle based on keyboard and mouse input, then draws the player square at its new position
if (frameCount % 60 === 0) { enemies.push(new Enemy());
frameCount is incremented every frame; the modulo operator % (frameCount % 60) returns 0 every 60 frames, triggering enemy spawning at regular intervals
for (let i = projectiles.length - 1; i >= 0; i--) {
Iterates backwards through the projectiles array (from last element to first); backwards iteration lets us safely remove elements during the loop without skipping items
projectiles[i].update(); // Move projectile projectiles[i].show(); // Draw projectile
For each projectile, update() adds velocity to position, moving it one step; show() draws it at its new location
for (let j = enemies.length - 1; j >= 0; j--) {
Nested loop: for each projectile, iterate backwards through all enemies to check if they collide
if (projectiles[i].hits(enemies[j])) {
Calls the hits() method of the projectile, which calculates distance to the enemy and returns true if they overlap
score += 10; // Increase score on hit
Adds 10 points to the score whenever a projectile hits an enemy
hitSound.amp(0.7, 0.05); // Fade in to 0.7 amplitude over 0.05 seconds
Instantly triggers the hit sound by fading in the oscillator's amplitude to 0.7 over 0.05 seconds (50 milliseconds), creating a quick beep
hitSound.amp(0, 0.1, 0.05); // Fade out to 0 amplitude over 0.1 seconds, starting 0.05s later
Schedules the sound to fade back to silence, starting 0.05 seconds after the fade-in begins, over 0.1 seconds; the three parameters are (targetAmplitude, fadeDuration, delayBeforeStart)
projectiles.splice(i, 1); // Remove projectile enemies.splice(j, 1); // Remove enemy
splice() removes elements from an array; splice(i, 1) removes 1 element at index i; this deletes both the projectile and the enemy from their respective arrays
break; // Projectile hit one enemy, so it's gone
Breaks out of the inner loop (enemy loop) since this projectile is now deleted and can't hit any more enemies
if (projectiles[i].offScreen()) { projectiles.splice(i, 1);
After checking collisions, if the projectile has traveled off the screen, remove it from the array to avoid memory bloat
for (let i = enemies.length - 1; i >= 0; i--) {
Iterate backwards through all enemies (same backwards pattern as projectiles to safely remove during iteration)
enemies[i].update(); // Move enemy towards player enemies[i].show(); // Draw enemy
Updates each enemy's position moving it toward the player, then draws it at its new location
if (enemies[i].hitsPlayer(player)) {
Calls hitsPlayer() on the enemy, which calculates if its rectangle overlaps the player's rectangle
gameState = 'gameOver';
Sets the game state to 'gameOver', which stops spawning new enemies and switches to showing the game-over screen
gameOverSound.amp(0.6, 0.1); // Fade in to 0.6 amplitude over 0.1 seconds
Triggers the game-over sound by fading in its oscillator; the longer fade (0.1s) makes it more ominous than the quick hit sound
break; // Game is over, no need to check other enemies
Breaks out of the enemy loop since the game is over anyway
textSize(32); fill(0); text('Score: ' + score, 10, 30);
Sets text size to 32 pixels, fill color to black, and draws the current score at position (10, 30) near the top-left corner
} else if (gameState === 'gameOver') {
If the game state is not 'playing', execute this block to show the game-over screen
textSize(64); fill(255, 0, 0); // Red text textAlign(CENTER, CENTER);
Increases text size to 64 pixels, sets fill to red, and centers text alignment both horizontally and vertically
text('GAME OVER', width / 2, height / 2);
Draws 'GAME OVER' in large red text at the center of the canvas

mousePressed()

mousePressed() is a p5.js event function that runs automatically once when the mouse button is clicked, making it perfect for discrete actions like firing a shot. It only runs during the click itself, not while the button is held—if you want continuous fire while holding the mouse, use mouseIsPressed (a boolean variable) instead. The two-step sound fade creates a smooth envelope: fade in quickly (0.05s) then fade out more slowly (0.2s) for a natural 'pop' sound.

🔬 This creates a new projectile and plays a sound. What if you wanted to create THREE projectiles at once (like a spray or shotgun)? Try duplicating the projectiles.push() line but offset the angle by adding a small amount to player.angle.

    projectiles.push(new Projectile(player.x, player.y, player.angle));
    // Play shoot sound
    shootSound.amp(0.5, 0.05); // Fade in to 0.5 amplitude over 0.05 seconds
    shootSound.amp(0, 0.2, 0.1); // Fade out to 0 amplitude over 0.2 seconds, starting 0.1s later
function mousePressed() {
  if (gameState === 'playing') {
    // Create a new projectile fired from the player's position, aiming at the mouse
    projectiles.push(new Projectile(player.x, player.y, player.angle));
    // Play shoot sound
    shootSound.amp(0.5, 0.05); // Fade in to 0.5 amplitude over 0.05 seconds
    shootSound.amp(0, 0.2, 0.1); // Fade out to 0 amplitude over 0.2 seconds, starting 0.1s later
  }
}
Line-by-line explanation (4 lines)
if (gameState === 'playing') {
Only allow shooting if the game is actively playing—prevents accidental shots after game-over
projectiles.push(new Projectile(player.x, player.y, player.angle));
Creates a new Projectile at the player's current position (player.x, player.y) and passes the player's current aim angle; push() adds it to the projectiles array
shootSound.amp(0.5, 0.05); // Fade in to 0.5 amplitude over 0.05 seconds
Triggers the shoot sound by fading in the oscillator from silence to 0.5 amplitude in 0.05 seconds (50 milliseconds)
shootSound.amp(0, 0.2, 0.1); // Fade out to 0 amplitude over 0.2 seconds, starting 0.1s later
Schedules the sound to fade back to silence after 0.1 seconds, over 0.2 seconds total; this keeps the sound brief and snappy

keyPressed()

keyPressed() is called automatically once per key press, making it ideal for one-time actions like restart. To respond to keys being held down, use keyIsDown(keyCode) instead. The logical AND operator (&&) checks that BOTH conditions are true: the game must be over AND the key must be 'r', preventing accidental restarts during gameplay.

function keyPressed() {
  if (gameState === 'gameOver' && key === 'r') {
    restartGame(); // Restart the game if 'R' is pressed on Game Over screen
  }
}
Line-by-line explanation (2 lines)
if (gameState === 'gameOver' && key === 'r') {
Checks if the game is over AND if the pressed key is 'r'; key is a p5.js variable containing the character of the most recently pressed key
restartGame(); // Restart the game if 'R' is pressed on Game Over screen
Calls the restartGame() function, which resets all game variables and returns to the playing state

restartGame()

This function demonstrates how to reset an entire game state by reassigning global variables and arrays. By setting arrays to empty [], we don't need to loop through and delete elements—a fresh array is more efficient. Creating a new Player object ensures all its properties (position, speed, angle) are reset to defaults.

function restartGame() {
  score = 0;
  projectiles = []; // Clear all projectiles
  enemies = [];     // Clear all enemies
  player = new Player(width / 2, height / 2); // Re-initialize player
  gameState = 'playing'; // Set game state back to playing
}
Line-by-line explanation (5 lines)
score = 0;
Resets the score counter to zero for the new game
projectiles = []; // Clear all projectiles
Replaces the projectiles array with an empty array, effectively deleting all on-screen bullets
enemies = []; // Clear all enemies
Replaces the enemies array with an empty array, removing all on-screen enemies
player = new Player(width / 2, height / 2); // Re-initialize player
Creates a fresh Player object at the center of the canvas, resetting position and aiming angle
gameState = 'playing'; // Set game state back to playing
Changes the game state from 'gameOver' back to 'playing', which resumes the main game loop logic in draw()

windowResized()

windowResized() is a p5.js event function that runs automatically whenever the browser window is resized. Without it, the canvas would stop responding to the new window size. Recentering the player prevents it from being suddenly off-screen if the canvas shrinks, maintaining a consistent play experience during dynamic window resizing.

function windowResized() {
  resizeCanvas(windowWidth, windowHeight); // Resize canvas to match new window dimensions
  player.x = width / 2; // Center player horizontally
  player.y = height / 2; // Center player vertically
}
Line-by-line explanation (3 lines)
resizeCanvas(windowWidth, windowHeight); // Resize canvas to match new window dimensions
p5.js function that resizes the canvas; this is called automatically whenever the browser window is resized, and we pass the new window dimensions
player.x = width / 2; // Center player horizontally
Recalculates the player's horizontal position to remain centered in the new canvas size
player.y = height / 2; // Center player vertically
Recalculates the player's vertical position to remain centered vertically in the new canvas size

class Player

The Player class encapsulates all player-related logic: movement, aiming, and drawing. The update() method handles input and recalculates position/angle every frame, while show() handles rendering using p5.js transform functions. The key insight is translate() + rotate() + push()/pop(): this pattern lets you draw rotated objects easily without complex math. atan2() is crucial for converting Cartesian coordinates (x, y differences) into polar coordinates (angle), which is essential for aiming systems.

🔬 These four if-statements check for WASD movement. What if you wanted the player to move FASTER when holding W and S together, or SLOWER when holding A and D? Try creating a movement multiplier that increases based on certain conditions.

    if (keyIsDown(87)) { // W key
      this.y -= this.speed;
    }
    if (keyIsDown(83)) { // S key
      this.y += this.speed;
    }
    if (keyIsDown(65)) { // A key
      this.x -= this.speed;
    }
    if (keyIsDown(68)) { // D key
      this.x += this.speed;
    }
class Player {
  constructor(x, y) {
    this.x = x;
    this.y = y;
    this.size = 30; // Size of the player square
    this.speed = 5; // Movement speed
    this.angle = 0; // Aiming angle
  }

  update() {
    // Movement (WASD keys)
    if (keyIsDown(87)) { // W key
      this.y -= this.speed;
    }
    if (keyIsDown(83)) { // S key
      this.y += this.speed;
    }
    if (keyIsDown(65)) { // A key
      this.x -= this.speed;
    }
    if (keyIsDown(68)) { // D key
      this.x += this.speed;
    }

    // Constrain player to stay within canvas bounds
    this.x = constrain(this.x, this.size / 2, width - this.size / 2);
    this.y = constrain(this.y, this.size / 2, height - this.size / 2);

    // Aiming: Rotate player towards the mouse position
    this.angle = atan2(mouseY - this.y, mouseX - this.x);
  }

  show() {
    push(); // Save current drawing style
    translate(this.x, this.y); // Move origin to player's position
    rotate(this.angle);        // Rotate player to face the mouse
    fill(0, 0, 255); // Blue player character
    rectMode(CENTER);
    rect(0, 0, this.size, this.size); // Draw player square
    // Add a small red rectangle to indicate the aiming direction
    fill(255, 0, 0);
    rect(this.size / 2, 0, this.size / 2, 5);
    pop(); // Restore original drawing style
  }
}
Line-by-line explanation (21 lines)

🔧 Subcomponents:

calculation Constructor constructor(x, y) { this.x = x; this.y = y; this.size = 30; // Size of the player square this.speed = 5; // Movement speed this.angle = 0; // Aiming angle }

Initializes a Player object with position, size, speed, and starting aiming angle

for-loop Keyboard Movement // Movement (WASD keys) if (keyIsDown(87)) { // W key this.y -= this.speed; } if (keyIsDown(83)) { // S key this.y += this.speed; } if (keyIsDown(65)) { // A key this.x -= this.speed; } if (keyIsDown(68)) { // D key this.x += this.speed; }

Checks which keys are currently held down and moves the player in four directions (up, down, left, right)

calculation Mouse-Based Aiming // Aiming: Rotate player towards the mouse position this.angle = atan2(mouseY - this.y, mouseX - this.x);

Calculates the angle from the player to the mouse cursor using atan2(), which converts x and y offsets into a rotation angle

calculation Drawing with Transforms push(); // Save current drawing style translate(this.x, this.y); // Move origin to player's position rotate(this.angle); // Rotate player to face the mouse fill(0, 0, 255); // Blue player character rectMode(CENTER); rect(0, 0, this.size, this.size); // Draw player square // Add a small red rectangle to indicate the aiming direction fill(255, 0, 0); rect(this.size / 2, 0, this.size / 2, 5); pop(); // Restore original drawing style

Uses translate() and rotate() to position and orient the player square, then draws a small red indicator showing the aiming direction

constructor(x, y) {
Constructor method that runs when a new Player object is created; x and y parameters set the starting position
this.x = x; this.y = y;
Store the x and y parameters as properties of this object, making them accessible and modifiable later
this.size = 30; // Size of the player square
Sets the width and height of the player square to 30 pixels; changing this makes the player larger or smaller
this.speed = 5; // Movement speed
Defines how many pixels the player moves per frame when a key is held down
this.angle = 0; // Aiming angle
Initializes the aiming angle to 0 radians (pointing right); this will be updated every frame to point at the mouse
update() {
This method is called every frame to update the player's state: position from keyboard input and angle from mouse position
if (keyIsDown(87)) { // W key this.y -= this.speed;
keyIsDown() checks if a key is currently held; 87 is the key code for W; -= subtracts (moves the player up)
if (keyIsDown(83)) { // S key this.y += this.speed;
S key (83) moves the player down by adding to this.y
if (keyIsDown(65)) { // A key this.x -= this.speed;
A key (65) moves the player left by subtracting from this.x
if (keyIsDown(68)) { // D key this.x += this.speed;
D key (68) moves the player right by adding to this.x
// Constrain player to stay within canvas bounds this.x = constrain(this.x, this.size / 2, width - this.size / 2);
constrain() clamps a value between a minimum and maximum; here it prevents the player from moving past the left or right edge, accounting for the player's size
this.y = constrain(this.y, this.size / 2, height - this.size / 2);
Similarly constrains vertical movement to keep the player within the top and bottom edges
// Aiming: Rotate player towards the mouse position this.angle = atan2(mouseY - this.y, mouseX - this.x);
atan2() is a trigonometric function that calculates the angle from the player to the mouse; it returns a value in radians that rotate() can use directly
show() {
This method is called every frame to draw the player at its current position and angle
push(); // Save current drawing style
push() saves the current drawing transformation state (like fill color, stroke, rotation, etc.)
translate(this.x, this.y); // Move origin to player's position
translate() moves the drawing origin (0, 0) to the player's position; now all subsequent drawing happens relative to this point
rotate(this.angle); // Rotate player to face the mouse
rotate() spins the entire coordinate system by this.angle radians; everything drawn after this will be rotated
fill(0, 0, 255); // Blue player character rectMode(CENTER);
Sets fill color to blue (0, 0, 255) and rectMode(CENTER) so the rectangle draws from its center (important for clean rotation)
rect(0, 0, this.size, this.size); // Draw player square
Draws a square at (0, 0) with width and height of this.size; because of translate() and rotate(), this appears at the player's position, rotated to face the mouse
// Add a small red rectangle to indicate the aiming direction fill(255, 0, 0); rect(this.size / 2, 0, this.size / 2, 5);
Draws a small red rectangle to the right of the player's center, serving as a visual aiming indicator; it also rotates with the player
pop(); // Restore original drawing style
pop() restores the drawing state saved by push(), undoing all transformations and style changes so they don't affect other drawings

class Projectile

The Projectile class demonstrates vector decomposition: converting a single angle and magnitude (speed) into separate x and y components using trigonometry. This is a foundational technique in any game involving projectiles or movement. The collision detection using distance is a circle-circle approximation (treating the rectangle as a circle), which is fast but slightly forgiving—more accurate collision would require proper circle-rectangle math.

🔬 These lines convert angle into x and y velocity using cos and sin. What would happen if you multiplied vx by 2 to make projectiles move twice as fast horizontally? Try it and see if the bullet flies diagonally faster in certain directions.

    this.vx = this.speed * cos(angle);
    this.vy = this.speed * sin(angle);
class Projectile {
  constructor(x, y, angle) {
    this.x = x;
    this.y = y;
    this.speed = 10; // Projectile speed
    this.size = 10;  // Size of the projectile circle
    // Calculate x and y velocity components based on angle
    this.vx = this.speed * cos(angle);
    this.vy = this.speed * sin(angle);
  }

  update() {
    // Move projectile
    this.x += this.vx;
    this.y += this.vy;
  }

  show() {
    fill(255, 200, 0); // Yellow projectile
    noStroke();
    ellipse(this.x, this.y, this.size); // Draw projectile as a circle
  }

  hits(enemy) {
    // Simple circle-rectangle collision detection (projectile is circle, enemy is rect)
    let d = dist(this.x, this.y, enemy.x, enemy.y);
    return d < this.size / 2 + enemy.size / 2;
  }

  offScreen() {
    // Check if projectile is outside canvas bounds
    return (this.x < -this.size || this.x > width + this.size ||
            this.y < -this.size || this.y > height + this.size);
  }
}
Line-by-line explanation (16 lines)

🔧 Subcomponents:

calculation Velocity Calculation // Calculate x and y velocity components based on angle this.vx = this.speed * cos(angle); this.vy = this.speed * sin(angle);

Converts a single angle and speed value into separate x and y velocity components using trigonometry, allowing diagonal motion in any direction

conditional Collision Detection hits(enemy) { // Simple circle-rectangle collision detection (projectile is circle, enemy is rect) let d = dist(this.x, this.y, enemy.x, enemy.y); return d < this.size / 2 + enemy.size / 2; }

Calculates distance from projectile center to enemy center; if distance is less than the sum of their radii, they overlap and collide

conditional Off-Screen Check offScreen() { // Check if projectile is outside canvas bounds return (this.x < -this.size || this.x > width + this.size || this.y < -this.size || this.y > height + this.size); }

Returns true if the projectile has traveled beyond any edge of the canvas, allowing the draw loop to remove it safely

constructor(x, y, angle) {
Constructor receives starting position (x, y) and the angle at which to fire; angle comes from the player's current aiming angle
this.x = x; this.y = y;
Store the starting position; projectiles are created at the player's center
this.speed = 10; // Projectile speed
Defines the total speed of the projectile; this magnitude will be split between x and y velocity components
this.size = 10; // Size of the projectile circle
Sets the projectile's diameter to 10 pixels; used for collision detection and drawing
// Calculate x and y velocity components based on angle this.vx = this.speed * cos(angle); this.vy = this.speed * sin(angle);
Converts angle (in radians) into separate x and y velocity using trigonometric functions; cos() gives the horizontal component, sin() gives the vertical component
update() {
Called every frame to move the projectile
// Move projectile this.x += this.vx; this.y += this.vy;
Adds velocity to position; this small increment every frame creates smooth motion toward the direction it was fired
show() {
Called every frame to draw the projectile
fill(255, 200, 0); // Yellow projectile
Sets fill color to yellow (RGB: 255, 200, 0)
noStroke();
Disables the outline around the circle, making it appear solid
ellipse(this.x, this.y, this.size); // Draw projectile as a circle
Draws a circle at the projectile's current position with diameter equal to this.size
hits(enemy) {
Method that checks if this projectile collides with an enemy; returns true or false
// Simple circle-rectangle collision detection (projectile is circle, enemy is rect) let d = dist(this.x, this.y, enemy.x, enemy.y);
dist() calculates the Euclidean distance between the projectile and enemy centers using the distance formula
return d < this.size / 2 + enemy.size / 2;
Returns true if the distance is less than the sum of both objects' radii; this is a simple but effective collision check
offScreen() {
Method that checks if the projectile has traveled beyond the canvas boundaries; returns true if off-screen
return (this.x < -this.size || this.x > width + this.size || this.y < -this.size || this.y > height + this.size);
Returns true if the projectile is beyond any edge; uses OR (||) operators so ANY condition being true returns true; the extra this.size margin allows objects slightly off-screen to still be drawn

class Enemy

The Enemy class demonstrates several game AI basics: random spawning from screen edges, target-seeking using atan2(), and axis-aligned bounding-box (AABB) collision detection. The targeting logic is a simple 'seek' behavior—the enemy always moves toward the player's current position. More sophisticated AI could include path-finding, dodging, or predictive targeting. The collision detection using axis-aligned rectangles is fast and works well for this game; rotated rectangles or complex shapes would require more sophisticated math.

🔬 This code makes enemies aim at the player's CURRENT position. What if enemies predicted where the player is moving? Try adding the player's velocity to the target position to make enemies lead their shots (aim ahead of the player).

  update() {
    // Move enemy towards the player's current position
    let angle = atan2(player.y - this.y, player.x - this.x);
    this.x += this.speed * cos(angle);
    this.y += this.speed * sin(angle);
  }
class Enemy {
  constructor() {
    // Spawn enemy at a random edge of the screen
    let side = floor(random(4)); // 0: top, 1: right, 2: bottom, 3: left
    if (side === 0) { // Top
      this.x = random(width);
      this.y = -20;
    } else if (side === 1) { // Right
      this.x = width + 20;
      this.y = random(height);
    } else if (side === 2) { // Bottom
      this.x = random(width);
      this.y = height + 20;
    } else { // Left
      this.x = -20;
      this.y = random(height);
    }

    this.size = 40; // Size of the enemy square
    this.speed = random(1, 3); // Random movement speed for variety
  }

  update() {
    // Move enemy towards the player's current position
    let angle = atan2(player.y - this.y, player.x - this.x);
    this.x += this.speed * cos(angle);
    this.y += this.speed * sin(angle);
  }

  show() {
    fill(255, 0, 0); // Red enemy character
    rectMode(CENTER);
    rect(this.x, this.y, this.size, this.size); // Draw enemy square
  }

  hitsPlayer(player) {
    // Simple rectangle-rectangle collision detection (enemy is rect, player is rect)
    let dx = abs(this.x - player.x);
    let dy = abs(this.y - player.y);

    if (dx > (this.size / 2 + player.size / 2)) { return false; }
    if (dy > (this.size / 2 + player.size / 2)) { return false; }

    return true; // Collision detected
  }
}
Line-by-line explanation (20 lines)

🔧 Subcomponents:

conditional Random Edge Spawning let side = floor(random(4)); // 0: top, 1: right, 2: bottom, 3: left if (side === 0) { // Top this.x = random(width); this.y = -20; } else if (side === 1) { // Right this.x = width + 20; this.y = random(height); } else if (side === 2) { // Bottom this.x = random(width); this.y = height + 20; } else { // Left this.x = -20; this.y = random(height); }

Randomly chooses one of four screen edges and positions the enemy just outside the canvas at that edge

calculation Targeting the Player // Move enemy towards the player's current position let angle = atan2(player.y - this.y, player.x - this.x); this.x += this.speed * cos(angle); this.y += this.speed * sin(angle);

Calculates the angle from enemy to player and moves toward the player each frame using the same velocity decomposition technique as projectiles

conditional Rectangle Collision Detection hitsPlayer(player) { // Simple rectangle-rectangle collision detection (enemy is rect, player is rect) let dx = abs(this.x - player.x); let dy = abs(this.y - player.y); if (dx > (this.size / 2 + player.size / 2)) { return false; } if (dy > (this.size / 2 + player.size / 2)) { return false; } return true; // Collision detected }

Checks axis-aligned rectangle collision by comparing horizontal and vertical distances against the sum of half-sizes (radii)

constructor() {
Constructor for Enemy takes no parameters; all enemy properties are randomly or procedurally generated
// Spawn enemy at a random edge of the screen let side = floor(random(4)); // 0: top, 1: right, 2: bottom, 3: left
random(4) generates a decimal between 0 and 4; floor() rounds down to 0, 1, 2, or 3, each representing a different screen edge
if (side === 0) { // Top this.x = random(width); this.y = -20;
If side 0 (top): place the enemy at a random horizontal position, just above the canvas (y = -20 puts it slightly off-screen)
} else if (side === 1) { // Right this.x = width + 20; this.y = random(height);
If side 1 (right): place the enemy just beyond the right edge at a random vertical position
} else if (side === 2) { // Bottom this.x = random(width); this.y = height + 20;
If side 2 (bottom): place the enemy just below the canvas at a random horizontal position
} else { // Left this.x = -20; this.y = random(height);
If side 3 (left, the default): place the enemy just beyond the left edge at a random vertical position
this.size = 40; // Size of the enemy square
All enemies are 40x40 pixels; this is larger than the player (30 pixels) to make them visually threatening
this.speed = random(1, 3); // Random movement speed for variety
Each enemy gets a random speed between 1 and 3 pixels per frame, adding unpredictability to enemy behavior
update() {
Called every frame to update the enemy's position
// Move enemy towards the player's current position let angle = atan2(player.y - this.y, player.x - this.x);
Calculates the angle from the enemy to the player using the same atan2() technique as player aiming; this makes enemies 'seek' the player
this.x += this.speed * cos(angle); this.y += this.speed * sin(angle);
Moves the enemy in the direction of the calculated angle by decomposing speed into x and y components
show() {
Called every frame to draw the enemy
fill(255, 0, 0); // Red enemy character
Sets fill color to red (RGB: 255, 0, 0); red contrasts with the blue player and yellow projectiles
rectMode(CENTER);
Ensures the rectangle draws from its center, making rotation and positioning calculations consistent
rect(this.x, this.y, this.size, this.size); // Draw enemy square
Draws a 40x40 pixel square at the enemy's current position
hitsPlayer(player) {
Method that checks if this enemy has collided with the player; called from the main draw loop
let dx = abs(this.x - player.x); let dy = abs(this.y - player.y);
Calculates the absolute (unsigned) horizontal and vertical distances between the two objects' centers
if (dx > (this.size / 2 + player.size / 2)) { return false; }
If the horizontal distance exceeds the sum of their half-widths, they can't be colliding; return false early
if (dy > (this.size / 2 + player.size / 2)) { return false; }
If the vertical distance exceeds the sum of their half-heights, they can't be colliding; return false early
return true; // Collision detected
If both horizontal and vertical distances are within the collision threshold, the rectangles overlap and collision is true

📦 Key Variables

player object

Stores the Player object that represents the player character; contains position, angle, and methods for movement and drawing

let player;
projectiles array

Stores all active Projectile objects; projectiles are added when the mouse is clicked and removed when they hit enemies or go off-screen

let projectiles = [];
enemies array

Stores all active Enemy objects; enemies are spawned every 60 frames and removed when hit by projectiles or when they reach the player

let enemies = [];
score number

Tracks the player's current score; increases by 10 each time an enemy is destroyed

let score = 0;
gameState string

Stores the current game state as either 'playing' (game is active) or 'gameOver' (player has lost); determines which logic runs in draw()

let gameState = 'playing';
shootSound object

A p5.Oscillator object that plays the sound effect when the player fires a projectile

let shootSound;
hitSound object

A p5.Oscillator object that plays the sound effect when a projectile hits an enemy

let hitSound;
gameOverSound object

A p5.Oscillator object that plays the sound effect when the game ends

let gameOverSound;

🔧 Potential Improvements (6)

Here are some ways this code could be enhanced:

BUG draw() - projectile collision detection

When a projectile hits an enemy, the loop breaks but only for the inner (enemy) loop; if there are multiple projectiles, splicing at index i could cause index skipping or undefined behavior in complex scenarios

💡 Consider using filter() instead of splice() to safely remove elements: projectiles = projectiles.filter((p, index) => index !== i)

PERFORMANCE draw() - nested collision loops

Every projectile is checked against every enemy every frame (O(n²) complexity); with many projectiles and enemies, this becomes a bottleneck

💡 For larger games, use spatial partitioning (quadtree) or divide the canvas into grid cells to only check nearby objects

BUG Projectile.hits() collision detection

Using distance-based collision (circle-circle) for a circle projectile and rectangle enemy is approximate; projectiles might pass through corner edges or miss at angles

💡 Implement proper circle-rectangle collision detection by finding the closest point on the rectangle to the circle's center

STYLE Enemy movement AI

Enemies always move toward the player's current position, making them predictable; no variety in enemy behavior

💡 Add different enemy types: some that move predictively, some that strafe, some that patrol—this adds depth to gameplay

FEATURE Game mechanics

No difficulty progression; enemy spawn rate never increases and all enemies have the same speed range

💡 Gradually increase spawn frequency or max enemy speed based on score or time, creating an escalating challenge curve

FEATURE Player feedback

No visual indication of damage or health; player has no warning before losing

💡 Add a health/lives system with a visual indicator (hearts, bars) so players know they're taking damage before the game ends

🔄 Code Flow

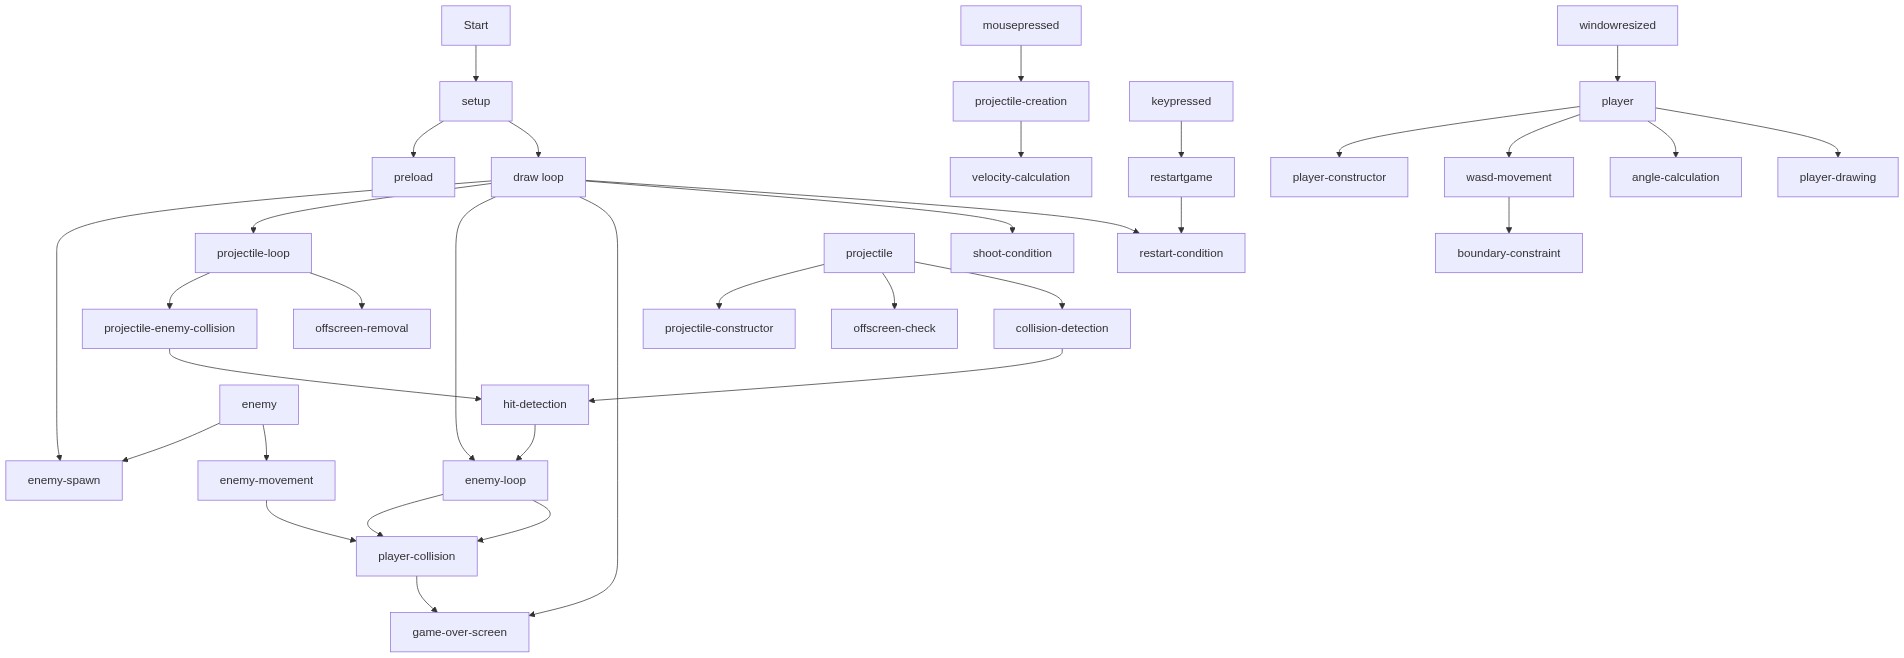
Code flow showing preload, setup, draw, mousepressed, keypressed, restartgame, windowresized, player, projectile, enemy

💡 Click on function names in the diagram to jump to their code

graph TD start[Start] --> setup[setup] setup --> preload[preload] preload --> setup setup --> draw[draw loop] draw --> player-constructor[player-constructor] draw --> player-movement[player-movement] draw --> player-aiming[player-aiming] draw --> player-drawing[player-drawing] draw --> enemy-spawn[enemy-spawn] draw --> projectile-collision-loop[projectile-collision-loop] draw --> enemy-update-loop[enemy-update-loop] draw --> game-over-screen[game-over-screen] click preload href "#fn-preload" click setup href "#fn-setup" click draw href "#fn-draw" click player-constructor href "#sub-player-constructor" click player-movement href "#sub-player-movement" click player-aiming href "#sub-player-aiming" click player-drawing href "#sub-player-drawing" click enemy-spawn href "#sub-enemy-spawn" click projectile-collision-loop href "#sub-projectile-collision-loop" click enemy-update-loop href "#sub-enemy-update-loop" click game-over-screen href "#sub-game-over-screen" projectile-collision-loop --> projectile-offscreen[projectile-offscreen] projectile-collision-loop --> projectile-collision[projectile-collision] projectile-collision-loop --> projectile-velocity[projectile-velocity] enemy-update-loop --> enemy-targeting[enemy-targeting] enemy-update-loop --> enemy-collision[enemy-collision] enemy-spawn --> enemy-spawn[enemy-spawn] game-over-screen --> gameover-sound-setup[gameover-sound-setup] click gameover-sound-setup href "#sub-gameover-sound-setup" mousepressed[mousepressed] --> shoot-sound-setup[shoot-sound-setup] click shoot-sound-setup href "#sub-shoot-sound-setup" keypressed[keypressed] --> restartgame[restartgame] click restartgame href "#fn-restartgame" windowresized[windowresized] --> windowresized[windowresized] click windowresized href "#fn-windowresized"

❓ Frequently Asked Questions

What visual experience does the 'Hit the Blocks' p5.js sketch provide?

The sketch creates an interactive game environment where a player can shoot projectiles at enemies that spawn on the screen, set against a light gray background.

How can players interact with the 'Hit the Blocks' game?

Players can control the player character and shoot projectiles at incoming enemies, aiming to score points before the game ends.

What creative coding concepts are showcased in this p5.js sketch?

The sketch demonstrates real-time interaction, sound synthesis with p5.Sound, and object-oriented programming through the use of player and enemy classes.

Preview

hit the blocks - p5.js creative coding sketch preview
Sketch Preview
Code flow diagram showing the structure of hit the blocks - Code flow showing preload, setup, draw, mousepressed, keypressed, restartgame, windowresized, player, projectile, enemy
Code Flow Diagram