
hostb

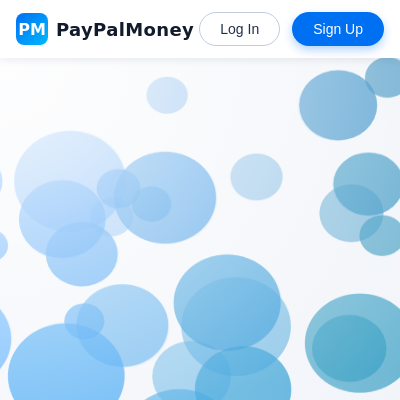
This sketch creates an animated background of 60 pulsating bubbles that float smoothly across the canvas with semi-transparent trails. Each bubble has a gradient color based on its position and pulses in opacity, creating a fluid, dynamic visual effect designed to enhance the PayPalMoney demo website.

🧪 Try This!

Experiment with the code by making these changes:

  1. Remove motion trails entirely — Change the background alpha to 255 so the canvas is fully repainted every frame instead of fading old bubbles gradually
  2. Make bubbles move much faster — Increase the velocity range in initBubbles() so bubbles dash across the screen instead of drifting lazily
  3. Double the number of bubbles — Increase NUM_BUBBLES to create a much denser, busier background with more visual movement
  4. Invert the color gradient — Swap the lerp start and end values so colors flow the opposite direction across the canvas
  5. Extreme pulsation — Make the opacity changes much more dramatic so bubbles appear and disappear more visibly
Prefer the full editor? Open it there →

📖 About This Sketch

This sketch generates a living, breathing background of floating bubbles for a PayPalMoney demo website. The bubbles drift across the canvas with smooth motion, their colors shift from teal to blue depending on their position, and their opacity pulses gently over time—all rendered on top of a semi-transparent background to leave colorful trails. It demonstrates three essential creative coding techniques: object arrays, trigonometric animation, and color interpolation with lerp().

The code is organized into a setup() function that initializes the canvas and bubble array, a draw() function that animates and colors all bubbles every frame, and an initBubbles() helper that generates random bubbles with varied sizes and velocities. By reading it you will learn how to manage many moving objects efficiently, how to use sin() and frameCount for smooth pulsing effects, and how to build responsive backgrounds that attach to DOM containers.

⚙️ How It Works

  1. When the sketch loads, setup() finds the HTML container for the background, creates a canvas sized to fit it, and calls initBubbles() to populate the bubbles array with 60 random bubble objects, each with position, velocity, size, and a phase value for animation.
  2. Every frame, draw() paints a semi-transparent light blue background (background with alpha = 90) which creates smooth motion trails as new frames layer over fading old ones.
  3. For each bubble in the array, the code moves it by adding its velocity (vx and vy) to its position, then wraps it around the canvas edges so bubbles that exit one side reappear on the opposite side.
  4. A sine wave using frameCount calculates each bubble's pulsating opacity: it oscillates between 40 and 120 alpha, with each bubble's phase offset so they pulse out of sync, creating a living rhythm.
  5. The bubble's color is calculated by interpolating between blue and teal based on where the bubble sits on the canvas: the x position controls the blue-to-aqua shift, and the y position controls a teal-to-cyan shift using two lerp() calls.
  6. Finally, circle() draws each bubble at its position with diameter r * 2, and the loop repeats 60 times per second to animate the scene.

🎓 Concepts You'll Learn

Animation loop with frameCountObject arrays and for-of loopsTrigonometric animation with sin()Color interpolation with lerp()Canvas wrapping and edge detectionSemi-transparent backgrounds for trailsDOM attachment and responsive canvas sizing

📝 Code Breakdown

setup()

setup() runs once when the sketch starts. This function attaches the canvas to a specific HTML container, which is essential for embedding animated backgrounds into web pages. The c.parent() method is the key to integrating p5.js with existing HTML.

function setup() {
  // Create canvas and attach it to the background container
  const container = document.getElementById('p5-background');
  const c = createCanvas(container.offsetWidth, container.offsetHeight);
  c.parent('p5-background');

  noStroke();
  initBubbles();
}
Line-by-line explanation (5 lines)

🔧 Subcomponents:

calculation Canvas sizing and attachment const c = createCanvas(container.offsetWidth, container.offsetHeight);

Creates a canvas that matches the HTML container's dimensions so the background fills the space perfectly

function-call Bubble population initBubbles();

Populates the bubbles array with 60 random bubble objects ready to animate

const container = document.getElementById('p5-background');
Finds the HTML element with id 'p5-background' so we can measure its size and attach our canvas to it
const c = createCanvas(container.offsetWidth, container.offsetHeight);
Creates a p5.js canvas that is exactly as wide and tall as the container, so the background fills the entire space
c.parent('p5-background');
Tells p5.js to place the canvas inside the 'p5-background' div instead of at the bottom of the page
noStroke();
Removes outlines from all shapes so bubbles appear as clean, filled circles with no borders
initBubbles();
Calls the initBubbles function to create 60 bubble objects with random positions, sizes, and velocities
draw()

draw() is where the animation happens. It runs 60 times per second, updating every bubble's position, wrapping edges, calculating a pulsating opacity, interpolating colors based on position, and drawing circles. The semi-transparent background is the secret to smooth trails—each new frame partially covers the old one, fading it out naturally.

🔬 These four lines wrap bubbles around the canvas edges. What happens if you remove them all and let bubbles drift off-screen forever?

    if (b.x < -b.r) b.x = width + b.r;
    if (b.x > width + b.r) b.x = -b.r;
    if (b.y < -b.r) b.y = height + b.r;
    if (b.y > height + b.r) b.y = -b.r;

🔬 These lines create the gradient color effect. What if you swap tX and tY—so colors change top-to-bottom instead of left-to-right?

    const tX = b.x / width;
    const tY = b.y / height;

    const r = lerp(0, 0, tX);          // keep low
    const g = lerp(110, 180, tY);      // teal-ish
    const bl = lerp(255, 170, tX);     // blue → aqua
function draw() {
  // Transparent-ish background for smooth trails
  background(240, 244, 250, 90);

  for (let b of bubbles) {
    // Move
    b.x += b.vx;
    b.y += b.vy;

    // Wrap around edges
    if (b.x < -b.r) b.x = width + b.r;
    if (b.x > width + b.r) b.x = -b.r;
    if (b.y < -b.r) b.y = height + b.r;
    if (b.y > height + b.r) b.y = -b.r;

    // Pulsating alpha
    const alpha = 80 + 40 * sin(frameCount * 0.01 + b.phase);

    // Gradient-ish color based on position
    const tX = b.x / width;
    const tY = b.y / height;

    const r = lerp(0, 0, tX);          // keep low
    const g = lerp(110, 180, tY);      // teal-ish
    const bl = lerp(255, 170, tX);     // blue → aqua

    fill(r, g, bl, alpha);
    circle(b.x, b.y, b.r * 2);
  }
}
Line-by-line explanation (16 lines)

🔧 Subcomponents:

function-call Semi-transparent background background(240, 244, 250, 90);

Paints a light blue overlay that is slightly transparent (alpha 90), allowing old bubble positions to fade gradually and create smooth motion trails

for-loop Bubble movement loop for (let b of bubbles) {

Iterates through every bubble in the array so each one can be moved, wrapped, colored, and drawn

conditional Edge wrapping if (b.x < -b.r) b.x = width + b.r;

Teleports bubbles that exit the left edge back to the right side, creating a seamless looping effect

calculation Opacity pulsing const alpha = 80 + 40 * sin(frameCount * 0.01 + b.phase);

Uses a sine wave to make alpha oscillate between 40 and 120, with each bubble's phase offset to pulse independently

calculation Position-based gradient const r = lerp(0, 0, tX);

Interpolates colors based on bubble position so left bubbles are one color and right bubbles are another

background(240, 244, 250, 90);
Paints a semi-transparent light blue every frame—alpha 90 means it's mostly opaque, so old bubble positions fade out slowly, leaving visible trails
for (let b of bubbles) {
A for-of loop that iterates through every bubble object in the bubbles array, one at a time, storing it in variable 'b'
b.x += b.vx;
Moves the bubble right or left by adding its horizontal velocity to its x position
b.y += b.vy;
Moves the bubble up or down by adding its vertical velocity to its y position
if (b.x < -b.r) b.x = width + b.r;
If the bubble has drifted off the left edge (x is less than negative its radius), teleport it to the right edge
if (b.x > width + b.r) b.x = -b.r;
If the bubble drifted off the right edge, teleport it to the left edge
if (b.y < -b.r) b.y = height + b.r;
If the bubble drifted off the top edge, teleport it to the bottom edge
if (b.y > height + b.r) b.y = -b.r;
If the bubble drifted off the bottom edge, teleport it to the top edge
const alpha = 80 + 40 * sin(frameCount * 0.01 + b.phase);
Calculates opacity using a sine wave that oscillates between 40 and 120; frameCount * 0.01 makes it change slowly, and b.phase makes each bubble pulse at a different time
const tX = b.x / width;
Converts the bubble's x position into a normalized value between 0 and 1 (0 = left edge, 1 = right edge)
const tY = b.y / height;
Converts the bubble's y position into a normalized value between 0 and 1 (0 = top edge, 1 = bottom edge)
const r = lerp(0, 0, tX);
Interpolates the red channel between 0 and 0—it stays at 0, keeping red low across all bubbles
const g = lerp(110, 180, tY);
Interpolates the green channel from 110 (at top) to 180 (at bottom), so bubbles shift from teal to more cyan as they fall
const bl = lerp(255, 170, tX);
Interpolates the blue channel from 255 (at left edge) to 170 (at right edge), so left bubbles are bright blue and right bubbles are aqua
fill(r, g, bl, alpha);
Sets the fill color to the calculated RGB values and opacity before drawing the bubble
circle(b.x, b.y, b.r * 2);
Draws a circle at the bubble's position with diameter equal to twice its radius, using the color set by fill()

windowResized()

windowResized() is a built-in p5.js function that automatically runs whenever the browser window is resized. This sketch uses it to keep the canvas filling the container at all times and to regenerate bubbles so they fit the new dimensions. Without it, the canvas would stay its original size and the background would look broken on mobile or when dragging the window edge.

function windowResized() {
  const container = document.getElementById('p5-background');
  resizeCanvas(container.offsetWidth, container.offsetHeight);
  // Optionally regenerate bubbles when size changes
  initBubbles();
}
Line-by-line explanation (3 lines)

🔧 Subcomponents:

function-call Canvas resize resizeCanvas(container.offsetWidth, container.offsetHeight);

Tells p5.js to shrink or grow the canvas to match the new container size when the window is resized

const container = document.getElementById('p5-background');
Finds the HTML container element so we can measure its new size after the window was resized
resizeCanvas(container.offsetWidth, container.offsetHeight);
Resizes the p5.js canvas to match the container's new dimensions
initBubbles();
Regenerates the bubble array so they are positioned and scattered across the newly-sized canvas

initBubbles()

initBubbles() is called every time we need a fresh set of bubbles—once in setup(), and again in windowResized() whenever the window changes size. It empties the bubbles array and fills it with NUM_BUBBLES new objects, each with random position, velocity, size, and phase. This is where the variety and life in the background comes from.

🔬 These two lines set how fast each bubble drifts. What if you increase both ranges to random(-1, 1) so bubbles zoom across the screen much faster?

      vx: random(-0.3, 0.3),
      vy: random(-0.3, 0.3),
function initBubbles() {
  bubbles = [];
  for (let i = 0; i < NUM_BUBBLES; i++) {
    const r = random(18, 60);
    bubbles.push({
      x: random(width),
      y: random(height),
      vx: random(-0.3, 0.3),
      vy: random(-0.3, 0.3),
      r,
      phase: random(TWO_PI)
    });
  }
}
Line-by-line explanation (10 lines)

🔧 Subcomponents:

calculation Clear bubbles array bubbles = [];

Empties the bubbles array so we can fill it with fresh bubble objects

for-loop Bubble creation loop for (let i = 0; i < NUM_BUBBLES; i++) {

Loops 60 times (NUM_BUBBLES) to create 60 individual bubble objects with random properties

calculation Bubble object creation bubbles.push({

Creates a bubble object with x, y, velocity, size, and phase, then adds it to the bubbles array

bubbles = [];
Empties the bubbles array by assigning it a new empty array, clearing any old bubbles
for (let i = 0; i < NUM_BUBBLES; i++) {
Starts a loop that runs NUM_BUBBLES times (60), using i as a counter from 0 to 59
const r = random(18, 60);
Generates a random radius for this bubble between 18 and 60 pixels
bubbles.push({
Creates a new object and adds it to the bubbles array using push()
x: random(width),
Sets the bubble's starting x position to a random point across the canvas width
y: random(height),
Sets the bubble's starting y position to a random point across the canvas height
vx: random(-0.3, 0.3),
Sets horizontal velocity to a random value between -0.3 and 0.3 pixels per frame, so some bubbles drift left and others right
vy: random(-0.3, 0.3),
Sets vertical velocity to a random value between -0.3 and 0.3 pixels per frame, so bubbles drift in all directions
r,
Shorthand for 'r: r'—stores the radius we created earlier in the bubble object
phase: random(TWO_PI)
Assigns a random phase offset (between 0 and 2π) so each bubble's pulsation starts at a different point in the sine wave

📦 Key Variables

bubbles array

Stores all 60 bubble objects; each bubble is an object with properties x, y, vx, vy, r (radius), and phase

let bubbles = [];
NUM_BUBBLES number

A constant that defines how many bubbles to create (60); changing this changes the density of the background

const NUM_BUBBLES = 60;

🔧 Potential Improvements (4)

Here are some ways this code could be enhanced:

BUG draw() - color calculation

The red channel lerp uses lerp(0, 0, tX) which always evaluates to 0 regardless of tX, making it redundant

💡 Change to lerp(50, 100, tX) or similar to create actual color variation in the red channel, or intentionally leave it at 0 with a clearer comment

PERFORMANCE draw() - bubble iteration

Every bubble is processed and drawn even if it's off-screen or invisible; with hundreds of bubbles this could slow down

💡 Add an early check: if (alpha < 5) continue; to skip rendering bubbles that are nearly invisible

STYLE initBubbles()

The random velocity range (-0.3 to 0.3) is a magic number not defined as a constant, making it hard to tune globally

💡 Define const MAX_VELOCITY = 0.3; at the top and use it in initBubbles(), so adjusting speed is a single edit

FEATURE setup() / draw()

The sketch uses a fixed frameRate of 60 fps (p5.js default) which may not match all monitors or use GPU efficiently

💡 Add frameRate(60); in setup() explicitly, or consider requestAnimationFrame timing for smoother animation on high-refresh displays

🔄 Code Flow

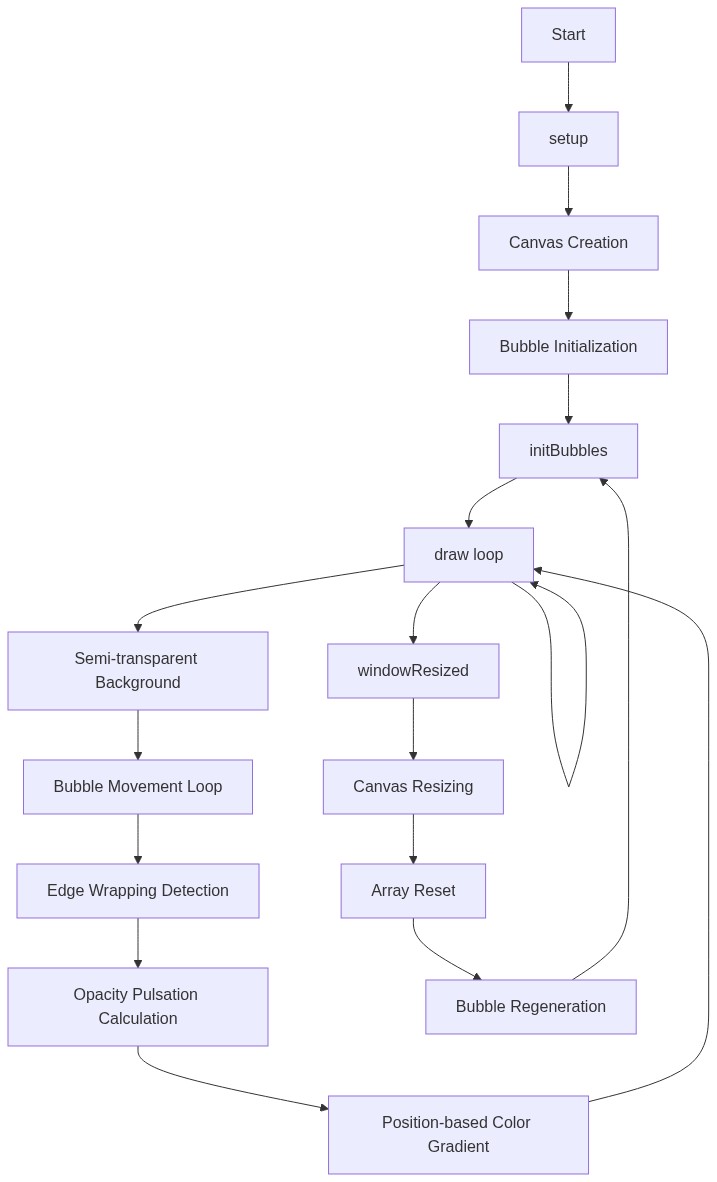
Code flow showing setup, draw, windowresized, initbubbles

💡 Click on function names in the diagram to jump to their code

graph TD start[Start] --> setup[setup] setup --> draw[draw loop] draw --> trailbackground[trail-background] draw --> positionupdate[position-update] positionupdate --> wrappinglogic[wrapping-logic] positionupdate --> pulsationcalc[pulsation-calc] positionupdate --> colorinterpolation[color-interpolation] draw --> canvascreation[canvas-creation] draw --> bubbleinit[bubble-init] setup --> bubbleinit setup --> canvascreation windowresized --> resizecall[resize-call] windowresized --> arrayreset[array-reset] arrayreset --> bubbleinit bubbleinit --> creationloop[creation-loop] creationloop --> bubbleobject[bubble-object] bubbleobject --> bubbleinit click setup href "#fn-setup" click draw href "#fn-draw" click windowresized href "#fn-windowresized" click bubbleinit href "#fn-initbubbles" click canvascreation href "#sub-canvas-creation" click trailbackground href "#sub-trail-background" click positionupdate href "#sub-position-update" click wrappinglogic href "#sub-wrapping-logic" click pulsationcalc href "#sub-pulsation-calc" click colorinterpolation href "#sub-color-interpolation" click resizecall href "#sub-resize-call" click arrayreset href "#sub-array-reset" click creationloop href "#sub-creation-loop" click bubbleobject href "#sub-bubble-object"

❓ Frequently Asked Questions

What visual effects does the hostb p5.js sketch create?

The hostb sketch generates an animated background filled with pulsating bubbles that change color and opacity, creating a dynamic and visually appealing effect.

Is there any user interaction available in the hostb sketch?

The sketch does not provide direct user interaction; however, it responds to window resizing by adjusting the canvas and regenerating bubbles.

What creative coding concepts are demonstrated in the hostb sketch?

This sketch showcases techniques such as particle animation, color interpolation, and edge wrapping, illustrating how to create smooth, fluid animations using p5.js.

Preview

hostb - p5.js creative coding sketch preview
Sketch Preview
Code flow diagram showing the structure of hostb - Code flow showing setup, draw, windowresized, initbubbles
Code Flow Diagram