
Jellyfish Aquarium Attempt - xelsed.ai

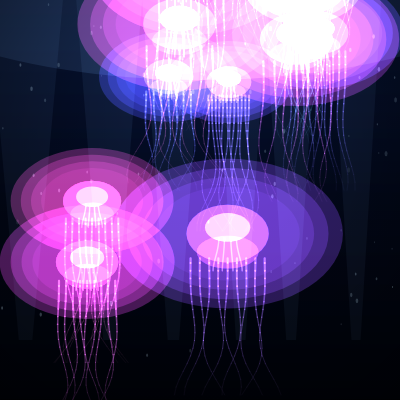
This sketch renders a tranquil deep-sea aquarium where glowing jellyfish drift upward and sway through Perlin-noise currents above a hand-painted gradient ocean floor. Soft particles drift like plankton in the background while the jellyfish glow using additive blending, giving them a true bioluminescent look.

🧪 Try This!

Experiment with the code by making these changes:

  1. Fill the ocean with jellyfish — Raising NUM_JELLYFISH creates a much denser, busier swarm of glowing creatures.
  2. Shift the color palette to warm tones — The hue range decides whether jellyfish glow blue/pink or a completely different color family - try warm oranges and yellows instead.
  3. See the scene without additive glow — Removing blendMode(ADD) shows the jellyfish as flat translucent shapes instead of glowing bioluminescent creatures, revealing exactly what that one function call is doing.
Prefer the full editor? Open it there →

📖 About This Sketch

This sketch fills the screen with translucent, glowing jellyfish that pulse, swim upward, and sway their tentacles as they drift through a painted deep-ocean backdrop complete with light rays and a vignette. The bioluminescent look comes from p5's HSB color mode combined with blendMode(ADD), which makes overlapping translucent shapes brighten each other instead of just blending, exactly how real glowing creatures look underwater. Soft Perlin noise (the noise() function) drives the gentle horizontal drifting so each jellyfish wanders in an organic, non-repeating way rather than moving in a straight line.

The code is organized around two ES6 classes, Jellyfish and Particle, each with their own update()/display() methods, plus a one-time drawBackground() function that paints a static ocean gradient onto an offscreen buffer with createGraphics() so it never has to be redrawn every frame. Studying this sketch teaches you how to separate expensive one-time drawing from cheap per-frame animation, how object-oriented classes keep hundreds of animated elements organized, and how blend modes and color modes completely change the mood of a scene.

⚙️ How It Works

  1. On load, setup() creates the canvas, pre-renders the ocean gradient, light rays, and vignette once into an offscreen graphics buffer called bgLayer, then spawns 14 Jellyfish objects and 90 Particle objects at random positions.
  2. Every frame, draw() first stamps the pre-rendered bgLayer image onto the canvas as the background, avoiding the cost of repainting the gradient and light rays every frame.
  3. The color mode switches to HSB so hue, saturation, brightness and alpha can be tuned independently, then the drifting background particles update and draw themselves quietly behind everything else.
  4. blendMode(ADD) is switched on before the jellyfish are drawn, so every glowing layer of their bells and tentacles brightens whatever is underneath, creating the signature bioluminescent look, then blendMode(BLEND) restores normal drawing for the next frame.
  5. Each Jellyfish uses a sine wave to pulse its bell size and swimming speed, Perlin noise to drift sideways smoothly, and per-tentacle sine waves with increasing amplitude toward the tip to create a trailing, fluid sway.
  6. When a jellyfish floats above the top of the screen, or a particle drifts above it, they are simply reset to a random position near or below the bottom edge, creating an endless looping current.

🎓 Concepts You'll Learn

HSB color modeAdditive blending with blendMode(ADD)Perlin noise for organic motionOffscreen graphics buffers (createGraphics)Object-oriented classes in JavaScriptBezier curvesCanvas 2D gradients via drawingContext

📝 Code Breakdown

setup()

setup() runs once when the sketch starts. It's the perfect place to do expensive one-time work (like pre-rendering a background) and to fill arrays with your initial objects.

🔬 This loop randomizes each jellyfish's hue between 190 and 320. What happens visually if you narrow that range to just random(280, 320) so every jellyfish is some shade of pink/magenta?

  for (let i = 0; i < NUM_JELLYFISH; i++) {
    const x = random(width * 0.15, width * 0.85);
    const y = random(height);
    const baseSize = random(18, 40);
    // Bioluminescent pinks, purples, and blues (HSB hues ~190–320)
    const hue = random(190, 320);
    jellyfishList.push(new Jellyfish(x, y, baseSize, hue));
  }
function setup() {
  createCanvas(windowWidth, windowHeight);

  // Pre-render the static ocean background to an offscreen buffer
  bgLayer = createGraphics(windowWidth, windowHeight);
  drawBackground(bgLayer);

  // Create jellyfish
  for (let i = 0; i < NUM_JELLYFISH; i++) {
    const x = random(width * 0.15, width * 0.85);
    const y = random(height);
    const baseSize = random(18, 40);
    // Bioluminescent pinks, purples, and blues (HSB hues ~190–320)
    const hue = random(190, 320);
    jellyfishList.push(new Jellyfish(x, y, baseSize, hue));
  }

  // Create soft drifting particles
  for (let i = 0; i < NUM_PARTICLES; i++) {
    particles.push(new Particle(true));
  }
}
Line-by-line explanation (7 lines)

🔧 Subcomponents:

for-loop Jellyfish Creation Loop for (let i = 0; i < NUM_JELLYFISH; i++) {

Creates NUM_JELLYFISH new Jellyfish objects at random positions with random size and hue

for-loop Particle Creation Loop for (let i = 0; i < NUM_PARTICLES; i++) {

Creates NUM_PARTICLES drifting Particle objects scattered anywhere on screen

createCanvas(windowWidth, windowHeight);
Makes the canvas fill the entire browser window.
bgLayer = createGraphics(windowWidth, windowHeight);
Creates a separate offscreen drawing surface the same size as the canvas - drawing here doesn't show up until you image() it onto the main canvas.
drawBackground(bgLayer);
Paints the expensive gradient, light rays, and vignette onto bgLayer ONCE, instead of every single frame.
const x = random(width * 0.15, width * 0.85);
Picks a random horizontal starting spot, kept away from the very edges so jellyfish don't spawn half off-screen.
const hue = random(190, 320);
Picks a random hue between roughly cyan/blue and magenta/pink for that jellyfish's bioluminescent glow color.
jellyfishList.push(new Jellyfish(x, y, baseSize, hue));
Creates a new Jellyfish object with these randomized properties and adds it to the array that draw() will loop over.
particles.push(new Particle(true));
Creates a Particle and passes true so it starts at a completely random y position, instead of below the screen.
draw()

draw() runs continuously, roughly 60 times per second. Because the expensive background painting was moved into setup(), draw() here only has to do cheap work: update positions and draw shapes, which keeps the animation smooth even with many jellyfish and particles.

🔬 blendMode(ADD) is what makes the jellyfish glow instead of just looking like flat translucent circles. What happens visually if you delete these two blendMode lines entirely?

  blendMode(ADD);
  for (let j of jellyfishList) {
    j.update();
    j.display();
  }
  blendMode(BLEND); // reset blend mode
function draw() {
  // Draw deep ocean background
  colorMode(RGB, 255);
  background(0);
  image(bgLayer, 0, 0, width, height);

  // Switch to HSB for luminous jellyfish and particles
  colorMode(HSB, 360, 100, 100, 100);

  // Subtle floating particles (behind jellyfish)
  for (let p of particles) {
    p.update();
    p.display();
  }

  // Additive blend for bioluminescent glow
  blendMode(ADD);
  for (let j of jellyfishList) {
    j.update();
    j.display();
  }
  blendMode(BLEND); // reset blend mode
}
Line-by-line explanation (6 lines)

🔧 Subcomponents:

for-loop Particle Update/Draw Loop for (let p of particles) {

Updates and draws every background particle before the jellyfish, so they appear behind them

for-loop Jellyfish Update/Draw Loop for (let j of jellyfishList) {

Updates and draws every jellyfish using additive blending for the glow effect

colorMode(RGB, 255);
Switches color interpretation to standard 0-255 RGB before drawing the background image.
background(0);
Clears the canvas to solid black as a fallback layer underneath the ocean image.
image(bgLayer, 0, 0, width, height);
Stamps the pre-rendered ocean gradient buffer onto the visible canvas - very cheap compared to redrawing the gradient every frame.
colorMode(HSB, 360, 100, 100, 100);
Switches to Hue/Saturation/Brightness color mode so the glowing colors can be controlled by hue angle, which is more intuitive for bioluminescent hues.
blendMode(ADD);
Turns on additive blending - overlapping translucent shapes add their brightness together instead of just layering, which is what makes the jellyfish glow instead of just looking like flat translucent shapes.
blendMode(BLEND); // reset blend mode
Restores normal blending after the jellyfish are drawn, so it doesn't affect anything drawn next frame before this line runs again.

windowResized()

windowResized() is a special p5.js function that automatically runs whenever the browser window is resized. It's the standard place to call resizeCanvas() and rebuild anything sized to the window, like this offscreen background buffer.

function windowResized() {
  resizeCanvas(windowWidth, windowHeight);
  bgLayer = createGraphics(windowWidth, windowHeight);
  drawBackground(bgLayer);
}
Line-by-line explanation (3 lines)
resizeCanvas(windowWidth, windowHeight);
A built-in p5.js function that automatically fires whenever the browser window changes size, letting you resize the canvas to match.
bgLayer = createGraphics(windowWidth, windowHeight);
Creates a brand new offscreen buffer at the new size, since the old one no longer matches the window dimensions.
drawBackground(bgLayer);
Re-paints the ocean gradient and light rays at the new size so the background always fills the window correctly.

drawBackground(g)

This function demonstrates rendering to an offscreen buffer with createGraphics() - a key performance technique. Anything static (that doesn't need to change every frame) should be drawn once into a buffer like g and then just displayed with image(), instead of being recalculated 60 times per second.

🔬 This loop blends topCol into midCol for the first half of the screen, then midCol into bottomCol for the second half. What happens if you change the 0.5 split points to 0.2, making the bright 'surface' zone much thinner?

  for (let y = 0; y < g.height; y++) {
    const t = y / g.height;
    let c;
    if (t < 0.5) {
      c = g.lerpColor(topCol, midCol, t / 0.5);
    } else {
      c = g.lerpColor(midCol, bottomCol, (t - 0.5) / 0.5);
    }
    g.stroke(c);
    g.line(0, y, g.width, y);
  }
function drawBackground(g) {
  g.push();
  g.colorMode(RGB, 255);

  // Vertical gradient: lighter near surface, darker in depth
  const topCol = g.color(10, 30, 80);
  const midCol = g.color(3, 12, 40);
  const bottomCol = g.color(0, 3, 15);

  for (let y = 0; y < g.height; y++) {
    const t = y / g.height;
    let c;
    if (t < 0.5) {
      c = g.lerpColor(topCol, midCol, t / 0.5);
    } else {
      c = g.lerpColor(midCol, bottomCol, (t - 0.5) / 0.5);
    }
    g.stroke(c);
    g.line(0, y, g.width, y);
  }

  // Soft surface glow
  g.noStroke();
  g.fill(120, 180, 255, 40);
  g.ellipse(g.width / 2, -g.height * 0.15, g.width * 1.8, g.height * 0.7);

  // Subtle light rays from above
  g.blendMode(ADD);
  g.noStroke();
  for (let i = 0; i < 6; i++) {
    const cx = g.width * ((i + 0.5) / 6 + random(-0.03, 0.03));
    const spread = g.width * (0.08 + random(-0.02, 0.02));
    const alpha = 18;
    g.fill(140, 200, 255, alpha);
    g.beginShape();
    g.vertex(cx - spread, 0);
    g.vertex(cx + spread, 0);
    g.vertex(cx + spread * 0.18, g.height * 0.85);
    g.vertex(cx - spread * 0.18, g.height * 0.85);
    g.endShape(CLOSE);
  }
  g.blendMode(BLEND);

  // Gentle vignette using Canvas 2D gradient
  const ctx = g.drawingContext;
  const gradient = ctx.createRadialGradient(
    g.width / 2,
    g.height * 0.2,
    g.width * 0.1,
    g.width / 2,
    g.height * 0.5,
    g.width * 0.9
  );
  gradient.addColorStop(0, "rgba(0,0,0,0)");
  gradient.addColorStop(1, "rgba(0,0,0,0.7)");
  ctx.fillStyle = gradient;
  ctx.fillRect(0, 0, g.width, g.height);

  g.pop();
}
Line-by-line explanation (12 lines)

🔧 Subcomponents:

for-loop Vertical Gradient Loop for (let y = 0; y < g.height; y++) {

Draws one horizontal line per pixel row, blending between three colors to create a smooth vertical ocean gradient from light near the surface to dark in the depths

conditional Top-half vs Bottom-half Blend if (t < 0.5) {

Chooses whether to blend from top color to mid color, or mid color to bottom color, depending on how far down the current row is

for-loop Light Ray Shapes Loop for (let i = 0; i < 6; i++) {

Draws 6 semi-transparent triangular beams of light streaming down from the surface, slightly randomized in position and width

g.push();
Saves the current drawing settings of the offscreen buffer g so changes made here don't leak outside this function.
const topCol = g.color(10, 30, 80);
Defines the color used near the ocean surface - a dim blue - as a reusable color object.
c = g.lerpColor(topCol, midCol, t / 0.5);
Smoothly interpolates (blends) between the top and mid colors based on how far down this pixel row is, creating a gradient instead of hard color bands.
g.stroke(c);
Sets the line color for this row to the calculated blended color.
g.line(0, y, g.width, y);
Draws one full-width horizontal line at row y - repeating this for every row builds the smooth vertical gradient.
g.blendMode(ADD);
Switches the offscreen buffer to additive blending so the overlapping light ray shapes brighten each other instead of just stacking.
const cx = g.width * ((i + 0.5) / 6 + random(-0.03, 0.03));
Spaces 6 light rays evenly across the width, with a small random horizontal jitter so they don't look mechanically uniform.
g.beginShape();
Starts defining a custom four-sided shape (a beam) using individual vertex points.
const ctx = g.drawingContext;
Reaches past p5.js into the raw HTML5 Canvas 2D API to access features p5 doesn't wrap directly, like radial gradients.
const gradient = ctx.createRadialGradient(...)
Creates a radial gradient shape that will be transparent in the center and dark at the edges, used to darken the corners of the scene.
ctx.fillRect(0, 0, g.width, g.height);
Fills the entire buffer with that radial gradient, producing the vignette effect that focuses attention toward the center.
g.pop();
Restores the drawing settings that were active before this function started, so nothing here affects code that runs afterward.

Jellyfish (constructor)

The constructor runs once when 'new Jellyfish(...)' is called, and its job is to set up all the randomized personality traits (speed, size, tentacle count, drift pattern) that make each jellyfish instance behave slightly differently.

class Jellyfish {
  constructor(x, y, baseSize, hue) {
    this.pos = createVector(x, y);
    this.baseSize = baseSize;
    this.hue = hue;

    // Gentle upward motion parameters
    this.minSpeed = random(0.15, 0.35);
    this.maxSpeed = this.minSpeed + random(0.25, 0.6);

    // Horizontal drifting using Perlin noise
    this.horizontalDriftAmount = random(25, 60);
    this.horizontalDriftSpeed = random(0.002, 0.006);
    this.noiseSeed = random(1000);

    // Bell pulsing
    this.pulseSpeed = random(0.03, 0.06);
    this.pulseOffset = random(TWO_PI);
    this.bellScale = 1;

    // Tentacles
    this.numTentacles = floor(random(7, 13));
    this.tentacleLength = random(90, 150);
    this.tentacleWiggleSpeed = random(0.015, 0.03);
    this.tentacleWiggleAmount = random(10, 24);
    this.tentaclePhaseOffsets = [];
    for (let i = 0; i < this.numTentacles; i++) {
      this.tentaclePhaseOffsets.push(random(TWO_PI));
    }

    this.currentX = x;
  }
Line-by-line explanation (6 lines)

🔧 Subcomponents:

for-loop Tentacle Phase Offset Loop for (let i = 0; i < this.numTentacles; i++) {

Gives each individual tentacle its own random starting point in the sway animation so they don't all wiggle in perfect unison

this.pos = createVector(x, y);
Stores the jellyfish's position as a p5.Vector, a convenient object bundling an x and y coordinate together.
this.minSpeed = random(0.15, 0.35);
Picks a random slow upward swimming speed for when the bell is contracted.
this.maxSpeed = this.minSpeed + random(0.25, 0.6);
Builds the fast speed on top of minSpeed, guaranteeing maxSpeed is always faster, used when the bell is fully pulsed.
this.noiseSeed = random(1000);
Gives each jellyfish its own unique starting point in the Perlin noise field, so every jellyfish drifts differently even though they use the same noise function.
this.numTentacles = floor(random(7, 13));
Randomly decides how many tentacles this jellyfish has, between 7 and 12 (floor rounds down).
this.tentaclePhaseOffsets.push(random(TWO_PI));
Stores a random starting angle for each tentacle's sine wave sway, so tentacles move out of sync with each other for a more organic look.

Jellyfish.update()

update() is called every frame for every jellyfish and is responsible only for changing numbers (position, scale, speed) - it never draws anything. Separating 'update logic' from 'drawing logic' (display()) is a common and useful pattern in animated sketches.

🔬 This is what makes jellyfish loop forever instead of disappearing. What happens if you comment this whole block out?

    if (this.pos.y < -this.baseSize * 4) {
      this.pos.y = height + random(this.baseSize, height * 0.5);
      this.pos.x = random(width * 0.15, width * 0.85);
    }
  update() {
    // Pulsing controls size and swimming speed
    const t = frameCount * this.pulseSpeed + this.pulseOffset;
    const pulsePhase = (sin(t) + 1) / 2; // 0..1
    this.bellScale = 1 + 0.18 * sin(t);
    const swimSpeed = lerp(this.minSpeed, this.maxSpeed, pulsePhase);

    // Float upward
    this.pos.y -= swimSpeed;

    // Horizontal drift with noise
    const n = noise(this.noiseSeed, frameCount * this.horizontalDriftSpeed);
    const drift = map(n, 0, 1, -this.horizontalDriftAmount, this.horizontalDriftAmount);
    this.currentX = this.pos.x + drift;

    // Wrap from top back to lower area
    if (this.pos.y < -this.baseSize * 4) {
      this.pos.y = height + random(this.baseSize, height * 0.5);
      this.pos.x = random(width * 0.15, width * 0.85);
    }
  }
Line-by-line explanation (9 lines)

🔧 Subcomponents:

conditional Screen Wrap Check if (this.pos.y < -this.baseSize * 4) {

Detects when a jellyfish has floated completely off the top of the screen and teleports it back below the bottom edge

const t = frameCount * this.pulseSpeed + this.pulseOffset;
Builds a slowly-increasing angle over time, using frameCount (which increases by 1 every frame) multiplied by this jellyfish's own pulse speed.
const pulsePhase = (sin(t) + 1) / 2; // 0..1
sin(t) naturally oscillates between -1 and 1; adding 1 and dividing by 2 rescales it to a friendlier 0 to 1 range.
this.bellScale = 1 + 0.18 * sin(t);
Makes the bell grow and shrink by up to 18% around its normal size, creating the pulsing swimming motion.
const swimSpeed = lerp(this.minSpeed, this.maxSpeed, pulsePhase);
Uses lerp (linear interpolation) to smoothly speed up when the bell contracts (pushing water out) and slow down when it relaxes, just like a real jellyfish.
this.pos.y -= swimSpeed;
Moves the jellyfish upward (decreasing y moves things up on screen) by its current swim speed.
const n = noise(this.noiseSeed, frameCount * this.horizontalDriftSpeed);
Samples Perlin noise using this jellyfish's unique seed and slowly advancing time, producing smooth, organic randomness instead of jittery random() values.
const drift = map(n, 0, 1, -this.horizontalDriftAmount, this.horizontalDriftAmount);
Perlin noise returns values between 0 and 1; map() rescales that into a left/right drift distance centered on zero.
if (this.pos.y < -this.baseSize * 4) {
Checks if the jellyfish has floated far enough above the top of the canvas that it's no longer visible.
this.pos.y = height + random(this.baseSize, height * 0.5);
Teleports the jellyfish to somewhere below the bottom of the screen so it can float back up again, creating an endless loop.

Jellyfish.display()

This is a great example of translate() plus push()/pop(): instead of adding this.pos.x and this.pos.y to every single coordinate inside drawTentacles() and drawBell(), the whole coordinate system is shifted once, letting those functions draw as if the jellyfish were always at (0,0).

  display() {
    push();
    translate(this.currentX, this.pos.y);

    const r = this.baseSize * this.bellScale;

    // Tentacles behind the bell
    this.drawTentacles(r);

    // Glowing bell
    this.drawBell(r);

    pop();
  }
Line-by-line explanation (5 lines)
push();
Saves the current drawing state (position, rotation, styles) so the translate() below only affects this jellyfish.
translate(this.currentX, this.pos.y);
Moves the drawing origin (0,0) to the jellyfish's current position, so every shape drawn afterward can use simple local coordinates centered on the jellyfish.
const r = this.baseSize * this.bellScale;
Calculates the jellyfish's current radius by combining its fixed base size with the animated pulsing scale.
this.drawTentacles(r);
Draws the tentacles first, so the bell (drawn next) overlaps and covers their tops, making them look attached underneath.
pop();
Restores the saved drawing state, undoing the translate() so the next jellyfish (or anything else) starts from the normal canvas origin.

Jellyfish.drawTentacles(r)

This function is a classic example of drawing a flexible, rope-like shape from straight line segments: by looping along the tentacle's length and offsetting each segment's position with a sine wave (whose phase changes per segment), you get smooth, flowing curves without needing any physics simulation.

🔬 The tentacle sway multiplies by portion * portion so the tip moves much more than the base. What happens visually if you remove one of the portion multiplications, making sway grow more linearly (just portion instead of portion * portion)?

        const sway = sin(
          frameCount * this.tentacleWiggleSpeed + phaseOffset + j * 0.35
        );
        const swayAmount = this.tentacleWiggleAmount * portion * portion;
        const x = anchorX + sway * swayAmount;
  drawTentacles(r) {
    const segments = 18;
    const baseY = r * 0.6;

    for (let i = 0; i < this.numTentacles; i++) {
      const tIndex =
        (i - (this.numTentacles - 1) / 2) /
        max(1, (this.numTentacles - 1) / 2);
      const anchorX = tIndex * r * 0.9;

      let prevX = anchorX;
      let prevY = baseY;

      const phaseOffset = this.tentaclePhaseOffsets[i];

      for (let j = 1; j <= segments; j++) {
        const portion = j / segments;

        // Vertical position along the tentacle
        const targetY = baseY + this.tentacleLength * portion;

        // Flowing sway that increases towards the tip
        const sway = sin(
          frameCount * this.tentacleWiggleSpeed + phaseOffset + j * 0.35
        );
        const swayAmount = this.tentacleWiggleAmount * portion * portion;
        const x = anchorX + sway * swayAmount;

        // Slight lift near the bell when contracting
        const y = targetY + this.bellScale * -3 * (1 - portion);

        const w = map(j, 0, segments, 2.2, 0.4);
        strokeWeight(w);

        const alpha = map(j, 0, segments, 60, 10);
        stroke(this.hue, 55, 100, alpha);

        line(prevX, prevY, x, y);

        prevX = x;
        prevY = y;
      }
    }
  }
Line-by-line explanation (8 lines)

🔧 Subcomponents:

for-loop Per-Tentacle Loop for (let i = 0; i < this.numTentacles; i++) {

Loops over every tentacle this jellyfish has, spacing their anchor points evenly across the underside of the bell

for-loop Per-Segment Loop for (let j = 1; j <= segments; j++) {

Draws each tentacle as a chain of short connected line segments, so it can bend and sway rather than being one straight rigid line

const tIndex = (i - (this.numTentacles - 1) / 2) / max(1, (this.numTentacles - 1) / 2);
Converts the tentacle's index (0, 1, 2...) into a value ranging from -1 (leftmost tentacle) to 1 (rightmost tentacle), centered at 0 for the middle tentacle.
const anchorX = tIndex * r * 0.9;
Spreads the tentacles' starting x positions evenly across the width of the bell, scaled by the bell's radius.
const portion = j / segments;
A value from near-0 (top of tentacle, near the bell) to 1 (very tip of the tentacle), used to control how much things change along its length.
const sway = sin( frameCount * this.tentacleWiggleSpeed + phaseOffset + j * 0.35 );
Creates a wave motion along the tentacle's length by adding j * 0.35 to the sine input, so different segments are at different points in the wave at the same moment, producing a flowing S-curve rather than the whole tentacle swinging rigidly.
const swayAmount = this.tentacleWiggleAmount * portion * portion;
Squaring portion means sway barely affects segments near the bell but grows rapidly toward the tip, mimicking how real tentacles whip more freely at their ends.
const w = map(j, 0, segments, 2.2, 0.4);
Tapers the line thickness from thicker near the bell to thinner near the tip, giving the tentacle a natural cone-like shape.
const alpha = map(j, 0, segments, 60, 10);
Fades the tentacle's opacity toward the tip, making it look like it dissolves into the water.
line(prevX, prevY, x, y);
Draws one short segment connecting the previous point to this new point - repeated for all segments this builds a smooth curving tentacle.

Jellyfish.drawBell(r)

This function shows how to fake a soft glow without any shaders or filters: by layering several increasingly large, increasingly transparent shapes UNDER an opaque main shape (helped by additive blending in draw()), you get a convincing luminous halo using only basic ellipse() calls.

🔬 This loop stacks 4 translucent ellipses to build the glow halo. What happens if you increase glowLayers to 12 - does the glow get noticeably softer and brighter, or does it slow the sketch down more than it helps?

    const glowLayers = 4;
    for (let i = glowLayers; i >= 1; i--) {
      const glowRadius = r * (1.4 + i * 0.35);
      const alpha = 7 * i;
      fill(baseHue, 70, 100, alpha);
      ellipse(0, 0, glowRadius * 2.0, glowRadius * 1.3);
    }
  drawBell(r) {
    noStroke();
    const baseHue = this.hue;

    // Soft outer glow layers
    const glowLayers = 4;
    for (let i = glowLayers; i >= 1; i--) {
      const glowRadius = r * (1.4 + i * 0.35);
      const alpha = 7 * i;
      fill(baseHue, 70, 100, alpha);
      ellipse(0, 0, glowRadius * 2.0, glowRadius * 1.3);
    }

    // Main bell
    fill(baseHue, 70, 100, 75);
    ellipse(0, 0, r * 2.0, r * 1.4);

    // Slightly darker lower rim
    fill(baseHue, 80, 75, 90);
    ellipse(0, r * 0.45, r * 1.5, r * 0.8);

    // Inner glowing core
    fill(baseHue + 15, 45, 100, 70);
    ellipse(0, -r * 0.15, r * 1.1, r * 0.7);

    // Soft inner folds/arms
    stroke(baseHue + 10, 40, 100, 45);
    strokeWeight(1.4);
    noFill();
    const innerCount = 4;
    for (let i = 0; i < innerCount; i++) {
      const a = map(i, 0, innerCount - 1, -PI / 4, PI / 4);
      const x1 = sin(a) * r * 0.3;
      const y1 = r * 0.1;
      const x2 = sin(a) * r * 0.5;
      const y2 = r * 0.9;
      bezier(
        x1,
        y1,
        x1,
        y1 + r * 0.35,
        x2,
        y2 - r * 0.25,
        x2,
        y2
      );
    }
  }
Line-by-line explanation (7 lines)

🔧 Subcomponents:

for-loop Outer Glow Layers Loop for (let i = glowLayers; i >= 1; i--) {

Draws several stacked, increasingly transparent ellipses from largest to smallest to build up a soft glowing halo around the bell

for-loop Inner Fold Curves Loop for (let i = 0; i < innerCount; i++) {

Draws several bezier curves inside the bell to suggest soft internal folds or arms, fanned out at slightly different angles

for (let i = glowLayers; i >= 1; i--) {
Counts DOWN from glowLayers to 1, so the largest, faintest glow ellipse is drawn first and smaller, slightly-stronger ellipses are layered on top of it.
const glowRadius = r * (1.4 + i * 0.35);
Each layer gets progressively larger the higher i is, since it's drawn first (furthest back) at i=glowLayers.
const alpha = 7 * i;
Each layer's opacity scales with i too, though since we're using blendMode(ADD) in draw(), these low-alpha overlapping ellipses accumulate into a bright core with a soft fading edge.
fill(baseHue, 70, 100, 75);
Sets the main bell's fill color: this jellyfish's hue, high saturation, full brightness, and moderate transparency.
fill(baseHue + 15, 45, 100, 70);
Shifts the hue slightly (+15) and lowers saturation for the inner core, giving it a subtly different, lighter glowing color than the outer bell.
const a = map(i, 0, innerCount - 1, -PI / 4, PI / 4);
Spreads the 4 inner fold curves out in a fan shape from -45 degrees to +45 degrees.
bezier( x1, y1, x1, y1 + r * 0.35, x2, y2 - r * 0.25, x2, y2 );
Draws a smooth curved line using two control points to bend the curve, creating the soft, drooping fold shapes visible inside the bell.

Particle (constructor)

This is a compact pattern: instead of writing initialization code twice (once for the constructor, once for when the particle needs to respawn), both cases call the same reset() method with a different argument.

class Particle {
  constructor(randomY) {
    this.reset(randomY);
  }
Line-by-line explanation (1 lines)
this.reset(randomY);
Rather than duplicating setup code, the constructor just calls reset() immediately, passing along whether this particle should start at a totally random y position (used only at sketch startup).

Particle.reset(randomY)

reset() is called both when a Particle is first created and every time it drifts off the top of the screen, letting a small pool of particle objects be reused forever instead of constantly creating and destroying new ones.

  reset(randomY) {
    this.x = random(width);
    this.y = randomY ? random(height) : height + random(20, 200);
    this.speed = random(0.1, 0.4);
    this.size = random(1, 3);
    this.alpha = random(8, 25);
  }
Line-by-line explanation (3 lines)
this.y = randomY ? random(height) : height + random(20, 200);
A ternary operator: if randomY is true, place the particle anywhere vertically on screen (used only at the very start); otherwise, place it just below the bottom edge so it drifts up into view naturally.
this.speed = random(0.1, 0.4);
Gives this particle its own gentle upward drift speed, slower than the jellyfish, since these particles represent tiny plankton or bubbles.
this.alpha = random(8, 25);
Keeps particles very faint and subtle so they don't distract from the jellyfish, which are the main visual focus.

Particle.update()

This tiny function is a great, simple example of object recycling/pooling: rather than deleting particles and creating new ones (which would grow the array unnecessarily), each particle resets itself in place, keeping memory use constant no matter how long the sketch runs.

  update() {
    this.y -= this.speed;
    if (this.y < -20) {
      this.reset(false);
    }
  }
Line-by-line explanation (3 lines)

🔧 Subcomponents:

conditional Off-screen Respawn Check if (this.y < -20) {

Detects when a particle has drifted above the visible canvas and calls reset() to send it back below the bottom edge

this.y -= this.speed;
Moves the particle upward by its own constant speed every frame.
if (this.y < -20) {
Checks whether the particle has drifted just above the top edge of the canvas (20 pixels of buffer so it fully disappears before resetting).
this.reset(false);
Passing false means it will respawn below the bottom of the screen (rather than at a random y), so it smoothly re-enters and drifts up again, creating an endless recycled stream of particles.

Particle.display()

display() is intentionally simple and cheap since it runs for every one of the 90 particles every single frame - keeping per-particle drawing minimal is important for maintaining smooth framerates.

  display() {
    noStroke();
    // Cool bluish particles, very subtle
    fill(200, 20, 100, this.alpha);
    ellipse(this.x, this.y, this.size, this.size * 1.8);
  }
Line-by-line explanation (2 lines)
fill(200, 20, 100, this.alpha);
Uses a fixed cool blue hue (200) with low saturation for all particles, only varying opacity (this.alpha) between particles for subtle variation.
ellipse(this.x, this.y, this.size, this.size * 1.8);
Draws each particle as a slightly stretched vertical ellipse rather than a perfect circle, giving a subtle sense of upward motion blur.

📦 Key Variables

jellyfishList array

Holds every Jellyfish object currently in the scene so draw() can loop over and animate/render all of them each frame.

let jellyfishList = [];
particles array

Holds every Particle object (drifting plankton-like specks) so they can be updated and drawn behind the jellyfish.

let particles = [];
NUM_JELLYFISH number

A constant controlling how many Jellyfish objects are created in setup() - the main visual density of the scene.

const NUM_JELLYFISH = 14;
NUM_PARTICLES number

A constant controlling how many background Particle objects are created in setup().

const NUM_PARTICLES = 90;
bgLayer object

An offscreen p5.Graphics buffer holding the pre-rendered ocean gradient, light rays, and vignette, so this expensive artwork is only drawn once instead of every frame.

let bgLayer;

🔧 Potential Improvements (4)

Here are some ways this code could be enhanced:

PERFORMANCE drawBackground(g)

The vertical gradient is drawn by looping over every single pixel row and calling g.line() once per row (potentially over 1000 iterations on a tall screen), which is slow compared to native gradient APIs.

💡 Use the Canvas 2D context's createLinearGradient() (similar to how the vignette already uses createRadialGradient()) and fill a single rectangle instead of looping line-by-line - this would be dramatically faster and produce an even smoother gradient.

BUG windowResized()

Every time the window is resized, a brand new createGraphics() buffer is created but the old bgLayer object is never explicitly removed, which can leak memory if the user resizes their window many times.

💡 Call bgLayer.remove() before reassigning bgLayer to a new createGraphics() buffer to free the old one's resources.

FEATURE Jellyfish class

Jellyfish currently ignore the mouse entirely, so there's no interactive element to the aquarium beyond passively watching it.

💡 Add a small attraction or avoidance force in update() based on dist(mouseX, mouseY, this.currentX, this.pos.y), letting jellyfish gently drift toward or scatter away from the cursor for a more engaging, interactive aquarium.

STYLE drawBell(r) and drawTentacles(r)

Many visual tuning values are 'magic numbers' scattered directly in the code (like 1.4, 0.35, 7, 0.9, -3), making it hard to know what to tweak for a particular visual effect without reading the whole function.

💡 Extract these as named constants or class properties (e.g. this.glowSpread, this.rimDarkness) near the top of the class so they're easier to find, understand, and experiment with.

🔄 Code Flow

Code flow showing setup, draw, windowresized, drawbackground, jellyfish, jellyfishupdate, jellyfishdisplay, drawtentacles, drawbell, particle, reset, particleupdate, particledisplay

💡 Click on function names in the diagram to jump to their code

graph TD start[Start] --> setup[setup] setup --> draw[draw loop] draw --> jellyfish-spawn-loop[jellyfish-spawn-loop] draw --> particle-spawn-loop[particle-spawn-loop] draw --> particle-update-loop[particle-update-loop] draw --> jellyfish-update-loop[jellyfish-update-loop] draw --> gradient-loop[gradient-loop] draw --> light-rays-loop[light-rays-loop] jellyfish-spawn-loop --> jellyfish[jellyfish] jellyfish --> jellyfishupdate[jellyfishupdate] jellyfishupdate --> jellyfishdisplay[jellyfishdisplay] jellyfishdisplay --> drawtentacles[drawtentacles] jellyfishdisplay --> drawbell[drawbell] particle-spawn-loop --> particle[particle] particle --> reset[reset] particle-update-loop --> particleupdate[particleupdate] particleupdate --> particledisplay[particledisplay] jellyfish-update-loop --> wrap-check[wrap-check] wrap-check --> jellyfishupdate gradient-loop --> gradient-conditional[gradient-conditional] tentacle-phase-loop --> tentacle-outer-loop[tentacle-outer-loop] tentacle-outer-loop --> tentacle-segment-loop[tentacle-segment-loop] drawbell --> glow-loop[glow-loop] drawbell --> inner-folds-loop[inner-folds-loop] particle-respawn-check --> reset click setup href "#fn-setup" click draw href "#fn-draw" click jellyfish-spawn-loop href "#sub-jellyfish-spawn-loop" click particle-spawn-loop href "#sub-particle-spawn-loop" click particle-update-loop href "#sub-particle-update-loop" click jellyfish-update-loop href "#sub-jellyfish-update-loop" click gradient-loop href "#sub-gradient-loop" click light-rays-loop href "#sub-light-rays-loop" click jellyfish href "#fn-jellyfish" click jellyfishupdate href "#fn-jellyfishupdate" click jellyfishdisplay href "#fn-jellyfishdisplay" click drawtentacles href "#fn-drawtentacles" click drawbell href "#fn-drawbell" click particle href "#fn-particle" click reset href "#fn-reset" click particleupdate href "#fn-particleupdate" click particledisplay href "#fn-particledisplay" click wrap-check href "#sub-wrap-check" click gradient-conditional href "#sub-gradient-conditional" click tentacle-phase-loop href "#sub-tentacle-phase-loop" click tentacle-outer-loop href "#sub-tentacle-outer-loop" click tentacle-segment-loop href "#sub-tentacle-segment-loop" click glow-loop href "#sub-glow-loop" click inner-folds-loop href "#sub-inner-folds-loop" click particle-respawn-check href "#sub-particle-respawn-check"

❓ Frequently Asked Questions

What visual experience does the Jellyfish Aquarium sketch provide?

The sketch creates a mesmerizing underwater scene featuring bioluminescent jellyfish floating gracefully in a deep blue ocean, complemented by soft drifting particles.

Is there any user interaction available in the Jellyfish Aquarium sketch?

The sketch does not currently have interactive features; it is designed as a visual display of jellyfish and ocean aesthetics.

What creative coding techniques are showcased in the Jellyfish Aquarium sketch?

This sketch demonstrates the use of offscreen graphics for background rendering, color blending for bioluminescence, and particle systems for soft movements in an aquatic environment.

Preview

Jellyfish Aquarium Attempt - xelsed.ai - p5.js creative coding sketch preview
Sketch Preview
Code flow diagram showing the structure of Jellyfish Aquarium Attempt - xelsed.ai - Code flow showing setup, draw, windowresized, drawbackground, jellyfish, jellyfishupdate, jellyfishdisplay, drawtentacles, drawbell, particle, reset, particleupdate, particledisplay
Code Flow Diagram