
Just a rock simulator

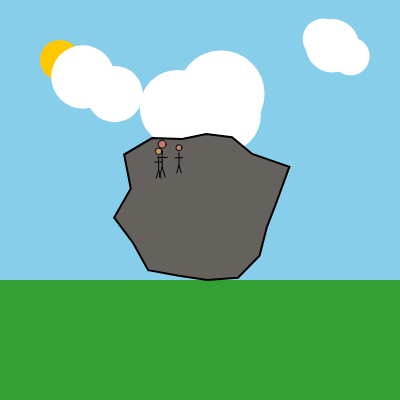
This sketch creates a scenic landscape simulator with a randomly generated irregular rock shape positioned on grass, clouds floating in the sky, a sun, and small people standing on top of the rock. The entire scene is responsive to window resizing, regenerating all elements to fit the new canvas dimensions.

🧪 Try This!

Experiment with the code by making these changes:

  1. Make the sky purple — Changing the background color instantly transforms the mood of the entire scene
  2. Make the rock much bigger — The rock will scale up, and all people and details will scale with it, keeping proportions perfect
  3. Crowd the rock with people — More figures appear standing on top of the rock, making it feel populated
  4. Make a cloudy day — Many more clouds appear, filling the sky and creating an overcast feel
  5. Make the grass orange — The grassy area at the bottom turns orange instead of green, creating an alien landscape
Prefer the full editor? Open it there →

📖 About This Sketch

This sketch builds a complete landscape scene using fundamental p5.js drawing techniques: shapes like circle(), ellipse(), rect(), and line() to draw the sun, clouds, rock, and people. The magic comes from procedurally generating an irregular rock shape using polar coordinates and randomness—each time you refresh, you get a unique, lumpy rock. The entire scene respects your browser window size and regenerates beautifully whenever you resize it.

The code is organized into generation functions that run once in setup() to create data for rocks, clouds, and people, then drawing functions that render that data every frame. By studying this sketch you will learn how to separate data generation from rendering (a powerful design pattern), how to build complex shapes from arrays of points, how to make your sketches responsive with windowWidth and windowHeight, and how to use the windowResized() callback to keep everything looking good when the canvas changes size.

⚙️ How It Works

  1. When the sketch loads, setup() calls generateRock() to create an array of random vertices that form an irregular polygon, then generateClouds() and generatePeople() to create arrays storing each cloud and person's properties. The rock position is calculated so its lowest point sits on the grass line at 70% down the canvas.
  2. Every frame, draw() paints a sky-blue background, draws a green grass rectangle in the bottom 30%, places the sun in the top-left corner, then calls three drawing functions: drawClouds(), drawRock(), and drawPeople().
  3. drawClouds() loops through the cloud array and draws each cloud as a cluster of overlapping white ellipses (lumps) positioned around the cloud's center.
  4. drawRock() uses push() and translate() to move the drawing origin to the rock's position on the canvas, then uses beginShape() and vertex() to draw the irregular polygon stored in rockVertices.
  5. drawPeople() loops through the people array and draws each person as a circle (head), lines (body, arms, legs), positioned relative to the rock using translate().
  6. When you resize your browser window, windowResized() fires, recalculating the canvas size and regenerating all rock, cloud, and people data so the scene remains properly proportioned and centered.

🎓 Concepts You'll Learn

Procedural generationPolar coordinatesResponsive canvas sizingVertex-based polygonsData separation from renderingTransform stack (push/pop)

📝 Code Breakdown

setup()

setup() runs once when the sketch first loads. Notice how it calls all the generation functions but NOT the drawing functions—data is created here, rendered in draw(). This separation is a powerful pattern that keeps your code organized.

function setup() {
  createCanvas(windowWidth, windowHeight);
  // Tip: Use windowWidth/windowHeight for responsive canvas

  // Generate the rock's vertices once in setup()
  // This prevents the rock from changing shape every frame, avoiding flicker
  generateRock();

  // Generate cloud data once in setup()
  generateClouds();

  // Generate people data once in setup()
  generatePeople();

  // Set the rock's color (a shade of gray/brown)
  rockColor = color(random(80, 120), random(80, 120), random(80, 120));

  // --- MODIFIED ROCK POSITION CALCULATION ---
  let maxY = 0;
  for (let v of rockVertices) {
    if (v.y > maxY) {
      maxY = v.y; // Find the lowest (largest Y) point of the rock's shape relative to its center
    }
  }
  // Position the rock horizontally in the center, and vertically so its lowest point
  // sits on the grass line (height * 0.7)
  rockPosition = createVector(width / 2, height * 0.7 - maxY);
  // ------------------------------------------
}
Line-by-line explanation (8 lines)

🔧 Subcomponents:

calculation Rock Position Calculation for (let v of rockVertices) { if (v.y > maxY) { maxY = v.y; } }

Finds the lowest point of the rock shape so it can sit properly on the grass

createCanvas(windowWidth, windowHeight);
Creates a canvas that matches your entire browser window size, making the sketch fully responsive
generateRock();
Generates the random vertices for the rock shape once, preventing it from changing shape every frame
generateClouds();
Creates an array of cloud data with positions and lumps (ellipses) that make up each cloud
generatePeople();
Creates an array of people data, each with position, size, and color properties
rockColor = color(random(80, 120), random(80, 120), random(80, 120));
Picks a random gray-brown color for the rock by choosing random RGB values in the 80-120 range
let maxY = 0;
Starts a variable to track the lowest (highest Y value) point of the rock
for (let v of rockVertices) { if (v.y > maxY) { maxY = v.y; } }
Loops through all rock vertices to find which one has the largest Y value (lowest point on screen)
rockPosition = createVector(width / 2, height * 0.7 - maxY);
Positions the rock's center horizontally in the middle of the canvas and vertically so its lowest point touches the grass at 70% down
draw()

draw() runs 60 times per second and controls rendering order: sky first (so it doesn't cover anything), then grass, sun, clouds, rock, and people (so they layer on top). The order you call functions in draw() determines what appears in front.

🔬 This draws the grass 70% down the canvas. What happens if you change height * 0.7 to height * 0.5? Where does the grass line move?

  // 2. Draw the Grass
  fill(50, 160, 50);       // Green grass color
  noStroke();             // No outline for the grass
  rect(0, height * 0.7, width, height * 0.3); // Draw a rectangle from 70% down

🔬 The sun is currently at 15% across and 15% down. What happens if you change both 0.15 values to 0.5? What if you change the diameter from * 0.1 to * 0.25?

  // 3. Draw the Sun
  fill(255, 200, 0);       // Yellow sun color
  noStroke();             // No outline for the sun
  circle(width * 0.15, height * 0.15, min(width, height) * 0.1); // Top-left, responsive size
function draw() {
  // 1. Draw the Sky
  background(135, 206, 235); // Sky blue

  // 2. Draw the Grass
  fill(50, 160, 50);       // Green grass color
  noStroke();             // No outline for the grass
  rect(0, height * 0.7, width, height * 0.3); // Draw a rectangle from 70% down

  // 3. Draw the Sun
  fill(255, 200, 0);       // Yellow sun color
  noStroke();             // No outline for the sun
  circle(width * 0.15, height * 0.15, min(width, height) * 0.1); // Top-left, responsive size

  // 4. Draw the Clouds
  drawClouds();

  // 5. Draw the Rock (existing logic)
  drawRock();

  // 6. Draw the People (on top of the rock)
  drawPeople();
}
Line-by-line explanation (9 lines)

🔧 Subcomponents:

calculation Sky Background background(135, 206, 235); // Sky blue

Clears the canvas each frame and fills it with sky blue

calculation Grass Rectangle rect(0, height * 0.7, width, height * 0.3); // Draw a rectangle from 70% down

Draws the grass as a green rectangle taking up the bottom 30% of the canvas

calculation Sun Circle circle(width * 0.15, height * 0.15, min(width, height) * 0.1); // Top-left, responsive size

Draws a yellow sun circle in the top-left that scales with the window size

background(135, 206, 235); // Sky blue
Fills the entire canvas with sky blue (RGB: 135, 206, 235) and clears everything drawn last frame
fill(50, 160, 50);
Sets the fill color to green for the grass
noStroke();
Tells p5 not to draw outlines around shapes from now until stroke() is called
rect(0, height * 0.7, width, height * 0.3);
Draws a green rectangle starting at 70% down the canvas (height * 0.7) that spans the full width and fills the remaining 30% of height
fill(255, 200, 0);
Changes the fill color to yellow for the sun
circle(width * 0.15, height * 0.15, min(width, height) * 0.1);
Draws a circle at 15% across and 15% down the canvas; min(width, height) * 0.1 makes the sun's diameter 10% of whichever dimension is smaller, keeping it proportional
drawClouds();
Calls the function that draws all clouds
drawRock();
Calls the function that draws the rock using its stored vertices
drawPeople();
Calls the function that draws all people standing on the rock

generateRock()

This function uses polar coordinates (angle and radius) to generate an irregular shape. By adding random variation to the radius at each angle, we create bumpy, natural-looking rocks. The use of cos() and sin() to convert to X, Y coordinates is a fundamental technique for drawing circular or orbital patterns.

🔬 This loop spreads numPoints evenly around a full circle (0 to TWO_PI). What happens if you change TWO_PI to PI? How does the rock shape change when you only use half a circle?

  for (let i = 0; i < numPoints; i++) {
    let angle = map(i, 0, numPoints, 0, TWO_PI);
    let r = currentRockRadius + random(-currentRockRadius * 0.2, currentRockRadius * 0.2); // Add irregularity to radius
    let x = r * cos(angle);
    let y = r * sin(angle);
    rockVertices.push(createVector(x, y));
  }
function generateRock() {
  rockVertices = []; // Clear any previous vertices

  // Approximate radius of the rock
  currentRockRadius = min(width, height) * 0.2; // Store for other elements
  let numPoints = floor(random(10, 20)); // Number of points for the rock's outline

  // Generate vertices using polar coordinates with some randomness
  for (let i = 0; i < numPoints; i++) {
    let angle = map(i, 0, numPoints, 0, TWO_PI);
    let r = currentRockRadius + random(-currentRockRadius * 0.2, currentRockRadius * 0.2); // Add irregularity to radius
    let x = r * cos(angle);
    let y = r * sin(angle);
    rockVertices.push(createVector(x, y));
  }
}
Line-by-line explanation (9 lines)

🔧 Subcomponents:

for-loop Vertex Generation Loop for (let i = 0; i < numPoints; i++) { ... }

Creates each point of the rock's outline by calculating polar coordinates and adding randomness

rockVertices = [];
Empties the array so old vertices are cleared before new ones are generated
currentRockRadius = min(width, height) * 0.2;
Calculates the rock's base radius as 20% of whichever is smaller (width or height), making the rock responsive to window size
let numPoints = floor(random(10, 20));
Picks a random whole number between 10 and 20—this is how many vertices (corners) the rock will have
for (let i = 0; i < numPoints; i++) {
Loops once for each point, creating vertices evenly spaced around a circle
let angle = map(i, 0, numPoints, 0, TWO_PI);
Converts the loop counter (0 to numPoints) into an angle (0 to 2π radians, a full circle) so each vertex is evenly spaced around
let r = currentRockRadius + random(-currentRockRadius * 0.2, currentRockRadius * 0.2);
Creates the radius for this vertex by taking the base radius and randomly adjusting it ±20%, making the rock lumpy and irregular
let x = r * cos(angle);
Converts polar coordinates (radius and angle) to Cartesian X using the cosine formula
let y = r * sin(angle);
Converts polar coordinates to Cartesian Y using the sine formula
rockVertices.push(createVector(x, y));
Stores the X, Y coordinates as a vector and adds it to the array

drawRock()

drawRock() takes the pre-generated vertices and actually renders them as a filled polygon. Notice the push() and pop()—they protect other drawing code from the translate() effect, so clouds and people aren't accidentally shifted. The beginShape() / vertex() / endShape() pattern is the core way p5.js draws custom polygons.

🔬 Currently endShape() uses CLOSE to connect the last vertex back to the first. What happens if you change CLOSE to just OPEN (or remove it)? Will the rock shape still look like a closed rock?

  beginShape(); // Start drawing a custom shape
  for (let v of rockVertices) {
    vertex(v.x, v.y); // Add each generated vertex to the shape
  }
  endShape(CLOSE); // Close the shape
function drawRock() {
  push(); // Isolate drawing styles
  translate(rockPosition.x, rockPosition.y); // Move to the rock's position

  fill(rockColor);       // Use the generated rock color
  stroke(rockColor - 30); // Slightly darker stroke
  strokeWeight(2);       // Thin stroke

  beginShape(); // Start drawing a custom shape
  for (let v of rockVertices) {
    vertex(v.x, v.y); // Add each generated vertex to the shape
  }
  endShape(CLOSE); // Close the shape

  pop(); // Restore previous drawing styles
}
Line-by-line explanation (10 lines)

🔧 Subcomponents:

for-loop Vertex Drawing Loop for (let v of rockVertices) { vertex(v.x, v.y); }

Loops through each stored rock vertex and draws it as part of a polygon

push();
Saves the current drawing state (colors, transformations, etc.) so we can restore it later with pop()
translate(rockPosition.x, rockPosition.y);
Moves the drawing origin to the rock's position so all vertices are drawn relative to that point
fill(rockColor);
Sets the fill color to the rock color chosen in setup()
stroke(rockColor - 30);
Sets the outline color to a slightly darker version of the rock color by subtracting 30 from each RGB component
strokeWeight(2);
Makes the outline 2 pixels thick
beginShape();
Tells p5 to start recording vertices for a custom polygon shape
for (let v of rockVertices) {
Loops through each vertex stored in the rockVertices array
vertex(v.x, v.y);
Adds this vertex to the polygon being drawn
endShape(CLOSE);
Finishes the polygon and automatically draws a line back to the first vertex to close it
pop();
Restores the drawing state saved by push(), undoing the translate() so future shapes aren't offset

generateClouds()

This function builds nested data structures: an array of clouds, where each cloud is an object containing an array of lumps. This nested structure lets drawClouds() loop through clouds, then loop through lumps within each cloud. It's a powerful pattern for organizing complex scene data.

🔬 Clouds currently stay in the top 30% of the canvas. What happens if you change height * 0.3 to height * 0.7? Where would clouds appear?

    cloud.x = random(width * 0.1, width * 0.9);
    cloud.y = random(height * 0.1, height * 0.3); // Top portion of the canvas
function generateClouds() {
  clouds = [];
  let numClouds = floor(random(3, 6)); // 3 to 5 clouds
  for (let i = 0; i < numClouds; i++) {
    let cloud = {};
    cloud.x = random(width * 0.1, width * 0.9);
    cloud.y = random(height * 0.1, height * 0.3); // Top portion of the canvas
    cloud.baseRadius = min(width, height) * random(0.05, 0.1); // Base size for the cloud

    cloud.lumps = [];
    let numLumps = floor(random(3, 6)); // 3 to 5 ellipses (lumps) per cloud
    for (let j = 0; j < numLumps; j++) {
      let lump = {};
      lump.offsetX = random(-cloud.baseRadius * 0.8, cloud.baseRadius * 0.8);
      lump.offsetY = random(-cloud.baseRadius * 0.5, cloud.baseRadius * 0.5);
      lump.radius = cloud.baseRadius * random(0.5, 1.2); // Vary lump sizes
      cloud.lumps.push(lump);
    }
    clouds.push(cloud);
  }
}
Line-by-line explanation (16 lines)

🔧 Subcomponents:

for-loop Cloud Generation Loop for (let i = 0; i < numClouds; i++) { ... }

Creates each cloud with a random position and size

for-loop Cloud Lump Loop for (let j = 0; j < numLumps; j++) { ... }

Creates the overlapping ellipses (lumps) that make up each cloud's fluffy shape

clouds = [];
Empties the clouds array to start fresh
let numClouds = floor(random(3, 6));
Randomly picks 3, 4, or 5 clouds to generate
for (let i = 0; i < numClouds; i++) {
Loops once for each cloud to create
let cloud = {};
Creates an empty object to store properties of this cloud
cloud.x = random(width * 0.1, width * 0.9);
Randomly positions the cloud horizontally between 10% and 90% across the canvas
cloud.y = random(height * 0.1, height * 0.3);
Randomly positions the cloud vertically in the top 30% of the canvas (sky area)
cloud.baseRadius = min(width, height) * random(0.05, 0.1);
Sets a base size for the cloud as 5-10% of the smaller canvas dimension
cloud.lumps = [];
Creates an array to store the lumps (ellipses) that make up this cloud
let numLumps = floor(random(3, 6));
Randomly decides this cloud will have 3-5 lumps
for (let j = 0; j < numLumps; j++) {
Loops once for each lump to create
let lump = {};
Creates an empty object to store properties of this lump
lump.offsetX = random(-cloud.baseRadius * 0.8, cloud.baseRadius * 0.8);
Randomly offsets the lump horizontally relative to the cloud's center
lump.offsetY = random(-cloud.baseRadius * 0.5, cloud.baseRadius * 0.5);
Randomly offsets the lump vertically (smaller range than X for a flatter cloud)
lump.radius = cloud.baseRadius * random(0.5, 1.2);
Gives this lump a random size between 50% and 120% of the cloud's base radius
cloud.lumps.push(lump);
Adds this lump to the cloud's lump array
clouds.push(cloud);
Adds the completed cloud object to the main clouds array

drawClouds()

drawClouds() demonstrates nested loops: the outer loop picks a cloud, the inner loop draws all that cloud's lumps. This pattern is essential for rendering hierarchical data. Notice how the data (generateClouds) is completely separate from the rendering (drawClouds)—you can change one without the other.

🔬 Each lump is drawn as an ellipse with diameter lump.radius * 2. What happens if you change that to lump.radius * 3 or lump.radius * 1? Do the clouds get fluffier or denser?

  for (let cloud of clouds) {
    for (let lump of cloud.lumps) {
      ellipse(cloud.x + lump.offsetX, cloud.y + lump.offsetY, lump.radius * 2);
    }
  }
function drawClouds() {
  fill(255); // White clouds
  noStroke();

  for (let cloud of clouds) {
    for (let lump of cloud.lumps) {
      ellipse(cloud.x + lump.offsetX, cloud.y + lump.offsetY, lump.radius * 2);
    }
  }
}
Line-by-line explanation (5 lines)

🔧 Subcomponents:

for-loop Nested Cloud and Lump Loop for (let cloud of clouds) { for (let lump of cloud.lumps) { ... } }

Loops through each cloud, then loops through each lump within that cloud to draw overlapping ellipses

fill(255);
Sets the fill color to white (255, 255, 255) for the clouds
noStroke();
Removes outlines from the ellipses so clouds look soft
for (let cloud of clouds) {
Loops through each cloud object in the clouds array
for (let lump of cloud.lumps) {
For this cloud, loops through each lump (ellipse) within it
ellipse(cloud.x + lump.offsetX, cloud.y + lump.offsetY, lump.radius * 2);
Draws a white ellipse at the cloud's position plus the lump's offset, with a diameter of lump.radius * 2

generatePeople()

generatePeople() stores each person's position relative to the rock's center (x_offset, y_offset) and its size relative to the rock's radius. This relative sizing ensures people always look proportional to the rock, whether the rock is huge or tiny after a window resize.

function generatePeople() {
  people = [];
  let numPeople = floor(random(2, 5)); // 2 to 4 people

  for (let i = 0; i < numPeople; i++) {
    let person = {};
    // Position relative to the rock's center
    person.x_offset = random(-currentRockRadius * 0.6, currentRockRadius * 0.6); // Horizontal position on rock
    person.y_offset = -currentRockRadius * random(0.2, 0.4); // Feet y relative to rock center, on top of rock

    person.height = currentRockRadius * random(0.3, 0.5); // Person height relative to rock size
    person.width = person.height * 0.3; // Person width relative to height

    // Random skin tone
    person.color = color(random(180, 220), random(120, 160), random(80, 120));

    people.push(person);
  }
}
Line-by-line explanation (10 lines)

🔧 Subcomponents:

for-loop Person Generation Loop for (let i = 0; i < numPeople; i++) { ... }

Creates each person with random position, size, and skin tone

people = [];
Empties the people array to start fresh
let numPeople = floor(random(2, 5));
Randomly picks 2, 3, or 4 people to generate
for (let i = 0; i < numPeople; i++) {
Loops once for each person to create
let person = {};
Creates an empty object to store properties of this person
person.x_offset = random(-currentRockRadius * 0.6, currentRockRadius * 0.6);
Randomly positions the person horizontally on top of the rock, within 60% of the rock's radius left or right
person.y_offset = -currentRockRadius * random(0.2, 0.4);
Positions the person above the rock center (negative Y) at a height proportional to the rock size; varies 20-40% of the radius
person.height = currentRockRadius * random(0.3, 0.5);
Sets the person's height as 30-50% of the rock's radius, making people scale with the rock
person.width = person.height * 0.3;
Sets the person's width to 30% of their height for realistic proportions
person.color = color(random(180, 220), random(120, 160), random(80, 120));
Picks a random skin tone by choosing random RGB values in specific ranges
people.push(person);
Adds the completed person object to the people array

drawPeople()

drawPeople() uses translate() to position each person relative to the rock, then draws a simple stick figure using circles and lines. The use of push() and pop() is critical—it ensures each person's translate() only affects that person's drawing, not the whole scene.

🔬 The multipliers like 0.8, 0.6, and 0.3 control where body parts are positioned vertically. What happens if you change the arm line Y from -person.height * 0.6 to -person.height * 0.9? Do their arms move up toward their head?

    // Head
    circle(0, -person.height, person.width * 0.8);

    // Body
    line(0, -person.height * 0.8, 0, -person.height * 0.3);

    // Arms
    line(-person.width * 0.5, -person.height * 0.6, person.width * 0.5, -person.height * 0.6);
function drawPeople() {
  for (let person of people) {
    push();
    // Translate to the person's feet position (relative to the canvas)
    translate(rockPosition.x + person.x_offset, rockPosition.y + person.y_offset);

    fill(person.color);
    stroke(person.color - 50); // Slightly darker stroke for outline
    strokeWeight(1);

    // Head
    circle(0, -person.height, person.width * 0.8);

    // Body
    line(0, -person.height * 0.8, 0, -person.height * 0.3);

    // Arms
    line(-person.width * 0.5, -person.height * 0.6, person.width * 0.5, -person.height * 0.6);

    // Legs
    line(0, -person.height * 0.3, -person.width * 0.3, 0);
    line(0, -person.height * 0.3, person.width * 0.3, 0);

    pop();
  }
}
Line-by-line explanation (12 lines)

🔧 Subcomponents:

for-loop Person Drawing Loop for (let person of people) { ... }

Loops through each person and draws them as a simple stick figure

calculation Head Circle circle(0, -person.height, person.width * 0.8);

Draws the person's head at the top of their body

calculation Body Line line(0, -person.height * 0.8, 0, -person.height * 0.3);

Draws a vertical line for the torso from neck to hips

calculation Arms line(-person.width * 0.5, -person.height * 0.6, person.width * 0.5, -person.height * 0.6);

Draws a horizontal line for both arms

calculation Legs line(0, -person.height * 0.3, -person.width * 0.3, 0); line(0, -person.height * 0.3, person.width * 0.3, 0);

Draws two diagonal lines for legs from hips to feet

for (let person of people) {
Loops through each person in the people array
push();
Saves the current drawing state so the translate() and fill() don't affect other elements
translate(rockPosition.x + person.x_offset, rockPosition.y + person.y_offset);
Moves the drawing origin to the person's feet position so the person is drawn relative to that point
fill(person.color);
Sets the fill color to this person's skin tone
stroke(person.color - 50);
Sets the outline color to a darker version of their skin tone
strokeWeight(1);
Makes body lines 1 pixel thick
circle(0, -person.height, person.width * 0.8);
Draws the head as a circle at the top of the person (Y is negative so it's above the feet)
line(0, -person.height * 0.8, 0, -person.height * 0.3);
Draws the body as a vertical line from 80% of height (below the head) to 30% of height (hips)
line(-person.width * 0.5, -person.height * 0.6, person.width * 0.5, -person.height * 0.6);
Draws arms as a horizontal line at 60% of height, extending left and right of center
line(0, -person.height * 0.3, -person.width * 0.3, 0);
Draws the left leg as a diagonal line from hips to feet
line(0, -person.height * 0.3, person.width * 0.3, 0);
Draws the right leg as a diagonal line from hips to feet
pop();
Restores the drawing state, undoing the translate() so other people or elements aren't offset

windowResized()

windowResized() is a special p5.js callback that runs whenever the browser window is resized. It's essential for responsive sketches. Notice how it calls all the generation functions again—this ensures every element adapts smoothly to the new canvas dimensions without breaking.

function windowResized() {
  resizeCanvas(windowWidth, windowHeight);
  // Called when preview panel is resized

  // Recalculate rock position and regenerate shape on resize
  generateRock(); // Regenerate shape first
  let maxY = 0;
  for (let v of rockVertices) {
    if (v.y > maxY) {
      maxY = v.y;
    }
  }
  rockPosition = createVector(width / 2, height * 0.7 - maxY); // Reposition rock

  // Regenerate clouds on resize to adapt to new canvas size
  generateClouds();

  // Regenerate people on resize to adapt to new canvas size and rock position
  generatePeople();
}
Line-by-line explanation (7 lines)

🔧 Subcomponents:

for-loop Rock Position Recalculation Loop for (let v of rockVertices) { if (v.y > maxY) { maxY = v.y; } }

Finds the lowest point of the rock again after the shape is regenerated

resizeCanvas(windowWidth, windowHeight);
Immediately resizes the p5.js canvas to match the new window dimensions
generateRock();
Regenerates the rock shape with a new random set of vertices appropriate for the new canvas size
let maxY = 0;
Creates a variable to find the lowest point of the newly generated rock
for (let v of rockVertices) { if (v.y > maxY) { maxY = v.y; } }
Loops through all rock vertices to find the one with the largest Y value (lowest point)
rockPosition = createVector(width / 2, height * 0.7 - maxY);
Recalculates the rock's position so it sits at 70% down the canvas, even after the canvas size changed
generateClouds();
Regenerates clouds so they fit the new canvas proportions
generatePeople();
Regenerates people so they scale appropriately to the new rock and canvas size

📦 Key Variables

rockVertices array

Stores the X, Y coordinates of each point that makes up the rock's irregular polygon shape

let rockVertices = [];
rockColor color

Stores the RGB color chosen for the rock—calculated once in setup() so the rock stays the same color every frame

let rockColor = color(100, 100, 100);
rockPosition p5.Vector

Stores the X, Y position of the rock's center on the canvas, used to translate the rock when drawing

let rockPosition = createVector(200, 350);
currentRockRadius number

Stores the rock's base radius (before irregularity is added), used to scale clouds and people proportionally

let currentRockRadius = 80;
clouds array

Stores data for each cloud: position, base size, and array of lumps (overlapping ellipses)

let clouds = [];
people array

Stores data for each person: position relative to rock, height, width, and skin color

let people = [];

🔧 Potential Improvements (4)

Here are some ways this code could be enhanced:

BUG setup() and windowResized()

Rock position calculation (finding maxY) is duplicated in both setup() and windowResized(), creating maintenance burden and potential inconsistencies

💡 Extract the rock position calculation into its own function, e.g., function calculateRockPosition() { ... return createVector(...) }, and call it from both places

STYLE generateRock()

The variable name 'r' for radius is vague and doesn't follow the more descriptive naming used elsewhere

💡 Rename 'let r =' to 'let vertexRadius =' to make the code more readable and self-documenting

PERFORMANCE draw()

All three generation functions (generateRock, generateClouds, generatePeople) are called on every window resize, but they could be optimized by only regenerating the ones that depend on the canvas size change

💡 Consider caching canvas-relative calculations or only regenerating when necessary, though the current simple approach is fine for small sketches

FEATURE drawPeople()

People are drawn with fixed proportions and pose—they all have the same stick figure stance

💡 Add variation to person.poseAngle or randomize arm/leg angles in generatePeople() to give people different poses and make the scene more dynamic

🔄 Code Flow

Code flow showing setup, draw, generaterock, drawrock, generateclouds, drawclouds, generatepeople, drawpeople, windowresized

💡 Click on function names in the diagram to jump to their code

graph TD start[Start] --> setup[setup] setup --> draw[draw loop] draw --> skydraw[sky-draw] draw --> grassdraw[grass-draw] draw --> sundraw[sun-draw] draw --> drawrock[drawrock] draw --> drawclouds[drawclouds] draw --> drawpeople[drawpeople] click setup href "#fn-setup" click draw href "#fn-draw" click skydraw href "#sub-sky-draw" click grassdraw href "#sub-grass-draw" click sundraw href "#sub-sun-draw" click drawrock href "#fn-drawrock" click drawclouds href "#fn-drawclouds" click drawpeople href "#fn-drawpeople" drawrock --> rockposcalc[rock-position-calc] rockposcalc --> drawrock click rockposcalc href "#sub-rock-position-calc" drawrock --> vertexloop1[vertex-loop] vertexloop1 --> drawrock click vertexloop1 href "#sub-vertex-loop" drawclouds --> cloudloop[cloud-loop] cloudloop --> drawclouds click cloudloop href "#sub-cloud-loop" cloudloop --> nestedloops[nested-loops] nestedloops --> drawclouds click nestedloops href "#sub-nested-loops" nestedloops --> lumploop[lump-loop] lumploop --> nestedloops click lumploop href "#sub-lump-loop" drawpeople --> peopleloop1[people-loop] peopleloop1 --> drawpeople click peopleloop1 href "#sub-people-loop" peopleloop1 --> headcircle[head-circle] headcircle --> drawpeople click headcircle href "#sub-head-circle" peopleloop1 --> bodyline[body-line] bodyline --> drawpeople click bodyline href "#sub-body-line" peopleloop1 --> armsline[arms-line] armsline --> drawpeople click armsline href "#sub-arms-line" peopleloop1 --> legsline[legs-lines] legsline --> drawpeople click legsline href "#sub-legs-lines" windowresized[windowResized] --> setup click windowresized href "#fn-windowresized" setup --> generaterock[generaterock] generaterock --> vertexloop2[vertex-loop] vertexloop2 --> generaterock click vertexloop2 href "#sub-vertex-loop" generaterock --> resizeloop[resize-loop] resizeloop --> generaterock click resizeloop href "#sub-resize-loop"

❓ Frequently Asked Questions

What visual elements are created in the Just a Rock Simulator sketch?

The sketch visually creates a serene landscape featuring a rock, grass, a blue sky, and a sun, with the rock positioned prominently in the center.

Is the Just a Rock Simulator sketch interactive for users?

The current version of the sketch does not include interactive features, focusing instead on generating a static visual representation of a rock in a scenic environment.

What creative coding concept is demonstrated in the Just a Rock Simulator sketch?

This sketch demonstrates the concept of procedural generation by creating unique rock shapes and positions based on randomly generated vertices and colors.

Preview

Just a rock simulator - p5.js creative coding sketch preview
Sketch Preview
Code flow diagram showing the structure of Just a rock simulator - Code flow showing setup, draw, generaterock, drawrock, generateclouds, drawclouds, generatepeople, drawpeople, windowresized
Code Flow Diagram