
just drive

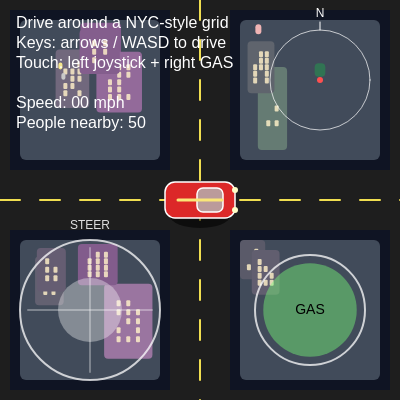
This sketch creates a playable driving simulator on an infinite NYC-style grid with procedurally generated buildings, parks, and pedestrians. Drive your red taxi around neighborhoods ranging from dense midtown skyscrapers to suburban houses, controlled via keyboard arrows or touch joystick.

🧪 Try This!

Experiment with the code by making these changes:

  1. Drive in daylight instead of night — The dark blue background creates a night-time mood. Changing it to a bright blue or white will make the city feel like daytime.
  2. Make the city denser with taller buildings — Increasing MANHATTAN_RADIUS extends the zone where tall skyscrapers appear, making more of the city look like dense downtown Manhattan.
  3. Paint the taxi a different color — Red is the classic NYC taxi color, but you can change it to blue, yellow, or any RGB value. The car will instantly become a different color.
  4. Make pedestrians glow more at night — Currently 75% of building windows are lit. Decreasing the threshold makes fewer windows dark, so buildings glow brighter.
  5. Increase the steering speed for arcade-like response — The car currently steers slowly at high speed for realism. Increasing turnRate makes the car spin faster, feeling more arcade-like.
Prefer the full editor? Open it there →

📖 About This Sketch

This sketch builds a miniature playable city where you drive a red taxi across an infinite Manhattan-style grid. The city is procedurally generated using pseudorandom functions, meaning the same block coordinates always produce identical buildings—so the world feels consistent as you drive. The sketch combines several advanced p5.js techniques: camera translation to keep the car centered, efficient culling to only draw visible blocks, and collision detection that keeps pedestrians inside city blocks.

The code is organized into three major systems: input (handling both keyboard and touch controls), car physics (velocity, steering, friction), and city rendering (buildings at three density levels, parks, roads, and dynamic pedestrians). By studying it, you will learn how to build a procedurally generated world, implement a third-person camera, handle touch input on mobile, and optimize drawing performance by culling off-screen objects and reducing detail at distance.

⚙️ How It Works

  1. When the sketch loads, setup() creates a full-screen canvas and initializes the car at position (0,0) with zero speed, facing right (angle 0). Touch controls are positioned in the bottom corners.
  2. Every frame, draw() clears the background to night-time dark blue, updates input from keyboard and touch, applies car physics (acceleration, friction, turning), and updates pedestrian positions.
  3. The camera uses translate() to center the car on screen: translate(width/2 - car.x, height/2 - car.y) shifts all drawing so the car stays in the middle while the world moves around it.
  4. drawCity() iterates through all grid blocks visible in the current view. For each block, it checks distance from the city center (to pick density level: tall towers near center, mixed mid-rise buildings in middle zones, small houses in outer areas) and distance from the car (to decide whether to draw detailed windows and decorations).
  5. Parks (Central Park and small neighborhood parks) are scattered deterministically using pseudoRandom(). Pedestrians spawn in a ring around the car, wander inside city blocks, and bounce off road edges.
  6. The HUD displays speed, pedestrian count, and a minimap showing the car's position relative to Manhattan's radius. Touch controls show a visual joystick on the left and a GAS button on the right.

🎓 Concepts You'll Learn

Procedural generation with pseudorandom seedingCamera following and translation transformsSpatial culling for performance optimizationTouch joystick and mobile game controlsGame physics (velocity, friction, steering)Building density and level-of-detail rendering

📝 Code Breakdown

setup()

setup() runs exactly once when the sketch starts. It is the place to create the canvas, initialize game objects, and configure p5.js settings. Understanding object literals like the car object is essential to game development—each property (x, y, speed, etc.) stores a piece of the car's state.

function setup() {
  createCanvas(windowWidth, windowHeight);

  // Car starts near "Midtown Manhattan"
  car = {
    x: 0,
    y: 0,
    angle: 0,          // 0 rad = facing right (east)
    speed: 0,
    maxSpeed: 12,
    accel: 0.4,
    friction: 0.08,
    turnRate: 0.06
  };

  layoutTouchControls();
  textFont('sans-serif');
}
Line-by-line explanation (12 lines)

🔧 Subcomponents:

function-call Canvas Setup createCanvas(windowWidth, windowHeight);

Creates a full-screen canvas that fills the entire browser window

object-creation Car Object Initialization car = { x: 0, y: 0, angle: 0, speed: 0, maxSpeed: 12, accel: 0.4, friction: 0.08, turnRate: 0.06 };

Creates the car object with position, physics properties, and steering parameters

function-call Touch Control Positioning layoutTouchControls();

Places the joystick and gas button in the correct positions for the current screen size

createCanvas(windowWidth, windowHeight);
Creates a canvas that fills the entire browser window, responsive to any screen size
car = {
Begins defining the car object that will store position, velocity, and physics parameters
x: 0,
Car's horizontal position starts at world coordinate 0 (center)
y: 0,
Car's vertical position starts at world coordinate 0 (center)
angle: 0, // 0 rad = facing right (east)
Car's rotation in radians; 0 means facing right (east), PI/2 means facing down (south)
speed: 0,
Current velocity; positive values move the car forward, negative values move it backward
maxSpeed: 12,
The highest speed the car can reach; prevents unlimited acceleration
accel: 0.4,
How much speed increases each frame when the accelerator is pressed—higher = faster acceleration
friction: 0.08,
How quickly the car slows down when no input is given—simulates rolling resistance
turnRate: 0.06
How many radians the car rotates per frame when steering; controls turning speed
layoutTouchControls();
Calls a function to position the joystick and gas button for the current screen size
textFont('sans-serif');
Sets the font used for HUD text (speed display, instructions) to a clean sans-serif typeface
draw()

draw() is the heartbeat of the sketch—it runs 60 times per second. The function updates game state (input, physics), then uses push/pop and translate() to implement a camera that follows the car. This is a classic game engine pattern: update world state, then render it from the player's viewpoint.

🔬 The translate() line centers the car on screen by shifting ALL drawing afterward. What happens if you change it to translate(width, height) instead? Where does the car appear?

  push();
  translate(width / 2 - car.x, height / 2 - car.y);

  drawCity();
  drawPedestrians();
  drawCar();
  pop();
function draw() {
  background(15, 20, 35); // dark night‑time city

  updateInput();
  updateCar();
  updatePedestrians();

  // Camera: keep the car roughly centered
  push();
  translate(width / 2 - car.x, height / 2 - car.y);

  drawCity();
  drawPedestrians();
  drawCar();
  pop();

  drawHUD();
  drawTouchControls();
}
Line-by-line explanation (12 lines)

🔧 Subcomponents:

function-call Clear Background background(15, 20, 35);

Fills the entire canvas with dark blue-black, erasing the previous frame

function-call Process Input updateInput();

Reads keyboard keys and touch events, sets input flags (forward, left, etc.)

function-call Update Physics updateCar();

Applies acceleration, friction, turning, and moves the car based on input

function-call Update Pedestrians updatePedestrians();

Moves pedestrians, removes those too far away, spawns new ones near the car

transform Camera Translation translate(width / 2 - car.x, height / 2 - car.y);

Shifts all world drawing so the car appears centered on screen

function-call Draw World Contents drawCity(); drawPedestrians(); drawCar();

Renders city blocks, roads, pedestrians, and the car—all shifted by the camera translation

function-call Draw Screen Overlay drawHUD(); drawTouchControls();

Renders speed, map, and UI controls on top of the game world (not affected by camera)

background(15, 20, 35);
Fills the canvas with a dark blue-black color (RGB: 15, 20, 35), erasing everything drawn last frame so we don't see motion blur
updateInput();
Polls the keyboard and touch screen, updating the inputForward, inputLeft, etc. boolean flags
updateCar();
Applies physics: increases/decreases speed based on input, applies friction, updates the car's angle, and moves the car to its new position
updatePedestrians();
Moves all pedestrians, removes those too far from the car, spawns new ones to maintain a target population
push();
Saves the current transformation matrix (translation, rotation, scale) so we can restore it later
translate(width / 2 - car.x, height / 2 - car.y);
Shifts all subsequent drawing by (width/2 - car.x, height/2 - car.y) pixels, which centers the car on screen and makes the world move around it
drawCity();
Renders all visible city blocks, roads, buildings, windows, parks, and lane markings (all affected by the camera translation)
drawPedestrians();
Renders all pedestrians as small colored rectangles (affected by camera translation)
drawCar();
Renders the red taxi with headlights and stripe (affected by camera translation, so it stays centered)
pop();
Restores the saved transformation matrix so the HUD and touch controls draw at their original screen positions
drawHUD();
Renders text and minimap in screen space (not affected by camera translation, so they stay fixed on screen)
drawTouchControls();
Renders joystick and gas button at fixed screen positions (for touch devices or UI preview)

updateInput()

updateInput() reads both keyboard (via keyIsDown) and touch input (via the touches array) each frame. The keyboard code is straightforward: check if a key is held. Touch is more complex because we must calculate distances and normalize vectors to convert a 2D touch swipe into steering direction. This function demonstrates a key game dev pattern: separating input detection from action (the input flags are consumed later in updateCar).

🔬 These thresholds (0.25) prevent accidental steering when you drag the joystick almost vertically. What happens if you change them to 0.5 or 0.1? How does steering feel different?

          if (nx > 0.25) {
            inputRight = true;
          } else if (nx < -0.25) {
            inputLeft = true;
          }
function updateInput() {
  // Reset input each frame
  inputForward = inputBackward = inputLeft = inputRight = false;

  // Keyboard input (arrows + WASD)
  if (keyIsDown(UP_ARROW) || keyIsDown(87)) inputForward = true;    // W / ↑
  if (keyIsDown(DOWN_ARROW) || keyIsDown(83)) inputBackward = true; // S / ↓
  if (keyIsDown(LEFT_ARROW) || keyIsDown(65)) inputLeft = true;     // A / ←
  if (keyIsDown(RIGHT_ARROW) || keyIsDown(68)) inputRight = true;   // D / →

  // Reset touch state
  joystick.dx = 0;
  joystick.dy = 0;
  joystick.active = false;
  gasButton.pressed = false;

  // Touch joystick + gas button
  if (touches && touches.length > 0) {
    for (let t of touches) {
      const x = t.x;
      const y = t.y;

      // Joystick: steering (left bottom)
      const dxJ = x - joystick.x;
      const dyJ = y - joystick.y;
      const distJ = Math.sqrt(dxJ * dxJ + dyJ * dyJ);
      if (distJ < joystick.baseRadius * 1.4) {
        joystick.active = true;
        const clampedDist = min(distJ, joystick.baseRadius);
        if (distJ > 0.001) {
          const nx = dxJ / distJ;
          const ny = dyJ / distJ;
          joystick.dx = nx * clampedDist;
          joystick.dy = ny * clampedDist;

          // Horizontal axis controls left/right steering
          if (nx > 0.25) {
            inputRight = true;
          } else if (nx < -0.25) {
            inputLeft = true;
          }
        }
      }

      // Gas button: accelerate (right bottom)
      const dxG = x - gasButton.x;
      const dyG = y - gasButton.y;
      if (dxG * dxG + dyG * dyG < gasButton.radius * gasButton.radius) {
        gasButton.pressed = true;
      }
    }

    if (gasButton.pressed) {
      inputForward = true;
      // No touch reverse/brake; friction slows you down.
      // Keyboard S / ↓ still works for reverse.
    }
  }
}
Line-by-line explanation (15 lines)

🔧 Subcomponents:

statement Reset Input Flags inputForward = inputBackward = inputLeft = inputRight = false;

Clears all input flags at the start of each frame so stale input doesn't persist

conditional Keyboard Input Detection if (keyIsDown(UP_ARROW) || keyIsDown(87)) inputForward = true;

Checks if the player is holding up arrow or W key and sets the forward flag

calculation Joystick Distance Calculation const distJ = Math.sqrt(dxJ * dxJ + dyJ * dyJ);

Calculates Euclidean distance from touch point to joystick center to detect if touch is near the joystick

calculation Normalize Joystick Vector const nx = dxJ / distJ; const ny = dyJ / distJ;

Converts the raw touch offset into a unit direction vector (length 1) to determine steering direction

conditional Gas Button Touch Detection if (dxG * dxG + dyG * dyG < gasButton.radius * gasButton.radius)

Checks if the touch point is inside the circular gas button using squared distance (avoids expensive sqrt)

inputForward = inputBackward = inputLeft = inputRight = false;
Resets all four input flags to false at the start of the frame. This prevents input from 'sticking' after a key is released
if (keyIsDown(UP_ARROW) || keyIsDown(87)) inputForward = true;
keyIsDown() returns true if the key is currently held down. 87 is the ASCII code for 'W'. If either up arrow or W is pressed, set inputForward to true
if (keyIsDown(DOWN_ARROW) || keyIsDown(83)) inputBackward = true;
83 is 'S'. Detects backward input from down arrow or S key
if (keyIsDown(LEFT_ARROW) || keyIsDown(65)) inputLeft = true;
65 is 'A'. Detects left steering input
if (keyIsDown(RIGHT_ARROW) || keyIsDown(68)) inputRight = true;
68 is 'D'. Detects right steering input
if (touches && touches.length > 0) {
touches is a p5.js array that exists only on touch devices. This line checks if there is at least one active touch
const dxJ = x - joystick.x;
Calculates the horizontal offset from the touch point to the joystick center
const distJ = Math.sqrt(dxJ * dxJ + dyJ * dyJ);
Uses the Pythagorean theorem to calculate the straight-line distance from the touch to the joystick center
if (distJ < joystick.baseRadius * 1.4) {
If the touch is within 1.4× the joystick's base radius (a generous hit zone), treat it as a joystick input
const clampedDist = min(distJ, joystick.baseRadius);
Limits the joystick movement to never extend beyond its baseRadius—prevents the knob from flying off if you swipe far away
const nx = dxJ / distJ; const ny = dyJ / distJ;
Divides by distJ to normalize the vector, converting it to a direction with length 1. This separates direction from distance
joystick.dx = nx * clampedDist; joystick.dy = ny * clampedDist;
Scales the normalized direction by the clamped distance to position the joystick knob visually between center and max radius
if (nx > 0.25) { inputRight = true; }
If the horizontal component of the joystick direction is positive enough (> 0.25 threshold), turn right. Threshold prevents accidental turning on vertical swipes
if (dxG * dxG + dyG * dyG < gasButton.radius * gasButton.radius) {
Uses squared distance to test if the touch point is inside the circular gas button—faster than computing sqrt()
inputForward = true;
If the gas button was touched, set the forward flag so the car accelerates

updateCar()

updateCar() implements the core physics loop: read input, apply forces (acceleration and friction), constrain to limits, apply steering scaled by speed, then move the car. This is a simplified but effective model of car dynamics. The speed-dependent steering (angle += turn * (speed/maxSpeed)) is a subtle detail that makes the car feel weighty and realistic—at low speeds, you turn sharply; at high speeds, you turn gradually.

🔬 These lines handle acceleration and speed limits. What happens if you remove the * 0.8 on the backward line so backing up is as strong as going forward? Or change the constrain limits to allow full-speed reverse?

  if (forward) car.speed += car.accel;
  if (backward) car.speed -= car.accel * 0.8;

  // Limit speed (allow a little reverse)
  car.speed = constrain(car.speed, -car.maxSpeed * 0.5, car.maxSpeed);
function updateCar() {
  const forward = inputForward;
  const backward = inputBackward;
  const left = inputLeft;
  const right = inputRight;

  if (forward) car.speed += car.accel;
  if (backward) car.speed -= car.accel * 0.8;

  // Limit speed (allow a little reverse)
  car.speed = constrain(car.speed, -car.maxSpeed * 0.5, car.maxSpeed);

  // Turning depends on speed so you can't spin in place too fast
  if (car.speed !== 0) {
    let turn = 0;
    if (left) turn -= car.turnRate;
    if (right) turn += car.turnRate;
    car.angle += turn * (car.speed / car.maxSpeed);
  }

  // Simple friction when not accelerating/braking
  if (!forward && !backward) {
    if (car.speed > 0) {
      car.speed = max(0, car.speed - car.friction);
    } else if (car.speed < 0) {
      car.speed = min(0, car.speed + car.friction);
    }
  }

  // Move in the facing direction
  car.x += cos(car.angle) * car.speed;
  car.y += sin(car.angle) * car.speed;
}
Line-by-line explanation (13 lines)

🔧 Subcomponents:

conditional Acceleration if (forward) car.speed += car.accel;

Increases the car's speed when the accelerator is pressed

conditional Braking if (backward) car.speed -= car.accel * 0.8;

Decreases the car's speed (or reverses it) when backward is pressed; multiplied by 0.8 so reverse is weaker

calculation Speed Constraint car.speed = constrain(car.speed, -car.maxSpeed * 0.5, car.maxSpeed);

Clamps speed between -maxSpeed*0.5 (max reverse) and maxSpeed (max forward)

conditional Speed-Dependent Steering car.angle += turn * (car.speed / car.maxSpeed);

Applies turning only when moving; scales turn amount by speed ratio so steering feels less responsive when moving slowly

conditional Friction Deceleration if (car.speed > 0) { car.speed = max(0, car.speed - car.friction); }

Gradually slows the car when no input is given, simulating rolling resistance

calculation Position Update car.x += cos(car.angle) * car.speed; car.y += sin(car.angle) * car.speed;

Moves the car in the direction it is facing by a distance equal to its speed using trigonometry

const forward = inputForward;
Copies the input flag into a local variable for cleaner code inside updateCar()
if (forward) car.speed += car.accel;
If the forward button is pressed, increase the car's speed by the accel amount (0.4 by default)
if (backward) car.speed -= car.accel * 0.8;
If the backward button is pressed, decrease speed by accel * 0.8. The 0.8 factor makes backward weaker than forward, a common game design choice
car.speed = constrain(car.speed, -car.maxSpeed * 0.5, car.maxSpeed);
constrain() clamps the speed to stay between -6 (half of maxSpeed 12) and 12. This prevents unlimited acceleration
if (car.speed !== 0) {
Only allow steering when the car is moving; prevents spinning in place when stopped
let turn = 0;
Accumulates the turn amount. Left decreases it, right increases it
if (left) turn -= car.turnRate;
If steering left, subtract turnRate (0.06) from turn
car.angle += turn * (car.speed / car.maxSpeed);
Apply the turn scaled by the ratio of current speed to max speed. At half speed, steering is half as strong—makes the car feel inertial and realistic
if (!forward && !backward) {
If no accelerator or brake input is being applied, apply friction
if (car.speed > 0) { car.speed = max(0, car.speed - car.friction); }
If moving forward, reduce speed by friction amount (0.08), but don't go below 0. This simulates the car coasting to a stop
} else if (car.speed < 0) { car.speed = min(0, car.speed + car.friction); }
If moving backward (negative speed), reduce the magnitude of speed by adding friction, but don't exceed 0
car.x += cos(car.angle) * car.speed;
Move the car's x position forward by cos(angle) * speed. cos and sin convert the car's angle into x and y components
car.y += sin(car.angle) * car.speed;
Move the car's y position forward by sin(angle) * speed. Together with the x line, this moves the car in the direction it is facing

drawCity()

drawCity() is the sketch's biggest rendering function. It demonstrates several critical optimization techniques: grid-based culling (only iterate visible cells), AABB culling (skip off-screen blocks), and level-of-detail rendering (draw details only near the car). The three-tier building system (tall/mixed/low) creates the illusion of a real city with varied neighborhoods. The lane marking culling shows how even small optimizations add up—don't draw dashes far away where they're too small to see.

function drawCity() {
  const padding = GRID_SPACING * 2;

  const viewLeft = car.x - width / 2 - padding;
  const viewRight = car.x + width / 2 + padding;
  const viewTop = car.y - height / 2 - padding;
  const viewBottom = car.y + height / 2 + padding;

  const startI = Math.floor(viewLeft / GRID_SPACING) - 1;
  const endI = Math.floor(viewRight / GRID_SPACING) + 1;
  const startJ = Math.floor(viewTop / GRID_SPACING) - 1;
  const endJ = Math.floor(viewBottom / GRID_SPACING) + 1;

  // --- Building & park blocks first (so roads can draw on top) ---
  noStroke();
  for (let i = startI; i < endI; i++) {
    for (let j = startJ; j < endJ; j++) {
      const x0 = i * GRID_SPACING + ROAD_WIDTH / 2;
      const x1 = (i + 1) * GRID_SPACING - ROAD_WIDTH / 2;
      const y0 = j * GRID_SPACING + ROAD_WIDTH / 2;
      const y1 = (j + 1) * GRID_SPACING - ROAD_WIDTH / 2;

      const w = x1 - x0;
      const h = y1 - y0;
      if (w <= 0 || h <= 0) continue;

      // Cull blocks completely outside of view
      if (x1 < viewLeft || x0 > viewRight || y1 < viewTop || y0 > viewBottom) continue;

      const cx = (x0 + x1) * 0.5;
      const cy = (y0 + y1) * 0.5;

      // Distance to city center and to the car
      const distFromCenter = dist(cx, cy, 0, 0);
      const distFromCar = dist(cx, cy, car.x, car.y);

      // PERF: Only draw tiny details (windows, park paths) near the car
      const detailedBlock = distFromCar < DETAIL_RADIUS;

      if (isCentralPark(cx, cy) || isSmallParkBlock(i, j, distFromCenter)) {
        drawParkBlock(x0, y0, w, h, i, j, detailedBlock);
      } else {
        if (distFromCenter < MANHATTAN_RADIUS * 0.75) {
          // Dense midtown / downtown
          drawTallBlock(x0, y0, w, h, i, j, detailedBlock);
        } else if (distFromCenter < MANHATTAN_RADIUS * 1.4) {
          // Mixed residential / mid‑rise
          drawMixedBlock(x0, y0, w, h, i, j, detailedBlock);
        } else {
          // Outer boroughs / suburbs
          drawLowBlock(x0, y0, w, h, i, j, detailedBlock);
        }
      }
    }
  }

  // --- Roads on top of blocks ---
  noStroke();
  fill(30); // asphalt

  // Vertical avenues
  for (let i = startI; i <= endI; i++) {
    const x = i * GRID_SPACING;
    rect(x - ROAD_WIDTH / 2, viewTop - padding, ROAD_WIDTH, (viewBottom - viewTop) + 2 * padding);
  }
  // Horizontal streets
  for (let j = startJ; j <= endJ; j++) {
    const y = j * GRID_SPACING;
    rect(viewLeft - padding, y - ROAD_WIDTH / 2, (viewRight - viewLeft) + 2 * padding, ROAD_WIDTH);
  }

  // Lane markings (simple dashed yellow lines)
  stroke(240, 222, 80);
  strokeWeight(2);

  // PERF: Only draw dashed lines on roads near the car
  const laneDetailRadius = GRID_SPACING * 3;

  // Vertical dashes
  for (let i = startI; i <= endI; i++) {
    const x = i * GRID_SPACING;
    if (abs(x - car.x) > laneDetailRadius) continue;
    for (let y = viewTop - padding; y < viewBottom + padding; y += 40) {
      line(x, y, x, y + 20);
    }
  }
  // Horizontal dashes
  for (let j = startJ; j <= endJ; j++) {
    const y = j * GRID_SPACING;
    if (abs(y - car.y) > laneDetailRadius) continue;
    for (let x = viewLeft - padding; x < viewRight + padding; x += 40) {
      line(x, y, x + 20, y);
    }
  }
}
Line-by-line explanation (15 lines)

🔧 Subcomponents:

calculation View Bounds Calculation const viewLeft = car.x - width / 2 - padding;

Calculates the rectangular region visible on screen, including padding for off-screen objects that might become visible soon

for-loop Grid Cell Iteration for (let i = startI; i < endI; i++) { for (let j = startJ; j < endJ; j++) {

Iterates only through grid cells that might be visible, skipping the vast majority of the infinite grid

conditional Block-Level Culling if (x1 < viewLeft || x0 > viewRight || y1 < viewTop || y0 > viewBottom) continue;

Skips rendering blocks completely outside the view rectangle

conditional Building Density Selection if (distFromCenter < MANHATTAN_RADIUS * 0.75) { drawTallBlock(...) }

Selects the building renderer (tall/mixed/low) based on distance from city center

conditional Detail Level Decision const detailedBlock = distFromCar < DETAIL_RADIUS;

Determines whether to draw expensive details (windows, paths) only for blocks near the car

for-loop Road Rendering for (let i = startI; i <= endI; i++) { rect(x - ROAD_WIDTH / 2, ...); }

Renders all visible vertical avenues and horizontal streets as gray rectangles

for-loop Lane Marking Culling if (abs(x - car.x) > laneDetailRadius) continue;

Only draws dashed yellow line markings on roads near the car to save performance

const padding = GRID_SPACING * 2;
Adds a buffer zone around the visible area so blocks just off-screen are prepared before they scroll into view
const viewLeft = car.x - width / 2 - padding;
Calculates the left edge of the visible rectangle in world coordinates
const startI = Math.floor(viewLeft / GRID_SPACING) - 1;
Converts the left view edge into a grid column index (rounded down, minus 1 for safety margin)
for (let i = startI; i < endI; i++) {
Loops through only the grid columns that are visible or near-visible, not the infinite grid
const x0 = i * GRID_SPACING + ROAD_WIDTH / 2;
Calculates the left edge of the block, which starts after the road's left half
const x1 = (i + 1) * GRID_SPACING - ROAD_WIDTH / 2;
Calculates the right edge of the block, ending before the next road's left half
if (w <= 0 || h <= 0) continue;
Skips blocks with zero or negative size (shouldn't happen but guards against division errors)
if (x1 < viewLeft || x0 > viewRight || y1 < viewTop || y0 > viewBottom) continue;
AABB (axis-aligned bounding box) culling: skips blocks completely outside the visible area
const cx = (x0 + x1) * 0.5;
Calculates the block's center point for distance calculations
const distFromCenter = dist(cx, cy, 0, 0);
Measures distance from the block to the city's center (0, 0) to determine building density
const detailedBlock = distFromCar < DETAIL_RADIUS;
A boolean flag: true if the block is close enough to the car to render expensive details like windows
if (distFromCenter < MANHATTAN_RADIUS * 0.75) { drawTallBlock(...); }
If the block is in the dense inner core, render tall skyscrapers
fill(30); // asphalt
Sets fill color to dark gray (RGB: 30,30,30) for road rendering
for (let i = startI; i <= endI; i++) { const x = i * GRID_SPACING;
Loops through vertical road lines, drawing them as tall rectangles between view bounds
if (abs(x - car.x) > laneDetailRadius) continue;
Skips drawing dashed lane markings on roads far from the car (PERF optimization)

drawTallBlock()

drawTallBlock() demonstrates procedural generation using pseudorandom seeding. Instead of storing a building layout in memory, it regenerates the same buildings every time based on grid coordinates. The formula (0.18 + 0.18*r1) for width and (0.28 + 0.38*r2) for height were chosen to create realistic tall buildings. By using large prime multipliers (37, 41, 53, 59), the code ensures different buildings in the same block have uncorrelated sizes and positions.

function drawTallBlock(x0, y0, w, h, i, j, detailed) {
  const margin = 10;

  // Base block (sidewalk + lot)
  fill(65, 75, 90);
  rect(x0 + margin, y0 + margin, w - 2 * margin, h - 2 * margin, 6);

  const base = pseudoRandom(i, j);
  const towerCount = 2 + Math.floor(base * 3); // 2–4 towers

  for (let n = 0; n < towerCount; n++) {
    const r1 = pseudoRandom(i * 37 + n, j * 41 + n);
    const r2 = pseudoRandom(i * 53 + n, j * 59 + n);

    const bw = (w - 2 * margin) * (0.18 + 0.18 * r1);
    const bh = (h - 2 * margin) * (0.28 + 0.38 * r2);
    const bx = x0 + margin + r1 * ((w - 2 * margin) - bw);
    const by = y0 + margin + r2 * ((h - 2 * margin) - bh);

    fill(90 + r1 * 70, 90 + r2 * 40, 105 + r1 * 60);
    rect(bx, by, bw, bh, 4);

    // PERF: Windows only on nearby towers
    if (detailed) {
      drawBuildingWindows(bx, by, bw, bh, i, j, n, true);
    }
  }
}
Line-by-line explanation (11 lines)

🔧 Subcomponents:

function-call Base Color Fill fill(65, 75, 90);

Sets the background color for the block's lot/sidewalk area

calculation Tower Count Seeding const towerCount = 2 + Math.floor(base * 3);

Uses pseudorandom value to deterministically decide 2–4 towers per block

for-loop Tower Placement Loop for (let n = 0; n < towerCount; n++) {

Iterates through each tower in the block, placing them at seeded positions

calculation Procedural Tower Color fill(90 + r1 * 70, 90 + r2 * 40, 105 + r1 * 60);

Uses seeded random values to tint each tower a different shade of blue-gray

const margin = 10;
Adds a 10-pixel border around the block for sidewalk/grass, keeping buildings inset
fill(65, 75, 90);
Sets fill to a dark gray (the lot/pavement color)
rect(x0 + margin, y0 + margin, w - 2 * margin, h - 2 * margin, 6);
Draws the base rectangle inset by margin on all sides, with 6-pixel rounded corners
const base = pseudoRandom(i, j);
Generates a block-level pseudorandom seed (0–1) based on grid coordinates (i, j) so the same block always has the same layout
const towerCount = 2 + Math.floor(base * 3);
Converts the base random value (0–1) into 2–4 towers: Math.floor(0 * 3) to Math.floor(1 * 3) gives 0–3, plus 2 gives 2–5... wait, that's 2–5. Actually Math.floor maps [0,1) to [0,3), so adding 2 gives [2,5), which is 2–4 or sometimes 5. The comment says 2–4 so likely intended as 2–5.
const r1 = pseudoRandom(i * 37 + n, j * 41 + n);
Generates a pseudorandom value (0–1) for the n-th tower's x-position, using large primes (37, 41) to create low correlation with other seeds
const bw = (w - 2 * margin) * (0.18 + 0.18 * r1);
Calculates tower width: (0.18 + 0.18*r1) scales to 0.18–0.36, so width ranges from 18% to 36% of the available block width
const bh = (h - 2 * margin) * (0.28 + 0.38 * r2);
Calculates tower height: (0.28 + 0.38*r2) scales to 0.28–0.66, creating tall buildings (28–66% of block height)
const bx = x0 + margin + r1 * ((w - 2 * margin) - bw);
Places the tower horizontally: starts at x0+margin and offsets by r1 scaled to fit within available space (so it doesn't overlap edges)
fill(90 + r1 * 70, 90 + r2 * 40, 105 + r1 * 60);
Colors the tower using a deterministic tint: adds random amounts (scaled by r1/r2) to base RGB (90,90,105), creating variety while staying bluish-gray
if (detailed) { drawBuildingWindows(...); }
Only draws windows if the block is close to the car (detailed=true), saving performance on distant buildings

drawBuildingWindows()

drawBuildingWindows() is a masterclass in procedural detail. Every window's position, size, and light state is deterministically seeded, so the same building always looks identical. The algorithm distributes windows evenly using gap calculations, then randomly darkens 25% of them to simulate people's lights being on/off. Tall buildings get narrower windows than mid-rise for visual realism. This function is only called when detailed=true (near the car) to keep performance up.

function drawBuildingWindows(bx, by, bw, bh, i, j, n, isTall) {
  const base = pseudoRandom(i * 101 + n * 7, j * 103 + n * 11);
  const cols = 2 + Math.floor(base * 2);      // 2–3 columns
  const rows = 3 + Math.floor(base * 3);      // 3–5 rows

  const marginX = bw * 0.14;
  const marginY = bh * 0.18;

  const areaW = bw - marginX * 2;
  const areaH = bh - marginY * 2;
  if (areaW <= 0 || areaH <= 0) return;

  const windowW = isTall ? 4 : 5;
  const windowH = isTall ? 6 : 5;

  const gapX = (areaW - cols * windowW) / max(cols + 1, 2);
  const gapY = (areaH - rows * windowH) / max(rows + 1, 2);

  fill(255, 240, 200, isTall ? 210 : 180);
  noStroke();

  for (let c = 0; c < cols; c++) {
    for (let r = 0; r < rows; r++) {
      // Some windows off, some on (deterministic)
      const onSeed = pseudoRandom(
        i * 211 + n * 17 + c * 5,
        j * 223 + n * 19 + r * 7
      );
      if (onSeed < 0.25) continue; // window "off"

      const wx = bx + marginX + gapX * (c + 1) + windowW * c;
      const wy = by + marginY + gapY * (r + 1) + windowH * r;
      rect(wx, wy, windowW, windowH, 1);
    }
  }
}
Line-by-line explanation (12 lines)

🔧 Subcomponents:

calculation Window Grid Seeding const cols = 2 + Math.floor(base * 2);

Deterministically decides window grid dimensions based on building index

calculation Interior Margin const marginX = bw * 0.14;

Insets window grid from building edges by 14% of building width

calculation Gap Distribution const gapX = (areaW - cols * windowW) / max(cols + 1, 2);

Distributes remaining space evenly between windows to center them in the building

for-loop Window Grid Rendering for (let c = 0; c < cols; c++) { for (let r = 0; r < rows; r++) {

Iterates through each window position in the grid

conditional Light State Determination if (onSeed < 0.25) continue;

25% of windows stay dark (off), 75% glow with light

const base = pseudoRandom(i * 101 + n * 7, j * 103 + n * 11);
Generates a building-specific seed using large primes (101, 103) and tower index (n) to ensure each tower has a unique window layout
const cols = 2 + Math.floor(base * 2);
Creates 2–3 columns of windows by scaling the base random value (0–1) into 0–2 then adding 2
const rows = 3 + Math.floor(base * 3);
Creates 3–6 rows of windows (or 3–5 with the range, depending on Math.floor rounding)
const marginX = bw * 0.14;
Insets the window grid from the building edge by 14% of building width (roughly 14 pixels if the building is 100 wide)
const areaW = bw - marginX * 2;
Calculates the available horizontal space inside the building after margins
if (areaW <= 0 || areaH <= 0) return;
Exits early if the building is too small to fit any windows
const windowW = isTall ? 4 : 5;
Tall buildings get smaller (4px) windows; mid-rise buildings get slightly larger (5px) windows for visual variety
const gapX = (areaW - cols * windowW) / max(cols + 1, 2);
Calculates spacing between windows: subtracts total window width from available width, then divides by number of gaps (cols+1)
fill(255, 240, 200, isTall ? 210 : 180);
Sets window color to warm yellow (255,240,200) with full opacity (210) for tall buildings or half opacity (180) for mid-rise
const onSeed = pseudoRandom( i * 211 + n * 17 + c * 5, j * 223 + n * 19 + r * 7 );
Generates a unique 0–1 value for each window using coordinates (i,j), tower index (n), and window position (c,r) with high prime multipliers
if (onSeed < 0.25) continue;
If the window's seed is less than 0.25 (25% chance), skip drawing it so it appears dark/off
const wx = bx + marginX + gapX * (c + 1) + windowW * c;
Calculates window x position: start at building x, add left margin, add (c+1) gaps, then add offset for column c's windows

updatePedestrians()

updatePedestrians() manages a pool of pedestrians: spawning them near the car, deleting distant ones, and updating their positions. The backward loop (i--) when deleting is a common bug trap—iterating forward while splicing skips elements, so pros always iterate backward. The clamping logic keeps pedestrians inside blocks (away from roads) by checking block boundaries and turning them when they hit edges. The 1% random turn chance creates organic movement without expensive path-finding.

🔬 This loop removes pedestrians that are too far away. Notice it iterates backward (i--) instead of forward. What would happen if you changed it to for (let i = 0; i < pedestrians.length; i++) and iterated forward instead?

  // Remove pedestrians that are far away from the car
  const maxDist = max(width, height) * 1.8;
  for (let i = pedestrians.length - 1; i >= 0; i--) {
    const p = pedestrians[i];
    if (dist(p.x, p.y, car.x, car.y) > maxDist) {
      pedestrians.splice(i, 1);
    }
  }
function updatePedestrians() {
  // Remove pedestrians that are far away from the car
  const maxDist = max(width, height) * 1.8;
  for (let i = pedestrians.length - 1; i >= 0; i--) {
    const p = pedestrians[i];
    if (dist(p.x, p.y, car.x, car.y) > maxDist) {
      pedestrians.splice(i, 1);
    }
  }

  // Spawn new pedestrians near the car until we hit the target count
  let safety = 0;
  while (pedestrians.length < TARGET_PEDESTRIANS &&
         pedestrians.length < MAX_PEDESTRIANS &&
         safety < 12) {
    spawnPedestrian();
    safety++;
  }

  // Move pedestrians
  const stepMargin = 6;
  for (let p of pedestrians) {
    p.x += cos(p.dir) * p.speed;
    p.y += sin(p.dir) * p.speed;

    // Keep them inside the inner part of a block (off the road)
    const i = Math.floor(p.x / GRID_SPACING);
    const j = Math.floor(p.y / GRID_SPACING);

    const x0 = i * GRID_SPACING + ROAD_WIDTH / 2 + stepMargin;
    const x1 = (i + 1) * GRID_SPACING - ROAD_WIDTH / 2 - stepMargin;
    const y0 = j * GRID_SPACING + ROAD_WIDTH / 2 + stepMargin;
    const y1 = (j + 1) * GRID_SPACING - ROAD_WIDTH / 2 - stepMargin;

    if (x1 > x0 && y1 > y0) {
      if (p.x < x0) {
        p.x = x0;
        p.dir = random([0, PI]);
      } else if (p.x > x1) {
        p.x = x1;
        p.dir = random([0, PI]);
      }

      if (p.y < y0) {
        p.y = y0;
        p.dir = random([HALF_PI, 3 * HALF_PI]);
      } else if (p.y > y1) {
        p.y = y1;
        p.dir = random([HALF_PI, 3 * HALF_PI]);
      }
    }

    // Occasional random turn to wander around
    if (random() < 0.01) {
      const dirChoices = [0, HALF_PI, PI, 3 * HALF_PI];
      p.dir = random(dirChoices);
    }
  }
}
Line-by-line explanation (11 lines)

🔧 Subcomponents:

for-loop Garbage Collection for (let i = pedestrians.length - 1; i >= 0; i--) { if (dist(...) > maxDist) pedestrians.splice(i, 1); }

Removes pedestrians far from the car to prevent memory buildup

while-loop Pedestrian Spawning while (pedestrians.length < TARGET_PEDESTRIANS && safety < 12) { spawnPedestrian(); }

Spawns new pedestrians until reaching target count, with a safety limit to prevent infinite loops

for-loop Pedestrian Movement for (let p of pedestrians) { p.x += cos(p.dir) * p.speed; p.y += sin(p.dir) * p.speed; }

Updates each pedestrian's position based on their direction and speed

conditional Block Boundary Clamping if (p.x < x0) { p.x = x0; p.dir = random([0, PI]); }

Bounces pedestrians off block edges and turns them toward the middle

conditional Random Wandering if (random() < 0.01) { p.dir = random(dirChoices); }

Makes pedestrians occasionally turn randomly to create natural-looking movement patterns

const maxDist = max(width, height) * 1.8;
Calculates the farthest distance a pedestrian can be from the car (1.8× the larger of screen width or height) before being deleted
for (let i = pedestrians.length - 1; i >= 0; i--) {
Iterates backward through the pedestrians array so deletion doesn't skip elements
if (dist(p.x, p.y, car.x, car.y) > maxDist) {
Measures distance from pedestrian to car; if too far, remove them
pedestrians.splice(i, 1);
Removes one element at index i from the array, shrinking the array
while (pedestrians.length < TARGET_PEDESTRIANS && pedestrians.length < MAX_PEDESTRIANS && safety < 12) {
Spawns pedestrians until reaching the target count (50), capped at max (90), with a safety check to prevent infinite loops
p.x += cos(p.dir) * p.speed;
Moves the pedestrian horizontally by cos(direction) * speed, same trigonometric formula as the car
const i = Math.floor(p.x / GRID_SPACING);
Determines which grid block (column i) the pedestrian is in
const x0 = i * GRID_SPACING + ROAD_WIDTH / 2 + stepMargin;
Calculates the left boundary of the pedestrian zone (inside the block, offset from roads)
if (p.x < x0) { p.x = x0; p.dir = random([0, PI]); }
If the pedestrian hits the left block edge, clamp their position to x0 and turn them to face right (0 rad) or left (PI rad)
const dirChoices = [0, HALF_PI, PI, 3 * HALF_PI];
Array of cardinal directions: 0=East, PI/2=South, PI=West, 3*PI/2=North (rounded to the nearest street)
if (random() < 0.01) { p.dir = random(dirChoices); }
1% chance per frame to randomly pick a new cardinal direction, creating natural-looking wandering behavior

drawCar()

drawCar() uses push/pop and transformations to create a local coordinate system for the car. This is a pattern you'll use constantly: define shapes relative to local origin (0,0), apply transforms, then restore. The shadow ellipse slightly offset downward (y=16) grounds the car to the ground plane. The rectMode(CENTER) call ensures all rectangles draw from their center, making rotation around the car's center natural.

function drawCar() {
  push();
  translate(car.x, car.y);
  rotate(car.angle);

  rectMode(CENTER);

  // Shadow under car
  noStroke();
  fill(0, 140);
  ellipse(0, 16, 60, 24);

  // Car body
  stroke(255);
  strokeWeight(1.5);
  fill(220, 40, 40);
  rect(0, 0, 70, 36, 10);

  // Roof / windows
  fill(180, 210);
  rect(10, 0, 26, 24, 6);

  // Taxi‑like stripe
  stroke(250, 230, 120);
  strokeWeight(3);
  line(-22, 0, 22, 0);

  // Headlights
  noStroke();
  fill(255, 255, 200);
  ellipse(35, -10, 6, 6);
  ellipse(35, 10, 6, 6);

  pop();
}
Line-by-line explanation (14 lines)

🔧 Subcomponents:

transform Car Coordinate System push(); translate(car.x, car.y); rotate(car.angle);

Creates a local coordinate system centered on the car facing its direction

drawing Shadow ellipse(0, 16, 60, 24);

Draws a dark ellipse under the car to add depth and ground it to the road

drawing Car Body fill(220, 40, 40); rect(0, 0, 70, 36, 10);

Draws the main red rectangular body of the car

drawing Roof/Windows fill(180, 210); rect(10, 0, 26, 24, 6);

Draws a semi-transparent roof/window area on top of the car body

drawing Taxi Stripe line(-22, 0, 22, 0);

Draws a horizontal yellow line through the middle (classic NYC taxi stripe)

drawing Headlights ellipse(35, -10, 6, 6); ellipse(35, 10, 6, 6);

Draws two yellow circles at the front of the car representing headlights

push();
Saves the current transformation matrix so drawCar's transforms don't affect subsequent drawing
translate(car.x, car.y);
Shifts the coordinate system to the car's world position
rotate(car.angle);
Rotates the coordinate system so the car's local x-axis points in the direction it's facing
rectMode(CENTER);
Tells rect() to interpret its first two arguments as center position (not top-left corner)
fill(0, 140);
Sets fill to black with ~55% opacity (140/255) for the shadow
ellipse(0, 16, 60, 24);
Draws an ellipse centered slightly below (y=16) the car, 60 wide and 24 tall—makes the car look grounded
stroke(255); strokeWeight(1.5); fill(220, 40, 40);
Sets outline to white (1.5px thick) and fill to red (RGB: 220,40,40)
rect(0, 0, 70, 36, 10);
Draws the main car body: 70 pixels long, 36 wide, centered at local origin (0,0), with 10-pixel rounded corners
fill(180, 210);
Semi-transparent gray (RGB: 180,180,210 assuming the last value repeats, though only 2 args given—typo?)
rect(10, 0, 26, 24, 6);
Draws the roof/window area: offset 10 pixels forward, 26 wide, 24 tall, representing windows
stroke(250, 230, 120); strokeWeight(3); line(-22, 0, 22, 0);
Draws a thick yellow line from -22 to +22 on the x-axis through the center (classic taxi stripe)
fill(255, 255, 200);
Sets fill to warm pale yellow for the headlights
ellipse(35, -10, 6, 6); ellipse(35, 10, 6, 6);
Draws two 6-pixel circles at the front (x=35) of the car, one above (y=-10) and one below (y=+10) the centerline
pop();
Restores the saved transformation so subsequent drawing isn't rotated/translated

pseudoRandom()

pseudoRandom(a, b) is a Perlin-noise-like seeding function used throughout the sketch to make procedurally generated content consistent. The coefficients 127.1, 311.7, and 43758.5453 are not magic—they're just chosen to be irrational and large enough that different (a, b) pairs produce different results. This function enables infinite procedural generation: instead of storing the layout of every building, the code regenerates it the same way every frame based on grid coordinates.

// Deterministic pseudo‑random 0–1 based on two integers
function pseudoRandom(a, b) {
  const x = Math.sin(a * 127.1 + b * 311.7) * 43758.5453;
  return x - Math.floor(x);
}
Line-by-line explanation (2 lines)

🔧 Subcomponents:

calculation Sine Hashing const x = Math.sin(a * 127.1 + b * 311.7) * 43758.5453;

Converts integer inputs into a large float via sine, using prime-like coefficients to spread values

calculation Fractional Extraction return x - Math.floor(x);

Extracts the decimal part of x to produce a value between 0 and 1

const x = Math.sin(a * 127.1 + b * 311.7) * 43758.5453;
This line is a classic procedural generation trick. Math.sin of any large number bounces between -1 and 1 chaotically. By multiplying the inputs (a, b) by large irrational coefficients (127.1, 311.7) and scaling by 43758.5453, we get a huge pseudo-random float. The same inputs always produce the same output (deterministic), so the same city block always looks identical.
return x - Math.floor(x);
Math.floor(x) rounds down to the nearest integer. Subtracting it from x leaves only the decimal part (e.g., 12.73 - 12 = 0.73), which is always in the range [0, 1)

drawHUD()

drawHUD() renders the game's user interface on top of the world: text instructions, speed readout, and a minimap. The minimap is especially interesting—it uses coordinate conversion functions (worldToMapX/Y) to convert world coordinates to screen space, then scales them to fit a small circle. The nf() function formats numbers (2 digits, 0 decimals for mph). This is a common game dev pattern: update and render world state, then overlay fixed-position UI on top.

function drawHUD() {
  fill(255);
  noStroke();
  textSize(16);
  textAlign(LEFT, TOP);

  const speedMph = abs(car.speed) * 4; // fake mph from speed value
  const lines = [
    'Drive around a NYC‑style grid',
    'Keys: arrows / WASD to drive',
    'Touch: left joystick + right GAS',
    '',
    'Speed: ' + nf(speedMph, 2, 0) + ' mph',
    'People nearby: ' + pedestrians.length
  ];
  text(lines.join('\n'), 16, 16);

  // Simple mini‑map showing where you are relative to "Manhattan"
  const r = 50;
  const cx = width - 80;
  const cy = 80;

  // Outer circle
  noFill();
  stroke(255, 180);
  strokeWeight(1);
  circle(cx, cy, r * 2);

  // Scale from world → minimap
  const mapScale = r / (MANHATTAN_RADIUS * 1.5);

  const worldToMapX = (wx) => cx + wx * mapScale;
  const worldToMapY = (wy) => cy + wy * mapScale;

  // "Central Park" area on mini‑map
  const parkTop = -GRID_SPACING * 5;
  const parkBottom = -GRID_SPACING * 1;
  const parkLeft = -GRID_SPACING * 1.6;
  const parkRight = GRID_SPACING * 1.6;

  noStroke();
  fill(40, 140, 80, 160);
  const pX = worldToMapX(parkLeft);
  const pY = worldToMapY(parkTop);
  const pW = worldToMapX(parkRight) - pX;
  const pH = worldToMapY(parkBottom) - pY;
  rect(pX, pY, pW, pH, 4);

  // Car position on mini‑map
  fill(255, 80, 80);
  const mx = worldToMapX(car.x);
  const my = worldToMapY(car.y);
  circle(mx, my, 6);

  // North indicator
  stroke(255);
  strokeWeight(1);
  line(cx, cy - r, cx, cy - r - 8);
  noStroke();
  textAlign(CENTER, BOTTOM);
  textSize(12);
  fill(255);
  text('N', cx, cy - r - 10);
}
Line-by-line explanation (13 lines)

🔧 Subcomponents:

text-rendering Speed Readout const speedMph = abs(car.speed) * 4;

Converts the internal speed value to a fake mph for the HUD display

text-rendering Info Text text(lines.join('\n'), 16, 16);

Renders instructions and game state as multi-line text in the top-left corner

calculation Minimap Scaling const mapScale = r / (MANHATTAN_RADIUS * 1.5);

Calculates how many screen pixels equal one world unit on the minimap

calculation Coordinate Conversion const worldToMapX = (wx) => cx + wx * mapScale;

Arrow function to convert world coordinates to minimap screen coordinates

drawing Central Park Rendering fill(40, 140, 80, 160); rect(pX, pY, pW, pH, 4);

Renders Central Park as a green rectangle on the minimap

drawing Car Position Marker fill(255, 80, 80); circle(mx, my, 6);

Draws the car as a small red dot on the minimap

fill(255); noStroke(); textSize(16); textAlign(LEFT, TOP);
Sets text color to white, size to 16pt, aligned to top-left corner
const speedMph = abs(car.speed) * 4;
Converts the internal speed (0–12) to fake mph (0–48) by multiplying by 4. abs() ensures reverse speed shows as positive
const lines = [ 'Drive around a NYC‑style grid', ... ];
Creates an array of strings including instructions and live game info
text(lines.join('\n'), 16, 16);
Joins the array into a multi-line string (separated by newlines) and renders it at screen position (16, 16)
const r = 50; const cx = width - 80; const cy = 80;
Sets up the minimap: 50-pixel radius, centered at (width-80, 80) in screen space
circle(cx, cy, r * 2);
Draws the minimap's outer boundary as a circle with diameter 2r (diameter not radius in p5.js)
const mapScale = r / (MANHATTAN_RADIUS * 1.5);
Calculates the ratio of screen pixels to world units. Smaller ratio = zoomed out on minimap
const worldToMapX = (wx) => cx + wx * mapScale;
Defines an arrow function that converts world x-coordinate to minimap screen x-coordinate
const pX = worldToMapX(parkLeft);
Converts the park's left world boundary to minimap screen coordinates
fill(40, 140, 80, 160); rect(pX, pY, pW, pH, 4);
Renders Central Park on the minimap as a green rectangle with some transparency
fill(255, 80, 80); circle(mx, my, 6);
Draws the car's position on the minimap as a small red dot
line(cx, cy - r, cx, cy - r - 8);
Draws a line pointing north (upward) from the top of the minimap circle
text('N', cx, cy - r - 10);
Labels the north indicator with the letter 'N'

📦 Key Variables

car object

Stores the player's vehicle: position (x, y), angle (rotation), speed, and physics parameters (maxSpeed, accel, friction, turnRate)

let car = { x: 0, y: 0, angle: 0, speed: 0, maxSpeed: 12, accel: 0.4, friction: 0.08, turnRate: 0.06 };
inputForward, inputBackward, inputLeft, inputRight boolean

Four flags that track whether the player is pressing accelerate, brake, turn-left, or turn-right this frame

let inputForward = false;
joystick object

Touch control state: center position (x, y), visual sizes (baseRadius, knobRadius), current offset (dx, dy), and active flag

let joystick = { x: 0, y: 0, baseRadius: 70, knobRadius: 32, dx: 0, dy: 0, active: false };
gasButton object

Touch gas button state: center position (x, y), radius, and pressed flag

let gasButton = { x: 0, y: 0, radius: 55, pressed: false };
pedestrians array of objects

Dynamic array of all pedestrians currently active near the car, each with position (x, y), direction, speed, size, and color

let pedestrians = []; // filled by spawnPedestrian()
GRID_SPACING number

Distance between major streets/avenues in pixels—determines the size of city blocks

const GRID_SPACING = 220;
ROAD_WIDTH number

Width of streets in pixels

const ROAD_WIDTH = 60;
MANHATTAN_RADIUS number

Distance from city center (0,0) that defines how far the dense downtown extends; controls building density zones

const MANHATTAN_RADIUS = 10 * GRID_SPACING;
DETAIL_RADIUS number

Distance from the car at which detailed features (windows, park paths) are drawn; farther buildings have no details

const DETAIL_RADIUS = GRID_SPACING * 2.8;
TARGET_PEDESTRIANS, MAX_PEDESTRIANS number

Spawn system tries to keep around TARGET_PEDESTRIANS (50) active, capped at MAX_PEDESTRIANS (90) for performance

const TARGET_PEDESTRIANS = 50; const MAX_PEDESTRIANS = 90;
PEDESTRIAN_COLORS array of objects

Array of RGB color objects used to randomly color pedestrians for visual variety

const PEDESTRIAN_COLORS = [ { r: 245, g: 230, b: 140 }, ... ];

🔧 Potential Improvements (5)

Here are some ways this code could be enhanced:

PERFORMANCE drawBuildingWindows()

Window rendering uses many pseudoRandom() calls (one per window per frame), which is computationally expensive. When many buildings are on screen with windows, this can cause frame drops.

💡 Cache the window layout for each building using the block's (i, j) coordinates as a key. Generate windows once and store them in an object; reuse that layout instead of recalculating every frame.

BUG updatePedestrians() boundary clamping

When a pedestrian hits a block edge, their direction is set to a random cardinal direction. However, if they're at a corner (hitting both x and y boundaries), they might bounce twice in one frame, leading to unpredictable behavior.

💡 Separate x and y boundary checks into different code paths, or check both before applying any direction change to avoid double-bouncing.

FEATURE updateCar()

The car's steering response is speed-dependent (car.angle += turn * (car.speed / car.maxSpeed)) which is realistic but can feel unresponsive at low speeds. New players may struggle to steer while parking.

💡 Add a minimum steering multiplier (e.g., always at least 0.5× max turn rate even when stopped) to allow responsive steering when parked, while keeping high-speed steering realistic.

STYLE Global constants

Magic numbers like 0.75, 1.4, 1.6 for building density thresholds and park bounds are scattered throughout drawCity() and isCentralPark(). These are hard-coded and difficult to tweak.

💡 Define these as named constants at the top: const MIDTOWN_INNER_RADIUS = MANHATTAN_RADIUS * 0.75, const RESIDENTIAL_RADIUS = MANHATTAN_RADIUS * 1.4, etc. This makes the code more self-documenting and easier to experiment with.

BUG drawCity() lane marking loop

Lane markings are drawn only if abs(x - car.x) < laneDetailRadius. At very high car speeds, this distance check might incorrectly cull nearby lane markings if the car moves more than laneDetailRadius in a single frame.

💡 Use a slightly larger culling radius or check if the lane line intersects the visible area rather than just the car's position.

🔄 Code Flow

Code flow showing setup, draw, updateinput, updatecar, drawcity, drawtallblock, drawbuildingwindows, updatepedestrians, drawcar, pseudorandom, drawhud

💡 Click on function names in the diagram to jump to their code

graph TD start[Start] --> setup[setup] setup --> canvas-creation[Canvas Setup] setup --> car-initialization[Car Object Initialization] setup --> ui-layout[Touch Control Positioning] setup --> draw[draw loop] click setup href "#fn-setup" click canvas-creation href "#sub-canvas-creation" click car-initialization href "#sub-car-initialization" click ui-layout href "#sub-ui-layout" draw --> clear-screen[Clear Background] draw --> reset-flags[Reset Input Flags] draw --> input-update[Process Input] draw --> physics-update[Update Physics] draw --> camera-transform[Camera Translation] draw --> world-drawing[Draw World Contents] draw --> hud-drawing[Draw Screen Overlay] click draw href "#fn-draw" click clear-screen href "#sub-clear-screen" click reset-flags href "#sub-reset-flags" click input-update href "#sub-input-update" click physics-update href "#sub-physics-update" click camera-transform href "#sub-camera-transform" click world-drawing href "#sub-world-drawing" click hud-drawing href "#sub-hud-drawing" input-update --> keyboard-check[Keyboard Input Detection] input-update --> joystick-distance[Joystick Distance Calculation] input-update --> joystick-normalization[Normalize Joystick Vector] input-update --> gas-collision[Gas Button Touch Detection] click keyboard-check href "#sub-keyboard-check" click joystick-distance href "#sub-joystick-distance" click joystick-normalization href "#sub-joystick-normalization" click gas-collision href "#sub-gas-collision" physics-update --> acceleration[Acceleration] physics-update --> braking[Braking] physics-update --> speed-limit[Speed Constraint] physics-update --> steering[Speed-Dependent Steering] physics-update --> friction[Friction Deceleration] physics-update --> movement[Position Update] click acceleration href "#sub-acceleration" click braking href "#sub-braking" click speed-limit href "#sub-speed-limit" click steering href "#sub-steering" click friction href "#sub-friction" click movement href "#sub-movement" world-drawing --> view-culling[View Bounds Calculation] world-drawing --> grid-iteration[Grid Cell Iteration] world-drawing --> block-culling[Block-Level Culling] world-drawing --> density-selection[Building Density Selection] world-drawing --> detail-level[Detail Level Decision] world-drawing --> road-drawing[Road Rendering] world-drawing --> lane-marking[Lane Marking Culling] click view-culling href "#sub-view-culling" click grid-iteration href "#sub-grid-iteration" click block-culling href "#sub-block-culling" click density-selection href "#sub-density-selection" click detail-level href "#sub-detail-level" click road-drawing href "#sub-road-drawing" click lane-marking href "#sub-lane-marking" drawcity --> drawtallblock[drawTallBlock] drawcity --> drawbuildingwindows[drawBuildingWindows] click drawcity href "#fn-drawcity" click drawtallblock href "#fn-drawtallblock" click drawbuildingwindows href "#fn-drawbuildingwindows" drawtallblock --> base-color[Base Color Fill] drawtallblock --> tower-count[Tower Count Seeding] drawtallblock --> tower-loop[Tower Placement Loop] drawtallblock --> tower-color[Procedural Tower Color] click base-color href "#sub-base-color" click tower-count href "#sub-tower-count" click tower-loop href "#sub-tower-loop" click tower-color href "#sub-tower-color" drawbuildingwindows --> grid-seeding[Window Grid Seeding] drawbuildingwindows --> margin-calc[Interior Margin] drawbuildingwindows --> gap-distribution[Gap Distribution] drawbuildingwindows --> window-rendering[Window Grid Rendering] drawbuildingwindows --> light-state[Light State Determination] click grid-seeding href "#sub-grid-seeding" click margin-calc href "#sub-margin-calc" click gap-distribution href "#sub-gap-distribution" click window-rendering href "#sub-window-rendering" click light-state href "#sub-light-state" updatepedestrians --> garbage-collection[Garbage Collection] updatepedestrians --> spawning-loop[Pedestrian Spawning] updatepedestrians --> movement[Pedestrian Movement] updatepedestrians --> boundary-clamping[Block Boundary Clamping] updatepedestrians --> wandering[Random Wandering] click garbage-collection href "#sub-garbage-collection" click spawning-loop href "#sub-spawning-loop" click movement href "#sub-movement" click boundary-clamping href "#sub-boundary-clamping" click wandering href "#sub-wandering" drawcar --> transform-setup[Car Coordinate System] drawcar --> shadow[Shadow] drawcar --> body[Car Body] drawcar --> roof[Roof/Windows] drawcar --> stripe[Taxi Stripe] drawcar --> headlights[Headlights] click transform-setup href "#sub-transform-setup" click shadow href "#sub-shadow" click body href "#sub-body" click roof href "#sub-roof" click stripe href "#sub-stripe" click headlights href "#sub-headlights" drawhud --> speed-display[Speed Readout] drawhud --> info-text[Info Text] drawhud --> minimap-scale[Minimap Scaling] drawhud --> world-to-map[Coordinate Conversion] drawhud --> park-drawing[Central Park Rendering] drawhud --> car-marker[Car Position Marker] click speed-display href "#sub-speed-display" click info-text href "#sub-info-text" click minimap-scale href "#sub-minimap-scale" click world-to-map href "#sub-world-to-map" click park-drawing href "#sub-park-drawing" click car-marker href "#sub-car-marker"

❓ Frequently Asked Questions

What visual experience does the 'just drive' p5.js sketch create?

The 'just drive' sketch simulates driving around a NYC-style grid, featuring a dark nighttime cityscape populated with pedestrians and a driving car that responds to user inputs.

How can users interact with the 'just drive' sketch?

Users can interact with the sketch using touch controls, including a joystick for steering and a gas button to accelerate the car.

What creative coding techniques are demonstrated in the 'just drive' sketch?

The sketch showcases techniques such as real-time physics simulation for vehicle movement, dynamic pedestrian generation, and responsive touch-based controls.

Preview

just drive - p5.js creative coding sketch preview
Sketch Preview
Code flow diagram showing the structure of just drive - Code flow showing setup, draw, updateinput, updatecar, drawcity, drawtallblock, drawbuildingwindows, updatepedestrians, drawcar, pseudorandom, drawhud
Code Flow Diagram
