killer monkey 2.0

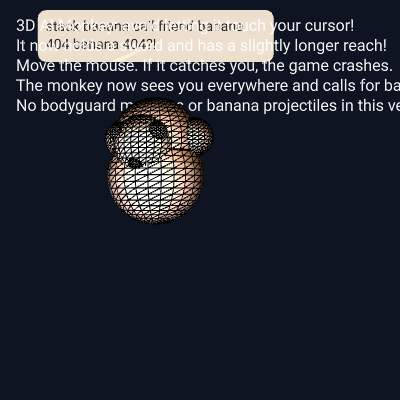
This sketch creates a single aggressive 3D monkey wielding a sword that relentlessly chases your mouse cursor across a dark, glowing space. The monkey uses steering AI to predict and hunt your movements, speaking in glitchy banana-themed phrases, until it catches you and crashes the game.

🧪 Try This!

Experiment with the code by making these changes:

  1. Make the monkey twice as fast — Increasing maxSpeed makes the monkey chase harder and faster, raising the difficulty.
  2. Make the monkey predict further ahead — Increasing the lead multiplier makes the monkey aim further in front of your cursor, anticipating your movements.
  3. Change the sword's reach to be huge — Multiplying the catchRadius by a larger number extends the sword's threat zone, making the game harder.
  4. Make the monkey bob up and down faster — Changing the sine wave frequency makes the bobbing animation snappier, adding more energy.
  5. Turn off the word wrapping in speech bubbles — Setting maxWidth very large lets phrases stretch across the screen instead of breaking into multiple lines.
  6. Make the monkey speak way more often — Lowering PHRASE_INTERVAL makes new speech appear every second instead of every 3 seconds.
Prefer the full editor? Open it there →

📖 About This Sketch

Killer Monkey 2.0 places you in a dark space with a single mischievous 3D monkey that never stops hunting your cursor. The sketch demonstrates advanced p5.js techniques: WEBGL 3D geometry with lighting, steering AI using vectors, and mouse-tracking behavior. As you move, the monkey predicts your path, speaks random glitchy phrases, and tries to catch you with its sword. When it succeeds, the canvas crashes with a dramatic error screen.

The code is organized around a central Monkey class that handles AI movement, 3D rendering, and state management, plus helper functions for speech, collision, and crash effects. By studying it, you will learn how to build an interactive 3D character, implement steering algorithms that make enemies feel intelligent, overlay 2D text on WEBGL scenes, and create emergent gameplay from simple rules.

⚙️ How It Works

  1. When the sketch loads, setup() creates a WEBGL canvas and instantiates a single Monkey object positioned near the center, then calls newMonkeyPhrase() to seed the first bit of dialogue.
  2. Every frame, draw() clears the background and sets up 3D lighting (ambient light plus a warm point light that follows the monkey), then computes a predicted target position by extrapolating the mouse's velocity slightly ahead.
  3. The main monkey updates its position using the seek() steering method, which calculates a force that pulls it toward the predicted target while limiting acceleration and velocity to create natural-feeling movement.
  4. The monkey's 3D body—made of nested spheres for head, body, ears, eyes with pupils that track the mouse, and a sword in front—is drawn in 3D space, then the coordinate system resets to overlay a 2D speech bubble above the monkey.
  5. Every 180 frames (or when state changes), newMonkeyPhrase() picks 3–6 random words from the chase and glitch pools, concatenates them, and adds random punctuation to create the monkey's mischievous dialogue.
  6. Collision detection checks if the distance between the monkey and the cursor falls below the sword's reach radius; if so, triggerCrash() switches the game state and noLoop() freezes the animation, while drawCrashScreen() shows a flickering error message.

🎓 Concepts You'll Learn

3D rendering (WEBGL)Steering behavior (AI pursuit)Vector math (velocity, acceleration, forces)Mouse tracking and collision detectionState management (play vs. crashed)2D/3D coordinate transformsLighting and material renderingObject-oriented design (Monkey class)

📝 Code Breakdown

preload()

preload() is called before setup() and is the right place to load assets like fonts, images, and sound files. Without it, text() might use a fallback font.

function preload() {
  uiFont = loadFont(
    "https://cdn.jsdelivr.net/fontsource/fonts/roboto@latest/latin-400-normal.woff"
  );
}
Line-by-line explanation (1 lines)
uiFont = loadFont(
Loads a web font file (Roboto) that will be used for all text rendering—p5.js needs fonts to be pre-loaded before setup() or text won't display properly.

setup()

setup() runs once before the draw loop begins. It is where you initialize your canvas, create objects, load assets, and set up initial state.

function setup() {
  // WEBGL renderer for 3D
  createCanvas(windowWidth, windowHeight, WEBGL);

  // Create the initial monkey (main monkey)
  monkeys.push(new Monkey(width * 0.5, height * 0.5));

  // Removed: Creation of bodyguard monkey

  textFont(uiFont);
  textSize(16);
  textAlign(CENTER, CENTER);

  lastMouseX = mouseX;
  lastMouseY = mouseY;

  newMonkeyPhrase("chase"); // Start with the main monkey chasing
}
Line-by-line explanation (5 lines)

🔧 Subcomponents:

initialization WEBGL Canvas Creation createCanvas(windowWidth, windowHeight, WEBGL);

Creates a full-screen 3D canvas instead of the default 2D canvas—necessary for the monkey's 3D sphere-based geometry and lighting.

initialization Main Monkey Creation monkeys.push(new Monkey(width * 0.5, height * 0.5));

Creates a single Monkey object at the center of the canvas and adds it to the monkeys array for updates and rendering.

initialization Text Configuration textFont(uiFont); textSize(16); textAlign(CENTER, CENTER);

Prepares the loaded font, sets a default text size, and centers text alignment for UI and speech bubbles.

createCanvas(windowWidth, windowHeight, WEBGL);
Creates a full-screen canvas using the WEBGL renderer (the third argument), which enables 3D drawing, lighting, and transformations.
monkeys.push(new Monkey(width * 0.5, height * 0.5));
Constructs a new Monkey at the center of the canvas and adds it to the monkeys array—even though there's only one monkey, the array structure allows the code to scale.
textFont(uiFont);
Tells p5.js to use the Roboto font (loaded in preload) for all subsequent text() calls.
lastMouseX = mouseX;
Records the mouse's starting position so the next frame can calculate the mouse's velocity (how far it moved) for AI prediction.
newMonkeyPhrase("chase");
Generates the monkey's first phrase by calling the phrase generator with the 'chase' mode, seeding the currentPhrase variable.

draw()

draw() runs continuously at 60 frames per second. This is the main game loop—it dispatches to other functions based on game state, creating the illusion of continuous animation.

🔬 The draw() function is the heartbeat of your animation—it runs 60 times per second. What would happen if you added a second drawScene() call, so it runs twice per frame? Why might that be wasteful?

  if (gameState === "play") {
    drawScene();
  } else if (gameState === "crashed") {
    drawCrashScreen();
    noLoop();
function draw() {
  if (gameState === "play") {
    drawScene();
  } else if (gameState === "crashed") {
    drawCrashScreen();
    noLoop(); // Freeze everything = "crash"
  }
}
Line-by-line explanation (5 lines)

🔧 Subcomponents:

conditional Game State Dispatch if (gameState === "play") { drawScene(); } else if (gameState === "crashed") { drawCrashScreen(); noLoop();

Branches between two game states—'play' runs the main game loop, while 'crashed' shows an error screen and freezes animation.

if (gameState === "play") {
Checks whether the game is in play mode—if the monkey hasn't caught you yet, this is true.
drawScene();
Calls the main drawing function that updates the monkey, renders 3D geometry, checks collisions, and draws the UI.
} else if (gameState === "crashed") {
If the monkey caught you, this branch executes instead.
drawCrashScreen();
Draws the crash screen with red text and flickering error squares.
noLoop();
Stops the draw loop from running any more frames, freezing the animation permanently.

drawScene()

drawScene() is the core gameplay function—it updates the monkey's position, renders it, checks for collisions, and manages speech timing. Understanding this function is key to modifying the game's feel.

🔬 This code predicts where you're going by looking at where you moved last frame. What happens if you set the multiplier to 0, so lead is always (0, 0)? Why might that make the game easier or harder?

  // Compute cursor "future" target for slightly smarter chase
  const mouseVel = createVector(mouseX - lastMouseX, mouseY - lastMouseY);
  let target = createVector(mouseX, mouseY);
  if (mouseVel.mag() > 0.5) {
    // Predict a bit ahead in the direction of motion
    const lead = mouseVel.copy().mult(12);
    target.add(lead);
  }

🔬 This loop checks distance to the cursor. What if you changed the condition to > instead of <? (Or added 500 to catchRadius?) What would the game feel like?

  const catchRadius = mainMonkey.size * 0.6;
  for (let monkey of monkeys) {
    const dToMouse = dist(monkey.pos.x, monkey.pos.y, mouseX, mouseY);
    if (dToMouse < catchRadius) {
      triggerCrash();
      return;
function drawScene() {
  // Simple background instead of heavy per-frame gradient
  background(15, 20, 35);

  // Lighting for 3D monkey
  ambientLight(80);
  directionalLight(200, 200, 230, 0.3, -0.7, -1);

  // Compute cursor "future" target for slightly smarter chase
  const mouseVel = createVector(mouseX - lastMouseX, mouseY - lastMouseY);
  let target = createVector(mouseX, mouseY);
  if (mouseVel.mag() > 0.5) {
    // Predict a bit ahead in the direction of motion
    const lead = mouseVel.copy().mult(12);
    target.add(lead);
  }

  // --- Main Monkey Logic (monkeys[0]) ---
  const mainMonkey = monkeys[0];

  // Warm point light following the main monkey
  pointLight(
    255, 190, 150,
    mainMonkey.pos.x - width / 2,
    mainMonkey.pos.y - height / 2,
    250
  );

  // The main monkey always chases the cursor, seeing it everywhere
  mainMonkey.setState("chasing");

  // AI movement for main monkey
  mainMonkey.update(target);
  mainMonkey.display3D();

  // Speech bubble logic for main monkey
  phraseTimer--;
  if (mainMonkey.justChangedState) {
    newMonkeyPhrase("chase"); // Always use chase phrases
    mainMonkey.justChangedState = false;
    phraseTimer = PHRASE_INTERVAL;
  } else if (phraseTimer <= 0) {
    newMonkeyPhrase("chase"); // Always use chase phrases
    phraseTimer = PHRASE_INTERVAL;
  }

  // After 3D drawing, switch to a 2D-style overlay
  resetMatrix();
  translate(-width / 2, -height / 2, 0);
  noLights();

  // Speech bubble (2D overlay) for main monkey
  drawSpeechBubble(
    mainMonkey.pos.x,
    mainMonkey.pos.y - mainMonkey.size * 0.8,
    currentPhrase
  );

  // Removed: Bodyguard Monkey Logic (monkeys[1])

  // --- Main Monkey Backup Trigger Logic ---
  // Ensure only the main monkey (monkeys[0]) can call for backup
  // And ensure the bodyguard is currently off-screen (inactive)
  if (monkeys[0].state === "chasing") {
    const dToMouse = dist(monkeys[0].pos.x, monkeys[0].pos.y, mouseX, mouseY);
    // Trigger backup every 15 seconds (900 frames) if backupCooldown is over
    // AND the main monkey is far from the cursor (can't catch you)
    if (backupCooldown <= 0 && dToMouse > width * 0.3) { // Use width * 0.3 as a reasonable "far" threshold
      // Removed: activateBodyguard() call
      backupCooldown = 900; // Reset cooldown to 15 seconds (900 frames)
      newMonkeyPhrase("backup"); // Main monkey says backup phrase
      console.log("Main monkey called for backup! (but no one arrived)");
    }
  }
  backupCooldown = max(0, backupCooldown - 1); // Decrement cooldown every frame

  // Console logging to help debug backup
  // console.log("dToMouse:", dToMouse.toFixed(0), "backupCooldown:", backupCooldown);

  // Removed: Projectile Logic

  // --- Collision Detection for ALL Monkeys ---
  // Increased catchRadius to account for the sword's reach
  const catchRadius = mainMonkey.size * 0.6;
  for (let monkey of monkeys) {
    const dToMouse = dist(monkey.pos.x, monkey.pos.y, mouseX, mouseY);
    if (dToMouse < catchRadius) {
      triggerCrash();
      return; // End draw loop immediately if caught
    }
  }

  // UI / Instructions
  drawHUD();

  // Save last mouse for next frame
  lastMouseX = mouseX;
  lastMouseY = mouseY;
}
Line-by-line explanation (16 lines)

🔧 Subcomponents:

initialization 3D Lighting ambientLight(80); directionalLight(200, 200, 230, 0.3, -0.7, -1); pointLight( 255, 190, 150, mainMonkey.pos.x - width / 2, mainMonkey.pos.y - height / 2, 250 );

Sets up the 3D lighting environment—ambient provides base illumination, directional mimics sunlight, and the point light follows the monkey to highlight it warmly.

calculation AI Target Prediction const mouseVel = createVector(mouseX - lastMouseX, mouseY - lastMouseY); let target = createVector(mouseX, mouseY); if (mouseVel.mag() > 0.5) { const lead = mouseVel.copy().mult(12); target.add(lead); }

Calculates the mouse's velocity and predicts where it will be 12 pixels ahead—this makes the monkey aim slightly in front of you instead of directly at you.

conditional Speech Generation Timing phraseTimer--; if (mainMonkey.justChangedState) { newMonkeyPhrase("chase"); mainMonkey.justChangedState = false; phraseTimer = PHRASE_INTERVAL; } else if (phraseTimer <= 0) { newMonkeyPhrase("chase"); phraseTimer = PHRASE_INTERVAL; }

Decrements the phrase timer every frame and generates new speech either when the monkey's state changes or when the timer expires (every 180 frames).

conditional Backup Call Logic if (monkeys[0].state === "chasing") { const dToMouse = dist(monkeys[0].pos.x, monkeys[0].pos.y, mouseX, mouseY); if (backupCooldown <= 0 && dToMouse > width * 0.3) { backupCooldown = 900; newMonkeyPhrase("backup"); console.log("Main monkey called for backup! (but no one arrived)"); } }

Every 15 seconds (900 frames), if the monkey is far from you and the cooldown has elapsed, it shouts a backup phrase and resets the cooldown timer.

conditional Collision Detection const catchRadius = mainMonkey.size * 0.6; for (let monkey of monkeys) { const dToMouse = dist(monkey.pos.x, monkey.pos.y, mouseX, mouseY); if (dToMouse < catchRadius) { triggerCrash(); return; } }

Loops through all monkeys and checks if any are within the sword's reach of the cursor—if so, triggers the crash state immediately.

background(15, 20, 35);
Clears the canvas with a dark blue-gray color every frame, erasing the previous frame so you don't see motion trails.
ambientLight(80);
Adds base lighting to the entire scene so the monkey is visible—without this, 3D objects would be pitch black.
directionalLight(200, 200, 230, 0.3, -0.7, -1);
Simulates a distant light source (like the sun) coming from direction (0.3, -0.7, -1), casting cool blue-white light on the monkey.
const mouseVel = createVector(mouseX - lastMouseX, mouseY - lastMouseY);
Creates a vector showing how far the mouse moved this frame (current position minus last frame's position).
if (mouseVel.mag() > 0.5) {
Only applies leading prediction if the mouse is moving; if it's still, aim directly at it.
const lead = mouseVel.copy().mult(12);
Multiplies the velocity by 12 to predict 12 pixels ahead—change this number to make the prediction more or less aggressive.
mainMonkey.setState("chasing");
Forces the monkey into 'chasing' state every frame (in this version, it never does anything else).
mainMonkey.update(target);
Updates the monkey's position by applying steering forces toward the predicted target.
mainMonkey.display3D();
Renders the monkey's 3D geometry (spheres, lighting, sword) at its current position.
phraseTimer--;
Decrements the speech timer by 1 every frame, counting down from 180 to 0.
resetMatrix();
Resets all 3D transforms so subsequent 2D drawing isn't rotated or translated—necessary to overlay the speech bubble correctly.
translate(-width / 2, -height / 2, 0);
Translates back to normal screen coordinates for 2D drawing (WEBGL's origin is at the center, but we want (0,0) at the top-left).
noLights();
Disables 3D lighting for 2D overlay drawing, so the speech bubble appears at consistent brightness.
const catchRadius = mainMonkey.size * 0.6;
Defines the sword's threat radius as 60% of the monkey's size—adjust this to make the sword longer or shorter.
if (dToMouse < catchRadius) {
If the cursor gets within the catchRadius, the monkey's sword touches you.
lastMouseX = mouseX;
Saves the current mouse position so next frame can calculate velocity.

Monkey class (constructor and core methods)

The Monkey class encapsulates all the monkey's data (position, velocity, state) and methods (update, seek, display3D). This object-oriented design makes it easy to manage multiple monkeys or modify behavior.

class Monkey {
  constructor(x, y) { // Removed isBackup parameter
    // Keep positions in 2D screen coordinates (0..width, 0..height)
    this.pos = createVector(x, y);
    this.vel = p5.Vector.random2D().mult(2);
    this.acc = createVector(0, 0);

    // All monkeys now behave like the original main monkey
    this.maxSpeed = 4.0;
    this.maxForce = 0.2;

    this.size = 120; // All monkeys are the same size

    this.state = "chasing";   // Now always chasing
    this.justChangedState = false;

    // Removed: this.isBackup property
    // Removed: this.fireCooldown property

    // For wandering behavior (not used in this version, but kept for context)
    this.wanderTheta = random(TWO_PI);
  }
Line-by-line explanation (7 lines)

🔧 Subcomponents:

initialization Position and Velocity this.pos = createVector(x, y); this.vel = p5.Vector.random2D().mult(2);

Sets the monkey's starting position and gives it a random initial velocity so it doesn't start perfectly still.

initialization AI Movement Parameters this.maxSpeed = 4.0; this.maxForce = 0.2;

Limits how fast the monkey can move (maxSpeed) and how quickly it can change direction (maxForce)—key tuning values for the AI.

this.pos = createVector(x, y);
Stores the monkey's position as a 2D vector—this persists between frames and is updated every frame by the update() method.
this.vel = p5.Vector.random2D().mult(2);
Gives the monkey an initial velocity in a random direction with magnitude 2—this prevents it from just sitting still at the start.
this.acc = createVector(0, 0);
Initializes acceleration to zero—steering forces will add to this every frame, then it's reset.
this.maxSpeed = 4.0;
The monkey will never exceed this speed—it's a ceiling on how fast it can move toward you.
this.maxForce = 0.2;
Limits how much steering force is applied each frame—higher values make sharper, more responsive turns.
this.size = 120; // All monkeys are the same size
The diameter of the monkey's body spheres and the scale of all its features—used throughout display3D() for proportions.
this.state = "chasing"; // Now always chasing
The monkey's current behavior state—in this version, it never changes from 'chasing'.

update(target)

update() implements the steering behavior algorithm: seek() calculates a force, that force changes velocity, and velocity changes position. This three-step process creates smooth, natural-feeling motion.

🔬 This is the core physics loop that moves the monkey every frame. If you changed this.pos.add(this.vel) to this.pos.add(this.vel.copy().mult(2)), what would happen? How would doubling the velocity affect gameplay?

    this.vel.add(this.acc);
    this.vel.limit(this.maxSpeed);
    this.pos.add(this.vel);
    this.acc.mult(0);
  update(target) {
    let steering;

    // Monkey always seeks the target (cursor)
    steering = this.seek(target);

    this.applyForce(steering);

    this.vel.add(this.acc);
    this.vel.limit(this.maxSpeed);
    this.pos.add(this.vel);
    this.acc.mult(0);

    // handleEdges() is still commented out for "infinite range"
    // this.handleEdges();
  }
Line-by-line explanation (6 lines)

🔧 Subcomponents:

calculation Steering Calculation steering = this.seek(target);

Computes a steering force that pulls the monkey toward the target without overshooting or stopping abruptly.

calculation Physics Integration this.vel.add(this.acc); this.vel.limit(this.maxSpeed); this.pos.add(this.vel); this.acc.mult(0);

Applies the classic physics loop: acceleration changes velocity, velocity changes position, then acceleration resets.

steering = this.seek(target);
Calls the seek() method to compute a steering force toward the target—see the seek() function for details.
this.applyForce(steering);
Adds the steering force to the monkey's acceleration—forces accumulate.
this.vel.add(this.acc);
Updates velocity by adding the total accumulated acceleration—this is how forces cause motion.
this.vel.limit(this.maxSpeed);
Clamps the velocity so it never exceeds maxSpeed, keeping the monkey's motion realistic.
this.pos.add(this.vel);
Updates position by adding the velocity—the monkey moves in the direction and speed of its velocity vector.
this.acc.mult(0);
Resets acceleration to (0, 0) for the next frame—forces don't carry over; they must be re-applied each frame.

seek(target)

seek() implements the 'arrival' behavior from steering algorithms—it calculates a force that pulls the monkey toward the target while naturally slowing down as it approaches, creating smooth pursuit.

🔬 The slowdown zone helps the monkey decelerate instead of crashing into you. What if you removed the if-statement and always used speed = map(d, 0, 500, 0, this.maxSpeed)? What would the monkey's behavior feel like over a larger distance?

    let speed = this.maxSpeed;
    // Only slow down when very close, otherwise use maxSpeed
    if (d < 120) {
      speed = map(d, 0, 120, 0, this.maxSpeed);
    }
    desired.setMag(speed);
  // Steering towards a target
  seek(target) {
    const desired = p5.Vector.sub(target, this.pos);
    const d = desired.mag();

    if (d === 0) return createVector(0, 0);

    let speed = this.maxSpeed;
    // Only slow down when very close, otherwise use maxSpeed
    if (d < 120) {
      speed = map(d, 0, 120, 0, this.maxSpeed);
    }
    desired.setMag(speed);

    const steer = p5.Vector.sub(desired, this.vel);
    steer.limit(this.maxForce * 1.8); // more aggressive steering when seeking
    return steer;
  }
Line-by-line explanation (9 lines)

🔧 Subcomponents:

calculation Direction to Target const desired = p5.Vector.sub(target, this.pos); const d = desired.mag();

Computes the vector from the monkey to the target and measures the distance—this tells the monkey which direction to go and how far away you are.

conditional Deceleration Zone if (d < 120) { speed = map(d, 0, 120, 0, this.maxSpeed); }

When the monkey gets within 120 pixels of you, it slows down proportionally to distance—the closer it gets, the slower it moves, preventing wild overshooting.

calculation Steering Force Capping steer.limit(this.maxForce * 1.8);

Limits how much the steering force can turn the monkey's velocity, multiplied by 1.8 for aggressive chasing.

const desired = p5.Vector.sub(target, this.pos);
Subtracts the monkey's position from the target to get a vector pointing from the monkey toward the target.
const d = desired.mag();
Calculates the distance to the target (the magnitude of the direction vector).
if (d === 0) return createVector(0, 0);
If the monkey is already on the target, return zero force—no steering needed.
let speed = this.maxSpeed;
By default, the monkey travels at maximum speed toward the target.
if (d < 120) {
If the target is within 120 pixels (close enough), enter the slowdown zone.
speed = map(d, 0, 120, 0, this.maxSpeed);
Scales speed proportionally to distance—at distance 0, speed is 0 (stopped); at distance 120, speed is maxSpeed.
desired.setMag(speed);
Sets the magnitude of the desired velocity to the calculated speed while keeping the direction the same.
const steer = p5.Vector.sub(desired, this.vel);
Subtracts current velocity from desired velocity to get the steering force—this is the difference we need to apply.
steer.limit(this.maxForce * 1.8);
Caps the steering force so it can't be too large—multiplied by 1.8 makes the monkey turn more aggressively when chasing.

display3D()

display3D() is a tour of p5.js 3D geometry—it combines nested push/pop blocks with translate(), rotateX(), rotateY(), and primitive shapes (sphere, cylinder, box). Each part is positioned relative to others, creating a convincing 3D character from simple math.

🔬 The pupils track your cursor by offsetting based on the look direction. What happens if you change 0.15 to 0.5? Or to 0? Why does this affect how 'intelligent' the monkey looks?

    // Pupils look toward mouse (2D direction mapped to small offset)
    const look = createVector(mouseX - this.pos.x, mouseY - this.pos.y);
    look.limit(this.size * 0.06);

    const pupilOffsetX = look.x * 0.15;
    const pupilOffsetY = look.y * 0.15;
  // 3D monkey model with sword
  display3D() {
    push();

    // Convert from screen coords (0..width, 0..height) to WEBGL coords (centered)
    translate(this.pos.x - width / 2, this.pos.y - height / 2, 0);

    // Small up‑down bob
    const bob = sin(frameCount * 0.08 + this.pos.x * 0.01) * 4;
    translate(0, bob, 0);

    // Slight Y rotation based on velocity (leans when moving left/right)
    const yaw = map(this.vel.x, -this.maxSpeed, this.maxSpeed, -0.5, 0.5);
    rotateY(yaw);

    // Body color changes slightly when chasing (always chasing now)
    let bodyR = 180;
    let bodyG = 110;
    let bodyB = 60;

    // Removed: Temporary debug color for isBackup

    // --- Body ---
    push();
    translate(0, this.size * 0.25, 0);
    ambientMaterial(bodyR, bodyG, bodyB);
    // Reduced detailX from 32 to 24 to remove console warning
    sphere(this.size * 0.4, 24, 24);
    pop();

    // --- Head ---
    push();
    ambientMaterial(bodyR, bodyG, bodyB);
    translate(0, -this.size * 0.05, 0);
    // Reduced detailX from 32 to 24 to remove console warning
    sphere(this.size * 0.35, 24, 24);

    // Ears
    push();
    ambientMaterial(130, 80, 45);
    translate(-this.size * 0.32, -this.size * 0.02, -this.size * 0.05);
    sphere(this.size * 0.16, 20, 16);
    pop();

    push();
    ambientMaterial(130, 80, 45);
    translate(this.size * 0.32, -this.size * 0.02, -this.size * 0.05);
    sphere(this.size * 0.16, 20, 16);
    pop();

    // Inner ears
    push();
    ambientMaterial(190, 140, 90);
    translate(-this.size * 0.32, -this.size * 0.02, 0);
    sphere(this.size * 0.1, 18, 14);
    pop();

    push();
    ambientMaterial(190, 140, 90);
    translate(this.size * 0.32, -this.size * 0.02, 0);
    sphere(this.size * 0.1, 18, 14);
    pop();

    // Face / muzzle patch
    push();
    ambientMaterial(220, 190, 150);
    translate(0, this.size * 0.05, this.size * 0.24);
    sphere(this.size * 0.24, 24, 18);
    pop();

    // Eyes (white)
    const eyeOffsetX = this.size * 0.16;
    const eyeOffsetY = -this.size * 0.04;
    const eyeZ = this.size * 0.34;

    push();
    ambientMaterial(255);
    translate(-eyeOffsetX, eyeOffsetY, eyeZ);
    sphere(this.size * 0.08, 16, 12);
    pop();

    push();
    ambientMaterial(255);
    translate(eyeOffsetX, eyeOffsetY, eyeZ);
    sphere(this.size * 0.08, 16, 12);
    pop();

    // Pupils look toward mouse (2D direction mapped to small offset)
    const look = createVector(mouseX - this.pos.x, mouseY - this.pos.y);
    look.limit(this.size * 0.06);

    const pupilOffsetX = look.x * 0.15;
    const pupilOffsetY = look.y * 0.15;

    push();
    ambientMaterial(0);
    translate(
      -eyeOffsetX + pupilOffsetX,
      eyeOffsetY + pupilOffsetY,
      eyeZ + this.size * 0.03
    );
    sphere(this.size * 0.03, 10, 8);
    pop();

    push();
    ambientMaterial(0);
    translate(
      eyeOffsetX + pupilOffsetY,
      eyeOffsetY + pupilOffsetY,
      eyeZ + this.size * 0.03
    );
    sphere(this.size * 0.03, 10, 8);
    pop();

    // Nose
    push();
    ambientMaterial(80, 50, 40);
    translate(0, this.size * 0.11, this.size * 0.35);
    sphere(this.size * 0.06, 16, 12);
    pop();

    // Simple mouth: a darker patch that changes size when chasing
    push();
    ambientMaterial(90, 40, 30); // Always chasing now
    translate(0, this.size * 0.18, this.size * 0.36);
    sphere(this.size * 0.08, 16, 12);
    pop();

    pop(); // end head

    // Tail
    push();
    ambientMaterial(bodyR, bodyG, bodyB);
    translate(0, this.size * 0.3, -this.size * 0.35);
    rotateX(-PI / 3);
    cylinder(this.size * 0.05, this.size * 0.8, 8, 1);
    pop();

    // --- Sword (held/mounted in front, between head and torso) ---
    push();
    ambientMaterial(180, 180, 180); // Metallic gray for blade and crossguard
    translate(0, 0, this.size * 0.1); // Slightly in front of the origin (neck area)
    rotateX(PI / 2); // Rotate to point forward along Z-axis

    // Now, the "origin" for the sword is where the handle meets the crossguard.
    // The handle extends downwards from this point.
    // The blade extends upwards from this point.

    // Handle
    push();
    ambientMaterial(100, 70, 40); // Brown handle
    translate(0, this.size * 0.075, 0); // Move down half its length from sword origin
    cylinder(this.size * 0.06, this.size * 0.15, 12, 1);
    pop();

    // Crossguard (already at sword origin)
    ambientMaterial(180, 180, 180); // Metallic gray
    box(this.size * 0.12, this.size * 0.03, this.size * 0.03);

    // Blade
    push();
    translate(0, -this.size * 0.25, 0); // Move up half its length from sword origin
    ambientMaterial(220, 220, 220); // Lighter metallic gray for blade
    cylinder(this.size * 0.03, this.size * 0.5, 10, 1);
    pop();

    pop(); // End sword

    pop();
  }

Line-by-line explanation (11 lines)

🔧 Subcomponents:

transformation Screen to WEBGL Coordinates translate(this.pos.x - width / 2, this.pos.y - height / 2, 0);

Converts from screen coordinates (0 to width, 0 to height) to WEBGL centered coordinates—necessary because WEBGL's origin is at the canvas center.

animation Up-Down Bobbing const bob = sin(frameCount * 0.08 + this.pos.x * 0.01) * 4; translate(0, bob, 0);

Uses sine wave over time to create a smooth up-and-down floating motion, making the monkey feel alive and less static.

animation Velocity-Based Leaning const yaw = map(this.vel.x, -this.maxSpeed, this.maxSpeed, -0.5, 0.5); rotateY(yaw);

Rotates the monkey's body slightly based on horizontal velocity—leans left when moving left, right when moving right, adding visual feedback.

calculation Eye Pupil Tracking const look = createVector(mouseX - this.pos.x, mouseY - this.pos.y); look.limit(this.size * 0.06); const pupilOffsetX = look.x * 0.15; const pupilOffsetY = look.y * 0.15;

Calculates the direction from the monkey's head to your cursor and offsets the pupils to 'look' at you—creates the illusion of intelligent observation.

3d-model Sword Assembly // Handle push(); ambientMaterial(100, 70, 40); // Brown handle translate(0, this.size * 0.075, 0); cylinder(this.size * 0.06, this.size * 0.15, 12, 1); pop(); // Crossguard ambientMaterial(180, 180, 180); box(this.size * 0.12, this.size * 0.03, this.size * 0.03); // Blade push(); translate(0, -this.size * 0.25, 0); ambientMaterial(220, 220, 220); cylinder(this.size * 0.03, this.size * 0.5, 10, 1); pop();

Draws three parts of a sword—brown handle below, metallic crossguard in the middle, and lighter blade above—creating a threatening weapon the monkey holds.

push();
Saves the current transformation matrix so we can apply monkey-specific transforms without affecting other objects.
translate(this.pos.x - width / 2, this.pos.y - height / 2, 0);
Moves the origin to the monkey's screen position (accounting for WEBGL's center-based coordinates).
const bob = sin(frameCount * 0.08 + this.pos.x * 0.01) * 4;
Uses a sine wave that progresses over frameCount to create smooth bobbing—0.08 controls speed, * 4 controls amplitude (how far up/down).
const yaw = map(this.vel.x, -this.maxSpeed, this.maxSpeed, -0.5, 0.5);
Maps horizontal velocity to a rotation angle—negative velocity (moving left) gives negative rotation, positive gives positive rotation.
rotateY(yaw);
Rotates the monkey around the Y-axis (vertical spine)—makes it lean and turn to face the direction it's moving.
let bodyR = 180; let bodyG = 110; let bodyB = 60;
Sets the monkey's base brown color (RGB: 180, 110, 60)—used for body, head, and other neutral parts.
sphere(this.size * 0.4, 24, 24);
Draws a sphere with diameter equal to 40% of the monkey's size—the 24, 24 args set geometric detail (reducing from 32 to avoid warnings).
const look = createVector(mouseX - this.pos.x, mouseY - this.pos.y);
Creates a vector pointing from the monkey's head to your cursor—this direction will move the pupils toward you.
look.limit(this.size * 0.06);
Clamps the look vector to a maximum length so the pupils don't move too far (stays within the eye).
translate(0, -this.size * 0.25, 0);
Moves the blade upward from the sword's origin to position it above the crossguard.
cylinder(this.size * 0.03, this.size * 0.5, 10, 1);
Draws the blade as a tall, thin cylinder (diameter 3% of size, length 50% of size).

newMonkeyPhrase(mode)

newMonkeyPhrase() generates randomized dialogue by selecting from word pools, assembling phrases, and adding punctuation. This simple approach creates the illusion of personality and variety without complex language generation.

🔬 The word pools are built dynamically based on mode. What if you always used pool = monkeyChaseWords.concat(monkeyBackupWords, monkeyGlitchWords) regardless of mode? What would the monkey's speech sound like?

  let pool;
  if (mode === "chase") {
    pool = monkeyChaseWords.concat(monkeyGlitchWords);
  } else if (mode === "backup") {
    pool = monkeyBackupWords.concat(monkeyGlitchWords);
function newMonkeyPhrase(mode) {
  let pool;
  if (mode === "chase") {
    pool = monkeyChaseWords.concat(monkeyGlitchWords);
  } else if (mode === "backup") {
    pool = monkeyBackupWords.concat(monkeyGlitchWords); // Use backup words when calling backup
  } else {
    // Should not happen in this version, but fallback
    pool = monkeyIdleWords.concat(monkeyChaseWords, monkeyGlitchWords);
  }

  const wordCount = floor(random(3, 7));
  let words = [];
  for (let i = 0; i < wordCount; i++) {
    words.push(random(pool));
  }

  let phrase = words.join(" ");
  // Random punctuation
  const punct = random(["!", "!!", "?!", "...", ""]);
  currentPhrase = phrase + punct;
}
Line-by-line explanation (6 lines)

🔧 Subcomponents:

conditional Word Pool Selection if (mode === "chase") { pool = monkeyChaseWords.concat(monkeyGlitchWords); } else if (mode === "backup") { pool = monkeyBackupWords.concat(monkeyGlitchWords);

Picks which array of words to draw from based on the monkey's current state—chase mode uses aggressive words, backup mode uses emergency words.

loop Random Word Assembly const wordCount = floor(random(3, 7)); let words = []; for (let i = 0; i < wordCount; i++) { words.push(random(pool)); }

Picks 3–6 random words from the selected pool and assembles them into an array, creating variable-length phrases.

calculation Random Punctuation const punct = random(["!", "!!", "?!", "...", ""]); currentPhrase = phrase + punct;

Adds random punctuation (or none) to the end of the phrase, making monkey speech feel more expressive and unpredictable.

if (mode === "chase") {
Checks if the mode is 'chase'—used for normal hunting behavior.
pool = monkeyChaseWords.concat(monkeyGlitchWords);
Combines chase words and glitch words into a single pool—concat() merges two arrays.
const wordCount = floor(random(3, 7));
Picks a random integer between 3 and 6 (inclusive) to decide how many words the monkey will say.
words.push(random(pool));
Picks a random word from the pool and adds it to the words array.
let phrase = words.join(" ");
Joins all words with spaces between them—turn ["BANANA", "zoom", "hunt"] into "BANANA zoom hunt".
const punct = random(["!", "!!", "?!", "...", ""]);
Randomly selects from a list of punctuation marks, including an empty string for no punctuation.

drawSpeechBubble(x, y, txt)

drawSpeechBubble() combines text layout (word wrapping, sizing), 2D geometry (rect, triangle), and constrain() to create a robust UI element that stays on-screen and displays dynamic text—a good example of combining multiple p5.js primitives.

function drawSpeechBubble(x, y, txt) {
  push();
  textAlign(LEFT, TOP);
  textSize(14);

  const padding = 8;
  const maxWidth = 220;

  const lines = splitIntoLines(txt, maxWidth);
  const lineHeight = 18;
  const bubbleW = maxWidth + padding * 2;
  const bubbleH = lines.length * lineHeight + padding * 2;

  const bx = constrain(x - bubbleW * 0.5, 10, width - bubbleW - 10);
  const by = constrain(y - bubbleH - 20, 10, height - bubbleH - 10);

  // Bubble
  noStroke();
  fill(255, 240, 220, 235);
  rect(bx, by, bubbleW, bubbleH, 10);

  // Tail toward monkey head
  fill(255, 240, 220, 235);
  triangle(
    x, y - 10,
    bx + bubbleW * 0.3, by + bubbleH,
    bx + bubbleW * 0.35, by + bubbleH
  );

  // Text
  fill(40);
  let ty = by + padding;
  for (let line of lines) {
    text(line, bx + padding, ty);
    ty += lineHeight;
  }

  pop();
}
Line-by-line explanation (11 lines)

🔧 Subcomponents:

calculation Word Wrapping const lines = splitIntoLines(txt, maxWidth);

Splits the phrase into multiple lines if it's too wide, preventing the speech bubble from stretching off-screen.

calculation Dynamic Bubble Sizing const bubbleW = maxWidth + padding * 2; const bubbleH = lines.length * lineHeight + padding * 2;

Calculates the bubble's width and height based on the number of text lines—taller text means taller bubble.

calculation Screen-Edge Constraint const bx = constrain(x - bubbleW * 0.5, 10, width - bubbleW - 10); const by = constrain(y - bubbleH - 20, 10, height - bubbleH - 10);

Ensures the bubble stays on-screen by clamping its position to valid ranges—prevents it from disappearing off the edges.

shape Pointer Triangle triangle( x, y - 10, bx + bubbleW * 0.3, by + bubbleH, bx + bubbleW * 0.35, by + bubbleH );

Draws a small triangle pointing from the bubble down toward the monkey, creating a speech-bubble tail.

push();
Saves the current drawing state so changes to text size, alignment, and fill don't affect other drawings.
textAlign(LEFT, TOP);
Aligns text to the top-left corner of the text box for consistent layout inside the bubble.
textSize(14);
Sets text to 14 pixels tall—readable but compact for the bubble.
const lines = splitIntoLines(txt, maxWidth);
Calls a helper function to break the text into lines that fit within 220 pixels wide.
const bx = constrain(x - bubbleW * 0.5, 10, width - bubbleW - 10);
Centers the bubble horizontally on x, then clamps it to stay 10 pixels from the left and right edges.
const by = constrain(y - bubbleH - 20, 10, height - bubbleH - 10);
Positions the bubble 20 pixels above y, then clamps it to stay on screen vertically.
fill(255, 240, 220, 235);
Sets the bubble color to cream (RGB 255, 240, 220) with slight transparency (alpha 235).
rect(bx, by, bubbleW, bubbleH, 10);
Draws the speech bubble as a rounded rectangle (radius 10) at position (bx, by).
triangle(x, y - 10, bx + bubbleW * 0.3, by + bubbleH, bx + bubbleW * 0.35, by + bubbleH);
Draws a thin pointer triangle from the monkey's position down to the bottom of the bubble.
for (let line of lines) {
Loops through each line of wrapped text.
text(line, bx + padding, ty);
Draws the line at position (bx + padding, ty), with padding to keep it inside the bubble edges.

splitIntoLines(str, maxWidth)

splitIntoLines() is a simple word-wrap algorithm—it's a practical example of text layout that every UI-heavy sketch needs. Understanding this pattern helps you build complex text-based interfaces.

function splitIntoLines(str, maxWidth) {
  const words = str.split(" ");
  let lines = [];
  let current = "";

  for (let w of words) {
    const test = current === "" ? w : current + " " + w;
    if (textWidth(test) > maxWidth) {
      if (current !== "") lines.push(current);
      current = w;
    } else {
      current = test;
    }
  }
  if (current !== "") lines.push(current);
  return lines;
}
Line-by-line explanation (6 lines)

🔧 Subcomponents:

calculation Word Tokenization const words = str.split(" ");

Breaks the phrase into individual words separated by spaces for line-wrapping logic.

loop Width-Based Line Breaking for (let w of words) { const test = current === "" ? w : current + " " + w; if (textWidth(test) > maxWidth) {

Iterates through words, testing each candidate line's width—if it exceeds maxWidth, the current line is finished and a new line starts.

const words = str.split(" ");
Splits the string into an array of words at every space character.
for (let w of words) {
Loops through each word to build up lines.
const test = current === "" ? w : current + " " + w;
Tests adding the next word to the current line—if current is empty, test is just the word; otherwise, add a space and the word.
if (textWidth(test) > maxWidth) {
Checks if adding the word would make the line too wide using p5.js's textWidth() function.
if (current !== "") lines.push(current);
If the line has content, save it to the lines array before starting a new line.
current = w;
Starts a new line with just the current word (which didn't fit on the previous line).

drawHUD()

drawHUD() is a simple overlay that displays game instructions—it's an example of how to layer 2D UI on top of a 3D scene using resetMatrix() and translate().

function drawHUD() {
  push();
  textAlign(LEFT, TOP);
  textSize(16);
  fill(255, 240);
  text("3D AI Monkey: avoid letting it touch your cursor!", 16, 16);
  text("It now holds a sword and has a slightly longer reach!", 16, 36);
  text("Move the mouse. If it catches you, the game crashes.", 16, 56);
  text("The monkey now sees you everywhere and calls for backup!", 16, 76);
  text("No bodyguard monkeys or banana projectiles in this version.", 16, 96);
  pop();
}
Line-by-line explanation (4 lines)
textAlign(LEFT, TOP);
Aligns text to the top-left corner—good for left-aligned UI text.
textSize(16);
Sets text to 16 pixels tall for readability.
fill(255, 240);
Sets text color to nearly-white (RGB 255) with slight transparency (alpha 240).
text("3D AI Monkey: avoid letting it touch your cursor!", 16, 16);
Draws the first instruction line at screen position (16, 16)—the top-left corner with 16-pixel padding.

triggerCrash()

triggerCrash() is a state-change function that shifts from gameplay to the crash screen. Simple but effective—one function call handles the transition.

function triggerCrash() {
  gameState = "crashed";
  // One last special phrase
  currentPhrase = "monkey.exe has stopped your game";
}
Line-by-line explanation (2 lines)
gameState = "crashed";
Changes the game state to 'crashed', which causes draw() to switch to drawCrashScreen() instead of drawScene().
currentPhrase = "monkey.exe has stopped your game";
Sets a final dramatic message that will display in the speech bubble on the crash screen.

drawCrashScreen()

drawCrashScreen() uses random rectangles and dramatic red text to create a convincing fake error screen. It's a good example of using randomness for visual effect and text placement for impact.

function drawCrashScreen() {
  background(10);

  resetMatrix();
  translate(-width / 2, -height / 2, 0);
  noLights();

  // Flash effect
  const flashes = 40;
  for (let i = 0; i < flashes; i++) {
    const x = random(width);
    const y = random(height);
    const w = random(20, 200);
    const h = random(5, 40);
    const alpha = random(80, 200);
    fill(random(200, 255), random(0, 50), random(0, 50), alpha);
    noStroke();
    rect(x, y, w, h);
  }

  fill(255, 40, 40);
  textAlign(CENTER, CENTER);
  textSize(48);
  text("GAME CRASHED", width / 2, height / 2 - 20);

  textSize(20);
  fill(240);
  text("The AI monkey caught your cursor with its sword.", width / 2, height / 2 + 20);
  text("Reload to try again.", width / 2, height / 2 + 50);
}
Line-by-line explanation (6 lines)

🔧 Subcomponents:

loop Random Error Flashes const flashes = 40; for (let i = 0; i < flashes; i++) { const x = random(width); const y = random(height); const w = random(20, 200); const h = random(5, 40); const alpha = random(80, 200); fill(random(200, 255), random(0, 50), random(0, 50), alpha); noStroke(); rect(x, y, w, h); }

Draws 40 random red rectangles at random positions and sizes with random transparency to simulate a computer crash screen.

background(10);
Clears the canvas with a very dark color (almost black), setting a dire tone.
resetMatrix();
Resets 3D transforms so text and shapes are in normal 2D screen coordinates.
translate(-width / 2, -height / 2, 0);
Adjusts coordinates back to standard screen space (top-left origin).
const flashes = 40;
Sets the number of random error rectangles to draw.
fill(random(200, 255), random(0, 50), random(0, 50), alpha);
Creates a random red-ish color (high R, low G/B) for each flash, mimicking error screen visual noise.
text("GAME CRASHED", width / 2, height / 2 - 20);
Displays the crash title in large red text at the center of the screen.

windowResized()

windowResized() is a p5.js callback that runs whenever the window size changes. It's essential for full-screen sketches to scale gracefully.

function windowResized() {
  resizeCanvas(windowWidth, windowHeight);
}
Line-by-line explanation (1 lines)
resizeCanvas(windowWidth, windowHeight);
Automatically resizes the p5.js canvas when the browser window is resized, keeping the sketch responsive.

📦 Key Variables

uiFont font object

Stores the loaded Roboto font for text rendering—ensures consistent typography across speech bubbles and HUD.

let uiFont;
monkeys array

Holds all Monkey objects in the sketch—currently only one monkey (monkeys[0]), but the array structure supports scaling.

let monkeys = [];
gameState string

Tracks whether the game is running ('play') or has ended ('crashed')—controls which draw function executes.

let gameState = "play";
currentPhrase string

Stores the monkey's current speech, displayed in the speech bubble—updated by newMonkeyPhrase().

let currentPhrase = "";
phraseTimer number

Countdown timer in frames until the next phrase is generated—decrements each frame, resets when it hits zero.

let phraseTimer = 0;
PHRASE_INTERVAL number

The interval in frames between automatic phrase generation—180 frames at 60 FPS equals 3 seconds.

const PHRASE_INTERVAL = 180;
lastMouseX number

The mouse's X position from the previous frame—used to calculate mouse velocity for AI prediction.

let lastMouseX;
lastMouseY number

The mouse's Y position from the previous frame—used to calculate mouse velocity for AI prediction.

let lastMouseY;
backupCooldown number

Timer in frames until the monkey can call for backup again—prevents backup spam by enforcing a 900-frame (15-second) cooldown.

let backupCooldown = 0;
monkeyIdleWords array of strings

Word pool for when the monkey is idle/calm (not used in current version, but available for future states).

["ook", "eek", "ooh", "aa", "banana", "tree time", ...]
monkeyChaseWords array of strings

Aggressive words and phrases the monkey says while chasing—mixed with glitch words for texture.

["BANANA!", "human!", "got you", "fast monkey", ...]
monkeyGlitchWords array of strings

Tech/glitch-themed words that add character to monkey speech—mixed into all dialogue pools.

["banana 404", "brain buffer", "monkey.exe", ...]
monkeyBackupWords array of strings

Urgent phrases the monkey shouts when calling for reinforcement—mixed with glitch words.

["BACKUP!", "reinforce!", "call friend", ...]

🔧 Potential Improvements (5)

Here are some ways this code could be enhanced:

BUG display3D() pupils tracking

The right pupil uses pupilOffsetY instead of pupilOffsetX in the translate call, causing asymmetric eye movement.

💡 Change `translate(eyeOffsetX + pupilOffsetY, ...` to `translate(eyeOffsetX + pupilOffsetX, ...` to make both eyes track symmetrically.

PERFORMANCE drawCrashScreen() flash effect

Generating 40 random rectangles every frame is computationally wasteful—the user can't see individual frame differences, and the effect could use a static image.

💡 Create the flash grid once in a p5.Graphics object during setup and reuse it, or reduce flashes to 10-20 and use smaller random ranges.

STYLE Monkey constructor and class methods

Comments mention removed code (isBackup, fireCooldown) but the code is still cluttered—it makes the class harder to understand.

💡 Remove all commented-out properties and methods to clean up the class definition. If version history matters, keep comments in a separate documentation file.

FEATURE collision detection

The catchRadius is fixed at 0.6 * size—harder to tune at runtime than a global tunable.

💡 Create a global constant `const CATCH_RADIUS_RATIO = 0.6;` at the top and use it in drawScene(), making it easier for players to adjust difficulty.

STYLE backup trigger logic

The backup cooldown and trigger logic is convoluted and produces no visible effect (no bodyguard appears), cluttering the code.

💡 Remove the backup system entirely or fully implement it with a visible second monkey that appears on-screen and helps the main monkey.

🔄 Code Flow

Code flow showing preload, setup, draw, drawscene, monkeyclass, update, seek, display3d, newmonkeyphrase, drawspeechbubble, splitintolines, drawhud, triggercrash, drawcrashscreen, windowresized

💡 Click on function names in the diagram to jump to their code

graph TD start[Start] --> setup[setup] setup --> draw[draw loop] click setup href "#fn-setup" click draw href "#fn-draw" draw --> drawscene[drawScene] drawscene --> statecheck[state-check] click drawscene href "#fn-drawscene" click statecheck href "#sub-state-check" statecheck -->|play| webglcanvas[webgl-canvas] statecheck -->|crashed| drawcrashscreen[drawCrashScreen] click drawcrashscreen href "#fn-drawcrashscreen" webglcanvas --> lightingsetup[lighting-setup] lightingsetup --> monkeyinstantiation[monkey-instantiation] monkeyinstantiation --> textsetup[text-setup] click lightingsetup href "#sub-lighting-setup" click monkeyinstantiation href "#sub-monkey-instantiation" click textsetup href "#sub-text-setup" draw --> collisioncheck[collision-check] click collisioncheck href "#sub-collision-check" collisioncheck -->|if collision| triggercrash[triggerCrash] click triggercrash href "#fn-triggercrash" draw --> mouseprediction[mouse-prediction] click mouseprediction href "#sub-mouse-prediction" draw --> speechtimer[speech-timer] click speechtimer href "#sub-speech-timer" draw --> backuptrigger[backup-trigger] click backuptrigger href "#sub-backup-trigger" drawscene --> positioninit[position-init] positioninit --> aiparameters[ai-parameters] aiparameters --> seekcall[seek-call] seekcall --> directioncalc[direction-calc] directioncalc --> slowdownzone[slowdown-zone] slowdownzone --> steeringlimit[steering-limit] steeringlimit --> physicsloop[physics-loop] physicsloop --> bobbinganimation[bobbing-animation] bobbinganimation --> leaningrotation[leaning-rotation] leaningrotation --> pupiltracking[pupil-tracking] pupiltracking --> display3d[display3D] click positioninit href "#sub-position-init" click aiparameters href "#sub-ai-parameters" click seekcall href "#sub-seek-call" click directioncalc href "#sub-direction-calc" click slowdownzone href "#sub-slowdown-zone" click steeringlimit href "#sub-steering-limit" click physicsloop href "#sub-physics-loop" click bobbinganimation href "#sub-bobbing-animation" click leaningrotation href "#sub-leaning-rotation" click pupiltracking href "#sub-pupil-tracking" click display3d href "#fn-display3d" drawscene --> newmonkeyphrase[newMonkeyPhrase] newmonkeyphrase --> wordpoolselection[word-pool-selection] wordpoolselection --> wordselection[word-selection] wordselection --> punctuation[punctuation] punctuation --> wordwrapping[word-wrapping] wordwrapping --> bubble-sizing[bubble-sizing] bubble-sizing --> constrainposition[constrain-position] constrainposition --> triangleTail[triangle-tail] click newmonkeyphrase href "#fn-newmonkeyphrase" click wordpoolselection href "#sub-word-pool-selection" click wordselection href "#sub-word-selection" click punctuation href "#sub-punctuation" click wordwrapping href "#sub-word-wrapping" click bubble-sizing href "#sub-bubble-sizing" click constrainposition href "#sub-constrain-position" click triangleTail href "#sub-triangle-tail" drawcrashscreen --> flashEffect[flash-effect] click flashEffect href "#sub-flash-effect" windowresized[windowResized] -->|on resize| draw click windowresized href "#fn-windowresized"

❓ Frequently Asked Questions

What visual experience does the killer monkey 2.0 sketch provide?

The sketch features a dark, glowing 3D space where a mischievous monkey chases the mouse cursor, creating a dynamic and playful visual environment.

How can users interact with the killer monkey 2.0 sketch?

Users interact by moving their mouse, which provokes the monkey to chase and trigger various random banana-themed phrases.

What creative coding techniques are showcased in the killer monkey 2.0 sketch?

The sketch demonstrates concepts such as object-oriented programming with the monkey character, random phrase generation, and real-time user interaction within a 3D space.

Preview

killer monkey 2.0 - p5.js creative coding sketch preview
Sketch Preview
Code flow diagram showing the structure of killer monkey 2.0 - Code flow showing preload, setup, draw, drawscene, monkeyclass, update, seek, display3d, newmonkeyphrase, drawspeechbubble, splitintolines, drawhud, triggercrash, drawcrashscreen, windowresized
Code Flow Diagram