mazey

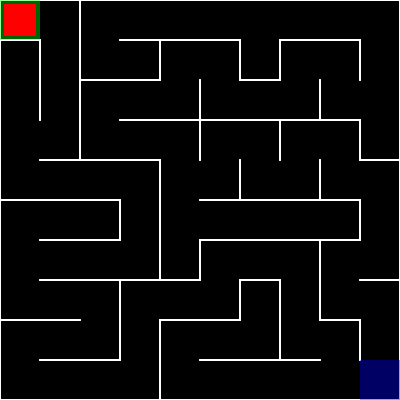
This sketch creates an interactive maze game where players navigate a red cube from a green start cell to a blue goal cell using arrow keys or WASD. The maze is procedurally generated using the Recursive Backtracker algorithm, and the cube moves smoothly between cells with interpolation.

🧪 Try This!

Experiment with the code by making these changes:

  1. Change the cube color — The red cube will turn a different color, letting you customize the player character's appearance
  2. Speed up the cube's movement — Increase moveSpeed to make the cube slide faster between cells, creating a more frantic feel
  3. Make a bigger, simpler maze — Larger cells mean fewer walls and a less complex puzzle; great for understanding the maze layout
  4. Change the goal color — Swap the semi-transparent blue goal marker for a different color to make it stand out more
  5. Make walls glow with a different color — Change the wall color from white to something vibrant, like cyan or magenta
  6. Instant movement instead of sliding — Set moveSpeed to 1.0 to make the cube teleport instantly to the next cell instead of sliding smoothly
Prefer the full editor? Open it there →

📖 About This Sketch

This sketch builds a complete maze game in p5.js. Players control a red cube sliding smoothly through corridors, starting at the top-left (green) and racing to the bottom-right goal (blue). The maze itself is generated fresh each time using the Recursive Backtracker algorithm—a depth-first maze generation technique that carves passages by visiting random neighbors and backtracking when stuck. The cube's movement uses lerp() to create silky-smooth sliding between cells, and wall collision detection prevents the player from moving through walls.

The code is organized into three layers: maze generation (setup and generateMaze), maze rendering (the Cell class and draw loop), and player interaction (keyPressed, keyReleased, and attemptMove). By studying it, you will learn how to combine grid-based game logic with smooth animation, how to implement a classic procedural generation algorithm, and how to handle continuous key input for fluid player control.

⚙️ How It Works

  1. When the sketch loads, setup() creates a grid of Cell objects filling the canvas based on cellSize. Each cell starts with four walls (top, right, bottom, left). The Recursive Backtracker algorithm then carves the maze by walking from cell to cell, removing walls between visited neighbors and backtracking when trapped—this guarantees a perfect maze with exactly one path between any two cells.
  2. Each frame, draw() clears the black background, displays all cell walls in white, highlights the green start cell and blue goal cell, and renders the red cube at its smoothly interpolated position. The maze never changes after setup; it stays static for the player to solve.
  3. When the player presses an arrow key or WASD, keyPressed() records which direction is held. The attemptMove() function checks whether the current cell has a wall in that direction—if there is no wall, the cube begins sliding toward the adjacent cell using lerp(). The cube moves smoothly over multiple frames, updating displayCubeX and displayCubeY until it reaches the target grid cell's center.
  4. Once the cube snaps to its target cell, if a direction key is still held, attemptMove() runs again to continue sliding; if no key is held, the cube stops and waits. The keyReleased() function clears the held direction when a key is released, halting further movement attempts.
  5. If the cube reaches the bottom-right cell (mazeEndX, mazeEndY), gameWon becomes true and a 'You Win!' message appears. The windowResized() function regenerates the entire maze and resets the game whenever the browser window is resized.

🎓 Concepts You'll Learn

Procedural maze generationRecursive Backtracker algorithmGrid-based navigationLerp-based smooth animationCollision detection with wallsContinuous key input handling2D arrays and cell indexingState management and flags

📝 Code Breakdown

setup()

setup() runs once when the sketch starts. Here it builds the entire grid structure, generates the maze layout, and initializes the player cube. Every variable needed during gameplay is set up here.

🔬 This double loop creates all the cells. What happens if you change the inner loop to start at 1 instead of 0? Will the grid still fill the canvas, or will something be missing?

  // Initialize the grid with Cell objects
  for (let j = 0; j < rows; j++) {
    for (let i = 0; i < cols; i++) {
      let cell = new Cell(i, j);
      grid.push(cell);
    }
  }
function setup() {
  createCanvas(windowWidth, windowHeight);
  // Calculate cols and rows based on canvas size and cellSize
  cols = floor(width / cellSize);
  rows = floor(height / cellSize);

  // Initialize the grid with Cell objects
  for (let j = 0; j < rows; j++) {
    for (let i = 0; i < cols; i++) {
      let cell = new Cell(i, j);
      grid.push(cell);
    }
  }

  // Start maze generation from the first cell (0,0)
  current = grid[0];
  current.visited = true;

  // Generate the maze using Recursive Backtracker
  generateMaze();

  // Initialize cube's logical position at the top-left cell
  cubeX = 0;
  cubeY = 0;
  // Initialize cube's display and target positions
  displayCubeX = cubeX * cellSize + cellSize / 2;
  displayCubeY = cubeY * cellSize + cellSize / 2;
  targetCubeX = cubeX;
  targetCubeY = cubeY;
  isInterpolating = false;
  currentHeldDirection = null;
  gameWon = false;

  // Define the maze end cell (bottom-right)
  mazeEndX = cols - 1;
  mazeEndY = rows - 1;
}
Line-by-line explanation (11 lines)

🔧 Subcomponents:

for-loop Grid Initialization Loop for (let j = 0; j < rows; j++) { for (let i = 0; i < cols; i++) { let cell = new Cell(i, j); grid.push(cell); } }

Creates a 2D grid of Cell objects by looping through rows and columns, storing them in a 1D array

calculation Cube Position Initialization displayCubeX = cubeX * cellSize + cellSize / 2;

Converts the logical grid coordinate (0) to a pixel screen coordinate by multiplying by cellSize and adding half a cell for centering

createCanvas(windowWidth, windowHeight);
Creates a canvas that fills the entire browser window, making the game responsive to window size
cols = floor(width / cellSize);
Calculates how many cell columns fit horizontally by dividing canvas width by cellSize and rounding down
rows = floor(height / cellSize);
Calculates how many cell rows fit vertically the same way
let cell = new Cell(i, j);
Creates a new Cell object with grid coordinates (i, j)—each cell stores its own wall configuration
grid.push(cell);
Adds the cell to the 1D grid array, storing 2D grid information linearly (easier for indexing)
current = grid[0];
Sets the starting point for maze generation to the top-left cell at array index 0
current.visited = true;
Marks the starting cell as visited so the Recursive Backtracker algorithm knows not to revisit it immediately
generateMaze();
Calls the maze generation function, which carves passages by removing walls between neighboring cells
cubeX = 0;
Sets the cube's logical grid position to column 0 (leftmost)
displayCubeX = cubeX * cellSize + cellSize / 2;
Converts logical grid coordinate to pixel screen position (0 * 40 + 20 = 20 pixels from left edge)
mazeEndX = cols - 1;
Sets the goal location to the rightmost column; mazeEndY = rows - 1 sets it to the bottom row
draw()

draw() runs 60 times per second, making it the engine of animation. Every frame, it renders the static maze, updates the cube's position via lerp(), checks for win conditions, and displays the victory message. The isInterpolating flag controls when the cube moves; the currentHeldDirection flag controls in which direction. Together, these flags create the feeling of continuous, responsive gameplay.

🔬 This code smoothly slides the cube using lerp(). What happens if you change moveSpeed from 0.2 to 1.0? Will the cube still slide, or will it teleport instantly?

  if (isInterpolating) {
    displayCubeX = lerp(displayCubeX, targetCubeX * cellSize + cellSize / 2, moveSpeed);
    displayCubeY = lerp(displayCubeY, targetCubeY * cellSize + cellSize / 2, moveSpeed);

🔬 These two rectangles highlight the start and goal cells. What happens if you change the second color from blue to red? Or if you increase the alpha value from 100 to 255 to make the colors opaque?

  // Draw start cell (green)
  noStroke();
  fill(0, 255, 0, 100); // Semi-transparent green
  rectMode(CORNER);
  rect(0, 0, cellSize, cellSize);

  // Draw end cell (blue)
  fill(0, 0, 255, 100); // Semi-transparent blue
  rect(mazeEndX * cellSize, mazeEndY * cellSize, cellSize, cellSize);
function draw() {
  background(0); // Black background

  // Draw the maze
  for (let i = 0; i < grid.length; i++) {
    grid[i].show();
  }

  // Draw start cell (green)
  noStroke();
  fill(0, 255, 0, 100); // Semi-transparent green
  rectMode(CORNER);
  rect(0, 0, cellSize, cellSize);

  // Draw end cell (blue)
  fill(0, 0, 255, 100); // Semi-transparent blue
  rect(mazeEndX * cellSize, mazeEndY * cellSize, cellSize, cellSize);

  // Update cube's display position for smooth movement
  if (isInterpolating) {
    displayCubeX = lerp(displayCubeX, targetCubeX * cellSize + cellSize / 2, moveSpeed);
    displayCubeY = lerp(displayCubeY, targetCubeY * cellSize + cellSize / 2, moveSpeed);

    // Check if the cube is close enough to the target
    // If it is, snap to target and try to move again or stop
    let threshold = 1.0; // Pixels
    if (dist(displayCubeX, displayCubeY, targetCubeX * cellSize + cellSize / 2, targetCubeY * cellSize + cellSize / 2) < threshold) {
      displayCubeX = targetCubeX * cellSize + cellSize / 2;
      displayCubeY = targetCubeY * cellSize + cellSize / 2;
      cubeX = targetCubeX; // Update logical position
      cubeY = targetCubeY; // Update logical position

      if (currentHeldDirection !== null) { // If a key is still held, attempt the next move
        attemptMove();
      } else { // No key held, stop interpolating
        isInterpolating = false;
      }
    }
  } else {
    // If not interpolating, ensure display position matches logical position
    displayCubeX = cubeX * cellSize + cellSize / 2;
    displayCubeY = cubeY * cellSize + cellSize / 2;
  }

  // Draw the cube
  noStroke();
  fill(255, 0, 0); // Red cube
  rectMode(CENTER); // Draw rectangle from its center
  rect(displayCubeX, displayCubeY, cellSize * 0.8, cellSize * 0.8); // Slightly smaller than cell

  // Check for win condition
  if (cubeX === mazeEndX && cubeY === mazeEndY && !gameWon) {
    gameWon = true;
  }

  if (gameWon) {
    fill(255);
    textSize(64);
    textAlign(CENTER, CENTER);
    text("You Win!", width / 2, height / 2);
  }
}
Line-by-line explanation (13 lines)

🔧 Subcomponents:

for-loop Maze Rendering Loop for (let i = 0; i < grid.length; i++) { grid[i].show(); }

Iterates through every cell and calls its show() method to draw all walls

calculation Start and Goal Cell Highlighting rect(0, 0, cellSize, cellSize);

Draws semi-transparent rectangles at the start (green) and goal (blue) cell positions to visually mark them

conditional Smooth Movement Interpolation if (isInterpolating) { displayCubeX = lerp(displayCubeX, targetCubeX * cellSize + cellSize / 2, moveSpeed); displayCubeY = lerp(displayCubeY, targetCubeY * cellSize + cellSize / 2, moveSpeed);

Uses lerp() to gradually move the cube's display position toward its target grid cell over multiple frames

conditional Snap to Target and Continue Movement if (dist(displayCubeX, displayCubeY, targetCubeX * cellSize + cellSize / 2, targetCubeY * cellSize + cellSize / 2) < threshold) {

Detects when the cube is close enough to its target, snaps it exactly to the center, and checks if the player is still holding a direction key

conditional Win Condition Check if (cubeX === mazeEndX && cubeY === mazeEndY && !gameWon) {

Checks whether the cube has reached the goal cell and sets the gameWon flag

background(0); // Black background
Fills the canvas with black every frame, erasing the previous frame to prevent visual trails
grid[i].show();
Calls the show() method of each Cell, which draws its white walls if they exist
fill(0, 255, 0, 100); // Semi-transparent green
Sets the fill color to green with alpha 100 (out of 255), creating a semi-transparent overlay
rect(0, 0, cellSize, cellSize);
Draws a rectangle at the top-left corner (0, 0) with size cellSize—this highlights the starting cell
rect(mazeEndX * cellSize, mazeEndY * cellSize, cellSize, cellSize);
Draws a rectangle at the bottom-right corner using maze end coordinates, highlighting the goal cell
if (isInterpolating) {
Checks if the cube is currently sliding toward a target cell; if true, update its position
displayCubeX = lerp(displayCubeX, targetCubeX * cellSize + cellSize / 2, moveSpeed);
lerp() (linear interpolation) moves displayCubeX 20% (moveSpeed) of the way closer to the target pixel x-position every frame, creating smooth sliding
if (dist(displayCubeX, displayCubeY, targetCubeX * cellSize + cellSize / 2, targetCubeY * cellSize + cellSize / 2) < threshold) {
dist() calculates the pixel distance between the cube's display position and its target; when it's less than 1 pixel, snap to target and continue
cubeX = targetCubeX; // Update logical position
Updates the cube's logical grid position (used for wall collision checks) to match the target once sliding is done
if (currentHeldDirection !== null) { // If a key is still held, attempt the next move
If the player is still holding an arrow key, try to slide to the next cell in that direction; otherwise, stop movement
rect(displayCubeX, displayCubeY, cellSize * 0.8, cellSize * 0.8); // Slightly smaller than cell
Draws the red cube at its smoothly interpolated screen position, 80% the size of a cell so it fits comfortably inside
if (cubeX === mazeEndX && cubeY === mazeEndY && !gameWon) {
Checks if the cube's logical grid position matches the goal cell AND the game hasn't already been won
text("You Win!", width / 2, height / 2);
Displays the victory message centered on the canvas at a large font size

generateMaze()

The Recursive Backtracker is one of the most popular maze generation algorithms. It creates 'perfect' mazes (exactly one path between any two points) by depth-first exploration with backtracking. Start at one cell, carve toward random unvisited neighbors, and when stuck, backtrack to try other branches. The stack remembers where to backtrack to, and the visited flag prevents revisiting cells. This algorithm guarantees a solvable maze with no isolated areas.

function generateMaze() {
  while (stack.length > 0 || hasUnvisitedNeighbors(current)) {
    let next = current.checkNeighbors(); // Find an unvisited neighbor

    if (next) { // If an unvisited neighbor exists
      next.visited = true; // Mark it as visited
      stack.push(current); // Push the current cell onto the stack (for backtracking)

      removeWalls(current, next); // Remove the wall between current and next cell

      current = next; // Move to the next cell
    } else if (stack.length > 0) { // If no unvisited neighbors, backtrack
      current = stack.pop(); // Pop from the stack to go back to a previous cell
    } else { // If no unvisited neighbors and stack is empty, maze generation is complete
      break;
    }
  }
}
Line-by-line explanation (11 lines)

🔧 Subcomponents:

while-loop Main Maze Generation Loop while (stack.length > 0 || hasUnvisitedNeighbors(current)) {

Continues carving the maze until all cells are visited and the backtracking stack is empty—this guarantees the maze is complete and has no isolated areas

conditional Carve Forward Branch if (next) { next.visited = true; stack.push(current); removeWalls(current, next); current = next;

If an unvisited neighbor exists, visit it and carve the passage by removing the shared wall between them

conditional Backtrack Branch } else if (stack.length > 0) { current = stack.pop();

If stuck (no unvisited neighbors), pop the stack to return to a previous cell where there might be other branches to explore

while (stack.length > 0 || hasUnvisitedNeighbors(current)) {
The loop continues as long as either there are cells on the stack to backtrack to OR the current cell has unvisited neighbors—this ensures all cells eventually get carved
let next = current.checkNeighbors(); // Find an unvisited neighbor
Calls checkNeighbors() which returns a random unvisited neighbor of the current cell, or undefined if none exist
if (next) { // If an unvisited neighbor exists
Checks whether a valid unvisited neighbor was found (not undefined)
next.visited = true; // Mark it as visited
Sets the neighbor's visited flag to true so we don't visit it again later
stack.push(current); // Push the current cell onto the stack (for backtracking)
Saves the current cell so we can return to it later if we get stuck—this is how backtracking works
removeWalls(current, next); // Remove the wall between current and next cell
Carves a passage by removing the shared wall between the two cells, creating a path the player can walk through
current = next; // Move to the next cell
Sets current to the new cell, so the next iteration explores from there
} else if (stack.length > 0) { // If no unvisited neighbors, backtrack
If current has no unvisited neighbors but the stack has cells, pop to go back to a previous cell that might have unexplored branches
current = stack.pop(); // Pop from the stack to go back to a previous cell
Retrieves the most recently saved cell from the stack and makes it current, effectively backtracking one step
} else { // If no unvisited neighbors and stack is empty, maze generation is complete
If the stack is empty and current has no unvisited neighbors, every cell has been visited and every passage carved
break;
Exits the while loop, ending maze generation

hasUnvisitedNeighbors()

This helper function is called during maze generation to check whether the current cell has any unvisited neighbors worth carving toward. It safely retrieves all four orthogonal neighbors using index1D() to convert 2D grid coordinates to 1D array indices, handles out-of-bounds cases, and filters for unvisited cells. The && operator short-circuits: if a neighbor is undefined (out of bounds), the condition fails immediately without checking the visited flag.

function hasUnvisitedNeighbors(cell) {
  let neighbors = [];
  let top = grid[index1D(cell.i, cell.j - 1)];
  let right = grid[index1D(cell.i + 1, cell.j)];
  let bottom = grid[index1D(cell.i, cell.j + 1)];
  let left = grid[index1D(cell.i - 1, cell.j)];

  if (top && !top.visited) {
    neighbors.push(top);
  }
  if (right && !right.visited) {
    neighbors.push(right);
  }
  if (bottom && !bottom.visited) {
    neighbors.push(bottom);
  }
  if (left && !left.visited) {
    neighbors.push(left);
  }

  return neighbors.length > 0; // Return true if there's at least one valid unvisited neighbor
}
Line-by-line explanation (8 lines)

🔧 Subcomponents:

calculation Four-Direction Neighbor Lookup let top = grid[index1D(cell.i, cell.j - 1)];

Converts 2D grid coordinates to a 1D array index and retrieves the cell at that position, handling out-of-bounds gracefully

conditional Unvisited Neighbor Validation if (top && !top.visited) { neighbors.push(top); }

Checks that the neighbor exists (top &&) and is unvisited (!top.visited) before adding it to the list

let neighbors = [];
Creates an empty array to collect all valid unvisited neighbors of this cell
let top = grid[index1D(cell.i, cell.j - 1)];
Gets the cell directly above (j - 1) by converting 2D coordinates to a 1D array index; index1D() returns -1 if out of bounds, and grid[-1] is undefined
let right = grid[index1D(cell.i + 1, cell.j)];
Gets the cell to the right (i + 1)
let bottom = grid[index1D(cell.i, cell.j + 1)];
Gets the cell below (j + 1)
let left = grid[index1D(cell.i - 1, cell.j)];
Gets the cell to the left (i - 1)
if (top && !top.visited) {
Checks two things: top exists (true if it's not undefined, i.e., in bounds) AND top has not been visited yet
neighbors.push(top);
Adds the valid unvisited neighbor to the neighbors array
return neighbors.length > 0;
Returns true if any unvisited neighbors were found, false if the cell is completely surrounded by visited cells or boundaries

index1D()

index1D() is a utility function that bridges 2D grid thinking and 1D array storage. The grid is stored as a flat 1D array for simplicity, but cells are logically arranged in 2D rows and columns. This function performs the conversion: given column i and row j, return the 1D array index. The formula i + j * cols works because row j contains (j * cols) cells, plus column i within that row. Bounds checking prevents accessing invalid indices.

function index1D(i, j) {
  if (i < 0 || j < 0 || i > cols - 1 || j > rows - 1) {
    return -1; // Return -1 for out-of-bounds
  }
  return i + j * cols;
}
Line-by-line explanation (3 lines)

🔧 Subcomponents:

conditional Out-of-Bounds Check if (i < 0 || j < 0 || i > cols - 1 || j > rows - 1) {

Validates that grid coordinates (i, j) are within the valid range before converting them

if (i < 0 || j < 0 || i > cols - 1 || j > rows - 1) {
Checks if the column i or row j is outside the grid boundaries—if so, the coordinate is invalid
return -1; // Return -1 for out-of-bounds
Returns -1 as a sentinel value indicating invalid coordinates; grid[-1] will be undefined, which is handled safely by the && operator elsewhere
return i + j * cols;
Converts 2D grid coordinates (i, j) to a 1D array index using the formula: column + (row * number of columns). For example, cell (3, 2) in a 10-column grid becomes 3 + (2 * 10) = 23

removeWalls()

removeWalls() carves passages in the maze by removing walls. Two adjacent cells share a wall; when they should be connected, this function sets both cells' facing walls to false. The logic uses coordinate differences to determine direction: if a.i - b.i equals 1, they're horizontally adjacent with a to the right. The function always removes BOTH sides of the shared wall so the passage is open from both cells' perspectives.

function removeWalls(a, b) {
  let x = a.i - b.i;
  if (x === 1) { // 'a' is to the right of 'b'
    a.left = false;
    b.right = false;
  } else if (x === -1) { // 'a' is to the left of 'b'
    a.right = false;
    b.left = false;
  }

  let y = a.j - b.j;
  if (y === 1) { // 'a' is below 'b'
    a.top = false;
    b.bottom = false;
  } else if (y === -1) { // 'a' is above 'b'
    a.bottom = false;
    b.top = false;
  }
}
Line-by-line explanation (11 lines)

🔧 Subcomponents:

conditional Horizontal Wall Removal let x = a.i - b.i; if (x === 1) { a.left = false; b.right = false;

Determines if cells are horizontally adjacent and removes the shared wall between them

conditional Vertical Wall Removal let y = a.j - b.j; if (y === 1) { a.top = false; b.bottom = false;

Determines if cells are vertically adjacent and removes the shared wall between them

let x = a.i - b.i;
Calculates the horizontal distance between the two cells: 1 means a is to the right of b, -1 means a is to the left of b, 0 means they're in the same column
if (x === 1) { // 'a' is to the right of 'b'
If a's column is exactly 1 greater, they are horizontally adjacent with a on the right
a.left = false;
Removes a's left wall (the wall between them from a's perspective)
b.right = false;
Removes b's right wall (the wall between them from b's perspective)—now there's a passage between them
} else if (x === -1) { // 'a' is to the left of 'b'
If a's column is exactly 1 less, they are horizontally adjacent with a on the left
a.right = false;
Removes a's right wall
b.left = false;
Removes b's left wall
let y = a.j - b.j;
Calculates the vertical distance: 1 means a is below b, -1 means a is above b
if (y === 1) { // 'a' is below 'b'
If a's row is exactly 1 greater, they are vertically adjacent with a below
a.top = false;
Removes a's top wall (the wall between them from a's perspective)
b.bottom = false;
Removes b's bottom wall, creating a passage

Cell (class)

The Cell class is the fundamental building block of the maze. Each cell represents one square in the grid and stores four boolean wall flags (top, right, bottom, left). The checkNeighbors() method is called during maze generation to find candidates for carving. The show() method draws the cell on the canvas, converting logical grid coordinates to pixel positions and drawing white lines only where walls exist. By toggling wall flags off in removeWalls(), the maze generation algorithm carves passages; by checking walls in attemptMove(), the collision detection prevents the player from walking through uncarved walls.

🔬 These four if-statements draw the cell's four walls based on whether each wall exists. What happens if you comment out the line for the right wall? Will the entire right side of the maze disappear, or just certain walls?

    // Draw walls if they exist
    if (this.top) {
      line(x, y, x + cellSize, y);
    }
    if (this.right) {
      line(x + cellSize, y, x + cellSize, y + cellSize);
    }
    if (this.bottom) {
      line(x + cellSize, y + cellSize, x, y + cellSize);
    }
    if (this.left) {
      line(x, y + cellSize, x, y);
    }
class Cell {
  constructor(i, j) {
    this.i = i;
    this.j = j;
    this.top = true;
    this.right = true;
    this.bottom = true;
    this.left = true;
    this.visited = false;
  }

  // Method to check for unvisited neighbors
  checkNeighbors() {
    let neighbors = [];
    let top = grid[index1D(this.i, this.j - 1)];
    let right = grid[index1D(this.i + 1, this.j)];
    let bottom = grid[index1D(this.i, this.j + 1)];
    let left = grid[index1D(this.i - 1, this.j)];

    if (top && !top.visited) {
      neighbors.push(top);
    }
    if (right && !right.visited) {
      neighbors.push(right);
    }
    if (bottom && !bottom.visited) {
      neighbors.push(bottom);
    }
    if (left && !left.visited) {
      neighbors.push(left);
    }

    if (neighbors.length > 0) {
      // Pick a random unvisited neighbor
      let r = floor(random(0, neighbors.length));
      return neighbors[r];
    } else {
      return undefined;
    }
  }

  // Method to display the cell's walls
  show() {
    let x = this.i * cellSize;
    let y = this.j * cellSize;
    stroke(255); // White lines
    strokeWeight(2); // Thicker lines for visibility

    // Draw walls if they exist
    if (this.top) {
      line(x, y, x + cellSize, y);
    }
    if (this.right) {
      line(x + cellSize, y, x + cellSize, y + cellSize);
    }
    if (this.bottom) {
      line(x + cellSize, y + cellSize, x, y + cellSize);
    }
    if (this.left) {
      line(x, y + cellSize, x, y);
    }
  }
}
Line-by-line explanation (14 lines)

🔧 Subcomponents:

calculation Cell Constructor constructor(i, j) { this.i = i; this.j = j; this.top = true; this.right = true; this.bottom = true; this.left = true; this.visited = false; }

Initializes a cell with grid coordinates and four walls, all starting as true (existing)

calculation checkNeighbors Method checkNeighbors() {

Finds all unvisited neighbors, picks one randomly, and returns it for the maze generation algorithm to carve toward

calculation show Method show() {

Draws the cell's walls on the canvas by checking each wall flag and drawing white lines where they exist

this.i = i;
Stores the cell's column index (x-coordinate in grid space)
this.j = j;
Stores the cell's row index (y-coordinate in grid space)
this.top = true;
Initializes the top wall as existing (true); later removeWalls() sets it to false to carve passages
this.visited = false;
Marks this cell as unvisited at creation; maze generation sets it to true as it explores
let r = floor(random(0, neighbors.length));
Picks a random integer between 0 and the number of neighbors, selecting one neighbor at random
return neighbors[r];
Returns the randomly selected neighbor, or undefined if no unvisited neighbors exist
let x = this.i * cellSize;
Converts the cell's logical grid column (i) to pixel x-coordinate by multiplying by cellSize
let y = this.j * cellSize;
Converts the cell's logical grid row (j) to pixel y-coordinate by multiplying by cellSize
stroke(255); // White lines
Sets the stroke color to white for drawing walls
if (this.top) {
Checks if the top wall exists (true); if so, draw it
line(x, y, x + cellSize, y);
Draws a horizontal line from the top-left corner (x, y) to the top-right corner (x + cellSize, y)
if (this.right) {
Checks if the right wall exists; if so, draw a vertical line from top-right to bottom-right
if (this.bottom) {
Checks if the bottom wall exists; if so, draw a horizontal line from bottom-right to bottom-left
if (this.left) {
Checks if the left wall exists; if so, draw a vertical line from bottom-left to top-left

attemptMove()

attemptMove() is the collision detection and movement system. Every time a player holds an arrow key, this function runs to check whether the next move is valid. It enforces two rules: (1) don't move beyond the canvas edges (boundary check), and (2) don't move through walls (wall check). If both checks pass, the function updates the target position and sets isInterpolating = true, which tells draw() to start smoothly sliding the cube via lerp(). If blocked, it clears currentHeldDirection so the cube doesn't get stuck trying the same blocked move repeatedly.

🔬 Each case checks a boundary (cubeX > 0 for left, cubeX < cols - 1 for right) AND a wall flag. What happens if you remove the boundary check? Can you move off the canvas?

  switch (currentHeldDirection) {
    case 'left':
      if (cubeX > 0 && !currentCell.left) {
        newTargetCubeX--;
        moveAllowed = true;
      }
      break;
    case 'right':
      if (cubeX < cols - 1 && !currentCell.right) {
        newTargetCubeX++;
        moveAllowed = true;
      }
      break;
function attemptMove() {
  if (gameWon || currentHeldDirection === null) {
    isInterpolating = false; // Stop if game won or no direction held
    return;
  }

  let newTargetCubeX = cubeX;
  let newTargetCubeY = cubeY;
  let moveAllowed = false;

  let currentCell = grid[index1D(cubeX, cubeY)];

  switch (currentHeldDirection) {
    case 'left':
      if (cubeX > 0 && !currentCell.left) {
        newTargetCubeX--;
        moveAllowed = true;
      }
      break;
    case 'right':
      if (cubeX < cols - 1 && !currentCell.right) {
        newTargetCubeX++;
        moveAllowed = true;
      }
      break;
    case 'up':
      if (cubeY > 0 && !currentCell.top) {
        newTargetCubeY--;
        moveAllowed = true;
      }
      break;
    case 'down':
      if (cubeY < rows - 1 && !currentCell.bottom) {
        newTargetCubeY++;
        moveAllowed = true;
      }
      break;
  }

  if (moveAllowed) {
    targetCubeX = newTargetCubeX;
    targetCubeY = newTargetCubeY;
    isInterpolating = true;
  } else {
    // Hit a wall or boundary, stop trying to move in this direction
    currentHeldDirection = null;
    isInterpolating = false;
  }
}
Line-by-line explanation (12 lines)

🔧 Subcomponents:

conditional Early Return Guard if (gameWon || currentHeldDirection === null) {

Stops movement if the game is won or no key is being held

switch-case Direction Movement Switch switch (currentHeldDirection) {

Routes movement logic based on which direction is currently held, checking walls and boundaries for each

conditional Move Approval and Execution if (moveAllowed) {

If the move was approved (no wall or boundary block), updates the target position and begins interpolation

if (gameWon || currentHeldDirection === null) {
Checks if the game is already won OR no direction key is being held; if either is true, stop movement
isInterpolating = false; // Stop if game won or no direction held
Halts any in-progress cube movement by setting the interpolation flag to false
let newTargetCubeX = cubeX;
Initializes the new target to the current position; will only change if a valid move is made
let currentCell = grid[index1D(cubeX, cubeY)];
Retrieves the Cell object at the cube's current logical position, needed to check its wall configuration
case 'left':
Handles left arrow key or 'a' key press
if (cubeX > 0 && !currentCell.left) {
Checks TWO conditions: the cube is not at the left edge (cubeX > 0) AND there is no left wall in the current cell
newTargetCubeX--;
Decrements the target column by 1, moving the cube left
moveAllowed = true;
Sets the flag to true, signaling that the move is valid and should be executed
if (moveAllowed) {
Checks if the move was approved; if yes, apply it
targetCubeX = newTargetCubeX;
Updates the cube's target grid position to the new calculated position
isInterpolating = true;
Sets the interpolation flag to true, signaling draw() to start smoothly sliding the cube toward the target
} else { // Hit a wall or boundary, stop trying to move in this direction currentHeldDirection = null;
If the move was blocked, clear the held direction so the cube stops and doesn't repeatedly try the blocked move

keyPressed()

keyPressed() is a p5.js built-in function that fires every time a key is pressed. This sketch uses it to detect arrow keys (LEFT_ARROW, RIGHT_ARROW, UP_ARROW, DOWN_ARROW) and WASD keys. It maps them all to a unified direction string, then checks whether that direction is different from currentHeldDirection—this prevents spam-calling attemptMove() when a key is held down, since p5.js fires keyPressed() repeatedly for held keys. The direction change guard ensures smooth, responsive input.

🔬 This code maps four different key types to four directions. What happens if you add another key, like the spacebar? Would the cube move diagonally, or would spacebar just do nothing?

  let newDirection = null;
  if (keyCode === LEFT_ARROW || key === 'a' || key === 'A') {
    newDirection = 'left';
  } else if (keyCode === RIGHT_ARROW || key === 'd' || key === 'D') {
    newDirection = 'right';
  } else if (keyCode === UP_ARROW || key === 'w' || key === 'W') {
    newDirection = 'up';
  } else if (keyCode === DOWN_ARROW || key === 's' || key === 'S') {
    newDirection = 'down';
  }
function keyPressed() {
  if (gameWon) {
    return;
  }

  let newDirection = null;
  if (keyCode === LEFT_ARROW || key === 'a' || key === 'A') {
    newDirection = 'left';
  } else if (keyCode === RIGHT_ARROW || key === 'd' || key === 'D') {
    newDirection = 'right';
  } else if (keyCode === UP_ARROW || key === 'w' || key === 'W') {
    newDirection = 'up';
  } else if (keyCode === DOWN_ARROW || key === 's' || key === 'S') {
    newDirection = 'down';
  }

  // Only start a new held direction if it's different from the current one
  // This prevents spamming attemptMove if a key is already held
  if (newDirection !== null && currentHeldDirection !== newDirection) {
    currentHeldDirection = newDirection;
    attemptMove(); // Start or continue movement
  }
}
Line-by-line explanation (6 lines)

🔧 Subcomponents:

conditional Game Won Guard if (gameWon) { return; }

Prevents further input if the game is already won

conditional Key to Direction Mapping if (keyCode === LEFT_ARROW || key === 'a' || key === 'A') {

Maps arrow keys and WASD keys to direction strings for unified input handling

conditional Direction Change Guard if (newDirection !== null && currentHeldDirection !== newDirection) {

Only updates the held direction if a valid key was pressed AND the direction actually changed, preventing repeated function calls for held keys

if (gameWon) {
Checks if the game is already won; if so, ignore all input
if (keyCode === LEFT_ARROW || key === 'a' || key === 'A') {
Checks if the pressed key is the left arrow OR the 'a' key (case-insensitive); keyCode and key are p5.js built-in variables
newDirection = 'left';
Sets newDirection to a string identifying the direction, so different keys can control the same logical action
if (newDirection !== null && currentHeldDirection !== newDirection) {
Only updates the held direction if (1) a valid direction key was pressed (newDirection is not null) AND (2) the direction is DIFFERENT from the currently held direction
currentHeldDirection = newDirection;
Records which direction is now being held so that keyReleased() can know which key to stop tracking
attemptMove(); // Start or continue movement
Calls the movement function, which checks for walls and begins interpolation if the move is valid

keyReleased()

keyReleased() is a p5.js built-in function that fires when a key is released. This sketch uses it to stop movement by clearing currentHeldDirection when the controlling key is released. The important detail is the guard condition: only stop if the released key is the one currently controlling movement. This handles the case where a player might press left, then press down without releasing left; releasing left should not stop the downward movement. The actual transition to isInterpolating = false happens in draw(), after the current cell-to-cell slide completes.

function keyReleased() {
  if (gameWon) {
    return;
  }

  let releasedDirection = null;
  if (keyCode === LEFT_ARROW || key === 'a' || key === 'A') {
    releasedDirection = 'left';
  } else if (keyCode === RIGHT_ARROW || key === 'd' || key === 'D') {
    releasedDirection = 'right';
  } else if (keyCode === UP_ARROW || key === 'w' || key === 'W') {
    releasedDirection = 'up';
  } else if (keyCode === DOWN_ARROW || key === 's' || key === 'S') {
    releasedDirection = 'down';
  }

  // If the released key is the one currently controlling movement, stop
  if (releasedDirection !== null && releasedDirection === currentHeldDirection) {
    currentHeldDirection = null; // Stop holding this direction
    // isInterpolating will become false in draw() once the current interpolation finishes
  }
}
Line-by-line explanation (5 lines)

🔧 Subcomponents:

conditional Released Key to Direction Mapping if (keyCode === LEFT_ARROW || key === 'a' || key === 'A') {

Maps released keys to directions, mirroring the mapping in keyPressed()

conditional Movement Stop Guard if (releasedDirection !== null && releasedDirection === currentHeldDirection) {

Only stops movement if the released key is the one currently controlling the cube—other released keys are ignored

if (gameWon) {
If the game is won, ignore all key release events
let releasedDirection = null;
Creates a variable to identify which direction's key was released, initialized to null (no key)
if (keyCode === LEFT_ARROW || key === 'a' || key === 'A') {
Detects if the released key is a left-movement key (arrow or 'a')
if (releasedDirection !== null && releasedDirection === currentHeldDirection) {
Checks if a valid direction key was released AND it matches the direction currently controlling the cube
currentHeldDirection = null; // Stop holding this direction
Clears the held direction, signaling the cube to stop moving after the current interpolation finishes

windowResized()

windowResized() is a p5.js built-in function that fires whenever the browser window is resized. This sketch uses it to rebuild the entire game: the canvas is resized, the grid is recalculated, a fresh maze is generated, and the cube is reset to the starting position. This makes the game responsive—players can adjust their browser window and get a new puzzle automatically. The function essentially calls most of the setup logic again, ensuring all state variables are consistent with the new canvas size.

function windowResized() {
  resizeCanvas(windowWidth, windowHeight);
  // Re-calculate grid dimensions
  cols = floor(width / cellSize);
  rows = floor(height / cellSize);
  grid = []; // Clear old grid

  // Initialize new grid
  for (let j = 0; j < rows; j++) {
    for (let i = 0; i < cols; i++) {
      let cell = new Cell(i, j);
      grid.push(cell);
    }
  }

  // Start new maze generation from the first cell (0,0)
  current = grid[0];
  current.visited = true;
  stack = []; // Clear stack for new generation
  generateMaze(); // Generate the new maze

  // Reset cube position and movement state
  cubeX = 0;
  cubeY = 0;
  displayCubeX = cubeX * cellSize + cellSize / 2;
  displayCubeY = cubeY * cellSize + cellSize / 2;
  targetCubeX = cubeX;
  targetCubeY = cubeY;
  isInterpolating = false;
  currentHeldDirection = null;
  gameWon = false;

  // Re-define maze end
  mazeEndX = cols - 1;
  mazeEndY = rows - 1;
}
Line-by-line explanation (8 lines)

🔧 Subcomponents:

calculation Canvas Resize and Grid Recalculation resizeCanvas(windowWidth, windowHeight);

Resizes the canvas to fit the new window size and recalculates the grid dimensions

calculation Grid Rebuild grid = []; // Clear old grid

Clears the old grid and rebuilds it with new dimensions

calculation Maze Regeneration generateMaze(); // Generate the new maze

Generates a completely new maze for the resized canvas

calculation Game State Reset cubeX = 0;

Resets the cube and all game variables to their initial states

resizeCanvas(windowWidth, windowHeight);
A p5.js function that resizes the canvas to match the new window dimensions
cols = floor(width / cellSize);
Recalculates the number of columns based on the new canvas width
grid = []; // Clear old grid
Empties the old grid array so it can be rebuilt with the new dimensions
let cell = new Cell(i, j);
Creates new Cell objects for the resized grid
generateMaze(); // Generate the new maze
Runs the maze generation algorithm on the new grid, creating a fresh puzzle for the new canvas size
cubeX = 0;
Resets the cube's logical position to the top-left corner
currentHeldDirection = null;
Clears any in-progress movement so the cube starts fresh
mazeEndX = cols - 1;
Recalculates the goal position based on the new grid dimensions

📦 Key Variables

cols number

Stores the number of columns in the maze grid, calculated by dividing canvas width by cellSize

let cols = floor(width / cellSize);
rows number

Stores the number of rows in the maze grid, calculated by dividing canvas height by cellSize

let rows = floor(height / cellSize);
cellSize number

The width and height of each grid cell in pixels; controls maze complexity and granularity

let cellSize = 40;
grid array

A 1D array storing all Cell objects; cells are accessed via index1D() to convert 2D grid coordinates

let grid = [];
current object

The cell currently being processed during maze generation; moves through neighbors and backtracks

let current;
stack array

A stack of Cell objects used for backtracking during maze generation; stores cells to revisit when stuck

let stack = [];
cubeX number

The cube's current logical grid column (cell index), used for collision detection and position tracking

let cubeX;
cubeY number

The cube's current logical grid row (cell index), used for collision detection and position tracking

let cubeY;
displayCubeX number

The cube's interpolated pixel x-coordinate on screen, updated by lerp() for smooth sliding animation

let displayCubeX;
displayCubeY number

The cube's interpolated pixel y-coordinate on screen, updated by lerp() for smooth sliding animation

let displayCubeY;
targetCubeX number

The logical grid column the cube is sliding toward; set by attemptMove()

let targetCubeX;
targetCubeY number

The logical grid row the cube is sliding toward; set by attemptMove()

let targetCubeY;
moveSpeed number

The lerp factor (0.0 to 1.0) controlling how quickly the cube slides between cells; higher values mean faster movement

let moveSpeed = 0.2;
isInterpolating boolean

Flag indicating whether the cube is currently sliding toward a target cell; used to control animation in draw()

let isInterpolating = false;
currentHeldDirection string or null

Stores the direction ('left', 'right', 'up', 'down') currently being held by the player, or null if no key is held

let currentHeldDirection = null;
mazeEndX number

The logical grid column of the goal cell (always the rightmost column, cols - 1)

let mazeEndX;
mazeEndY number

The logical grid row of the goal cell (always the bottom row, rows - 1)

let mazeEndY;
gameWon boolean

Flag indicating whether the player has reached the goal; prevents further movement and shows victory message

let gameWon = false;

🔧 Potential Improvements (5)

Here are some ways this code could be enhanced:

BUG draw() - cube rendering

The cube's display position is updated in draw() even if isInterpolating is false, which could cause visual drift if displayCubeX/displayCubeY are modified elsewhere

💡 Ensure displayCubeX and displayCubeY are only updated within the isInterpolating conditional block to keep the cube's screen position tightly coupled to its logical position when not moving

PERFORMANCE draw() - maze rendering loop

Every frame, the entire grid loops through and calls show() on every cell to redraw all walls, even though the walls never change after maze generation

💡 Consider creating a pre-rendered background image or graphics buffer (createGraphics) once during setup, then draw that buffer instead of re-rendering walls every frame—this would significantly improve performance for large mazes

STYLE hasUnvisitedNeighbors() and Cell.checkNeighbors()

These two functions contain nearly identical code for finding unvisited neighbors, creating code duplication

💡 Extract the common neighbor-finding logic into a single helper function to reduce duplication and make maintenance easier

FEATURE keyPressed() and keyReleased()

The key mapping logic is duplicated in both functions, making it hard to add new control schemes

💡 Extract key mapping into a separate function like getDirectionFromKey() that returns a direction string; call it from both keyPressed() and keyReleased() to DRY out the code

BUG attemptMove() - collision detection

The collision detection checks walls in the current cell, but if the cube is between cells during interpolation and a key is pressed, the wall check uses the OLD cell, which may not reflect the intended next move

💡 Store the last successful move direction and ensure wall checks happen against the target cell's configuration once the cube snaps to it; alternatively, disable new movement attempts while isInterpolating is true

🔄 Code Flow

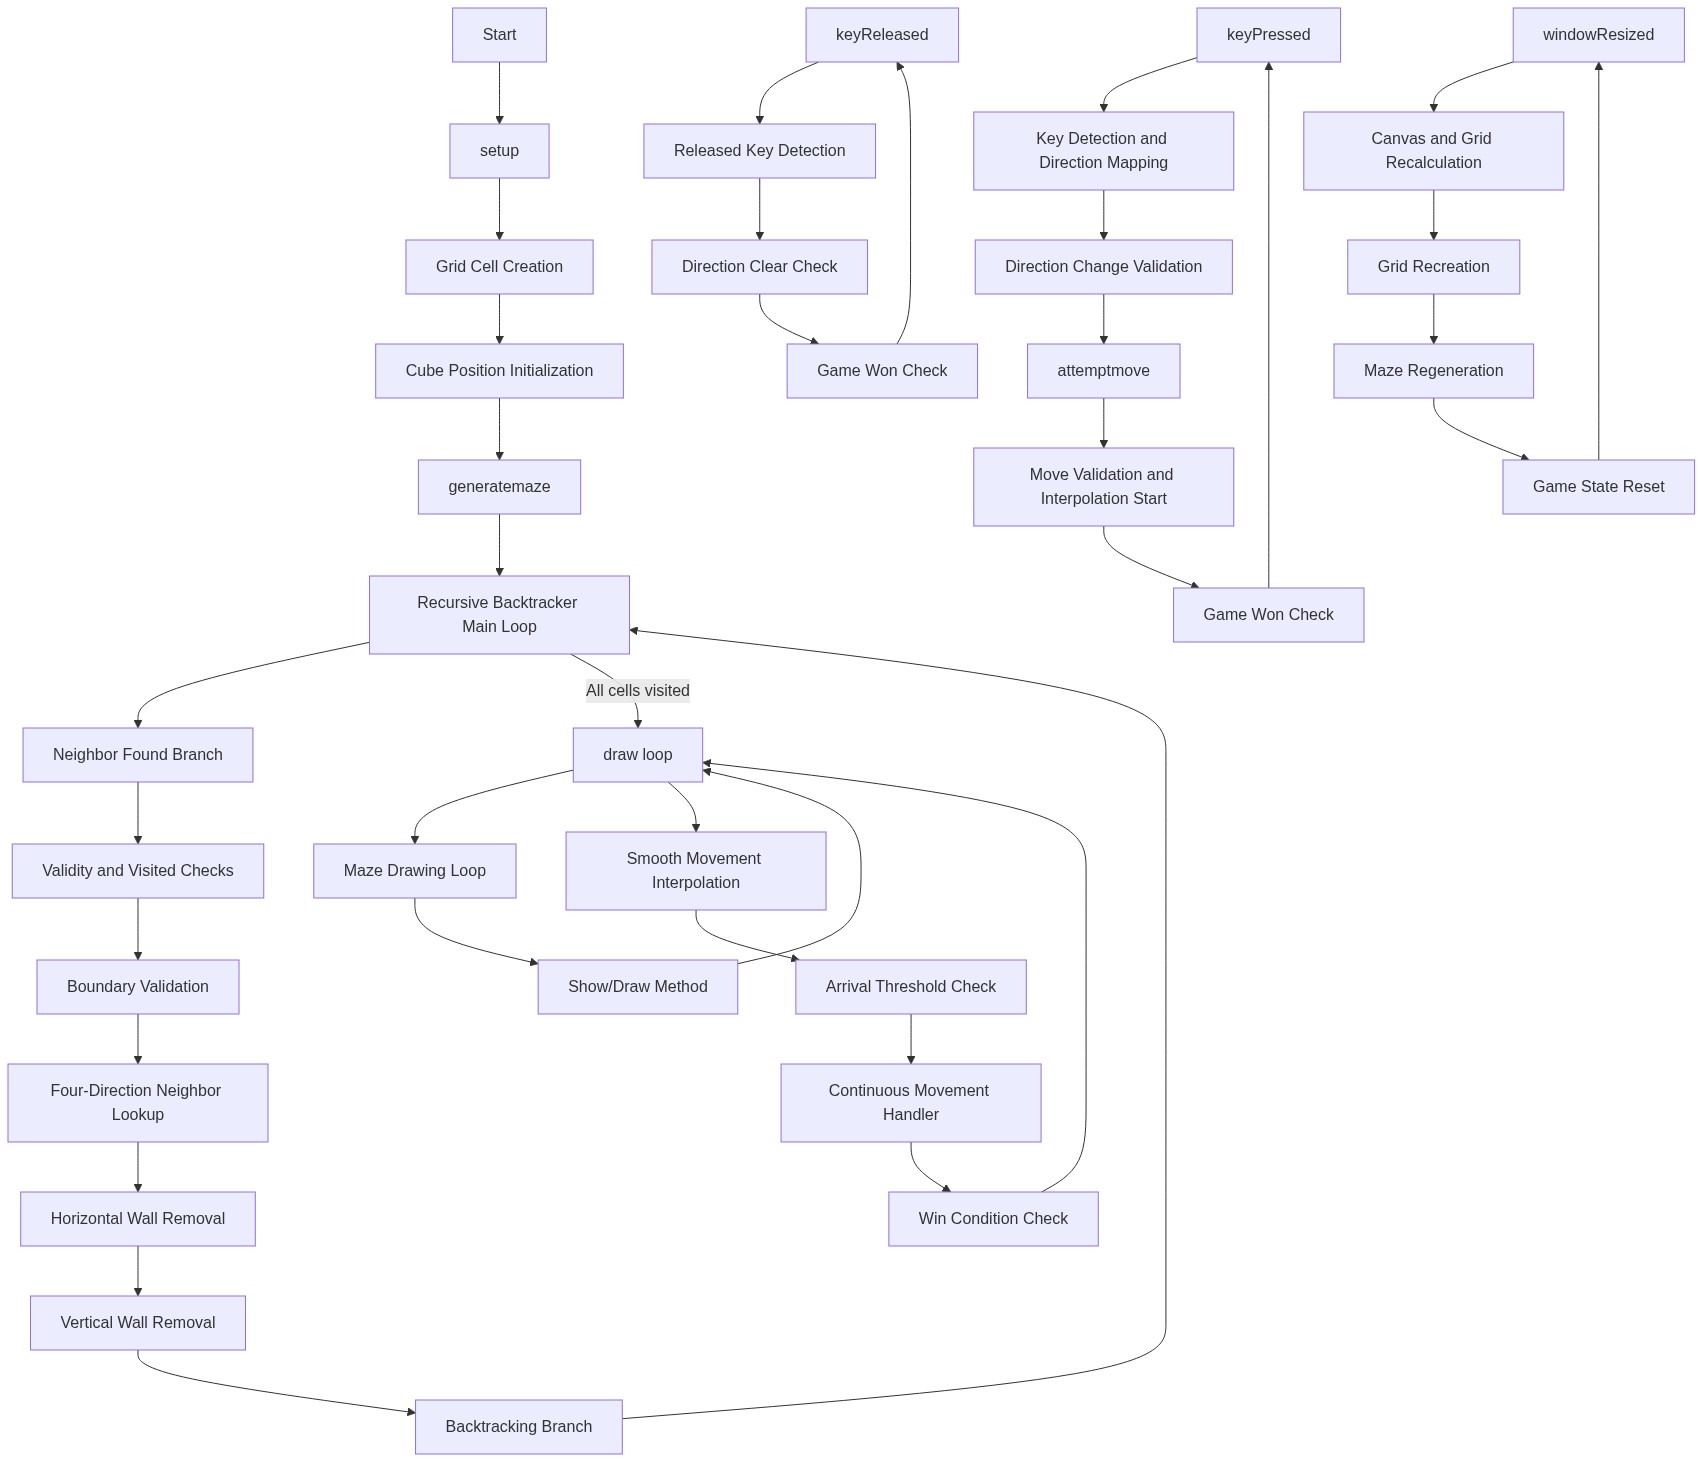
Code flow showing setup, draw, generatemaze, hasunvisitedneighbors, index1d, removewalls, cell, attemptmove, keypressed, keyreleased, windowresized

💡 Click on function names in the diagram to jump to their code

graph TD start[Start] --> setup[setup] setup --> gridinit[grid-init-loop] gridinit --> cubeinit[cube-position-init] cubeinit --> generatemaze[generatemaze] generatemaze --> whileloop[while-loop] whileloop --> carvingbranch[carving-branch] carvingbranch --> neighborlookup[neighbor-lookup] neighborlookup --> validationloop[validation-loop] validationloop --> boundscheck[bounds-check] boundscheck -->|valid| removewalls[removewalls] removewalls --> whileloop validationloop -->|invalid| backtrackbranch[backtrack-branch] backtrackbranch --> whileloop whileloop -->|complete| setup setup --> draw[draw loop] draw --> mazeinit[maze-draw-loop] mazeinit --> startgoal[start-goal-draw] startgoal --> smoothinterp[smooth-interpolation] smoothinterp --> snapcontinue[snap-and-continue] snapcontinue --> wincheck[win-condition] wincheck -->|won| gamewoncheck[game-won-check] gamewoncheck --> draw wincheck -->|not won| earlyreturn[early-return] earlyreturn --> draw draw -->|continue| draw click setup href "#fn-setup" click generatemaze href "#fn-generatemaze" click draw href "#fn-draw" click whileloop href "#sub-while-loop" click carvingbranch href "#sub-carving-branch" click neighborlookup href "#sub-neighbor-lookup" click validationloop href "#sub-validation-loop" click boundscheck href "#sub-bounds-check" click removewalls href "#sub-removewalls" click mazeinit href "#sub-maze-draw-loop" click startgoal href "#sub-start-goal-draw" click smoothinterp href "#sub-smooth-interpolation" click snapcontinue href "#sub-snap-and-continue" click wincheck href "#sub-win-condition" click gamewoncheck href "#sub-game-won-check" click earlyreturn href "#sub-early-return"

❓ Frequently Asked Questions

What visual experience does the mazey sketch provide?

The mazey sketch creates a visually engaging environment where a glowing cube navigates through a dark, procedurally generated maze, contrasting the green start point with a blue goal.

How can users navigate the maze in the mazey sketch?

Users can interact with the mazey sketch by using the arrow keys to smoothly slide the cube from cell to cell, guiding it through the maze.

What creative coding techniques are showcased in the mazey sketch?

The sketch demonstrates procedural maze generation using the Recursive Backtracker algorithm and smooth interpolation for cube movement between cells.

Preview

mazey - p5.js creative coding sketch preview
Sketch Preview
Code flow diagram showing the structure of mazey - Code flow showing setup, draw, generatemaze, hasunvisitedneighbors, index1d, removewalls, cell, attemptmove, keypressed, keyreleased, windowresized
Code Flow Diagram